11g Release 5 (11.1.5)
Part Number E20375-06
Contents
Contact
Us
|
Oracle® Fusion
Applications
Financials Implementation Guide 11g Release 5 (11.1.5) Part Number E20375-06 |
Contents |
Contact Us |
|
Previous |
Next |
This chapter contains the following:
Define AutoInvoice Line Ordering Rules
Define AutoInvoice Grouping Rules
Define Balance Forward Billing Cycles
FAQs for Salesperson Account References
To ensure that the AutoInvoice process works properly, you need to prepare Oracle Fusion Receivables for any new data that you want to import. If your original system uses any setup data which is not yet defined in Receivables, you must define this data within Receivables before using AutoInvoice.
There are these points to consider when setting up data for AutoInvoice:
Data Checklist
AutoInvoice Setup
Transaction Flexfield
Ensure that you have set up and updated the appropriate records in Receivables and related applications.
Add or update this setup data:
Add or import customers, if your original system contains data for customers that are not yet defined in Receivables.
Add units of measure, if your original system uses units of measure not yet defined.
Add or update in Oracle Fusion General Ledger this data:
Currencies, if your original system uses currencies not yet defined.
Accounting flexfield segment values, if your original system uses values not yet defined.
Add or update in Oracle Fusion Tax this tax data:
Tax rates assigned to tax rate codes that are not yet defined.
Tax rates associated with products shipped to specific locations.
Full or partial customer and item tax exemptions.
Add or update these Receivables lookup codes:
Free on Board (FOB) lookup codes, if your original system uses FOB point codes not yet defined.
Freight carrier lookup codes.
Add or update this Receivables data:
AutoAccounting (This is a required setup to use AutoInvoice)
Payment terms
Transaction types
Transaction sources
Salespersons
Revenue scheduling rules
Review and update in Receivables data specific to AutoInvoice.
Review and update this data:
AutoInvoice Grouping Rules: Define additional grouping rules or update the default grouping rule provided by Receivables. AutoInvoice uses grouping rules to determine how to create transactions.
AutoInvoice uses the following hierarchy when determining the grouping rule to use:
Transaction source
Customer site
Customer profile
System options
AutoInvoice Line Ordering Rules: Define line ordering rules for AutoInvoice to determine how to order transaction lines. AutoInvoice randomly orders lines on your transactions if you do not define line ordering rules.
AutoInvoice Transaction Source Automatic Receipt Handling: If you want AutoInvoice to automatically evaluate imported credits for receipt handling, enable the Receipt Handling for Credits option on the AutoInvoice transaction source.
Profile Options: Set these profile options for AutoInvoice:
ID Flexfield Code: Specify the ID of the flexfield code used by AutoInvoice.
Maximum Lines per AutoInvoice Worker: Specify the maximum number of lines per AutoInvoice worker.
Source Code: Specify the source code used by AutoInvoice.
Use Parallel Hint: Enable parallel hints in AutoInvoice.
AutoInvoice Gather Statistics Allowed: If you set this profile option to Yes, then when you submit AutoInvoice, the program first analyzes the interface tables (RA_INTERFACE_LINES_ALL, RA_INTERFACE_DISTRIBUTIONS_ALL, and RA_INTERFACE SALESCREDITS_ALL) and gathers statistics to determine how best to execute the transaction import.
If the number of records to be imported and the number of worker processes are approximately the same as the previous submission of AutoInvoice, then you can set this profile option to No and skip this analysis.
Receivables uses the transaction flexfield to uniquely identify each transaction and transaction line you import using AutoInvoice. Transaction flexfields are also used to refer to and link transaction lines.
You must define both a line-level and a header-level transaction flexfield. All segments in the line-level transaction flexfield that refer to header information must also exist in the header-level transaction flexfield. For example, if you define a line-level transaction flexfield with four segments, and only the last two segments refer to line-level information, define the header-level transaction flexfield using the first two segments.
If you do not create Reference and Link-to transaction flexfields, then Receivables will use the line-level transaction flexfield structure to link and reference different lines. You do not have to define separate Reference and Link-to transaction flexfields in this case.
However, if you are planning to create a customized form to enter interface data to display the Reference and Link-to transaction flexfields, then you must define these transaction flexfields. These flexfields must have the same flexfield structures as the line-level transaction flexfield.
AutoInvoice uses line ordering rules to determine how to order and number each line after your transactions have been grouped into invoices, debit memos and credit memos. You can specify a line ordering rule for each grouping rule.
Oracle Fusion Receivables provides the following transaction attributes from the RA_INTERFACE_LINES_ALL table that you can use for AutoInvoice line ordering rules:
ACCOUNTING_RULE_DURATION
ACCOUNTING_RULE_ID
ACCOUNTING_RULE_NAME
AMOUNT
ATTRIBUTE_CATEGORY
ATTRIBUTE1-15
FOB_POINT
INTERFACE_LINE_ATTRIBUTE1-15
INTERFACE_LINE_CONTEXT
ORIG_SYSTEM_SHIP_ADDRESS_ID
QUANTITY
QUANTITY_ORDERED
REASON_CODE
REASON_CODE_MEANING
REFERENCE_LINE_ATTRIBUTE1-15
REFERENCE_LINE_CONTEXT
REFERENCE_LINE_ID
SALES_ORDER
SALES_ORDER_DATE
SALES_ORDER_LINE
SALES_ORDER_SOURCE
SHIP_DATE_ACTUAL
SHIP_VIA
TAX_CODE
UNIT_SELLING_PRICE
UNIT_STANDARD_PRICE
UOM_CODE
UOM_NAME
WAYBILL_NUMBER
Assign an AutoInvoice line ordering rule to an AutoInvoice grouping rule when you want to organize the transaction lines belonging to a transaction created by the grouping rule in a specific order. Use the Order By Type to specify whether to order the values belonging to a transaction attribute from least to greatest (Ascending) or greatest to least (Descending).
For example, if you are importing transactions from Oracle Fusion Distributed Order Orchestration, you can define a line ordering rule with the attribute SALES_ORDER_LINE to list the items on the invoice in the same order as they appear on the sales order.
Or, you can define a line ordering rule with the attribute AMOUNT and an Order By Type of Descending to ensure that the highest invoice line amounts are listed first on the transactions created by the grouping rule.
AutoInvoice grouping rules contain transaction attributes that must be identical for all items on the same transaction. For example, transaction number (TRX_NUMBER) is a mandatory attribute of all grouping rules. If you have two records in the interface tables with different transaction numbers, AutoInvoice creates separate transactions for each record.
Oracle Fusion Receivables provides both mandatory and optional transaction attributes for imported transactions. You cannot delete a mandatory attribute from any grouping rule, but you can add optional attributes to the mandatory attributes to create a new grouping rule.
Receivables provides the following mandatory transaction attributes from the RA_INTERFACE_LINES_ALL table that must apply to all transactions created using AutoInvoice grouping rules:
COMMENTS
CONS_BILLING_NUMBER
CONVERSION_DATE
CONVERSION_RATE
CONVERSION_TYPE
CREDIT_METHOD_FOR_ACCT_RULE
CREDIT_METHOD_FOR_INSTALLMENTS
CURRENCY_CODE
CUSTOMER_BANK_ACCOUNT_ID
CUST_TRX_TYPE_ID
DOCUMENT_NUMBER
DOCUMENT_NUMBER_SEQUENCE_ID
GL_DATE
HEADER_ATTRIBUTE1-15
HEADER_ATTRIBUTE_CATEGORY
HEADER_GDF_ATTRIBUTE1-30
INITIAL_CUSTOMER_TRX_ID
INTERNAL_NOTES
INVOICING_RULE_ID
ORIG_SYSTEM_BILL_ADDRESS_ID
ORIG_SYSTEM_BILL_CONTACT_ID
ORIG_SYSTEM_BILL_CUSTOMER_ID
ORIG_SYSTEM_SHIP_CONTACT_ID
ORIG_SYSTEM_SHIP_CUSTOMER_ID
ORIG_SYSTEM_SOLD_CUSTOMER_ID
ORIG_SYSTEM_BATCH_NAME
PAYMENT_SERVER_ORDER_ID
PAYMENT_SET_ID
PREVIOUS_CUSTOMER_TRX_ID
PRIMARY_SALESREP_ID
PRINTING_OPTION
PURCHASE_ORDER
PURCHASE_ORDER_DATE
PURCHASE_ORDER_REVISION
REASON_CODE
RECEIPT_METHOD_ID
RELATED_CUSTOMER_TRX_ID
SET_OF_BOOKS_ID
TERM_ID
TERRITORY_ID
TRX_DATE
TRX_NUMBER
Receivables provides the following optional transaction attributes from the RA_INTERFACE_LINES_ALL table that you assign to transaction classes within an AutoInvoice grouping rule:
ACCOUNTING_RULE_DURATION
ACCOUNTING_RULE_ID
ATTRIBUTE1-15
ATTRIBUTE_CATEGORY
INTERFACE_LINE_ATTRIBUTE1-15
INTERFACE_LINE_CONTEXT
INVENTORY_ITEM_ID
REFERENCE_LINE_ID
RULE_START_DATE
SALES_ORDER
SALES_ORDER_DATE
SALES_ORDER_LINE
SALES_ORDER_REVISION
SALES_ORDER_SOURCE
TAX_CODE
TAX_RATE
This example illustrates how to use grouping rules to group transaction lines into transactions during AutoInvoice import.
Define an AutoInvoice grouping rule that specifies that to appear on the same invoice, items must match on all mandatory attributes, such as currency (CURRENCY_CODE) and customer bill-to address (ORIG_SYSTEM_BILL_ADDRESS_ID), and must also match on the optional attribute of sales order type (SALES_ORDER_SOURCE).
During AutoInvoice import, assume that all mandatory attributes match other than currency and customer bill-to address.
This diagram illustrates how three imported invoices are created according to the AutoInvoice grouping rule defined in this example:
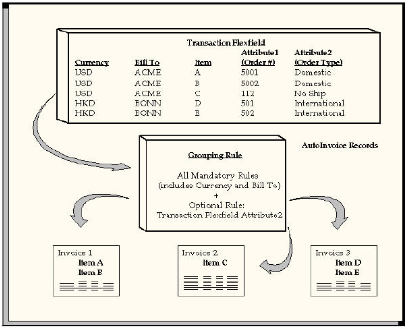
Items A and B share the same currency and sales order type, so they appear on the same invoice (Invoice 1). Item C has the same currency as A and B, but it has a different sales order type, so it appears on its own invoice (Invoice 2). Items D and E share the same currency and sales order type, so they appear on the same invoice (Invoice 3).
Because of the optional attribute of sales order type, AutoInvoice created three invoices. If the grouping rule had designated only mandatory attributes, then AutoInvoice would have created only two invoices.
During AutoInvoice processing, if you have transaction lines that fail validation, Oracle Fusion Receivables looks at the value of the Invalid Line field in the transaction source to determine the grouping of transactions.
If the value is Reject Invoice, then AutoInvoice rejects all of the transaction lines that make up one invoice according to the grouping rule, if any one of the transaction lines are invalid. For example, if a grouping rule specifies that three transaction lines should be created as one invoice and one of the transaction lines has an error, AutoInvoice rejects all three transaction lines and does not create an invoice.
However, if the value is Create Invoice, AutoInvoice rejects the one invalid transaction line and creates an invoice from the two remaining valid transaction lines.
During AutoInvoice processing, Oracle Fusion Receivables validates that transaction and document numbers are unique after grouping has completed. In certain cases, AutoInvoice will create multiple invoices in the same group with the same transaction or document number. Once grouping is completed, AutoInvoice checks for duplicate transaction and document numbers and reports any lines that fail validation.
For example, two lines are imported with the same transaction number, but they have different currencies. These lines are split into two separate invoices during grouping due to the different currencies. Once grouping has completed, both of the invoices will fail validation due to identical transaction numbers.
If AutoInvoice uses grouping rules and it is processing a transaction class that is not defined for a grouping rule, then AutoInvoice only uses the mandatory transaction attributes to group transactions.
Use payment terms to identify due dates and discount dates on your customer transactions. You assign payment terms to customer profiles or to customer information on transactions.
Considerations for payment terms include:
Payment Terms and Discounts
Split Payment Terms with Installments
Prepayment Payment Terms
Define standard payment terms for your customers to specify the due date and discount date for their open items. Payment terms can include a discount percent for early payment, and you can assign multiple discounts to each line of your payment terms.
For example, the payment terms named 2% 10, Net 30 indicates that a customer is allowed a two percent discount if payment is received within 10 days; after 10 days, the entire balance is due within 30 days of the transaction date with no applicable discount.
Enable the Allow discount on partial payments option to let your customers take discounts for partial payments on items associated with payment terms. A partial payment is a payment that is less than the remaining amount due. If you do this, you must also ensure that the Discount on partial payment system option is enabled.
Use the Discount Basis field to determine what amount Oracle Fusion Receivables uses to calculate discounts for the particular payment terms. If the payment terms use installments, you can assign discount percentages to each installment.
Create split payment terms for invoice installments that have different due dates. The payment terms determine the amount of each installment.
Use the Installment Option field to determine how to allocate the freight and tax charged to transactions. You can either distribute tax and freight charges across all installments, or allocate all freight and tax charges to the first installment.
Define the payment schedule for the split payment terms. The payment schedule determines when each installment is due, how much in each installment is due, and how much discount to offer in each installment.
You can optionally define prepayment payment terms by enabling the Prepayment option. You assign prepayment payment terms to transactions to indicate which business transactions require prepayment for goods and services.
Prepayment payment terms do not require the capture of funds in advance of invoicing or the delivery of prepaid goods or services. You must establish specific business practices at your enterprise if you want to capture these funds in advance.
Split payment terms derive different amounts due in each installment of the payment schedule, depending on the setting of the Installment Option field.
If the base amount is different from the relative amount, and you set the Installment Option field to Allocate tax and freight, Oracle Fusion Receivables prorates the base amount across the relative amounts of the payment schedule based upon the ratio you define. Receivables uses the following equation to determine the original amount due for each installment:
Amount Due = Relative Amount/Base Amount * Invoice Amount
If you set the Installment Option field to Include tax and freight in first installment, the base amount and the relative amounts that you specify for the payment schedule only indicate how the original line amounts of the invoices to which you assign these payment terms are distributed across different installments.
In this case, the original freight and tax amounts are included in the first installment, in addition to the line amount allocated by the ratio of the base amount and the relative amount that you specify for the first payment. Receivables uses the following equation to determine the original amount due for the first installment:
Amount Due = (Relative Amount/Base Amount * Base Line Amount) + Base Freight Amount + Base Tax Amount
The payment terms Discount Basis field determines on what basis Oracle Fusion Receivables calculates the discount amount.
Discount Basis
Invoice Amount
Calculates the discount amount based on the sum of the tax, freight, and line amounts of transactions.
Lines Only
Calculates the discount amount based on only the line amounts of transactions.
Lines, Freight Items and Tax
Calculates the discount amount based on the amount of line items and their freight and tax amounts, but excludes freight and charges at the transaction header level.
Lines and Tax, not Freight Items and Tax
Calculates the discount amount based on the line items and their tax amounts, but excludes freight items and their tax lines.
Oracle Fusion Receivables uses different formulas to calculate discounts, depending on your setup, the payment terms on the transaction, and the type of payment received.
Receivables provides formulas for these discount events:
Maximum Discount
Earned Discounts and Partial Payments Allowed
Unearned Discounts with Partial Payment Discounts Allowed
Earned Discounts with Partial Payment Discounts Not Allowed
Unearned Discounts and Partial Payments Not Allowed
Discount on Lines Only
Use the following formula to determine the maximum discount amount:
Maximum Discount = (Amount Due Original) * (Highest Discount Percent - Discount Taken)
If the receipt amount is more than the amount due remaining less the discount, Receivables uses the following formula to determine the earned discount:
Earned Discount = Amount Due Remaining * Discount Percent
If the receipt amount is either the same or less than the amount due remaining less the discount, Receivables uses the following formula to determine the earned discount:
Earned Discount = (Receipt Amount * Discount Percent) / (1 - Discount Percent)
Receivables uses the following formula to determine unearned discounts if partial payments are allowed:
Unearned Discount = Maximum Discount - Earned Discount
If the Allow discount on partial payments option on the payment terms is not enabled, Receivables only takes discounts if the receipt amount closes the installment.
Receivables uses the following formula to determine earned discounts if partial payment discounts are not allowed:
Earned Discount = Amount Due Original * Discount Percent
If the Allow discount on partial payments option on the payment terms is not enabled, Receivables only takes discounts if the receipt amount closes the installment.
Receivables uses the following formula to determine unearned discounts if partial payments are not allowed:
Unearned Discount = (Amount Due Original) * (Maximum Discount Percent - Earned Discount)
If the Discount Basis field on the payment term is set to Lines Only, Receivables does not take discounts on receipt amounts applied to tax, freight, or late charges and uses the following formula to determine the discount amount:
Line Percent = Discount Percent * (Sum of Lines + Sum of Line Adjustments - Sum of Line Credits) / (Amount Due Original + Sum of Adjustments - Sum of Credits)
Once you determine the discount line percent, use this as the discount percent in the formulas above.
This example illustrates how Receivables displays discount information based on the apply date of the receipt.
When you enter receipts manually, Oracle Fusion Receivables determines whether discounts are allowed based on the payment terms, discount grace days, system options, transaction date, and receipt apply date. If discounts are allowed, Receivables determines the amount of both earned and unearned discounts, as determined by the details of your setup.
Assume that you are using the following information:
Unearned Discounts = Yes
Payment Terms: 10/10, 5/15, Net 30
Discount Grace Days = 0
Calculate Discount on Lines Only = No
Allow Discount on Partial Payments = Yes
This table shows the discount details:
|
Percent |
Date |
On Lines Only |
On Partial Payments |
|---|---|---|---|
|
5 |
17-DEC-10 |
NO |
YES |
|
10 |
12-DEC-10 |
NO |
YES |
Assume these invoice details:
Invoice #101
Invoice Date = 02-DEC-10
Due Date = 01-JAN-11
Amount = $1100
The following table displays the default discount amounts based on different receipt application dates. You can also see the amount of earned and unearned discounts that your customers can take.
|
Receipt Apply Date |
Receipt Amount |
Default Discount Amount |
Message Line |
Earned Discount Allowed |
Unearned Discount Allowed |
|---|---|---|---|---|---|
|
From 02-DEC-10 to 12-DEC-10 |
$990 |
$110 |
Discount Earned = 110 Total = 110 |
$110 |
None |
|
After 17-DEC-10 |
$990 |
0 To take the unearned discount, you must update the amount. |
Discount Earned = 0 Total = 110 |
None |
$110 |
|
From 02-DEC-10 to 12-DEC-10 |
$1000 $10 of the receipt is left as Unapplied after the default discount. |
$110 |
Discount Earned = 110 Total = 110 |
$110 |
None |
|
From 13-DEC-10 to 17-DEC-10 |
$1000 After the discount of $52.63 defaults, the receipt is fully applied. However, there is still a remaining balance of $47.37 on the invoice. |
$52.63 To take the unearned discount, you must update the amount. |
Discount Earned = 52.63 Total = 110 |
$52.63 |
$57.37 |
|
After 17-DEC-10 |
$1000 Since there is no default discount, the receipt is fully applied. There is a remaining balance of $100 on the invoice. |
0 To take the unearned discount, you must update the amount. |
Discount Earned = 0 Total = 110 |
None |
$110 |
Balance forward billing payment terms pass the balance forward billing cycle to the Create Balance Forward Bill program. The billing cycle determines when customer balance forward bills are generated.
Because balance forward bills cannot be split across installments, all settings related to installments on balance forward billing payment terms are disabled. You cannot change existing payment terms back and forth for use as both a non-balance forward billing and balance forward billing payment terms.
Define AutoAccounting to specify how to determine the default general ledger accounts for transactions that you enter manually or import using AutoInvoice. You must define AutoAccounting before you can enter transactions in Oracle Fusion Receivables. When you enter transactions, you can override the default general ledger accounts that AutoAccounting creates.
Account Types
Define an AutoAccounting record for each type of account. You can then assign either a table name or constant value to each segment of the account.
AutoInvoice Clearing
The clearing account for imported transactions. Receivables uses the clearing account to hold any difference between the specified revenue amount and the selling price times the quantity for imported invoice lines. Receivables only uses the clearing account if you have enabled this option on the transaction source used for imported transactions.
Freight
The freight account for transactions.
Receivable
The receivable account for transactions.
Revenue
The revenue and late charges account for transactions.
Tax
The tax account for transactions.
Unbilled Receivable
The unbilled receivable account for transaction. Receivables uses this account when the transaction uses the In Arrears invoicing rule. If the revenue scheduling rule on the transaction recognizes revenue before the invoicing rule bills it, Receivables uses this account.
Unearned Revenue
The unearned revenue account for transactions. Receivables uses this account when a transaction uses the In Advance invoicing rule. If the revenue scheduling rule on the transaction recognizes revenue after the invoicing rule bills it, Receivables uses this account.
Table Names
Enter either the table name or constant value that you want Receivables to use to retrieve information for each accounting flexfield segment of a given account.
Enter a constant value instead of a table name if you want AutoAccounting to always use the same value for a given segment. You must ensure that you enter information that is valid for this segment. For example, if you defined your Company segment as a two-character segment with valid values ranging from 00 to 10, you must enter a two-character value within this range.
Bill-to Site
Use the bill-to site of the transaction to determine this segment of revenue, freight, receivable, AutoInvoice clearing, tax, unbilled receivable, and unearned revenue accounts.
Salesperson
Use the salesperson table to determine this segment of revenue, freight, receivable, AutoInvoice clearing, tax, unbilled receivable, and unearned revenue accounts.
If you select this option for AutoInvoice clearing, tax, or unearned revenue accounts, Receivables uses the revenue account associated with the salesperson on the transaction. If you select this option for the unbilled receivable account, Receivables uses the receivable account associated with the salesperson on the transaction.
If the transaction has a line type of Line with an inventory item of Freight, AutoAccounting uses the revenue scheduling rules for the freight account rather than the revenue account.
Standard Lines
Use the memo line or inventory item on the transaction to determine this segment of revenue, AutoInvoice clearing, freight, tax, unbilled receivable, and unearned revenue accounts.
If you select this option for AutoInvoice clearing, freight, tax, unbilled receivable or unearned revenue accounts, Receivables uses the revenue account associated to the memo line item or inventory item.
If the transaction has a line type of Line with an inventory item of Freight, AutoAccounting uses the revenue scheduling rules for the freight account rather than the revenue account.
Tax
Use the tax account assigned to the tax rate codes on the transaction.
Transaction Types
Use the transaction types table to determine this segment of revenue, freight, receivable, AutoInvoice clearing, tax, unbilled receivable, and unearned revenue accounts.
If the transaction has a line type of Line with an inventory item of Freight, AutoAccounting uses the revenue scheduling rules for the freight account rather than the revenue account.
To implement AutoAccounting, you first define your AutoAccounting structure and then define information for each salesperson, transaction type, product, and tax rate code in order for AutoAccounting to properly create your default accounts.
You must define your AutoAccounting structure before you can enter invoices and credit memos, and you can only define one structure for each account type. During transaction creation, if AutoAccounting cannot determine all of the Accounting Flexfield segments, it derives what it can and displays an incomplete Accounting Flexfield. You must provide any missing Accounting Flexfield information before you can complete a transaction.
There are these points to consider about creating your AutoAccounting structure:
AutoInvoice Clearing Account
Freight Account
Receivable Account
Revenue Account
Tax Account
Unbilled Receivable Account
Unearned Revenue Account
Available Information for Each Account
This table indicates the information that you can use to create each type of account. (Rec) and (Rev) indicate whether the account information is taken from the corresponding Receivables or Revenue Accounting Flexfield.
|
Information Source / AutoAccounting Type |
Constant |
Customer Bill-to Site |
Salesperson |
Transaction Type |
Standard Item |
Tax Rate Code |
|---|---|---|---|---|---|---|
|
AutoInvoice Clearing Account |
Yes |
Yes |
Yes (Rev) |
Yes |
Yes (Rev) |
No |
|
Freight |
Yes |
Yes |
Yes |
Yes |
Yes (Rev) |
No |
|
Receivable |
Yes |
Yes |
Yes |
Yes |
No |
No |
|
Revenue |
Yes |
Yes |
Yes |
Yes |
Yes |
No |
|
Tax |
Yes |
Yes |
Yes (Rev) |
Yes |
Yes (Rev) |
Yes |
|
Unbilled Receivable |
Yes |
Yes |
Yes (Rec) |
Yes |
Yes (Rev) |
No |
|
Unearned Revenue |
Yes |
Yes |
Yes (Rev) |
Yes |
Yes (Rev) |
No |
If AutoAccounting for the AutoInvoice Clearing, Tax, Unbilled Receivable, or Unearned Revenue accounts is based on standard item, Receivables uses the segment from the standard item Revenue Accounting Flexfield.
If AutoAccounting for the AutoInvoice Clearing, Tax, or Unearned Revenue accounts is based on salesperson, Receivables uses the account segment from the salesperson Revenue Flexfield. If AutoAccounting for Unbilled Receivable is based on salesperson, Receivables uses the segment from the salesperson Receivable Flexfield.
If the AutoInvoice Clearing, Revenue, Tax, Unbilled Receivable, or Unearned Revenue accounts are based on salesperson and there are multiple salespersons on the transaction, then Receivables creates separate distributions for each salesperson.
During AutoInvoice processing, Receivables uses the AutoInvoice clearing account to store any differences between the specified revenue amount and the (price * quantity) for imported invoice lines.
Receivables only uses the AutoInvoice clearing account if you enabled the Create clearing option on the transaction source assigned to imported transactions. However, you must define a clearing account in any case.
You can use constant value, customer bill-to site, salesperson, transaction type, and standard item for your AutoInvoice clearing account. If you select salesperson or standard item, Receivables uses the specified Revenue Flexfield.
The freight account controls the account in general ledger to which you post freight amounts. You can use constant value, customer bill-to site, salesperson, transaction type, and standard item to specify your freight account.
If you choose standard item, Receivables uses the specified Revenue Flexfield. In addition, you cannot import transactions with header-level freight through AutoInvoice.
If the transaction has a line type of LINE with an inventory item of freight, AutoAccounting uses the revenue scheduling rules for the freight type account rather than the revenue type account.
The receivable account controls the account in your general ledger to which you post receivable amounts. You can use transaction type, customer bill-to site, salesperson, and constant value to specify your receivable account.
The revenue account controls the account in your general ledger to which you post your revenue amounts. You can use transaction type, customer bill-to site, standard item, salesperson, and constant value to specify your revenue account.
The tax account controls the account in your general ledger to which you post tax amounts. You can use tax rate codes, customer bill-to site, salesperson, transaction type, standard item, and constant value to specify your tax account.
If you select salesperson or standard item, Receivables uses the specified Revenue Flexfield.
Receivables uses the unbilled receivable account for transactions that have invoicing and revenue scheduling rules. Whenever the revenue scheduling rule recognizes revenue on the transaction before the invoicing rule bills it, Receivables posts this amount to the unbilled receivable account.
You can select constant value, customer bill-to site, salesperson, transaction type, and standard item for your unbilled receivable account.
If you select standard item, Receivables uses the specified Revenue Flexfield. If you select salesperson, Receivables uses the salesperson Receivable Flexfield.
Receivables uses the unearned revenue account for transactions that have invoicing and revenue scheduling rules. Whenever the revenue scheduling rule recognizes revenue on the transaction after the invoicing rule bills it, Receivables posts this amount to the unearned revenue account.
You can select constant value, customer bill-to site, salesperson, transaction type, and standard item for your unearned revenue account.
If you select salesperson or standard item, Receivables uses the specified Revenue Flexfield.
This example illustrates how to derive default Accounting Flexfield segments in AutoAccounting.
Oracle Fusion Receivables uses AutoAccounting to derive the default accounting, and uses predefined setup in Oracle Fusion Subledger Accounting so that the Create Receivables Accounting program accepts the default accounts that AutoAccounting derives without change. However, if you modify the Subledger Accounting setup to define custom accounting, then you can select a constant value for all Accounting Flexfield segments.
These two scenarios illustrate how Receivables uses the AutoAccounting structure you define to determine your Accounting Flexfield defaults.
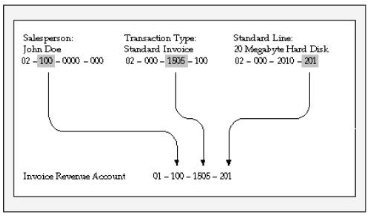
You want to define a four segment Revenue Flexfield: 00-000-0000-000 (Company-Cost Center-Account-Product). You can define AutoAccounting to derive defaults for each segment:
Company, the first segment, is the constant 01.
Cost Center, the second segment, derives from the salesperson (John Doe).
Account, the third segment, derives from the transaction type (Standard Invoice).
Product, the fourth segment, derives from the standard line (20 Megabyte Hard Disk).
Salesperson John Doe enters a one line Standard Type invoice for a 20 Megabyte Hard Drive.
This graphic illustrates how AutoAccounting derives the Revenue Flexfield based on a separate definition for each segment:
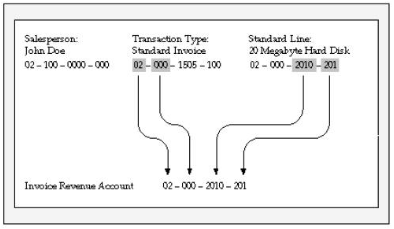
You redefine the structure so that AutoAccounting only uses information from the transaction type (Standard Invoice) for segments 1 and 2, and standard line (consulting services) for segments 3 and 4.
This graphic illustrates how AutoAccounting derives the Revenue Flexfield based on the same definitions for segments 1 and 2 and segments 3 and 4:
AutoAccounting derives the default accounting for each accounting event in Oracle Fusion Receivables according to your setup. AutoAccounting assigns valid Accounting flexfields to invoices and credit memos, and automatically generates valid Accounting flexfields for all related accounts: freight, receivable, revenue, AutoInvoice clearing, tax, unbilled receivable, and unearned revenue.
When you submit the Create Receivables Accounting program, this creates the subledger accounting entries. Oracle Fusion Subledger Accounting transfers the final accounting to Oracle Fusion General Ledger.
You can optionally define your own accounting rules in Subledger Accounting to create accounting that meets your business requirements. If you customize the Subledger Accounting setup to create your own accounting, then Subledger Accounting overwrites the default accounts, or individual segments of accounts, that AutoAccounting originally derived during transaction entry.
Use the Open Receivable and Post to GL options on the transaction type to manage posted and non-posted activities on transactions.
If the Open Receivable option is enabled, Oracle Fusion Receivables updates your customer balances each time you create a complete debit memo, credit memo, chargeback, or on-account credit with this transaction type. Receivables also includes these transactions in the standard aging and collection processes.
If the Post to GL option is enabled, Receivables posts transactions with this transaction type to general ledger. If this option is not enabled, then no accounting is generated for transactions with this transaction type.
Considerations for defining transaction types include:
Creating a Void Transaction Type
Updating Customer Accounts and Aging
Updating Accounting Only
You can void a debit memo, credit memo, on-account credit or invoice by defining a Void transaction type. When you define a Void transaction type, set the Open Receivable and Post to GL options to No. Then, as long as there is no activity against the transaction, and it has not been posted to general ledger, you can make the transaction invalid by changing the transaction type to Void.
This activity is not included on the Review Customer Account Details page since the activity does not modify the customer balance.
If you set the Open Receivable option to Yes and Post to GL option to No, Receivables updates customer accounts with the transaction activity of transactions assigned this transaction type. Receivables also includes these transaction in aging reports. There is no effect on accounting.
Use transaction types with these settings during your initial implementation, where the transaction amount is included in the general ledger beginning balance for the receivable account, but activity still needs to be aged and payment collected against it. All related activities against the transaction, such as credit memos, payments, and adjustments, are accounted as affecting the customer balance. You can review these activities on the Review Customer Account Details page.
If you set the Open Receivable option to No and Post to GL option to Yes, Receivables updates accounting without any impact on the customer balance.
Use transaction types with these settings when you want to adjust accounting activity, such as when you rebill a customer in order to reclassify the general ledger account. A credit memo and invoice with the Open Receivable option set to No are created where the credit memo reverses the general ledger account of the original invoice, and the invoice creates accounting with the new general ledger account. This activity is transparent to the customer because the original invoice is used for the cash application when payment is received.
This activity is not included on the Review Customer Account Details page since the activity does not modify the customer balance.
The transaction type that you assign to a transaction defines the type of application that is permitted against the transaction balance. This definition is managed by the Natural Application Only and Allow Overapplication options.
Natural application lets you only apply a payment or credit to a transaction that brings the transaction balance close to or equal to zero. For example, if an invoice has a balance due of $400, you can make applications against this transaction up to $400 only. With natural application, you can only bring the balance to zero.
Overapplication lets you apply more than the balance due on a transaction. For example, if you apply a $500 receipt to a $400 invoice, this overapplies the invoice by $100 and reverses the balance sign from positive to negative.
Whether or not a transaction allows overapplication determines the actions that you can take on that transaction.
If a transaction that allows natural application only is paid in full, then in order to credit the transaction you must first unapply the transaction from the receipt before creating the credit.
If you want to use AutoInvoice to import credit memos against paid invoices and evaluate these credits for automatic receipt handling, then the transaction type of the paid invoices must allow natural application only. However, if the Receipt Handling for Credits option is not enabled on the transaction source of the transaction, AutoInvoice leaves the related credit memo in the interface tables until you unapply the invoice from the receipt.
Define the accounting for transaction types of class Invoice, Chargeback, Credit Memo, and Debit Memo. Oracle Fusion Receivables uses this information along with your AutoAccounting definition to determine the accounts to use for transactions with the applicable transaction type.
There are points to consider for each reference account on a transaction type:
Revenue
Freight
Receivable
AutoInvoice Clearing
Tax
Unbilled Receivable
Unearned Revenue
Enter a revenue account, unless the transaction type does not allow freight.
If the Invoice Accounting Used for Credit Memos profile option is set to No, then a revenue account is not required for Credit Memo transaction types.
Enter a freight account, unless the transaction type does not allow freight.
Enter a receivable account for all transaction types.
If the Post To GL option on the transaction type is enabled, Receivables creates a receivable transaction record using this account in order to transfer accounting to general ledger and create a journal entry.
For Chargeback transaction types, enter the Receivable Chargeback account. The offset to the Receivable account on the original debit transaction is generated by the chargeback adjustment.
If the Invoice Accounting Used for Credit Memos profile option is set to No, then a receivable account is not required for Credit Memo transaction types.
If this is an Invoice or Debit Memo transaction type, enter an AutoInvoice clearing account. Receivables uses this account to hold any difference between the revenue amount specified for the revenue account and the selling price times the quantity for imported invoice lines.
Receivables only uses the AutoInvoice clearing account for imported transactions that have a transaction source with the Create clearing option enabled. If the Create clearing option is not enabled, then AutoInvoice requires that the revenue amount on the invoice be equal to the selling price times the quantity.
If this is an Invoice, Credit Memo or Debit Memo transaction type, enter a tax account.
If this is an Invoice or Credit Memo transaction type, enter an unbilled receivable account. This account is for transactions that use the In Arrears invoicing rule.
If this is an Invoice or Credit Memo transaction type, enter an unearned revenue account. This account is for transactions that use the In Advance invoicing rule.
Define your transaction types in the following order:
Credit memo transaction types
Invoice transaction types
Debit memo transaction types
Chargeback transaction types
If applicable, define the transaction types that you want to add to your transaction sources before defining transaction sources.
If you are using late charges, define a transaction type with a class of Debit Memo for debit memos, and a transaction type with a class of Invoice for interest invoices. Specify the receivable and revenue accounts for these transaction types. Oracle Fusion Receivables uses these accounts instead of AutoAccounting when generating late charges.
You can use the Open Receivable option on the transaction type to implement an approval cycle for any temporary or preliminary transactions.
For example, if you have particularly sensitive debit memos, credit memos, on-account credits, chargebacks, and invoices that you want to review after creation, you can define a transaction type called Preliminary with Open Receivable set to No and assign it to the applicable transactions. This transaction type does not update your customer balances.
When you review and approve the transaction, you can define a transaction type called Final with Open Receivable set to Yes and assign it to the same transactions. This will now update your customer balances on these transactions.
Use the various options on the transaction source assigned to a transaction to manage your transaction numbering requirements.
There are these points to consider when defining transaction numbering for transactions assigned to specific transaction sources:
Defining Document Sequences
Using Automatic Transaction Numbering
Copying Document Numbers to Transaction Numbers
Allowing Duplicate Transaction Numbers
Using the Credit Memo Transaction Source
If necessary, define document sequences to assign unique numbers to each transaction, in addition to the transaction number automatically assigned by Oracle Fusion Receivables.
To automatically number new transactions you create using a transaction source, enable the Automatic transaction numbering option and enter a number in the Last Number field.
For example, to start numbering transactions with 1000, enter a last number of 999. Receivables automatically updates the Last Number fields on transaction sources, so you can review the transaction source later to see the last transaction number that was generated.
Note
The last transaction number on the transaction source is an approximation only, due to caching.
You can use automatic transaction numbering with both Imported and Manual transaction sources.
If you are using document sequences and you want to use the same value for both the document number and the transaction number for transactions assigned to a transaction source, enable the Copy document number to transaction number option.
If you are using Gapless document sequences, you should enable this option if you require gapless transaction numbering. This ensures that transaction numbers are generated sequentially and that there are no missing numbers.
Enable the Allow duplicate transaction numbers option to allow duplicate transaction numbers within a transaction source.
You cannot use this option with automatic transaction numbering.
Assign a credit memo transaction source to an invoice transaction source, if you want to number credit memos differently from the invoices that they credit.
During AutoInvoice processing, whether you must provide sales credit information on imported transaction lines depends on the settings of the Allow sales credits option on the transaction source and the Require salesperson system option.
These are the requirements for passing sales credit information on imported transaction lines:
If the Require salesperson system option and the Allow sales credits option on the transaction source are both enabled, you must provide sales credit information.
If the Require salesperson system option is not enabled and the Allow sales credits option on the transaction source is enabled, you can provide sales credit information, but it is not required.
If the Require salesperson system option is enabled and the Allow sales credits option on the transaction source is not enabled, you must provide sales credit information.
If neither the Require salesperson system option nor the Allow sales credits option on the transaction source are enabled, you cannot provide sales credit information. AutoInvoice ignores any values that you pass.
Use the AutoInvoice Options and Import Information regions of an Imported transaction source to define how AutoInvoice validates imported transaction lines assigned a particular transaction source.
You do not have to pass values for all of the fields that are referenced in the transaction source. If you do not want AutoInvoice to pass certain data, then where available you can set the related option to None.
Note
Even if you set a transaction source data option to None in order not to import this information into the interface tables, AutoInvoice can still validate and reject transaction lines with invalid data.
These settings affect the validation of imported transactions:
Invalid Line field: Indicate how AutoInvoice handles imported transactions with invalid lines by selecting either Reject Invoice or Create Invoice.
If you select Reject Invoice, AutoInvoice does not import this transaction or any of its lines into the interface tables.
If you select Create Invoice, AutoInvoice creates a transaction with valid lines only. For example, you import an invoice with three invoice lines and one of the lines is invalid. AutoInvoice creates the invoice with only the two valid lines and rejects the invalid line. You can use the Edit Transaction page to add the rejected line.
Accounting Date in a Closed Period field: Indicate how AutoInvoice handles imported transactions that have lines in the interface lines table that are in a closed period.
Select Adjust to have AutoInvoice automatically adjust the accounting dates to the first accounting date of the next open or future enterable period.
Select Reject to reject these transaction lines.
In the Import Information subregions, where applicable select Number, Value, Segment or ID for each option to indicate how AutoInvoice validates information.
Select Number to import a record into the interface tables using its assigned number.
Select Value to import a record into the interface tables using its actual name.
Note
Use Value if you intend to use the transaction source to import data from a non-Oracle system.
Select Segment to use the flexfield segment.
Select ID to use the internal identifier of the record.
Select Amount or Percent to indicate how AutoInvoice validates Sales Credits and Revenue Account Allocations on transaction lines.
AutoInvoice validates imported data based on the settings of the applicable Imported transaction source. Transactions that fail validation appear in the Import AutoInvoice Validation report.
AutoInvoice ensures that certain column values agree with each other. These values can be within an interface table or multiple interface tables. For example, if the transaction source indicates not to use a revenue scheduling rule, AutoInvoice ignores any values passed for invoicing rule, revenue scheduling rule, and revenue scheduling rule duration.
AutoInvoice performs these validations on transaction lines with revenue scheduling rules:
Requires that these transactions also include an invoicing rule, if you import transactions that use revenue scheduling rules.
Rejects lines, if the revenue scheduling rule has overlapping periods.
Rejects lines, if all of the accounting periods do not exist for the duration of the revenue scheduling rule.
You may want to create certain records before creating your transaction sources.
You can optionally create these objects for all transaction sources:
Transaction types: Define the transaction types that you want to appear by default on transactions assigned to your transaction sources.
Invoice transaction flexfield: Define the reference information that you want to capture in the invoice transaction flexfield and display on imported transactions, such as a purchase order number.
Credit memo transaction source: Define a transaction source for credit memos before you define a transaction source for invoices. Use this transaction source to number the credit memos created against invoices differently from the invoices they are crediting.
You can optionally create these objects for Imported transaction sources:
AutoInvoice grouping rule: Define the grouping rule to appear by default on imported transaction lines.
AutoInvoice clearing account: Define an AutoInvoice clearing account, if you intend to enable the Create clearing option. AutoInvoice puts any difference between the revenue amount and the selling price times the quantity for a transaction into this account.
Special conditions may apply to the creation of transaction sources for credit memos.
Review these considerations for transaction sources assigned to credit memos:
Define Manual transaction sources for credit memos created by the credit memo request approval process.
Enable the Copy transaction information flexfield to credit memo option on Manual transaction sources used for credit memos, to copy the invoice transaction flexfield reference information to the credit memo that is crediting the invoice.
Define and assign transaction sources for credit memos to transaction sources for invoices, if you want to number the credit memos created against invoices differently from the invoices they are crediting.
Assign the AutoInvoice grouping rule to Imported transaction sources that AutoInvoice uses to group imported transaction lines.
If you do not assign a grouping rule to an Imported transaction source, AutoInvoice uses the following hierarchy to determine which rule to use:
Grouping rule assigned to the transaction source of the transaction line.
Grouping rule assigned to the bill-to customer site profile of the transaction line.
Grouping rule assigned to the bill-to customer profile of the transaction line.
Grouping rule assigned to system options.
If you do not use an AutoInvoice clearing account and enable the Create clearing option on the transaction source, AutoInvoice requires that the revenue amount be equal to the selling price times the quantity for all of the transactions it processes. AutoInvoice rejects any transaction line that does not meet this requirement.
You can optionally associate a revenue account with a memo line.
If AutoAccounting depends on memo line, Oracle Fusion Receivables uses the revenue account segment values defined for the memo line, in combination with the rest of your AutoAccounting structure, to determine the default revenue, freight, AutoInvoice clearing, tax, unbilled receivable, unearned revenue, and receivable accounts for invoices that include the memo line.
When you create a debit memo or on-account credit memo with memo lines, Receivables uses the Revenue account from the original receivable item as the credit account. However, when you create debit memo reversals or chargebacks, Receivables uses instead the Revenue flexfield from the original receivable item as the credit account.
Use memo lines on your transactions when the item is not an inventory item. For example, you can define a memo line called Consulting Services to identify charges for consulting activities. You can assign memo lines to debit memos, on-account credits, debit memo reversals, chargebacks, and invoices.
You can use tax memo lines on transactions if your tax definition lets you enter manual tax lines on transactions. After you enter a tax memo line on a transaction, you can specify the amount of tax to assign to the transaction line.
You can enable and maintain balance forward billing details at the customer account level and customer site level. The rules governing the interaction between the account and account sites determine what sites are included in balance forward bills.
These rules apply to balance forward billing at the account level and site level:
Account level customer profile values become the default values for the related customer sites when you create site profiles.
If balance forward billing is enabled at the account level, you still need to enable balance forward billing on the related site profiles if you want to include these sites for balance forward billing.
Once you create a site profile and define balance forward billing details, the site profile no longer references the account profile. This lets you define different balance forward billing details for a particular site.
Balance forward billing definitions at the site level take precedence over balance forward billing definitions at the account level.
This example demonstrates how to set up balance forward billing for the customer Business World. The example includes the setup of a balance forward billing cycle, payment terms and the Business World customer profile.
This table summarizes key decisions for this scenario.
|
Decisions to Consider |
In This Example |
|---|---|
|
What billing cycle is used? |
Monthly |
|
What day of month is used on the payment terms? |
15th |
|
How are balance forward bills consolidated? |
Account level |
|
Can the customer exclude transactions from the balance forward bill? |
Yes |
To generate balance forward bills for a customer:
Define a balance forward billing cycle.
Define balance forward billing payment terms.
Set up the customer profile class for balance forward billing.
Assign the profile class to the Business World customer account.
Define the balance forward billing cycle to use for this customer:
|
Field |
Value |
|---|---|
|
Name |
Name that identifies this balance forward billing cycle for this customer. |
|
Frequency |
Monthly |
|
Repeat Every |
1 |
|
Day of Month |
Last Day of Month |
Define the balance forward billing payment terms to use for this customer:
|
Field |
Value |
|---|---|
|
Name |
Name that identifies these payment terms for this customer. |
|
Billing Cycle |
The billing cycle you defined in the previous step. |
|
Due By Day of Month |
15 |
Set up the customer profile for Business World for balance forward billing:
|
Field |
Value |
|---|---|
|
Balance Forward Billing Enable |
Enable this option. |
|
Bill Level |
Account |
|
Bill Type |
Detail |
|
Payment Terms |
The balance forward billing payment terms you defined in the previous step. |
|
Override terms |
Enable this option. |
Note
The Override terms option makes available to transactions non-balance forward payment terms and the one balance forward billing payment terms you defined in the previous step. This lets you exclude individual transactions from balance forward billing by assigning the transaction non-balance forward payment terms.
Assign the profile class to the Business World account:
The balance forward billing cycle determines the dates in the year that Oracle Fusion Receivables generates balance forward bills, and the transactions that are included in balance forward bills. You assign balance forward billing cycles to payment terms.
When you run the Create Balance Forward Bill program, you must select a billing cycle. You can also select specific customers, customer sites, and payment terms. A run of the Create Balance Forward Bill program includes all transactions not included on a previous balance forward bill that are assigned the payment terms with the selected billing cycle, or a subset of these payment terms as determined by the other program parameters.
Assign general ledger accounts to your salespersons. When AutoAccounting depends on salesperson, Oracle Fusion Receivables uses the account references that you define here to derive the accounts to use on transactions that are assigned a particular salesperson.
The remit-to address lets your customers know where to send payment for their open debit items. After you create a remit-to address, you can assign it to the bill-to addresses of the customers and customer sites that you designate by country and, if applicable, by region and postal code range.
If the Print remit-to address system option is enabled, Oracle Fusion Receivables prints the remit-to address on the related dunning letters and statements.
During the import process, AutoInvoice rejects all invoices for which it cannot determine a remit-to address. In order for AutoInvoice to import an invoice, you must either define a remit-to address for the geographical location of each applicable bill-to site or define a remit-to address to use as default for one or more locations.
Create or select a remit-to address, then open the Receipts from Criteria dialog box. Select the country that you want to assign to this remit-to address. If you only select a country, then all customer bill-to sites in this country are assigned this remit-to address.
If you want to assign this remit-to address to specific locations within the country, you can optionally select a state (region) within the country, and a range of postal codes.
When you create a remit-to address, a country appears by default if one was defined in system options. You can change the default to the applicable country of the remit-to address.
If you have Oracle Fusion Trading Community Data Quality installed, you can expose a Verify Address button on the Create and Edit Remit-to Address pages for applicable countries.
After you enter a remit-to address, use the Verify Address button to confirm that the address is in the Oracle Fusion Trading Community Model registry. If it is not, Oracle Fusion Receivables either presents alternative addresses or lets you optionally add the address you entered to the registry.
|
Previous |
Next |
Copyright © 2011-2012, Oracle and/or its affiliates. All rights reserved. Legal Notices |
Contents |
Contact Us |