11g Release 5 (11.1.5)
Part Number E20379-05
Contents
Contact
Us
|
Oracle® Fusion
Applications Workforce Deployment Implementation Guide 11g Release 5 (11.1.5) Part Number E20379-05 |
Contents |
Contact Us |
|
Previous |
Next |
This chapter contains the following:
Manage Payroll Process Configuration
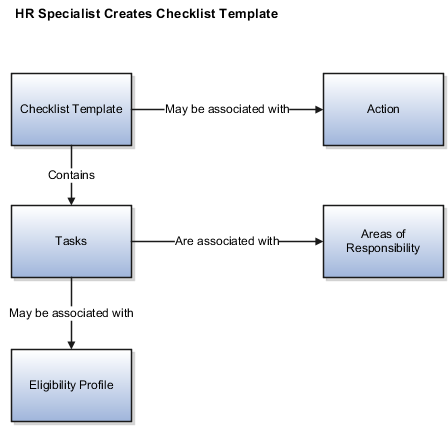
Use checklists for actions that require the completion of standard tasks, such as creating users or reassigning resources. For example, employee hire and termination actions typically require a number of people to complete standard tasks. You create and maintain tasks within a checklist template. You can create checklist templates that can be allocated to persons either automatically or manually.
The figure shows the components of a checklist template and their major relationships.
This figure shows the components of the checklist allocation process and how they relate to each other.
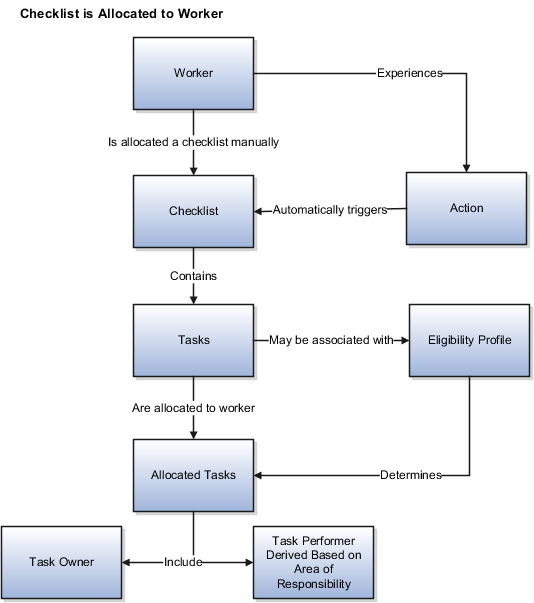
Actions track changes in personal circumstances, for example, new hire, transfer, or termination. Link an action to a checklist template to allocate the checklist to persons automatically when they experience the action. Note that, the checklist template is still available for manual allocation, even if it is linked to an action.
You create tasks within a checklist template, however, managers can also create and maintain tasks within an allocated checklist. You can enter a task duration and specify if a task is required. When the task appears in an allocated checklist, the date in the target end date field reflects this duration. You can set the checklist status to completed only if all the required tasks are complete.
Link an eligibility profile to a checklist task to control whether that task appears in a specific allocated checklist. The task appears in the allocated checklist of a worker only if the worker matches the eligibility criteria.
Performer is the person carrying out the task. You select the task performers' areas of responsibility when you create a checklist template. During checklist allocation, the persons with the selected responsibilities are automatically assigned as performers for the tasks and notified of the assignment. You can view, but not update, the task performers in the allocated checklist.
Allocated checklists are those that have been allocated to workers and contain the tasks relevant to them.
Task owner, generally synonymous with a manager, is the person responsible for ensuring task completion. Managers can display the tasks within an allocated checklist and monitor the status themselves or assign alternative owners for the tasks.
Managers can display the allocated checklists for their workers and update the checklist and task statuses as necessary. Performers and owners can view the checklist tasks assigned to them in their worklist and update the task status. Note that these statuses are not used to determine the checklist or task availability, they are for information purposes only.
The checklist and task statuses are:
Initiated
Completed
Rejected
Outstanding
In Progress
Suspended
The status of the checklist and the tasks in the checklist is automatically set to initiated when you allocate the checklist.
Use this status to indicate that the checklist or task is complete. You can set the checklist status to completed only if all the required tasks are complete. The checklist status is automatically set to completed when you set the status of the last required task to completed. Note that the task does not disappear from the allocated checklist or the worklist when you set the status to completed. You must delete it yourself if required.
Use this status to reject a checklist, for example, because it was wrongly allocated to a person. Task owners or performers can use this status to decline ownership of a task, for example, if the task has been wrongly assigned to them.
Use this status to indicate that the checklist or task is not complete by the target date.
Use the other statuses to record progress made against the checklist or tasks, for example, to indicate that tasks are in progress or the checklist is suspended because of unavailability of resources.
This example demonstrates how to create a checklist template that is allocated automatically to all newly hired workers to track certain tasks involved in hiring a worker. The tasks in the checklist vary according to eligibility rules.
The following table summarizes key decisions for this scenario:
|
Decisions to Consider |
In this Example |
|---|---|
|
Allocate checklist automatically? |
Yes, checklist is allocated automatically to persons experiencing new hire action. |
|
Which tasks to include in the checklist? |
|
|
What are the task performers' responsibilities? |
|
|
Do eligibility rules apply to any tasks? |
|
Create a checklist template, associate it with the Hire action, and create three tasks for the template.
|
Field |
Value |
|---|---|
|
Name |
New Hire |
|
Category |
On Boarding |
|
Action |
Hire |
|
Field |
Create E-mail Account Task |
Issue Laptop Task |
Issue Meal Vouchers Task |
|---|---|---|---|
|
Required |
Yes |
No |
No |
|
Eligibility Profile |
|
Manager_Users |
India_Work_Location |
|
Responsibility Type |
IT Support Representative |
IT Support Representative |
HR Representative |
No. Managers cannot edit or delete the checklist template that they create using the save as template option. However, they can allocate the checklist template to workers and edit the checklist and task attributes within the allocated checklists. The HR specialist can make changes in the checklist template if required and make the revised template available for allocation to all users.
Each allocated checklist is a specific instance of the checklist template. Therefore, changes in the checklist template do not affect the allocated checklists. Similarly, the checklist template is unaffected by changes in the allocated checklists.
You add eligibility criteria to an eligibility profile, and then associate the profile with an object that restricts eligibility.
The following figure shows the relationships between eligibility components.
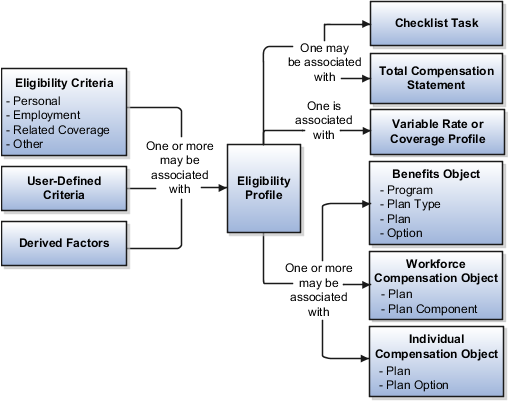
You can add different types of eligibility criteria to an eligibility profile. For many common criteria, such as gender or employment status, you can select from a list of predefined criteria values. However, you must create user-defined criteria and derived factors before you can add them to an eligibility profile.
When you add an eligibility criterion to a profile, you define how to use it to determine eligibility. For example, when you add gender as a criterion, you must specify a gender value (male or female) and whether to include or exclude persons who match that value.
You can associate an eligibility profile with different kinds of objects:
Associate an eligibility profile with a variable rate or variable coverage profile to establish the criteria required to qualify for that rate or coverage.
Associate an eligibility profile with a checklist task to control whether that task appears in an allocated checklist.
Associate an eligibility profile with a total compensation statement to apply additional eligibility criteria after statement generation population parameters.
Associate one or more eligibility profiles with a benefits or compensation object to establish the eligibility criteria for specific plans and options.
Derived factors define how to calculate certain eligibility criteria that change over time, such as a person's age or length of service. You add derived factors to eligibility profiles and then associate the profiles with objects that restrict eligibility.
You can create six different types of derived factors: age, compensation, length of service, hours worked, full-time equivalent, and a combination of age and length of service.
For each factor that you create, you specify one or more rules about how eligibility is determined. For example, the determination rule for an age derived factor specifies the day on which to evaluate the person's calculated age for eligibility. If the determination rule is set to the first of the year, then the person's age as of the first of the year is used to determine eligibility.
For the full-time equivalent factor, you specify the minimum and maximum full-time equivalent percentage and whether to use the primary assignment or the sum of all assignments when evaluating eligibility. For example, if the percentage range is 90 to 100 percent for the sum of all assignments, then a person who works 50 percent full-time on two different assignments is considered eligible.
Other settings define the unit of measure for time or monetary amounts, rounding rules, and minimums and maximums.
The following scenarios illustrate how to define different types of derived factors:
Benefits administrators frequently use age factors to determine dependent eligibility. You can also use age as a factor when determining life insurance rates. Age factors typically define a range of ages, referred to as age bands, and rules for evaluating the person's age. The following table illustrates a set of age bands that could be used to determine eligibility for life insurance rates that vary based on age.
|
Derived Factor Name |
Greater Than or Equal To Age Value |
Less Than Age Value |
|---|---|---|
|
Age Under 25 |
1 |
25 |
|
Age 25 to 34 |
25 |
35 |
|
Age 35 to 44 |
35 |
45 |
|
Age 45 to 54 |
45 |
55 |
|
Age 55 to 64 |
55 |
65 |
|
Age 64 or Older |
65 |
75 |
The determination rule and other settings for each age band are the same:
|
Field |
Value |
|---|---|
|
Determination Rule |
First of calendar year |
|
Age to Use |
Person's |
|
Units |
Year |
|
Rounding |
None |
A derived factor for length of service defines a range of values and rules for calculating an employee's length of service. The following table illustrates a set of length-of-service bands that could be used to determine eligibility for compensation objects such as bonuses or severance pay.
|
Derived Factor Name |
Greater Than or Equal To Length of Service Value |
Less Than Length of Service Value |
|---|---|---|
|
Service Less Than 1 |
0 |
1 |
|
Service 1 to 4 |
1 |
5 |
|
Service 5 to 9 |
5 |
10 |
|
Service 10 to 14 |
10 |
15 |
|
Service 15 to 19 |
15 |
20 |
|
Service 20 to 24 |
20 |
25 |
|
Service 25 to 29 |
25 |
30 |
|
Service 30 Plus |
30 |
999 |
The determination rule and other settings for each length-of-service band are the same:
|
Field |
Value |
|---|---|
|
Period Start Date Rule |
Date of hire (This sets the beginning of the period being measured.) |
|
Determination Rule |
End of year (This sets the end of the period being measured.) |
|
Age to Use |
Person's |
|
Units |
Year |
|
Rounding |
None |
A derived factor for compensation defines a range of values and rules for calculating an employee's compensation amount. The following table illustrates a set of compensation bands that could be used to determine eligibility for compensation objects such as bonuses or stock options.
|
Derived Factor Name |
Greater Than or Equal To Compensation Value |
Less Than Compensation Value |
|---|---|---|
|
Less than 20000 |
0 |
20,000 |
|
Salary 20 to 34000 |
20,000 |
35,000 |
|
Salary 35 to 49000 |
35,000 |
50,000 |
|
Salary 50 to 75000 |
50,000 |
75,000 |
|
Salary 75 to 99000 |
75,000 |
100,000 |
|
Salary 100 to 200000 |
100,000 |
200,000 |
|
Salary 200000 Plus |
200,000 |
999,999,999 |
The determination rule and other settings for each compensation band are the same:
|
Field |
Value |
|---|---|
|
Determination Rule |
First of year |
|
Unit of Measure |
US Dollar |
|
Source |
Stated compensation |
|
Rounding |
Rounds to nearest hundred |
The Age to Use value that you select is an important aspect of an age derived factor. This value determines whose birth date is used to calculate the derived age.
In most cases, you use the Person's value in the Age to Use field to define an age derived factor for either a participant or dependent eligibility profile. In this case, each person's birth date is used to calculate the age criterion by which eligibility is evaluated for that person.
For example, if you select Person's as the Age to Use value, and associate the age derived factor with a dependent eligibility profile, each dependent's eligibility is evaluated based on the age calculated from his or her own birth date.
You might select another predefined value in the Age to Use field if you intend to evaluate participant or dependent eligibility or rates based on someone else's age, such as a spouse, child, or other dependent.
Note
If you choose Inherited Age, the evaluation is based on the date of birth as defined in the person extra information flexfield.
If you select Person's oldest child as the Age to Use value, and associate this derived factor with a dependent eligibility profile, eligibility for all dependents is evaluated based on the age of the participant's oldest child. Consequently, when the oldest child reaches the maximum age of eligibility, for instance, all dependents become ineligible.
You can define your own criteria to meet any special needs of your organization. For example, if your organization employs deep sea divers and offers different benefits or benefits rates based on how deep they dive, you can create Depth of Diving as a new eligibility criterion.
The data for the eligibility criterion must be stored in a table that is accessible to the application. If the data is stored in either the Person or Assignment table, you can select the table and column from a list, and then specify the lookup type used to validate input values. You can also allow a range of valid values if the field stores a numeric value or a date.
Note
To select the correct values for the column and lookup fields, you must have a basic understanding of the structure of the table that stores the eligibility criterion information.
If the data is stored in a table other than the Person or Assignment table, you must first create a formula to retrieve the data from the table, and then set the formula type to User-Defined Criteria.
You can define two sets of criteria on the User-Defined Criteria page. The participant must meet the criteria defined in either set to be considered eligible (or to be excluded from eligibility if the Exclude check box is selected when the criteria is added to an eligibility profile).
After you have created your user-defined criteria, you can add it to an eligibility profile.
The following scenarios illustrate how to define different types of user-defined criteria. In each example, you must first create the user-defined criteria and then add it to an eligibility profile and set the criteria values to use in the profile.
A commercial diving company wants to offer different benefit rates to employees who dive to depths greater than 330 feet. This data is stored for each employee in a custom attribute called Dive_Depth in the Person table. To define eligibility based on diving depth, set the following values on the Create or Edit User-Defined Criteria page:
|
Field |
Value |
|---|---|
|
Table |
Person |
|
Column |
Dive_Depth_Attribute |
|
Lookup |
Dive_Depth_Validation |
|
Enable range validation one |
Selected |
Save the user-defined criteria, and then add it to an eligibility profile. Set the following values on the User-Defined Criteria tab, which is under the Other tab on the Create or Edit Eligibility Profile page:
|
Field |
Value |
|---|---|
|
Set 1 Meaning |
329 |
|
Set 1 To Meaning |
9999 |
|
Exclude |
Deselected |
Save the eligibility profile and associate it with a variable rate profile.
An employer wants to exclude work-at-home assignment from eligibility for a transportation benefit option. To accomplish this, set the following values on the Create or Edit User-Defined Criteria page:
|
Field |
Value |
|---|---|
|
Table |
Assignment |
|
Column |
Work_at_home |
|
Lookup |
YES_NO |
|
Enable range validation one |
Deselected |
Save the user-defined criteria, and then add it to an eligibility profile. Set the following values on the User-Defined Criteria tab:
|
Field |
Value |
|---|---|
|
Set 1 Meaning |
Yes |
|
Exclude |
Selected |
Save the eligibility profile and associate it with the transportation benefit option.
A company wants to offer a spot incentive bonus to hourly employees who worked 100 percent of their scheduled shift hours in a three month period. To determine eligibility for the bonus, create a formula that calculates scheduled hours less worked hours for each week in the previous three months. If the result of successive calculations is less than or equal to zero, then the formula returns a result of Yes. The first step is to create the formula. Once the formula has been defined, create a user-defined criterion to run the formula. Enter the following values on the Create or Edit User-Defined Criteria page:
|
Field |
Value |
|---|---|
|
Access One Formula |
Worked_Sched_Hours_Percent |
|
Enable range validation one |
Deselected |
Save the user-defined criteria, and then add it to an eligibility profile. Set the following values on the User-Defined Criteria tab:
|
Field |
Value |
|---|---|
|
Set 1 Meaning |
Yes |
|
Exclude |
Deselected |
Save the eligibility profile and associate it with the bonus compensation object.
Note
For very complex scenarios, your organization or implementation team can write a custom program to evaluate eligibility, and then create a formula that calls the custom program.
This example illustrates how to define eligibility criteria based on the number of hours an employee is scheduled to work within a specified period of time.
You want to limit eligibility for a benefits offering to employees who were scheduled to work between 30 and 40 hours each week or between 130-160 each month as of the end of the previous quarter. To do this, add two different ranges on the Range of Scheduled Hours tab, which is under the Employment tab on the Create or Edit Eligibility Profile page.
Set the values for the first range as shown in this table:
|
Field |
Value |
|---|---|
|
Sequence |
1 |
|
Minimum Hours |
30 |
|
Maximum Hours |
40 |
|
Scheduled Enrollment Periods |
Weekly |
|
Determination Rule |
End of previous quarter |
Set the values for the second range as shown in this table:
|
Field |
Value |
|---|---|
|
Sequence |
2 |
|
Minimum Hours |
130 |
|
Maximum Hours |
160 |
|
Scheduled Enrollment Periods |
Monthly |
|
Determination Rule |
End of previous quarter |
An eligibility profile defines criteria used to determine whether a person qualifies for a benefits offering, variable rate profile, variable coverage profile, compensation object, checklist task, or other object for which eligibility must be established.
The following are key aspects of working with eligibility profiles:
Planning and prerequisites
Specifying the profile type and usage
Defining eligibility criteria
Excluding from eligibility
Assigning sequence numbers
Adding multiple criteria
Viewing the criteria hierarchy
Before you create an eligibility profile, consider the following:
If an eligibility profile uses derived factors, user-defined formulas, or user-defined criteria to establish eligibility, you must create these items before you create the eligibility profile.
If you are defining eligibility criteria for a checklist task, variable rate profile, or variable coverage profile, you must include all criteria in a single eligibility profile, because these objects can be associated with only one eligibility profile. You can, however, associate multiple eligibility profiles with benefits offerings and compensation objects.
Eligibility profiles are reusable, so use names that identify the criteria being defined rather than the object with which the profile is associated. For example, use "Age-20-25+NonSmoker" rather than "Supplemental Life-Min Rate."
When you create an eligibility profile, you specify whether the profile applies to participants or dependents. Use participant profiles to define criteria for employees or ex-employees who are eligible for company-sponsored benefits. Use dependent profiles for participants' spouses, family members, or other individuals who qualify as dependents. Dependent profiles can be associated only with plans and plan types.
An eligibility profile's usage determines the type of objects the profile can be associated with. For example, if you set the profile usage to Benefits, the profile is available for selection when you are associating eligibility profiles with benefits objects, such as programs, plans, plan types, options, variable rate profiles, and variable coverage profiles. You can also set the usage to Compensation, Checklist, or Global.
Criteria defined in an eligibility profile are divided into categories:
Personal: Includes gender, person type, postal code ranges, and other person-specific criteria
Employment: Includes assignment status, hourly or salaried, job, grade, and other employment-specific criteria
Derived factors: Includes age, compensation, length of service, hours worked, full-time equivalent, and a combination of age and length of service
Other: Includes miscellaneous and user-defined criteria
Related coverage: Includes criteria based on whether a person is covered by, eligible for, or enrolled in other benefits offerings.
Some criteria, such as gender, provide a fixed set of choices. The choices for other criteria, such as person type, are based on values defined in tables. You can define multiple criteria for a given criteria type.
For each eligibility criterion that you add to a profile, you can indicate whether persons who meet the criterion are considered eligible or are excluded from eligibility. For example, an age factor can include persons between 20 and 25 years old or exclude persons over 65. If you exclude certain age bands, then all age bands not explicitly excluded are automatically included. Similarly, if you include certain age bands, then all age bands not explicitly included are automatically excluded.
You must assign a sequence number to each criterion. The sequence determines the order in which the criterion is evaluated relative to other criteria of the same type.
If you define multiple values for the same criteria type, such as two postal code ranges, a person needs to satisfy at least one of the criteria to be considered eligible. For example, a person who resides in either postal range is eligible.
If you include multiple criteria of different types, such as gender and age, a person must meet at least one criterion defined for each criteria type.
Select the View Hierarchy tab to see a list of all criteria that you have saved for this profile. The list is arranged by criteria type.
You can define multiple criteria in an eligibility profile or create separate profiles for individual criterion. To determine the best approach, consider the following:
Does the object you are defining eligibility for support multiple eligibility profiles?
What is the best approach in terms of efficiency and performance?
If you are defining eligibility criteria for a checklist task, variable rate profile, or variable coverage profile, you must include all criteria in a single eligibility profile, because these objects can be associated with only one eligibility profile. You can, however, associate multiple eligibility profiles with benefits offerings and compensation objects.
For optimum performance and efficiency, you should usually attach profiles at the highest possible level in the benefits object hierarchy and avoid duplicating criteria at lower levels. Plan types in program, plans in program, plans, and options in plans inherit the eligibility criteria associated with the program. For example, to be eligible for a benefits plan type, a person must satisfy eligibility profiles defined at the program level and at the plan type in program level.
However, it is sometimes faster to create more than one profile and attach the profiles at various levels in the hierarchy. For example, you might exclude employees from eligibility at the program level who do not have an active assignment. At the level of plan type in program, you might exclude employees who do not have a full-time assignment. Finally, at the plan level, you might exclude employees whose primary address is not within a service area you define.
Note
Eligibility criteria can be used to include or exclude persons from eligibility. Sequencing of criteria is more complicated when you mix included and excluded criteria in the same profile. For ease of implementation, try to keep all excluded criteria in a separate eligibility profile.
The following examples illustrate scenarios where eligibility profiles are needed and briefly describe the setup required for each scenario.
A 401(k) savings plan is restricted to full-time employees under 65 years of age. To restrict eligibility for the plan, you must first create a derived factor for the age band of 65 and older, if one does not already exist. Then create an eligibility profile. Set the Profile Usage to Benefits and the Profile Type to Participant. Add the following criteria:
|
Criteria Type |
Name |
Values |
|---|---|---|
|
Employment |
Assignment Category |
Full-Time |
|
Derived Factor |
Age |
Select the age derived factor you created previously, and then select the Exclude check box. |
Associate the eligibility profile with the 401(k) plan.
A bonus is offered to all employees who received the highest possible performance rating in all rating categories. To restrict eligibility for the bonus, create an eligibility profile. Set the Profile Usage to Compensation and the Profile Type to Participant. Add the following criteria for each rating category:
|
Criteria Type |
Name |
Values |
|---|---|---|
|
Employment |
Performance Rating |
Select the performance template and rating name, and then select the highest rating value. |
Associate the eligibility profile with the bonus compensation object.
A new hire checklist contains tasks that do not apply to employees who work in India. To restrict eligibility for the tasks, create a participant eligibility profile. Set the Profile Usage to Checklist and the Profile Type to Participant. Add the following criteria:
|
Criteria Type |
Name |
Values |
|---|---|---|
|
Employment |
Work Location |
Select India as the work location, and then select the Exclude check box. |
Associate the eligibility profile with each checklist task that does not apply to workers in India.
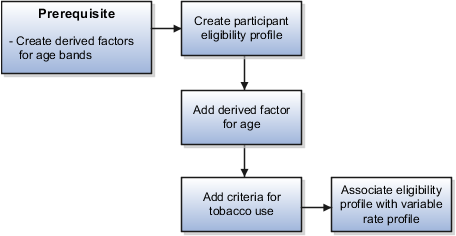
This example demonstrates how to create a participant eligibility profile used to determine eligibility for variable life insurance rates. The profile includes two eligibility criteria: age and tobacco. Once the eligibility profile is complete, you can associate it with a variable rate profile.
The following table summarizes key decisions for this scenario.
|
Decisions to Consider |
In this Example |
|---|---|
|
What is the profile type? |
Participant |
|
What type of object is associated with this profile? |
Variable rate for benefits offering |
|
What types of eligibility criteria are defined in this profile? |
Age derived factor (must have been previously defined) Uses Tobacco criteria |
|
What are the criteria values? |
Age: Under 30 Tobacco Use: None |
|
Should persons meeting these criteria be included or excluded from eligibility? |
Included |
The following figure shows the tasks to complete in this example:
Note
In this example, you create one eligibility profile that defines the requirements for a single variable rate. Typically, you create a set of eligibility profiles, one for each variable rate. When you have completed all steps described in this example, you can repeat them, varying the age and tobacco use criteria, to create a separate profile for each additional rate.
|
Field |
Value |
|---|---|
|
Name |
Age Under 30+Non-Smoking |
|
Profile Usage |
Benefits |
|
Description |
Participant, age under 30, non smoker |
|
Status |
Active |
|
Assignment to Use |
Any assignment |
Note
You can reuse this eligibility profile by associating it with other objects that restrict eligibility, including benefits offerings, compensation plans, and checklist tasks.
A common events model for Oracle Fusion Human Capital Management (HCM) products defines how to respond to certain data changes or business process trigger points. A common model enables a single event definition to drive both externally published business events and internal processes.
The events model comprises the following key components:
Event definitions
Event types
Event handlers
Published business events
Archived event data
An event definition identifies a set of registered HCM event objects, such as entity objects, that can be used to raise events.
Event types define the type of object to be detected, the particular DML mode for the type of data change, such as update, insert, or delete, along with any rules or conditions that further qualify the event. These conditions determine whether an event triggers further processing activities, such as archiving information relating to the event, internal processing initiated by the event, or publication of business events to the SOA framework. A common example of an event type is updates to a particular object attribute.
When the conditions of an event type are satisfied, an internal handler can specify how related functional areas within HCM are notified or an external handler can specify a published event to be raised.
An implementer can associate a particular published business event with a particular event definition so that when the change is detected, the associated published business event is rraised to the SOA application server. Published business events can be raised from any of the registered HCM event objects.
When defining event types, the implementer can indicate which attribute data should be stored for auditing purposes. The availability of archived events data also can assist internal HCM products to determine the nature of specific data changes when they are notified of the occurrence of an event.
When defining which data should be archived for a particular event type, the implementer can also specify the number of calendar days after the detected event that the data must be stored. After the specified number of days, the data can be purged from the database.
You can create or modify HCM event types when the predefined event types don't sufficiently meet the needs of your enterprise.
To determine your approach, consider the following questions:
Do the predefined event types cover the conditions you want to capture for data change event detection?
Does your enterprise have custom processes or services associated with a published business event?
For example, you can modify an existing event type to add a different published business event to be consumed by the new process or service if that is the only modification. If there other modifications you want, such as additional detection conditions or data changes, you can create a new event type.
Do any required SOA services already exist?
Examples of published business events as external handlers that invoke SOA processes include ChangedPersonDetails, that invokes a process in Oracle Fusion Trading Community Model, and ChangeLocation, that invokes a process in Oracle Fusion Financials. You can review existing published services in the Oracle Enterprise Repository.
The following figure illustrates the decision points for HCM event type customization.
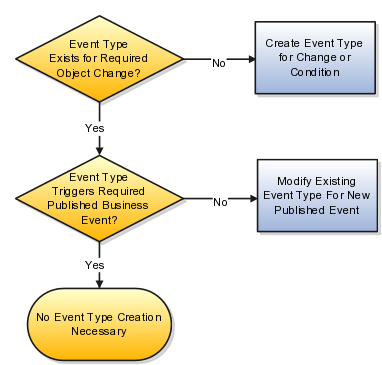
This example demonstrates how to create an event type that is based on a predefined event type but captures additional data.
The following table summarizes the key decisions for this scenario.
|
Decisions to Consider |
In This Example |
|---|---|
|
Which predefined event type is closest to meeting my business needs? |
PhoneUpdate |
|
What additional data must be captured? |
Extension |
|
What condition triggers this event? |
Updates to telephone extension data |
|
What rules must be met to trigger this event? |
Rule to detect changes to work telephone data |
In this example, the organization wants to capture changes to telephone extension number data for people within a particular building, and notify the operator who handles incoming calls for that building. The predefined event type does not contain the extension information or publishing conditions for that data, so you add a new condition that is defined to publish only where extension data is changed.
Find a predefined event type that best suits your needs by looking for object and attribute similarities. Predefined event types cannot be changes, so instead you create a copy after noting its values to use in the new event type.
|
Field or Tab |
Value |
|---|---|
|
Source Object |
PhoneEO |
|
Rule |
eo.New("PhoneType") > "W" & eo.New("PhoneType") < "X" |
|
DML Mode |
Update |
|
External Handlers Published Event Name |
ChangedPersonKeywords |
Copy the values from the event type you want to extend into a new event type.
eo.New("PhoneType") > "W" & eo.New("PhoneType") < "X".)
Note
There is no built-in syntax validation so testing that the rule is working as designed is strongly recommended. You can test the rule and monitor the event publication or examine the log files.
This example demonstrates how to create an event type that invokes a custom business process.
The following table summarizes the key decisions for this scenario.
|
Decisions to Consider |
In This Example |
|---|---|
|
What condition triggers this event? |
Change to termination date data. |
|
What process will be triggered by this event? |
Custom process: NotifiedTerminationDate. |
In this example, the business requires that the application initiates a special process whenever an administrator terminates an employee. This example creates a new event type that detects changes to termination date for employees' period of service.
Note
If an internal handler is used with an event type, its class name must be fully qualified and must exist in the system classpath.
AcceptedTerminationDate
ActualTerminationDate
AdjustedSycDate
LastWorkingDate
NotifiedTerminationDate
OriginalDateOfHire
ProjectedTerminationDate
RehireRecommendation
Rules in event types define the conditions under which changes to data are detected. Rules must be written using Groovy syntax. All attributes that you include as part of a rule must exist on the object for which the event type is built.
Note
There is no built-in syntax validation, so testing that the rule is working as designed is strongly recommended. You can test the rule and monitor the event publication or examine the log files.
Rule syntax for attribute names is case sensitive, so be sure to enter attributes correctly and enclose them in double quotation marks.
When referring to an object's old value, use the following syntax:
eo.Old("attrName")
When referring to an object's new value, use the following syntax:
eo.New("attrName")
Operators in rule syntax are useful for creating the conditional criteria that you want an event to detect.
|
Operator |
Usage |
|---|---|
|
> |
Greater than |
|
< |
Less than |
|
= = |
Equals |
|
& |
And |
|
| | |
Or |
The following scenarios illustrate using operators with proper rule syntax:
This example shows the proper syntax for the event detection to occur only when the status for an object has a particular value, in this case, when the performance document approval status attribute (PerformanceDocApproveStatusUpdate) is changed to Submitted.
eo.New("StatusCode") == "SUBMITTED"
This example shows the proper syntax for the event detection to occur only for a specific object type, in this case, only when the Phone Type attribute of the Phone entity object is Work Telephone.
eo.New("PhoneType") > "W" &
eo.New("PhoneType") < "X"
PhoneType represents the lookup table, PHONE_TYPE, which contains three lookup codes for work telephones: W1 W2, and W3. The rule above applies to phone types greater than W and less than X, the next letter of the alphabet, so that detection occurs for all phone types that begin with the letter W. This way, if you later add another lookup code for a fourth work telephone, W4 for example, the rule still applies correctly.
Understanding how HCM events work with external processes requires some knowledge of service-oriented architecture (SOA). The following resources provide key information about using SOA services and how to create, publish, and subscribe to business events in your enterprise using Oracle SOA Suite and Oracle Enterprise Repository.
This example demonstrates how to purge object change data that was stored as a result of published event detection.
Note
You cannot purge archived data that has not met or exceeded its storage duration. For example, if a particular event is defined to store data for 365 days, and you enter a purge date of 5 March 2012, only data that was archived for that event before 5 March 2011 will be purged.
Purge data from the tables that contain archived data for HCM events when a database administrator determines that the size of the tables is too big.
The archive tables to monitor for archived HCM events data are:
HRC_EVT_OBJ_CHANGES
HRC_EVT_OBJ_CHANGE_COMPONENTS
HRC_EVT_OBJ_CHG_ATTRIBUTES
Payroll process configuration groups provide sets of payroll action parameters, primarily related to logging and performance, for your processes and reports. When you run a process, you can select a process configuration group. If you do not select a process configuration group, the application uses the parameters in the default group.
You must specify the default group in the Process Configuration Group ACTION_PARAMETER_GROUPS profile option. You can set the profile option in the Setup and Maintenance work area using the Manage Default Process Configuration Group Profile Option Values task or the Manage Administrator Profile Values task.
Note
Entering a value for this profile option is a required step. The value of the Payroll License parameter in the process configuration group selected in the profile option determines the element templates used in the Manage Elements task and whether deduction cards are created automatically for new employees when you hire them.
A default process configuration group is predefined. You can edit the predefined group on the Default Group tab of the Manage Payroll Process Configuration page. You can select this group or another one as the default for your sites using the Process Configuration Group ACTION_PARAMETER_GROUPS profile option.
You can also create as many additional groups as you require on the Group Overrides tab on the Manage Process Configuration Group page. For example, you might want to create a group with the logging parameters turned on to troubleshoot processes. You can also specify different performance parameter values (such as chunk size and buffer size) for running different processes.
Payroll action parameters are system-level parameters that control aspects of the payroll batch processes. The effects of setting values for specific parameters may be system wide. Payroll batch processes read values from the PAY_ACTION_PARAMETERS table on startup, or provide appropriate values by default, if specific parameter values are not specified.
For some parameters you should understand the concept of array processing and how this affects performance. Values for each parameter are predefined with the system, but you can override these values as part of your initial implementation and for performance tuning. Use the Manage Payroll Process Configuration task in the Setup and Maintenance work area.
The following table describes action parameters and lists values and predefined default values:
|
Parameter |
Description |
Values |
Default Value |
|---|---|---|---|
|
Balance Buffer Size |
Size of the latest balance buffer used for array inserts and updates: 1 row per latest balance. |
Maximum: 1000. Minimum: 1. Note If your trace files show differences between execute and fetch timings, look at the buffer sizes you are using. Try setting each of these to 100. |
500 |
|
Shuffle Chunk Processing |
If set to Yes, randomizes the processing order of chunks of assignment actions to be processed rather than processing them sequentially. |
Yes, No |
No |
|
Chunk Size |
Number of relationship actions that should process together in chunks during the main processing phase. |
Maximum: 16000. Minimum: 1. |
20 |
|
Cost Buffer Size |
Size of the buffer used in array inserts and selects within the Costed run process. |
Maximum: 1000. Minimum: 1. |
500 |
|
Element Entry Buffer Size |
Size of the buffer used in the initial array selects of element entries, element entry values, run results, and run result values per assignment. |
Maximum: 1000. Minimum: 1. |
500 |
|
Formula Execution Logging |
Sets logging level to investigate formula code problems. |
|
No logging. |
|
Logging Area |
Area of code upon which code logging is performed. |
The values correspond to c-code entries in the form PY_ENTRY (env, pyipppr); where pyipppr is the functional area that will have logging enabled. |
|
|
Assignment ID for End of Logging |
Assignment ID upon which logging ends. |
|
All assignments |
|
Assignment ID for Start of Logging |
Assignment ID upon which logging starts. |
|
All assignments |
|
Logging Category |
Provides a large volume of detailed information that is useful for investigating problems. |
GMPE or blank for no logging. You can specify multiple values. |
No logging. |
|
Maximum number of roll back relationship actions |
Limits the maximum number of employees whose actions can be rolled back from application pages. |
Minimum: 1 |
50 |
|
Maximum Errors Allowed |
Number of consecutive actions that can return an error before the entire process is given the status of Error. |
Minimum: 0 |
CHUNK_SIZE or 20 |
|
Maximum Iterations Allowed per Run Action |
Maximum number of iterations allowed per run action. |
Minimum: 0 |
15 |
|
Notifications Expiry Offset |
Used in flows to expire notifications. |
|
|
|
Payroll License |
Specifies which payroll license to use. The parameter must be set to PAYROLL to make the full list of element templates available on the Create Elements page and to create a deduction card automatically when a person is hired. |
PAYROLL, HR_ONLY , and PAYROLL_INTERFACE. |
HR_ONLY |
|
Process Timeout |
Used in the Run Balance generation process to determine how many minutes are allowed before the process times out. |
Minimum: 0 |
If not specified, no timeout limit is enforced. |
|
Remove Report Assignment Actions |
Controls whether report processing actions are removed when report generation is complete. |
Yes, No |
Yes |
|
Run Result Buffer Size |
Size of the run result buffer used for array inserts and updates: 1 row per run result. |
Maximum: 1000. Minimum: 1. |
500 |
|
Override Location for Tax Libraries |
Overrides the location for Quantum tax libraries. |
There are no set values. Values for this parameter would be directory structures on the client site. |
$VERTEX_TOP/lib |
|
Transfer to GL Process on Date Earned |
As part of the Transfer to GL process, the system sets the accounting date to either date earned (E) or date paid (P). |
E = date earned P = date paid |
P |
|
Reversal and Balance Adjustment Accounting Date |
As part of the Transfer to GL process, the system bases the accounting date for balance adjustments and reversals on either the date earned (E) or date paid (P). |
E = date earned P = date paid |
P |
|
Threads |
Determines the total number of subprocesses that can run under the concurrent manager. |
Minimum: 1. |
1 |
|
Wage Basis Rules Buffer Size |
Size of the buffer used in array selects from the PAY_ TAXABILITY_RULES table within the Run process. |
Minimum: 100 |
500 |
|
Trace |
If set to Yes, enables the database trace facility. Only applies to application C processes. |
Yes, No |
No |
|
Trace Level |
Sets the trace level of the database trace event 10046. This provides additional fine level detail if tracing is enabled for the process. |
1, 4, 8, 12 |
None |
|
User Messaging |
If set to Yes, enables detailed logging of user-readable information to the PAY_MESSAGE_LINES table. |
Yes, No |
No |
Parallel Processing Parameters
THREADS
Oracle Fusion Global Payroll is designed to take advantage of multiprocessor machines. This means that you can improve performance of your batch processes by splitting the processing into a number of threads, or subprocesses, which run in parallel.
Note
Using threads and subprocesses may also improve performance if you are using PAYROLL_INTERFACE.
When you submit a batch process, the THREADS parameter determines the total number of subprocesses that run concurrently. The process submits THREADS minus 1 subprocesses.
Set this parameter to the value that provides optimal performance on your server. The default value of 1 is set for a single-processor machine. Benchmark tests on multiprocessor machines show that the optimal value is approximately 2 processes per processor. So, for example, if the server has 6 processors, you should set the initial value to 12 and test the impact on performance of variations on this value.
CHUNK_SIZE
Size of each commit unit for the batch process. This parameter determines the number of assignment actions that are inserted during the initial phase of processing and the number of assignment actions that are processed at one time during the main processing phase. Parameter values range from 1 to 16,000. The default value is 20.
Note
This does not apply to all processes, such as Generate Check Payments and Retroactive Pay.
During the initial phase of processing, this parameter defines the array size for insert. Large chunk size values are not desirable and the default value has been set as a result of benchmark tests. Each thread processes one chunk at a time.
Logging Parameters
During implementation and testing, you may need to turn on logging to provide a large volume of detailed information that is useful for investigating problems.
Use this parameter only when you need to investigate problems that are not easily identified in other ways. The logging activities can impact the overall performance of the process you are logging. Usually, this feature is needed during your initial implementation and testing before you go live. In a normal operation you should disable detailed logging.
Note
If you need to contact Oracle Support for assistance in identifying or resolving problems in running your payroll processes, you should prepare your log file first. Define the logging category, area, and range of assignments before resubmitting the problem.
LOGGING
Logging categories define the type of information included in the log. You can set any number of these categories by specifying multiple values so you can focus attention on specific areas that you think may be causing a problem. Parameter values are one or more logging categories, as described below. The default value is No logging.
The following table explains each logging category:
|
Parameter Value |
Logging Category |
Description |
|---|---|---|
|
B |
Balance Information. |
Outputs information to show specifics about Balances. |
|
F |
Formula information. |
Outputs information to show specifics from formula execution such as formula output names and values. |
|
G |
General logging information. No specific category. |
Output messages from the PY_LOG macro for general information. This option does not sort the output and you should normally choose a list of specific categories. |
|
M |
Entry or exit routing information. |
Output information to show when any function is entered and exited. The system may display messages such as In: pyippee and Out: pyippee. This information is indented to show the call level, and can be used to trace the path taken through the code at the function call level. Often, this information is useful when attempting to track down a problem such as a core dump. |
|
P |
Performance information |
Output information to show the number of times certain operations take place at the assignment and run levels and why the operation took place. This parameter is often used to balance buffer array writes. |
|
E |
Element entries information. |
Output information to show the state of the in-memory element entry structure, after the entries for an assignment have been fetched, and when any item of the structure changes. For example, the addition of indirects or updates. This information also shows the processing of the entry. |
|
Previous |
Next |
Copyright © 2011-2012, Oracle and/or its affiliates. All rights reserved. Legal Notices |
Contents |
Contact Us |