11g Release 5 (11.1.5)
Part Number E20381-05
Contents
Contact
Us
|
Oracle® Fusion
Applications Incentive Compensation Implementation Guide 11g Release 5 (11.1.5) Part Number E20381-05 |
Contents |
Contact Us |
|
Previous |
Next |
This chapter contains the following:
Approval Management: Highlights
Approval Management Configuration Options for Oracle Fusion Incentive Compensation: Explained
Incentive Compensation Payment Approval Process: How It Is Configured
Dispute Management and Approval: How It Is Configured
Manage Task Configurations for Incentive Compensation
Use approval management to determine the policies that apply to approval workflows for particular business objects such as expense reports. For example, you can specify levels of approval for expense reports over a particular amount, to reflect your own corporate policies. You also determine the groups of users who act on these workflow tasks, for example, the chain of approvers for expense reports.
Approval management is fully described in the Oracle Fusion Middleware Modeling and Implementation Guide for Oracle Business Process Management. Though the concepts described there apply also to Oracle Fusion Applications, the only setup relevant to Oracle Fusion Applications involves approval groups and task configuration. Customization of approval workflows themselves is described in the Oracle Fusion Applications Extensibility Guide.
The approval management extensions to the human workflow services of Oracle SOA Suite have the following default configuration options for Oracle Fusion Incentive Compensation.
|
Configuration Option |
Default Value |
Effect of Default Value |
|---|---|---|
|
Ad hoc insertion of approvers |
True |
Allow ad hoc insertion of approvers in the approval list. Users who add approvers may also modify or remove the approvers that they add. |
|
Allow delegate |
True |
Allow approvers to delegate their approval responsibilities to other users. One approver replaces another, but the approver list is otherwise unaltered. |
|
Allow pushback |
True |
An approver can push the transaction back to the previous approver, who thereby has a second opportunity to review the transaction. |
|
Allow reassign |
True |
Any approver can reassign the approval to a different approver. The approval list is recalculated based on the new approver. |
|
Allow request information |
True |
Approvers can request more information from another approver or the person who submitted the transaction. |
|
Allow self-approval |
False |
The person who submits the transaction cannot approve it. |
|
Allow withdraw |
True |
The requester or an administrator can withdraw a transaction while the approval process is incomplete. Approvers who have already approved are notified of the withdrawal. The transaction is removed from the work lists of approvers who have not yet approved. |
|
On error notify |
Incentive Compensation Application Administrator |
An incentive compensation application administrator is notified automatically when an error occurs. |
|
Period before task expires |
None |
Approval tasks do not expire. |
|
Period before task escalates |
None |
Approval tasks are not escalated to other approvers. |
|
Escalated approver |
None |
Approval tasks are not escalated to other approvers. |
|
Repeated approver frequency |
Once per approval |
An approver receives one notification per transaction, even when the approver appears multiple times in the approver list. |
|
Re-evaluate approver list |
True |
The approver list is regenerated after every response. |
|
Rejection outcome |
Stop all |
When an approver rejects a transaction, the approval process stops and the transaction is canceled. |
This topic covers the incentive compensation Payment Approval business process activities associated with the paysheet statuses, including when and what types of actionable and informational notifications the application sends to incentive compensation (IC) managers and analysts as well as participants and participant managers.
The following figure shows the payment approval business process activities and the job roles that perform them.
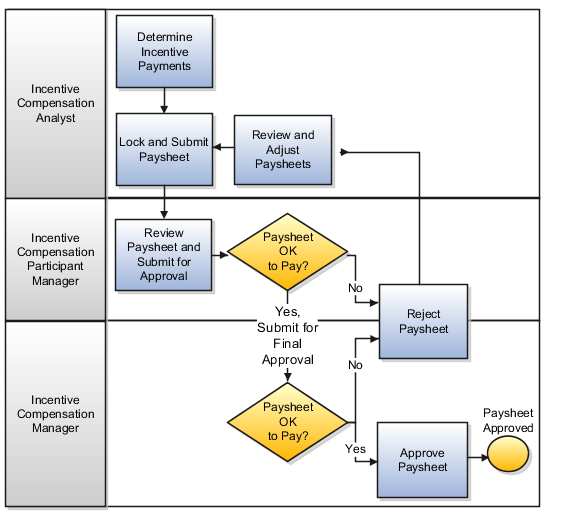
The application sends notifications to participants, participant managers, compensation analysts, and compensation managers based on the paysheet statuses and rules defined within the approval management extensions to the human workflow services of Oracle SOA Suite, as well as the analyst payment approval hierarchy in the Participant Assignments work area, on the Manage Analyst Payment Approval Hierarchy page. When you act on a notification, and edit the paysheet status, the business rules send a new notification. Define, add, edit, and delete steps and statuses within the approval management extensions, as required.
Tip
If you do not require the payment approval business process, in the Define Business Unit Configuration for Incentive Compensation task list, Manage Parameters task, for the Default Paysheet Approval Status parameter, select Approved, which is the final status before paying the payment batch.
Rule-based Exceptions using Minimum and Maximum Payment Autoapproval Amount Parameters
The provided payment approval business process includes an exception rule that causes the application to send actionable notifications to compensation managers if the paysheet amount is greater than or equal to X and less than or equal to Y (the application also automatically sets the status to Approved). If the minimum and maximum payment autoapproval amount parameters in the Manage Parameters task are NULL, then the application does not automatically approve any of the paysheets. The application still uses the regular approval business process that is in place and continues the regular approval business process activities for all paysheets.
The following table describes the provided approval business process activities, paysheet statuses, who sets the status, and the resulting application actions.
|
Activity |
Status |
Status Set By |
Application Action |
|---|---|---|---|
|
Create paysheets |
Unpaid* |
Application |
Send no notifications. |
|
Create paysheets |
Approved |
Application |
Check the minimum and maximum payment approval amount parameters and if the paysheet amount is between the two values, it sets the status and sends informational notifications to the participant and IC managers. |
|
Request more information from participant, participant manager, or Sales Operations |
Request More Information |
IC manager, analyst, participants, or participant manager |
Send an informational notification to the requestor and a request notification to the person being asked for more information. |
|
Submit locked paysheets |
Submitted |
IC analyst |
Send informational notifications to the relevant participant and analyst, as well as an actionable notification to the relevant IC manager. |
|
Approve paysheets |
Approved |
IC manager |
Send an actionable notification of approval to the relevant analyst and informational notifications of to the relevant participant and participant manager. |
|
Reject paysheets |
Rejected |
IC manager |
Send an actionable notification of rejection to the relevant analyst and informational notifications of to the relevant participant and participant manager. |
|
Reassign paysheet approval |
No change |
IC manager |
Send informational notifications to the analysts associated with the paysheet as well as the requesting incentive compensation manager. Also send an actionable notification to the new IC manager. |
* Based on the Default Paysheet Approval Status parameter
There are times when participants, their managers, compensation analysts, and compensation managers must create, track, and resolve disputes as part of the incentive compensation process. This effective dispute management includes automated notification to all involved parties.
Create: Complete the required fields as well as all fields relevant to expedite the resolution of your dispute. After you submit the new dispute, the application:
Creates the dispute record
Sets the task outcome to New
Assigns the dispute to the compensation analyst associated with the participant using the approval workflow
If you are a compensation analyst or manager and are creating the dispute for a participant assigned to you, the application automatically assigns the dispute to you, the initiator. If you are the participant or participant's manager, the application uses the approval workflow to identify the compensation analyst associated with you (the participant) or your direct report, the dispute participant.
Sets the status to Assigned when the approval workflow finds the compensation analyst associated with the dispute participant; otherwise, sets the status to New
Sends an actionable notification to the compensation analyst of the new dispute
Sends an informational notification to the dispute participant
Reassign and delegate: Compensation analysts can reassign one of more of their disputes to other analysts to balance the workload. Compensation managers can delegate disputes among analysts. In both situations, the application:
Supports the reassignment of disputes to users that are part of the Oracle Fusion Human Capital Management (HCM) hierarchy
Assigns the dispute to the selected (new) compensation analyst
Sets the status to Assigned
Sends an actionable notification to the new compensation analyst
Request more information: The compensation manager or analyst requests more information from the participant, participant's manager, or Sales Operations team--any incentive compensation user. The application:
Sets the status to Information requested
Sends an actionable notification to the identified user
Update Information: When the participant, participant's manager, or Sales Operations user update the dispute with the requested information, the application:
Sets the status to Assigned
Sends an actionable notification to the user who requested the additional information
Approve and reject: The compensation manager or analyst views the details of the dispute. If no further information is required, the analyst or manager approves or rejects the dispute. The application:
Sets the task outcome to Approved or Rejected
Sets the status to Approved or Rejected
Sends an informational notification to the dispute initiator, which can be a participant, the participant's manager, and the analyst
Escalate: When the resolution was not as expected, for example, the dispute was rejected, the compensation analyst can escalate the dispute, even a dispute that was closed. The application:
Sets the status to Escalated
Sends actionable notifications to the compensation analyst assigned to the dispute as well as all of the users with the Compensation Manager role
Sends an informational notification to the participant's manager, if the participant is the one escalating the dispute
Withdrawn: The dispute creator can withdraw the dispute before it is approved or rejected. The application:
Sets the status to Withdrawn
This example demonstrates how to create a custom incentive compensation attribute with a list of values for use in crediting rules for those situations where the delivered attributes do not fulfill business requirements. The application has these attributes (in the CN_TP_TRANSACTIONS_ALL table) enabled for use in crediting and classification rules:
AREA_CODE
CITY
COUNTRY
CUSTOMER_ID
Tip
Use the customer (directory id) or customer name range for matching.
INVENTORY_ITEM_ID
Tip
Use the product id or sales catalog hierarchy for matching.
ORG_ID
PARTICIPANT_ID
POSTAL_CODE
PROVINCE
ROLE_ID (enabled for crediting rules only
SALES_CHANNEL
SOURCE_ORG_ID
STATE
TERR_NAME
TRANSACTION_AMT_FUNC_CURR
TRANSACTION_QTY
TRANSACTION_TYPE
The three tasks covered in this topic are:
Run SQL script to enable a custom attribute as a qualifier for crediting rules.
Enable the custom attribute.
Edit and deploy the relevant descriptive flexfield.
Tip
Also use the steps in these tasks to create a custom attribute for classification rules by changing the usage_id from -1001 to -1002.
In this task, use SQL and a tool such as SQL Developer to create new FND LOOKUP values to use in the choice list on the user interface (optional), run the CN_RS_CUST_ATTR.CREATE_QUAL application programming interface (API) to create the custom attribute, and update the BATCH_TOTAL_SQL to assign the new custom attribute.
-- Example: create a Line of Business lookup
--          LOOKUP_TYPE = CN_LINE_OF_BUSINESS
DECLARE
   l_retcode VARCHAR2(30);
   l_errbuf VARCHAR2(10000);
BEGIN
   -- create the FND lookup TYPE
   fnd_lookup_types_pkg.CREATE_OR_UPDATE_ROW(
          X_VIEW_APPSNAME => 'FND',
          X_LOOKUP_TYPE => 'CN_LINE_OF_BUSINESS',
          X_APPLICATION_SHORT_NAME => 'CN',
          X_MEANING => 'Line of Business',
          X_DESCRIPTION => 'Fusion Example: Line of Business',
          X_REFERENCE_GROUP_NAME => '');
   -- populate the FND lookup values
   fnd_lookup_values_pkg.CREATE_OR_UPDATE_ROW(
          X_LOOKUP_TYPE => 'CN_LINE_OF_BUSINESS',
          X_VIEW_APPSNAME => 'FND',
          X_LOOKUP_CODE => 'COMMERCIAL_LEASE',
          X_MEANING => 'Commercial Leasing',
          X_SET_CODE => '',
          X_DESCRIPTION => 'Commercial Leasing',
          X_ENABLED_FLAG => 'Y',
          X_START_DATE_ACTIVE => sysdate,
          X_END_DATE_ACTIVE => '');
   fnd_lookup_values_pkg.CREATE_OR_UPDATE_ROW(
          X_LOOKUP_TYPE => 'CN_LINE_OF_BUSINESS',
          X_VIEW_APPSNAME => 'FND',
          X_LOOKUP_CODE => 'RESIDENTIAL',
          X_MEANING => 'Residential',
          X_SET_CODE => '',
          X_DESCRIPTION => 'Residential',
          X_ENABLED_FLAG => 'Y',
          X_START_DATE_ACTIVE => sysdate,
          X_END_DATE_ACTIVE => '');
   fnd_lookup_values_pkg.CREATE_OR_UPDATE_ROW(
          X_LOOKUP_TYPE => 'CN_LINE_OF_BUSINESS',
          X_VIEW_APPSNAME => 'FND',
          X_LOOKUP_CODE => 'CONSUMER_LOAN',
          X_MEANING => 'Consumer Personal Loans',
          X_SET_CODE => '',
          X_DESCRIPTION => 'Consumer Personal Loans',
          X_ENABLED_FLAG => 'Y',
          X_START_DATE_ACTIVE => sysdate,
          X_END_DATE_ACTIVE => '');
END;
/
|
API Parameter |
Description |
Sample Value |
|---|---|---|
|
p_attribute_id |
Get the current minimum attribut_id and decrement it by 1
|
-2026 |
|
p_object_version_number |
Not available |
1 |
|
p_org_id |
|
458 |
|
p_source_lang |
Not available |
'US' |
|
p_language |
Not available |
'US' |
|
p_name |
This is the user interface display name and you can enter any name |
'Line of Business' |
|
p_description |
Not available |
'Custom Attribute : Line of Business' |
|
p_attr_usage_id |
Use any number or pick the next number from here:
It is good to use the same value p_attribute_id, unless it is already assigned. |
-2026 |
|
p_usage_id |
usage_id = -1001 for crediting usage_id = -1002 for classification |
-1001 |
|
p_indexed_col_name |
Corresponds to cn_rs_usage_details_all table batch_total_sql. Use the next available value for the same data type, in the unused column. To see which indexed_col_name are used:
|
'SQUAL_CHAR20' |
|
p_display_type |
'CHAR' = varchar or character 'NUMERIC' = number |
'CHAR' |
|
p_source_column_name |
From the batch_total_sql field, there are two tables CN_TP_TRANSACTIONS_ALL and HZ_PARTIES. Use one of these fields as the source_column_name. If you want to use a field from other tables, then batch_total_sql must include those tables.
|
'ATTRIBUTE38' |
|
p_attr_relation_factor |
Get the next prime number, see http://primes.utm.edu/lists/small/1000.txt. To see which prime number is already used:
|
227 |
|
p_comparison_operator_cn |
Define the value for this custom attribute. Use the positive value of p_attribute_id. Naming convention: q<p_attribute_id>_cp |
'q2026_cp' |
|
p_low_value_char_cn |
Populate if using the equal or between parameter. Naming convention: q<p_attribute_id>_low_value_char |
'q2026_low_value_char' |
|
p_high_value_char_cn |
Populate if using the between parameter. Naming convention: q<p_attr_usage_id>_high_value_char |
'q2026_high_value_char' |
|
p_equal_flag |
Enable the EQUAL operator |
'Y' |
|
p_batch_op_eol |
SQL syntax for EQUAL operand if p_equal_flag = 'Y' |
'( A.squal_char20 = B.q2026_low_value_char AND B.q2026_cp = ''='' )' |
|
p_like_flag |
Enable the LIKE operator |
'Y' |
|
p_batch_op_like |
SQL syntax for EQUAL operand if P_LIKE_FLAG = 'Y' |
'( A.squal_char20 like B.q2026_low_value_char AND B.q2026_cp = ''LIKE'' )' |
|
p_between_flag |
Enable the BETWEEN operator |
'Y' |
|
p_batch_op_between |
SQL syntax for EQUAL operand if P_BETWEEN_FLAG = 'Y' |
'( A.squal_char20 between B.q2026_low_value_char and B.q2026_high_value_char AND B.q2026_cp = ''BETWEEN'' )' |
|
p_convert_to_id_flag |
Convert the varchar2 column to id column, set this value to 'Y' |
'N' |
|
p_low_value_char_id_cn |
Convert the varchar2 column to id column. Only edit if this P_CONVERT_TO_ID_FLAG = 'Y' |
null |
|
p_html_lov_sql1 |
If you want an list of value (LOV) to be associated to the attribute. |
'select /*+ FIRST_ROWS(10) */ 1 lookup_id, meaning meaning, lookup_code lookup_code from cn_lookups where lookup_type = ''CN_EXAMPLE_LINE_OF_BUSINESS'' ' |
-- Example: ATTRIBUTE38 is enabled for crediting with list of value
--          from CN_LINE_OF_BUSINESS FND lookup
DECLARE
   l_retcode VARCHAR2(30);
   l_errbuf VARCHAR2(10000);
BEGIN
   CN_RS_CUST_ATTR.CREATE_QUAL(
      p_attribute_id => -2026,
      p_object_version_number => 1,
      p_org_id => 458,
      p_SOURCE_LANG => 'US',
      p_LANGUAGE => 'US',
      p_name => 'Line of Business',
      p_description => 'Custom Attribute : Line of Business',
      p_ATTR_USAGE_ID => -2026,
      p_USAGE_ID => -1001,
      p_INDEXED_COL_NAME => 'SQUAL_CHAR20',
      p_DISPLAY_TYPE => 'CHAR',
      p_SOURCE_COLUMN_NAME => 'ATTRIBUTE38',
      p_ATTR_RELATION_FACTOR => 227,
      p_CONVERT_TO_ID_FLAG => 'N',
      p_COMPARISON_OPERATOR_CN => 'q2026_cp',
      p_LOW_VALUE_CHAR_CN => 'q2026_low_value_char',
      p_HIGH_VALUE_CHAR_CN => NULL,
      p_LOW_VALUE_CHAR_ID_CN => NULL,
      p_LOW_VALUE_NUMBER_CN => NULL,
      p_HIGH_VALUE_NUMBER_CN => NULL,
      p_VALUE1_ID_CN => NULL,
      p_VALUE2_ID_CN => NULL,
      p_VALUE3_ID_CN => NULL,
      p_VALUE4_ID_CN => NULL,
      p_FIRST_CHAR_CN => NULL,
      p_CURRENCY_CODE_CN => NULL,
      p_EQUAL_FLAG => 'Y',
      p_BATCH_OP_EQL => '( A.squal_char20 = B.q2026_low_value_char AND B.q2026_cp = ''='' )',
      p_LIKE_FLAG => 'N',
      p_BATCH_OP_LIKE => NULL,
      p_BETWEEN_FLAG => 'N',
      p_BATCH_OP_BETWEEN => NULL,
      p_BATCH_OP_COMMON_WHERE => NULL,
      p_SEEDED_FLAG => NULL,
      p_ALIAS_RULE1 => NULL,
      p_REAL_TIME_SELECT => NULL,
      p_REAL_TIME_WHERE => NULL,
      p_REAL_TIME_FROM => NULL,
      p_HTML_LOV_SQL1 => 'select /*+ FIRST_ROWS(10) */ 1 lookup_id, meaning meaning, lookup_code lookup_code from cn_lookups where lookup_type = ''CN_EXAMPLE_LINE_OF_BUSINESS'' ',
      p_HTML_LOV_SQL2 => NULL,
      p_HTML_LOV_SQL3 => NULL,
      p_HIERARCHY_TYPE => NULL,
      retcode => l_retcode,
      errbuf => l_errbuf);
END;
/
Important
Run this SQL to see which fields are already enabled in the existing batch_total_sql 's select statement.
sql> select batch_total_sql from cn_rs_usage_details_all where usage_id = -1001 and org_id = &org_id ;
DECLARE
  l_retcode VARCHAR2(30);
  l_errbuf VARCHAR2(10000);
BEGIN
  update cn_rs_usage_details_all
set batch_total_sql =
' SELECT T.TRANSACTION_ID TRANS_OBJECT_ID , ' ||
' T.PARTICIPANT_ID ASSIGNED_OBJECT_ID , ' ||
' T.SOURCE_EVENT_DATE EVENT_DATE , ' ||
' T.WORKER_ID , ' ||
' UPPER(substr(C.ACCOUNT_NAME,1,1)) SQUAL_FC01 , ' ||
' null SQUAL_CURC01 , ' ||
' T.SALES_CHANNEL SQUAL_CHAR01 , ' ||
' T.CITY SQUAL_CHAR02 , ' ||
' T.STATE SQUAL_CHAR03 , ' ||
' T.COUNTRY SQUAL_CHAR04 , ' ||
' C.ACCOUNT_NAME SQUAL_CHAR05 , ' ||
' P.PARTY_NUMBER SQUAL_CHAR06 , ' ||
' P.CATEGORY_CODE SQUAL_CHAR07 , ' ||
' T.POSTAL_CODE SQUAL_CHAR08 , ' ||
' T.PROVINCE SQUAL_CHAR09 , ' ||
' T.AREA_CODE SQUAL_CHAR10 , ' ||
' T.CUSTOMER_ID SQUAL_NUM01 , ' ||
' T.INVENTORY_ITEM_ID SQUAL_NUM02 , ' ||
' NULL SQUAL_NUM03 , ' ||
' T.SOURCE_ORG_ID SQUAL_NUM04 , ' ||
' T.PARTICIPANT_ID SQUAL_NUM05 , ' ||
' null SQUAL_FC02 , ' ||
' null SQUAL_CURC02 , ' ||
' NULL SQUAL_CHAR11 , ' ||
' T.TRANSACTION_TYPE SQUAL_CHAR12 , ' ||
' T.TERR_NAME SQUAL_CHAR13 , ' ||
' NULL SQUAL_CHAR14 , ' ||
' NULL SQUAL_CHAR15 , ' ||
' NULL SQUAL_CHAR16 , ' ||
' NULL SQUAL_CHAR17 , ' ||
' NULL SQUAL_CHAR18 , ' ||
' null SQUAL_CHAR19 , ' ||
' T.ATTRIBUTE38 SQUAL_CHAR20 , ' ||
' T.TRANSACTION_AMT_FUNC_CURR SQUAL_NUM06 , ' ||
' T.TRANSACTION_QTY SQUAL_NUM07 , ' ||
' T.ORG_ID SQUAL_NUM08 , ' ||
' null SQUAL_NUM09 , ' ||
' null SQUAL_NUM10 , ' ||
' null SQUAL_FC03 , ' ||
' null SQUAL_CURC03 , ' ||
' null SQUAL_CHAR21 , ' ||
' null SQUAL_CHAR22 , ' ||
' null SQUAL_CHAR23 , ' ||
' null SQUAL_CHAR24 , ' ||
' null SQUAL_CHAR25 , ' ||
' null SQUAL_CHAR26 , ' ||
' null SQUAL_CHAR27 , ' ||
' null SQUAL_CHAR28 , ' ||
' null SQUAL_CHAR29 , ' ||
' null SQUAL_CHAR30 , ' ||
' null SQUAL_NUM11 , ' ||
' null SQUAL_NUM12 , ' ||
' null SQUAL_NUM13 , ' ||
' null SQUAL_NUM14 , ' ||
' null SQUAL_NUM15 , ' ||
' null SQUAL_FC04 , ' ||
' null SQUAL_CURC04 , ' ||
' null SQUAL_CHAR31 , ' ||
' null SQUAL_CHAR32 , ' ||
' null SQUAL_CHAR33 , ' ||
' null SQUAL_CHAR34 , ' ||
' null SQUAL_CHAR35 , ' ||
' null SQUAL_CHAR36 , ' ||
' null SQUAL_CHAR37 , ' ||
' null SQUAL_CHAR38 , ' ||
' null SQUAL_CHAR39 , ' ||
' null SQUAL_CHAR40 , ' ||
' null SQUAL_NUM16 , ' ||
' null SQUAL_NUM17 , ' ||
' null SQUAL_NUM18 , ' ||
' null SQUAL_NUM19 , ' ||
' null SQUAL_NUM20 , ' ||
' null SQUAL_FC05 , ' ||
' null SQUAL_CURC05 , ' ||
' null SQUAL_CHAR41 , ' ||
' null SQUAL_CHAR42 , ' ||
' null SQUAL_CHAR43 , ' ||
' null SQUAL_CHAR44 , ' ||
' null SQUAL_CHAR45 , ' ||
' null SQUAL_CHAR46 , ' ||
' null SQUAL_CHAR47 , ' ||
' null SQUAL_CHAR48 , ' ||
' null SQUAL_CHAR49 , ' ||
' null SQUAL_CHAR50 , ' ||
' null SQUAL_NUM21 , ' ||
' null SQUAL_NUM22 , ' ||
' null SQUAL_NUM23 , ' ||
' null SQUAL_NUM24 , ' ||
' null SQUAL_NUM25 ' ||
' from CN_TP_TRANSACTIONS_ALL T , ' ||
' HZ_PARTIES P ' ||
' where T.CUSTOMER_ID = P.PARTY_ID(+) '
where usage_id = -1001;
END;
/
If you want to enable the attribute for classification, then select Enable for Classification.
Tip
To expose your customer attribute in the user interface, and in application-generated spreadsheets, edit and deploy the descriptive flexfield.
In the Define Business Unit Configuration for Incentive Compensation task list, Configure Tables and Columns task, enable the attribute for calculation and select the appropriate level 2 expression grouping. Also add a user-friendly name for the attribute, that the application displays in the incentive compensation expression builder.
You must first add the custom qualifiers to the incentive compensation classification or crediting rules.
|
Previous |
Next |
Copyright © 2011-2012, Oracle and/or its affiliates. All rights reserved. Legal Notices |
Contents |
Contact Us |