| Oracle® Enterprise Manager Cloud Control Getting Started with Oracle Fusion Middleware Management 12c Release 2 (12.1.0.2) Part Number E24215-03 |
|
|
PDF · Mobi · ePub |
| Oracle® Enterprise Manager Cloud Control Getting Started with Oracle Fusion Middleware Management 12c Release 2 (12.1.0.2) Part Number E24215-03 |
|
|
PDF · Mobi · ePub |
This chapter provides the information needed to discover and configure Identity Management targets.
This section describes how to discover Identity Management targets.
Enterprise Manager has a simple Discovery wizard for Oracle Access Manager 10g targets. The Discovery wizard collects details about Oracle Access Manager Targets including information about the host name, host login credentials, SNMP Agent credentials, and other details.
After the Discovery wizard is complete, you can add the discovered targets into an existing System topology or you can create a new System target that stores your topology into the Management Repository.
To discover Oracle Access Manager - Access Server, perform the following steps:
Log in to Enterprise Manager. Select Targets, then select Middleware.
From the Add menu, select Oracle Identity Management 10g (OAM, OIF, OIM).
Select Access Manager - Access Server and enter the host name on which your Access Server is running. Click OK to continue with the discovery of the Access Server.
Enter the information requested for Access Server. (The following table provides descriptions of the fields.) Click Next once all information requested is entered.
| Field | Description |
|---|---|
| Host User Name | User name on the operating system with administrator privileges. |
| Host User Password | Password of host administrator account.
|
| Access Server Home | Enter the home directory of your Access Server (<OAM_HOME>\access) - for example, C:\Program Files\OracleAccessManager\access |
| Access Server Version | Enter the version of your Oracle Access Manager - Access Server - for example, 10.1.4.0.1 |
| SNMP Agent Host | If your Simple Network Management Protocol (SNMP) Agent is running on a host other than the Cloud Control Management Agent host, then enter the SNMP Agent host name. Otherwise, skip this section. |
| SNMP Agent Port | Enter the UDP Port of the SNMP Agent - for example, 161 |
| SNMP Agent Community Name | Enter the community name of the SNMP Agent. |
| LDAP Server Host | Name of the Lightweight Directory Access Protocol (LDAP) host. The host name is available in the LDAPSERVERNAME parameter located in the <AccessServerInstallDir>/config/ldap/ConfigDB.xml file. |
| LDAP Server Port | Name of the LDAP port. The port name is available in the LDAPSERVERPORT parameter located in the <AccessServerInstallDir>/config/ldap/ConfigDB.xml file. |
| LDAP User Name | Name of the LDAP user. The user name is available in the LDAPROOTDN parameter located in the <AccessServerInstallDir>/config/ldap/ConfigDB.xml file. |
| LDAP Password | Password for the LDAP user. |
| LDAP Base | Name of the LDAP base. The base name is available in the LDAPOBLIXBASE parameter located in the <AccessServerInstallDir>/config/configInfo.xml file. |
Enterprise Manager discovers the topology of your Oracle Access Manager - Access Server deployment including the associated databases and directory servers.
To add this topology into an existing Access Manager - Access System target, select Use the specified system, and select an existing target of type Access Manager - Access System.
If you want to create a new Access Manager - Access System target, select the Create a new system and enter the name of the new system target. Click Finish to complete the discovery.
The next page shows a message confirming the discovery of Oracle Access Manager - Access Server.
Enterprise Manager has a simple Discovery wizard for Oracle Access Manager 10g targets. The Discovery wizard collects details about Oracle Access Manager Targets including information about the host name, host login credentials, SNMP Agent credentials, and other details.
After the Discovery wizard is complete, you can add the discovered targets into an existing System topology or you can create a new System target that stores your topology into Management Repository.
Log in to Enterprise Manager. Select Targets, then select Middleware.
From the Add menu, select Oracle Identity Management 10g (OAM, OIF, OIM).
Select Access Manager - Identity Server and enter the host name on which your Identity Server is running. Click OK to continue with the discovery of the Identity Server.
Enter the information requested for Oracle Access Manager - Identity Server. (The following table describes the fields.) Click Next once all information requested is entered.
| Field | Description |
|---|---|
| Host User Name | User name on the operating system with administrator privileges. |
| Host User Password | Password of host administrator account.
|
| Identity Server Home | Enter the home directory of your Identity Server (<OAM_HOME>\identity) - for example, C:\Program Files\OracleAccessManager\identity |
| Identity Server Version | Enter the version of your Oracle Access Manager - Identity Server - for example, 10.1.4.0.1 |
| SNMP Agent Host | If your Simple Network Management Protocol (SNMP) Agent is running on a host other than the Cloud Control Management Agent host, then enter the SNMP Agent host name. Otherwise, skip this section. |
| SNMP Agent Port | Enter the UDP Port of the SNMP Agent - for example, 161 |
| SNMP Agent Community Name | Enter the community name of the SNMP Agent. |
Enterprise Manager discovers the topology of your Oracle Access Manager - Identity Server deployment including the associated databases and directory servers. To add this topology into an existing Access Manager - Identity System target, select Use the specified system and select an existing target of type Access Manager - Identity System. If you want to create a new Access Manager - Identity System target, select Create a new system and enter the name of new system target. Click Finish to complete the discovery.
The next page shows a message confirming the discovery of Oracle Access Manager - Identity Server.
Enterprise Manager has a simple Discovery wizard for Oracle Identity Federation targets. The Discovery wizard collects details about Oracle Identity Federation targets including information about the host name, host login credentials, and other details.
After the Discovery wizard is complete, you can add the discovered targets into an existing System topology or you can create a new System target that stores your topology into the Management Repository.
To discover Oracle Identity Federation Server, perform the following steps:
Log in to Enterprise Manager. Select Targets, then select Middleware.
From the Add menu, select Oracle Identity Management 10g (OAM, OIF, OIM).
Select Identity Federation Server and enter the host name on which your Oracle Identity Federation Server is running. Click OK to continue with the discovery of the Identity Federation Server.
Enter the information requested for Oracle Identity Federation Server. Click Continue once all required information is entered.
| Field | Description |
|---|---|
| Application Server Target | Select the Application Server target on which Oracle Identity Federation is running. |
| Host User Name | User name on the operating system with administrator privileges. |
| Host User Password | Password of host administrator account. |
Enterprise Manager discovers the topology of your Oracle Identity Federation Server deployment including the associated databases and directory servers.
To add this topology into an existing Identity Federation System target, select Use the specified system and select an existing target of type Identity Federation System.
If you want to create a new Identity Federation System target, select Create a new system and enter the name of new system target. Click Finish to complete the discovery.
The next page shows a message confirming the discovery of Oracle Identity Federation Server.
Enterprise Manager has a simple Discovery wizard for Oracle Identity Manager targets. The Discovery wizard collects details about Oracle Identity Manager targets including information about the host name, host login credentials, and other details.
After the Discovery wizard is complete, you can add the discovered targets into an existing System topology or you can create a new System target that stores your topology into Enterprise Manager's Repository.
To discover Oracle Identity Manager Server, perform the following steps:
Log in to Enterprise Manager. Select Targets, then select Middleware.
From the Add menu, select Oracle Identity Management 10g (OAM, OIF, OIM).
Select Identity Manager Server and enter the host name on which your Oracle Identity Manager is running. Click OK to continue with the discovery of the Oracle Identity Manager Server.
Enter the information requested for Oracle Identity Manager Server. Click Continue once all the required information is entered.
| Field | Description |
|---|---|
| Application Server Target | Select the Application Server target on which Oracle Identity Manager is running. |
| Configured Database Target | Select the configured Database target used by Oracle Identity Manager |
| Database User Name | Enter the database user name used to access the tablespace reserved for Oracle Identity Manager. |
| Database Password | Enter the password for the database account reserved for Oracle Identity Manager. |
| Identity Manager Library Path | Enter the directory path for the Oracle Identity Manager library (<OIM_HOME>\xellerate\lib). |
| Host User Name | User name on the operating system with administrator privileges |
| Host Password | Password of host administrator account. |
Enterprise Manager discovers the topology of your Oracle Identity Manager Server deployment including the associated databases and directory servers.
To add this topology into an existing Identity Manager System target, select Use the specified system and select an existing target of type Identity Manager System.
If you would like to create a new Identity Manager System target, select Create a new system and enter the name of new system target. Click Finish to complete the discovery.
The next page shows a message confirming the discovery of Oracle Identity Manager Server.
Enterprise Manager has a simple Discovery wizard for Oracle Identity Management Suite 10g (including Oracle Internet Directory, Directory Integration Platform, Delegated Administration Server, and Single Sign-On Server) targets. The Discovery wizard collects details about Oracle Identity Management Suite 10g targets including information about the host name, host login credentials, and other details.
To discover Oracle Identity Management Suite 10g (including Oracle Internet Directory, Directory Integration Platform, Delegated Administration Server, and Single Sign-On Server), perform the following steps:
Log in to Enterprise Manager. Select Targets, then select Middleware.
From the Add menu, select Oracle Application Server.
Select the host on which Oracle Identity Management Suite 10g targets are running.
A confirmation page lists Oracle Application Servers found on the host selected. Click OK to continue. Important: Ensure that the Application Server is up before discovering the Identity Management Suite targets.
A final confirmation page appears. Click OK to finish the discovery process.
Enterprise Manager has a simple Discovery wizard for Oracle Identity Management 11g (including Oracle Internet Directory, Directory Integration Platform, Oracle Virtual Directory, Oracle Identity Federation, Oracle Access Manager, Oracle Adaptive Access and Oracle Identity Manager) targets. The Discovery wizard collects details about Oracle Identity Management 11g targets including information about the host, WebLogic User Name/Password, and other details.
Note:
Before discovering the targets associated with Oracle Access Manager 11g, download and install patch 10094106.To discover Oracle Identity Management 11g (including Oracle Internet Directory, Directory Integration Platform, Oracle Virtual Directory, Oracle Identity Federation, Oracle Access Manager, Oracle Adaptive Access Manager and Oracle Identity Manager), perform the following steps:
Log in to Enterprise Manager. Select Targets, then select Middleware.
From the Add menu, select Oracle Fusion Middleware/WebLogic Domain.
Enter the information requested to discover Oracle Identity Management 11g targets.
| Field | Description |
|---|---|
| Administration Server Host | Host on which the WebLogic domain for Identity Management is running. Import the certificates for this WLS domain on the agent if this is a secured domain. |
| Port | Port used for the WebLogic domain. Enter a number between 1 and 65535. |
| User Name | WebLogic domain user name. |
| Password | WebLogic domain password. |
| Unique Domain Identifier | A unique identifier for the Identity Management domain and is used to create a unique target name. The Unique Domain Identifier can contain only alphanumeric characters and the special character '_' and cannot contain any other special characters. |
| Agent | Agent that is running on the Identity Management host. Only an agent 12.1 or later can be used for finding targets. |
| Advanced Fields | Description |
| JMX Protocol | JMX protocol is used to make a JMX connection to the Administration Server. |
| Discover Down Servers | This is a signal to discover the servers that are down. |
| JMX Service URl | JMX Service URL is used to make a JMX connection to the Administration Server. If the URL is not specified, it will be created based on the input parameters. If the URL is specified, the Administration server host and port information must still be provided in the input parameters. |
| External Parameters | These parameters will be passed to the java process which makes a connection to the Administration Server. All the parameters must begin with -D. |
| Discovery Debug File Name | The agent side discovery messages for this session will be logged into this file. This file will be generated in the discovery agent's log directory <agent home>/sysman/log. If this file already exists, it will be updated. |
A list of all the Identity Management targets is listed. Click Add to complete the discovery. Note: If the Configured Agent text-box is blank for one or more of the targets, copy and paste the Management Agent URL before you proceed.
The status of target discovery is summarized in this screen. Ensure that all targets have been successfully added to Enterprise Manager. Press OK to finish the discovery process.The discovered targets will now be listed on the Identity and Access dashboard. From the Targets menu, select Middleware, then select Middleware Features.
To discover Oracle Directory Server Enterprise Edition 6.x, 7.x, 11g targets, perform the following steps:
Log in to Enterprise Manager. Select Targets, then select Middleware.
From the Add menu, select Oracle Directory Server Enterprise Edition.
Enter the information requested.
Oracle Directory Server Enterprise Edition Registry Host: Host of the Directory Server Control Center Registry
Oracle Directory Server Enterprise Edition Registry Port: Port of the Directory Server Control Center Registry
Directory Server User Name - for example CN=Directory Manager
Directory Server User Password
Oracle Directory Server Enterprise Edition Install Home: Path under which Directory Server Enterprise Edition is installed.
Unique Deployment Identifier: A unique identifier for ODSEE deployment.
With Enterprise Manager, you can collect user statistics for Oracle Internet Directory allowing you to view charts for failed and completed LDAP operations like Add, Bind, Compare, Delete, Modify, and Search.
To enable the collection of user statistics, perform the following steps:
From the Targets menu, select Middleware. From the Middleware Features menu, select Identity and Access.
Select the discovered Oracle Internet Directory target.
From the Oracle Internet Directory menu, select Fusion Middleware Control.
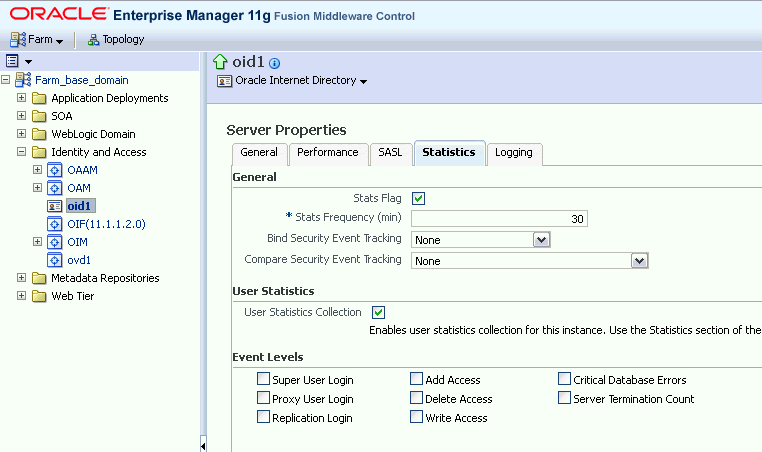
From the Targets menu in Fusion Middleware Control, select Administration, then select Server Properties. Check the box next to User Statistics Collection to enable this feature. Click Apply to save your changes. See Figure 20-1.
Figure 20-1 Server Properties - Statistics Tab
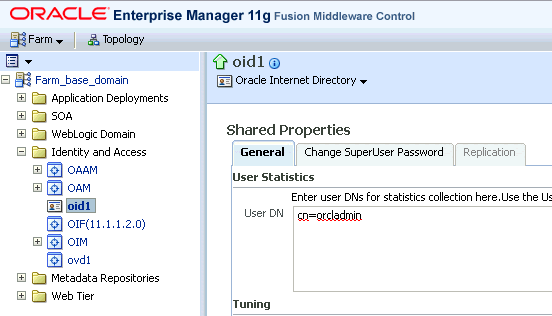
From the Target menu in Fusion Middleware Control, select Administration, then select Shared Properties. Enter a valid User DN (for example, cn=orcladmin) to enable user statistics collection for that user. See Figure 20-2.
Figure 20-2 Shared Properties - General Tab
This section describe how to create Identity Management elements.
With Enterprise Manager, you can create an Identity and Access System target that can be modeled with any discovered Oracle Identity Management target (including both Identity Management 10g and Identity Management 11g targets) and the underlying hosts, databases and LDAP servers as the key components providing an end-to-end system oriented view of the monitored Identity Management environment.
The Identity and Access System target provides access to metrics, alerts, charts, and topology view. In addition to monitoring your Oracle Identity Management environment from a system perspective, you can also monitor your environment from a service-oriented perspective using the Cloud Control Service Level Management framework.
To create a target of type Identity and Access System associated with any of the monitored Identity Management targets, perform the following steps:
Log in to Enterprise Manager. Select Targets, then select Systems.
From the Add menu, select Identity and Access System.
Select the Identity Management root target that you would like to include in your system topology. This can be the WebLogic Domain or the ODSEE Registry server.
Click Next to continue.
Select the targets within the domain that you would like to include in your system topology. You can also add additional targets that are not in the Identity Management domain, for example, databases, non-Oracle middleware, and so on. Click Next to continue.
Click Finish to complete the creation of Identity and Access System.
The Discovery wizard for Oracle Identity and Access Management Suite allows you to create a System target to store the end-to-end topology of monitored Oracle Identity Management components. The Management Pack Plus for Identity Management allows you to create the following System targets:
Access Manager - Access System
Access Manager - Identity System
Identity Federation System
Identity Manager System
Identity and Access System
A System target is modeled with all monitored Oracle Identity Management components and the underlying hosts as the key components providing an end-to-end system oriented view of the monitored Oracle Identity Management environment.
A System target provides access to metrics, alerts, charts, and topology view of all the infrastructure components. In addition to monitoring your Oracle Identity Management environment from a system perspective, you can also monitor your environment from a service-oriented perspective using the Cloud Control Service Level Management framework.
With the Management Pack Plus for Identity Management, users can create targets of type Generic Service or Web Application associated with any of the monitored Identity Management Systems: Access Manager - Access System, Access Manager - Identity System, Identity Federation System, and Identity Manager System.
The Web Application or Generic Service target provides an end-to-end service oriented view of the monitored Oracle Identity Management targets with access to performance and usage metrics, service tests, service level rules, service availability definition, alerts, charts, and topology view.
To create a target of type Generic Service associated with any of the monitored Identity Management Systems, perform the following steps:
Log in to Enterprise Manager. Select Targets, then select Services.
From the Add menu, select Generic Service.
Enter the general information requested for the new Generic Service.
Once you have created Generic Service or Web Application targets associated with your monitored Oracle Identity Management Systems, you can create a Services Monitoring Dashboard that summarizes Service Level Agreement Compliance, Actual Service Level Achieved, Key Performance and Usage Metrics, and Status of Key Components. Perform the following steps to create a Services Monitoring Dashboard:
From the Enterprise menu, select Reports, then select Information Publisher Reports.
Click the Create button.
Enter the general information requested for the new Report. Click the Elements tab once all information requested is entered.
Title
Enter a title for your new dashboard
Category/Sub-Category
Select a category and sub-category for your dashboard, for example, Category: Monitoring, Sub-Category: Dashboards
Use the specified target
Leave blank if this report has no report-wide target.
Options - Visual Style
Select Dashboard for a dashboard-view of your services.
Enter the elements information requested for the new Report. Click the Schedule tab once all information requested is entered.
Add
Select Services Monitoring Dashboard and click Continue.
Set Parameters
Click Set Parameters. Select the available services and click the Move button to add them to the Selected Services.
Enter the schedule information requested for the new Report. Click the Access tab once all information requested is entered.
Schedule
Enter your scheduling preferences for the report
E-Mail Report
Enter the email address and preferences for the report recipient.
Enter information about your access and security preferences for the new report. Click OK to create the new Services Monitoring Dashboard.
|
Copyright © 2011, 2012, Oracle and/or its affiliates. All rights reserved. Legal Notices |
|