| Oracle® Fusion Middleware User's Guide for Oracle WebCenter Portal: Spaces 11g Release 1 (11.1.1.6.0) Part Number E10149-10 |
|
|
PDF · Mobi · ePub |
| Oracle® Fusion Middleware User's Guide for Oracle WebCenter Portal: Spaces 11g Release 1 (11.1.1.6.0) Part Number E10149-10 |
|
|
PDF · Mobi · ePub |
To give individual spaces or the entire Spaces application a distinct personality or to associate with specific branding, portal designers can use skins to achieve the appearance and look and feel that suits their organization.
This chapter describes how to create and manage skins in Spaces. It includes the following sections:
For generic information about adding and editing different types of resources, see Chapter 10, "Working with the Resources that Compose a Portal or Community."
Audience
This chapter is intended for users who want to create and manage skins in their Spaces application.
Portal designers with the application permission Application-Skins-Create, Edit, and Delete Skins can manage application-level skins. Space moderators with the permission Space-Resources-Create, Edit, and Delete Resources (standard permission model) or Space-Skin-Create, Edit, and Delete Skins (advanced permission model) can manage space-level skins. For information about roles and permissions, see Chapter 20, "Understanding Security."
A skin is a resource that defines colors, fonts, and other aspects of various components used on the pages of a space. A skin changes the way the user interface appears, and not how the application functions.
Skins are based on the Cascading Style Sheet (CSS) specification. A skin is made up of various selectors that define the CSS styles or properties of different parts of a component. You can adjust the look and feel of any component by changing its style-related properties. Some selectors, like a background or foreground color or a font style, may be global and affect all components.
Out-of-the-box, Spaces provides certain built-in skins (Figure 14-1). Authorized users can change the appearance of a specific space or the entire application by using built-in skins.
If built-in skins do not quite match your requirements, you can create custom skins of your own within Spaces to brand your application or specific spaces as desired.
Spaces also gives you the flexibility to use an IDE like Oracle JDeveloper to create new skins or edit custom Spaces skins. You can then upload these skins back into the Spaces application.
If you have specific branding requirements for the way your application looks, you may want to create a custom skin of your own instead of using built-in skins. In Spaces, you can create skins at two levels—application level and space level.
To create a custom skin:
Navigate to the Resources page of your Spaces application or the space in which you want to create the custom skin, as described in Section 10.1.4, "Accessing Resources."
In the left navigation panel, under Look and Layout, select Skins.
On the menu bar, click Create.
In the Create New Skin dialog, in the Name field, enter a name for the custom skin (Figure 14-2).
In the Description field, enter a description for the custom skin.
The description is displayed below the skin name on the Resources page and as a tool tip when selecting a skin. You should ensure that the description helps users determine if they want to use this particular skin.
From the Copy from list, select an existing skin to use as the starting point for your new custom skin.
Tip:
You can also create a new custom skin by making a copy of an existing skin, as described in Section 14.4.4, "Copying a Skin."Click OK.
The newly created custom skin is listed on the Resources page. The gray circle icon next to the custom skin indicates that it is not yet published and hence is not available to other users. For information about publishing a skin, see Section 14.4.1, "Showing and Hiding a Skin."
Note:
You can also create skins in tools like Oracle JDeveloper that provide you more control and flexibility in skin creation. For information, see Section 14.6, "Using JDeveloper to Build Your Skins."This section describes how to edit custom skins. It includes the following subsections:
Spaces supports two types of skin editing, source code editing and simple editing.
This section includes the following subsections:
Source editing enables you to edit the source code of a custom skin in a text editor. This provides a powerful means of editing all the skin selectors available in a skin's CSS file.
Use the Edit Source dialog to edit a custom skin's source code. In this dialog, the source code is presented on the CSS tab (Figure 14-3).
A skin's CSS file supports and contains ADF skin selectors and the skin selectors associated with Composer components. For information about ADF skin selectors, refer to Oracle Fusion Middleware Tag Reference for Oracle ADF Faces Skin Selectors. For information about Composer components skin-specific selectors, refer to the section "Style Selectors for Composer Components" in Oracle Fusion Middleware Developer's Guide for Oracle WebCenter Portal.
In addition to ADF and Composer skin selectors, a skin's CSS file contains three Spaces-specific selectors. These include:
.WCPageTemplate:alias - Defines the background color and the image and its position for the main area of the page template below the top banner, as shown in the example below:
.WCPageTemplate:alias
{
  background-image:url(/afr/fusion/dbd_centerGradient.png);
  background-repeat:repeat-y;
  background-position:top center;
  background-color: #024296;
  color: white;
}
.WCContent - Defines the background color of the area of the page template containing the actual page content.
.WCContent
{
  background-color:#EEF3F8;
  border-top:1px solid #BECFE2;
}
.WCPortletContentMedium:alias - Defines the background color and image of task flows and portlets in showDetailFrame components.
.WCPortletContentMedium:alias
{
  background-image:url(/adf/images/gradient-275x275-fcfcfc.png);
  background-repeat:no-repeat;
}
While editing the source code of a custom skin, you can add, edit, or delete any skin selector to suit your requirements. For example, if you want to override the default font size, then in your skin's CSS file, you can specify the required size in the skin selector shown in Example 14-1.
Example 14-1 Overriding the Default Font Size in a Skin's CSS File
.AFDefaultFont:alias
{
font-size:12px;
}
When you edit the code using the Edit Source dialog, the format of the code is validated and an error message is displayed if you miss any tags or add them incorrectly.
For information about how to edit the source code of a skin, see Section 14.3.2, "Editing the Source Code of a Custom Skin."
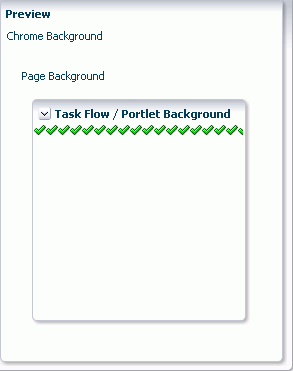
Simple editing provides a simple means of editing a skin's basic appearance settings: font, background color, and background image. To perform simple editing, you use the Edit dialog (Figure 14-4).
In the Edit dialog, you can define settings for the target areas listed below. Each target area maps to a WebCenter Portal-specific skin selector available in a skin's CSS file (described in Section 14.3.1.1, "About Source Code Editing.")
Page Template - Enables you to define the background color, background image, and font for the template used on a page. In a Skin's CSS file, this target area maps to the .WCPageTemplate:alias selector, which is used by all page templates.
Page - Enables you to choose the color and image of the page background. This target area sets the .WCContent style selector in the CSS file.
Task Flow/Portlet - Enables you to define the background color and image of task flows and portlets on a page. In the CSS file, this sets the .WCPortletContentMedium:alias selector, which defines the background color of Show Detail Frames that use medium background.
For information about how to edit the source code of a skin, see Section 14.3.3, "Editing a Custom Skin Using the Edit Dialog."
Use the Edit Source dialog to expose the underlying code of a custom skin and make adjustments to the skin selectors that make up the skin.
Caution:
You must have a thorough understanding of CSS specification about selectors if you plan to edit skin selectors. You might get into a situation where you are not sure why your style is not getting picked up, whereas it could very well be that the skin you are extending has a selector that is more specific than your selector.To edit the source code of a custom skin:
Navigate to the Resources page of your application or the desired space, as described in Section 10.1.4, "Accessing Resources."
In the left navigation panel, under Look and Layout, click Skins.
From the list of skins displayed on the right, select the skin whose source code you want to edit.
From the Edit menu, choose Edit Source.
In the Edit Source dialog, change the required settings (Figure 14-5).
Click OK.
To perform simple editing of a custom skin using the Edit dialog:
Navigate to the Resources page of your application or the desired space, as described in Section 10.1.4, "Accessing Resources."
In the left navigation panel, under Look and Layout, click Skins.
From the list of skins displayed on the right, select the skin that you want to edit.
From the Edit menu, choose Edit.
In the Edit dialog, from the Item list, select the target area for which you want to update skin properties.
Select any one of the following options:
Page Template - Select to choose the background color, background image, and font for the template used on a page.
Page - Select to choose the color and image of the page background.
Task Flow/Portlet - Select to choose the background color and image of task flows and portlets on a page.
From the Background Color list, select the background color you want to use for the target area.
When you select a background color, its RGB value appears in the Color field, and the selected target area is highlighted with that color in the Preview panel on the right.
In the Image field, enter the URI path of the image you want to use as a background image.
Note:
You can either specify an absolute URL (where the URL should also work if entered in a browser address field), or a relative URL that points to an image located somewhere in Spaces. To store an image in Spaces, you must upload the required file using the Documents service, as described in Section 41.8.1, "Uploading Files." You can then obtain the image's URL as described in Section 41.26.1, "Retrieving the URL for a Folder or File."You can choose to repeat the background image horizontally and/or vertically. Depending on your requirement, select the following checkboxes:
Repeat Horizontally - Select to show the background image aligned horizontally at the top of the page, with the image repeated across the horizontal bar (Figure 14-7).
Figure 14-7 Repeating an Image Horizontally Across a Target Area

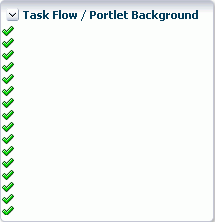
Repeat Vertically - Select to show the background image aligned vertically on the left side of the page, with the image repeated across the vertical bar (Figure 14-8).
Figure 14-8 Repeating an Image Vertically Across a Target Area

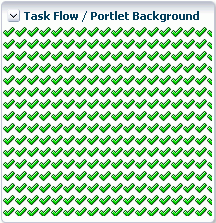
If you select both these checkboxes, copies of the selected image are repeated across the entire target area (Figure 14-9).
Figure 14-9 Repeating an Image Across the Entire Target Area

From the Font Family list, select the font you want to use for the Page Template area.
The Font list is displayed only when Page Template is selected as the target area.
Click OK.
This section describes the tasks involved in managing skins. It includes the following subsections:
When you create a custom skin, by default it is marked as hidden. A hidden skin is not available for use in the application, Home space, or any other space. To make a skin available, you must publish it. Further, for a custom skin created at the application level, you can control whether it is available to all or only selected spaces in the application.
Showing or hiding a skin follows the same procedure as any other resource. For information, see Section 10.4.3, "Showing and Hiding Resources."
For generic information about resource availability in Spaces, see Section 10.4.2, "Setting Properties on a Resource."
A range of properties is associated with custom skins that authorized users can access through the Edit Properties dialog.
This section includes the following subsections:
Section 14.4.2.1, "What You Should Know About Skin Properties"
Section 14.4.2.2, "Naming, Describing, and Categorizing a Custom Skin"
Section 14.4.2.4, "Setting the Availability of an Application-Level Custom Skin"
Use custom skin properties to:
Enter a display name and description
Provide an icon for use
Apply a category to classify a skin
Specify availability (for application-level skins only)
Associate attribute name/value pairs, for example, to control whether a page based on a selected page style opens in view or edit mode once it is created
Figure 14-10 shows the Edit Properties dialog of a custom skin. You specify the various properties in the General, Exclude Resource Usage, and Attributes sections.
With each custom skin, three default attributes are associated: skinId, skinFamily, and skinExtends. Table 14-1 provides a description of these attributes.
Note:
As an authorized user, you can add, modify, or delete the attributes of a custom skin. However, you must have a thorough understanding of these attributes if you want to manage them.Table 14-1 Default Attributes of a Skin
| Attribute | Description |
|---|---|
|
|
Specifies the unique identifier of a skin. Typically, it is a combination of the skin family and the render kit, for example |
|
|
Specifies the family to which a skin belongs. It is an identifier that can be used by a number of skins with different renderkits. For example, you could have a family named |
|
|
Specifies the ID of the skin being extended. For example, suppose you like the |
Setting the name, description, and category of a custom skin follows the same procedure as any other resource. For information, see Section 10.4.2.3, "Renaming, Describing, and Categorizing a Resource."
Associating an icon with a custom skin follows the same procedure as any other resource. For information, see Section 10.4.2.4, "Associating an Icon with a Resource."
Setting the availability of an application-level custom skin in a space follows the same procedure as any other resource. For information, see Section 10.4.2.5, "Setting the Availability of an Application-Level Resource in Other Spaces."
Setting the attributes of a custom skin follows the same procedure as any other resource. For information, see Section 10.4.2.6, "Working with the Attributes of a Resource."
For information about default skin attributes, see Table 14-1.
You can control whether all users or only specific users or groups can access the custom skin that you created in your application or a space. Setting access to a custom skin follows the same procedure as any other resource. For more information, see Section 10.4.4, "Setting Security for a Resource."
Spaces enables you to create copies of a skin. You can use this feature when you want to back up a skin or update a skin while keeping the original in use.
Copying a skin follows the same procedure as any other resource. For the generic procedure, see Section 10.4.1, "Copying a Resource."
Provided you are assigned the required permissions, you can delete any custom skin. Deleting a skin follows the same procedure as deleting any other resource. For information, see Section 10.4.5, "Deleting a Resource."
Each skin has an associated About page that summarizes useful information about it (Figure 14-11).
Accessing information about a skin follows the same procedure as any other resource. For information about how to access the About dialog, and for a description of the properties displayed in the dialog, see Section 10.1.5, "Viewing Information About a Resource."
For information about skin-specific default attributes, see Table 14-1.
As a Spaces administrator, you may customize the default appearance of the application for all users by changing its skin. As a space moderator, you may customize the appearance of your space for all members by changing its skin. Individual users can change the skin applied to their Home space through user preference settings.
This section includes the following subsections:
When you set a skin for the Spaces application, the skin is applied to the Home space and all spaces that use the application-level skin setting. The skin is also applied to any new spaces that are created. However, the skin is not applied to existing spaces for which a specific skin has already been set. Also, the skin is not applied to the administration pages. By default, these pages use the Fusion FX skin.
To apply a skin to the Spaces application:
Open the Spaces Administration page. See Section 4.1, "Accessing the Spaces Administration Page."
Click the Configuration tab.
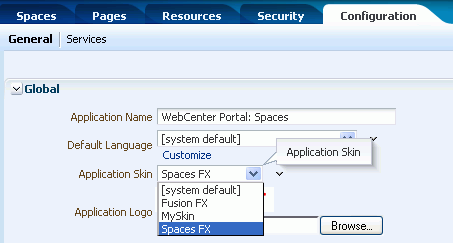
In the Global section of the General tab, select the desired skin from the Application Skin list (Figure 14-12).
Figure 14-12 Applying a Skin to the Spaces Application

Note:
If the desired skin does not appear in the Application Skin list, it may be because it is marked as hidden. A skin must be marked as Available to be available for selection. For information, see Section 14.4.1, "Showing and Hiding a Skin."Click Apply.
The skin you select is applied to Home space, any new spaces that are created, and all spaces that use the application-level skin setting. The skin is not applied to the spaces that override the application-level skin setting.
When you apply a skin to a space, the skin is applied to all the pages of the space. However, the administration pages are not affected; they always appear in the default skin. For information about applying a skin to a space, see Section 51.4.10, "Changing the Skin for a Space."
For information about applying a skin to your personal view of the Home space, see Section 35.5, "Changing the Home Space Look and Feel in Your View."
You may want to create a skin that is beyond the editing capabilities of Spaces, or you may prefer working in JDeveloper. To do this, you have several options:
Use the Edit Source option to edit the source code of the skin. You can edit the source code directly in the Edit Source dialog or you can copy the contents of the dialog to JDeveloper for editing and then copy the edited code back into the dialog. For more information, see Section 14.3.2, "Editing the Source Code of a Custom Skin."
Download an existing Spaces skin, import the skin into JDeveloper, edit the skin, and then upload it back to the Spaces application.
Create a completely new skin in JDeveloper and upload it to Spaces.
The steps to upload and download skins from Spaces are described in Section 10.5.2, "Downloading a Resource" and Section 10.5.3, "Uploading a Resource."
Oracle provides a special JDeveloper workspace (DesignWebCenterSpaces.jws) for developing Spaces resources, including skins. The workspace offers a design environment in which to create and edit your skins, and also enables you to upload your skins to Spaces for testing. For more information and to download the JDeveloper workspace, see "Developing Resources for the Spaces Application" in Oracle Fusion Middleware Developer's Guide for Oracle WebCenter Portal.
For information about specific considerations for creating skins for use in Spaces, see the chapter "Creating and Managing Skins" in Oracle Fusion Middleware Developer's Guide for Oracle WebCenter Portal.