3 Oracle Adaptive Access Manager Navigation
OAAM Admin is a Web application that you can use to manage all environment, and Adaptive Strong Authenticator, and Adaptive Risk Manager features. Oracle Adaptive Access Manager 11g provides superior protection for businesses and their customers through strong yet easy-to-deploy multi-factor authentication and proactive, real-time fraud prevention.
This chapter describes the navigation panel, major nodes, and pages available in Oracle Adaptive Access Manager, and it also includes instructions on signing in to the application.
The chapter contains the following sections:
3.1 Signing In to Oracle Adaptive Access Manager 11g
This section describes how to sign in to OAAM Admin.
The features available when you sign in are based according to roles and business requirements.
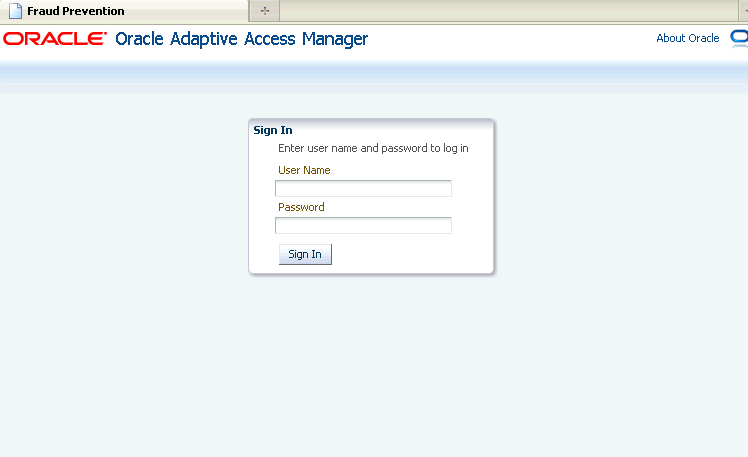
An Oracle Adaptive Access Manager Sign In page is shown in Figure 3-1.
To sign in to OAAM Admin, follow these steps:
-
In a browser window, enter the URL to the Oracle Adaptive Access Manager 11g Sign In page.
http://host:port/oaam_admin/
where
-
host refers to the Oracle Adaptive Access Manager managed server host
-
port refers to the OAAM Admin managed server port
-
/oaam_admin/refers to the OAAM Admin Sign In page
-
-
On the Sign In page, enter your credentials.
-
Click the Sign In button.
If you have logged in successfully, the Fraud Prevention tab appears on the left with an expanded navigation tree.
To sign out, select the Sign Out link in the upper-right corner of OAAM Admin.
3.2 OAAM Admin Console and Controls
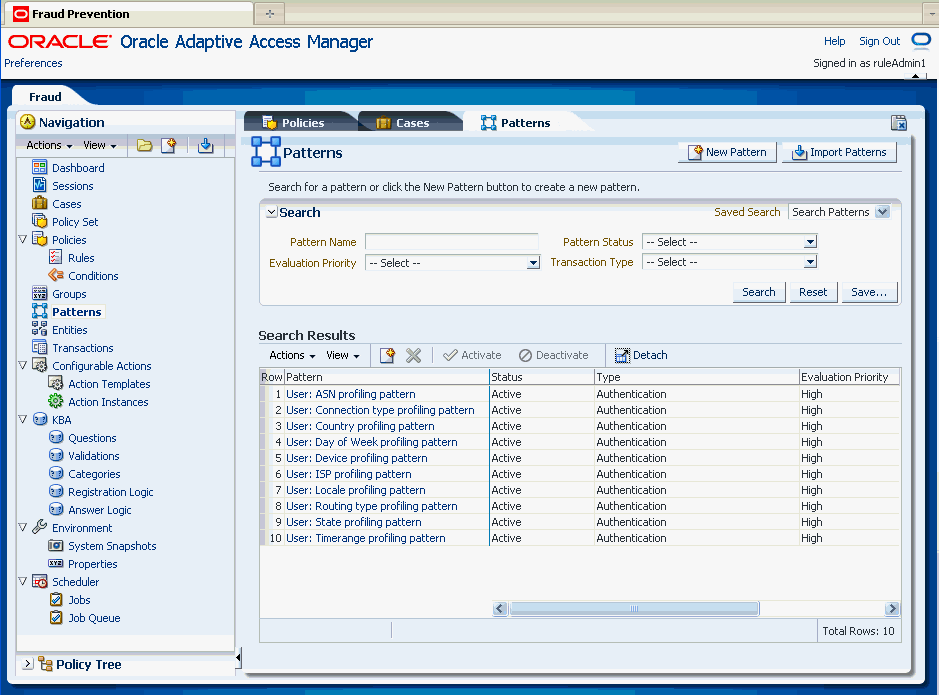
Upon a successful sign in, Oracle Adaptive Access Manager displays the OAAM Admin Console.
The Console is divided into the following areas: navigation panel on the left and the main, active page on the right.
The navigation panel helps users access all environment, Adaptive Strong Authenticator, and Adaptive Risk Manager features of Oracle Adaptive Access Manager. Named nodes in the panel identifies these items.
Initially, no active page is opened on the right side of OAAM Admin. You must open a node first.
Figure 3-2 shows OAAM Admin with an active page opened.
When you open a node, a new tab opens with the corresponding details or search page. A named tab identifies each open page. The active page generally enables you to create, view, and modify items.
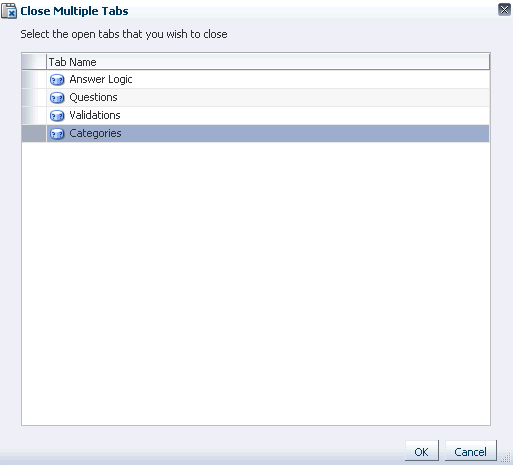
You can have up to ten pages open at one time, which enables multitasking.
Note:
If you try to open more than ten tabs, an error appears with the message that only ten tabs are allowed to be kept open. You can manually close one or more tabs and then try to open the new tab.
When multiple pages are open, only the active page and named tabs of other open pages are visible. You can click a named tab to return to the corresponding page.
The following sections provide more information about OAAM Admin:
3.3 Navigation Panel
OAAM Admin provides navigators for easy access to different features of Oracle Adaptive Access Manager.
The Navigation panel in OAAM Admin contains the following trees:
3.4 Navigation Tree
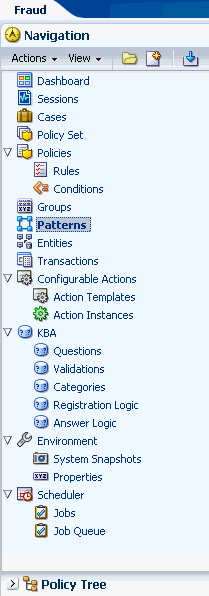
The Navigation tree, illustrated in Figure 3-3, is a collapsible and expandable tree that provides quick and visible access to features of Oracle Adaptive Access Manager.
3.4.1 Navigation Tree Structure
The Navigation tree includes named nodes that identify the individual features and groups of items within the Oracle Adaptive Access Manager product on which you can take action.
Figure 3-3 illustrates the Navigation tree.
Depending on your access level, the Navigation tree can display the following nodes:
| Features | Function |
|---|---|
|
Dashboard |
Access feature, which provides a high-level view of real customer data. |
|
Cases |
Access tools for creating and supporting Customer Service Representative (CSR). Cases not available in offline. |
|
Policies |
Access feature for designing policies to evaluate and handle business activities or potentially risky activities |
|
Groups |
Access feature to create groups for simplifying workload. |
|
Sessions |
Access feature to view the forensic record of a session |
|
Patterns |
Access feature to create patterns used for profiling behavior |
|
Entities |
Access feature to create data structure, which comprises of a set of attributes, that can be re-used across different transactions. |
|
Transactions |
Access feature to create transaction definitions so that client-specific transactions and parameters can be captured for monitoring |
|
KBA |
Access framework to manage tasks that impact challenge questions, validations and levels of logic algorithms used for answers, question categories, and levels of logic algorithms used for registration. |
|
Scheduler |
Access feature to manage jobs. |
|
Environment |
Access feature to manage Oracle Adaptive Access Manager environment. |
|
Configurable Actions |
Access feature to create custom actions |
3.4.2 Navigation Tree Menu and Toolbar
A menu and toolbar appears above the Navigation tree, as shown Figure 3-3. Menus provide commands that you can use to take action on the selected item in the Navigation tree. Many menu commands are also provided as command buttons in the toolbar for quick access.
Create New opens the corresponding create page of the selected node. Create New is available only for certain nodes where applicable. See Table 3-2, "Create New of Selected Nodes" for a list of pages that can be opened by clicking Create New.
Table 3-2 Create New of Selected Nodes
| Node | Subnode | Create Page or Dialog |
|---|---|---|
|
Dashboard |
N/A |
|
|
Sessions |
Not available |
|
|
Cases |
Create Case |
|
|
Policy Sets |
Not available |
|
|
Policies |
New Policy |
|
|
Rules |
Not available |
|
|
Conditions |
Not available |
|
|
Groups |
Create Group |
|
|
Patterns |
New Pattern |
|
|
Entities |
New Entity |
|
|
Transactions |
New Transaction |
|
|
Configurable Actions |
||
|
Action Templates |
New Action Template |
|
|
Action Instances |
New Action Instance |
|
|
KBA |
Not available |
|
|
Questions |
New Questions |
|
|
Validations |
Not Available |
|
|
Categories |
New Category |
|
|
Registration Logic |
Not available |
|
|
Answer Logic |
Not available |
|
|
Scheduler |
Not available |
|
|
Jobs |
Jobs search |
|
|
Job Queue |
Job Queue |
|
|
Environment |
Not available |
|
|
Snapshots |
Not available |
|
|
Properties |
New Property |
Open opens the corresponding page for the node you have selected.
Import opens the Import dialog for the node you have selected.
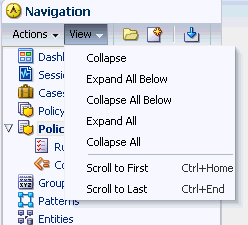
Figure 3-5, "View Menu" illustrates the View menu and commands. Menu items that cannot be used on the selection in the Navigation tree appear in grey.
The View menu command descriptions are provided in Figure 3-3.
| Command | Description |
|---|---|
|
Collapse |
Immediately closes the node. |
|
Expand All Below |
Immediately reveals all items below the selection. |
|
Collapse All Below |
Immediately closes the node and all items below the selection. |
|
Expand All |
Immediately reveals all the nodes and subnodes along with their leaf nodes in the Navigation tree. |
|
Collapse All |
Immediately closes all the nodes and subnodes along with their leaf nodes in the Navigation tree. |
|
Scroll to First |
Scrolls to the first node |
|
Scroll to Last |
Scrolls to the last node |
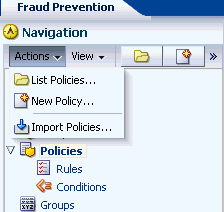
Figure 3-6 illustrates the Actions menu, which provides appropriate commands for the selection in the Navigation tree. For instance, if you have Policies selected in the Navigation tree, one of the commands, New Policy..., on the Actions menu enables you to open the New Policy page for creating a new policy.
| Command | Description |
|---|---|
|
Open |
Opens the search or details page for the selected item in the Navigation tree. |
|
List |
Opens the item, search, or details page. |
|
New |
Activates a new page that you can fill in to define a new item. |
|
Import |
Displays the Import dialog, which enables you to locate and import the item. |
3.5 Policy Tree
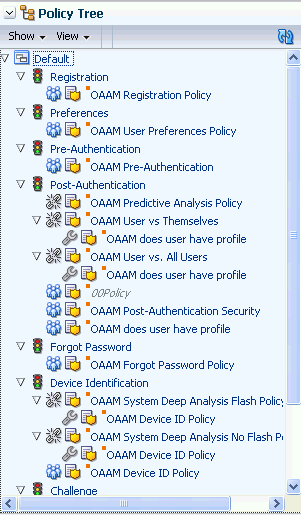
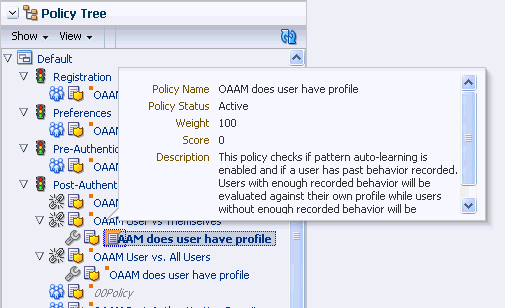
The Policy tree gives a visual representation of the policy hierarchy and the relationship between different policies, user groups, and the checkpoints.
Double-clicking an item in the Policy tree opens a dynamic tab for that item. This enables administrators to view and edit the configurations in context.
You can expand the Policy tree to view the details about the user groups and policies under each checkpoint.
For example the Forgot Password policy is under the Forgot Policy Checkpoint and All Users is assigned to the policy.
Policy is the last level in the Policy tree. You cannot drill down further except to see nested policies.
Table 3-5 provides a legend for the icons which appear on the Policy tree.
| Icon | Definition | Description |
|---|---|---|
|
Checkpoint |
The checkpoint is a decision and enforcement point when policies are call to run their rules. |
|
|
Policy |
The policies available in the system. Disabled policies are grayed out. Policies linked to multiple user groups are bolded and highlighted. To open the Policy Details page of a policy, double-click the Policy node. The Policy Details page can also be opened by clicking Open Selected from the context menu. To view nested policies, expand the policy node. |
|
|
All Users |
Policy is linked to All Users. |
|
|
User Groups |
Policy is linked to Users |
|
|
No user group |
No users are associated with the policy. |
|
|
Trigger combination |
Trigger combinations exist in the policy. |
|
|
More... |
Summary information is available about the policy. |
From the Policy tree, you can click the More icon for summary information on the policy.
3.6 Management Pages
The individual features and groups of items are organized on the Navigation tree. To open a component, double-click its node in the Navigation tree. The details of that node or a search page opens in a new tab on the right side of the console. A named tab identifies each open page, like the tabs on manila folders.
Only the active page is visible, with as many named tabs of other open pages that can fit on one line. You can click a named tab to return to the corresponding page.
The nodes and their corresponding pages are listed in Table 3-6.
| Node | Subnode | Pages |
|---|---|---|
|
Dashboard |
Dashboard |
|
|
Sessions |
Sessions |
|
|
Cases |
Cases search page |
|
|
Policy Sets |
Policy Sets page |
|
|
Policies |
Policies search page |
|
|
Rules |
Rules search page |
|
|
Conditions |
Conditions search page |
|
|
Groups |
Groups search page |
|
|
Patterns |
Pattern search page |
|
|
Entities |
Entities search page |
|
|
Transactions |
Transactions search page |
|
|
Configurable Actions |
Not available |
|
|
Action Templates |
Action Templates search page |
|
|
Action Instances |
Action Instance search page |
|
|
KBA |
Not available |
|
|
Note: KBA is not available in offline mode. |
||
|
Questions |
Questions search page |
|
|
Validations |
Validations search page |
|
|
Categories |
Categories search page |
|
|
Registration Logic |
Registration Logic page |
|
|
Answer Logic |
Answer Logic page |
|
|
Environment |
Not available |
|
|
System Snapshot |
Snapshots search page |
|
|
Properties |
Properties search page |
|
|
Scheduler |
||
|
Jobs |
New Job |
|
|
Job Queue |
3.6.1 Search Pages
The search page is the starting place for managing the environment, adaptive strong authentication, and adaptive risk management features, and groups of like items.
You can open a search page by:
-
Double-clicking a node in the Navigation tree
-
Right-clicking a node in the Navigation tree and selecting the List command from the context menu that appears
-
Selecting the node in the Navigation tree and then choosing the List command from the Actions menu
When a search page first appears, you see a search filter and a Search Results table. The Search Results table is initially empty. You must click the Search button to see a list of items.
To search for items:
-
Select the criteria to search from the pull-down lists. The lists of available criteria varies according to the feature.
-
Enter strings to match in the text boxes.
-
Select or specify filters to narrow the search scope.
-
Click the Search button to trigger the search and to display the results in the Search Results table.
The search returns all items that match the specified criteria; leave the fields empty to obtain the list of all items of the type.
3.6.1.1 Elements in the Search Form
This section describes the elements in the search forms.
You can search for items using the attribute search criteria fields.
The Reset button enables you to reset the search criteria.
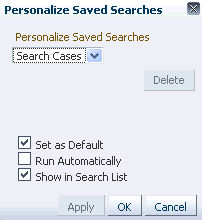
You can create saved searches that persist for the duration of your session. You would enter the search criteria, then click the Save button to open the Personalize Saved Search dialog. The Personalize Saved Search dialog is used to specify how you want to save the search criteria you entered. You can name the search, for example, myspecialsearch, so that it displays in the Saved Search list.
3.6.1.2 Search Results Table
The Search Results table shows at most the first 200 matches found by the search.
You can sort the results by using the Sort Ascending and Sort Descending buttons next to the column name.
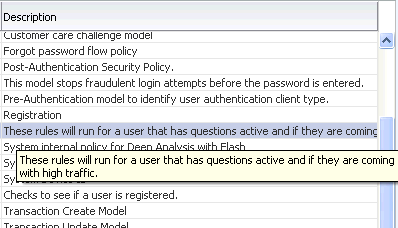
If the description of an item is too long to be fully shown, positioning the cursor over the visible text displays the entire description.
Once an item is selected in the Search Results table, an action can be performed on it by clicking one of the icons on the toolbar or by selecting a command from the Actions menu.
If you want to see more details, click the available link for the item.
3.6.1.3 Search Results Menu and Toolbar
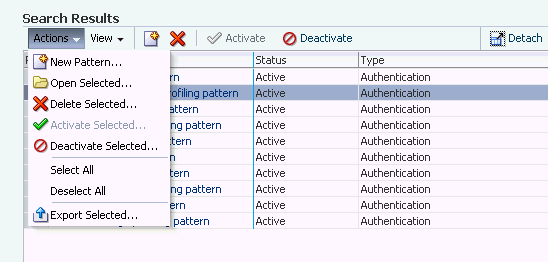
A menu and toolbar appears above the Search Results table. Figure 3-8 shows the Search Results Menu and Toolbar from the Patterns Search page.
The Actions menu and command buttons provide appropriate commands for the selection in the Navigation tree and Search Results table.
Figure 3-8 shows command buttons that may be available, depending on the selection.
Table 3-7 Results Menu and Toolbar
| Button | Definition | Description |
|---|---|---|
|
Create |
Opens a new page, which you can fill in to add a new item of the selected type. The new page opens as the active page on the right side of the Navigation tree. |
|
|
Delete |
Removes the selected item. |
|
|
Create Like |
Creates a new item that is similar— or "like"—the existing one. |
|
|
Activate |
Activates the selected item. |
|
|
Deactivate |
Deactivates the selected item. |
|
|
Detach |
Detaches the Results table. |
3.6.1.4 Select All
You can select all the results to perform actions on by clicking the header of the Row column in the upper-left corner of the Search Results table.

3.6.1.5 Create and Import
Generally, buttons to create new items or import items are in the upper-right corner of the console.

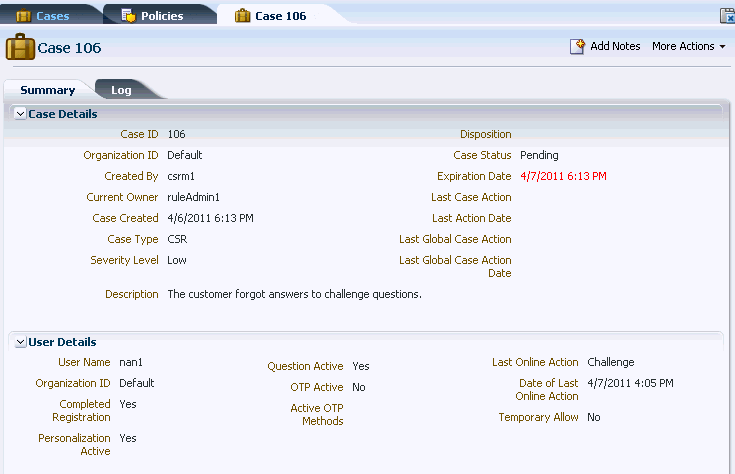
3.6.2 Detail Pages
You can view details of a specific item by opening its details page.
A Case Details page is shown in Figure 3-9.
3.7 Dashboard
The dashboard presents a real-time view of activity via aggregates and trending.
The dashboard is divided into three sections:
-
The performance panel (Section 1) presents real-time data. It shows the performance of the traffic that is entering the system. A trending graph is shown of the different types of data based on performance.
-
The summary panel (Section 2) presents aggregate data based on time range and different data types.
-
The dashboard panel (Section 3) presents historical data. The detailed dashboards are used for trending data over time ranges.
3.8 Online Help
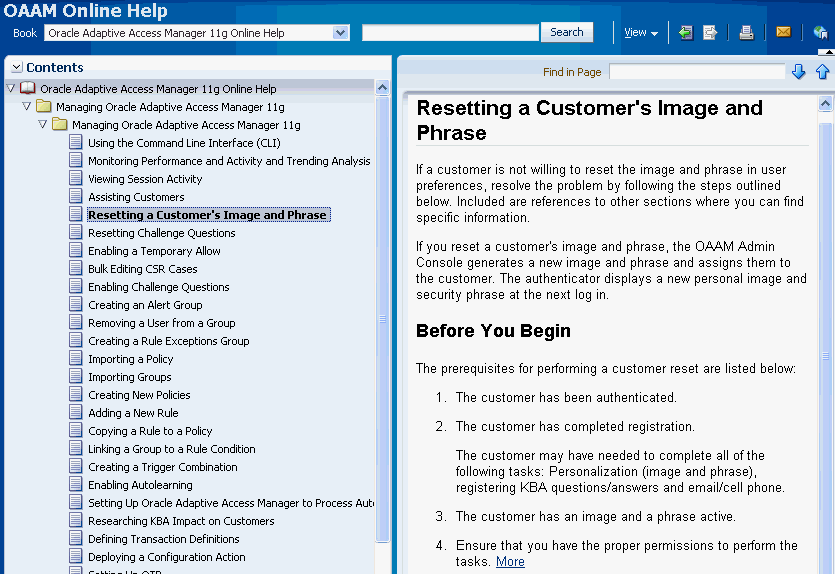
To access online help documentation, on the upper right corner of any window, click Help to bring up the help window. A help topic for the relevant top-level search or details page is displayed. These help topics contain links to information in an online version of the Oracle Fusion Middleware Administrator's Guide for Adaptive Access Manager.
Selecting Managing Oracle Adaptive Access Manager 11g Online Help displays several topics in the online documentation.
Topics that are displayed by selecting Help appear in only English and Japanese languages. Online Help is not translated into the nine Admin languages.
Refer to the following illustration for an example of an online help window.
3.9 Search, Create, and Import
Oracle Adaptive Access Manager provides more than one way to search, create, and import.
Depending on the selection, you can open a Search page by:
-
Double-clicking the node in the Navigation tree.
-
Right-clicking the node in the Navigation tree and selecting List <item> from the context menu.
-
Selecting the node in the Navigation tree and then choosing List <item> from the Actions menu.
-
Clicking the List <item> button in the Navigation tree toolbar.
Depending on the selection, you can open a Create page by:
-
Clicking the New <item> button in the upper right of the console.
-
Right-clicking the node in the Navigation tree and selecting New <item> from the context menu.
-
Selecting the node in the Navigation tree and then choosing New <item> from the Actions menu.
-
Clicking the Create new <items> button in the Navigation tree toolbar.
-
Selecting the Create New <item> button from the Search Results toolbar.
-
Selecting New <item> from the Actions menu in Search Results.
Depending on the selection, you can open a Import page by:
-
Clicking the Import <item> button in the upper right of the console.
-
Right-clicking the node in the Navigation tree and selecting Import <item> from the context menu.
-
Selecting the node in the Navigation tree and then choosing Import <item> from the Actions menu.
-
Clicking the Import <items> button in the Navigation tree toolbar.
3.10 Export to Excel
You can generate a report of the results from the Search pages for policies, questions, validations, snapshots, properties, entities, transactions, conditions, groups, patterns, and so on.
To export results to an Excel report:
-
Ensure the oaam.export.max.rows.allowed property is configured so that you are able to export all the rows needed. This property limits the maximum row selection.
-
In a search page, select rows the rows of interest from the search results.
-
Click the Export To Excel button.
When the export confirmation dialog is shown, you can view the selected list. The export table with the selected rows shows the ID number and display name columns, so that you can easily identity and verify the selected rows before the export.
-
Click Export to export the rows to Excel.
3.11 Access Level to OAAM Admin
OAAM Admin provides functions for security investigators and customer service representatives (CSRs), business and security analysts, security administrators, system administrators, and quality assurance. The functions and navigation that are available depend on the roles.
Refer to Table 3-8 for conceptual roles. These example roles are for reference only and do not refer to official OAAM out-of-the-box roles.
For information on the Navigation and Policy trees, see Section 3.4, "Navigation Tree" and Section 3.5, "Policy Tree."
Oracle Adaptive Access Manager 11g users must be defined using the Oracle WebLogic Administration Console.
For information on defining Oracle Adaptive Access Manager users, see the Oracle Fusion Middleware Installation Guide for Oracle Identity Management.
