43.3 Create a Barcode Report for the Web
The steps in this section show you how to build a JSP-based Web report, using the barcode JavaBean you imported in Section 43.2.1, "Import the Java classes into Reports Builder". If you want to build a paper report with a barcode, see Section 43.2, "Create a Barcode Report for Paper".
If you are not familiar with creating a JSP-based Web report and would like to learn how to create one, refer to the Oracle Reports Tutorial.
The report you will create in this section is the same as the one you created for paper. You will create a report that displays the invoice for a particular customer. This invoice will display the address of the customer, his order, and a barcode that represents the tracking number for the order. The company can use this barcode to find out the status of the order.
You can run the final version of the JSP report we have provided to see what you will build in these steps, but please note that you will need to update the location of the images in the source code (see Section 43.3.3, "Initialize the barcode JavaBean and set its properties") before you can run the report to the Web.
Note:
Before you begin this section, make sure you have all the necessary files, and that you have imported the Java classes, and set up the class path. See Section 43.1, "Prerequisites for This Example" and Section 43.2.1, "Import the Java classes into Reports Builder".
43.3.1 Create a query in an existing HTML file
When you create a JSP-based Web report, you can use an existing HTML file as a template. The steps in this section will show you how to open an HTML file in Reports Builder and add data to it.
To create a query in an existing HTML file:
-
In Reports Builder, choose File > Open and open the file
Examples\barcodebeanweb\source\shipping_label.html. -
In the Object Navigator, under SHIPPINGLABEL, double-click the view icon next to the Data Model node to display the Data Model view for the report.
-
In the Data Model view, click the SQL Query tool in the tool palette, then click in an open area of the Data Model view to display the SQL Query Statement dialog box.
-
In the SQL Query Statement field, enter the following
SELECTstatement:SELECT ALL CUSTOMERS_A1.CUST_FIRST_NAME, CUSTOMERS_A1.CUSTOMER_ID, CUSTOMERS_A1.CUST_LAST_NAME, CUSTOMERS_A1.CUST_ADDRESS.STREET_ADDRESS, CUSTOMERS_A1.CUST_ADDRESS.POSTAL_CODE, CUSTOMERS_A1.CUST_ADDRESS.CITY, CUSTOMERS_A1.CUST_ADDRESS.STATE_PROVINCE, CUSTOMERS_A1.CUST_ADDRESS.COUNTRY_ID, ORDERS.ORDER_ID, ORDERS.ORDER_DATE, ORDERS.ORDER_TOTAL, COUNTRIES.COUNTRY_NAME FROM CUSTOMERS CUSTOMERS_A1, ORDERS, HR.COUNTRIES WHERE ((ORDERS.CUSTOMER_ID = CUSTOMERS_A1.CUSTOMER_ID) AND (CUSTOMERS_A1.CUST_ADDRESS.COUNTRY_ID = HR.COUNTRIES.COUNTRY_ID)) AND ORDERS.ORDER_ID = :P_ORDER_ID ORDER BY order_ID
Note:
You can enter this query in any of the following ways:
-
Copy and paste the code from the provided text file called
barcode_code.txtinto the SQL Query Statement field. -
Click Query Builder to build the query without entering any code manually.
-
Type the code in the SQL Query Statement field.
-
-
Click OK.
If you are not connected to a database that contains the sample schema we have provided, you must log in now. If you are not sure what your connection string is, contact your database administrator. Note that this example uses the Order Entry sample schema.
-
When a message displays indicating that the bind parameter was created, click OK.
-
In the Data Model view, double-click the group object to display the Property Inspector, and set the following properties:
-
Under General Information, set the Name property to G_SHIPMENT.
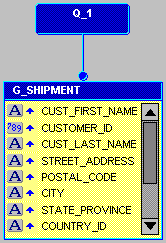
Your data model should look something like this:
Figure 43-5 Data Model for the JSP-based Web report query

Description of "Figure 43-5 Data Model for the JSP-based Web report query"
-
-
Save your report as
ShippingLabel_your_initials.jspto create the JSP-based Web source for this report.
You have now created the query that will pull in the data for your report.
43.3.2 Create three formula columns in your data model
You will need to create three formula columns in your report to retrieve the tracking number for the order, the origin of the order, and the destination for the order.
To create the TrackingNumber formula column:
-
In the Data Model view, click the Formula Column tool in the tool palette.
-
Click in the G_SHIPMENT group to create a new formula column.
-
Double-click the new formula column object (CF_1) to display the Property Inspector, and set the following properties:
-
Under General Information, set the Name property to TrackingNumber.
-
Under Column, set the Datatype property to Character.
-
Under Placeholder/Formula, click the PL/SQL Formula property field to display the PL/SQL Editor.
-
-
In the PL/SQL Editor, use the template to enter the following PL/SQL code:
function TrackingNumberFormula return char is
begin
    return(:Customer_id||:Order_ID||:country_ID);
end;
Note:
You can enter this code by copying and pasting it from the provided text file called
barcode_code.txt. -
Click Compile.
Note:
If your code does not compile, make sure you have typed in exactly the code we have provided.
-
When the code is compiled, click Close.
To create the OriginScan formula column:
-
Create another formula column in the G_SHIPMENT group.
-
Double-click the new formula column object (CF_1) to display the Property Inspector, and set the following properties:
-
Under General Information, set the Name property to OriginScan.
-
Under Column, set the Datatype property to Character.
-
Under Placeholder/Formula, click the PL/SQL Formula property field to display the PL/SQL Editor.
-
-
In the PL/SQL Editor, use the template to enter the following PL/SQL code:
function OriginScanFormula return char is
begin
  return('34324-OH-US');
end;
Note:
You can enter this code by copying and pasting it from the provided text file called
barcode_code.txt. -
Click Compile.
Note:
If your code does not compile, make sure you have typed in exactly the code we have provided.
-
When the code is compiled, click Close.
To create the DestinationScan formula column:
-
Create a third formula column in the G_SHIPMENT group.
-
Double-click the new formula column object (CF_1) to display the Property Inspector, and set the following properties:
-
Under General Information, set the Name property to DestinationScan.
-
Under Column, set the Datatype property to Character.
-
Under Placeholder/Formula, click the PL/SQL Formula property field to display the PL/SQL Editor.
-
-
In the PL/SQL Editor, use the template to enter the following PL/SQL code:
function DestinationScanFormula return char is
begin
return(:postal_code||'-'||:state_province||'-'||:country_ID);
end;
Note:
You can enter this code by copying and pasting it from the provided text file called
barcode_code.txt. -
Click Compile.
Note:
If your code does not compile, make sure you have typed in exactly the code we have provided.
-
When the code is compiled, click Close.
-
Save your report as a JSP.
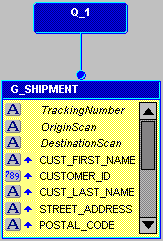
You have created the three formula columns that will hold the values for the tracking number, the origin, and the destination of the order. Your data model should look something like this:
Figure 43-6 Data Model with the three formula columns

Description of "Figure 43-6 Data Model with the three formula columns"
43.3.3 Initialize the barcode JavaBean and set its properties
To enable your JSP-based Web report to communicate with the JavaBean, you need to initialize it in the JSP. Unlike using the JavaBean with a paper report, you do not need to use the Java importer to import the Java classes.
In this section, you will also learn how to set the properties for the bean so that the correct data is being used to produce the barcode.
If you do not want to bother with typing the code in yourself, you can always open the source file (Examples/barcodebeanweb/source/shipping_manifest_web.rdf) and copy the appropriate pieces of the Web source into your report.
To ensure that the JavaBean references the correct barcode images, you must first update your report with the correct path.
-
In the Object Navigator, double-click the view icon next to the Web Source node for your JSP-based Web report (
ShippingLabel_your_initials) to display the Web Source view. -
In the Web Source view, look for the text:
Define Path information for your barcode images. -
Under this text, update the paths to make sure they point to the directories where your images will be generated (for example,
d:\\temp\\docroot\\images\\). Be sure to maintain the integrity of the paths we have provided.Note:
The directory where these files are located must be accessible by the Web server. This directory is typically located somewhere below the directory where you keep your JSPs. Make sure that this directory exists on your computer before you run the report to the Web.
-
In the Web Source view, look for the text:
initialize the java beans. -
Under this text, type the following code:
<jsp:useBean id="BC" scope="page" class="oracle.apps.barcode.util.BarCodeConstants" />
<jsp:useBean id="BM" scope="page" class="oracle.apps.barcode.BarCodeMaker" />
Note:
You can enter all the code in this section by copying and pasting it from the provided text file called
barcode_code.txt.
To set the barcode JavaBean properties:
-
In the Web Source view, look for the text:
setting the barcodes properties. -
Under this text, type the following code:
<jsp:setProperty name="BM" property="BarCodeType" value="<%= BC.BAR_CODE_128 %>" />
<jsp:setProperty name="BM" property="BarWidthInch" value="0.01"/>
<jsp:setProperty name="BM" property="Directory" value="<%= BarcodePhysicalPath %>"/>
To define the barcode variables:
-
In the Web Source view, look for the text:
Define variables to hold the data for the three barcodes. -
Under this text, type the following code:
 <%! private String BarCodeData1 = "12345-XX-XX"; %>
 <%! private String BarCodeData2 = "12345-XX-XX"; %>
 <%! private String BarCodeData3 = "12345-XX-XX"; %>
-
In the Web Source view, look for the text:
replace this with your RW:FOREACH open tag. -
Replace this line with the following code:
<rw:foreach id="R_G_SHIPMENT" src="G_SHIPMENT">
-
Look for the text:
replace this with your RW:FOREACH close tag. -
Replace this line with the following code:
</rw:foreach>
To code the formula columns to render the barcodes:
-
In the Web Source view, look for the text:
**BARCODEShippingTrackingNumber**. -
Under this text, type the following code:
<!-- Get the value of the TrackingNumber and assign it to the variable -->
<rw:getValue id="BarCodeData1" src="TrackingNumber"/>
<!-- Set the data for tbe barcode and the filename -->
<jsp:setProperty name="BM" property="BaseCodeData" value="<%= BarCodeData1 %>"/>
<jsp:setProperty name="BM" property="FileName" value="<%= BarCodeData1 %>"/>
<!-- Render the barcode -->
<% BM.renderBarCode(); %>
<!-- View the image in the page -->
<img src="assets/barcodes/<%= BarCodeData1 %>">
Note:
The lines beginning with "<!--" are comments. If you do not want comments in your code, you do not have to add these lines.
-
In the Web Source view, look for the text:
**BARCODEOriginScan**. -
Under this text, type the following code:
<!-- Get the value of the OriginScan and assign it to the variable -->
<rw:getValue id="BarCodeData2" src="OriginScan"/>
<!-- Set the data for tbe barcode and the filename -->
<jsp:setProperty name="BM" property="BaseCodeData" value="<%= BarCodeData2 %>"/>
<jsp:setProperty name="BM" property="FileName" value="<%= BarCodeData2 %>"/>
<!-- Render the barcode -->
<% BM.renderBarCode(); %>
<!-- View the image in the page -->
<img src="assets/barcodes/<%= BarCodeData2 %>">
-
In the Web Source view, look for the text:
**BARCODEDestinationScan**. -
Under this text, type the following code:
<!-- Get the value of the DestinationScan and assign it to the variable -->
<rw:getValue id="BarCodeData3" src="DestinationScan"/>
<!-- Set the data for tbe barcode and the filename -->
<jsp:setProperty name="BM" property="BaseCodeData" value="<%= BarCodeData3 %>"/>
<jsp:setProperty name="BM" property="FileName" value="<%= BarCodeData3 %>"/>
<!-- Render the barcode -->
<% BM.renderBarCode(); %>
<!-- View the image in the page -->
<img src="assets/barcodes/<%= BarCodeData3 %>">
-
Save your report as a JSP.
43.3.4 Run your report to the Web
Since you have created a Web report, you must run this report to the Web to see your results.
-
In the Object Navigator, click your report name, ShippingLabel_
your_initials. -
Click the Run Web Layout button in the toolbar to run your report to a browser.
Note:
If Netscape 7.0 is your default browser, and the browser does not display, set the registry key
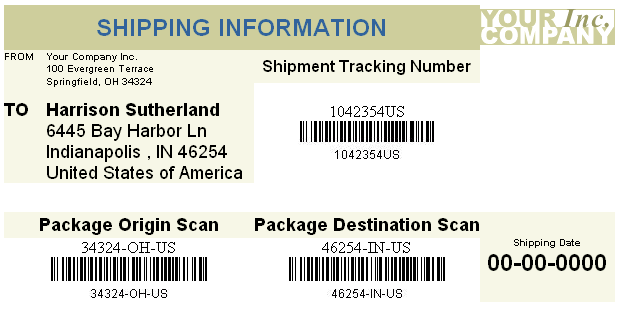
HKEY_CURRENT_USERS\Software\Oracle\Toolkit\Tkbrowserto the default browser location. Ensure that theBrowserNameand theBrowserPathkeys reflect the correct values. For example:BrowserName=Netscape 7;BrowserPath=C:\Program Files\Netscape\Netscape\Netscp.exe.Your report displays in your Web browser, and should look something like this:
Figure 43-7 Snapshot of the final JSP-based Web report with barcode

Description of "Figure 43-7 Snapshot of the final JSP-based Web report with barcode"
Note:
If you are not sure whether you produced the desired results, you can always open the file we provided in the results directory, called ShippingManifestWeb.html in your Web browser. Or, once you have updated the images path, you can run ShippingManifestWeb.jsp to the Web, and the report will display in the your browser.