3 Using Oracle BI Mobile
This chapter describes how to work with Oracle BI Mobile.
This chapter contains the following topics:
Note:
This chapter discusses working with Oracle BI Mobile and BI content in general terms. For details about working with Oracle BI Mobile in regard to specific BI catalog objects, see Chapter 4, "Working with BI Content."
Navigating the Oracle BI Presentation Catalog and BI Content
You navigate BI content on your device by sliding or scrolling through your favorite objects and your recently viewed objects, and by directly accessing dashboards in a special dashboards hierarchy view. To access BI content that you have not already viewed, marked as a favorite, or saved locally, you navigate or search the catalog on the server.
The Navigation bar allows you to move quickly between different screens. You can hide the Navigation bar by swiping left twice. To reveal the Navigation bar again, swipe right once from the left edge. Swipe a second time to reveal the view titles within the Navigation bar.
To access the Settings screen, swipe three times from the left edge—or tap the Options menu, then tap Settings.
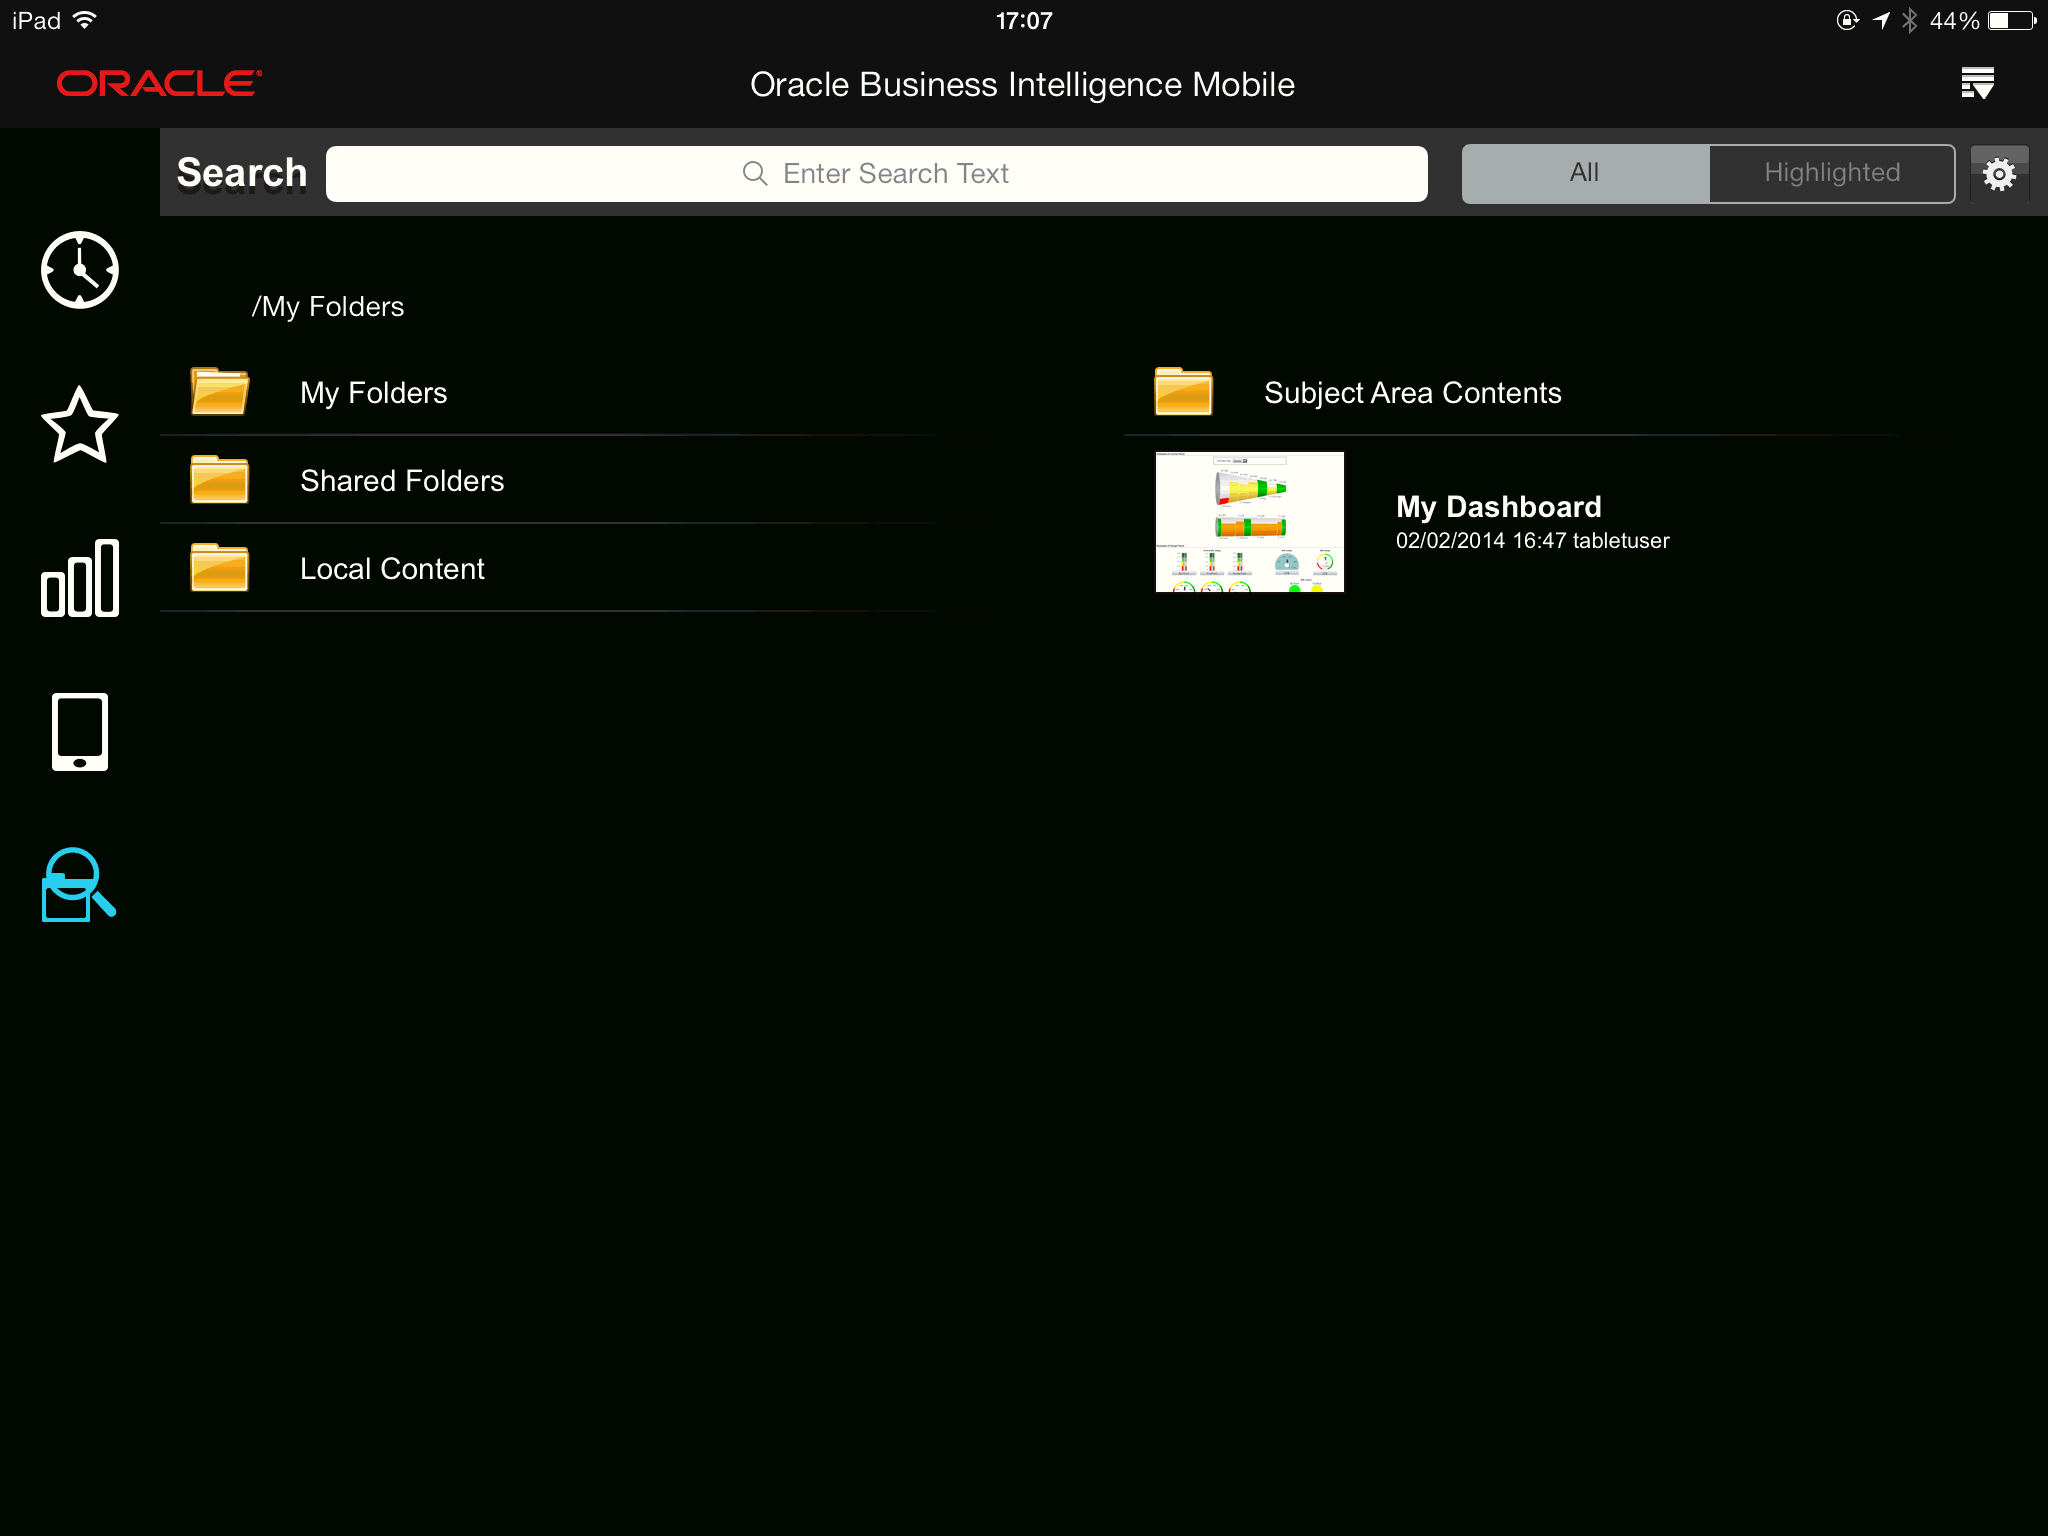
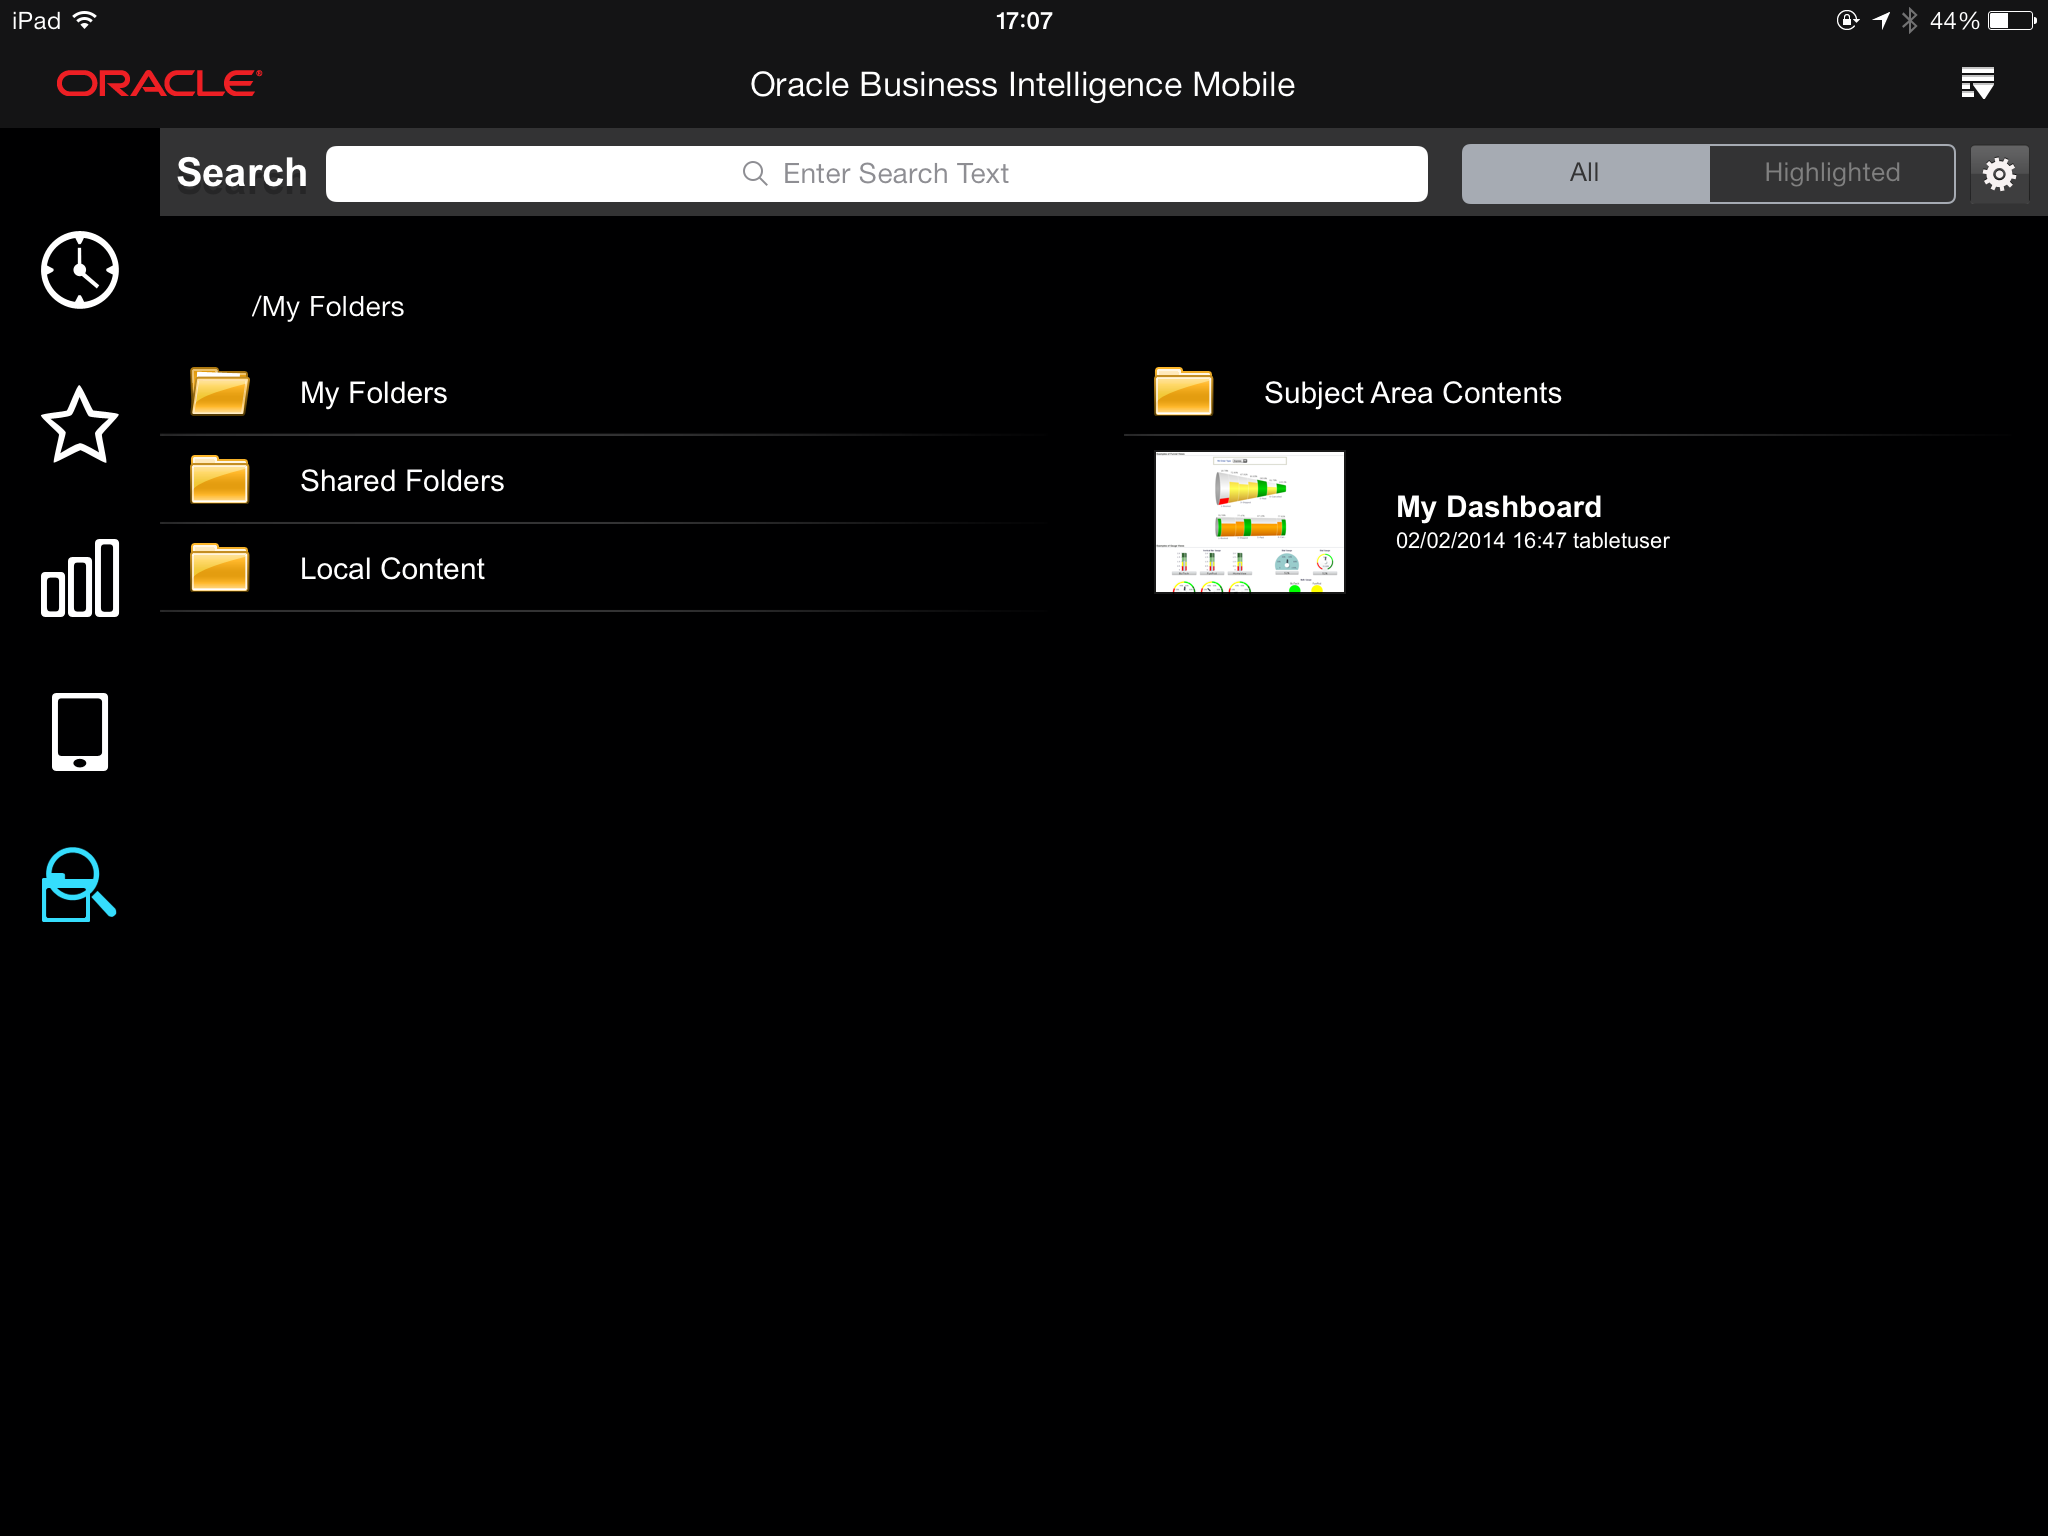
Figure 3-1 shows the Search view. With the All toggle selected, you can see the hierarchy of folders in the catalog.
Inside folders, generic icons represent content that you have not previously opened, while thumbnail images of the actual catalog objects represent BI content that you have previously opened.
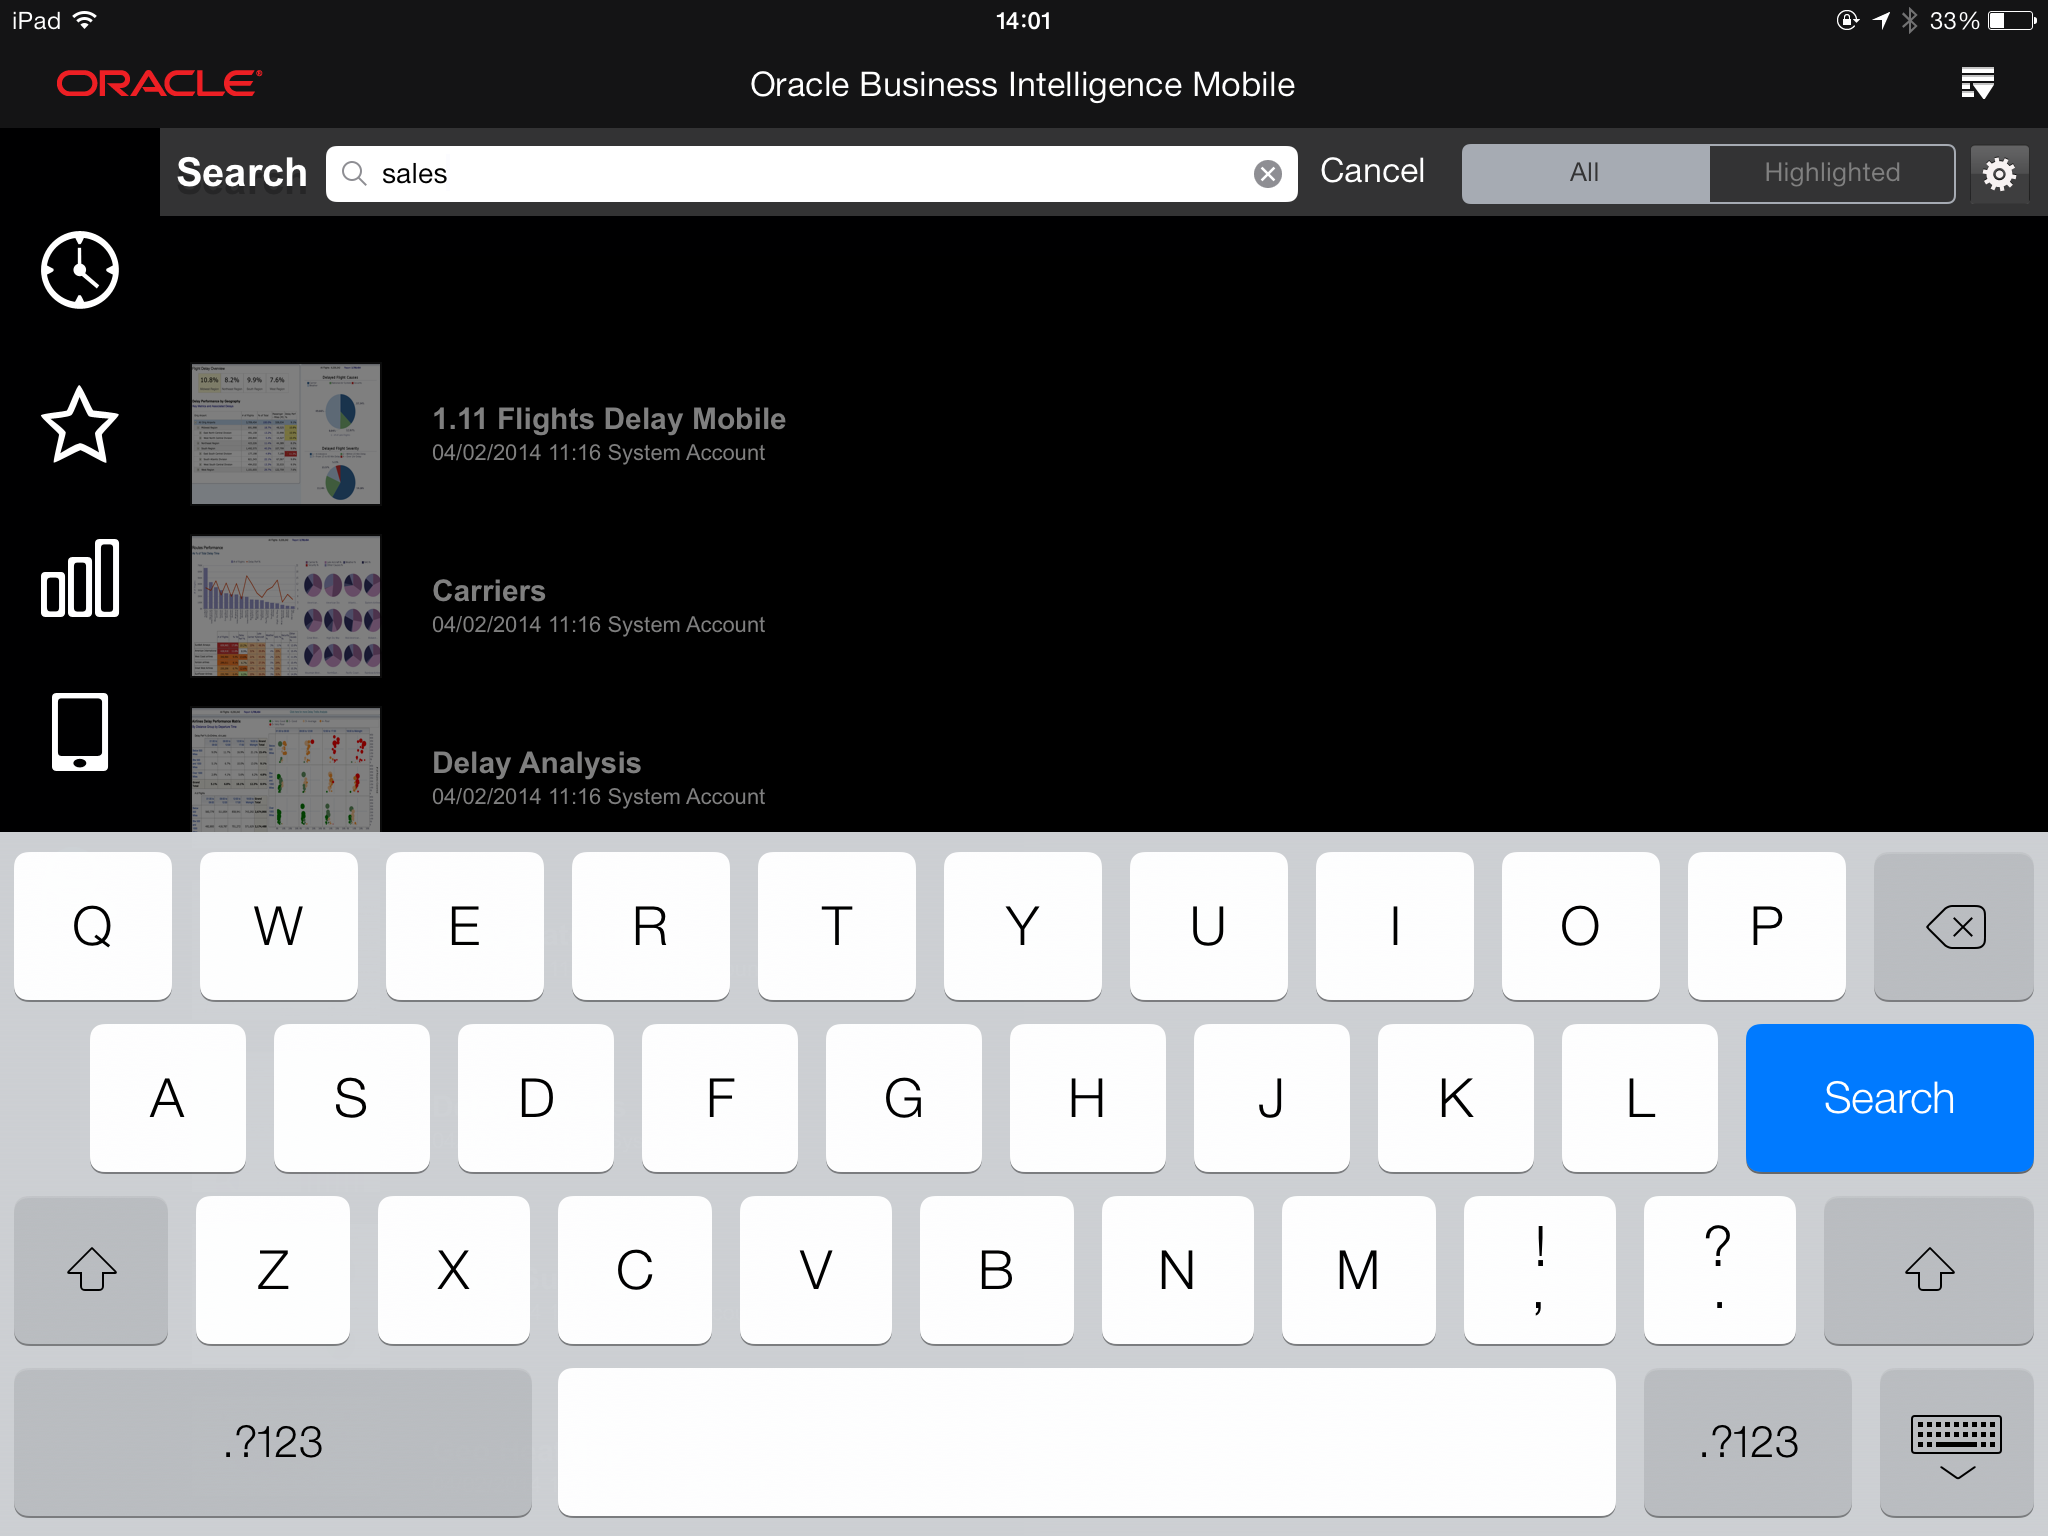
You use the All/Highlighted toggle at the top of the screen to specify which parts of the catalog to be included in your search. When you set the toggle to All, the search is performed in all folders (Local, Shared Folders, My Folders). When you set the toggle to Highlighted, the search is performed in the context of the folder that is highlighted in the catalog list.
This section includes the following topics:
-
"Switching Screen Orientation Between Landscape and Portrait"
-
"Navigating and Switching Between the Carousel, List, and Grid Display Styles"
For information on gestures that you use to interact with the application, see Appendix B, "Touch Gestures Used in Oracle BI Mobile."
Switching Screen Orientation Between Landscape and Portrait
While holding the iPad, you can quickly switch between landscape mode and portrait mode in order to view the Oracle BI Mobile application in whichever orientation best suits the display style or the format of Oracle BI content you are viewing. To switch the orientation, simply rotate the iPad in your hands.
Note:
If you want to lock the screen orientation so that it does not automatically change while you are holding the iPad, use the switch on the side of the device.
When switching screen orientation, BI content is not re-sized to fit the chosen orientation. For this reason, when you build dashboards intended for mobile viewing, you should consider both the landscape and portrait layouts.
Opening an Object in the Catalog
You open an object in the Oracle BI Presentation Catalog on your iPad by tapping its thumbnail image. You see the catalog hierarchy in the Search view.
To open a catalog object:
-
In the navigation bar, tap the Search icon to navigate to the Search view.
-
In a list of folders, perform one of the following actions:
-
To see the contents of a folder, tap the folder in the catalog list.
-
To go up a folder level, tap the Back arrow to the left of the directory path (below the search bar).
-
-
When you find the object you want to open, tap it.
Navigating and Switching Between the Carousel, List, and Grid Display Styles
You can choose between three display styles for the Recent view and the Favorites view. That is, you can view your BI content in three different ways. You navigate each of these display styles as follows:
-
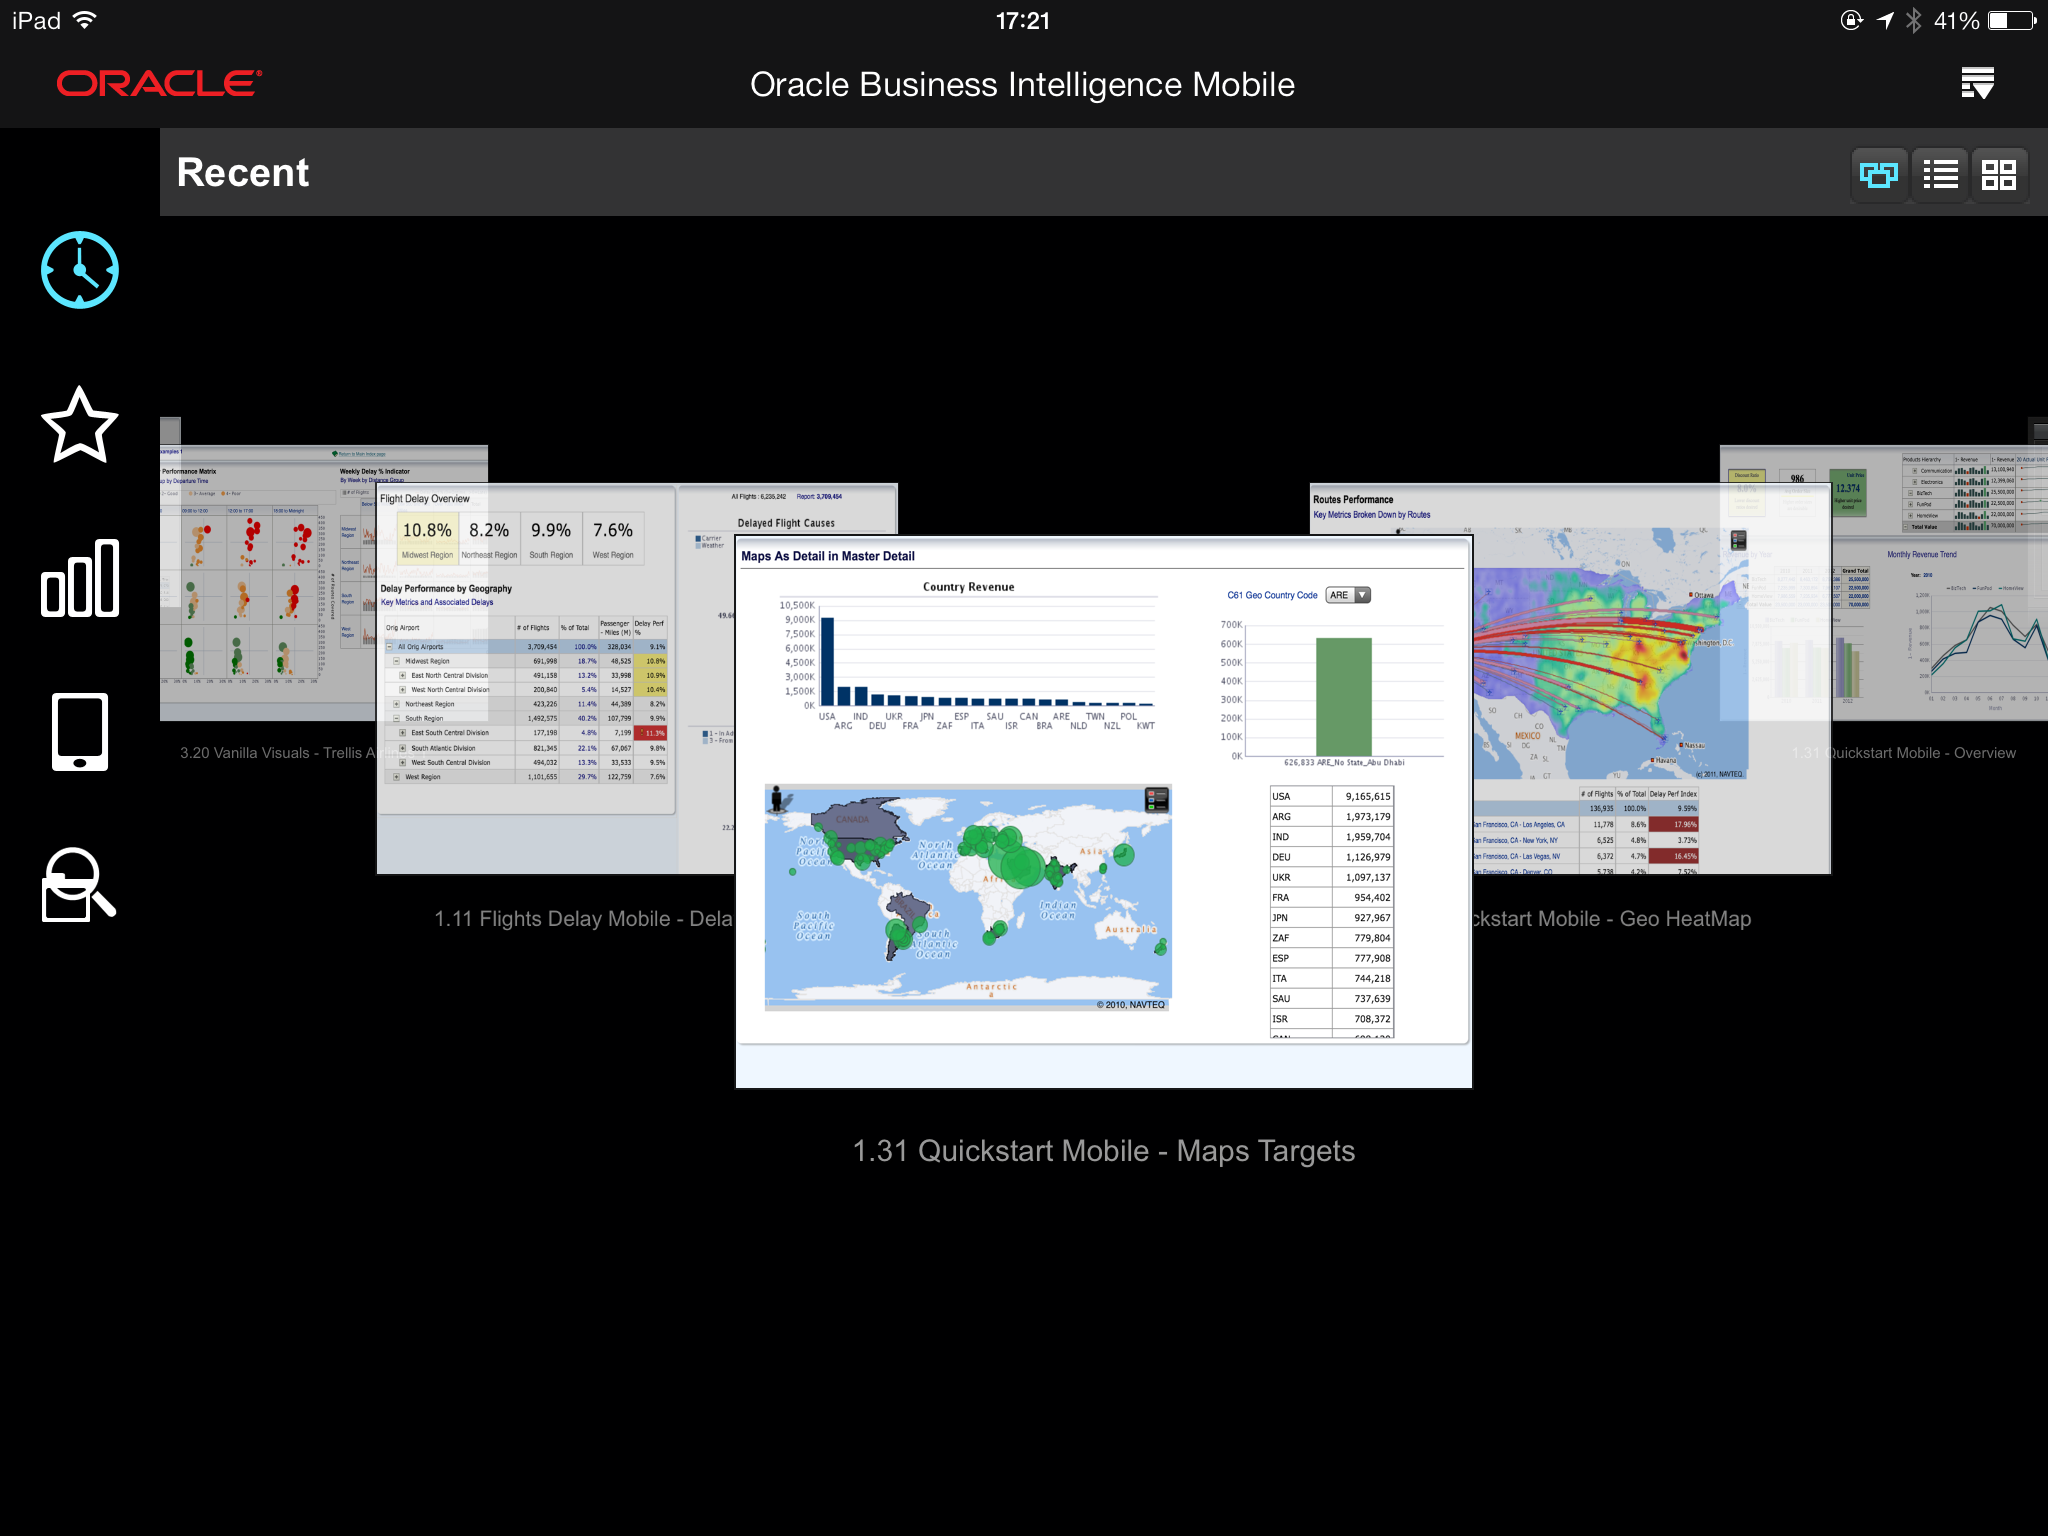
Carousel-style display. In the carousel, to navigate to a favorite or recent object, you can swipe to move to the next item (to the side of the highlighted item), or you can tap the next item to move to it. Then tap it to open it. To open a highlighted folder, tap it or use the spread-fingers gesture. To close a folder, use the pinch gesture; this takes you to the upper-level folder above the folder you closed.
-
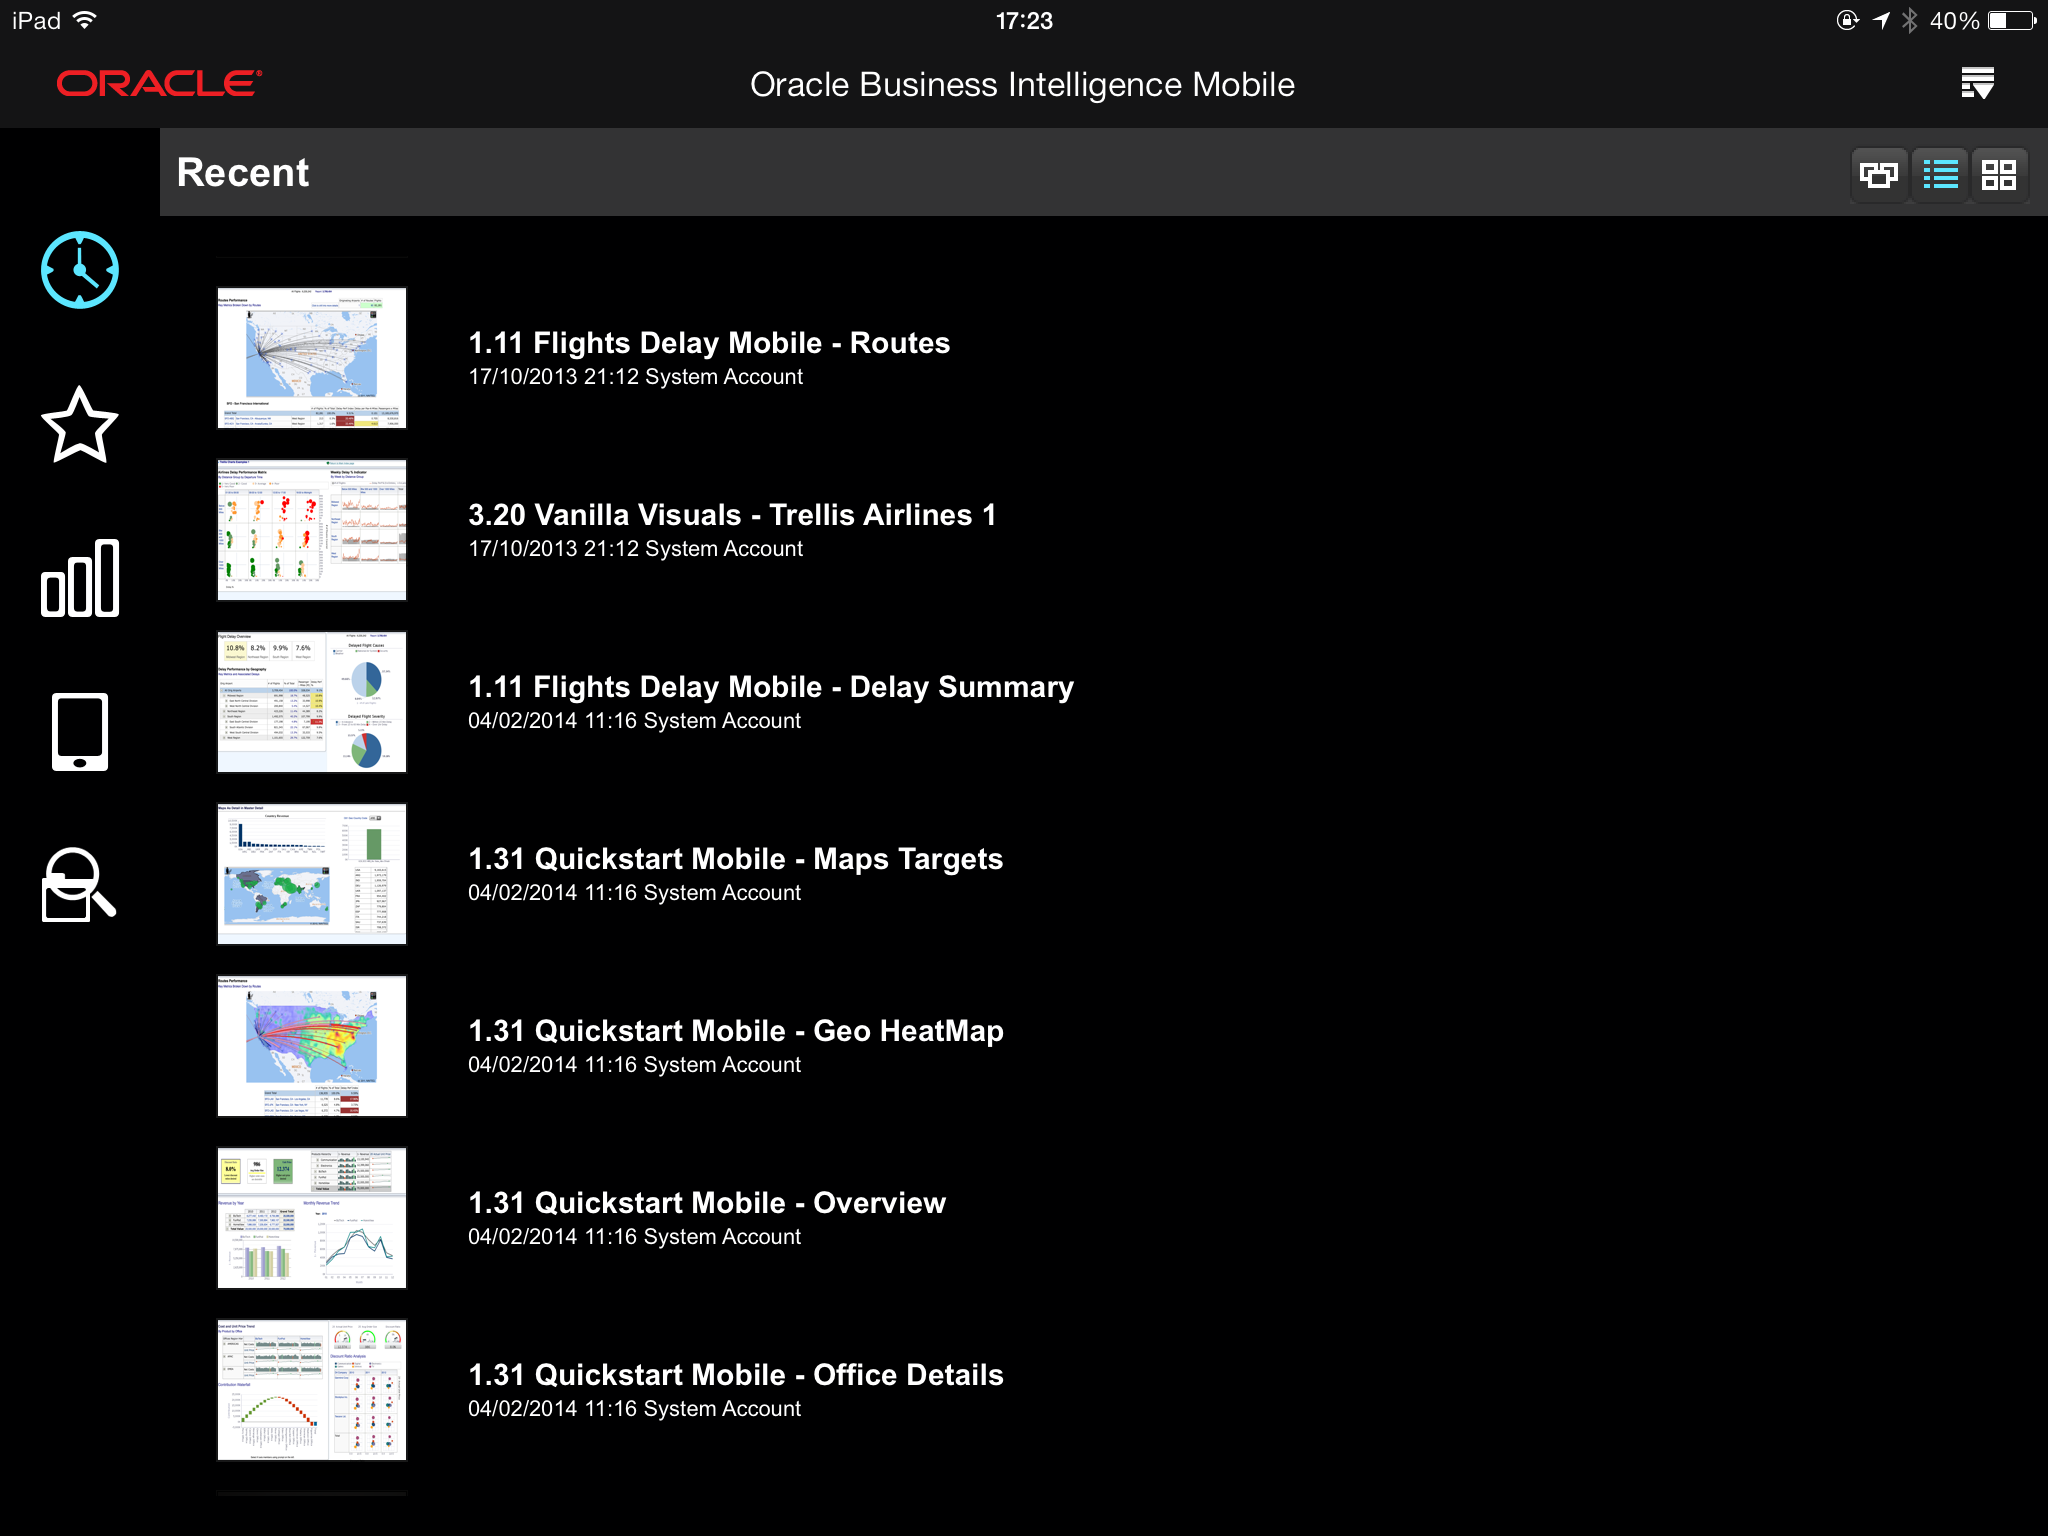
List-style display. In a list-style display, drag your finger up or down to navigate the list of objects, and when you see the object you want to view, tap it to open it.
-
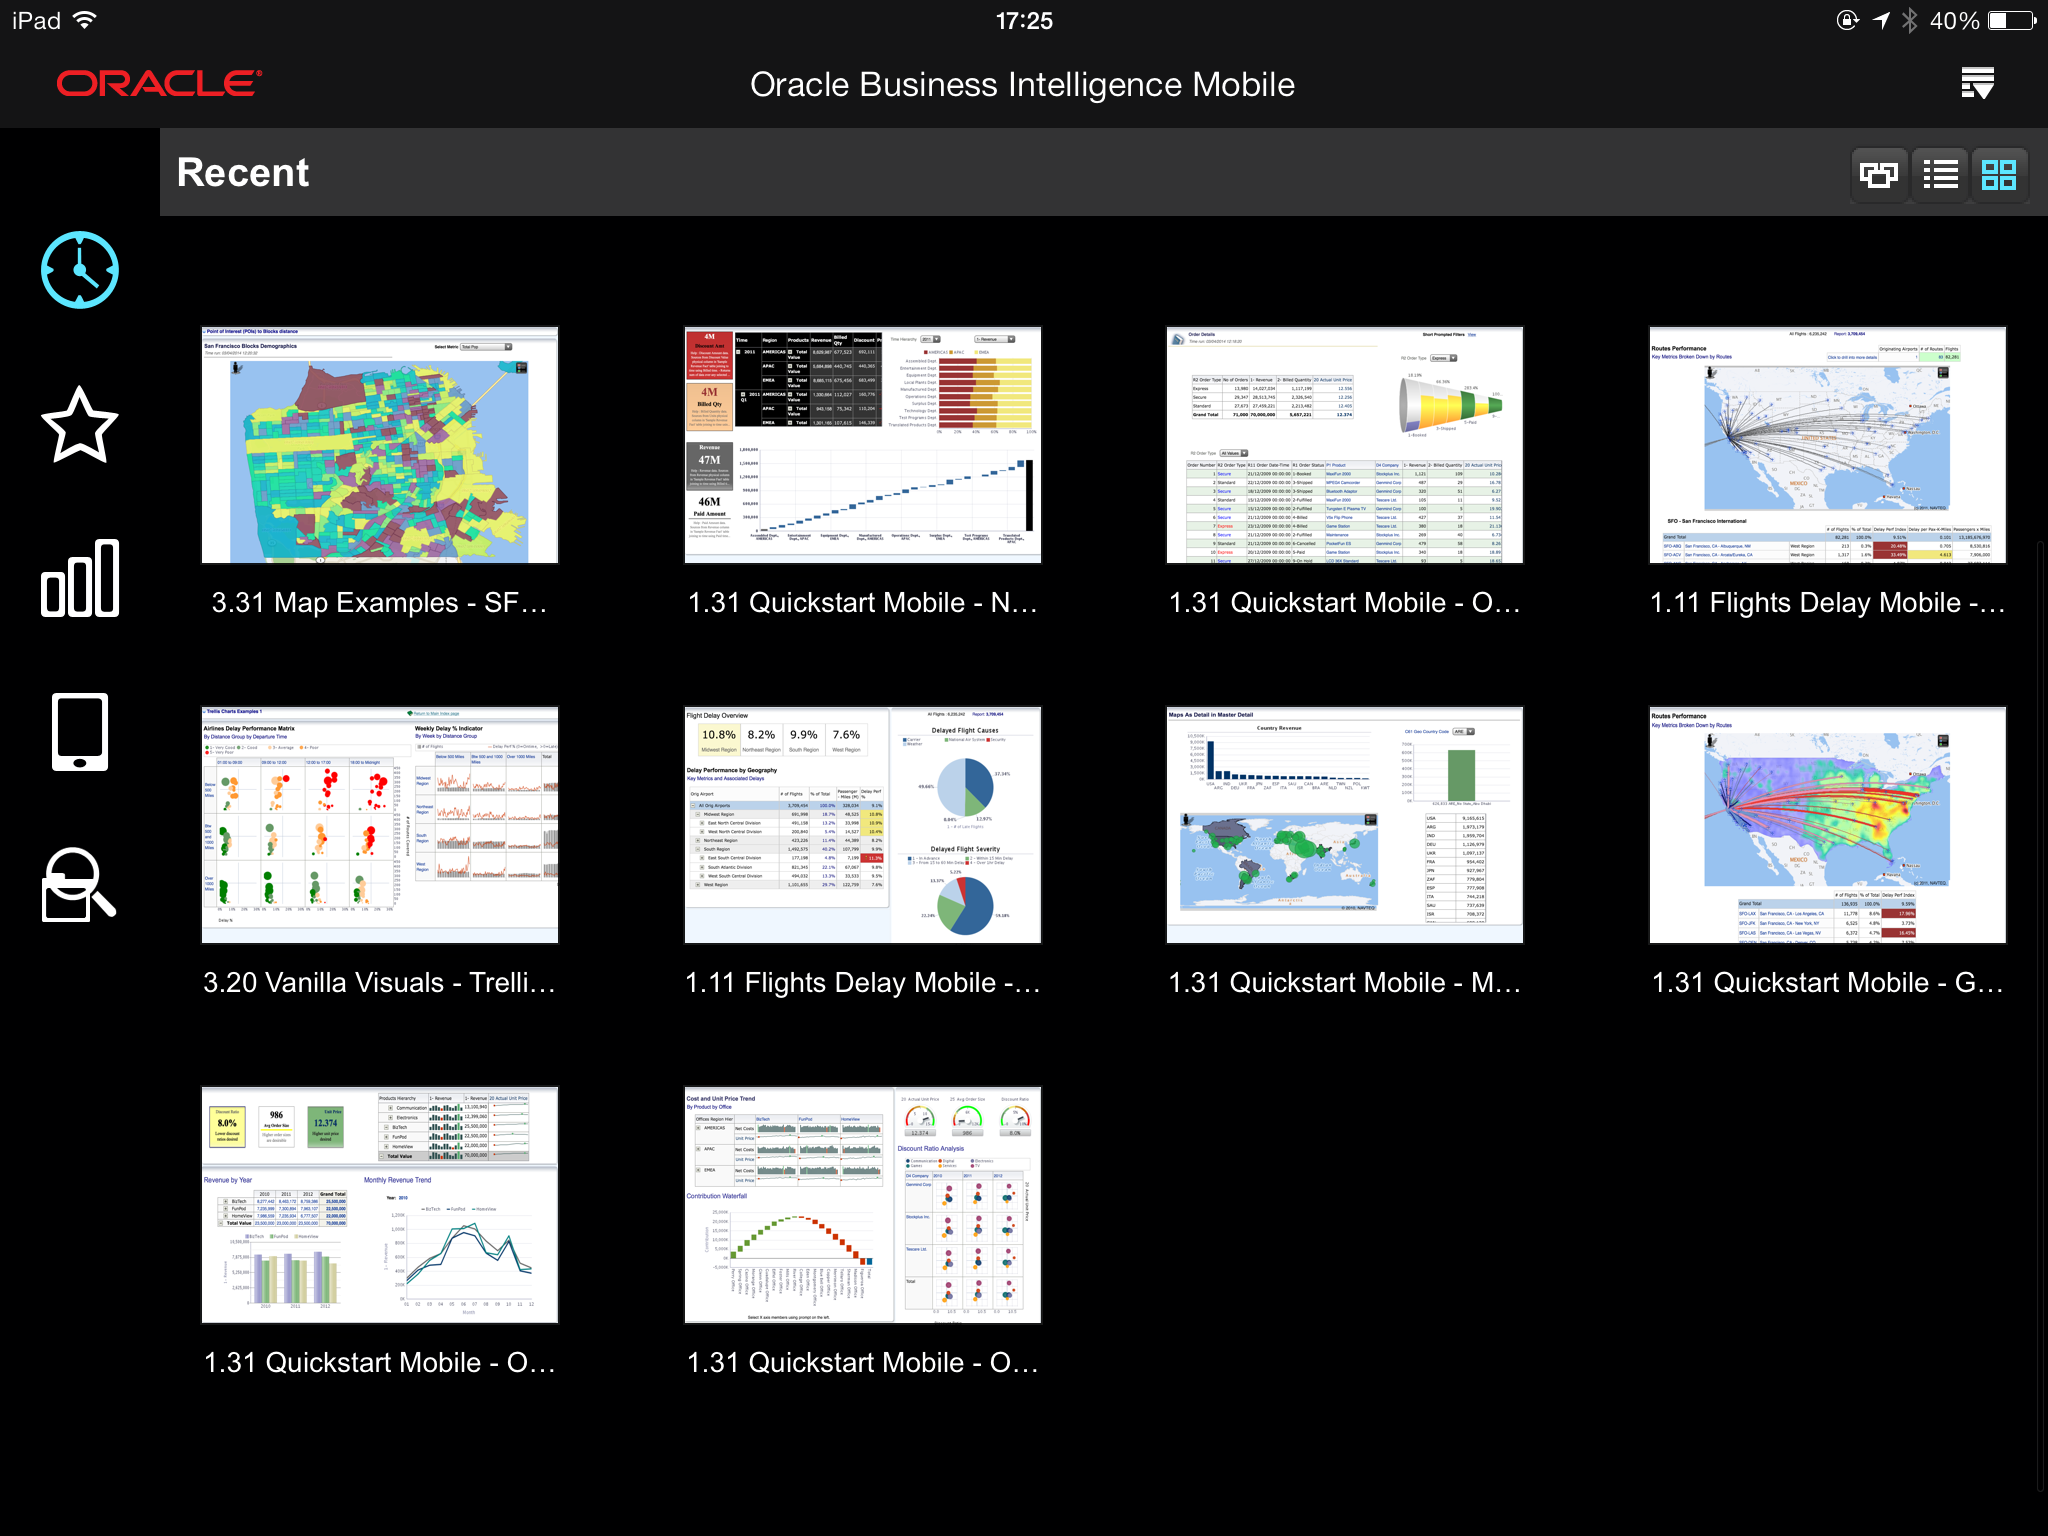
Grid-style display. In a grid-style display, tap an object in the grid to open it. If there are more objects than can fit in the display, drag your finger up or down to view all objects within the grid.
To switch between display styles, tap the respective icon for the display you want. In the Display bar, below the Options icon, you can see a toggle with three display-style icons, one of which is highlighted: the Carousel-style Display icon, the List-style Display icon, and the Grid-style Display icon.
Figure 3-2 shows the carousel-style display of the Recent view. Note that the toggle's highlighted icon is the Carousel-style Display icon.
Figure 3-3 shows the list-style display of the Recent view. Note that the List-style Display icon is displayed in the toggle at the right edge of the Display bar.
Figure 3-4 shows the grid-style display of the Recent view. Note that the Grid-style Display icon is displayed in the toggle at the right edge of the Display bar.
Navigating Directly to Dashboards
You can access your dashboards on your mobile device as quickly and easily as you can in your desktop version of Oracle BI EE. The Dashboards screen displays a list of all the top-level dashboards to which you have access.
To open a dashboard:
-
In the navigation bar, tap the Dashboards icon.
A list of your top-level dashboards is displayed for you to scroll through. This set of dashboards is identical to the list you see when signed in to Oracle BI EE with the desktop application.
-
Tap a dashboard.
About Working with BI Content in the Mobile Application
There are significant differences in how users interact with applications when the user interface is touch-based rather than mouse-based.
In the content area of your iPad's screen, you can view BI content using standard iPad browser interactions, such as panning. You can double-tap on a view to expand it to the full screen. The right-click functionality of the desktop application is accessed using a tap-and-hold gesture. As with many iPad applications, there is no dragging of content in Oracle BI Mobile.
See Appendix B, "Touch Gestures Used in Oracle BI Mobile" for information on the various interactions you can do in the Oracle BI Mobile application.
While viewing BI content, you can tap the Options icon in the title bar to access an Options menu. Menu items vary based on the type of BI content you are viewing.
For important information about how to protect your BI content, see
Working with Back Arrow and the Previous Icon
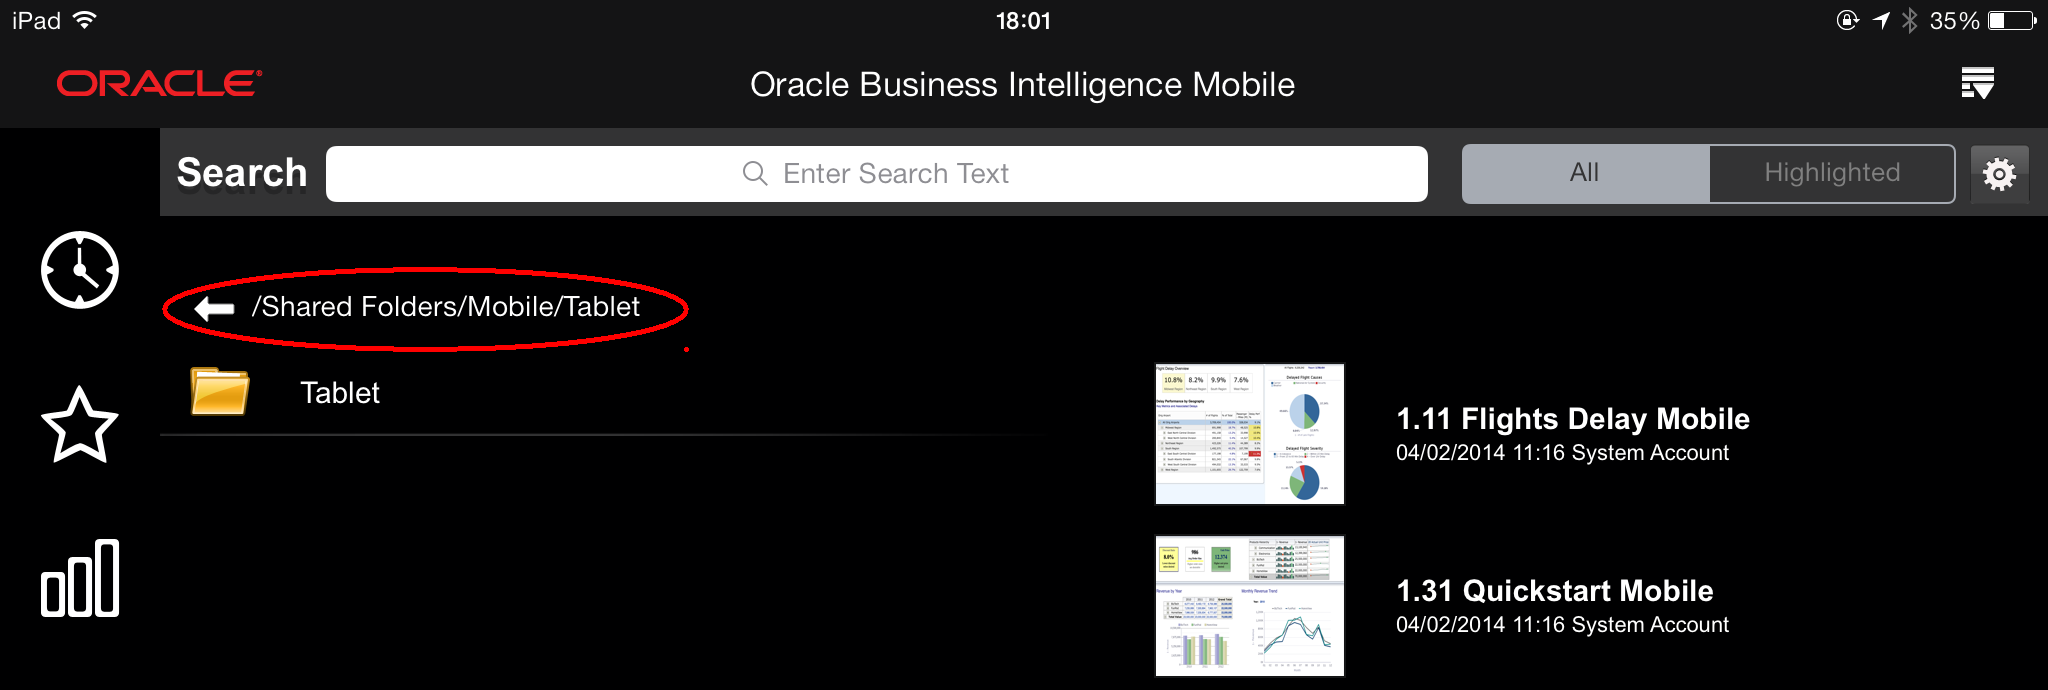
In Figure 3-5, you can see an example of a recent history of navigating the catalog, as a trail of breadcrumbs circled in red. To navigate the catalog backward through your recent history, tap the Back arrow to the left of the breadcrumbs.
When you have opened a catalog object, your screen includes a Previous icon at the top left in the title bar, as shown in Figure 3-6.
Tapping the Previous icon navigates you backward to your starting view, for example, to your Recent view if that is your default starting view.
Note:
In Oracle BI Mobile apps, the title bar toggles off to allow the screen space to be dedicated to the app. To navigate backward from within an Oracle BI Mobile app, tap once in the iPad's status bar (where the current time displays) to reveal the Previous icon, then tap the Previous icon to navigate back. For more information on Oracle BI Mobile apps, see "Working with Oracle BI Mobile Apps."
You can navigate backward from a drill, and you can navigate backward between external URLs (when there is a navigation link in the BI content).
Working with Tooltips
You can view tooltips within BI content by tapping individual items within the content, such as a bar in a graph.
A gesture called "tap-and-hold"—which is touching a menu option for about half a second—allows you in Oracle BI Mobile to view the full text of a tooltip if it extends beyond the size of the popup. If in a tooltip, a menu item's text exceeds the width of the context menu, tapping and holding the item opens a popup that displays the entire text of the menu option.
Refreshing BI Content
If the Refresh option is available, then you can refresh the data associated with the open BI content. The Refresh option updates the data associated with the object you are viewing; the Refresh option does not update any other modifications that may have happened to the object while you have had it open.
-
Open the object.
-
Tap the Options icon and then tap Refresh.
The query is rerun and the content is refreshed.
Viewing Properties of BI Content
You can view read-only properties about your BI content, including type, description, author, file location, and last-modified date. In addition, for alerts you can view alert definition fields (Last Run, General, Schedule, Condition, Content, Recipients, Destination, Actions).
To view properties for BI content:
-
Tap the Options icon and then tap Properties.
-
Review the catalog information in the Properties overlay.
-
When finished, drag down on the Properties overlay with one finger to hide it.
Applying and Clearing Dashboard Customizations
As you interact with BI content on your iPad, you can apply dashboard customizations from the desktop application, and also clear dashboard customizations.
When you use the Apply Customization feature, you get the latest list of currently available selections—including any customizations newly saved or changed on the Oracle BI Presentation Services server by others.
For information on saving dashboard customizations, see "What Are Saved Customizations for Dashboard Pages?" in Oracle Fusion Middleware User's Guide for Oracle Business Intelligence Enterprise Edition.
To apply a saved customization:
-
While viewing the analysis, tap the Options icon and then tap Apply Customization.
If a saved customization is available for the dashboard, you see its name in a list.
-
In the list of available saved customizations, tap the customization you want to apply.
The customization is applied to the dashboard page.
To clear a customization:
-
While viewing the dashboard, tap the Options icon and then tap Clear Customization.
Note:
You can also use the Clear Customization option to quickly restore to the defaults any prompts you have adjusted in a dashboard.
Working with Favorites
Use the Oracle BI EE favorites feature on your iPad to add as favorite any BI content that you view regularly or want to view again at another time. If you already have favorites added from your use of the desktop version of Oracle BI EE, these favorites pre-populate your favorites list when you begin using Oracle BI Mobile.
Your Favorites view shows all content you have added as favorite on your device and for your given server configuration. This means that if you configure another mobile device to the same server for the same user, the user sees the same set of favorites.
Your desktop favorites and your mobile favorites are always in sync. Changes made in either place on a given server are visible to you in both contexts.
In the Oracle BI Mobile application, you can navigate your Favorites hierarchy. While viewing a favorite, you can remove it from your favorites list. To organize your favorites, use the desktop application).
For general information on how favorites work in Oracle BI EE, see "What Are Favorites?" and that topic's related topics in Oracle Fusion Middleware User's Guide for Oracle Business Intelligence Enterprise Edition.
This section includes the following topics:
Adding Favorites in Oracle BI Mobile
When viewing BI content, you may find it useful to add objects to your favorites list to enable you to quickly return to them later.
You access the Favorites screen by tapping Favorites in the navigation bar.
To add a catalog object as a favorite:
-
While viewing the BI content, in the title bar where the object's title displays, tap the Options icon.
-
Tap Add to Favorites.
The BI content is added to your list of favorites.
-
In the navigation bar, tap the Favorites icon (the star).
The Favorites screen is displayed.
-
(Optional) Change the display style to list, carousel, or grid by tapping the respective display icon in the toggle.
-
Tap the favorite you want to open.
To remove a favorite:
-
While viewing the BI content, in the title bar where the object's title displays, tap the Options icon.
-
Tap Delete from Favorites.
The BI content is removed from your list of favorites.
Note:
On the iPhone, to remove a favorite, in the Favorites list, swipe the favorite to the left, then tap Remove.
Synchronizing Mobile Favorites with Desktop Favorites
Synchronization of favorites happens at login. When you connect to an Oracle BI Presentation Services server from your mobile device, your mobile favorites automatically synchronize with your desktop favorites. Any favorites you have added from your mobile device are automatically added to the "root" category. Any favorites you have added while logged in from the desktop are automatically synchronized to the device.
To move favorites between folders or organize them differently, you must first log in to the desktop Oracle BI EE application. For more information, see "Organizing Favorites" in Oracle Fusion Middleware User's Guide for Oracle Business Intelligence Enterprise Edition.
Working with Recent Items and Your History
Just like with your favorites, the list of your recent items is synchronized with the desktop version, and this happens at login. When you connect to an Oracle BI Presentation Services server from your iPad, your mobile list of recent items automatically synchronizes with your desktop recent items.
Local BI content does not display in your recent items list, because your locally saved catalog objects are not available from the desktop version.
Working with Local Content
In Oracle BI Mobile, a local-content version of a catalog object is like a briefing book. It is a separate copy of the BI content, for which only the data can be refreshed.
You can work with BI content saved locally to your iPad whether you have a server connection or not.
This section is organized as follows:
Saving Content Locally
You can save local versions of BI content to your mobile device. You can save analyses, dashboards, scorecards, briefing books, and BI Publisher reports.
To save BI content locally:
-
While viewing BI content, tap the Options icon.
-
Tap Save to Local.
-
Tap OK.
Note:
If you are saving BI content locally to your device, it is strongly recommended that you use the iPad's Passcode Lock feature. Make sure this setting is ON in the iPad's Settings screen, General section.
Viewing Local Content
In the Server Connection screen, you can directly access your Local Content without connecting to an Oracle BI Presentation Services server.
To view local content:
-
(Optional) In the login screen, tap Offline.
You do not need to be offline to view local content. Take this step if you want to see only local content (that is, no live content from a BI Presentation Services server).
-
In the Local view, swipe to scroll through your local content.
-
Tap the thumbnail for the BI object you want to view.
When viewing BI content that is saved locally, you can readily see that the content you are viewing is a local copy rather than live content, because "Local Copy" displays immediately after the name.
You can refresh your Local content while in online mode to fetch data changes from the server.
To delete local content:
-
In the Local view, find the thumbnail image for the catalog object you want to delete.
-
Swipe left across the row containing the thumbnail image.
-
Tap Delete.
To refresh your local content:
-
If you are in Offline mode and you want to refresh BI content you are viewing locally:
-
Tap the Previous icon to return to the Local view.
-
Tap the Options icon, and then tap Login [your BI Presentation Services server].
-
Tap the Local icon, and return to the BI content you were viewing.
-
Tap the Options icon, and then tap Refresh.
The timestamp on the BI object thumbnail, when in the Local view, shows the time that you refreshed it from the server.
-
-
If you are in Online mode and you want to refresh BI content you are viewing locally:
-
Tap the Options icon, then tap Refresh.
-
Securing BI Content Saved Locally
As described in "Understanding Mobile Device Management," there is a security toolkit available for the Oracle BI Mobile application that allows you to add additional protection to your BI content, including locally saved BI content.
There are security measures you can take with your iPad—outside of Oracle BI Mobile—that can enhance the security of your BI content and your organization's data. For example, you can remotely wipe the device clean in case of theft or loss.
While the location of locally saved BI content may be obvious, note that local content in Oracle BI Mobile is device-local. This means it is not just viewed locally, but it is actually physically located on the iPad and therefore it is accessible to anyone able to access the iPad. For this reason—when you are working with Oracle BI Mobile and saving content locally—a passcode lock on your iPad is vital to your organization's data security.
The use of a SSL connection, or a SSO and SSL connection, has no bearing on the security of your locally-saved BI content. Connecting to a secure Oracle BI EE online environment has nothing to do with offline content.
To set the iPad's Passcode Lock setting to ON:
-
In the iPad's home screen, tap the Settings icon.
-
In the General section, find the Passcode Lock row and toggle the setting to ON.
Note:
Your administrator should enforce passcode locks on your organization's Oracle BI Mobile iPads, unless they disable local content entirely on the server side, using the Local Content privilege. For more information, see "Disabling Local Content."
Disabling Local Content
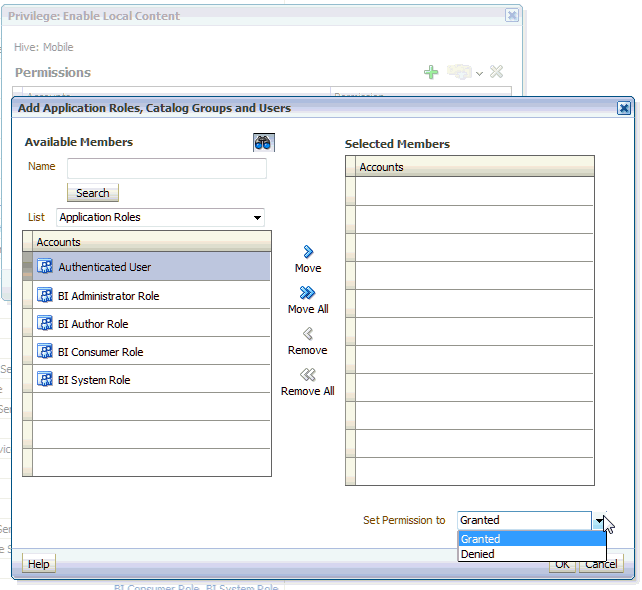
In the desktop version of Oracle BI EE, administrators can disable access to the save-locally feature. This is done in the Security area of the Administration: Manage Privileges page, by restricting the privilege called "Enable Local Content." For more information, see "Default Presentation Services Privilege Assignments" in Oracle Fusion Middleware Security Guide for Oracle Business Intelligence Enterprise Edition.
Figure 3-7 shows how the Enable Content Privilege can be disabled on a per-user basis, or by role, such as BI Consumer.
For more information on security of your BI content, see
Performing Searches
Oracle BI Mobile provides the same basic search behaviors as the desktop version of Oracle BI EE. In the Oracle BI Mobile application, you can search on catalog object name, catalog object type, location, and description. The results list of the search is restricted to objects you can view with Oracle BI Mobile. The results list is comprised of thumbnail images, each accompanied by the object name and date it was last modified.
If your administrator has integrated your desktop version of Oracle BI EE with Oracle Secure Enterprise Search, or with Oracle Endeca Server, you can perform full-text catalog searches in addition to basic catalog searches. (For Endeca searches, however, unlike in the desktop version, you cannot filter the data based on attributes, nor can you narrow the search results or sort them based on relevance.) For information on full-text catalog search, see "How Can I Search for Objects" in Oracle Fusion Middleware Metadata Repository Builder's Guide for Oracle Business Intelligence Enterprise Edition.
The Search view displays the search directory below the search criteria field. When the All/Highlighted toggle is set to Highlighted, the search directory represents the base directory from which your search is performed. If the toggle is set to All, the search is performed across all folders (My Folders, Shared Folders, Local Content).
You can change your search options using the Search Settings screen. The Search Settings screen is accessed from the Search view using the gear icon beside the All/Highlighted toggle. For more information, see "Adjusting Search Settings."
Figure 3-8 shows the Search view.
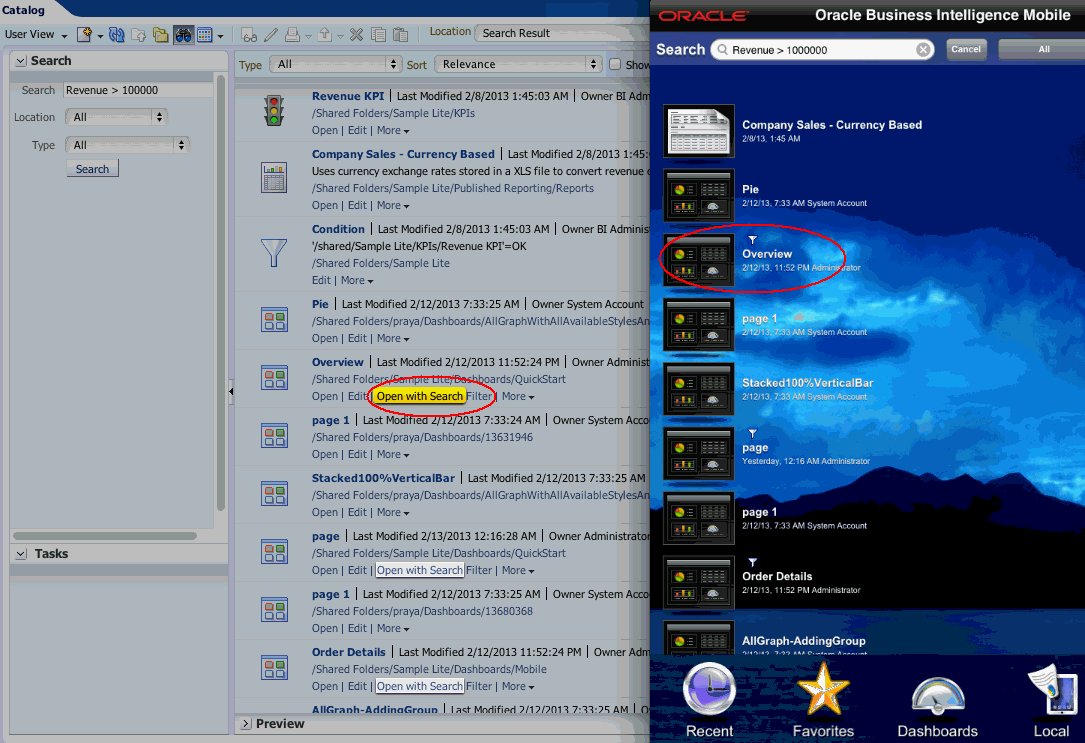
If your desktop version of Oracle BI EE is integrated with Oracle Endeca Server, on some dashboard icons in your search results list, you may see a tiny funnel icon, as circled in red in Figure 3-9. The funnel icon indicates that the object has been set (in the desktop version) to enable opening with a search filter applied. (In the desktop version, you click Open with Search Filter to open the dashboard in this way.) In Oracle BI Mobile, when you open a dashboard that has this funnel icon, the dashboard opens and applies the search criteria values (of the applied search filter) as prompt values to the dashboard.
Navigating the Search View
The Search view has a toggle for All and Highlighted, and your search is performed either in a specific location within the catalog (that you highlight) or within the entire catalog, depending on which setting you select.
If you perform a search within a specific, highlighted location, and then want to expand your search to the entire catalog, you can tap Continue searching in other folders to do so. This option displays below the last entry in the search result list, or below the "No results found" message. See Figure 3-10.
You can cancel a search that is in progress by tapping the Cancel button.
Note:
Your local BI content is included in searches performed from the Search view. To search only among BI content saved locally, use the Search field in the Local view.
Adjusting Search Settings
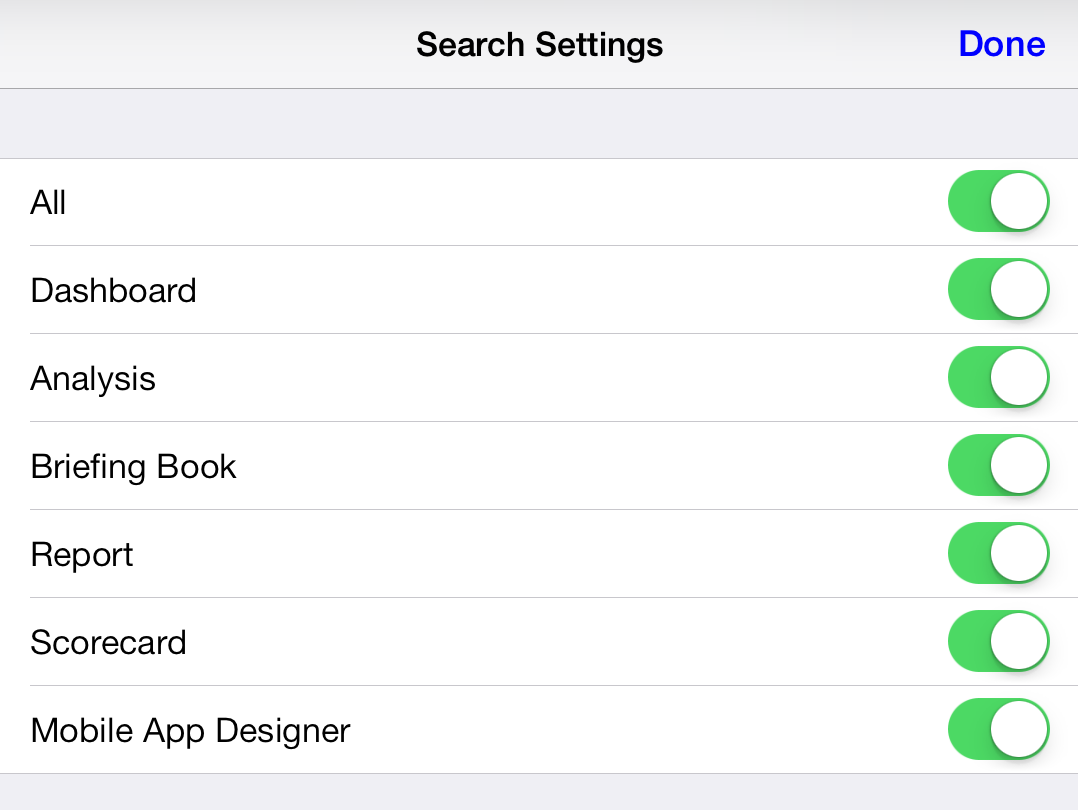
You access the search options specified for your device using the Search Settings dialog. You use this dialog to set the catalog object types you want to include in searches. Figure 3-11 shows the Search Settings dialog.
To adjust the search settings:
-
To the right of the Search field and the All/Highlighted toggle, tap the Search Settings icon (the gear).
-
In the Search Settings dialog, tap the ON/OFF toggles for each type of catalog object you want to include or exclude in searches.
-
When you are finished, tap Done.
Searching for BI Content
In the Oracle BI Mobile application, you search for BI content in the Search view.
To search for BI content:
-
In the navigation bar, tap the Search icon.
The Search view is displayed.
-
In the Search field at the top of the Search view, enter your search criteria. An example of criteria is "UPC*" to search all content for which the content name begins with "UPC".
The syntax of the search string is identical to that of the desktop version of Oracle BI EE, including usage of special characters. Search criteria are case-insensitive. See the "Search pane" topic in Oracle Fusion Middleware User's Guide for Oracle Business Intelligence Enterprise Edition.
-
Tap the Search button in the keyboard, as shown in Figure 3-12.
Your search is performed on the server, and the search results are displayed in a list. Tap a row to open BI content.
When you view the list of thumbnails that comprise your search results, the enclosing folder of an object is not obvious.
To determine the location of an object in the catalog:
-
While viewing the catalog object, tap the Options icon.
-
Tap Properties.
The object's location is specified in the Location row of the Properties overlay.
-
On the Properties overlay, swipe down with one finger to return to the object.
Sending BI Content in Email
If you have configured an email account on your iPad, you can embed links to BI content in emails you send. You can also send BI content as attachments to emails, or as inline content in the emails.
While you are viewing BI content, you can send it in email.
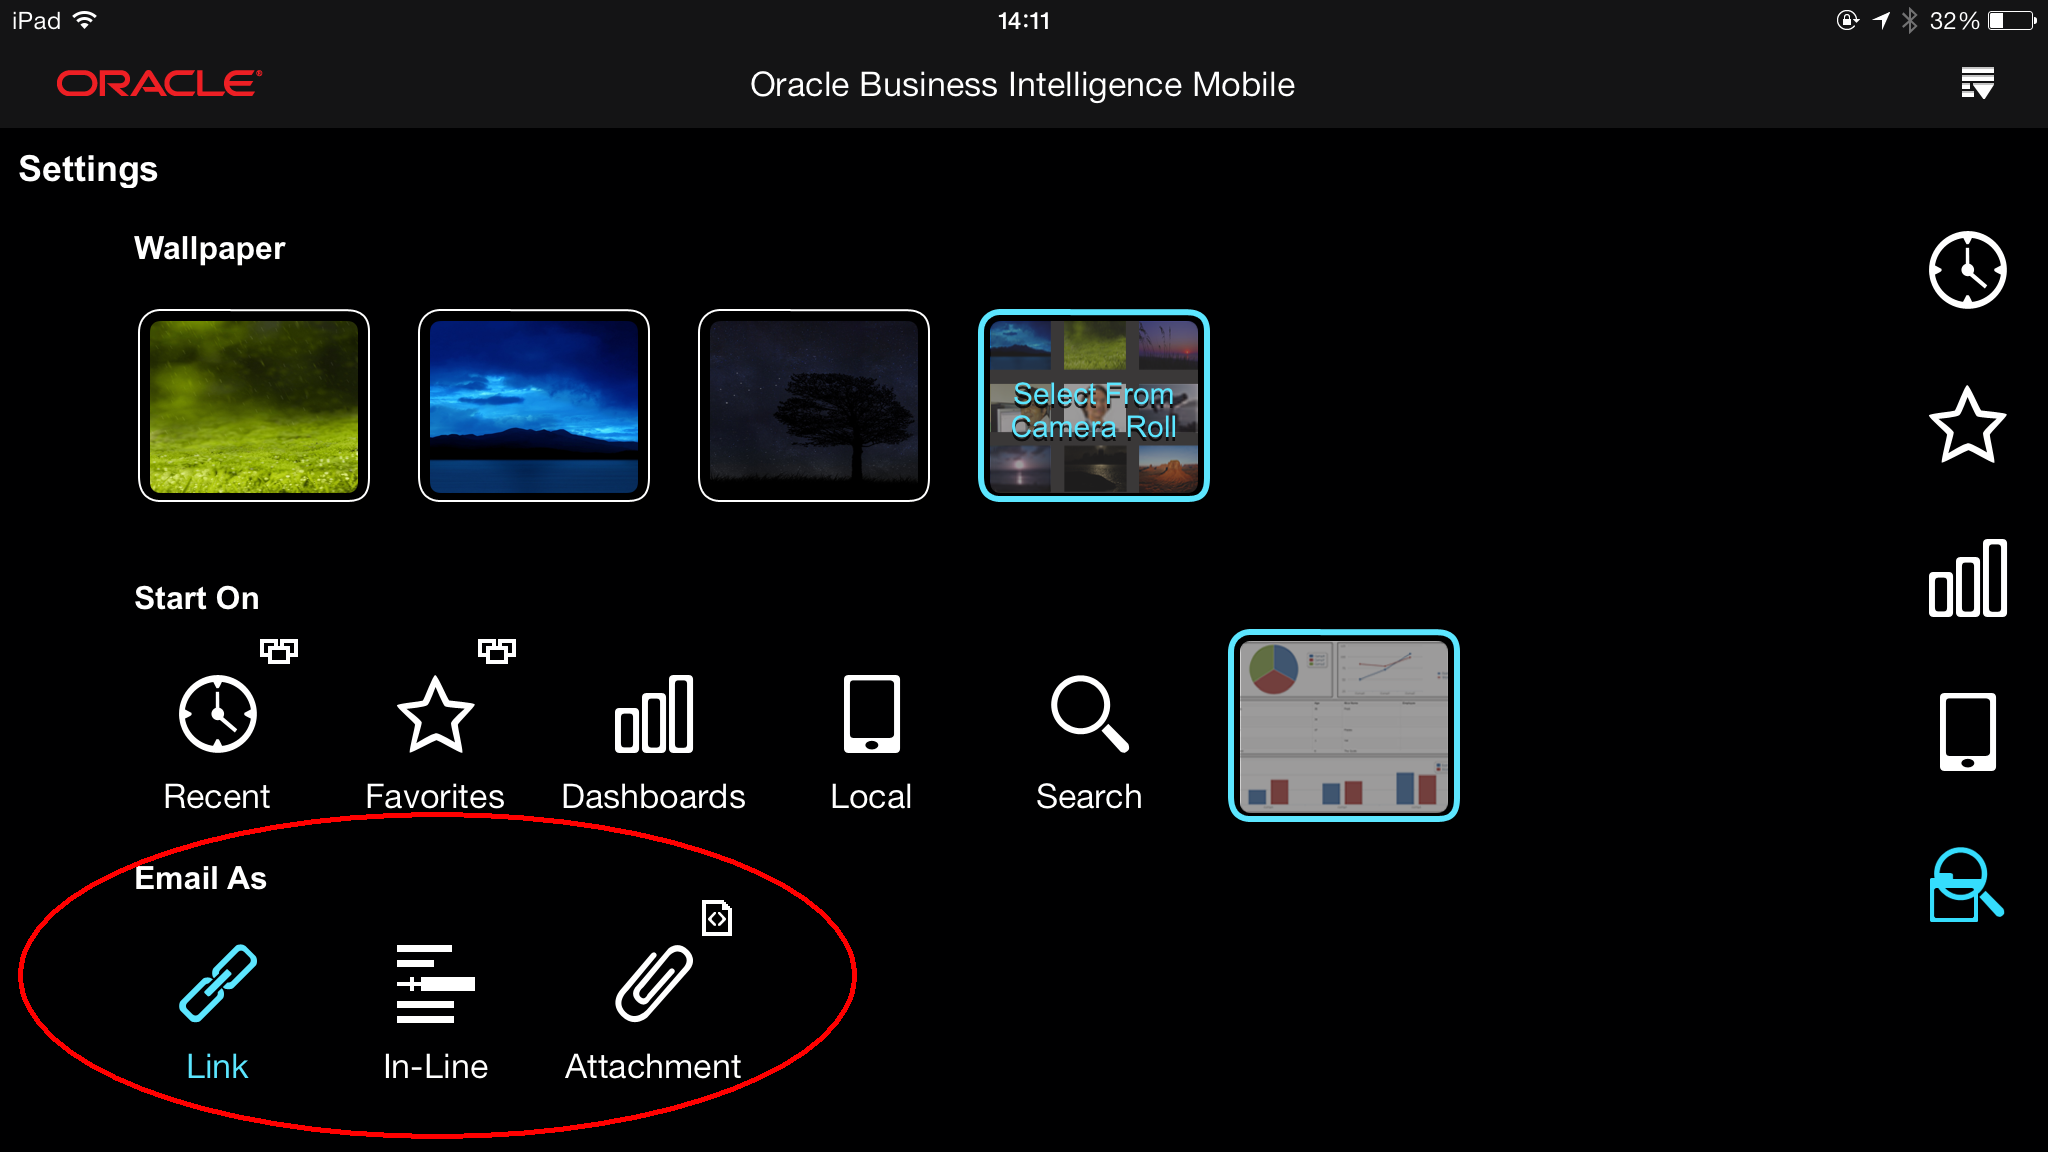
You specify the way in which you want to email BI content in the Email As section of the Settings screen, shown in Figure 3-13.
You can send BI content in several ways. You must decide which method of sending BI content is best for you, noting the various constraints you face when you have no control over your recipient's email client or web browser. Your choices of how to send BI content in email are the following:
-
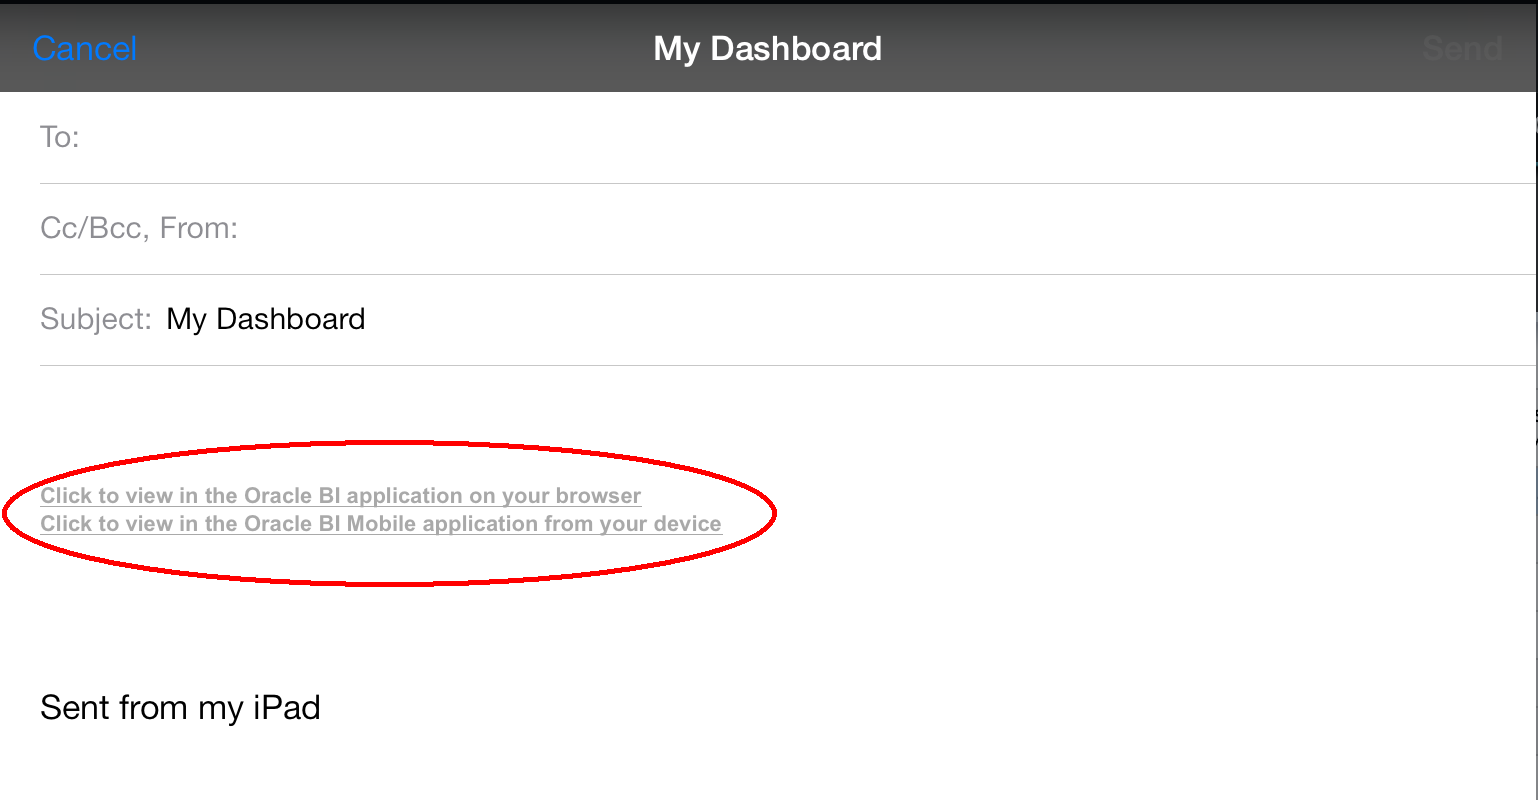
Send email with links. When this is your send-email setting and you tap Email, an email window is launched, with links to the BI content embedded in the body of the email, as shown in Figure 3-14. The links are two URL types: one is a URL that points to the content and launches a browser to open it, and the other is a URL that launches the content in the recipient's instance of the Oracle BI Mobile application. Your recipient receives the two URLs, and then chooses how to view the BI content.
Note that some BI content linked to with a URL that launches a browser may not display correctly, depending on the recipient's browser. For example, if you send a link to BI content that includes a graph, and your recipient is using a browser such as Microsoft Internet Explorer 7 or 8, the graph will not display correctly. The BI content should ideally be launched in a browser such as Microsoft Internet Explorer 9 (or higher), Mozilla Firefox, or Google Chrome.
-
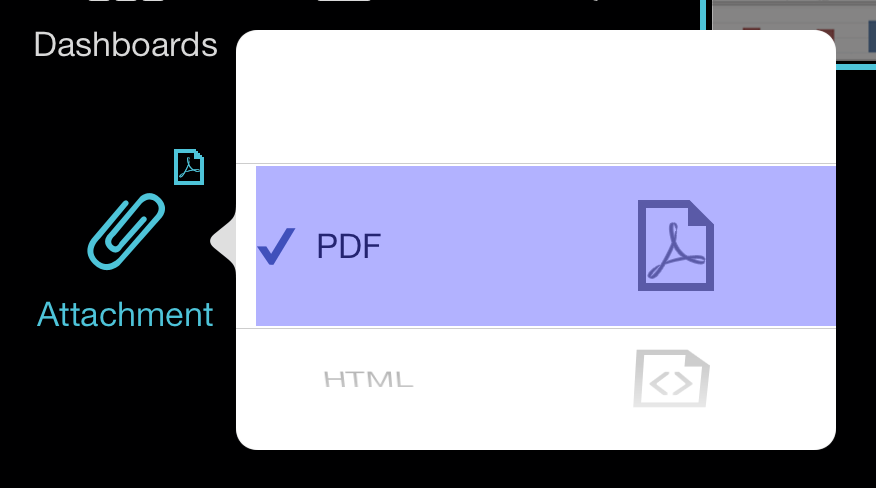
Send email with an attachment. You can choose either the HTML or PDF format for the attachment. Depending on the email client your recipient is using, the attachment you send may be unviewable, or images and text may be displayed incorrectly.
-
Send email with the BI content inline. BI content sent inline in emails may display incorrectly in older email clients. See "Sending BI Content Inline in Email."
To specify how your BI content is emailed:
-
In the branding bar, tap the Options icon, then tap Settings.
The Settings screen is displayed.
-
In the Email As section, tap one of:
-
Link
-
In-Line
-
Attachment
-
-
(Optional) If you selected Link as your sending preference, then your recipient will receive two links in the email and can then choose whether to view the link through a browser or view the link through Oracle BI Mobile. (Using the first of these two options, your recipient can view the BI content even without having access to Oracle BI Mobile.)
-
(Optional) If you selected Attachment as your sending preference, tap PDF or HTML to choose the attachment format. as shown in Figure 3-15.
-
(Optional) If you set your sending preference to Inline, make sure you understand how this affects your recipient's experience of the BI content by reading "Sending BI Content Inline in Email."
To send BI content in an email:
-
While viewing the BI content, tap the Options icon, then tap Email. Based on your email-sending preferences specified in the Settings screen, your draft email is created with embedded links, with an attachment, or with the BI content displayed inline in the email.
-
Enter the recipient's email address, and any accompanying message.
-
Tap Send.
Sending Local BI Content in Email
When you send locally-saved BI content in an email, there are no links to embed. The content is always added as an attachment.
To send local BI content in an email:
-
While viewing local BI content, tap the Options icon, then tap Email.
-
Enter the recipient's email address, and any accompanying message.
An email is created, embedded with the local BI content as an attachment. The format of the attachment is either PDF or HTML, depending on your setting in the Settings screen.
-
Tap Send.
Sending BI Content Inline in Email
You can send BI content inline in emails by using the In-Line display preference in the Settings screen.
Depending on the email client your recipient is using, the inline BI content you send may be unviewable, or images and text may be displayed incorrectly. It is best to avoid using the In-Line display preference unless you know that the recipient's email client displays inline content. Certain older email clients may not be able to display inline content containing HTML and images.
To send BI content inline in an email:
-
In the branding bar, tap the Options icon, then tap Settings.
The Settings screen is displayed.
-
In the Email As section, tap Inline.
-
Navigate to the BI content you want to send in an email.
-
While viewing the BI content, tap the Options icon, then tap Email.
Your draft email is created with the BI content displayed inline in the email.
-
Enter the recipient's email address, and any accompanying message.
-
Tap Send.
Printing BI Content
If you are using an iPad that supports multitasking (that is, a device running iOS 4.2 or later), you can wirelessly print BI content.
Note:
For the printer discovery and execution of print jobs provided by the Apple iOS, you must have an AirPrint-enabled printer connected to the same wireless network as your iOS device.
To print BI content:
-
While viewing BI content, tap the Options icon.
-
Tap Print.
Note:
The XML format is not supported for printing. While you can view FO-formatted XML (XSL-FO) using Oracle BI Mobile, XML data cannot be printed from your mobile device. ???To address Doc Bug 12958528.
