35 Integrating Microsoft Excel with a Human Task
This chapter describes for developers how to integrate the enterprise system capabilities of Oracle SOA Suite with Microsoft Excel 2007. This integration enables you to invoke a BPEL process from Microsoft Excel and attach Microsoft Excel workbooks to workflow email notifications. You can configure this integration without having to switch between tools.
This chapter includes the following sections:
-
Section 35.1, "Configuring Your Environment for Invoking a BPEL Process from an Excel Workbook"
-
Section 35.2, "Attaching Excel Workbooks to Human Task Workflow Email Notifications"
35.1 Configuring Your Environment for Invoking a BPEL Process from an Excel Workbook
From an Excel workbook, you can invoke a BPEL process that is deployed in Oracle WebLogic Server. To perform this task, you install a plug-in of the Application Development Framework Desktop Integration (ADF-DI) on the same host as the Excel document that invokes the BPEL process.
35.1.1 How to Create an Oracle JDeveloper Project of the Type Web Service Data Control
You use the Create Web Service Data Control Wizard to create the project.
To create an Oracle JDeveloper project of the type web service data control:
-
In Oracle JDeveloper, from the File menu, select New. The New Gallery dialog appears.
-
In the Categories section, expand Business Tier, then select Data Controls. The corresponding items appear in the Items pane.
-
In the Items pane, select Web Service Data Control and click OK. The Create Web Service Data Control Wizard appears.
-
Follow the instructions in the online Help for this wizard. As you follow these instructions, you are prompted to select the WSDL file and operations to use for this project.
35.1.2 How to Create a Dummy JSF Page
In this task, you generate a page definition file. The actual layout generated in the JSF file is not of a concern. Instead, you simply want to generate a page definition file that contains these controls and actions. This page definition is used later in the Excel file.
-
In Oracle JDeveloper, from the File menu, select New. The New Gallery dialog appears.
-
In the Categories section, from the Web Tier node, select JSF. The corresponding items appear in the Items pane.
-
In the Items pane, select JSF Page and then click OK. The Create JSF Page dialog appears.
-
Fill in the various fields by following the instructions in the online Help for this dialog.
-
When prompted, drag and drop the controls and fields from the Component Palette that you are interested in using in the Excel document.
For an example of how to perform this task, see Section 35.2.3.3, "Task 3: Create a Valid Page Definition File to Be Used in the Excel Workbook."
35.1.3 How to Add Desktop Integration to Your Oracle JDeveloper Project
To add Oracle ADF-DI to the technology scope of your project, use the Project Properties dialog in JDeveloper.
To add Oracle ADF Desktop Integration to your project:
-
In the Application Navigator, right-click the project to which you want to add the Oracle ADF-DI module and choose Project Properties from the context menu.
If your application uses the Fusion Web Application application template, select the ViewController project. If your application uses another application template, select the project that corresponds to the web application.
-
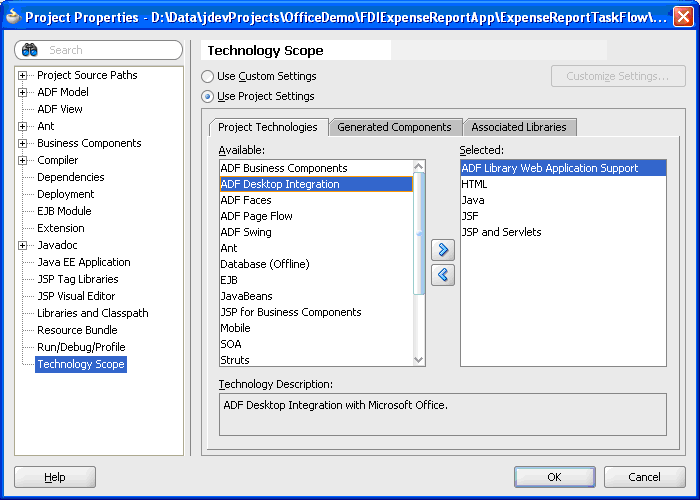
In the Project Properties dialog, select Technology Scope to view the list of available technologies.
-
Choose the ADF Desktop Integration and ADF Library Web Application Support project technologies and add them to the Selected Technologies list.
-
Click OK.
35.1.4 What Happens When You Add Desktop Integration to Your Oracle JDeveloper Project
When you add the Oracle ADF-DI module to the technology scope of your project, the following events occur:
-
The project adds the Oracle ADF-DI runtime library. This library references the following
.jarfiles in its class path: -
The project's deployment descriptor (
web.xml) is modified to include the following entries:-
Note:
The value for the
url-patternattribute of theservlet-mappingelement foradfdiRemotemust match the value of theRemoteServletPathworkbook property described in Oracle Fusion Middleware Desktop Integration Developer's Guide for Oracle Application Development Framework.
The previous list is not exhaustive. Adding Oracle ADF-DI to a project makes other changes to
web.xml. Some entries inweb.xmlare only added if they do not exist. -
When you add ADF Library Web Application Support to the technology scope of your project, the project's web.xml file is modified to include the entries shown in Example 35-1.
Example 35-1 web.xml File Entries
    <filter>
        <filter-name>ADFLibraryFilter</filter-name>
        <filter-class>oracle.adf.library.webapp.LibraryFilter</filter-class>
    </filter>
    <filter-mapping>
        <filter-name>ADFLibraryFilter</filter-name>
        <url-pattern>/*</url-pattern>
        <dispatcher>FORWARD</dispatcher>
        <dispatcher>REQUEST</dispatcher>
    </filter-mapping>
    <servlet>
        <servlet-name>adflibResources</servlet-name>
        <servlet-class>oracle.adf.library.webapp.ResourceServlet</servlet-class>
    </servlet>
    <servlet-mapping>
        <servlet-name>adflibResources</servlet-name>
        <url-pattern>/adflib/*</url-pattern>
    </servlet-mapping>
Ensure that the filter for ADF Library Web Application Support (<filter-name>ADFLibraryFilter</filter-name>) appears below the adfdiExcelDownload filter entries in web.xml, as shown in Example 35-2. This action enables integrated Excel workbooks to be downloaded from the application.
Example 35-2 web.xml File Entries
<filter>
<filter-name>adfdiExcelDownload</filter-name>
        <filter-class>oracle.adf.desktopintegration.filter.DIExcelDownloadFilter</filter-c
lass>
</filter>
<filter>
<filter-name>ADFLibraryFilter</filter-name>
<filter-class>oracle.adf.library.webapp.LibraryFilter</filter-class>
</filter>
...
<filter-mapping>
<filter-name>adfdiExcelDownload</filter-name>
<url-pattern>*.xlsx</url-pattern>
</filter-mapping>
<filter-mapping>
<filter-name>adfdiExcelDownload</filter-name>
<url-pattern>*.xlsm</url-pattern>
</filter-mapping>
...
<filter-mapping>
<filter-name>ADFLibraryFilter</filter-name>
<url-pattern>/*</url-pattern>
<dispatcher>FORWARD</dispatcher>
<dispatcher>REQUEST</dispatcher>
</filter-mapping>
For more information about web.xml, see Oracle Fusion Middleware Desktop Integration Developer's Guide for Oracle Application Development Framework.
35.1.5 How to Deploy the Web Application You Created in Step 1
For an example of how to perform this task, see Section 35.2.3.5, "Task 5: Deploy the ADF Task Flow."
35.1.6 How to Install Microsoft Excel
Install Microsoft Excel by following the appropriate Microsoft documentation.
35.1.7 How to Install the Oracle ADF-Desktop Integration Plug-in
To perform this installation, follow the steps in Section 35.2.3.4, "Task 4: Prepare the Excel Workbook."
35.1.8 How to Specify the User Interface Controls and Create the Excel Workbook
For instructions, see Section 35.2.3.4, "Task 4: Prepare the Excel Workbook."
35.2 Attaching Excel Workbooks to Human Task Workflow Email Notifications
As an alternative to using Oracle BPM Worklist, you can attach an Excel workbook with task details as part of a human task workflow email notification. In this case, the user receives an email about a new task. This email has an Excel workbook attached, and, when the user opens the attachment, they are directed to a login page similar to that for Oracle BPM Worklist. The Excel workbook includes such task details as task ID, payload, and so on. Buttons correspond to the actions the user can perform, and clicking one of them invokes the corresponding BPEL process.
35.2.1 Enabling Attachment of Excel Workbooks to Human Task Workflow Email Notifications
To enable this functionality, do the following:
-
In Oracle JDeveloper, create an ADF task flow that corresponds to a particular human task activity in a BPEL process.
-
Modify the settings in the ADF-DI-enabled Excel sheet to point to the server on which the task flow is deployed, then save this Excel sheet as part of the
.warfile packaged for the ADF task flow. The steps for performing these tasks are covered in Section 35.2.3, "Example: Attaching an Excel Workbook to Email Notifications." Later, you use the page definition files generated in Section 35.1.2, "How to Create a Dummy JSF Page."Note:
Packaging the Excel workbook with the ADF task flow assumes that there is a one-to-one correspondence between the ADF task flow and the Excel sheet used for a workflow.
-
Enable the ADF task flow project for desktop integration and deploy it to the server.
35.2.2 What Happens During Runtime When You Enable Attachment of Excel Workbooks to Human Task Workflow Email Notifications
Note the following end-user experience during runtime:
-
A user receives an email notification regarding a new task, with the Excel attachment. When the attachment is opened, the user is directed to a login page and prompted to enter a username and password. This login page is similar to the login page for Oracle BPM Worklist.
-
The Excel workbook loads up with the task details (for example, task identifier, payload, and so on). There are buttons corresponding to actions the user can take. Clicking one of these buttons starts the BPEL process in which the task is a step.
Note the following runtime behaviors:
-
The Excel workbook is added as an attachment only when the flag include task attachments for the corresponding task is set to
true. -
Before adding the Excel workbook as an attachment, runtime verifies that a digital signature is not enabled for the workflow.
-
When the ADF task flow is deployed to the server, such data as the hostname and port number of the task flow URI is registered in the database.
-
When an email notification is created, runtime retrieves the hostname and port number of the application server and the context root of the task flow application from the database. It uses this information to find the Excel workbook,
workflow_name.xls.
35.2.3 Example: Attaching an Excel Workbook to Email Notifications
This section describes how to attach an Excel workbook to email notifications.
35.2.3.1 Task 1: Enable the ADF Task Flow Project with Oracle ADF-DI Capabilities
In this task, you configure the web application to work with Oracle ADF-DI.
-
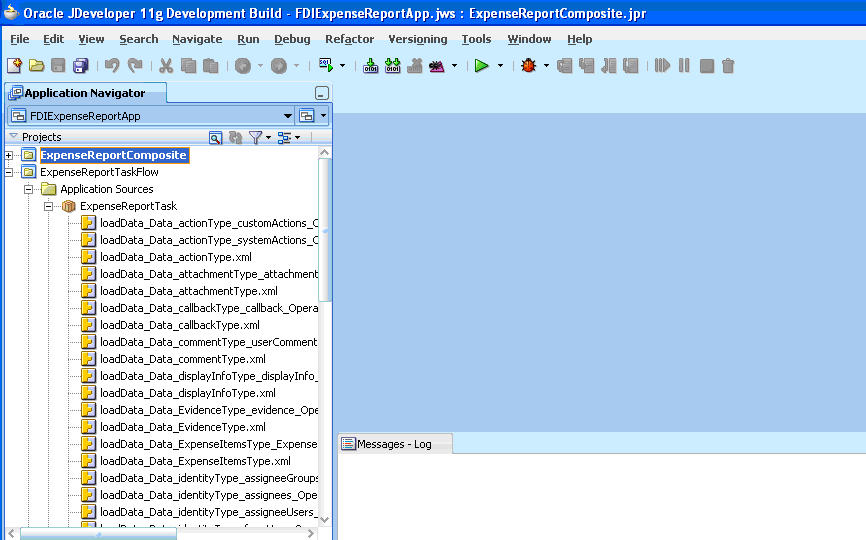
Create an ADF task flow project based on a human task. This creates a data control corresponding to the task and an
.xmlfiles corresponding to the task's structure. Figure 35-1 shows Oracle JDeveloper with a sample project open.Figure 35-1 Oracle JDeveloper with a Sample Project Open
Description of "Figure 35-1 Oracle JDeveloper with a Sample Project Open"
-
Add Oracle ADF Desktop Integration to the project by following the instructions in Section 35.1.3, "How to Add Desktop Integration to Your Oracle JDeveloper Project."
Figure 35-2 shows the Oracle JDeveloper Project Properties dialog when you add Oracle ADF-DI to your project.
Figure 35-2 Oracle JDeveloper Project Properties Dialog
Description of "Figure 35-2 Oracle JDeveloper Project Properties Dialog"
-
When the technology scopes mentioned in Step 2 are added to the project, verify that the necessary events have occurred:
-
In the Application Navigator, right-click the project.
-
Click Project Properties, then select Libraries and Classpath.
-
Confirm that the entry ADF Desktop Integration Runtime exists and is checked.
-
Select this library and click View.
-
Confirm that the library references
wsclient.jarandadf-desktop-integration.jarare in its class path.
-
-
Confirm that the project's deployment descriptor, namely,
web.xml, is modified to include the following entries:-
A servlet named
adfdiRemote -
A filter named
adfdiExcelDownload -
A MIME mapping for Excel files
The previous list is not exhaustive. Adding ADF Desktop Integration and ADF Library Web Application Support to the project makes other changes to
web.xml. Here is a sample snippet of the deployment descriptor:<context-param> <param-name>javax.faces.STATE_SAVING_METHOD</param-name> <param-value>client</param-value> </context-param> <context-param> <description>...</description> <param-name>org.apache.myfaces.trinidad.CHECK_FILE_MODIFICATION </param-name> <param-value>false</param-value> </context-param> <context-param> <description>Whether the 'Generated by...' comment at the bottom of ADF Faces HTML pages should contain version number information.</description> <param-name>oracle.adf.view.rich.versionString.HIDDEN</param-name> <param-value>false</param-value> </context-param> <filter> <filter-name>trinidad</filter-name> <filter-class>org.apache.myfaces.trinidad.webapp.TrinidadFilter </filter-class> </filter> <filter> <filter-name>ADFLibraryFilter</filter-name> <filter-class>oracle.adf.library.webapp.LibraryFilter </filter-class> </filter> <filter> <filter-name>adfBindings</filter-name> <filter-class>oracle.adf.model.servlet.ADFBindingFilter </filter-class> </filter> <filter> <filter-name>adfdiExcelDownload</filter-name> <filter-class> oracle.adf.desktopintegration.filter.DIExcelDownloadFilter </filter-class> </filter> <filter-mapping> <filter-name>trinidad</filter-name> <servlet-name>Faces Servlet</servlet-name> <dispatcher>FORWARD</dispatcher> <dispatcher>REQUEST</dispatcher> </filter-mapping> <filter-mapping> <filter-name>adfBindings</filter-name> <servlet-name>Faces Servlet</servlet-name> <dispatcher>FORWARD</dispatcher> <dispatcher>REQUEST</dispatcher> </filter-mapping> <filter-mapping> <filter-name>trinidad</filter-name> <servlet-name>adfdiRemote</servlet-name> </filter-mapping> <filter-mapping> <filter-name>adfBindings</filter-name> <servlet-name>adfdiRemote</servlet-name> </filter-mapping> <filter-mapping> <filter-name>adfdiExcelDownload</filter-name> <url-pattern>*.xlsx</url-pattern> </filter-mapping> <filter-mapping> <filter-name>adfdiExcelDownload</filter-name> <url-pattern>*.xlsm</url-pattern> </filter-mapping> <filter-mapping> <filter-name>ADFLibraryFilter</filter-name> <url-pattern>/*</url-pattern> <dispatcher>FORWARD</dispatcher> <dispatcher>REQUEST</dispatcher> </filter-mapping> <servlet> <servlet-name>Faces Servlet</servlet-name> <servlet-class>javax.faces.webapp.FacesServlet</servlet-class> <load-on-startup>1</load-on-startup> </servlet> <servlet> <servlet-name>resources</servlet-name> <servlet-class>org.apache.myfaces.trinidad.webapp.ResourceServlet</servlet-clas s> </servlet> <servlet> <servlet-name>adflibResources</servlet-name> <servlet-class>oracle.adf.library.webapp.ResourceServlet</servlet-class> </servlet> <servlet> <servlet-name>adfdiRemote</servlet-name> <servlet-class>oracle.adf.desktopintegration.servlet.DIRemoteServlet</servlet-c lass> </servlet> <servlet-mapping> <servlet-name>Faces Servlet</servlet-name> <url-pattern>/faces/*</url-pattern> </servlet-mapping> <servlet-mapping> <servlet-name>resources</servlet-name> <url-pattern>/adf/*</url-pattern> </servlet-mapping> <servlet-mapping> <servlet-name>resources</servlet-name> <url-pattern>/afr/*</url-pattern> </servlet-mapping> <servlet-mapping> <servlet-name>adflibResources</servlet-name> <url-pattern>/adflib/*</url-pattern> </servlet-mapping> <servlet-mapping> <servlet-name>adfdiRemote</servlet-name> <url-pattern>/adfdiRemoteServlet</url-pattern> </servlet-mapping> <session-config> <session-timeout>35</session-timeout> </session-config> <mime-mapping> <extension>html</extension> <mime-type>text/html</mime-type> </mime-mapping> <mime-mapping> <extension>txt</extension> <mime-type>text/plain</mime-type> </mime-mapping> <mime-mapping> <extension>xlsx</extension> <mime-type>application/vnd.openxmlformats-officedocument.spreadsheetml.sheet</m ime-type> </mime-mapping> <mime-mapping> <extension>xlsm</extension> <mime-type>application/vnd.ms-excel.sheet.macroEnabled.12</mime-type> </mime-mapping> -
-
Add the following
<auth-filter>entry toweblogic.xml.<weblogic-web-app> <auth-filter>oracle.bpel.services.workflow.client.worklist.util.FDIFilter </auth-filter> . .</weblogic-web-app>
-
Click Save All.
-
Right-click the project and click Rebuild.
-
Ensure there are no compilation errors and the build completes successfully.
The web application is now configured to work with Oracle ADF-DI.
35.2.3.2 Task 2: Set up Authentication
This task is required to add Oracle ADF-DI to create a web session for an Excel workbook.
-
Add ADF security to your project:
-
From the Application menus, select Secure, then Configure ADF Security.
-
Select ADF Authentication.
-
Click Finish.
-
-
Create a login page for the application:
-
From the directory
ExpenseReportTaskFlow\public_html\, copy the fileLoginPage.jspto the directoryproject_home\public_html. -
Refresh the view in Oracle JDeveloper.
-
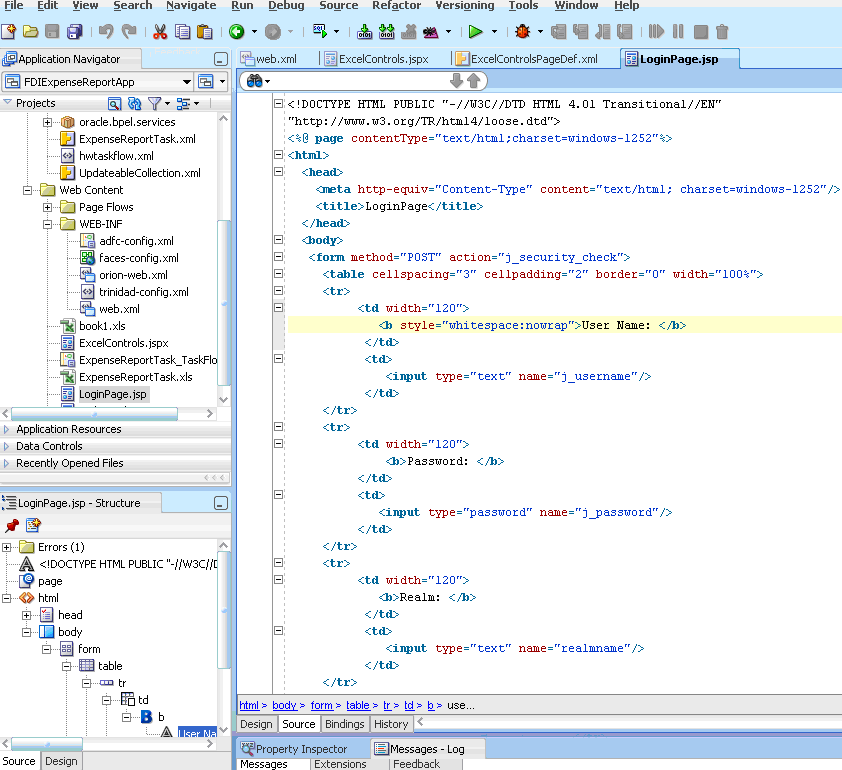
Verify that the file
LoginPage.jspis visible. It should appear as shown in Figure 35-3.Figure 35-3 Oracle JDeveloper: Login.jsp File
Description of "Figure 35-3 Oracle JDeveloper: Login.jsp File"
-
-
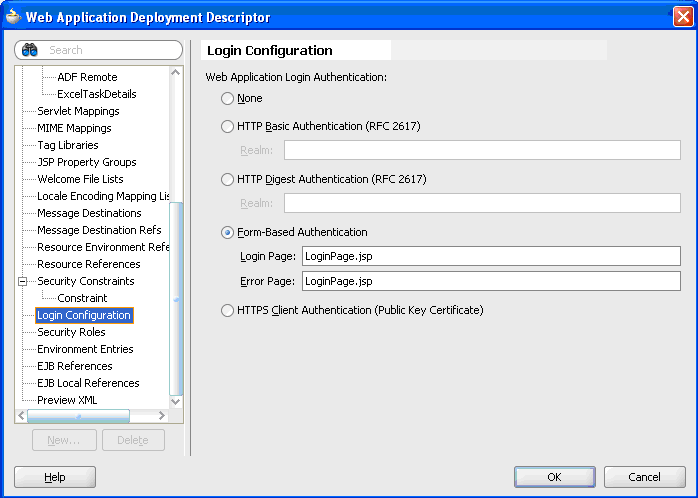
Once you have added ADF security, confirm that the following entries are added to the
web.xmlfile. If some entries are missing, add them manually. Form authentication, using the login page created in Step 2 of Section 35.2.3.2, "Task 2: Set up Authentication," is used.<security-constraint> <web-resource-collection> <web-resource-name>allPages</web-resource-name> <url-pattern>/</url-pattern> </web-resource-collection> <auth-constraint> <role-name>Administrators</role-name> </auth-constraint> </security-constraint> <security-constraint> <web-resource-collection> <web-resource-name>adfAuthentication</web-resource-name> <url-pattern>/adfAuthentication</url-pattern> </web-resource-collection> <auth-constraint> <role-name>Administrators</role-name> </auth-constraint> </security-constraint> <login-config> <auth-method>FORM</auth-method> <realm-name>jazn.com</realm-name> <form-login-config> <form-login-page>/LoginPage.jsp</form-login-page> <form-error-page>/LoginPage.jsp</form-error-page> </form-login-config> </login-config> <security-role> <role-name>Administrators</role-name> </security-role>Figure 35-4 shows how these entries appear graphically in the Web Application Deployment Descriptor dialog.
Figure 35-4 Oracle JDeveloper: Application Deployment Descriptor
Description of "Figure 35-4 Oracle JDeveloper: Application Deployment Descriptor"
-
For every logical security role added in
web.xml, make a corresponding entry inweblogic.xmlas follows:<weblogic-web-app> <auth-filter>oracle.bpel.services.workflow.client.worklist.util.FDIAuthFilter</ auth-filter> <security-role-assignment> <role-name>Administrators</role-name> <principal-name>fmwadmin</principal-name> <principal-name>users</principal-name> </security-role-assignment> . . </weblogic-web-app> -
Click Save All.
The ADF task flow web application is now configured for login capability that can be used by the Excel workbook.
35.2.3.3 Task 3: Create a Valid Page Definition File to Be Used in the Excel Workbook
The page definition file ExcelControlsPageDef.xml is used to create the Excel workbook. Perform the following steps:
-
Create a new Java class by following these steps:
-
-
Select Technologies > General > Simple Files > Java Class.
-
Specify details as follows:
Name:
TaskRetrieversPackage: (leave it as default)
Extends:
oracle.bpel.services.workflow.client.worklist.excel.TasksRetriever(Click Browse to select this class.)This creates a new Java class
<default-package>.TasksRetriever.
-
-
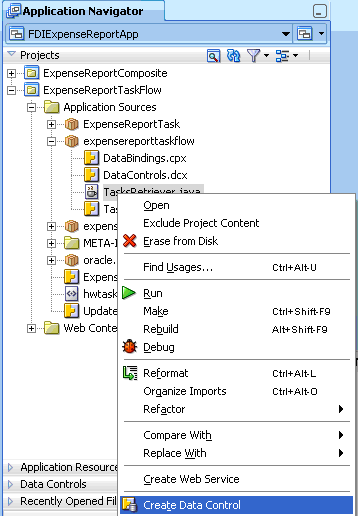
Create a data control for this newly created Java class. This data control provides access to an API that retrieves all assigned tasks for a user. Figure 35-5 shows the menu for creating the data control.
Figure 35-5 Oracle JDeveloper: Creating a Data Control
Description of "Figure 35-5 Oracle JDeveloper: Creating a Data Control"
-
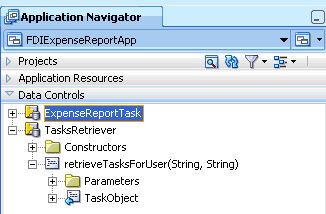
Verify that the newly created data control TasksRetriever is visible in the Data Control palette in the lower portion of the Application Navigator. Figure 35-6 shows the Application Navigator with the Data Control palette expanded.
Figure 35-6 Oracle JDeveloper: Application Navigator with Data Control Palette Expanded
Description of "Figure 35-6 Oracle JDeveloper: Application Navigator with Data Control Palette Expanded"
-
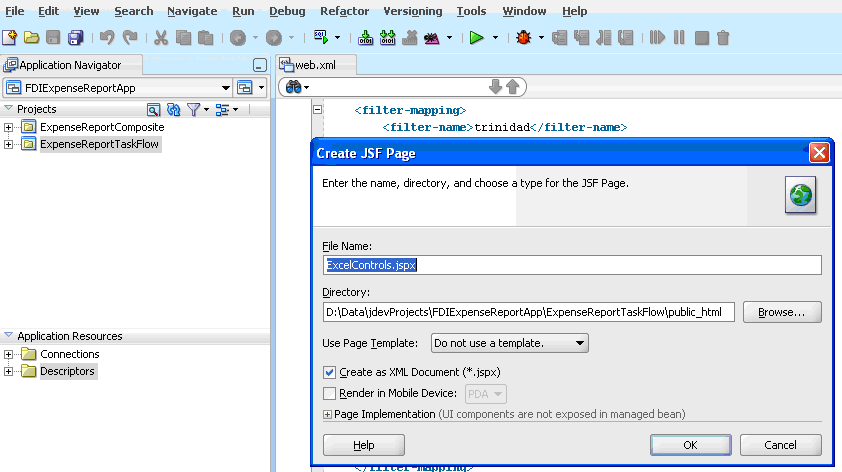
Create a new JSF JSP page, namely,
ExcelControls.jspx. This generates a page definition that can be used by ADF-DI while authoring the Excel document. Figure 35-7 provides details.Figure 35-7 Oracle JDeveloper: Creating a JSF JSP Page
Description of "Figure 35-7 Oracle JDeveloper: Creating a JSF JSP Page"
-
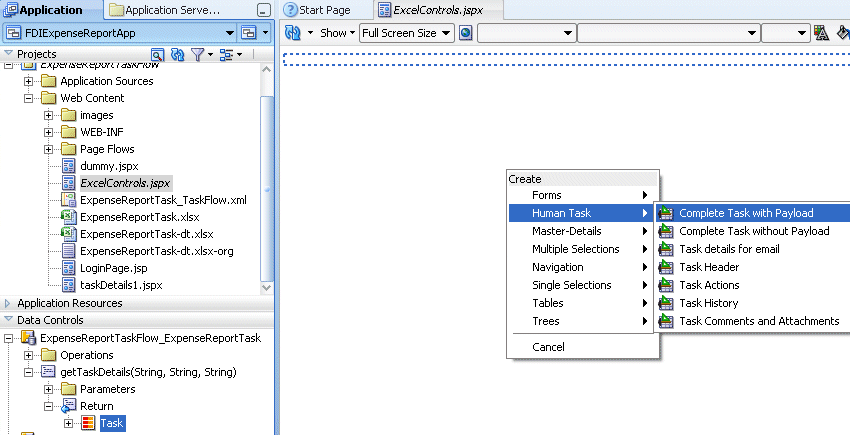
Drag and drop the task node from the Data Controls palette to
ExcelControls.jspx. -
Select Human Task, then select Complete task with payload. Figure 35-8 illustrates the sequence of menus you use.
Figure 35-8 Oracle JDeveloper: Creating an ADF Read-Only Form
Description of "Figure 35-8 Oracle JDeveloper: Creating an ADF Read-Only Form"
-
Click OK on dialogs that pop up.
-
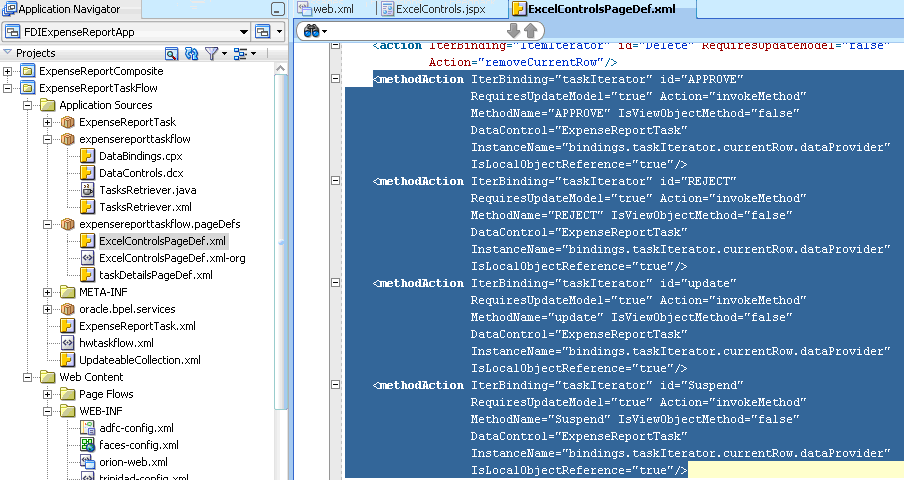
Drag and drop one or more task actions to the
.jspxfile. In this example, as shown in Figure 35-9, the actions APPROVE, REJECT, update, and Suspend are added to create the entries in the page definition.Figure 35-9 Oracle JDeveloper: Configuring the Page Definition File
Description of "Figure 35-9 Oracle JDeveloper: Configuring the Page Definition File"
-
Drag and drop the retrieveTasksForUser() method from the Data Controls palette (expand the node TasksRetriever) to ExcelControls.jspx.
-
For now, click OK on the Edit Action Binding dialog. This creates a binding in
ExcelControlsPageDef.xmlto extract all assigned tasks for the logged-in user. -
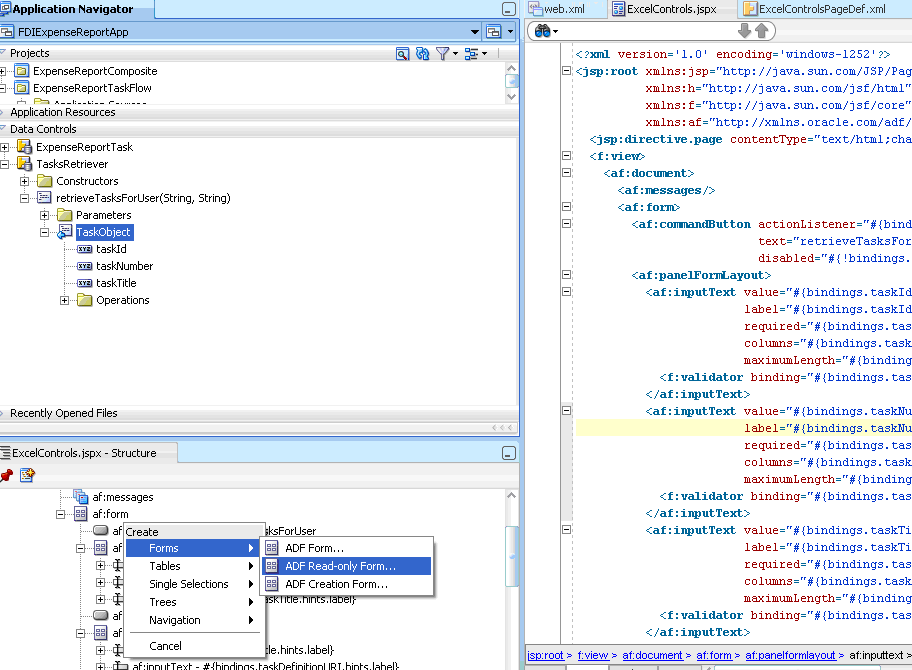
Drag and drop TaskObject from the Data Control palette to ExcelControls.jspx to create an ADF read-only form.
-
Verify that corresponding
<methodIterator> executable and<attributeValues>bindings are created inExcelControlsPageDef.xml. Figure 35-10 provides details.Figure 35-10 Oracle JDeveloper: Page Definition File
Description of "Figure 35-10 Oracle JDeveloper: Page Definition File"
-
Depending on the number of task details to be exposed in the Excel workbook, drag and drop as many ADF controls as needed. In this example, you expose only as many task details as needed to develop a minimally-operational workbook.
-
Create a list binding in
ExcelControlsPageDef.xmlthat can create a list of assigned tasks in the Excel workbook. -
Add the following entry to the
<bindings>element in the page definition.<list ListOperMode="navigation" IterBinding="retrieveTasksForUserIterator" id="retrievedTaskList" StaticList="false"> <AttrNames> <Item Value="taskNumber"/> </AttrNames> </list> -
Similarly, add the following list binding in
ExcelControlsPageDef.xmlto use later to create a list of an updatable table of expense items in the Excel workbook.<list ListOperMode="navigation" IterBinding="ItemIterator" id="expenseItemsList" StaticList="false"> <AttrNames> <Item Value="itemName"/> </AttrNames> </list> -
Click Save All.
-
Right-click the project and click Rebuild.
-
Ensure that there are no compilation errors and the build completes successfully.
35.2.3.4 Task 4: Prepare the Excel Workbook
To author the Excel workbook, follow these steps:
-
For information about desktop requirements for running the ADF-DI solution, see Chapter "Setting Up Your Development Environment" of Oracle Fusion Middleware Desktop Integration Developer's Guide for Oracle Application Development Framework.
-
Configure security for Excel:
-
Open Excel.
-
Click the Microsoft Office button, then click Excel Options.
-
Click the Trust Center tab, then click Trust Center Settings.
-
Click the Macro Settings tab, then click the checkbox labeled Trust Access to the VBA project object model.
-
Click OK.
-
-
Run the setup tool that comes with the Oracle ADF-DI module. The setup tool is stored in the following folder:
JDEV_HOME\jdeveloper\adfdi\bin\excel\client. -
Create a new Excel workbook in the directory
project_home\public_html. -
Click View, then click Refresh. This displays the Excel workbook in Oracle JDeveloper.
-
Run the conversion command on the Excel workbook. The Oracle ADF-DI module stores the conversion tool,
convert-adfdi-excel-solution.exe, inORACLE_JDEVELOPER_HOME\jdeveloper\adfdi\bin\excel\convert. To convert the Excel workbook, execute the following command:convert-adfdi-excel-solution.exe <workbook.xlsx> -attach
The Excel workbook is now enabled to use the Oracle ADF-DI framework.
-
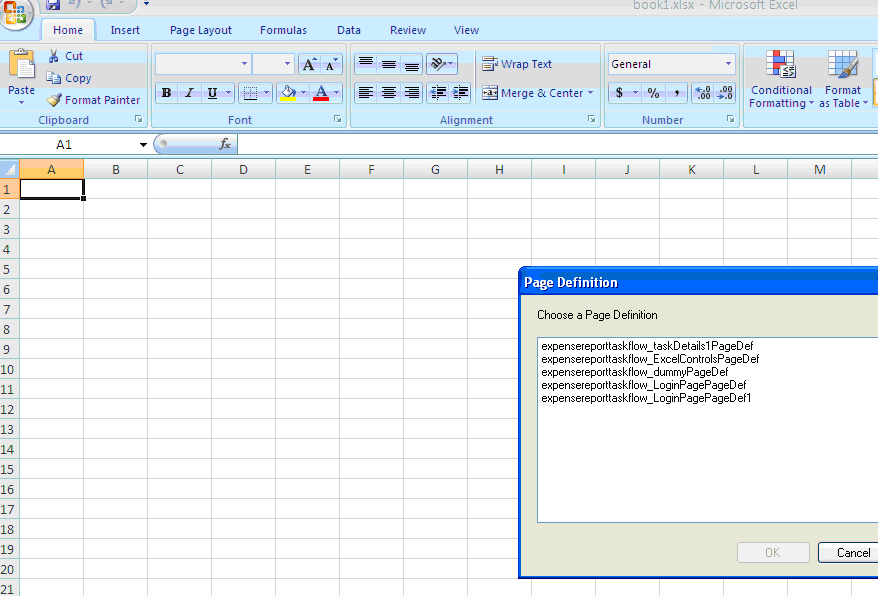
Open the Excel workbook and choose a page definition. In this use case, the page definition is
expensereporttaskflow_ExcelControlsPageDef. Figure 35-11 provides details.Figure 35-11 Excel: Page Definition Dialog
Description of "Figure 35-11 Excel: Page Definition Dialog"
-
In the Document Actions pane, select Workbook Properties.
-
Specify the ProtectedWebPage:
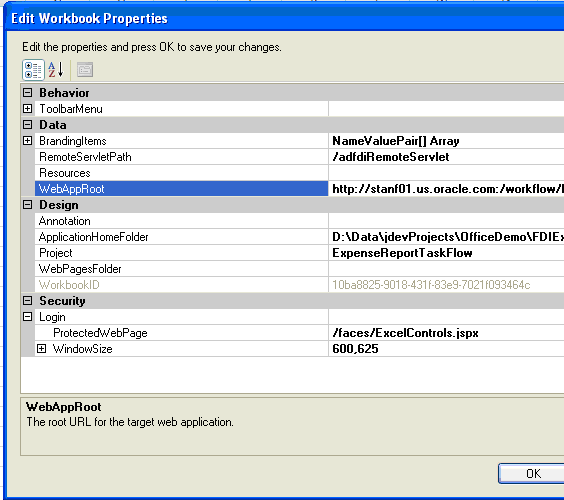
http://application_server:port//workflow/application_name/faces/app/logon. (This URL is protected and triggers form authentication. See Section 35.2.3.2, "Task 2: Set up Authentication." )Specify WebAppRoot:
http://application_server:port//workflow/application_name. Click OK.Figure 35-12 provides details.
For more information, see Oracle Fusion Middleware Desktop Integration Developer's Guide for Oracle Application Development Framework.
-
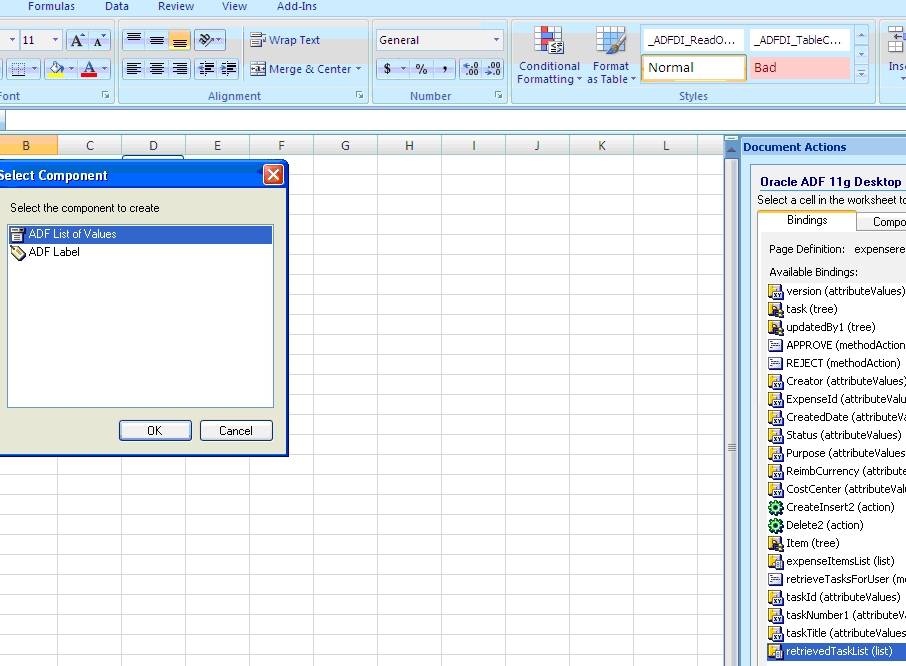
From the Document Actions pane, insert ADF Bindings to create the corresponding fields in the Excel workbook. For further details on specific components, see Oracle Fusion Middleware Desktop Integration Developer's Guide for Oracle Application Development Framework. For instance, insert binding retrievedTaskList to create a list of values. Figure 35-13 provides details.
Figure 35-13 Excel: Creating s List of Values
Description of "Figure 35-13 Excel: Creating s List of Values"
-
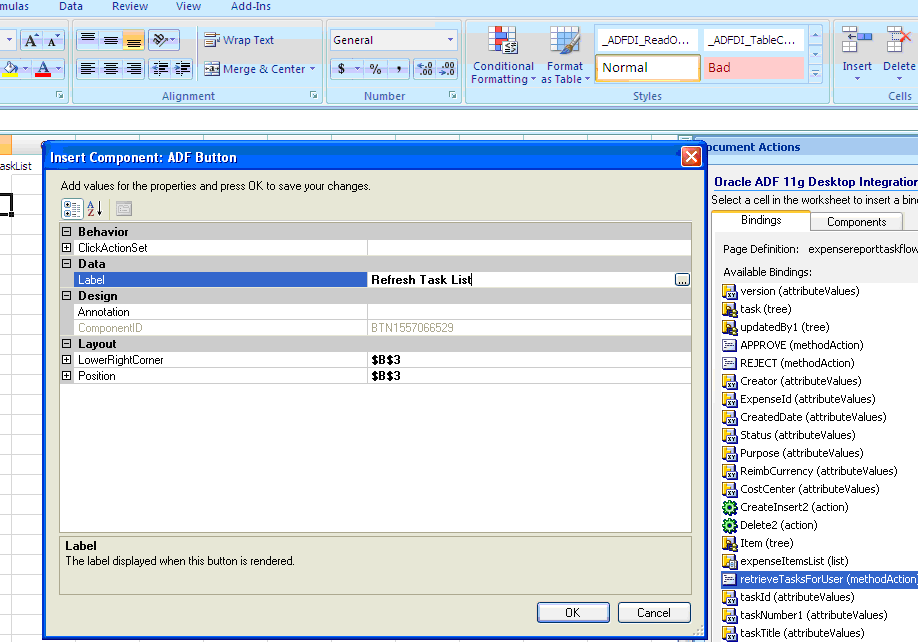
Insert a methodAction binding to create a button in Excel. Figure 35-14 provides details.
Figure 35-14 Excel: Inserting a methodAction Binding
Description of "Figure 35-14 Excel: Inserting a methodAction Binding"
-
Insert a tree binding to create an ADF Table component. A table component is an updatable table of records in Excel. For instance, the list binding expenseItemsList is a candidate for a table component.
See Also:
Oracle Fusion Middleware Desktop Integration Developer's Guide for Oracle Application Development Framework for further information about creating and modifying a Table component.
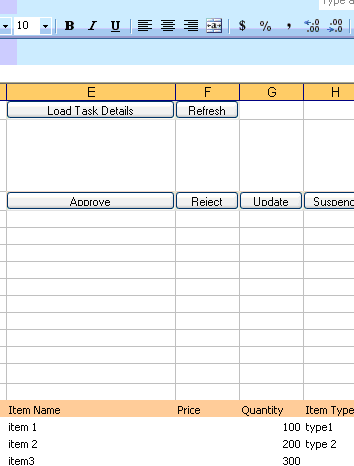
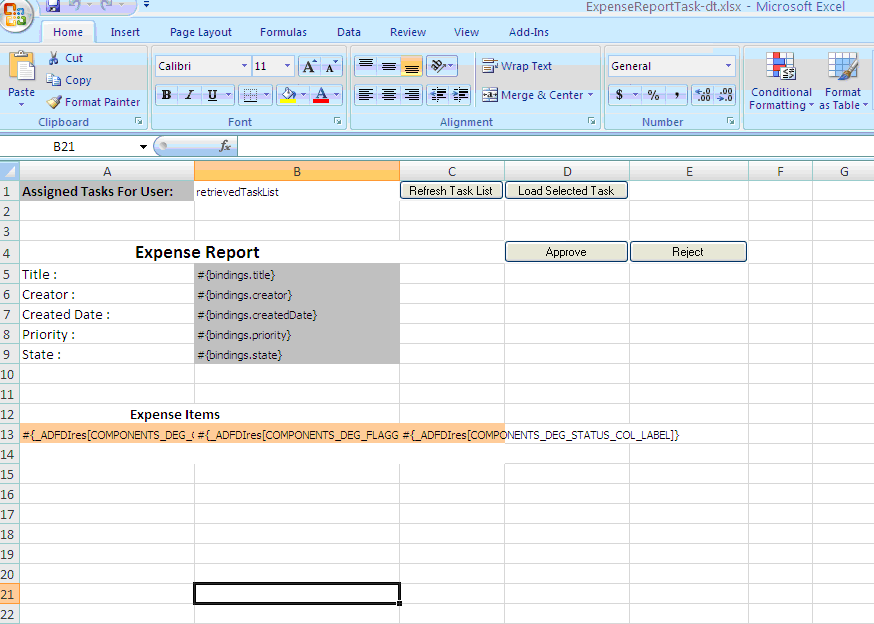
A completed Excel workbook for an expense report application looks similar to that shown in Figure 35-15.
Figure 35-15 Excel Workbook Integrated with Oracle ADF-DI
Description of "Figure 35-15 Excel Workbook Integrated with Oracle ADF-DI"
-
Publish the workbook by following these steps:
-
On the toolbar, click Publish. The Publish Workbook dialog appears.
-
In the File name field, specify the name as
workflow_name.xls. The workflow name is the value of the elementWorkflowNamespecified inproject_home\adfmsrc\hwtaskflow.xml. In this example, the name of the published Excel workbook isExpenseReportTask.xls.
-
-
In Oracle JDeveloper, click View > Refresh.
-
Verify that the published workbook is visible under Web Content, as shown in Figure 35-16.
Figure 35-16 Oracle JDeveloper: Verifying Workbook Under WebContent
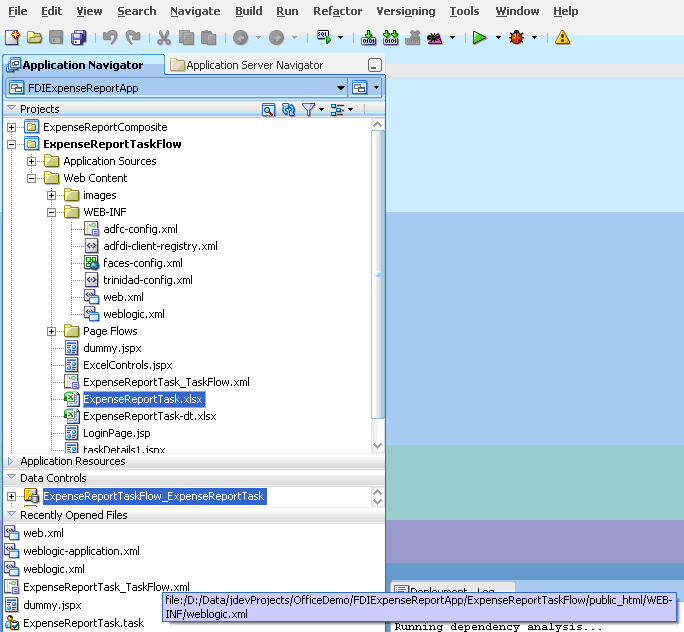
Description of "Figure 35-16 Oracle JDeveloper: Verifying Workbook Under WebContent"
-
Click Save All. The ADF task flow is now ready for deployment.
35.2.3.5 Task 5: Deploy the ADF Task Flow
To deploy the ADF task flow, follow these steps:
-
For the Excel workbook to be sent as an attachment when a task is assigned, you must configure the corresponding task in the SOA composite application:
-
In Oracle JDeveloper, open the SOA composite application that corresponds to the ADF task flow.
-
Open the
.taskfile. -
In the Advanced tab of the Notification section of the Human Task Editor, verify that the Send task attachments with email notifications checkbox is checked.
-
-
Deploy the application. To perform a deployment, right-click the SOA composite application, select Deploy, select the project name, and follow the pages on the deployment wizard.
-
Deploy the ADF task flow.
-
In the Application Navigator, expand Projects, and select the application.
-
Select Deploy > application_TaskFlow (in this example, the application task flow is ExpenseReportTaskFlow).
-
Follow the pages on the deployment wizard.
-
At this point, the ADF task flow is successfully deployed.
35.2.3.6 Task 6: Test the Deployed Application
To test the deployed application, follow these steps:
-
Invoke the deployed SOA composite application and verify that the assignee receives the Excel workbook as part of the email notification. Figure 35-17 provides details.
Figure 35-17 Excel Workbook Attached to an Email
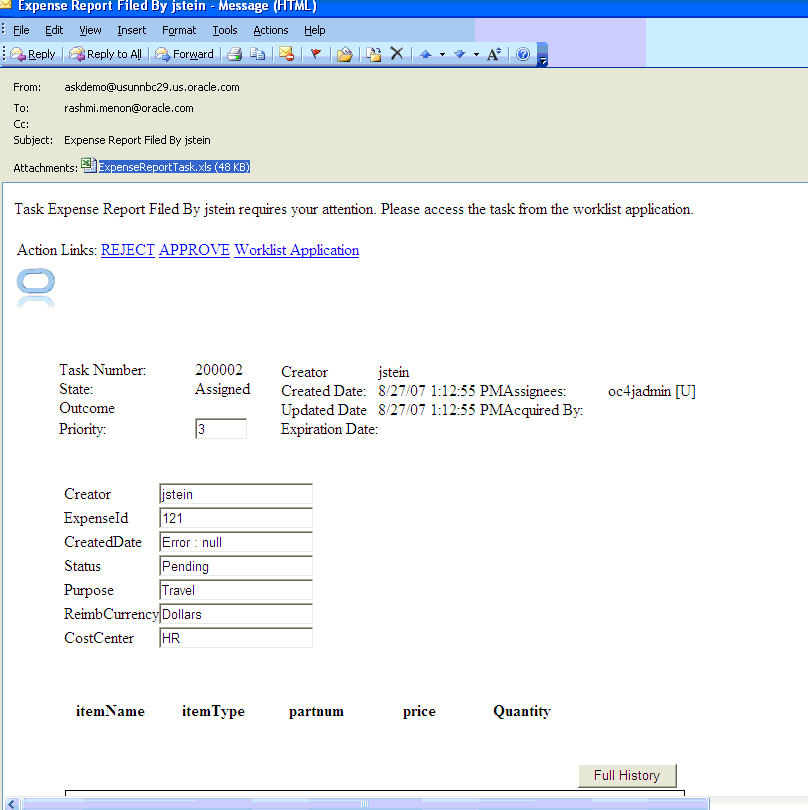
Description of "Figure 35-17 Excel Workbook Attached to an Email"
Note:
To successfully open and execute the workbook, the user's desktop host should have the correct security policy and must run the
caspolcommand to grant trust to the client assemblies hosted on the network share. -
Open the Excel workbook. You are directed to a login page. (This is
LoginPage.jspfrom Section 35.1.2, "How to Create a Dummy JSF Page.") -
Enter your security credentials. Figure 35-18 provides details.
Figure 35-18 Desktop-Integrated Excel Workbook: Login Page
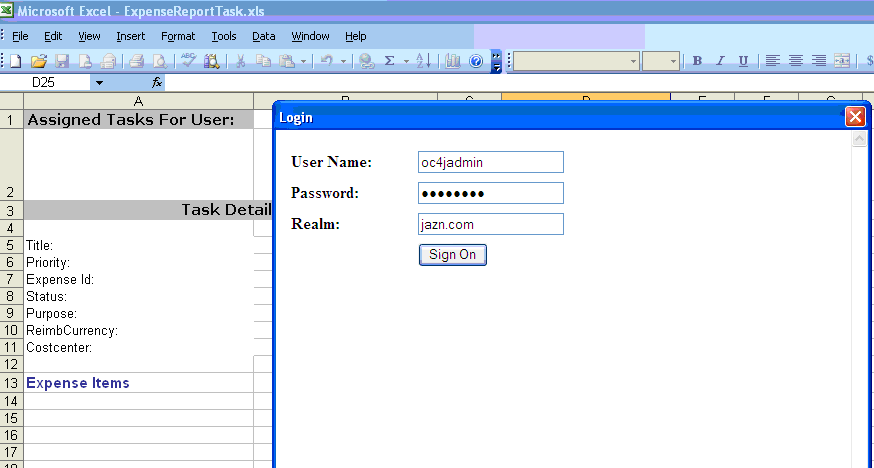
Description of "Figure 35-18 Desktop-Integrated Excel Workbook: Login Page"
-
Examine the workbook to verify the following:
-
All the assigned tasks for the logged-in user are retrieved in the Excel workbook. Figure 35-19 provides details.
Figure 35-19 ADF Desktop-Integrated Excel Workbook with Assigned Tasks
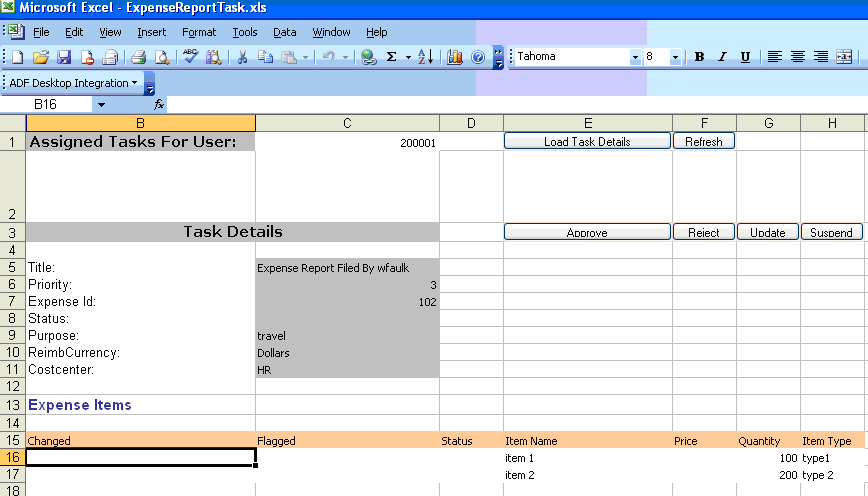
Description of "Figure 35-19 ADF Desktop-Integrated Excel Workbook with Assigned Tasks "
-
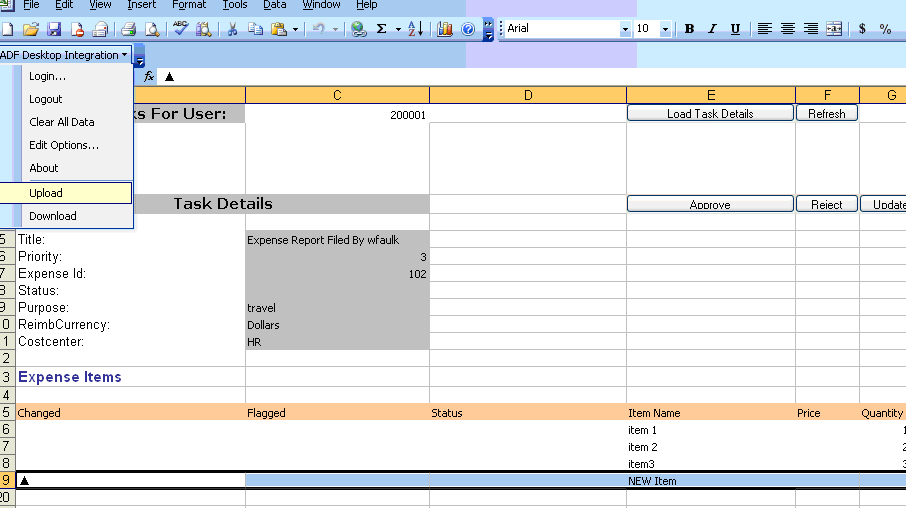
You can navigate to the needed task from the list of assigned tasks and update it as required. For instance, as shown in Figure 35-20, you can upload new expense items in the Expense Report application.
Figure 35-20 ADF Desktop-Integrated Excel Workbook Uploading New Items
Description of "Figure 35-20 ADF Desktop-Integrated Excel Workbook Uploading New Items"
-
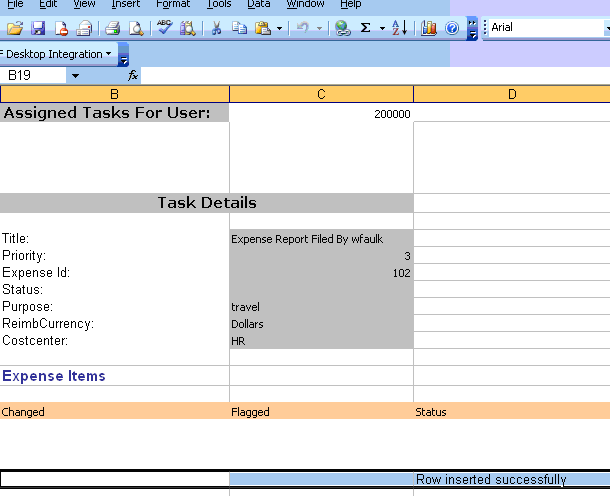
The Status column in the workbook indicates if the upload was successful. Figure 35-21 provides details.
Figure 35-21 ADF Desktop-Integrated Excel Workbook
Description of "Figure 35-21 ADF Desktop-Integrated Excel Workbook"
Also, you can perform actions on the task by clicking Approve, Reject, Update, or Suspend. Figure 35-22 provides details.
-
