A User Interface
The Content Server interface includes various pages that you can use to administer and manage your Site Studio Web sites:
A.1 Manage Web Sites Page
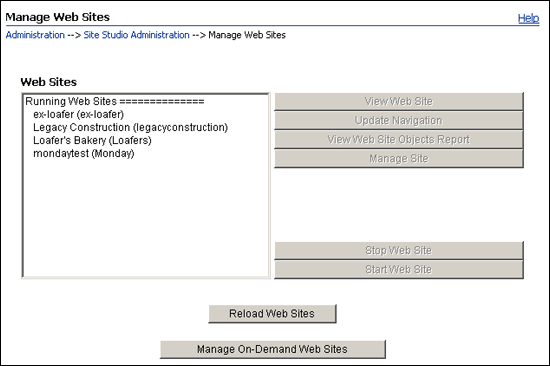
The Manage Web Sites page is used to manage all available Web sites on the content server. From here you can view the Web site, view the objects report, start or stop the Web site (make it available or unavailable to view), and control the management of each selected Web site as described in this document.
| Element | Description |
|---|---|
| Web Sites | This area lists all Web sites that are managed by the content server. All sites that are currently up and available are listed under "Running Web Sites," and all sites that are not running are under "Stopped Web Sites." |
| View Web Site | Click this button to view the selected Web site in your web browser. |
| Update Navigation | Click this button to update the navigation of the selected Web site. As a site manager, you can modify the structure of a Web site, including adding and removing directories and subdirectories, or moving directories into other areas of the Web site. If you alter the site structure, then all site navigation should be updated (rebuilt). |
| View Web Site Objects Report | Click this button to view the Web Site Objects Reports page for the selected site (see "Web Site Objects Report Page"). This page details the activity of use of each part of a Web site. |
| Manage Site | Click this button to see the Manage Site page for the selected site (see "Manage Site Page (Site Studio Manager)"). This page enables you to perform several site management tasks, such as modifying the site hierarchy, assigning page templates, and changing custom properties. |
| Stop Site | Click this button to stop the selected site. The site then moves from the "Running Web Sites" list to the "Stopped Web Sites" list in the Web Sites area. |
| Start Site | Click this button to start the selected site. The site then moves from the "Stopped Web Sites" list to the "Running Web Sites" list in the Web Sites area. |
| Reload Web Sites | Click this button to reload the page. When sites are started and stopped, occasionally the list of the running and the stopped Web sites must be refreshed to reflect the current status. |
| Manage On-Demand Web Sites | Click this button to open the On-Demand Web Sites page (see "Manage On-Demand Web Sites Page"). |
A.2 Manage Site Page (Site Studio Manager)
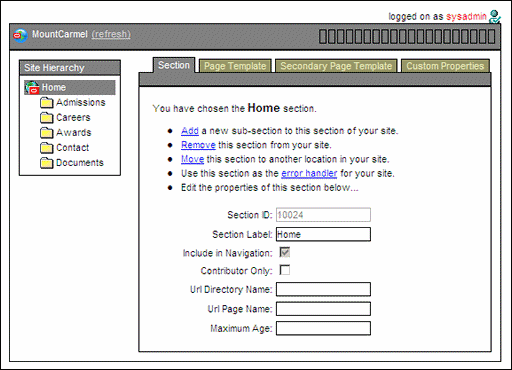
The Manage Site page is used to perform several management tasks for a Web site. This page may be accessible through the content server or Site Studio Contributor (if the designer set it up that way). If the Manager fragment appears on a page in Contributor and the page is in contribution mode, the tools available to the site manager appear within the application. They then appear either minimized (that is, just the top bar) or with the interface fully displayed within the page. To show the full Manager interface, click manage site in the bar. When accessed through the content server, the full interface is always shown.
The site hierarchy of the current Web site is shown on the left. You can right-click any item and perform several management tasks.
This page may have four tabs, each of which provides specific site management options:
A.2.1 Section Tab
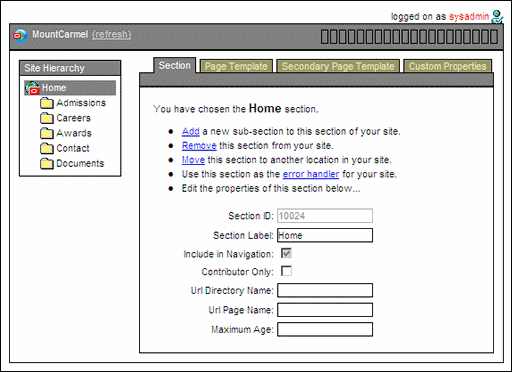
The Section tab on the Manage Site page is used to manage the sections within the hierarchy of the Web site, which includes adding and removing sub-sections, moving sections, and mark the error handler section of the Web site.
Figure A-3 Section Tab of Manage Site Page
Description of "Figure A-3 Section Tab of Manage Site Page"
| Element | Description |
|---|---|
| Add | Click to add a sub-section to the current section. See "Adding a Section" for more information. |
| Remove | Click to remove the current section from the Web site. See "Removing a Section" for more information. |
| Move | Click to move the current section to a different area of the site hierarchy. See "Moving a Section" for more information. |
| error handler | Click to mark the current section as the error handler section. See "Designating a Section as an Error Handler" for more information. |
| Section ID | This is the section ID that uniquely identifies the current section in the site hierarchy (and the content server). This field is typically disabled because changing it can break links that target this section. |
| Section Label | This is the name of the current section. The name is displayed in the site hierarchy and in the navigation menus on the Web site (but not necessarily in the URL). You can change the section label if you want. See "Renaming a Section" for more information. |
| Include in Navigation | Select this check box if you want the current section to be displayed as a link in the navigation menus on the Web site. See "Showing or Hiding a Section on the Web Site" for more information. |
| Contributor Only | Select this check box if you want the current section to appear only when the site is viewed in contribution mode. This may be useful, for example, to communicate directly with contributors or to preview content before making it publicly available. See "Designating a Section as Contributor-Only" for more information. |
| Url Directory Name | This is the directory name of the current section as it appears in the site URLs. For example, in the address http://www.example.com/product1/index.htm, the URL directory name is "product1." This value is also used in all path-based links to this section. By default, the URL directory name is identical to the section label, but you can use a different value if you want. The name should not contain any spaces or special characters. |
| Url Page Name | This is the URL that represents the primary page (associated with the current section) in the Web site address. If you do not specify a URL page name, then "index.htm" is used to represent the primary page. |
| Maximum Age | This is the maximum amount of time (in seconds) that a Web site page in the current section remains in cache. This improves the performance and security of a Site Studio Web site. See "Changing the Maximum Age of a Section" for more information. |
A.2.2 Page Template Tab
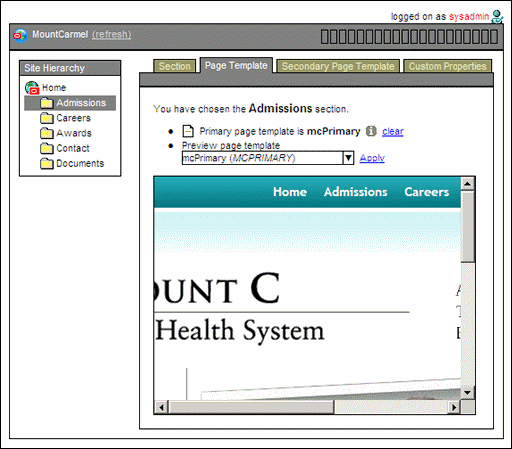
The Page Template tab on the Manage Site page is used to view the web page using the current page template. Additional page templates can be applied and previewed against the current section as well.
Figure A-4 Page Template Tab of Manage Site Page
Description of "Figure A-4 Page Template Tab of Manage Site Page"
| Element | Description |
|---|---|
| Click the icon to open the content information page for the current page template. This does not appear if the page template has not been set. | |
| clear | Click to remove the page template from the current section. This does not appear if the page template has not been set. See "Removing a Page Template From a Section" for more information. |
| Preview page template (menu) | Select a page template from the list to view within the current section. See "Previewing Page Templates" for more information. |
| Apply | Click to apply the selected page template to the current section. See "Assigning a Primary Page to a Section" for more information. |
A.2.3 Secondary Page Template Tab
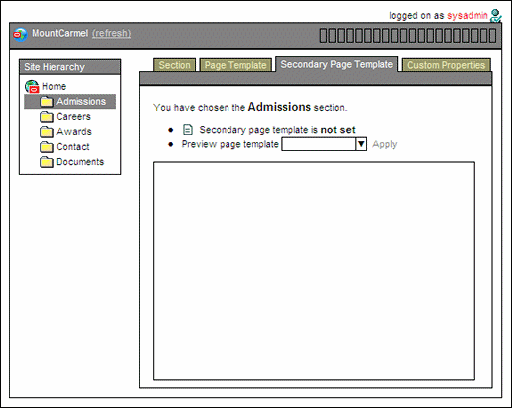
The Secondary Page Template tab on the Manage Site page is used to view the web page using the current secondary page template. Additional page templates can be applied and previewed against the current section as well.
Figure A-5 Secondary Page Template Tab of Manage Site Page (With No Page Selected)
Description of "Figure A-5 Secondary Page Template Tab of Manage Site Page (With No Page Selected)"
| Element | Description |
|---|---|
| Click the icon to open the content information page for the current page template. This does not appear if the secondary page template has not been set. | |
| clear | Click to remove the page template from the current section. This does not appear if the secondary page template has not been set. See "Removing a Page Template From a Section" for more information. |
| Preview page template (menu) | Select a page template from the list to view within the current section. See "Previewing Page Templates" for more information. |
| Apply | Click to apply the selected page template to the current section. See "Assigning a Secondary Page to a Section" for more information. |
A.2.4 Custom Properties Tab
The Custom Properties tab on the Manage Site page is used to edit the custom property information for the selected section in the site hierarchy. All custom properties are determined by the site designer. Section properties cannot be added or removed by a manager; only their values can be edited.
Figure A-6 Custom Properties Tab of Manage Site Page
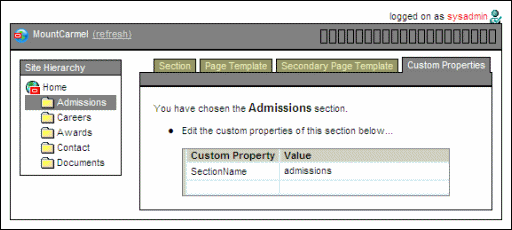
Description of "Figure A-6 Custom Properties Tab of Manage Site Page"
Note:
Contact your site designer regarding the proper use of the custom properties.A.3 Manage On-Demand Web Sites Page
The Manage On-Demand Web Sites page is used to mark sites as "on-demand" sites. The Web sites designated as "on-demand" are not loaded into the content server's memory until a request is received to load the site. This reduces load times when starting the content server. There will be a slight delay to serve the sites listed as "on-demand" when you access them in Designer for the first time.
Figure A-7 Manage On-Demand Web Sites page
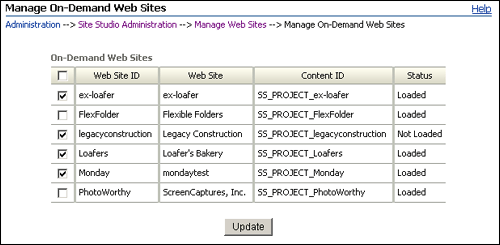
Description of "Figure A-7 Manage On-Demand Web Sites page"
| Element | Description |
|---|---|
| Check box | Select the check box to mark the site as an on-demand Web site. |
| Web Site ID | The site ID of the Web site on the content server. |
| Web Site | The name of the Web site on the content server. |
| Content ID | The content ID of the Web site on the content server. |
| Status | Displays which sites are loaded or not loaded into server memory. |
A.4 Web Site Objects Report Page
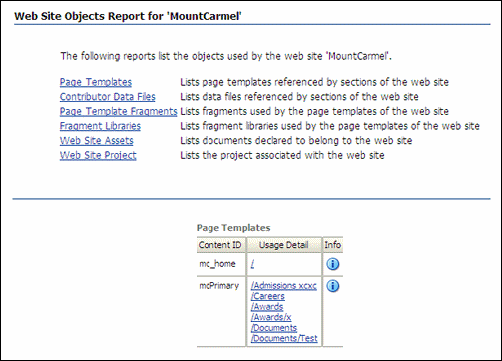
The Web Site Objects Report page shows site usage reports for all Web site objects marked for reporting. You can see information about several object categories, including page templates, contributor data files, page template fragments, fragment libraries, Web site assets, and the Web site project.
| Element | Description |
|---|---|
| Object categories | Click any of the object categories to see the report specific to that category. |
| Content ID | The content ID of the object in the content server. |
| Usage Detail | The specific information on the Web site object and where it was referenced. |
| Click this icon to see the content information page for the object. |
A.5 Web Site Addresses Page
The Web Site Addresses page is used to manage the site addresses for all available Web sites on the content server. You can view the defined site addresses, and add addresses or remove existing ones.
There are two ways to access your site: using a folder address or a domain address. When you first set up your site, you can use the folder address, like http://MyComputer/MySite (where MyComputer is the name of the system and MySite is the site ID). Sooner or later, however, you will likely want to use a domain address, like http://www.example.com (where example.com is your domain name) as a more convenient and public way to access your site.
A domain address requires additional DNS configuration that you or a site administrator must perform.
You can also use the Site Address dialog box in Designer to configure domain addresses.
Figure A-9 Manage Web Site Addresses Page
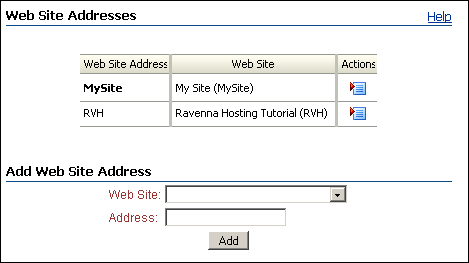
Description of "Figure A-9 Manage Web Site Addresses Page"
| Element | Description |
|---|---|
| Web Site Addresses | Displays existing site addresses that are configured for the specified site.
Click the menu icon in the Action column for more options:
|
| Add Web Site Address | Web Site: Use this menu to select a Web site on the content server.
Address: Enter the domain name to use. (You can add multiple domain names for your site.) |
| Add | Adds the domain name to your site. |
A.6 Manage Fragment Libraries Page
The Manage Fragment Libraries page is used to deploy fragment libraries to their required location on the content server. The libraries must be in the [CS-Dir]\weblayout\fragments directory to be available to your Web site. They are deployed to this location by default when you install Site Studio. However, if you manually check a fragment library into the Oracle Content Server, you must deploy it to this location.
The Manage Fragment Libraries page is also used to configure JSP support for JSP-enabled Web sites. If, after installing the Site Studio component, you add a group to the list of JSP-enabled groups in the Oracle Content Server, you must redeploy (extract) the JSP support files that enable Site Studio JSP fragments to work properly.
Figure A-10 Manage Fragment Libraries Page
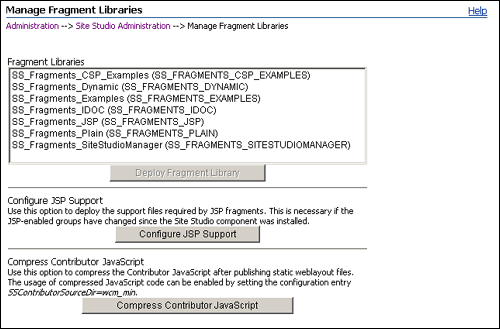
Description of "Figure A-10 Manage Fragment Libraries Page"
| Element | Description |
|---|---|
| Fragment Libraries | Displays all fragment libraries currently checked into the content server. |
| Deploy Fragment Library | Click to copy the selected fragment library to its required location on the content server ([CS-Dir]\weblayout\fragments), where it is available to Site Studio. You must select a fragment library in the list before this button becomes available.
As an alternative to this deployment method, you can use the Upload Fragment Library/Download Fragment Library element in Designer. |
| Configure JSP Support | Click to redeploy (extract) JSP support files to the necessary location on the content server so that JSP fragments work properly. |
| Compress Contributor JavaScript | Click to compress the Contributor JavaScript in the published Web site. This often improves performance of the pages in a Web site. |
A.7 Set Default Project Document Information Page
The Set Default Project Document Information page is used to define the default metadata (that is, content information) for Site Studio project files.
When you create a Web site in Designer, Site Studio generates an XML-based project file and checks it into the content server with certain metadata values. The default document information specifies which fields are automatically filled.
Figure A-11 Set Default Project Document Information Page
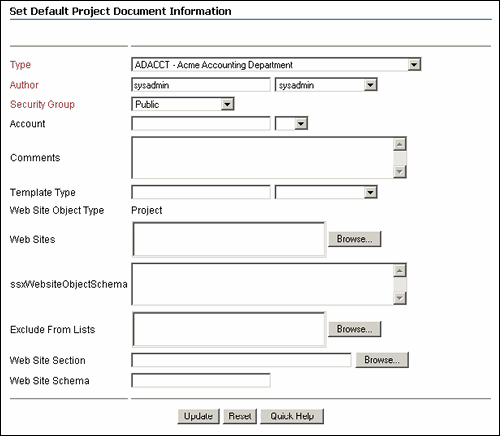
Description of "Figure A-11 Set Default Project Document Information Page"
| Element | Description |
|---|---|
| Metadata fields | Display all of the available metadata values in the content server that can be assigned to a Site Studio project file.
Enter the information for the default values in the applicable fields. All required metadata fields have red-colored field labels. If a field does not need or should not have default information, you can leave it blank. |
| Update | Click to update the metadata that is assigned to a Site Studio project file automatically. |
| Reset | Resets the page to its initial state when it was launched. |
A.8 Set Default Web Asset Document Information Page
The Set Default Web Asset Document Information page is used to define the default metadata (that is, content information) for Site Studio Web site assets, such as templates, images, or definitions.
This allows Site Studio to use default metadata when checking in web assets.
Figure A-12 Set Default Web Asset Document Information Page
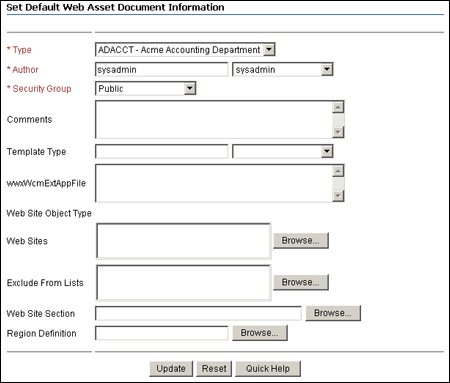
Description of "Figure A-12 Set Default Web Asset Document Information Page"
| Element | Description |
|---|---|
| Metadata fields | Display all of the available metadata values in the content server that can be assigned to a Site Studio Web site asset.
Enter the information for the default values in the applicable fields. All required metadata fields have red-colored field labels. If a field does not need or should not have default information, you can leave it blank. |
| Update | Click to update the metadata that is assigned to a Site Studio Web site asset automatically. |
| Reset | Resets the page to its initial state when it was launched. |
A.9 Manage Site Replication Page
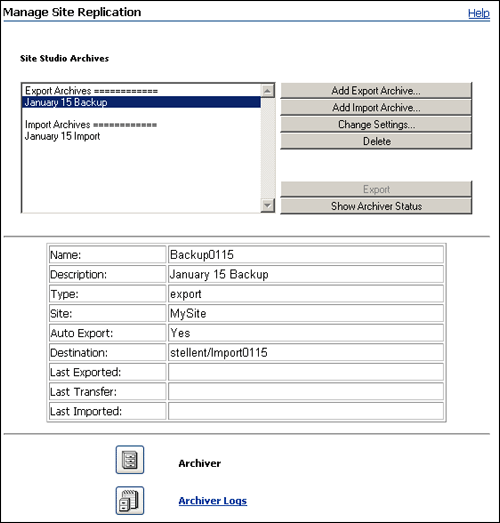
The Manage Site Replication page is used to manage the replication of Web sites from one content server to another. During this process, you must create an export archive on the source server and an import archive on a target server.
Before you perform these steps, you must configure the content servers so that they communicate with one another.
| Element | Description |
|---|---|
| Site Studio Archives | Displays all export and import archives currently checked into the content server. |
| Add Export Archive | Click to open the Add Export Archive page (see "Add Export Archive Page"), where you can create an export archive (on the source server). |
| Add Import Archive | Click to open the Add Import Archive page (see "Add Import Archive Page"), where you can create an import archive (on the target server). |
| Change Settings | Click to open the Edit Export Archive page (see "Edit Export Archive Page") or Edit Import Archive page (see "Edit Import Archive Page"), where you can edit the properties of an existing archive. |
| Delete | Click to delete the selected archive. |
| Export | Click to export the selected archive to the target server and initiate the replication process.
Once you export the archive, the replication process is automated. You do not have to import the archive on the target content server, manually transfer the archive, and so on. |
| Show Archiver Status | Click to display the progress of an existing archive (that replicates to a target server). |
| Archiver | Click the icon to launch the Archiver utility on the content server.
See the Content Server documentation for more information on Archiver and the archiving process. |
| Archiver Logs | Click the icon or the link to display the list of archive logs available to review.
See the Content Server documentation for more information on the Archiver logs and log files in general. |
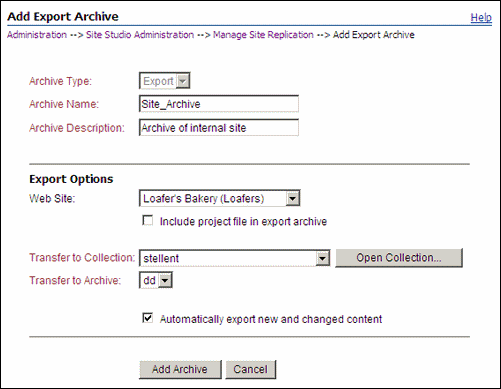
A.10 Add Export Archive Page
The Add Export Archive page is used to create an export archive file, which is used in the process of replicating a Web site from one content server to another. An export archive resides on the source server, where it collects information from the Web site. During replication, the export archive is copied to an import archive, which resides on the target server.
You must create an import archive on the target server before you create an export archive on the source server.
| Element | Description |
|---|---|
| Archive Type | Specifies whether this is an export or import archive (this option is marked for you). |
| Archive Name | Name of the archive. The name appears in the list of available archives on the Manage Site Replication page (see "Manage Site Replication Page").
The archive name should not contain any spaces or special characters. |
| Archive Description | Description of the archive. |
| Web Site | Identifies the Web site to create an export archive from and then replicate. Select the Web site from the menu.
Include project file in export archive: Select this check box if you want the project file to be included in the archive, which means you replicate the entire site. If you only want to replicate certain sections, clear this check box. |
| Transfer to Collection | Identifies the collection for the import archive on the target server where this export archive is copied to.
Open Collection: Click to open a browse dialog where you can select the collection on the target server. |
| Transfer to Archive | Identifies the import archive on the target server where this export archive is copied to.
Automatically export new and changed content: Select this check box if you want content that has changed on the source server to be replicated to the target server automatically. If you do not enable this option, you must manually trigger the replication. |
| Add Archive | Adds the export archive and returns you to the Manage Site Replication page (see "Manage Site Replication Page"). |
| Cancel | Cancels your settings and returns you to the Manage Site Replication page (see "Manage Site Replication Page"). |
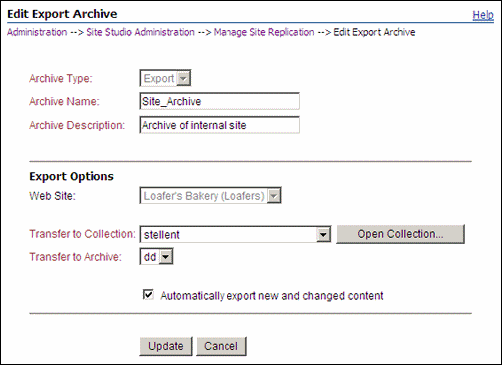
A.11 Edit Export Archive Page
The Edit Export Archive page is used to edit the properties of an existing export archive file, which is used in the process of replicating a Web site from one content server to another. An export archive resides on the source server, where it collects information from the Web site. During replication, the export archive is copied to an import archive, which resides on the target server.
| Element | Description |
|---|---|
| Archive Type | Specifies whether this is an export or import archive (this option is marked for you). |
| Archive Name | Name of the archive. The name appears in the list of available archives on the Manage Site Replication page (see "Manage Site Replication Page").
The archive name should not contain any spaces or special characters. |
| Archive Description | Description of the archive. |
| Web Site | Identifies the Web site to create an export archive from and then replicate. |
| Transfer to Collection | Identifies the collection for the import archive on the target server where this export archive is copied to.
Open Collection: Click to open a browse dialog where you can select the collection on the target server. |
| Transfer to Archive | Identifies the import archive on the target server where this export archive is copied to.
Automatically export new and changed content: Select this check box if you want content that has changed on the source server to be replicated to the target server automatically. If you do not enable this option, you must manually trigger the replication. |
| Update | Click to update the export archive and return to the Manage Site Replication page (see "Manage Site Replication Page"). |
| Cancel | Click to cancel your settings and return to the Manage Site Replication page (see "Manage Site Replication Page"). |
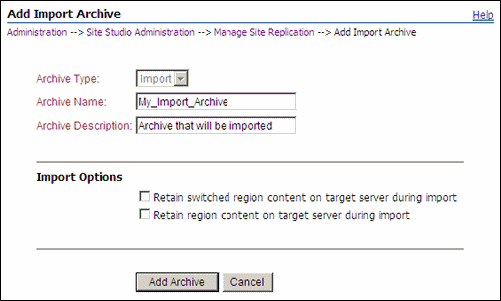
A.12 Add Import Archive Page
The Add Import Archive page is used to create an export archive file, which is used in the process of replicating a Web site from one content server to another. An import archive resides on the target server. During replication, content from the export archive is copied into the import archive. The import archive then copies the content to the target content server.
| Element | Description |
|---|---|
| Archive Type | Specifies whether this is an import or export archive (this option is marked for you). |
| Archive Name | Name of the archive. The name appears in the list of available archives on the Manage Site Replication page (see "Manage Site Replication Page").
The archive name should not contain any spaces or special characters. |
| Archive Description | Description of the archive. |
| Retain switched region content on target server during import | Select this check box you want to retain content that contributors assign to each region on the target Web site. These are the areas where a contributor has switched the contributor data file or native document originally assigned to a region.
You would typically choose to retain switched region content if you are replicating from a development server (source) to a contribution server (target), because in that scenario you want to preserve the changes made by a contributor. You would likely disable this option if you are replicating from a contribution server (source) to a consumption server (target), because in that scenario you want to overwrite anything that has changed on the consumption server. |
| Retain region content on target server during import | Select this check box if you want to retain the content that contributors edit in each region on the target Web site.
This prevents any contributor data files and native documents from being copied from the source server to the target server, which would potentially overwrite files edited by contributors. You would typically choose to retain region content if you are replicating from a development server (source) to a contribution server (target), because in that scenario you want to preserve the changes made by a contributor. You would likely disable this option if you are replicating from a contribution server (source) to a consumption server (target), because in that scenario you want to overwrite anything that has changed on the consumption server. |
| Add Archive | Click to add the import archive and return to the Manage Site Replication page (see "Manage Site Replication Page"). |
| Cancel | Click to cancel your settings and return to the Manage Site Replication page (see "Manage Site Replication Page"). |
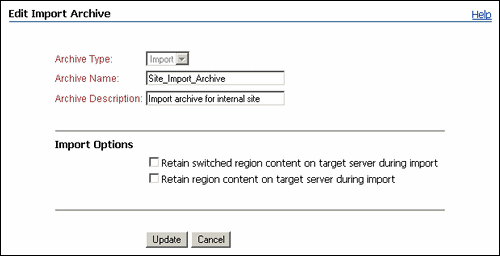
A.13 Edit Import Archive Page
The Edit Import Archive page is used to edit the properties of an existing import archive file, which is used in the process of replicating a Web site from one content server to another. An import archive resides on the target server. During replication, content from the export archive is copied into the import archive. The import archive then copies the content to the target content server.
| Element | Description |
|---|---|
| Archive Type | Specifies whether this is an import or export archive (this option is marked for you). |
| Archive Name | Name of the archive. The name appears in the list of available archives on the Manage Site Replication page (see "Manage Site Replication Page").
The archive name should not contain any spaces or special characters. |
| Archive Description | Description of the archive. |
| Retain switched region content on target server during import | Select this check box you want to retain content that contributors assign to each region on the target Web site. These are the areas where a contributor has switched the contributor data file or native document originally assigned to a region.
You would typically choose to retain switched region content if you are replicating from a development server (source) to a contribution server (target), because in that scenario you want to preserve the changes made by a contributor. You would likely disable this option if you are replicating from a contribution server (source) to a consumption server (target), because in that scenario you want to overwrite anything that has changed on the consumption server. |
| Retain region content on target server during import | Select this check box if you want to retain the content that contributors edit in each region on the target Web site.
This prevents any contributor data files and native documents from being copied from the source server to the target server, which would potentially overwrite files edited by contributors. You would typically choose to retain region content if you are replicating from a development server (source) to a contribution server (target), because in that scenario you want to preserve the changes made by a contributor. You would likely disable this option if you are replicating from a contribution server (source) to a consumption server (target), because in that scenario you want to overwrite anything that has changed on the consumption server. |
| Update | Click to update the import archive and return to the Manage Site Replication page (see "Manage Site Replication Page"). |
| Cancel | Click to cancel your settings and return to the Manage Site Replication page (see "Manage Site Replication Page"). |
A.14 General Component Information Page
The General Component Information page is used to provide information about the installed Site Studio component, Site Studio-specific metadata, directory paths, versions, and so on.
Figure A-18 General Component Information Page
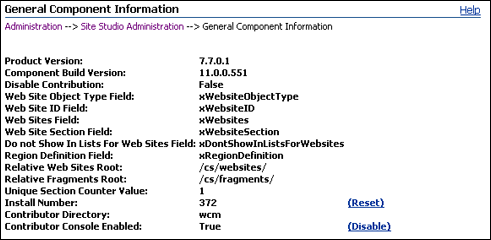
Description of "Figure A-18 General Component Information Page"
| Element | Description |
|---|---|
| Product Version | Displays the version of the Site Studio component. |
| Component Build Version | Displays the specific build of the Site Studio component version. |
| Disable Contribution | Indicates whether contribution is disabled (TRUE or FALSE). |
| Web Site Object Type Field | Displays the metadata field used for the Web site object types. |
| Web Site ID Field | Displays the metadata field used for the Web site IDs. |
| Web Sites Field | Displays the metadata field used for the Web site names. |
| Web Site Section Field | Displays the metadata field used for the Web site section names. |
| Do not Show In Lists For Web Sites Field | Displays the metadata field used for withholding from the Web site lists. |
| Region Definition Field | Displays the metadata field used for the region definition names. |
| Relative Web Sites Root | Displays the path to the Web sites. |
| Relative Fragments Root | Displays the path to the fragments. |
| Unique Section Counter Value | Displays the ID that is used for newly created sections in the site hierarchy (unless the designer manually enters a section ID). |
| Install Number | Displays the current install number of the Site Studio component. |
| (Reset) | Click to reset the current install number to 0. |
| Contributor Directory | The location of the Contributor source, including where all minified data is located. |
| Contributor Console Enabled | Displays if the Contributor Console is enabled and available, or disabled and unavailable.
For more information about the Contributor Console, see the Oracle WebCenter Content Technical Reference Guide for Site Studio. |
| (Enable) | (Disable) | Click to make the Contributor Console enabled or disabled. Only one option will appear depending on the current status of the console. |
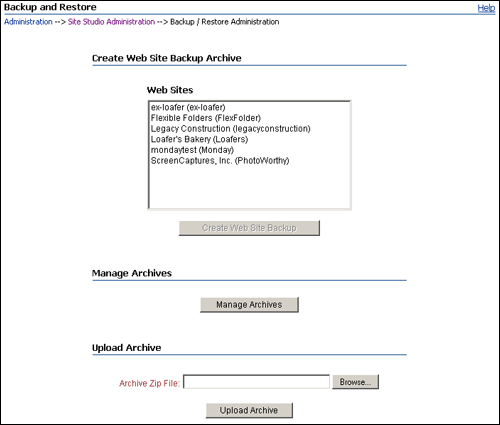
A.15 Backup and Restore Page
The Backup and Restore page is used to create backups of your site, download the backup file to a secure location or portable device, and restore from that backup. The backup feature uses the existing archiving and replicating framework built into Site Studio and Content Server.
| Element | Description |
|---|---|
| Web Sites | Displays all existing Web sites currently available on the content server. |
| Create Web Site Backup | Click to create a backup of the selected Web site. You see a page that shows the progress of the backup and any status information and error messages. |
| Manage Archives | Click to open the Manage Archives page (see "Manage Archives Page"), where you can view existing backups and definition bundles and choose to perform various actions on them. |
| Browse | Click to select an existing site backup file or download bundle for uploading to the content server. |
| Upload Archive | Uploads the Web site backup or definition bundle from your file system to the content server. You see a page that shows the progress of the backup and any status information and error messages. |
A.16 Manage Archives Page
The Manage Archives page is used to manage the existing Web site backups and the definition bundles uploaded through Administrator. You can view existing backups, and bundles, download a backup, restore from a backup, delete a backup, and unpack definition bundles.
Figure A-20 Web Site Backup Archives Page

Description of "Figure A-20 Web Site Backup Archives Page"
| Element | Description |
|---|---|
| Archive Type | Displays if the archive is a Web site backup or a definition bundle. |
| Archive Name | Displays the name of the archive used by the backup. |
| Web Site ID | Displays the name of the Web site that was backed up. |
| Backup Export Date | Displays the date and time that the backup was created or the bundle was uploaded. |
| Click this icon to open the actions menu, which will be different based on if the menu is for a Web site backup or if it for a definition bundle.
For a Web site backup:
For a definition bundle:
|
|
| Click this icon to open the Backup Archive Information page (see "Backup Archive Information Page"), which shows the details of the Web site backup or download bundle, including the archive name, description, Web site, and creation date |
To resize the columns on this page so that you can read each category, place your mouse over a border until it turns into a double-arrow and then drag your mouse to resize the column.
A.17 Backup Archive Information Page
The Archive Information page shows the details of a backup or definition bundle, including the archive name, description, Web site, creation date, and so on.
Figure A-21 Backup Archive Information Page
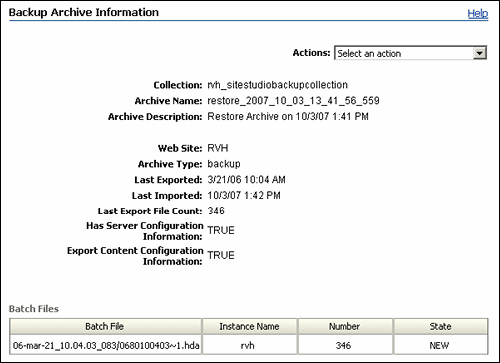
Description of "Figure A-21 Backup Archive Information Page"
| Element | Description |
|---|---|
| Actions (menu) | For a Web site backup:
For a definition bundle:
|
| Backup information fields | These fields show the details of the site backup or definition bundle, such as the archive name, archive description, Web site, creation date, and so on. |
| Batch File | Shows the details of the batch files used in the backup. |
| Instance Name | Name of the server the batch file was created on. |
| Number | Number of files contained in the backup/definition bundle when it was first uploaded. |
| State | The current state of the batch file. |
To resize the columns on this page so that you can read each category, place your mouse over a border until it turns into a double-arrow and then drag your mouse to resize the column.
A.18 Server Configuration Details Page
The Server Configuration Details page provides detailed configuration information for the content server that a backed-up Web site was located on at the time of the backup. This information includes the custom metadata fields, content types, security groups, configuration and environment settings, installed components, defined providers, and so on. This can be useful when you must know the content server environment for a particular site before you restore it.
Figure A-22 Server Configuration Details Page
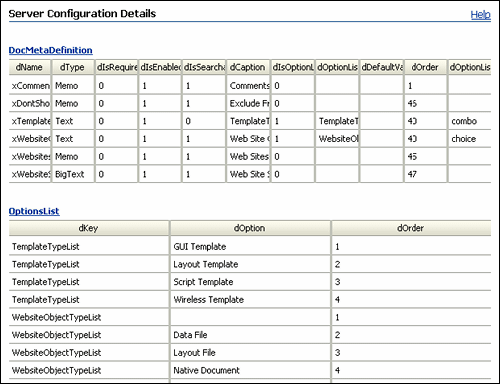
Description of "Figure A-22 Server Configuration Details Page"
| Element | Description |
|---|---|
| DocMetaDefinition | Displays the document types that were used on the content server. |
| OptionsList | Displays the option lists that were used on the content server. |
| QdocTypes | Displays the default content types that were used on the content server. |
| Qroles | Displays the users that were used on the content server. |
| QsecurityGroups | Displays the security groups that were used on the content server. |
| DocFormats | Displays the content formats that were used on the content server. |
| ConfigCfg | Displays the configuration settings that used on the content server. |
| GeneralConfig | Displays the general configuration settings that were used on the content server. |
| ServerEnvironment | Displays the server environment on the content server. |
| ComponentConfiguration | Displays the installed components that were used on the content server, along with their settings. |
| Providers | Displays the providers that were used on the content server. |
To expand a particular category and view it on a separate page, click the heading of that category.
To resize the columns on this page so that you can read each category, place your mouse over a border until it turns into a double-arrow and then drag your mouse to resize the column.
A.19 External Applications Administration page
The External Applications Administration page provides detailed cache information for external Site Studio applications. This cache information is sent back to external Site Studio applications so that they can clear their caches and request new content when needed.
Figure A-23 External Applications Administration Page
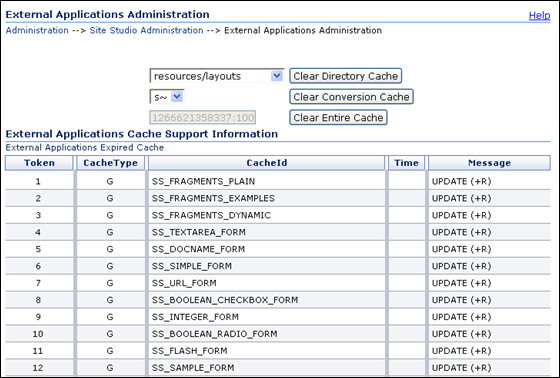
Description of "Figure A-23 External Applications Administration Page"
| Element | Description |
|---|---|
| Directory Cache list (untitled) | Displays the directory caches from the Oracle Content Server's weblayout area. |
| Clear Directory Cache | Click to clear the selected cache and refresh. |
| Conversion Cache List (untitled) | Displays the conversions in the cache. |
| Clear Conversion Cache | Click to clear the selected conversion cache and refresh. |
| Clear Entire Cache | Click to have all external Site Studio applications clear their caches. |
| Token | Displays a number that the external Site Studio application requests for cache information. |
| Cache Type | Displays the content type of the cache:
|
| Cache Id | Displays the ID for the cache. |
| Message | Displays a debugging message from the Oracle Content Server indexing cycle. |
| Client Id | Displays the ID for the application server. |
| Access Count | Displays the number of times the Client Id polled the cache. |
| Last Access Time | Displays the last time an access was made to the directory cache list by the Client Id. |
| Request Token | Displays the token sent as a request from the application server. |
| Sent Token | Displays the token sent to the Client Id in response. |
| Message | Displays an Oracle Content Server debugging message. |
