25 Using Oracle Data Integrator for Bulk Processing
Bulk data processing is the processing of a batch of discrete records between participating applications. Oracle AIA uses Oracle Data Integrator (ODI), a component of Oracle Fusion Middleware SOA Suite to perform bulk data integrations. This chapter provides an overview of design patterns for AIA ODI architecture and describes how to handle high volume transactions with Xref table, build ODI projects, use XREF knowledge module, work with ODI, work with Domain Value Maps, use Error Handling, use ODI Ref functions and how to publish the Package and Data Model as Web Service.
This chapter includes the following sections:
-
Section 25.1, "Introduction to Design Patterns for AIA-Oracle Data Integrator Architecture"
-
Section 25.9, "How to Publish the Package and Data Model as Web Service"
For information about using Oracle Data Integrator, see Oracle Fusion Middleware Developer's Guide for Oracle Data Integrator.
25.1 Introduction to Design Patterns for AIA-Oracle Data Integrator Architecture
Since Oracle Data Integrator data transfer is always point-to-point, the source and target systems must be capable of processing batch loads of data. An integration project should not adopt Oracle Data Integrator as a solution if there is a limitation in the number of rows that can be processed either on the source side or on the target-side application.
This section describes AIA-approved design patterns for using Oracle Data Integrator with AIA architecture. Design patterns approved by AIA are:
25.1.1 Initial Data Loads
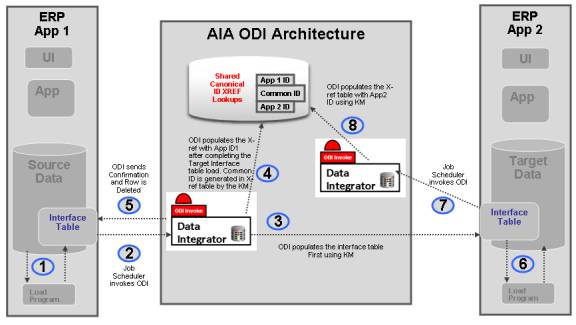
In this design pattern, shown in Figure 25-1, the initial set of data of a particular object is loaded from the source database to the target database; for example, loading Customer Account information or loading Invoice information into a new application database from an existing source application database. In the process, Xref data may or may not get established depending on the integration requirement.
The Oracle Data Integrator package that is developed for a specific integration cannot be reused for loading data into another participating application.
25.1.2 How to Perform the Oracle Data Integrator Data Load
To perform the Oracle Data Integrator Data load:
Note:
The following sample steps describe how you perform the initial data load from ERP Application 1 to ERP Application 2 as shown in Figure 25-1.
-
The source application ERP APP1 populates the interface table using its native technology.
Some applications can choose other strategies such as views or base tables as opposed to interface tables.
-
A job scheduler invokes the source side Oracle Data Integrator package.
-
Oracle Data Integrator extracts the data from Source Interface table and populates the Target Interface table.
-
After populating the Target interface table, you can choose to have Oracle Data Integrator populate the Xref table with App 1 ID and generate common ID.
This step is optional.
-
Oracle Data Integrator either deletes or updates the rows that were processed from the Source interface table to indicate that the rows are processed.
-
In the target application ERP APP2, the native application extracts data from the target interface table and populates the target database, thereby generating ERP Application 2 ID.
-
A job scheduler on the target application invokes the Oracle Data Integrator package to populate the Application 2 ID onto the Xref table matching on the Common ID.
For more information about Oracle Data Integrator, see Oracle Fusion Middleware Developer's Guide for Oracle SOA Suite.
25.1.3 High Volume Transactions with Xref Table
Whenever a need exists for a high-volume data transfer, AIA recommends using the Oracle Data Integrator solution for data transfer between applications. Using this approach, the Oracle Data Integrator package transfers data from source to target system on a regular basis.
For details about how to load data, see Section 25.1.2, "How to Perform the Oracle Data Integrator Data Load."
AIA recommends that the interface tables on the source side have a mechanism to indicate processed rows.
25.1.4 Intermittent High Volume Transactions
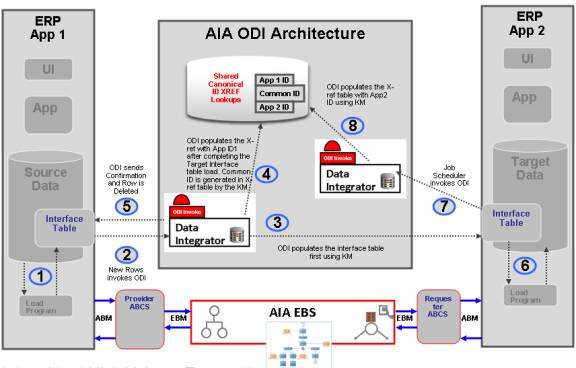
If you have a requirement that batch loading co-exists with regular online transactions, AIA recommends the approach illustrated in Figure 25-2.
In this scenario, two different flows send data from the source to the target application, one using the AIA Oracle Data Integrator approach, and the other using the standard AIA approach. The responsibility for ensuring data integrity lies with the participating applications. AIA recommends that only new records should be loaded using the AIA Oracle Data Integrator architecture approach.
For details about how to send data from source to target using AIA-Oracle Data Integrator architecture, see Section 25.1.2, "How to Perform the Oracle Data Integrator Data Load."
Create operations should be performed using the AIA Oracle Data Integrator approach while all other operations should be performed using AIA.
In this design pattern, do not use the AIA Oracle Data Integrator approach as an alternate route to send data when Oracle Fusion Middleware is unavailable. Instead, messages should be queued using an appropriate message queuing technology such as JMSQ, and handled using the guaranteed message technology recommended by AIA.
For more information about guaranteed messages, see Section 17.7, "Guaranteed Message Delivery."
25.2 High-Volume Transactions with Xref Table
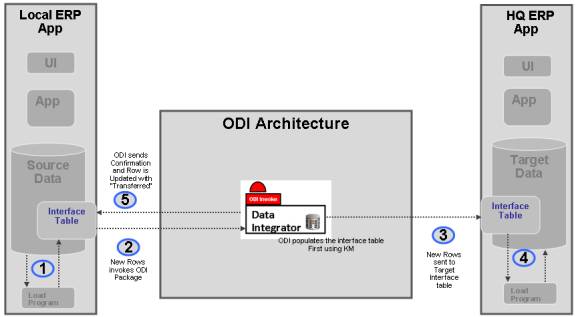
For situations in which storing Xref data for high-volume transactions does not make sense, AIA recommends using point-to-point integration using Oracle Data Integrator, as shown in Figure 25-3.
For example, the headquarters of a retail store chain receives data from individual retail stores every day at the close of business. In this scenario, you need not store Xref data between each individual local store with HQ because there are not any DML operations on those data sets.
For details about how to load data, see Section 25.1.2, "How to Perform the Oracle Data Integrator Data Load."
There is no AIA component in this architecture. Local ERP applications load their interface table and invoke an Oracle Data Integrator package to send data to the HQ Interface table. After the data is processed, Oracle Data Integrator updates the local ERP application's Interface table with a Transferred or Processed status for each row.
25.3 Building Oracle Data Integrator Projects
The Bulk Data processing strategy for AIA using Oracle Data Integrator is about building point-to-point solutions, taking into account the need to set up data in the Xref, using DVM, and ensuring that the processed data can participate in AIA services at runtime.
25.3.1 How to Build Oracle Data Integrator Projects
To build Oracle Data Integrator projects:
-
Define data servers.
The source and target data server that is defined is a logical entity referring to the physical database schema chosen for bulk data processing.
Link each data server you define to the physical data base schemas.
For more information, see Oracle Fusion Middleware Developer's Guide for Oracle SOA Suite.
-
Reverse engineer data servers.
Reverse engineer the data server to generate the various models along with the data stores.
-
Define interfaces.
Create interfaces for each of the data stores, as required.
In the process of creating interfaces, you specify the mapping between the source and target fields.
-
Define packages.
The packages are the steps in which the interfaces created are run along with some intermediate steps involving the Xref and also usage of DVM. If the package chooses to implement Xref, it must use a special integration knowledge module (IKM).
The package also has steps to clean up the source tables if you choose to do so.
25.4 Using the XREF Knowledge Module
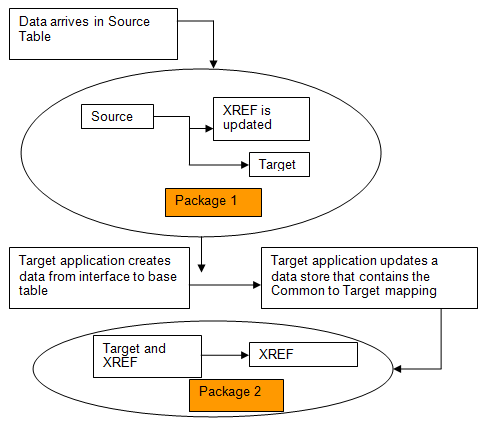
In Oracle Data Integrator, the creation of XREF data is a two-step process. Each step is an interface. The overall process is illustrated in Figure 25-4.
-
In the first interface, the user's source table is the source in Oracle Data Integrator and the user's target table is the target in Oracle Data Integrator.
While transporting data from source to target table, create XREF data for the source and common rows. In this process, if you want to populate any column of the target with the COMMON identifier, the Oracle Data Integrator knowledge module takes care of that too.
Note:
If the target interface table does not contain the placeholder for common data, you may have to either populate the source identifier or ask the application to identify a placeholder for the common value for each source row.
-
In the final step, after data is posted from the interface table to the base table, the target application must identify a data store where the mapping between target identifier and common (or source) identifier that you have sent during previous interface processing is available.
A second interface must be run in which this data store is the source in Oracle Data Integrator and the XREF table is the target. This creates the appropriate target columns in the XREF table.
25.4.1 What You Must Know About Cross-Referencing
Cross-referencing is an Oracle Fusion Middleware function, available through the Mediator component, and leveraged typically by any loosely coupled integration that is built on the Service Oriented Architecture (SOA) principles. It is used to manage the run-time correlation between the various participating applications of the integration.
While loading data from source tables to a target table, you must establish the cross-reference data in the SOA database just as it is done in the trickle feed architecture. While standard APIs are available in the SOA suite to populate the cross-reference tables, those APIs cannot be used in Oracle Data Integrator because that may lead to row-by-row processing as opposed to set-based processing.
The following sections describe how to load source table data to the target table and, at the same time, populate the cross-reference.
For more information about cross-referencing, see Section 26.4, "Working with DVMs and Cross-References."
25.5 Working with Oracle Data Integrator
Before working with Oracle Data Integrator, complete these prerequisites:
-
Define the master and work repository.
-
Define all topology parameters.
-
Physical architecture (for source, target, and XREF_DATA)
-
Logical architecture
-
Contexts
-
-
Define your data models.
-
Create a project.
-
Import the following Knowledge Modules into your project.
-
KM_LKM SQL to SQL (Mediator XREF) or KM_LKM SQL to Oracle (Mediator XREF)
-
CKM Oracle (delivered)
-
KM_IKM SQL Control Append (Mediator XREF)
-
For complete details on how to set up ODI, seeOracle Fusion Middleware Developer's Guide for Oracle Data Integrator.
25.5.1 How to Define Variables (Source and Target Column Names)
Because XREF column names cannot be hardcoded, two variables must be defined to hold the source and target column names. Normally, these column names are derived from the AIAConfiguration file. This section does not describe how to get that from the XML but rather it describes how to refresh this from a SQL select statement.
For complete details on variables, see "Working with Variables" in Oracle Fusion Middleware Developer's Guide for Oracle Data Integrator.
To define the source and target column names:
-
Create a variable
GetSourceColumnName.This variable is used to determine the column name of the
XREF_DATAtable. The Refreshing tab, as shown in Figure 25-5, has the appropriate SQL to get the value from the source, depending on the implementation. -
Create a variable
GetTargetColumnName.This variable is used to determine the column name of the
XREF_DATAtable. The Refreshing tab has the appropriate SQL to get the value from the source depending on the implementation.
25.5.2 How to Create the First Interface (Source to Target)
To create the first interface:
-
Create an interface.
-
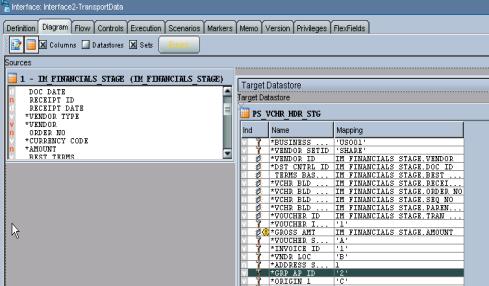
The source table in your data model should be dropped in Sources (in this example, IM_FINANCIALS_STAGE)
-
The target table (in this example, PS_VCHR_HDR_STG) appears in the target data store.
-
-
Provide mapping for each field, as shown in Figure 25-6.
-
Go to the Flow tab.
-
Select
LKMas the customized KM_LKM SQL to SQL (ESB XREF).This has an option called
SOURCE_PK_EXPRESSION. Pass the expression that represents the source key value in the XREF table in this option. If the source table has just one column defined as key, simply mention that column name (in this exampleSEQ_NO) for this option. If the source key has multiple columns, use the expression to derive the key value.For example, if two key columns are in the table and you want to store the concatenated value of those columns as your source value in XREF table, put this expression,
SEQ_NO|DOC_DATE, in the options value. This option is mandatory.If you are using update/delete along with XREF, then update the other options in the LKM. If you are not using update/delete, set the option
SRC_UPDATE_DELETE_ACTIONas None. -
In the IKM, choose the customized knowledge module IKM SQL to SQL (ESB Xref).
In this module, you must define the options listed in Table 25-1:
Table 25-1 Required Options in Customized Knowledge Module IKM SQL to SQL
Term Description XREF_TABLE_NAME
Name of your XREF table.
XREF_COLUMN_NAME
Name of the source column in the XREF table. Enter the variable name that you defined earlier (#GetSourceColumnName) in this option.
XREF_SYS_GUID_EXPRESSION
Select whether you want to use GUID or a sequence for the common identifier. For GUID, use SYS_GUID. For sequence, use the sequence name for this value.
XREF_ROWNUMBER_EXPRESSION
The value that goes into the ROWNUMBER column of the XREF_DATA table. Use the default value of GUID unless you require a sequence.
-
Choose CKM Oracle on the Controls tab when you select Knowledge Module.
If you need not send the common value to the target table, ignore this step.
If the target table does not have any placeholder for the common identifier and you are planning to supply the source identifier in one of the target table columns, you must use the standard mapping rules of Oracle Data Integrator to indicate what source identifier to populate in which column. This integration knowledge module does not do any work for you in that case.
If the target column that you want to hold the common identifier is a unique key of the target table, then put a dummy mapping on that column. This is due to an Oracle Data Integrator limitation; otherwise, the key is not shown next time you open the interface. At runtime, this dummy mapping is overwritten with the generated common identifier by the integration knowledge module. Mark the UD1 column to indicate which target column the column value goes in.
-
Validate and save the interface.
To create a package for the first interface:
-
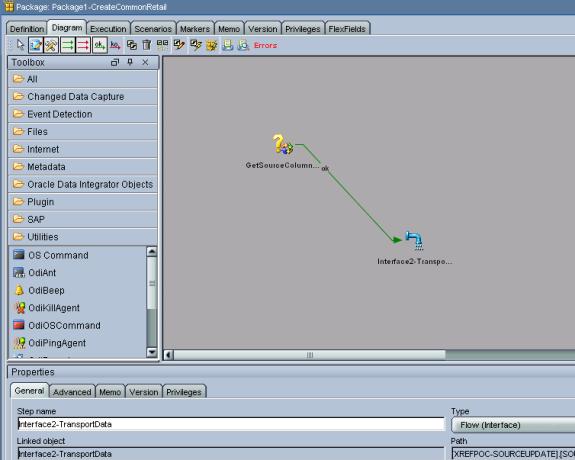
Create a package to run the interfaces, as shown in Figure 25-7.
This should contain at least two steps.
-
Refresh the variable that holds the source column name.
-
Run the interface.
Note:
Every implementation adds its own error-handling steps in the package.
-
-
Validate and save the package.
-
Run the package.
Most likely, this package runs as soon as the data arrives in the source table. You can achieve this by using the Oracle Data Integrator changed data capture.
How to run a package when the data arrives in a source table is described in the following sections.
25.5.3 How to Define the XREF View in SOA
To define the XREF view in SOA:
Create an XREF View in the XREF Database as shown in Example 25-1.
Example 25-1 Creation of an XREF View in the XREF Database
CREATE OR REPLACE FORCE VIEW "ORAESB"."INVOICE_XREF_VW" ("ROW_NUMBER",
"XREF_TABLE_NAME", "RETL_01", "COMMON", "PSFT_01") AS
  select row_number, XREF_TABLE_NAME,
  max(decode(XREF_COLUMN_NAME, 'RETL_01', VALUE,null)) RETL_01,
  max(decode(XREF_COLUMN_NAME, 'COMMON', VALUE,null)) COMMON,
  max(decode(XREF_COLUMN_NAME, 'PSFT_01', VALUE,null)) PSFT_01
  from XREF_DATA
GROUP BY row_number, XREF_TABLE_NAME;
Note:
Construct this view for each implementation.
25.5.4 How to Create the Second Interface (Update Target Identifier in XREF)
After the data is moved to target base tables and the target identifier is created, the data must get back to the XREF database corresponding to the source identifier to complete the loop. In the previous step, the common (or source) identifier was passed to the target system. Now the target system must provide a map between that common (or source) identifier and the target base identifier. This may come in the same interface table or it may come in a separate table. This mapping data store is used in this interface in the source. This interface is packaged and finally a separate process from target system runs that package.
To create the second interface:
-
Create an interface for data transport.
In the sources section, drop the XREF_VW view and the mapping data store (in this example, the same interface table in PeopleSoft PS_VCHR_HDR_STG). In the target data section, select the XREF_DATA table.
-
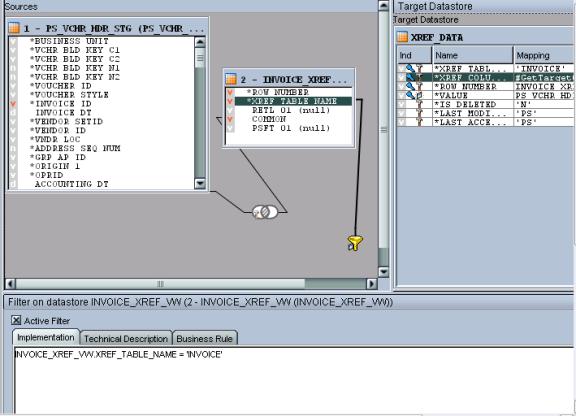
Apply a filter for XREF_VW with a WHERE clause to filter data from your table name only, as shown in Figure 25-8. For example,
XREF_VW.XREF_TABLE_NAME='INVOICE',if you are using this for INVOICE. -
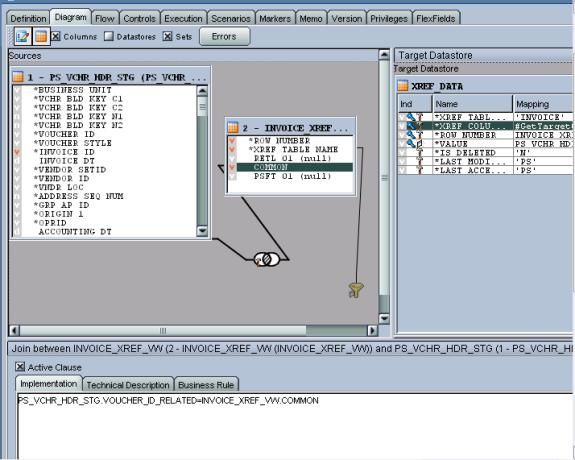
Join the mapping data store and XREF_VW with the columns that store the common (or source) identifier, as shown in Figure 25-9.
In this example, the column of the PeopleSoft interface table that stores common data is
VOUCHER_ID_RELATED. -
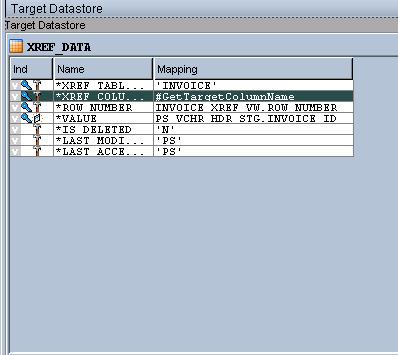
The XREF_TABLE_NAME map should be the XREF_TABLE name of the implementation.
-
XREF_COLUMN_NAME map should be
#GetTargetColumnName(pointing to the variable that was created earlier). -
Map ROW_NUMBER to the ROW_NUMBER of the XREF_VW.
-
The map for the VALUE field is the column that stores the target identifier in the mapping data store (in this example, the INVOICE_ID column of the PS_VCHR_HDR_STG).
-
The map for IS_DELETED is set to
N -
The map for LAST_MODIFIED and LAST_ACCESSED is different for each implementation.
-
Mark XREF_TABLE_NAME, XREF_COLUMN_NAME and VALUE as
Key, as shown in Figure 25-10. -
On the Flow tab, use the load knowledge module,
LKM SQL to Oracle. -
Use the integration knowledge module,
IKM Oracle incremental update. -
On the
Controlstab, use the check knowledge module,CKM Oracle. -
Validate and save the interface.
25.5.4.1 How to Create a Package for the Second Interface
To create a package for the second interface:
-
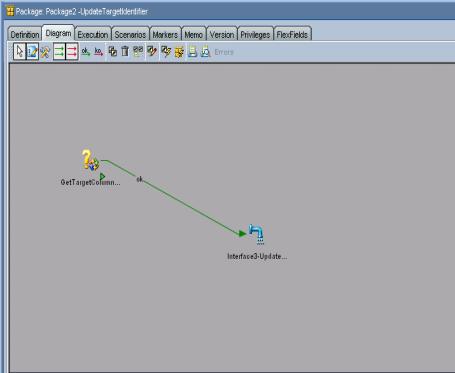
Create a package to run the interface, as shown in Figure 25-11.
This should contain at least two steps:
-
Refresh the variable that holds the target column name.
-
Run the first interface.
Note:
Every implementation adds its own error-handling steps in the package.
-
-
Validate and save the package.
-
Run the package.
Most likely, this package runs as soon as the data arrives in the target mapping data store. This can be achieved by using the Oracle Data Integrator changed data capture.
25.6 Working with Domain Value Maps
The Domain Value Maps (DVM) are available as XML files and can be used as delivered.
-
Reverse-engineer the DVM and it results in multiple relational tables.
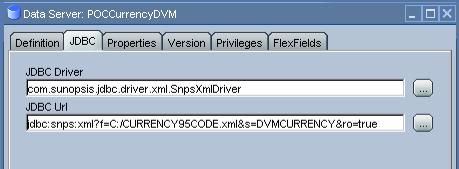
Here is how the DVM XML is converted after reverse-engineering. We have used the XML itself in the JDBC description for the data server and not any schema for reverse engineering, as shown in Figure 25-12.
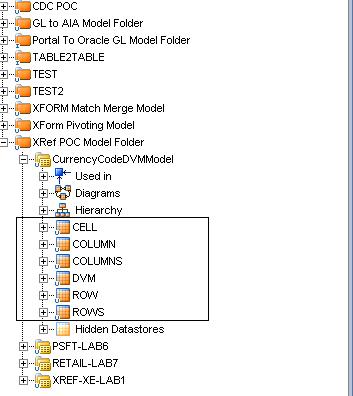
The DVM XML turns into six tables after the reverse-engineering, as shown in Figure 25-13.
-
Join those multiple tables to derive the corresponding mapping in the interface.
-
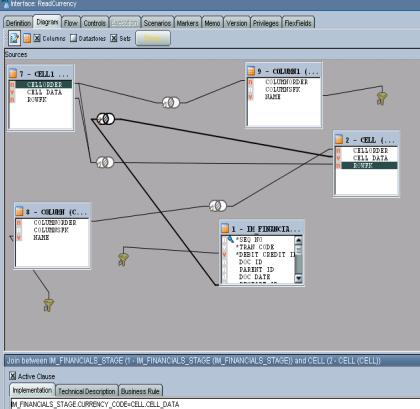
Join IM_FINANCIALS_STAGE with the CELL table, as shown in Figure 25-14.
Use the column in your main source table for DVM in the join.
-
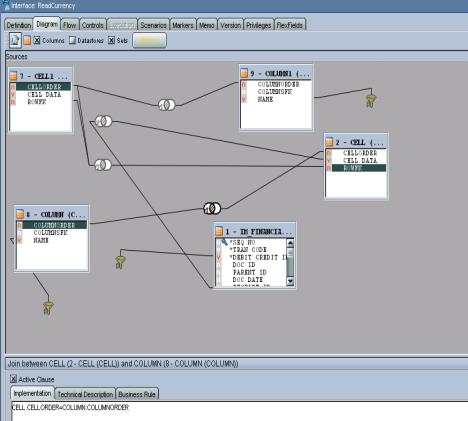
Join the CELL table with COLUMN table, as shown in Figure 25-15.
-
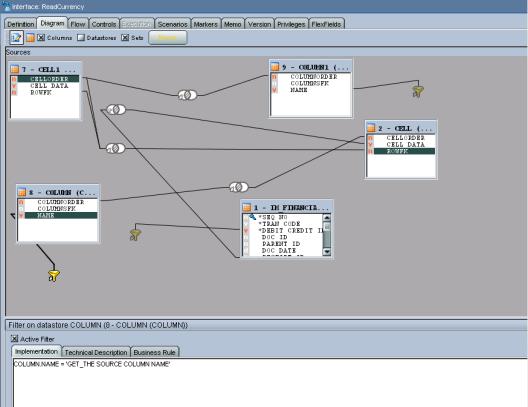
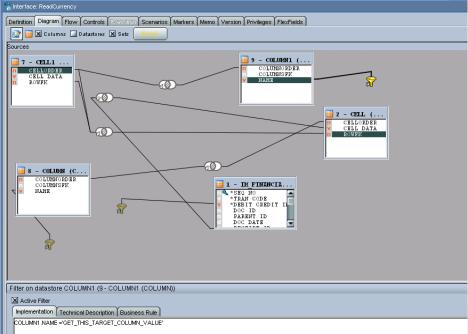
Add a filter for the COLUMN table (to determine the source column name), as shown in Figure 25-16. This filter can use a variable that holds the source column name.
-
Drop the CELL table and COLUMN table once more in the interface. They can be renamed, but for now settle with CELL1 and COLUMN1. These duplicate sets fetch the target values.
-
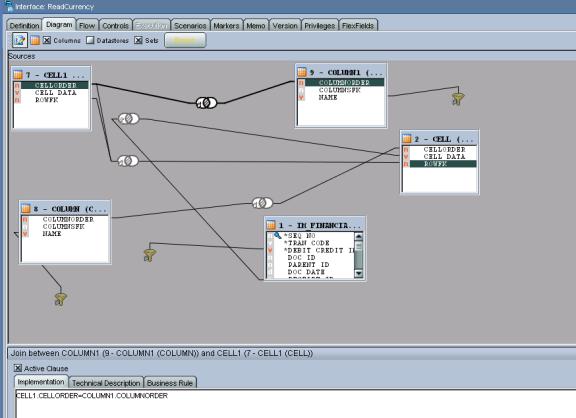
Join CELL1 with COLUMN1 table, as shown in Figure 25-17.
-
Add a filter on the COLUMN1 table (to determine the target column name), as shown in Figure 25-18.
This filter can use a variable that holds the source column name.
-
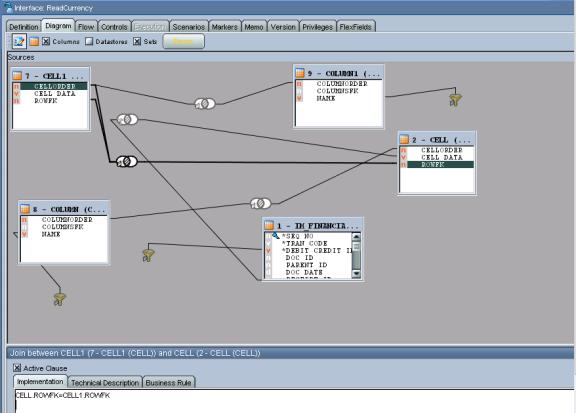
Finally, self-join the CELL table with another CELL (CELL1) table, as shown in Figure 25-19.
-
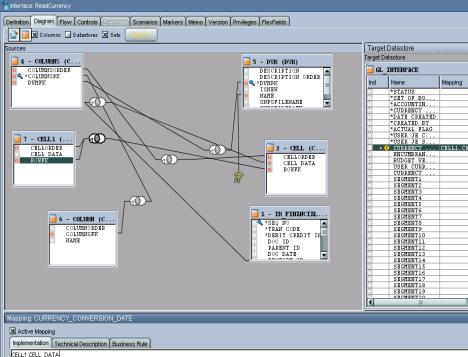
Use this second CELL data (CELL1 table's data) in the target interface mapping, as shown in Figure 25-20.
Note:
You must repeat all joins for each DVM-centric column.
25.7 Using Error Handling
To use error handling for the Oracle Data Integrator flows:
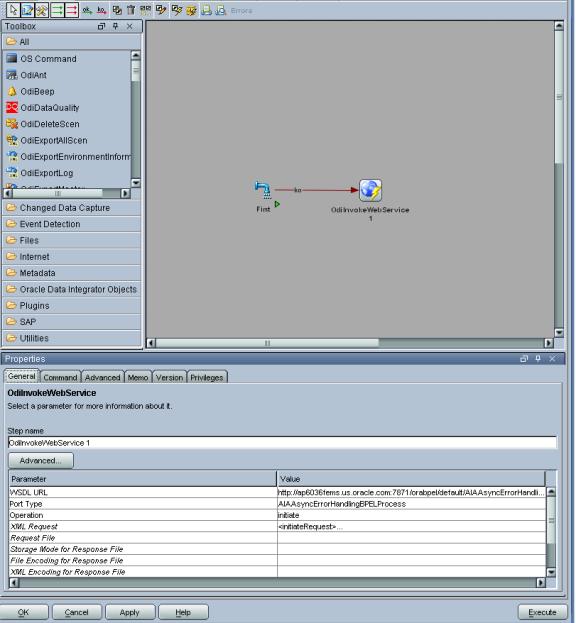
The package shown in Figure 25-21 is a sample interface that invokes the AIAAsyncErrorHandlingBPELProcess when it ends in error.
The XML Request Input for this process is provided in Example 25-2.
Example 25-2 XML Request Input for AIAAsyncErrorHandlingBPELProcess
<initiateRequest>
<Fault>
<EBMReference>
<EBMID/>
<EBMName/>
<EBOName/>
<VerbCode/>
<BusinessScopeReference>
<ID/>
<InstanceID>[End to End Process Name, Hard code, every developer must know
this process name]</InstanceID>
<EnterpriseServiceName/>
<EnterpriseServiceOperationName/>
</BusinessScopeReference>
<SenderReference>
<ID>[Sender Reference ID - Hard code the system id of the source system]</ID>
<SenderMessageID/>
<TransactionCode/>
<ObjectCrossReference>
<SenderObjectIdentification>
<BusinessComponentID/>
<ID/>
<ContextID/>
<ApplicationObjectKey>
<ID/>
<ContextID/>
</ApplicationObjectKey>
<AlternateObjectKey>
<ID/>
<ContextID/>
</AlternateObjectKey>
</SenderObjectIdentification>
<EBOID/>
</ObjectCrossReference>
<Application>
<ID/>
<Version/>
</Application>
</SenderReference>
</EBMReference>
<FaultNotification>
<ReportingDateTime><%=odiRef.getPrevStepLog("BEGIN")%></ReportingDateTime>
<CorrectiveAction>[ODI does not have it, leave this element null]</
CorrectiveAction >
<FaultMessage>
<Code>[ODI Error return code to be passed here. Must find the ODI system
variable to get the return code]</Code>
<Text><%=odiRef.getPrevStepLog("CONTEXT_NAME" )%>/<%=odiRef.getSession( "SESS_
NAME" )%>/<%=odiRef.getPrevStepLog("STEP_
NAME")%>:<![CDATA[<%=odiRef.getPrevStepLog("MESSAGE")%>]]></Text>
<Severity>[ODI does not have it, hard code it to 1]</Severity>
<Stack/>
</FaultMessage>
<FaultingService>
<ID>[Hard code a meaningful name of the Process, For example, CustomerInitialLoad (this
could be same as package name)] </ID>
<ImplementationCode>ODI</ImplementationCode>
<InstanceID><%=odiRef.getPrevStepLog("SESS_NO")%></InstanceID>
</FaultingService>
</FaultNotification>
</Fault>
</initiateRequest>
25.8 Oracle Data Integrator Ref Functions
Table 25-2 lists the Oracle Data Integrator Ref functions with a description of each.
Table 25-2 Oracle Data Integrator Ref Functions
| Ref Function | Description |
|---|---|
|
|
The date and time when the step that ended in error began |
|
|
The error message returned by the previous step, if any. It is a blank string if no error occurred. |
|
|
The number of the session |
|
|
The name of the context in which the step was performed. |
|
|
The name of the session. |
|
|
The name of the step. |
25.9 How to Publish the Package and Data Model as Web Service
To publish the package and data model as a Web service:
-
Install Axis2 as a standalone server.
-
Set an environment variable JAVA_HOME to the path name of the directory in which you installed the JDK release.
-
Download Apache Axis2 Version 1.2 (
http://axis.apache.org/axis2/java/core/download.cgi) and unpack the Axis2 Standard Binary Distribution into a convenient location so that the distribution resides in its own directory. Set an environment variable AXIS2_HOME to the path name of the extracted directory of Axis2 (for example, /opt/axis2-1.2). -
Start the Standalone Axis2 server by running the following command:
$AXIS2_HOME\bin\axis2server.bat(Windows)After startup, the default web services that are included with Axis2 are available by visiting http://localhost:8080/axis2/services/
-
Download the
axis2.warfromhttp://axis.apache.org/axis2/java/core/download.cgi.
-
-
Deploy
axis2.waron the OC4J Application Server.-
Deploy the
axis2.waron the OC4J Application Server (http://www.oracle.com/technetwork/middleware/ias/downloads/utilsoft-090603.html) or OC4J Server of the SOA Suite can also be used. Go tohttp://<Host:port>and launch the application server that takes you to OC4J home. Click the Application tab and then click the Deploy tab. It asks you the location of the file. Browse and point to theAxis2.warfile and then deploy. -
After the WAR is successfully deployed, test it by pointing the web browser to
http://<host:port>/axis2. This opens the Axis2 Web Application Home Page. -
Click Validate to ensure that the procedure ended successfully.
-
-
Install the Oracle Data Integrator Public Web Services on Axis2.
In Axis2, go to the Administration page.
-
Select the Upload Service link.
-
Browse for the Oracle Data Integrator Web Services .aar file.
It is located in the
/tools/web_services/subdirectory in the Oracle Data Integrator installation directory. -
Click the Upload button.
Axis2 uploads the Oracle Data Integrator Web Services. You can now see Data Integrator Public Web Services in the Axis2 services list.
-
The services and the operations of successfully installed services appear on the available services page (
http://<Host>:<HTTP port>/axis2/services/listServices), where you can see OdiInvoke
-
-
Environment setup for Data Services
-
The database drivers (
http://www.oracle.com/technetwork/database/enterprise-edition/jdbc9201-092698.html) must be installed in the appropriate directory. ORACLE_HOME/j2ee/home/applib for OC4J. -
Create the JDBC Datasource pointing to the data server:
-
Connect to OC4J administration interface.
-
On the Administration tab, in Services | JDBC Resources, click Go to task.
-
Click the Create button in the Connection Pools section.
-
Select the Axis2 application, select New Connection Pool, then Continue.
-
Fill in the fields for the JDBC data source and click Finish.
-
Click the Create button in the Data Sources section.
-
Select the Axis2 application, select Managed Datasource, then Continue.
-
-
META-INF/context.xml and WEB-INF/web.xml is updated in the iAxis directories.
Update application.xml in the given folder ORACLE_HOME\j2ee\home\applications\axis2\META-INF as shown in Example 25-3.
Example 25-3 Update application.xml in ORACLE_HOME\j2ee\home\applications\axis2\META-INF
<Context >
<Resource
name="jdbc/TestDS"
type="javax.sql.DataSource"
driverClassName="oracle.jdbc.OracleDriver"
url="jdbc:oracle:thin:@abijayku-idc:1522:orcl1"
username="master"
password="master"
maxIdle="2"
maxWait="-1"
maxActive="4"/>
</Context>
(Resource name will be reused in the web.xml file and in the Model in Designer.)
(driverClassName, url, username and password will explicitly point to the
data source.)
Update the web.xml file with the resource name of the context.xml file
(here res-ref-name) in the given folder ORACLE_
HOME\j2ee\home\applications\axis2\axis2\WEB-INF as follows:
<resource-ref>
<description>Data Integrator Data Services on
Oracle_SRV1</description>
<res-ref-name>jdbc/TestDS</res-ref-name>
<res-type>javax.sql.DataSource</res-type>
<res-auth>Container</res-auth>
</resource-ref>
-
Set an environment variable ODI_JAVA_HOME to the path name of the directory into which you installed the JDK release.
-
-
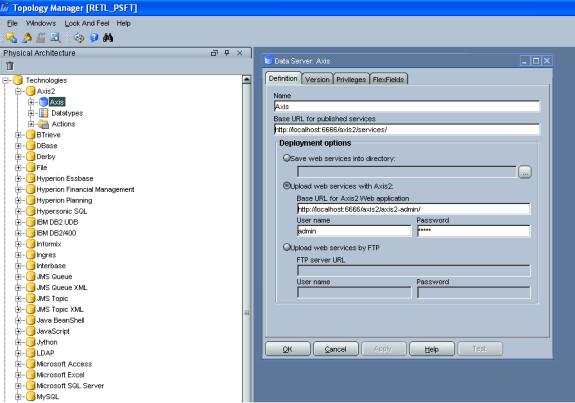
Configure the topology, as shown in Figure 25-22.
-
In Topology Manager's Physical Architecture view, select the Axis2 technology. Right-click and select Insert Dataserver. If you are using a different Web Services container, then choose the appropriate technology instead.
-
Complete the following fields on the Definition tab:
-
Name: Name of the dataserver as it appears in Oracle Data Integrator.
-
Base URL for published services:
http://<Host>:<HTTP port>/axis2/services. -
Select the option corresponding to the chosen method of deployment.
-
Web Service Upload: Specify the root URL for the Axis2 application, typically
http://<Host>:<HTTP port>/axis2/axis2-admin/, and the user name (admin) and password (axis2) of the Axis2 administrator.
-
-
Click OK. A window opens to enable you to create a physical schema.
-
Go to the Context tab, and define one logical schema for each context in which to deploy the Data Services.
-
Click OK.
-
-
Set up the Data Model to access the data of the table using a web service.
-
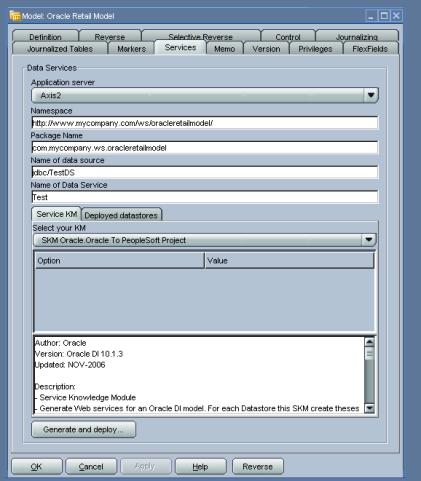
Open the model and go to the Services tab as shown in Figure 25-23.
-
From the Application Server list, select the Web Services container that you set up earlier.
-
Enter the Namespace to be used in the generated WSDL.
-
Specify the Package name used to name the generated Java package that contains your Web Service. Generally, this is of the form
com.<company name>.<project name>. -
In the Name of the data source field, copy and paste the name of the data source that you defined for the server when setting up the data sources. (Provide the JNDI location of the data source.)
-
Define the Data Service Name.
-
Select a service knowledge module (SKM Oracle) from the list, and set its options.
-
Go to the Deployed Datastores tab.
-
Select every data store needed to expose as a Web Service. For each one, specify a Data Service Name and the name of the Published Entity.
-
Click OK to save your changes.
-
Click the Generate and Deploy tab to deploy it on the OC4J server.
-
The deployed data store can be viewed at
http://<Host>:<HTTP port>/axis2/services/listServicesalong with all the available operations. -
The generated data service can be tested using OdiInvokeWebService tool provided in the package.
-
-
Run a scenario using a Web Service.
OdiInvoke web service is used to run a scenario using a web service. The WSDL is
http://<Host>:<HTTP port>/axis2/services/OdiInvoke?wsdl. The port to use is calledinvokeScenario.This web service commands an agent to connect a given work repository and to start a specific scenario. Parameters are similar to the ones used when running a scenario from an OS command. Example 25-4 is a sample SOAP request for this web service.
Example 25-4 Sample SOAP Request for the OdiInvoke Web Service
<invokeScenarioRequest>
<invokeScenarioRequest>
<RepositoryConnection>
<JdbcDriver>oracle.jdbc.driver.OracleDriver</JdbcDriver>
<JdbcUrl>jdbc:oracle:thin:@sbijayku-idc:1522:orcl1</JdbcUrl>
<JdbcUser>MASTER_FINPROJ</JdbcUser>
<JdbcPassword>master</JdbcPassword>
<OdiUser>SUPERVISOR</OdiUser>
<OdiPassword>SUNOPSIS</OdiPassword>
<WorkRepository>WORK</WorkRepository>
</RepositoryConnection>
<Command>
<ScenName>ABC</ScenName>
<ScenVersion>001</ScenVersion>
<Context>RETL_TO_PSFT</Context>
<LogLevel>5</LogLevel>
<SyncMode>1</SyncMode>
</Command>
<Agent>
<Host>sbijayku-idc</Host>
<Port>20910</Port>
</Agent>
</invokeScenarioRequest>
</invokeScenarioRequest>
The scenario execution returns a SOAP response as shown in Example 25-5.
