6 Working with Project Lifecycle Workbench Bills of Material
This chapter provides an overview of Bills of Materials and how to work with Bill of Materials for an AIA Lifecycle Project.
This chapter includes the following sections:
-
Section 6.2, "How to Generate a Bill of Material for an AIA Lifecycle Project"
-
Section 6.3, "How to Edit a Bill of Material for an AIA Lifecycle Project"
-
Section 6.4, "How to View a Bill of Material for an AIA Lifecycle Project"
6.1 Introduction to Bills of Material
Following the Oracle Application Integration Architecture (AIA) development lifecycle, required functionality for a Pre-Built Integration is implemented as a series of composites.
For more information about using the Service Constructor to generate these composites, see Chapter 4, "Working with Service Constructor."
After these design-time composites are complete, they are harvested into the Project Lifecycle Workbench.
For more information about harvesting design-time composites into the Project Lifecycle Workbench, see Section 5.2, "Harvesting Design-Time Composites into Project Lifecycle Workbench and Oracle Enterprise Repository."
At this point, you can use the Project Lifecycle Workbench to create a bill of material (BOM) for a Pre-Built Integration. The BOM specifies the inventory of composites that constitute the Pre-Built Integration. Using this feature can help expedite deployment plan generation for a Pre-Built Integration project by enabling the automatic or semiautomatic generation of the Pre-Built Integration's BOM.
For more information about generating a deployment plan using the Deployment Plan Generator, see Chapter 8, "Generating Deployment Plans and Deploying Artifacts."
The BOM options that appear for a user in the Project Lifecycle Workbench depend on the Project Lifecycle Workbench role assigned to their WebLogic user.
For more information about setting up Project Lifecycle Workbench roles, see "Setting up AIA Roles" in Oracle Fusion Middleware Installation and Upgrade Guide for Oracle Application Integration Architecture Foundation Pack.
AIALifecycleUser and AIALifecycleDeveloper roles are provided with the following BOM options on the Project page:
-
If the BOM has not yet been generated, the No Bill Of Material Exists message displays.
-
If the BOM has been generated, the View Bill Of Material link displays.
The user can click the link to view the BOM.
For more information about viewing BOMs, see Section 6.4, "How to View a Bill of Material for an AIA Lifecycle Project."
The AIALifecycleInstallDeveloper role is provided with the following BOM options on the Project page:
-
If the BOM has not yet been generated, the Generate Bill Of Material link displays.
The user can click the link to preview or generate the BOM.
For more information about generating BOMs, see Section 6.2, "How to Generate a Bill of Material for an AIA Lifecycle Project."
-
If BOM has been generated, the Edit Bill Of Material link displays.
The user can click the link to edit the BOM.
For more information about editing BOMs, see Section 6.3, "How to Edit a Bill of Material for an AIA Lifecycle Project."
Automatic generation of the BOM is possible if you have implemented AIA-recommended annotations when constructing composites and have harvested completed design-time composites to Project Lifecycle Workbench.
Generation of the BOM becomes semiautomatic if you have not implemented AIA-recommended annotations when constructing composites and have not harvested completed design-time composites to Project Lifecycle Workbench. In this case, manual intervention is necessary to generate the BOM.
For more information about AIA-recommended annotations, see Section 5.2, "Harvesting Design-Time Composites into Project Lifecycle Workbench and Oracle Enterprise Repository."
Along with prebuilt AIA Pre-Built Integrations, Oracle delivers the BOMs for these Pre-Built Integrations. You can import this BOM seed data into your system so that you can use the Project Lifecycle Workbench to revise the BOMs in accordance with any modifications you make to the prebuilt Pre-Built Integrations.
For more information about importing BOM seed data, see Section 7.4, "How to Import Seed Data."
6.2 How to Generate a Bill of Material for an AIA Lifecycle Project
Generate a BOM from an AIA Lifecycle project. The BOM captures all in-scope tasks, their ensuing composites and metadata.
The generated BOM output, an XML file, contains all composite information, which collectively makes up a project and is useful for configuring a deployment plan using the Deployment Plan Generator.
For more information about generating a deployment plan using the Deployment Plan Generator, see Chapter 8, "Generating Deployment Plans and Deploying Artifacts."
Prerequisites and Recommendations
In the AIA development lifecycle, as with any software development cycle, deployment plan generation occurs near the end of the development cycle. Do not generate BOM and generate deployment plan based on the BOM until you are certain that you are no longer required to alter the functional decomposition and project definition.
Likewise, the composites for the Pre-Built Integration should have been implemented and, ideally, harvested into the Project Lifecycle Workbench before approaching BOM generation.
For more information about using the Service Constructor to generate these composites, see Chapter 4, "Working with Service Constructor."
For more information about harvesting composites into the Project Lifecycle Workbench, see Section 5.2, "Harvesting Design-Time Composites into Project Lifecycle Workbench and Oracle Enterprise Repository."
Note:
If you have not annotated composites and you have not performed harvesting, you can still use BOM generation functionality by generating the BOM for your project and manually building BOM with annotations using the instructions in this chapter.
Only users assigned the AIALifecycleInstallDeveloper role can generate and modify a BOM for a Pre-Built Integration project. This user should be a developer who is responsible for producing the deployment plan for all executables in the project for which the BOM is being generated. This developer will therefore also have a solid overall picture of the project.
To generate a BOM for an AIA Lifecycle project:
-
Access the AIA Home Page. Click Go in the Project Lifecycle Workbench area. Select the Project tab.
-
Click the Generate Bill Of Material link.
This option is available only if your user has the AIALifecycleInstallationDeveloper role assigned and the BOM has not been generated.
-
If the BOM has been generated and you have been assigned the AIALifecycleInstallationDeveloper role, you will see the Edit Bill of Material link. Click it to view and edit and generated BOM.
For more information about editing BOMs, see Section 6.3, "How to Edit a Bill of Material for an AIA Lifecycle Project."
-
If the BOM has been generated and you have not been assigned the AIALifecycleInstallationDeveloper role, you will see the View Bill Of Material link. Click it to view the BOM on the Bill Of Material page.
For more information about viewing BOMs, see Section 6.4, "How to View a Bill of Material for an AIA Lifecycle Project."
-
-
The application prompts you with two choices:
-
Click Generate to generate the BOM for the Pre-Built Integration project and access it on the Bill Of Material page.
Click this option only if the functional decomposition and project definition have truly been completed.
Note:
After you generate the BOM for a project, any changes that are made to the BOM on the Bill Of Material page are not reflected in the original project definition and decomposition in the Project Lifecycle Workbench.
-
Click Preview to view the BOM. This option is available only before the BOM has been generated.
-
-
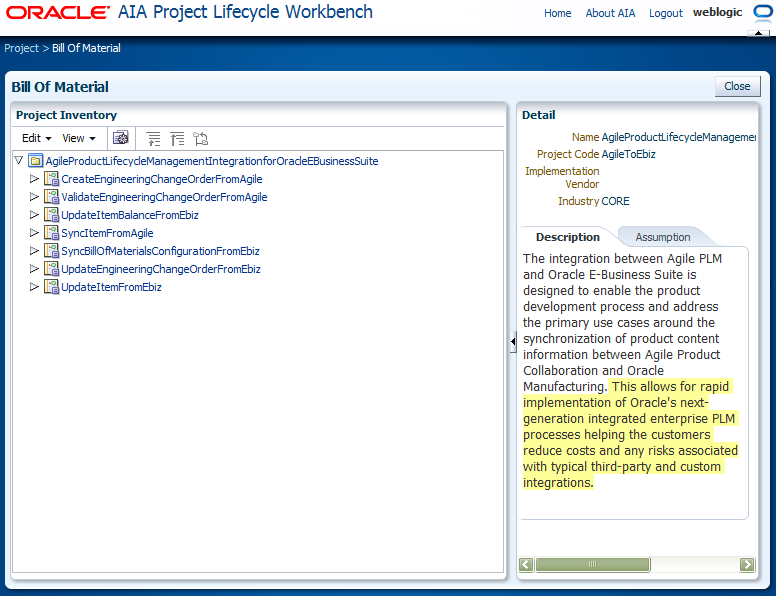
The generated BOM displays on the Bill Of Material page. Edit the BOM as necessary and click the Export BOM button, as shown in Figure 6-1 to export the BOM as an XML file to be supplied as input to the Deployment Plan Generator to expedite deployment plan generation.
The recommended location for the saved BOM XML file is AIA_HOME/aia_instances/<instance_name>/config.
The recommended file name for the saved BOM XML file is <Custom_Pre-Built Integration_Name>BOM.xml.
For more information about supplying the BOM XML file to the Deployment Plan Generator, see Chapter 8, "Generating Deployment Plans and Deploying Artifacts."
For more information about editing BOM, see Section 6.3, "How to Edit a Bill of Material for an AIA Lifecycle Project."
6.3 How to Edit a Bill of Material for an AIA Lifecycle Project
Edit a BOM for an AIA Lifecycle Project.
Prerequisites and Recommendations
The BOM must have been generated.
For more information about generating BOMs, see Section 6.2, "How to Generate a Bill of Material for an AIA Lifecycle Project."
Note:
Any changes that you make to the BOM on the Bill Of Material page are not reflected in the original project definition and decomposition in the Project Lifecycle Workbench.
Only users assigned the AIALifecycleInstallationDeveloper role can edit a BOM for a Pre-Built Integration project. This user should be a developer who is responsible for producing the deployment plan for all executables in the project for which the BOM is being generated. This developer will therefore also have a solid overall picture of the project.
To edit a BOM for an AIA Lifecycle Project:
-
Access the AIA Home Page. Click Go in the Project Lifecycle Workbench area. Select the Project tab.
-
Click the Edit Bill Of Material link.
This option is available only if your user has the AIALifecycleInstallationDeveloper role assigned and the BOM has been generated.
-
If the BOM has not been generated and you have been assigned the AIALifecycleInstallationDeveloper role, you will see the Generate Bill Of Material link.
For more information about generating BOMs, see Section 6.2, "How to Generate a Bill of Material for an AIA Lifecycle Project."
-
If the BOM has been generated and you have not been assigned the AIALifecycleInstallationDeveloper role, you will see the View Bill Of Material link. Click it to view the BOM on the Bill Of Material page.
For more information about viewing BOMs, see Section 6.4, "How to View a Bill of Material for an AIA Lifecycle Project."
-
-
The BOM displays on the Bill Of Material page.
-
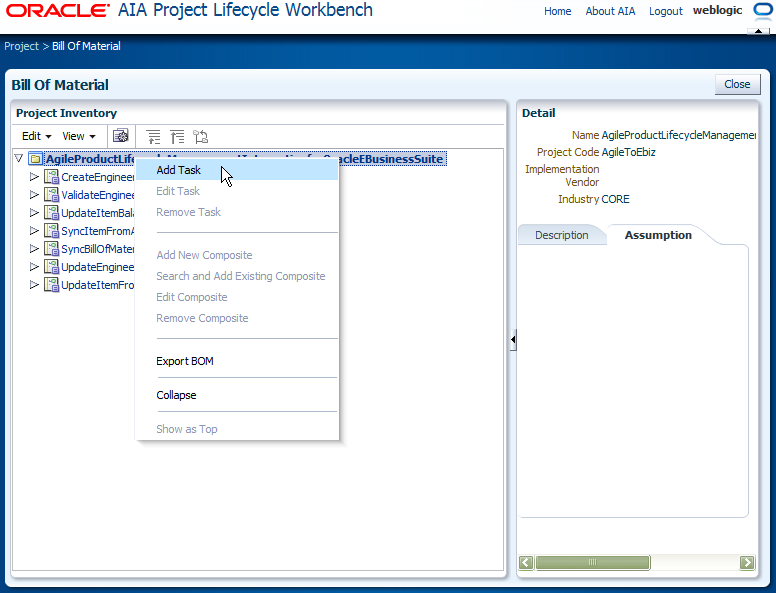
Right-click the project root node as shown in Figure 6-2 to view permitted actions.
Select Add Task.
-
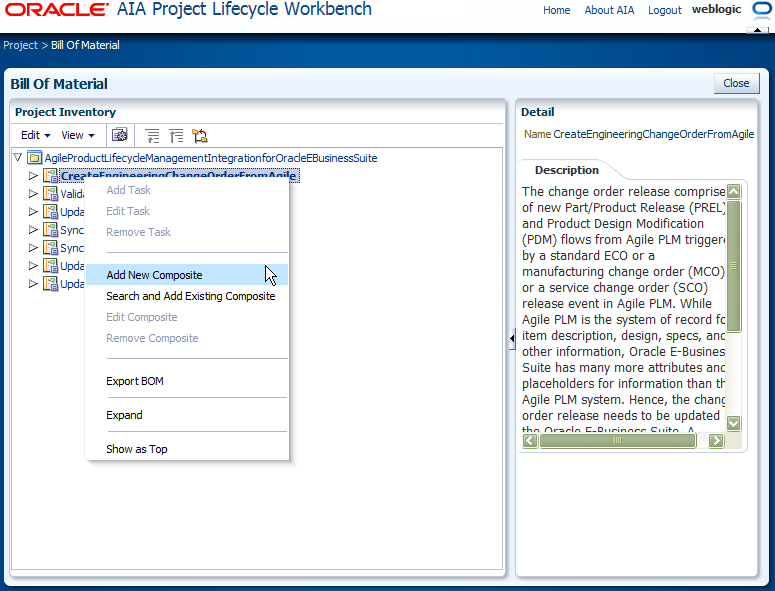
Right-click the task branch node as shown in Figure 6-3 to view permitted actions.
A task represents a chunk of functionality. The composites associated with a task collectively realize the business logic embodied by the task.
-
The Edit option is available for a task branch node if the task was added to the project root node of the generated BOM. The Edit option is not available if the task was added to the project before BOM generation through the functional decomposition pages.
-
The Remove option is available for a task branch node if the task was added to the project root node of the generated BOM. The Remove option is not available if the task was added to the project before BOM generation through the functional decomposition pages.
-
Select Add New Composite to manually define a composite and its annotations and to associate it with the task. Enter composite details in the Detail area that displays.
Note:
The newly added composite and its ensuing annotations are not harvested from composite source code. Instead, they are manually added through the BOM UI and are stored only in the Project Lifecycle Workbench.
You may subsequently re-harvest the added composite directly from source code. At this point, the annotations previously entered through the UI are overwritten by the harvested data. The Add New Composite option is always available.
-
Select Search and Add Existing Composite to access the Search and Add Existing Composite page, where you can search for and locate existing composites and associate one or more with the task.
For existing composites to be available for selection, they must have been harvested by running AIAHarvester.sh. Upon selecting one or more existing composites, any available composite details and annotations appear in the Detail area that appears. The Search and Add Existing Composite option is always available.
For more information about running AIAHarvester.sh, see Section 5.2, "Harvesting Design-Time Composites into Project Lifecycle Workbench and Oracle Enterprise Repository."
-
-
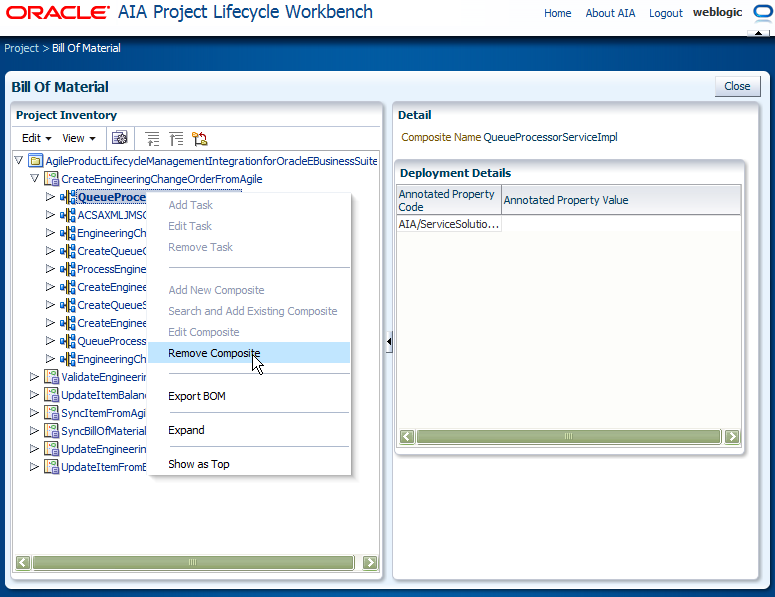
Right-click the composite leaf node to view permitted actions, as shown in Figure 6-4.
Multiple composites collectively provide functionality encompassed by a task. A composite can be defined and included in a BOM in either of two ways:
-
Harvested composites
A composite can be harvested upon completion of its implementation by running the AIAHarvester.sh command. A harvested composite can then be added to a generated BOM by selecting the Search and Add Existing Composite option on the task branch node.
For more information about running AIAHarvester.sh, see Section 5.2, "Harvesting Design-Time Composites into Project Lifecycle Workbench and Oracle Enterprise Repository."
-
Manually defined composites
The composite was not harvested, but rather was manually defined as an associated composite by selecting the Add New Composite option on the task branch node.
If you have defined a composite manually, select the composite leaf node to display the Detail area where you can edit composite-level annotations by specifying a series of XPath values in the BOM. The internal structure of the composite (services and references, for example) is not shown in the BOM. All annotations are flat for manually defined composites.
For both harvested and manually defined composites, select the Remove option to disassociate the composite from its parent task branch node. This removes the composite definition and association from the BOM. For harvested composites, this does not remove the composite from the Project Lifecycle Workbench database or the Oracle Enterprise Repository. For manually defined composites, this does not remove the composite from the Project Lifecycle Workbench database.
-
-
After you have finalized all details conveyed in the BOM, click Export BOM to export the BOM as an XML file to be supplied as input to the Deployment Plan Generator to expedite deployment plan generation.
The recommended location for the saved BOM XML file is AIA_HOME/aia_instances/<instance_name>/config.
The recommended file name for the saved BOM XML file is <Custom_Pre-Built Integration_Name>BOM.xml.
For more information about supplying the BOM XML file to the Deployment Plan Generator, see Chapter 8, "Generating Deployment Plans and Deploying Artifacts."
6.4 How to View a Bill of Material for an AIA Lifecycle Project
View a BOM from a Project Lifecycle Workbench project. The BOM captures project details, and the tasks defined as being in-scope for the project.
Prerequisites and Recommendations
The BOM to be viewed must have been generated.
The ability to view a BOM using the View Bill Of Material link is available only to a user with the AIALifeCycleUser or AIALifeCycleDeveloper role assigned.
Users with the AIALifeCycleInstallDeveloper role assigned will not see the View Bill Of Material link. Instead, they see the Generate Bill Of Material link or Edit Bill Of Material link. If the Generate Bill Of Material link displays, a user can click the link and select the Preview option to view the BOM. If the Edit Bill Of Material link displays, the user can click it to view and edit the BOM.
For more information about generating and editing the BOM as a user with the AIALifeCycleInstallDeveloper role assigned, see Section 6.2, "How to Generate a Bill of Material for an AIA Lifecycle Project" and Section 6.3, "How to Edit a Bill of Material for an AIA Lifecycle Project."
To view a BOM for an AIA Lifecycle project:
-
Access the AIA Home Page. Click Go in the Project Lifecycle Workbench area. Select the Project tab.
-
Click the View Bill Of Material link to view the BOM on the Bill Of Material page. The View Bill Of Material link does not display if the BOM has not yet been generated. The No Bill Of Material Exists message displays instead.
Depending on the lifecycle phase of the BOM, the Bill Of Material page may or may not display information.
For example, if the functional decomposition and service solution component definition are complete, but no composites have been implemented and nothing has been harvested, not much information appears on the page.
However, if functional decomposition, service solution component definition, actual composite implementation, and composite harvesting have been completed, the BOM tree displays to enable you to click through and view the functional decomposition.
-
Select nodes in the tree to display any available details and annotations for the selected node.
-
Project root node: Reflects the name of the project from which the BOM was generated.
-
Task branch nodes: Reflect the tasks that form the project from which the BOM was generated.
-
Composite leaf nodes: Reflect the composites that collectively implement the functionality of the tasks.
A composite consists of child elements, such as services, references, and so forth. As such, leaf nodes do not display child elements if annotations are not present for their child elements.
-


