A Managing Oracle Fusion Middleware BPEL Component for Content Server
This appendix describes how to install and configure the BpelIngetration component for Oracle WebCenter Content, and how to configure Oracle WebCenter Content Server workflows to initiate deployed processes on the Business Process Execution Language (BPEL) server.
This appendix covers the following topics:
A.1 Introduction
The BpelIngetration component adds the ability to interact with Business Process Execution Language (BPEL) Process Manager from within Content Server workflows. As an administrator, you can configure Content Server workflows to initiate a deployed process on the BPEL server.
The following topics are covered in this section:
A.1.1 Hardware Requirements
At a minimum, the BpelIngetration component has the same hardware requirements as for Content Server and Oracle BPEL Process Manager.
A.1.2 Software Requirements
This section specifies requirements for Content Server and BPEL Process Manager.
Oracle Content Server: Content Server release 11g or higher must be properly installed and running on the target computer.
Oracle BPEL Process Manager: Oracle Service-Oriented Architecture (SOA) Suite release 11g or higher must be properly installed and running on the target computer.
A.1.3 Software Distribution
The BpelIntegration component is shipped with WebCenter Content release 11g.
A.2 Installation
These instructions assume that you have already installed the release version of Oracle SOA Suite.
This section covers the following steps:
A.2.1 Integration Instructions
There are currently two ways to set up a content server to enable integration with Oracle SOA Suite:
-
Scenario One involves installing WebCenter Content in a domain that has been extended by Oracle SOA Suite. This involves installing all parts into one domain in a particular order. The Oracle SOA Suite libraries are available to all and the class path is augmented to contain the Oracle SOA Suite libraries.
-
Scenario Two involves manually copying the required libraries used by Oracle SOA Suite and augmenting the class path used to launch WebCenter Content inside of Oracle WebLogic Server.
The difference between the two scenarios is that the installation of Oracle SOA Suite augments the class path for you, while in Scenario Two this is a manual step. In the future, WebCenter Content will ship with the appropriate Oracle SOA Suite libraries.
A.2.1.1 Scenario One
To install WebCenter Content in a domain that has been extended by Oracle SOA Suite:
-
Create a new domain for Oracle SOA Suite.
-
Extend the Oracle SOA Suite domain by Oracle Business Activity Monitoring (BAM) and Oracle Enterprise Management (EM).
-
Extend the Oracle SOA Suite by WebCenter Content.
You may want to check that the setDomainEnv variable has been populated with Oracle SOA Suite-specific libraries. In particular, check that soa-infra-mgmt.jar is mentioned in the class path.
A.2.1.2 Scenario Two
To update a WebCenter Content domain that has not been extended by Oracle SOA Suite:
-
Copy the
/soadirectory from the Oracle home for Oracle SOA Suite to the Oracle home for WebCenter Content.Locate the Oracle SOA Suite 11g home directory for the Oracle SOA Suite server you are connecting to through WebCenter Content. There should be a directory called
soa. Copy this directory to the WebCenter Content home directory and leave it in the top directory, that is, copySOA_ORACLE_HOME/soatoWC_CONTENT_ORACLE_HOME/soa. -
Augment the class path for the WebCenter Content domain by editing the
setDomanEnv.cmdorsetDomainEnv.shfile, depending on your operating system.set POST_CLASSPATH=%ORACLE_HOME%\soa\modules\oracle.soa.mgmt_11.1.1\soa-infra-mgmt.jar;%POST_CLASSPATH%
A.2.1.3 Final Steps
The final step for both scenarios is enabling the BpelIngetration component and starting the servers.
If your Oracle SOA Suite instance is running in a separate server than WebCenter Content, you may see the following security error:
vax.xml.ws.WebServiceException: java.lang.SecurityException: [Security:090398]Invalid Subject: principals=[weblogic, Administrators]
   at com.sun.xml.ws.client.dispatch.DispatchImpl.doInvoke(DispatchImpl.java:209)
   at com.sun.xml.ws.client.dispatch.DispatchImpl.invoke(DispatchImpl.java:216)
If you encounter this error, you need to enable cross-domain security for both servers. Follow these instructions:
User will need to setup Trusted Domain on both WLS domain.
Goto WLS Console->Respected Domainssoainfra or bam ->Security
1. Make sure "Cross Domain Security Enabled"
2. Click on Save
3. Expand Advanced part of setting
4. Make sure you supplement the Credential and Confirm Credential fields.
5. Click on Save
Repeat for the same for the other WLS domain.
Finally, Restart both WLS Servers.
A.2.2 Enabling the Integration Component
To enable the Integration component:
-
Log in to the Content Server instance as a system administrator.
-
Choose Administration, then Admin Server, then Component Manager.
-
In the paragraph at the top of the page, click the Advanced Component Manager link.
-
Notice that there are two lists of Enabled and Disabled Components. Select BpelIntegration in the lower Disabled Components list.
-
Click Enable to move the item from the lower list to the upper.
-
At the bottom of the page, click Update.
-
Log in to the Oracle WebLogic Server Administration Console.
-
On the left-hand side of the console, click Domain Structure, then Environment, then Servers. The Summary of Servers page is displayed.
-
From the Control tab, select your server, then click Restart SSL.
A.3 Configuring the Integration Component
The following topics are covered in this section:
A.3.1 Architecture
The Integration uses BPEL client libraries to communicate with Oracle BPEL Process Manager. A process configuration is required to identify connection parameters, a BPEL process, and a BPEL operation. Additionally, a process configuration identifies document metadata fields and literal values assigned to the parameters passed to the BPEL operation.
A.3.1.1 Connection Configuration
Process configurations reside within files located in the data/orabpel directory. You may edit these files manually. However, there are some pages provided with the Integration component to make this job easier. The first page is a Connection Configurations page. From the Connection Configurations page you can view the defined connection configurations and add or delete connection configurations.
To access the Connection Configurations page choose Administration, then Oracle BPEL Administration. Click Connection Configurations.
This page contains a Connection menu at top right that is used to add a new connection. Each connection has an Actions menu that provides the following choices.
| Element | Description |
|---|---|
|
Configuration Information |
Allows you to view a connection configuration in more detail. |
|
Test Configuration |
Allows you to test the JNDI Properties of the connection configuration. |
|
Delete Configuration |
Allows you to delete a connection configuration. |
A.3.1.1.1 Adding a Connection Configuration
To add a connection configuration, choose Add Connection from the Connection menu at the top right of the Connections Configurations page. The Add Configuration page opens.
The fields on this page are defined in the following table.
| Element | Description |
|---|---|
|
Configuration ID |
Used to identify the connection configuration. Must be unique. |
|
Description |
Used to provide a description of the connection configuration. |
|
Domain |
The BPEL process domain identifier. |
|
Initial Context Factory |
The initial context factory to use to connect to the BPEL process manager. The value should be the fully qualified class name of the factory class that creates an initial context (for example, " |
|
Provider URL |
The location of the BPEL process manager. The value should contain a URL string (for example, " |
|
Security Principal |
The identity of the principal for authenticating the caller to the BPEL process manager. The value should contain a user identifier for a user registered on the BPEL process manager. |
|
Security Credentials |
The credentials of the principal for authenticating the caller to the BPEL process manager. The value should contain a password for the user identifier entered as the security principal. |
|
Confirm Security Credentials |
Used to confirm the security credentials password. |
A.3.1.1.2 Connection Configuration Information
To view detailed information about a specific connection configuration, choose Configuration Information from the Actions menu for the specific adapter in the configuration page. The Configuration Information page opens.
The following actions are available from the Actions menu at the top of the page.
| Element | Description |
|---|---|
|
Update Connection |
Allows you to edit the connection configuration. |
|
Delete Connection |
Allows you to delete the connection configuration. |
|
Test Connection |
Allows you to test the JNDI Properties of the connection configuration. |
A.3.2 Process Configurations
After the connections have been configured, processes can be defined and configured on the Process Configurations page. Use the Actions menu to change a process configuration.
Note:
Oracle WebCenter Content only supports a single namespace in SOAP request for WebCenter Content integration with BPEL process.
To access the Process Configurations page, choose Administration, then Oracle BPEL Administration. Click Process Configurations.
| Element | Description |
|---|---|
|
Add Process |
Allows you to add an additional process configuration. |
|
Configuration Information |
Opens the Configuration Information page for the process configuration. |
|
Update Process |
Enables you to edit the BPEL process and operation. |
|
Update Payload |
Enables you to edit the mappings from content item fields to payload properties. |
|
Delete Configuration |
Enables you to delete the process configuration. |
|
Test Connection |
Allows you to test the JNDI Properties of the connection configuration. |
After you create a process configuration, you must define process properties and payload mappings. For information on how to edit process properties, see Process Properties. For information on how to edit fields mappings, see Payload Mappings.
A.3.2.1 Process Properties
Process properties identify the BPEL process and the BPEL operation used to initiate a new process. These properties can be edited on the Update BPEL Process page.
To edit process properties, choose Update Process… from the Actions menu.
| Element | Description |
|---|---|
|
BPEL Process |
The process identifier of a deployed, active BPEL process. Each active process is listed with the Process Name and Process Revision. The default revision for each process is identified with an asterisk (*). |
|
BPEL Operation |
The name of an operation to initiate a process. |
A.3.2.2 Payload Mappings
Payload mappings define how Content Server fields and literal values are mapped to payload properties to initiate a process.
To edit payload mappings, click Update Payload from the Actions menu.
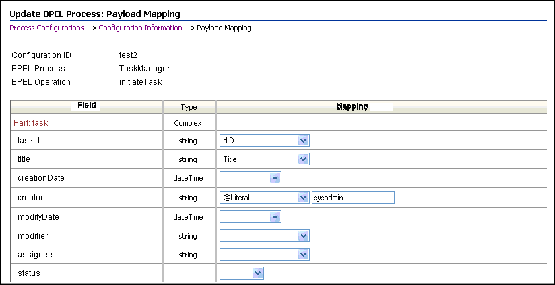
The Update BPEL Process: Payload Mapping page displays a form with three columns. Each of the columns is defined in the following table.
| Element | Description |
|---|---|
|
Field |
The name of the payload element to which values are mapped. |
|
Type |
The type of payload element. This is used to filter the options displayed in the value option list. Complex types contain other types. If the type is an array of elements, then the value mapping may be a comma-separated list that is parsed by the component. |
|
Mapping |
Used to identify the name of a Content Server field. These fields are the standard Content Item fields (dID, dDocName, dDocTitle, and so on), custom information fields, and some special system fields. The possible special fields are:
|
Figure A-4 shows an example of field mappings.
On this page, the following mapping is established:
-
The taskId payload field is assigned the value of the content's dID.
-
The title payload field is assigned the value of the content's Title.
-
The creator payload field is assigned the literal value of
sysadmin.
A.3.2.3 Preparing BPEL Composites for WebCenter Content Integration
The WebCenter Content integration with BPEL requires that the BPEL composite has a binding.adf entry in its service. This binding allows WebCenter Content to invoke the BPEL as a service and allows it to set the conversation ID to later query Oracle SOA Suite for status.
Consequently, when creating a BPEL composite and making it available to WebCenter Content, the following must be done:
-
Open the composite in JDeveloper.
-
Open the
composite.xmlfile in source mode. -
Find the service definition.
-
Add the following line to the service definition, where the
serviceNameis something meaningful of your choosing andregistryNamemust be empty.<binding.adf serviceName="YourUniqueServiceName" registryName=""/>
A possible composite example is as follows:
<service name="receive" ui:wsdlLocation="receive.wsdl">
<interface.wsdl interface="http://example.com/sca/soapservice/aug11_app_2/myThirdComposite/receive#wsdl.interface(execute_ptt)"/>
   <binding.ws port="http://example.com/sca/soapservice/aug11_app_2/myThirdComposite/receive#wsdl.endpoint(receive/execute_pt)"/>
   <binding.adf registryName="" serviceName="my3rdBPELService"/>
 </service>
This can also be done using JDeveloper widgets, but they require a non-empty registryName. The registryName for a composite without ADF is empty and the composite examples given here need the registry name to be empty. If they are not empty, API calls do not work properly after invoking the composite using the standard Oracle SOA Suite.
A.4 Configuring a Workflow in Content Server
The following topics are covered in this section:
A.4.1 Configuring a Workflow
To integrate with BPEL process manager, you must first configure a Content Server workflow. There are many possible ways to configure a workflow. The following tasks configure the most basic type of workflow that integrates with BPEL process manager.
Note:
Oracle WebCenter Content only supports a single namespace in SOAP request for WebCenter Content integration with BPEL process.
-
Start the Workflow Administration applet.
-
Add a new Criteria Workflow. For this example, the workflow name is
orabpeltest. -
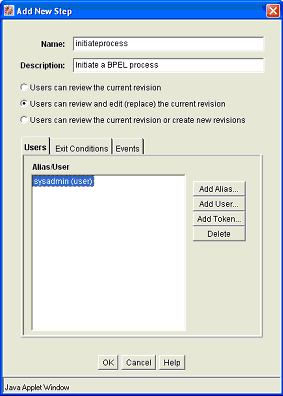
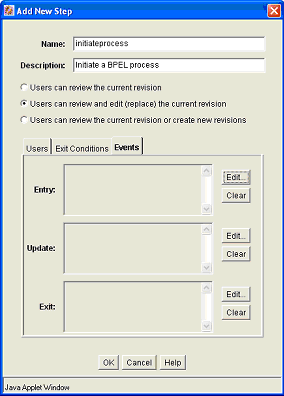
Add a step to the workflow. For this example, use
initiateprocessas the step name. -
Add step users.
-
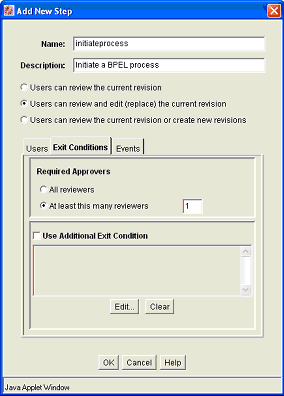
Select the Exit Conditions tab and select at least one reviewer. (This is an arbitrary setting, but in this instance, it leaves the content item in this workflow step after a BPEL process is initiated.)
-
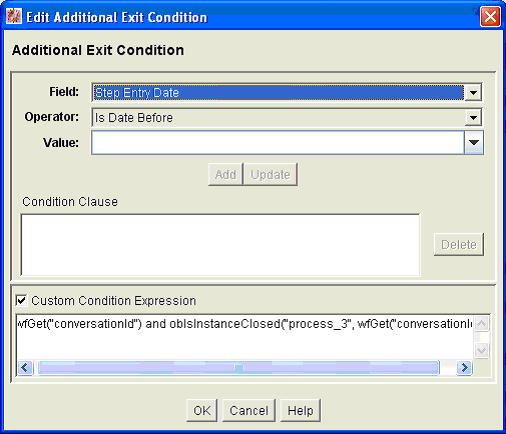
Add an exit condition by selecting the Use Additional Exit Condition check box and then clicking Edit…
-
In the Edit Additional Exit Condition dialog, check Custom Condition Expression and add the following script:
wfGet("conversationId") and obIsInstanceClosed("process_3", wfGet("conversationId"))Note:
Note that the Idoc Script function
obIsInstanceClosedtests if the BPEL instance with the specified conversation ID is still open. The conversation ID is stored in the workflow companion data when the process is invoked. -
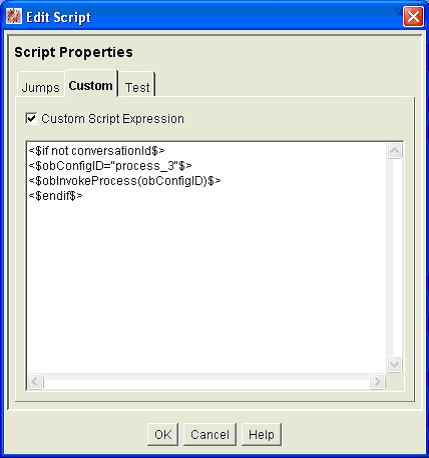
On the Events tab, click Edit… for the Entry event.
-
In the Edit Script dialog, click the Custom tab.
-
Click the Custom Script Expression check box to enable the script window.
-
Type the following lines into the script window:
<$if not conversationId$>
<$obConfigID="process_3"$>
<$obInvokeProcess(obConfigID)$>
<$endif$>
Note:
The component defines Idoc Script functions that can be used to start and determine the state of an invoked process. The
obInvokeProcessIdoc Script function takes the name of the process configuration ID as its one argument. Alternatively, you can use theORABPEL_INVOKE_BPELservice. This service requires theobConfigIDvariable to be set to the name of a process configuration. The service reads the process configuration and uses it to determine how to connect to BPEL process manager. -
Click OK to finish editing the script.
-
Click OK to finish editing the workflow step.
-
Enable the workflow.
A.4.2 BPEL Process Information
When a content item enters the workflow and initiates a BPEL process, an identifier is created and stored in the companion data file to identify the related BPEL process. This identifier is stored with the key "conversationId" and can be obtained from the companion data with custom Idoc Script in a workflow step event.
obInvokeProcess[obConfigID]: This function invokes the process as defined in the process configuration.
obIsInstanceClosed[obConfigID, conversationId]: This function returns true if the process as specified by the specified configuration with the given conversation ID has been closed. Closed includes completed and cancelled.
obIsInstanceOpen[obConfigID, conversationId]: This function returns true if the process as specified in the specified configuration and the given conversation ID is open.
obRetrieveStatus[obConfigID, conversationId]: This function returns true if it successfully retrieves information about the process. The data binder has information about the instance title, audit trail, trace and metadata as well as the process instance ID and revision tag.


