2 Scanning and Importing Documents
In the Capture client, document capture occurs in one of two ways: you scan paper documents using a TWAIN-compliant device, or you import electronic files. This chapter provides details on how to scan and import documents, based on client profile settings.
This chapter covers the following main topics:
2.1 Understanding Capturing
This section covers the following topics:
2.1.1 How are image and non-image documents handled in Capture?
Capture accommodates image and non-image documents:
-
When you scan documents, Capture creates multiple page image documents. In the document pane, you can view and edit each page individually (for example, move and rotate pages), and also verify where one document ends, and the next begins.
-
When you import non-image documents, Capture uses the client profile setting, taking one of the following paths:
-
Converts the file to a multiple page image document, as if you had scanned it. In the document pane, a thumbnail is displayed for each image, and you can select and edit individual pages (for example, move and rotate pages).
-
Imports the file and retains it in its native format. In the document pane, a thumbnail is displayed for each non-image page, up to a maximum number set in the client profile. You can index the document, but cannot edit its pages.
-
Prevents the file from being imported, and displays an error message.
-
2.1.2 How does scanning work?
Suppose you are handed one or more large boxes and instructed to scan their contents. You discover that each folder contains multiple customer documents, but they are assembled in many different ways. Some contain one page documents, some double-sided documents, and others contain related documents of varying numbers of pages. How do you scan them in batches so that it is clear where one document ends and the next one begins?
To know how to scan documents, you must know several key items:
-
How the documents are structured within each batch for scanning (see Section 2.1.3)
-
Which client profile to use, so that it can be matched to the structure
For production scanning, you are likely to use an ADF (automatic document feeder), a scanner or multifunction device feature that automatically feeds in pages one at a time, allowing you to scan multiple-page documents without manually replacing each page.
2.1.3 How are documents created during scanning?
When scanning, the selected client profile determines how documents are created and separated within a batch. Document separation and creation happen in one of these ways:
-
Capture prompts you to select a document creation option when you start scanning.
You select simplex (one-sided), duplex (double-sided), or a variable number of pages, which is typically for use with separator pages. For more information about prompted scanning, see Section 2.2.6.
-
Capture automatically creates documents based on the selected client profile's settings.
For example, when you scan with a client profile configured for duplex scanning, Capture automatically creates a new document after scanning both sides of a page. Typically, the Capture workspace manager specifies how each client profile you use automatically creates documents.
For more information about scanning with separator sheets, see Section 2.2.7.
After a batch's documents have been created, you can adjust them as needed in the document pane. For example, you can create new documents (Section 3.3.1) and remove document separation (Section 3.3.2). You can also drag and drop pages between documents as needed.
2.1.4 How does importing work?
You can import image documents, such as multiple page TIFF files, and non-image documents, such as Microsoft Word files, if allowed by the client profile. See Section 2.1.1. Instead of selecting a scanner source, select Import Source.
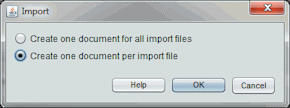
Each time you import, specify how to create documents in the batch if multiple files are selected:
-
Create one document for all import files
-
Create one document per import file
Note:
Non-image documents are created as separate documents regardless of the document creation option you choose.
After specifying a document creation option, select files to import. You can optionally rotate images upon import and delete source files after import.
2.2 Scanning Documents
This section covers the following topics:
2.2.1 How do I prepare documents for scanning?
To prepare documents for scanning:
-
Make sure the scanner is turned on.
For some scanners, you must ensure that the scanner is powered on before turning on the computer.
-
Determine the client profile to use.
If needed, ask your Capture workspace manager which client profile to use for batches to scan, based on their structure. You should know how the client profile creates documents within batches, as described in Section 2.1.2.
-
Organize documents into batches for scanning, inserting separator sheets between documents if needed.
For example, organize single-sided documents into a batch for use with a simplex client profile.
2.2.2 How do I select a scanner to use for Capture scanning?
To scan, you must have a TWAIN-compliant scanner available to your system.
-
Click the right side of the Capture Settings/Source button in the batch pane (Ctrl+Alt+S).
When you click the triangle, one or more capture sources are listed. A check mark displays next to the selected capture source, which may be a scanner or Import Source.
-
If you have multiple scanner sources listed, select one to use. To import rather than scan, select Import Source.
2.2.3 How do I select scanner settings?
Follow these steps to select scanner settings, which are specific to the selected scanner. Because capture settings are saved with the client profile, you can configure different scanner settings for each client profile. Note that you can set additional scanner options under Preferences, as described in Section 2.2.8.
-
If needed, select the scanner source to which to apply settings.
Press Ctrl+Alt+S and choose a scanner, as described in Section 2.2.2.
-
Click the left side of the Capture Settings/Source button in the batch pane (Ctrl+S).
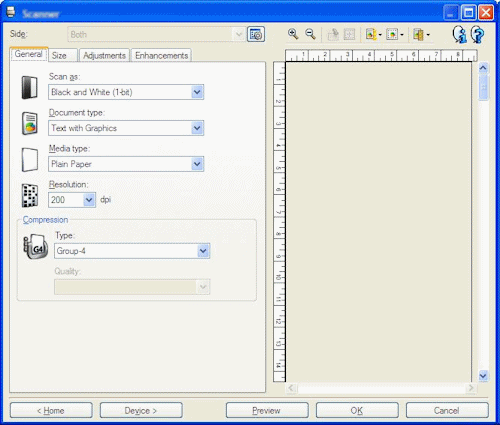
Settings relating to the selected scanner display.
-
Select scanner settings.
See the documentation provided with the scanner for more information. Note that settings relating to color and resolution may be disabled, depending on client profile settings.
2.2.4 How do I scan documents?
Follow these steps to scan a batch. These instructions assume that you have prepared the documents for scanning as described in Section 2.2.1.
-
Place the documents on the feeder tray of the scanner.
-
In the batch pane of the Capture client window, select a client profile.
-
If needed, select a different capture source by clicking the right side of the Capture Settings/Source button and choosing an available scanner (Section 2.2.2).
-
Click the Capture button. If prompted, select a document creation option (Section 2.2.6).
Capture begins scanning. If you encounter scanning problems, first check that the cables are properly connected and the scanner is powered on.
The batch is created in the batch pane list and locked to you. It displays in one of two ways:
-
The batch is selected in the batch pane and its batch information displays in the right pane.
-
The batch is open in the batch pane with its first document selected, while options for editing and indexing documents display in the right pane and lower left pane, respectively. To set this display as the default setting, click the Preferences link in the upper right corner of the window and select the Auto Review/Index batch after scanning field.
-
2.2.5 How do I scan or import from a business application?
For background information, see Section 1.4.5. Note that when capturing from a business application, the client profile is preselected and cannot be changed.
-
In a business application, click the button to capture documents. For example, click a Scan or Import button on a business record screen.
The Capture client window displays. Depending on client profile settings, Capture may immediately begin scanning using the specified scanner, or you may be prompted to select files to import or begin scanning.
-
If importing, select one or more files to import.
After the scanned or imported batch is created, it displays in one of two ways:
-
The batch is selected in the batch pane and its batch information displays in the right pane.
-
The batch is open in the batch pane with its first document selected, while options for editing and indexing documents display in the right pane and lower left pane, respectively. To set this display as the default setting, click the Preferences link in the upper right corner of the window and select the Auto Review/Index batch after scanning field.
-
-
Review, edit, and index documents as needed. Metadata fields may already contain values.
-
If needed, click the Capture button in the batch pane to capture additional batches.
Typically, only batches from your current Capture client session are listed in the batch pane.
-
Release batches by selecting one or more batches in the batch pane (holding down the Ctrl key), and clicking the Release button.
Depending on client settings, releasing batches may automatically sign you out of the Capture client and return you to the line of business web application. If not, click the Sign out link to exit Capture.
2.2.6 How do I create documents if prompted when scanning?
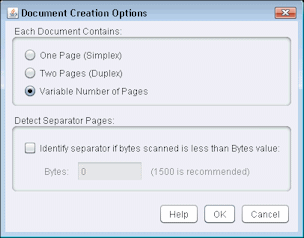
Depending on client profile settings, the Document Creation Options window may display after you click Capture to begin scanning, prompting you to specify how to create documents.
Figure 2-2 Selecting a Document Creation Option When Prompted

Description of "Figure 2-2 Selecting a Document Creation Option When Prompted"
-
Specify the contents of each document in the batch. You can choose:
-
One Page (Simplex): Select this option if all documents are single-sided.
-
Two Pages (Duplex): Select this option if all documents are double-sided.
-
Variable Number of Pages: Select this option if you are using separator sheets to define documents (as described in Section 2.2.7) or if documents are neither all single-sided or all double-sided documents.
-
-
Click OK.
Capture scans and creates a batch based on the document creation option you chose.
If you chose Variable Number of Pages but did not insert separator sheets, Capture created a single document. Use the Create New Document button in the document pane to create document separations in the batch (Section 3.3.1).
2.2.7 How do I scan using separator pages?
Separator pages provide a useful way of identifying where one document ends and the next one starts in a batch. To scan batches with documents divided by separator pages:
-
Before scanning, insert blank sheets between documents.
-
In the batch pane, select a client profile configured for separator sheet scanning.
The profile must be set to either prompt you to choose a document creation option or to create documents with a variable number of pages. If needed, ask your Capture workspace manager about client profile use.
-
Click the Capture button with a scanner source selected.
-
If the Document Creation Options window displays, select Variable Number of Pages. Select the Enable Separator Sheets field and enter a number in the Bytes field below it. The Bytes field defines the difference between a blank separator page and a page with a small amount of text. A blank page is detected if its file size (in bytes) is below a threshold value. The recommended number is 1500, which means Capture considers each page on which it finds fewer than 1500 bytes to be a blank page, and deletes it from the batch. If you encounter problems with this setting, increase or decrease the number of bytes as required.
-
If no prompt displays, Capture looks for blank pages while scanning and upon detecting one, creates a new document and discards the blank page. A blank page is detected if its file size (in bytes) is below a separator sheet threshold value configured in the client profile.
-
-
View the new batch's documents. The blank separator sheets were discarded when the batch was created.
2.2.8 How do I set scanning preferences?
In addition to scanner settings you configure using the Capture Settings/Source button (see Section 2.2.3), you can set additional scanning options under Preferences settings:
-
Click the Preferences link in the upper right area of the client window. See Section 1.5.
-
Optionally select the Prompt user to continue scanning into current batch field.
When selected, a message displays after Capture completes the initial scan that asks if you want to continue scanning into the current batch. This option allows you to pause to insert more paper into the automatic document feeder after it runs out of paper, then scan the pages into the current batch. It is also useful when scanning pages one at a time into a batch.
-
If needed, select the Prevent File Mode Transfer field.
File mode transfer, which instructs the TWAIN-compliant driver to write image files to disk rather than transfer them by memory buffer, is the preferred approach, as it significantly increases scanning performance. However, file transfer mode can cause scanning issues with certain scanner drivers. If needed, select this field to turn off file transfer mode.
-
Optionally select the Auto Review/Index batch after scanning field to view a batch in the document pane immediately after completing scanning the batch.
-
In the Minimum number of bytes scanned before deleting a page field, optionally specify how blank pages should be detected and deleted.
In this field, set the number of bytes below which Capture considers a page blank and deletes it. If this value is 0, Capture uses the value configured in the client profile for blank page detection.
-
Click Save.
2.3 Importing Documents
This section covers the following topics:
2.3.1 How do I specify importing rather than scanning?
To specify importing as the capture source:
-
In the batch pane, click the right side of the Capture Settings/Source button.
-
Select Import Source.
-
Click the Capture button to begin importing files.
2.3.2 How do I select import settings?
Follow these steps to select default import settings to display each time you import files. Import settings are saved with the selected client profile.
-
In the batch pane, click the left side of the Capture Settings/Source button.
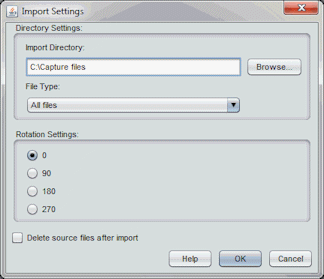
The Import Settings window displays. (If scanner settings display instead, click the right side of the Capture Settings/Source button and select Import Source.)
-
Click Browse next to the Import Directory field and specify a location from which to select files to import.
-
To import files of a specific type, select the type in the File Type field. For example, select TIFF to list TIFF files only. To display all files in the directory regardless of type, select All files.
-
In the Rotation Settings field, select a rotation degree (0, 90, 180, or 270). Capture rotates images during import as specified.
-
Select the Delete source files after import field to delete images from the import directory after they are successfully imported.
-
Click OK to save the settings.
2.3.3 How do I import files into a batch?
Follow these steps to import image files (such as multi-page TIFFs) or non-image files (such as Microsoft Word or PDF files) into Capture. When importing non-image files, the selected client profile determines whether Capture converts the files to image format, imports them in their native format, or prevents them from being imported.
-
In the batch pane, select a client profile.
This profile contains the settings used to import and create Capture batches. If needed, ask a Capture workspace manager which one to use.
-
If needed, click the right side of the Capture Settings/Source button and select Import Source to specify importing rather than scanning.
-
Click the Capture button.
-
In the Import window, specify how to create documents (one document from multiple files or one document per file), and click OK.
Figure 2-4 Selecting an Import Document Creation Option

Description of "Figure 2-4 Selecting an Import Document Creation Option"
-
In the Select files to import window, select one or more files to import, holding down the Ctrl key to select multiple files.
The selected files are displayed in the File Name field.
-
Click OK.
A new batch containing the imported files is selected in the batch pane.

