95 Creating Adapters and Plug-Ins
This chapter provides instructions for creating a complete integration solution to support content delivery from any source system to WebCenter Sites.
This chapter contains the following sections:
95.1 Overview of Creating Adapters and Plug-Ins
Creating an adapter and plug-in involves the following steps:
-
Implementing the pluggable interfaces that are provided within Content Integration Agent.
-
Registering the implementation(s) with the Content Integration Agent runtime system.
-
Registering
javafacilityin order to enable the Java Virtual Machine to delegate calls from the C++ Agent runtime to Java code.
Note:
A custom plug-in can be used with any adapter. You can implement and deploy as many plug-ins as necessary.
Before a custom adapter (or plug-in) can be successfully used, the data model for the publishable objects must exist on the WebCenter Sites system and be mapped to the WebCenter Sites system. The following steps are required:
-
Reproduce the objects' metadata in WebCenter Sites by creating a dedicated flex family (or re-using an existing flex family) to store the object types, their attributes, and the objects themselves.
-
Map object types and attributes to their respective flex family asset instances (created in the previous step). The map can be created directly in the adapter implementation, or in the
mappings.xmlfile.
95.2 Creating a Java Source Adapter
Publishing from an unsupported source system to WebCenter Sites requires you to create a Java-based source adapter. A plug-in is not required unless objects retrieved by the adapter must be processed before they are published.
Note:
If you are using a relational database, implement custom views or custom queries in order for the adapter to work.
To create a Java source adapter
-
Implement the adapter:
Implement the
IConnector,IProviderSession,IRepository, andIIteminterfaces. You can optionally implement theInputStreaminterface if items on your source system have primary binary content.Figure 95-1 shows the relationships among the interfaces. The entry point for the adapter's code is a factory class: the
IConnectorinterface implementation.Figure 95-1 Adapter and Plug-in Class Diagram

Description of "Figure 95-1 Adapter and Plug-in Class Diagram"
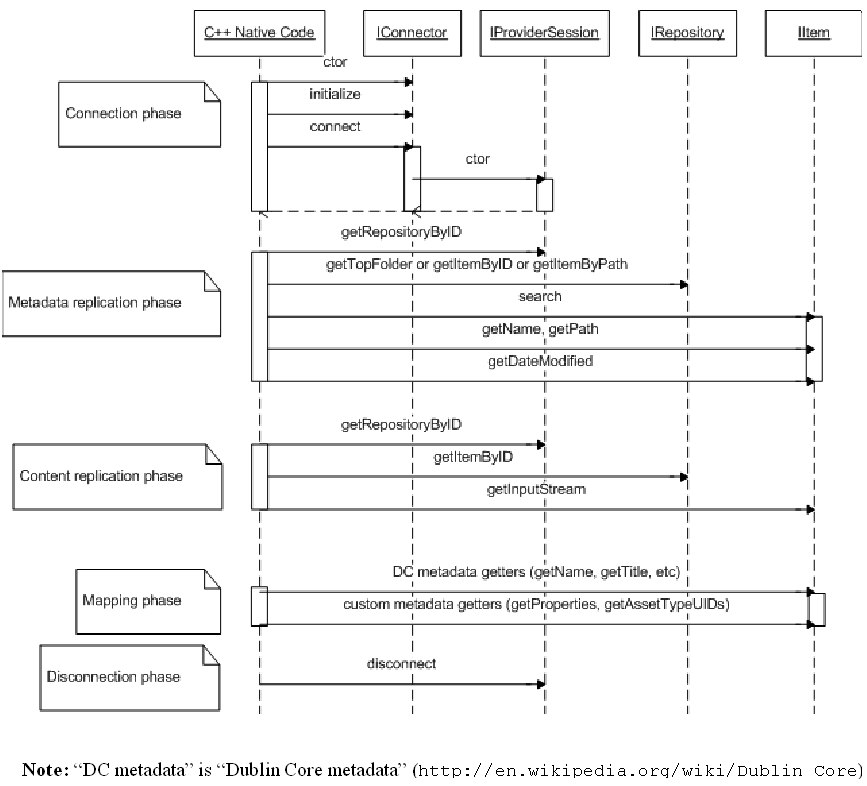
There are different phases in an adapter's lifetime. Depending on the phase, different methods are invoked. Figure 95-2 shows the sequence of calls during each phase.
Figure 95-2 Source Adapter Calls Sequence

Description of "Figure 95-2 Source Adapter Calls Sequence"
Analyzing Figure 3: Source adapter calls sequence
The ID, which is passed to the
getRepositoryByIDfunction, is taken from one of the corresponding workspace elements in thecatalog.xmlfile.Depending on what you pass to the
cipcommander, one of the following functions is invoked:-
If
-source_itemidis passed, thengetItemByIDis invoked passing theitemid. -
If
-source_itemidis omitted, and-source_pathis specified, then thegetItemByPathfunction is invoked. -
If neither
-source_itemidor-source_pathis specified, then thegetTopFolderfunction is invoked. (In this case, the entire repository is published.)
To ensure uniqueness, maintain a different
versionid,itemid, andpathfor all items inside the same repository, and keep the names different for all items inside the same folder. Thepathmust be in the form:<parent path>/<this item name>. -
-
Register the adapter:
-
Register the
IConnectorinterface implementation with Content Integration Agent by adding a 'connector' element tocatalog.xml(located inintegration_agent/conf/):<connector id="connector_id" name="connector_descriptive_name"> <library>javaconnector</library> <init-params> <param name="className">connector_class_name</param> connector-specific_parameters </init-params> </connector>
Parameter Description connector_id
Any unique identifier.
connector_descriptive_name
Any descriptive name (does not have to be unique).
connector_class_name
Name of the
IConnectorimplementation created.connector-specific_parameters
Set of parameters that will be passed to
IConnector.initializeduring the call. -
Enable publishing by adding a new '
provider' element tocatalog.xml:<provider id="provider_id" name="provider_descriptive_name"> <connector-ref refid="connector_id"/> <init-params/> provider-specific_parameters </init-params> </ provider >
Parameter Description provider_id
Any unique identifier.
provider_descriptive_name
Any descriptive name (doesn't have to be unique).
connector_id
Adapter's unique identifier.
provider-specific_parameters
Set of parameters that will be passed to
IConnector.loginduring the call. -
Deploy the adapter:
Place the adapter's
jarfiles into the folder<resource>/java/<connector_id>/lib, and theclassfiles into<resource>/java/<connector_id>/classes.The
<resource>folder is located within Content Integration Agent.On Windows:
<resource>is<%INSTALLDIR%>On Unix:
<resource>is<$INSTALLDIR/shared/cipagent>Note:
Adapter classes are loaded by different class loaders to prevent collisions with different implementations and loading/unloading features. We strongly advise placing all adapter
jarandclassfiles into the <connector_id>folder, instead of including them into theCLASSPATHenvironment variable, or thejava.class.pathproperty, or thejre/lib/extfolder.
-
-
If you require a Java plug-in (to process items retrieved by the adapter), continue to section Section 95.3, "Creating a Java Plug-In." Otherwise, enable
javafacility(to allow the Java Virtual Machine to delegate calls to Java code from the C++ Agent runtime). For instructions, see Section 95.4, "Enabling javafacility."
95.3 Creating a Java Plug-In
Note:
A custom plug-in can be used with any adapter. You can create and deploy as many plug-ins as necessary.
A plug-in is not required unless objects retrieved by the adapter must be processed before they are published to the WebCenter Sites system. The main purpose of a plug-in is to modify the metadata of retrieved items, add metadata to retrieved items, and reject items.
Creating a plug-in is similar to creating a adapter. The steps are as follows:
To create a Java plug-in
-
Implement the plug-in by implementing the
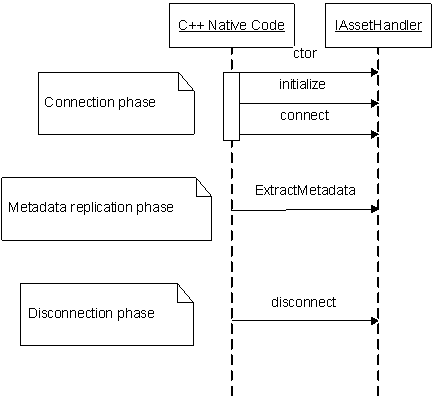
IAssetHandlerinterface (in Content Integration Agent).The entry point for a plug-in is the
IAssetHandlerinterface. This is the only interface which is directly used by the runtime system.In most cases
ExtractMetadatais the only method you need to implement. Figure 95-3 shows the calls sequence in a plug-in's lifetime. -
Register the plug-in with Content Integration Agent.
-
Add a new plug-in '
handler' element to thetypes.xmlfile (located in theintegration_agent/conf/folder):<handler id="handler_id"> <library>javaplugin</library> <init-params/> plugin-specific_parameters </init-params> </handler>
Parameter Description handler_idCustom plug-in's unique identifier.
plugin-specific parametersPlugin-specific parameters that are passed when the plug-in is initialized.
-
If you are using Content Interation Platform for EMC Documentum, complete this step. Otherwise, skip to step c.
Enable the handler for the selected handler sets. Which handler set to use is specified during the publication initiation process. Each handler set contains the list of handlers, which are invoked during the metadata extraction phase in the Content Integration Agent. Handlers are matched by either MIME type or asset type.
MIME type has the following form:
<major type>/<minor type>(
image/jpeg, for example). There is an option to use '*' for MIME types. It can be applied either to theminorpart or the whole MIME type. For example,*/*matches all assets, whiletext/*matches only text files.When using the
IConnectorContext.guessMIMETypefunction, it will look intomimetypes.xmlto get the corresponding MIME type for the supplied file extension. For example the call with "txt" parameter will produce the "text/plain" result.Asset types also support the '
*' notation, which matches all asset types.If more then one handler matches a specific item, then both are invoked in the same sequence in which they are registered within the handler set used. If any of the matching handlers returns the null object from the
IItem.extracMetadatacall, then the item is discarded from future processing and not sent to the target adapter. -
Enable the custom plug-in for selected object types by adding "
asset-type" elements to thetypes.xmlfile. Items for which this plug-in is invoked will be filtered according to MIME type.Note:
The
asset-typeelement in the context of a plug-in is a MIME type group.<asset-type type="MIME_type"> <extensions> <ext>ext</ext> . . . </extensions> <handler-ref refid="handler_id" /> </asset-type>
Parameter Description MIME type
MIME type of the item for which this plug-in will be invoked. MIMEtype must be of the form
<major_type/minor_type>, e.g.,text/plain.A wild-card symbol (
*) can also be used. For example:-
To enable the plug-in for all text files, specify:
text/* -
To enable the plug-in for all items, specify:
*/*
ext
File extension, e.g.,
.txtfor text files. The file extension does not directly affect the plug-in selection process. However, it is used to "guess' the MIME type for those systems where MIME type is not directly available (e.g., file system).handler_id
Custom plug-in's unique identifier (specified in the
handlerelement, in the previous step). -
-
Deploy the plug-in:
Place the plug-in's
jarfiles into the folder<resource>/java/<plugin_id>/lib, and theclassfiles into<resource>/java/<plugin_id>/classes.The
<resource>folder is located within Content Integration Agent.On Windows:
<resource>is<%INSTALLDIR%>On Unix:
<resource>is<$INSTALLDIR/shared/cipagent>Note:
Plug-in classes are loaded by different class loaders to prevent collisions with different implementations and loading/unloading features. We strongly advise placing all plug-in
jarandclassfiles into the<plugin_id>folder, instead of including them into theCLASSPATHenvironment variable, or thejava.class.pathproperty, or thejre/lib/extfolder.
-
-
If you created a custom adapter but have not enabled
javafacility, continue to Section 95.4, "Enabling javafacility."
95.4 Enabling javafacility
Calling Java code from C++ Agent runtime requires a special facility named java to be registered in facilities.xml.
To enable javafacility
-
Verify that
facilities.xmlis not commented (facilities.xmlis located in theintegration_agent/conf/folder). -
Add the following lines:
<facility name="javafacility">
     <library>java</library>
       <init-params>
         <param name="VMArgparam_id">Java_VM_argument
</param>
         <param name="VMLibraryPath">VM_library_path</param>
       </init-params>
</facility>
| Parameter | Description |
|---|---|
param_id |
Parameter's unique id (any unique value). In order to pass multiple arguments to the JVM, construct multiple parameters with different param_id's. |
Java_VM_argument |
Java VM argument to be passed to the Java VM created within the Agent runtime process. Example: <param name="VMArg0">-Xmx256m
|
VM_library_path |
Full path to the Java VM library (DLL or shared library) within the JRE/JDK installation. For example, for Sun JDK on Windows,
or:
|
95.5 Troubleshooting and Debugging
When developing custom components for CIP, it is often helpful to see more than just the default logging messages displayed in the production environment. CIP Agent supports five different logging levels:
-
fatal -
error -
warning -
info -
debug
Use the instructions below to debug custom components in CIP.
Note:
Do not use the settings shown below on a production system, as they can slow down the system's performance.
-
Escalating the logging level in CIP Agent
CIP is set to
errorby default. To increase the logging level, CIP Agent must run as a console executable:-
Stop the CIP Agent system service.
-
Run the cipagent -t debug command.
-
-
Debugging Java custom components
To debug custom Java implementations hosted within the Agent runtime, enable remote debugging in CIP Agent. For example, to start the remote debugger on port 7007 and suspend CIP Agent to wait until a debugger attaches, add the following lines to
javafacility:<param name="VMArg1">-Xdebug</param> <param name="VMArg2">-Xrunjdwp:transport=dt_socket, address=7007,server=y,suspend=y</param>
-
Escalating the logging level for Sites Agent Services
To get more data about an error in the Sites Agent Services application, set the
DEBUGlevel in thecommons-logging.propertiesfile for thecom.fatwire.logging.csagentservicescategory. We also recommend setting theDEBUGlogging level in thecommons-logging.propertiesfile for thecom.fatwire.logging.cs.dbcategory.
