81 Community-Gadgets: Customizing Its Functionality
The Community-Gadgets web application provides a number of customizability and extension points, such as CSS, templates, and Search Engine Optimization (SEO), which you can use to alter the appearance and functionality of any Community-Gadgets widget. However, using customizability and extension points may not always meet particular customers' project requirements because of certain web site design or usage related strategies applied to the widgets. In such scenarios, consider working with WebCenter Sites data structures directly and rendering them separately in a custom way in page templates.
This chapter describes WebCenter Sites data structures in details. It contains the following sections:
81.1 Overview of Community-Gadgets Data Model
Community-Gadgets uses WebCenter Sites as its data repository and communicates with it through REST APIs provided by Web Experience Management (WEM) Framework. Storing Community-Gadgets data structures in the WebCenter Sites repository leverages the WebCenter Sites asset model and caching system.
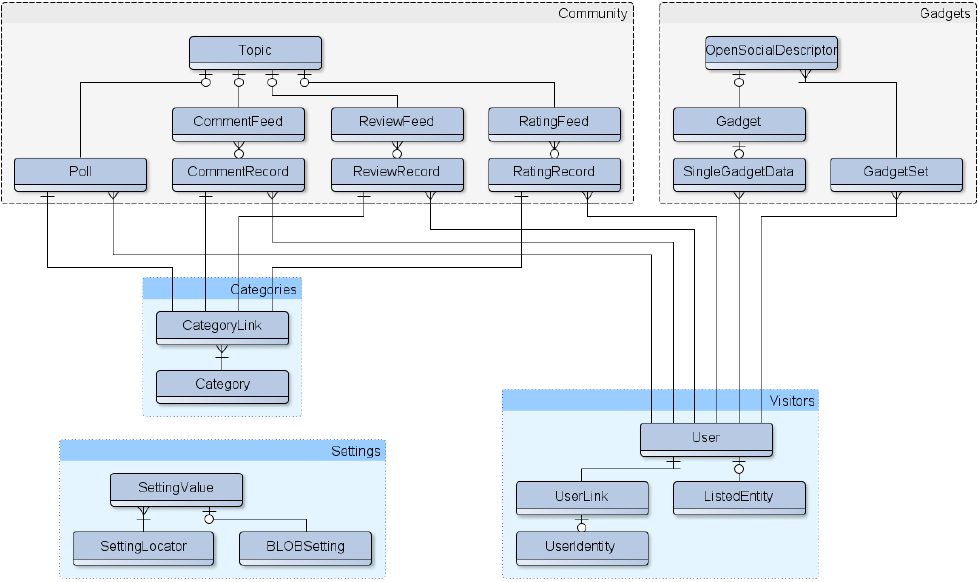
The object data model of the Community-Gadgets web application consists of the following categories and their objects:
-
Object: CommentFeed
-
Object: CommentRecord
-
Object: ReviewFeed
-
Object: ReviewRecord
-
Object: RatingFeed
-
Object: RatingRecord
-
Object: User
-
Object: UserIdentity
-
Object: UserLink
Section 81.1.7, "Gadgets and Dashboard"
-
Object: Gadget
-
Object: OpenSocialDescriptor
-
Object: SingleGadgetData
-
Object: GadgetSet
Figure 81-1 provides a graphical overview of these categories and objects. The User-Generated Content section shows that business objects are related to Community widgets, such as comments and reviews. Each user-generated content (UGC) entry, if posted by a registered user, has a set of user objects associated with it (the Visitors section).
Objects shown in Figure 81-1 are stored in the WebCenter Sites database tables, as specified in Table 81-1.
Table 81-1 Database Table Names of Objects
| Object | Database Table Name |
|---|---|
|
|
|
|
|
|
|
|
|
|
|
|
|
|
|
|
|
|
|
|
|
|
|
|
|
|
|
|
|
|
|
|
|
81.1.1 Comments
The following types of primary objects are associated with comments:
81.1.1.1 CommentFeed
This object represents the computed summary information about the web page on which the widget is deployed. The CommentFeed object is created in the database when the page on which the Comments widget is deployed is accessed for the first time.
To determine the connection between comments and the page on which they should be displayed, the Community-Gadgets web application uses the web page URL, which is the application-generated key in the widget deployment tag, or Resource ID, which administrators can specify during widget deployment. If the web page URL is available as the key, then the hash generated from the page URL is recorded in the CommentFeed object. If the resource ID is specified, it is recorded in the CommentFeed object. The CommentFeed object stores comments, and it has a one-to-many association with the CommentRecord objects that represent comments.
The CommentFeed objects are stored as a cg_comment_feed basic asset in WebCenter Sites and correspondingly as a cg_comment_feed table in the database. Table 81-2 describes the structure of this asset.
Table 81-2 Structure of the "cg_comment_feed" AssetType
| Property | Type | Description |
|---|---|---|
|
|
BIGINT |
Unique asset identifier or primary key of AssetType. |
|
|
VARCHAR(256) |
Identifier of the discussion. It is a logical link that Community-Gadgets uses to associate a list of comments with the page on which visitors posted comments. This link is established during widget deployment by specifying the value of the Resource ID field on the deployment page or the |
|
|
VARCHAR(256) |
URL that hosts the comment discussion thread. |
|
|
DATE |
Date when the feed object was created. |
|
|
DATE |
Latest modification date of a feed. |
|
|
VARCHAR(256) |
ID of the user who last modified the feed. |
|
|
VARCHAR(256) |
ID of the user who created the feed object. (The feed object is created during the first page load when a widget is just deployed. Typically it is done using a guest session, so |
|
|
BIGINT |
Number of comments that successfully passed moderation and are displayed to visitors. |
|
|
BIGINT |
Number of comments that have not passed moderation yet. |
|
|
VARCHAR(256) |
ID of the content category. It describes the type of content to which comments are attached: file, article, blog, and so on. (Specified as the |
|
|
VARCHAR(256) |
Title of the page on which the Comments widget is deployed. By default, the value of the window title is recorded here. Page designers may customize this value by specifying the |
|
|
VARCHAR(256) |
State of posting status which is defined from the Admin interface by Topic Page. Possible values: |
81.1.1.2 CommentRecord
This object represents a comment posted by a visitor on a site page. It is logically linked to the CommentFeed object through a many-to-one relationship via the cos_root_id field. In other words, many CommentRecord objects can be linked to one CommentFeed object.
Table 81-3 Structure of the cg_comment_record assetType
| Property | Type | Description |
|---|---|---|
|
|
BIGINT |
Identifier of a comment. |
|
|
VARCHAR(4000) |
Content of a posted comment. Its VARCHAR(4000) data type is translated into the most effective type of storage (for example, CLOB), depending on the database on which WebCenter Sites is installed. |
|
|
BIGINT |
Association to the CommentFeed object representing the page on which the conversation is happening. The value of the corresponding Use this column to query all the comments posted on a page. |
|
|
VARCHAR(450) |
State of a comment reflecting the stage of comment moderation. If manual moderation is enabled, the value may be:
If a comment has either passed moderation or is auto-published, the value will be:
If a comment has not passed through either automatic filters or moderator, then the values are:
To simplify navigation for moderators, the Community interface includes filters based on these categories. |
|
|
BIGINT |
ID of the visitor who posted the comment, or |
|
|
VARCHAR(256) |
Client's IP address from which the comment was posted. |
|
|
VARCHAR(450) |
Display name of a registered user or a guest who posted the comment entry. This field is used in the Community interface to display and sort comments by author names without posting extra requests to database. |
|
|
VARCHAR(450) |
If guest (unauthenticated visitors) posts are enabled in commenting permissions, and visitors are required to specify their email ID, then the email ID is saved in this column. |
|
|
BIGINT |
Level of a comment in the comment thread, if replies to comments are enabled. The bigger the number, the deeper the comment is posted in the tree. The initial value is |
|
|
BIGINT |
ID of the immediate parent comment to which a reply is posted. |
|
|
BIGINT |
Chain of comment parents in the hierarchy. The path from the leaf to the root. |
|
|
VARCHAR(32) |
|
|
|
BIGINT |
The number of times a comment is flagged. |
|
|
VARCHAR(450) |
Counts of helpfulness reports ("Yes" and "No") made on a comment, separated by comma, starting with zero. The initial value is |
|
|
INTEGER |
Pre-calculated rank of a comment according to helpfulness reported by other visitors. This is calculated by subtracting the count of "No" from the count of "Yes". |
|
|
DATE |
Date when the comment was posted. |
|
|
DATE |
Latest modification date of a comment (registered users are allowed to modify their comments, or moderator may modify a comment.). |
|
|
BIGINT |
If the discussion thread is enabled and replies can be posted to comments, then the number of replies to the current comment are recorded here. This count is not recursive, and therefore, only immediate child comments are considered (the children of children are excluded). |
|
|
VARCHAR(450) |
String generated in a special format. It enables ordering of comments by thread hierarchy using a simple WEM REST query and alphabetic ordering. The generation strategy is as follows:
|
81.1.2 Reviews
The following types of primary objects are associated with reviews. These objects are similar to those of comments:
81.1.2.1 ReviewFeed
This object represents a list of reviews posted on a site page. The ReviewFeed object is very similar to the CommentFeed object described in Section 81.1.1.1, "CommentFeed." Community-Gadgets uses the same code infrastructure to handle these objects. However, to simplify maintenance on the database schema level, the data for CommentFeed and ReviewFeed is stored in two separate tables. The only difference between CommentFeed and ReviewFeed is that the latter includes additional information pertaining to the average rank calculated across all posted reviews.
The ReviewFeed object is created in the database when the page on which the Reviews widget is deployed is accessed for the first time.
To determine the connection between reviews and the page on which they should be displayed, Community-Gadgets uses the web page URL, which is the application-generated key in the widget deployment tag, or Resource ID, which administrators can specify during widget deployment. If the web page URL is available as the key, then the hash generated from the page URL is recorded in the ReviewFeed object. If the resource ID is specified, it is recorded in the ReviewFeed object. The ReviewFeed object stores reviews, and it has a one-to-many association with the ReviewRecord objects that represent reviews.
The review feed objects are stored as a cg_review_feed basic asset in WebCenter Sites and correspondingly as a cg_review_feed table in the database. Table 81-4 describes the structure of this asset.
Table 81-4 Structure of cg_review_feed AssetType
| Property | Type | Description |
|---|---|---|
|
|
BIGINT |
Unique asset identifier or primary key of the AssetType. |
|
|
VARCHAR(256) |
Identifier of a discussion. It is a logical link that Community-Gadgets uses to associate a list of reviews with the page on which the reviewed topic is posted. This link is established during widget deployment by specifying the value of the Resource ID field on the deployment page or the |
|
|
VARCHAR(256) |
URL hosting the discussion to which reviews are being posted. |
|
|
DATE |
Date when the feed object was created. |
|
|
DATE |
Latest modification date of a feed. |
|
|
VARCHAR(256) |
ID of the user who last modified the feed. |
|
|
VARCHAR(256) |
ID of the user who created the feed object. (The feed object is created during the first page load when a widget is just deployed. Typically it is done using a guest session, so |
|
|
BIGINT |
Number of reviews that successfully passed moderation and are displayed to visitors. |
|
|
BIGINT |
Number of reviews that have not pass moderation yet. |
|
|
FLOAT |
Calculated as a mean, the average of all ranks that have been given to the reviews posted on a page. For example, if two reviews were posted on a page, out of which one has been given three stars and another five stars, then the value in this field will be 3+5/2 = 4. |
|
|
VARCHAR(450) |
Comma separated list of counts of ranks posted. This list contains five items in total. Each position (index) in the list holds the count of the corresponding number of stars given to a review. For example, if there are three reviews, out of which one has been given three stars and the others five stars, 0-s will be given for missing positions, and therefore, the list will contain |
|
|
VARCHAR(450) |
If the review type is set to thumbs up/down, the votes are recorded in this field. This is a denormalized field that holds a count of thumbs up and thumbs down separated by comma. For example, if out of three reviews, two have got thumb up and one thumb down, then the value of this field will be |
|
|
VARCHAR(256) |
ID of the content category describing the type of content to which the reviews are attached, for example, file, article, blog, and so on. (Specified as the |
|
|
VARCHAR(256) |
Title of the page on which the Reviews widget is deployed. By default, the value of the window title is recorded here. Page designers may customize this value by specifying the |
|
|
VARCHAR(256) |
State of posting status which defined from admin interface by Topic Page. Possible values: open, closed |
81.1.2.2 ReviewRecord
This object represents a review posted by a visitor on a site page. It is logically linked to the ReviewFeed object through a many-to-one relationship via the cos_root_id field.
Table 81-5 Structure of the cg_review_record AssetType
| Property | Type | Description |
|---|---|---|
|
|
BIGINT |
Identifier of a review. |
|
|
VARCHAR(4000) |
Content of a review posted. Its VARCHAR(4000) data type is translated into the most effective type of storage (for example, CLOB), depending on the database on which WebCenter Sites is installed. |
|
|
VARCHAR(450) |
Title of a review posted. |
|
|
FLOAT |
Number of stars (rank) given to a review by a visitor. If the rating type is thumbs up/down, then |
|
|
INTEGER |
If the rating type is configured to be thumbs up/down, the rank value stored here is: |
|
|
INTEGER |
Type of a given review rank. Possible value codes are: 0: Stars 1: Thumbs up/down |
|
|
BIGINT |
Association to the ReviewFeed object representing the page on which reviews are submitted. The value of the corresponding |
|
|
VARCHAR(450) |
State of a review reflecting the stage of content moderation.If manual moderation is enabled, the value may be:
If a review has either passed moderation or was auto-published, the value will be:
If a review has not passed through either automatic filters or moderator, values will be:
To simplify navigation for moderators, the Community interface includes filters based on these categories. |
|
|
BIGINT |
ID of the visitor who posted the review, or |
|
|
VARCHAR(256) |
Client's IP address from which the review was posted. |
|
|
VARCHAR(450) |
Display name of a registered user or a guest who posted the review entry. This field is used to display and sort reviews by author names in the Community interface without making extra requests to database. |
|
|
VARCHAR(450) |
If guest (unauthenticated visitors) posts are enabled in reviewing permissions and visitors are required to specify their email ID, the email ID value is saved in this column. |
|
|
VARCHAR(32) |
|
|
|
BIGINT |
The number of times a review has been flagged by others. |
|
|
VARCHAR(450) |
Counts of helpfulness reports ("Yes" and "No") made on a review, separated by comma, starting with zero. The initial value is |
|
|
INTEGER |
Pre-calculated rank of a review according to helpfulness reported by other visitors. It is the count of "No" subtracted from the count of "Yes". |
|
|
DATE |
Date when the review was posted. |
|
|
DATE |
Latest modification date of a review. (Only registered users are allowed to modify their reviews. Moderator can also modify a review, if needed.) |
81.1.3 Ratings
This object contains the list of ratings that visitors give to topics or any posts on a page. This is very similar to the ReviewFeed object.
The Ratings object is created in the database when a web page is accessed for the first time after the deployment of the Ratings widget on a web site.
To determine the connection between ratings and the page on which they should be displayed, Community-Gadgets uses the web page URL, which is the application-generated key in the widget deployment tag, or "Resource ID", which administrators can specify during widget deployment. If the web page URL is available as the key, then the hash generated from the page URL is recorded in the RatingFeed object. If the resource ID is specified, it is recorded in the RatingFeed object. The RatingFeed object stores ratings, and it has a one-to-many association with the RatingRecord objects that represent ratings.
The rating feed objects are stored as the cg_rating_feed basic asset in the WebCenter Sites repository and correspondingly as the cg_rating_feed table in the database.
The following types of primary objects are associated with ratings:
Table 81-6 and Table 81-7 describe the structure of the cg_rating_feed assetType.
81.1.3.1 RatingFeed
Table 81-6 Structure of the cg_rating_feed AssetType
| Property | Type | Description |
|---|---|---|
|
|
BIGINT |
Identifier of an object which holds a list of ratings posted on a page. |
|
|
VARCHAR(256) |
Identifier of the ratings on a particular web page. It is a logical link which enables Community-Gadgets to associate a list of ratings with the relevant page. This link is established during widget deployment by specifying the value of the Resource ID field on the deployment page or the It is recommended that you create your own strategy to generate |
|
|
VARCHAR(256) |
URL of the web page on which visitors leave their ratings. |
|
|
DATE |
Date when the feed object is created. |
|
|
DATE |
Last modified date of a feed. |
|
|
VARCHAR(256) |
ID of the user who created the feed object initially. (This happens during the first page load when a widget is just deployed. Typically, the feed object is created via a guest session, so |
|
|
BIGINT |
Number of ratings that successfully passed moderation and are counted in the general rating calculation. |
|
|
BIGINT |
Number of ratings that have not passed moderation yet. |
|
|
FLOAT |
Average (mean) of all star type ratings posted by visitors. For example, if out of the two ratings, one is a three-star rank and another is a five-star rank, then the value is calculated as 3+5/2 = 4. |
|
|
VARCHAR(450) |
Comma separated list of counts of ratings. This list contains five items in total. Each position (index) in the list holds the count of the corresponding number of stars given. For example, if out of the three ratings given, one is a three-star and the other two are five-star, then 0-s in this list signify missing positions. So the list will include: 0,0,1,0,2. Note the counts of ratings left at corresponding positions. From concrete positions you can know the number of votes/stars. |
|
|
VARCHAR(450) |
If the rating type is set to thumbs up/down, then the ratings are recorded in this field. This is a denormalized field to hold a comma separated count of thumbs up and thumbs down. For example, if out of the three ratings, the two are thumbs up and one is thumbs down, then the value stored will be equal to |
|
|
BIGINT |
If the |
|
|
BIGINT |
If the |
|
|
VARCHAR(256) |
ID of a content category. It describes the type of content to which the ratings are attached: file, article, blog, and so on. These are specified as the value of the "Resource Type" parameter on the deployment page or the |
|
|
VARCHAR(256) |
Title of the page on which the Ratings widget is deployed. By default the value of the window title is recorded as the page title. Page designers can customize this value by specifying the |
81.1.3.2 RatingRecord
This object represents a rating posted by a visitor on a site page. It is logically linked to the RatingFeed object via the "cos_root_id" field. This object is based on the many-to-one relationship model.
Table 81-7 Structure of the cg_rating_record AssetType
| Property | Type | Description |
|---|---|---|
|
|
BIGINT |
Identifier of a rating. |
|
|
INTEGER |
If the rating type is configured to be thumbs up/down, then the rank value recorded here is: 1 if it is thumbs up and |
|
|
INTEGER |
Type of rating rank. Possible value codes are:
|
|
|
BIGINT |
Association to the RatingFeed object representing the page on which ratings are submitted. The value of the corresponding |
|
|
VARCHAR(450) |
State of ratings reflecting the stage of content moderation. If manual moderation is enabled, the value may be If a rating has either passed moderation or was auto-published, the value will be If a rating has not pass through either automatic filters or moderator, then the value will be To simplify navigation for moderators, the Community interface provides filters for these categories on the right-side panel. |
|
|
BIGINT |
ID of the visitor who posted the rating. Or |
|
|
VARCHAR(256) |
Client's IP address from which the rating is posted. |
|
|
VARCHAR(450) |
Display name of a registered user or a guest who gave the rating. This field is used to display and sort ratings by author names in the Community interface without making extra requests to the database. |
81.1.4 Polls
The Polls functionality is represented in a single table in the database. When an administrator creates a poll, the corresponding row is inserted into this table (Table 81-8).
Table 81-8 Structure of the cg_poll AssetType
| Property | Type | Description |
|---|---|---|
|
|
BIGINT |
Identifier of a poll instance. |
|
|
VARCHAR(256) |
Unique string identifier of the poll instance. It is embedded into the deployment code snippet along with the regular ID so that if the integer ID is lost during data migration, the system can look up this poll by UID, thus preventing existing deployments from breaking. |
|
|
INTEGER |
Type of the chart in which poll results are to be displayed. Possible values are:
|
|
|
INTEGER |
ID of the theme to be applied to Poll on a web site. Possible values are:
|
|
|
DATE |
Date when the poll is started and opened for votes. The start date of the poll voting campaign. |
|
|
DATE |
Date when the poll is closed and no more voting is allowed. The end date of poll voting campaign. |
|
|
VARCHAR(32) |
Boolean value ( |
|
|
INTEGER |
Determines how poll results are shown:
|
|
|
INTEGER |
Widget for poll results context menu in pixels. |
|
|
VARCHAR(450) |
Title of the poll. |
|
|
VARCHAR(450) |
Main poll question. |
|
|
VARCHAR(4000) |
List of poll options to be available for voting in the JSON format. The metadata includes ID of the vote used by Community-Gadgets internally, the option title, color, and the number of votes left. For example:
|
|
|
VARCHAR(450) |
Message to be shown to visitors after their vote. |
|
|
VARCHAR(32) |
Boolean value ( |
|
|
VARCHAR(450) |
Disclaimer text to be shown at the bottom of the Poll widget. |
|
|
INTEGER |
Total number of votes on the current poll campaign. |
81.1.5 Topics
The Topics functionality allows to gather and precalculate statistics, such as review counts, rating values, and so on, across the Community widgets so that the collected information can be easily and efficiently queried later. The precalculation and optimization of visitors' feedback is important because this type of content may appear on the home page of a site or on the visitor's dashboard that lists most discussed/reviewed/rated articles.
Web pages on which the Community widgets are deployed and activities performed on those pages become the primary focus of the Topics functionality. Therefore, statistics are aggregated across tables such as CommentFeed, ReviewFeed, and RatingFeed.
Table 81-9 Structure of the cg_topic AssetType
| Property | Type | Description |
|---|---|---|
|
|
BIGINT |
Identifier of a topic instance. |
|
|
VARCHAR(450) |
URL of the page on which widgets are deployed. |
|
|
VARCHAR(450) |
HTML title of the page with which this topic is associated. |
|
|
VARCHAR(450) |
Resource ID of the page that links the UGC content to the page on which widgets are deployed. |
|
|
DATE |
Date when the topic is created. That is, when the page on which widgets are deployed is accessed for the first time using a browser. |
|
|
BIGINT |
Relation between the corresponding CommentFeed object and the |
|
|
BIGINT |
Number of comments posted on the page with which a particular topic is associated. |
|
|
VARCHAR(450) |
Content category (such as a blog or article) assigned to the Comments widget deployed on the page. It might be either the default category value or the customized category uploaded on the Appearance settings page. |
|
|
DATE |
Date when the CommentFeed object is last updated with statistic values (the number of comments posted, and so on). |
|
|
BIGINT |
Relation to the ReviewFeed object with which a topic is associated. |
|
|
BIGINT |
Number of reviews posted on a page with which a topic is associated. |
|
|
VARCHAR(450) |
Content category (such as a blog or article) assigned to the Reviews widget deployed on a page. It might be either a default category or the customized category uploaded on the Appearance settings page. |
|
|
DATE |
Date when the ReviewFeed object is last updated with statistic values (the number of reviews posted, ranks, and so on). |
|
|
BIGINT |
Relation to the RatingFeed object with which a particular topic is associated. |
|
|
BIGINT |
Number of ratings posted on a page with which this topic is associated. |
|
|
VARCHAR(450) |
Content category (such as blog, article, and so on) assigned to the Ratings widget deployed on a page. It might be either a default category or the customized category uploaded on the Appearance settings page. |
|
|
DATE |
Date when the RatingFeed object is last updated with statistic values (the number of ratings posted, their ranks, and so on). |
|
|
FLOAT |
Rank of the current topic among other topics. The current ranking schema is based on the frequency statistics and is calculated as a sum of the following fields: |
81.1.6 Visitors
The following types of primary objects are associated with visitors:
81.1.6.1 User
The User table represents a visitor profile maintained by Community-Gadgets, and it contains visitor-sensitive data such as display name, email, or avatar picture.
Table 81-10 Structure of the cg_user AssetType
| Property | Type | Description |
|---|---|---|
|
|
BIGINT |
Identifier of a user profile. |
|
|
VARCHAR(450) |
Email of a web site visitor. May not be populated if visitors logged in using Facebook, Twitter, Google, or through Janrain. The visitors that registered locally may use it to recover their passwords when needed. |
|
|
VARCHAR(450) |
Display name of a user. Either provided by a visitor during registration or taken from the social networking service using which the user logged in. |
|
|
INTEGER |
Type of the user profile. Possible values are:
|
|
|
VARCHAR(4000) |
Denormalized list of visitor identities in the JSON format. These identities are used during authentication, and therefore, they are linked to this profile. For example: [{"username":"john"}] The username field is related to a corresponding UserIdentity entry via the
|
|
|
BINARY |
For a profile of a local user who registered locally and did not use a social networking service, the customized avatar is stored in this field. |
|
|
VARCHAR(450) |
For a profile of a user who used a social networking service to log in, the URL of the avatar picture is stored here. |
81.1.6.2 UserIdentity
The two options for storing visitor credentials are LDAP and the WebCenter Sites database. The database option is set by default.
When the database is used, credentials of a user are stored in the UserIdentity table and associated with the corresponding visitor profile using the UserLink table.
Table 81-11 Structure of the cg_user_id AssetType
| Property | Type | Description |
|---|---|---|
|
|
BIGINT |
Identifier of a user's credentials. |
|
|
VARCHAR(256) |
User name used for authentication. |
|
|
VARCHAR(256) |
Email of a user for the purpose of recovering user's password when needed. |
|
|
VARCHAR(256) |
Type of identity provider used for authenticating a visitor. Possible values are:
|
|
|
VARCHAR(256) |
Encryption algorithm applied to secure the password of a user identity. The algorithm used in the current version of the system is |
|
|
VARCHAR(256) |
Encrypted value of a password used for authentication. |
81.1.6.3 UserLink
Table 81-12 links UserIdentity to User so that a visitor's identities (that have credentials for authentication) are properly associated with the visitor's user profile. This is a denormalized table so that some of the fields from the UserIdentity table are cached here as well.
Table 81-12 Structure of the cg_user_link AssetType
| Property | Type | Description |
|---|---|---|
|
|
BIGINT |
Identifier of a user link. |
|
|
VARCHAR(256) |
User name from the UserIdentity object with which this link associates the User object. |
|
|
VARCHAR(256) |
Email from the UserIdentity object with which this link associates the User object. |
|
|
VARCHAR(256) |
Identity provider code from the UserIdentity object with which this link associates the User object. Possible values are:
|
|
|
BIGINT |
Identifier of a User object with which this link associates the UserIdentity object. |
81.1.7 Gadgets and Dashboard
The following types of primary objects are associated with gadgets and dashboard fuctionality:
81.1.7.1 Gadget
The Gadget table represents a gadgets user settings maintained by Community-Gadgets.
Table 81-13 Structure of the cg_gadget AssetType
| Property | Type | Description |
|---|---|---|
|
|
BIGINT |
Identifier of a gadget. |
|
|
BIGINT |
Relation to the Gadget object from which a particular gadget is inherited. |
|
|
VARCHAR(256) |
Title of a gadget. |
|
|
BIGINT |
Relation to the User object with which a particular Gadget is associated. |
|
|
VARCHAR(256) |
Type of a Gadget object. Possible values:
|
|
|
VARCHAR(4000) |
URL to OpenSocial XML descriptor from which gadget is registered in the Gadgets interface. |
|
|
BIGINT |
Relation to the GadgetSet object with which a particular Gadget is associated. |
|
|
VARCHAR(4000) |
Community-Gadgets specific gadget attributes of a particular Gadget object in the JSON format. |
|
|
VARCHAR(4000) |
List of space separated categories that assigned to a particular Gadget object. |
|
|
VARCHAR(4000) |
Settings of a particular Gadget object in the JSON format. |
|
|
BIGINT |
Relation to the Blob object in which gadget icon is stored. |
|
|
BIGINT |
Relation to the Blob object in which gadget preview is stored. |
|
|
BIGINT |
Relation to the Blob object in which gadget thumbnail is stored. |
81.1.7.2 OpenSocialDescriptor
The OpenSocialDescriptor table represents OpenSocial gadgets XML descriptor which is used for the gadget registration in the Gadgets interface.
Table 81-14 Structure of the cg_open_social_descriptor AssetType
| Property | Type | Description |
|---|---|---|
|
|
BIGINT |
Identifier of a |
|
|
BIGINT |
Relation to the Gadget object with which a particular |
|
|
BIGINT |
Site name on which descriptor is created. |
|
|
VARCHAR(4000) |
De-normalized list of links to Gadget objects with a particular |
|
|
VARCHAR(4000) |
De-normalized list of gadget descriptor settings in the JSON format. The settings are read from gadget XML descriptor. |
81.1.7.3 SingleGadgetData
The SingleGadgetData table represents authorized user settings for separately deployed gadget.
Table 81-15 Structure of the cg_single_gadget_data AssetType
| Property | Type | Description |
|---|---|---|
|
|
BIGINT |
Identifier of a |
|
|
BIGINT |
Relation to the Gadget object with which a particular data is associated. |
|
|
BIGINT |
Relation to the |
|
|
BIGINT |
Identifier of the gadget. It is a logical link that Community-Gadgets uses to associate a deployed gadget with the page on which visitors posted comments. This link is established during widget deployment by specifying the value of the Resource ID field on the deployment page or the |
|
|
VARCHAR(4000) |
De-normalized list of gadget descriptor settings in the JSON format. The settings are read from gadget XML descriptor. |
81.1.7.4 GadgetSet
The GadgetSet table represents dashboard settings.
Table 81-16 Dashboard Properties
| Property | Type | Description |
|---|---|---|
|
|
BIGINT |
Identifier of a |
|
|
BIGINT |
Relation to the User object with which a particular |
|
|
VARCHAR(256) |
Type of a GadgetSetPossible values:
|
|
|
VARCHAR(4000) |
Dashboard interface settings that are stored as the URL parameter. |
81.2 Customizing CSS and Widget Templates
You can customize Community widgets in the following ways:
-
Color Schema and Skinning via CSS. The CSS is customized when a widget's look-and-feel must match that of the web site on which the widget is deployed.
-
Redesign via Widget Templates. Widget templates are customized when a widget requires significant changes, such as a new layout or enhancements to functionality.
The following sections describe how to perform these customizations:
81.2.1 Customizing CSS: Color Schema and Skinning
The general steps for customizing the CSS are:
-
Download the standard CSS skin of the widget.
-
Modify CSS styles for the interface elements that require customization.
-
Apply the customized CSS.
While the overall process is the same, customizing CSS styles for Comments and Reviews widgets is different from customizing other widgets.
This section includes the following:
81.2.1.1 Customizing Comments and Reviews Widgets
For Comments and Reviews, you can download the default CSS from the widget's Appearance page in the Community interface, modify it, and then upload it back. Community-Gadgets continues to host the CSS while it is being customized, so you can change it anytime you like.
To customize the Comments CSS:
-
Log in to the Community interface as an administrator.
-
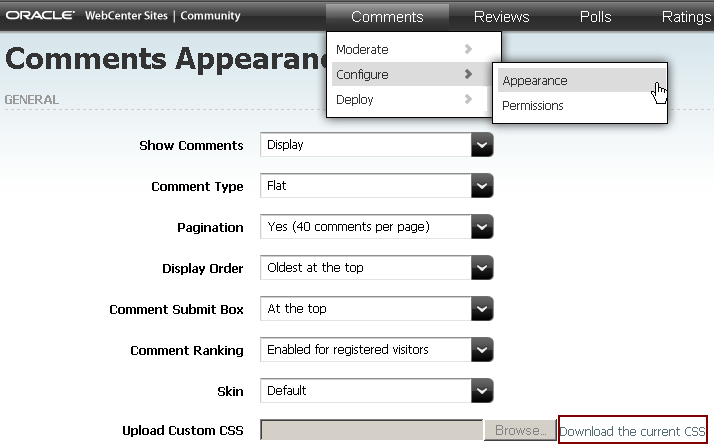
From the Comments menu, choose Configure, then Appearance to display the Comments Appearance page.
-
In the General section, click Download the current CSS next to the Upload custom CSS field.
-
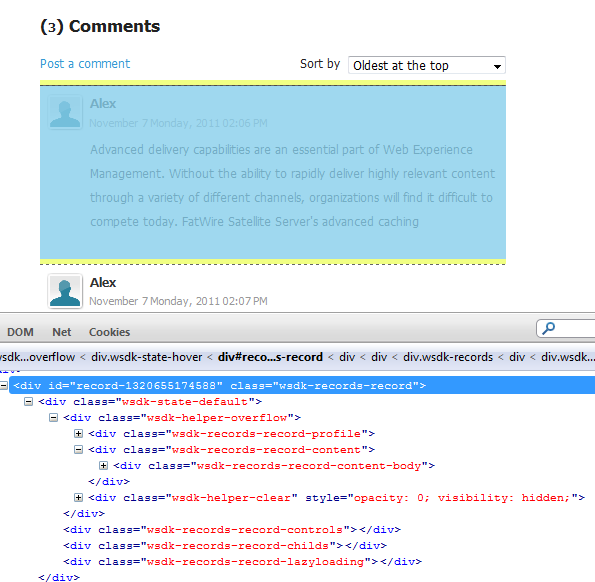
Open the downloaded CSS in FireFox for editing.
-
From the View menu, choose Firebug.
-
From the FireBug menu, choose Inspect Element. The CSS should look like the CSS in Figure 81-3.
-
The DIV element, which contains the entire Comments code, includes the
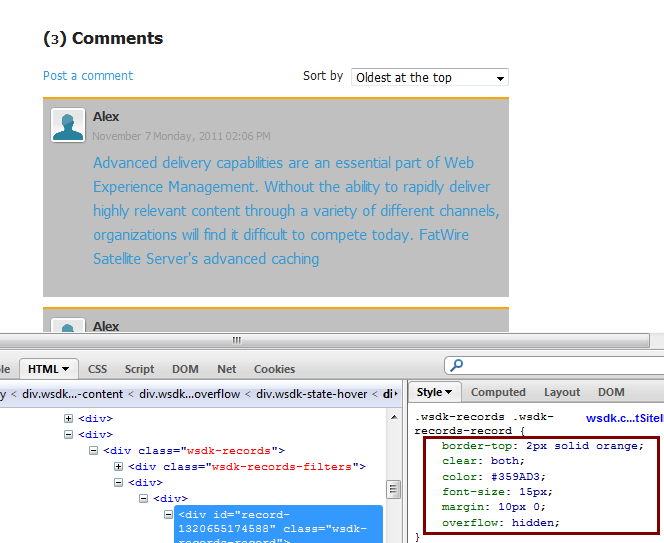
wsdk-records-recordclass. Search for this class in the default CSS previously downloaded by finding the following:.wsdk-records .wsdk-records-record { border-top: 1px dashed #666; clear: both; overflow: hidden; margin: 5px 0px; } Now, let's apply some customizations, for example change the default text color and size, and border: .wsdk-records .wsdk-records-record { border-top: 2px solid orange; color: #359AD3; font-size:15px; clear: both; overflow: hidden; margin: 10px 0px; } We can also find that background color is defined in the next div inside this container div, marked with CSS class "wsdk-state-default". Let's also define a custom background color: .wsdk-state-default { background: silver; } -
Customize the
wsdk-records-recordclass as required (Figure 81-4), then save your changes. -
To upload the customized CSS, go back to the Community interface.
-
From the Comments menu, choose Configure, then Appearance to display the Comments Appearance page.
-
In the General section, change Skin from Default to Custom, click Browse next to the Upload Custom CSS field, and select the CSS file you just customized.
-
Refresh the web page to refresh the widget, and verify if the changes you made to the CSS reflect in the widget interface.
To customize the CSS for the Reviews widget, go to Reviews, select Configure, and then Appearance. Then follow the procedure described above (from step 3 through step 12).
81.2.1.2 Customizing Other Widgets
For customizing widgets other than Comments and Reviews, you can use the general approach described in this section. Depending on your use cases, you can even customize Comments and Reviews widgets using the approach explained here.
The main difference between the approach that will be discussed in this section and what is described for Comments and Reviews widgets is that the customized CSS for other widgets is no longer hosted on the Community-Gadgets web application. Typically, the customized CSS is hosted on the web site on which comments are deployed.
Customize the Top Ranked Topics widget, which is an add-on to the Reviews functionality y following these steps:
Copy the Deployment and CSS Tags Into the Page Template
-
Log in to the Community-Gadgets as an administrator.
-
From the Reviews menu, choose Deploy, then Top Ranked Topics.
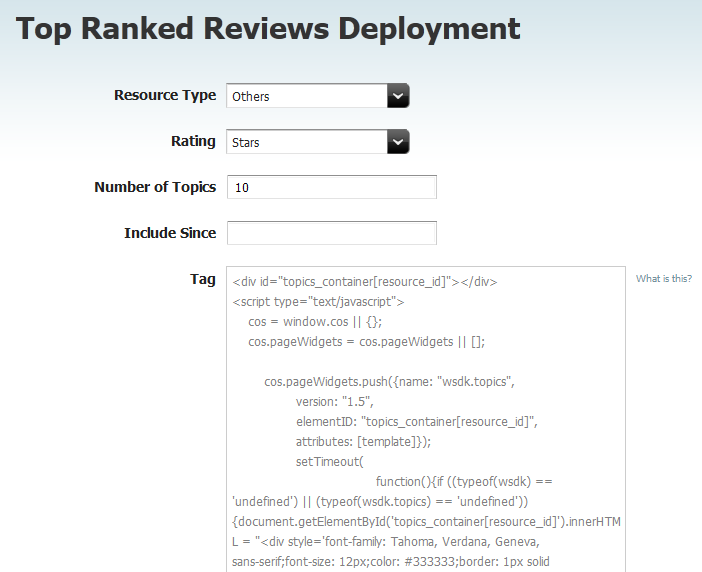
The Top Ranked Reviews Deployment form is displayed(Figure 81-5).
Figure 81-5 Top Ranked Reviews Deployment
Description of "Figure 81-5 Top Ranked Reviews Deployment"
-
Enter the necessary information for the Resource Type, Rating, Number of Topics, and Include Since fields. When the field for Include Since is selected, a calendar displays to select the initial date.
-
Copy and paste into the web page template the contents of both Tag and CSS Tag fields. The CSS will update based on the information added to the fields above. Insert the contents of the Tag field into the
<body>section of the template. Insert the contents of the CSS Tag field into the<head>section of page template. -
Deploy the code snippets.
After the page is rendered, the default look-and-feel of the top ranked topics will be similar to Figure 81-6.
Figure 81-6 Top Ranked Topic After the Tags are Placed in the Template

Description of "Figure 81-6 Top Ranked Topic After the Tags are Placed in the Template"
First, take a look at the ID and HREF attributes in the contents of the CSS Tag field that you just deployed. The value of the ID attribute must remain unaffected from customization. The HREF value will change as you will learn in the steps described in this section.
<link
id="cos_css"
type="text/css"
rel="stylesheet" href="http://localhost:8280/cg/wsdk/skin/wsdk.topics.css?site_id=FirstSiteII&gateway=true"
/>
Before you customize the CSS, download its contents by accessing the HREF location via an Internet browser.
-
In the downloaded CSS, locate CSS classes for topic links. Examine the structure of the widget.
-
To customize the topic headline and topic link colors, locate the respective code snippets. Search for
.fw_topics .headlineand.fw_topics .topic.Modify the following code based on web site design specifications:.fw_topics .headline h1 { color: #359AD3; font-size: 16px; } .fw_topics .topic { font-size: 14px; padding: 5px; font-weight: bold; text-decoration: none; } .fw_topics .topic a { color: orange; font-size: 12px; text-decoration: none; } -
To apply the CSS to the web site:
-
Copy it to the folder in which web site styles are stored.
-
In the CSS you copied to the page template earlier, replace the default location with the new URL from which the customized CSS is accessible. For example, if you copied it to the
skinsfolder, then the HREF element should look like this:<link id="cos_css" type="text/css" rel="stylesheet" href="http://localhost:8180/cs/skins/wsdk.topics.css" />
Note:
The ID attribute must remain equal to
cos_cssbecause when the Community-Gadgets web application loads any widget, it searches on the page for the<link>element with thecos_cssID. If this ID exists, the application continues to render the widget. If this ID does not exist, the application makes an explicit request for the default CSS skin and applies it to the page. Therefore, usingcos_cssas the ID attribute value prevents Community-Gadgets from overwriting the applied customization.
-
-
Reload the page which uses the widget whose CSS you just modified, and verify that your customizations are applied (Figure 81-7).
Figure 81-7 Customization Applied to a Widget

Description of "Figure 81-7 Customization Applied to a Widget"
Tip:
When deploying Community widgets on the same page, optimize the number of network calls by loading all of the widgets' CSS files in a single network call. Community-Gadgets supports this option by allowing you to specify a colon-separated list of widget names in the <link/> tag. That is, widget names do not need to be in separate <link/> elements. For example:
<link
id="cos_css"
type="text/css"
rel="stylesheet" href=" http://localhost:8280/cg/wsdk/skin/<widget name #1>:<widget name #2>:<widget name #3>.css?site_id=FirstSiteII&gateway=true "
/>
Examples of widget names are wsdk.topics and comments-summary. You can find out the actual values for a particular widget in the CSS Tag field of the corresponding deployment page.
81.2.2 Customizing a Widget Template
In the case of dramatic changes (such as changing the position of action links from bottom to top in the Comments widget), widget templates can be customized according to project requirements.
Widget templates are rendered dynamically using JavaScript on the browser side. These templates are based on the Google Closure Templates technology.
There is a set of template directives that can be used in customizations. For information, visit the Google documentation web site at: http://code.google.com/closure/templates/docs/commands.html
Ensure that you have read and understood the print, if/else, for, and foreach statements in Google documentation before you apply the information discussed in this section.
This section includes the following:
81.2.2.1 Understanding Community Widgets Templates
This section describes widget template technology and syntax. It explains how you can override attach points by translating those declared in the Community-Gadgets templates into corresponding WebCenter Sites template names. This section provides information about attach points available for customization in Community-Gadgets, and it explains how to navigate to the widget structure and locate the necessary attach points when customizing a template.
This section includes the following:
81.2.2.1.1 Context Variable Access Points
To modify templates, developers need to work with visitors' permissions (configured in the Community interface) and variables. Each Community-Gadgets template includes a standard $stack variable that you can use to discover these context variables and permissions. For example, you can use the following tag to insert localizable resources into a template:
<h1>Welcome to {$stack.resources.get('label.comments')} Widget </h1>
The $stack.resources variable is an access point to all the resources declared in cg.war/WEB-INF/classes/i18n_resources/widgets/cos.commons and cg.war/WEB-INF/classes/i18n_resources/widgets/<widget name>.
81.2.2.1.2 Dynamic Scripting
You can build the dynamic logic in the template by using JavaScript's {script} directive:
{script}
var lastIndex = 10;
{/script}
Then, variables defined inside {script} are available in other closure directives with $$ mark; for example, $$lastIndex:
{for $index in range($$lastIndex)}
For loop: Iteration #{$index + 1} of {$$lastIndex} in total
<br />
{/for}
In a scenario when the Google closure template variable needs to be accessed in the {script} tag, the regular {$var} syntax can be used:
{for $index in range(2)}
   {script}
          alert({$index});
   {/script}
{/for}
The data produced inside {script} can be displayed on a web page in the following ways:
-
By closing the
{script}tag and printing the data previously declared using the{$$variable}}syntax. -
By using the system output variable provided by Community-Gadgets to print results immediately from JavaScript using
output.append(variable)inside the{script}statement:{script} var message= "Hello World!"; output.append(message); {/script}
81.2.2.1.3 Widget Sources and Templates
The list of widget sources shipped with the Community-Gadgets web application is located in the cg.war/js/widgets directory. For example, the Comments-Gadgets widget's code is stored in the cg.war/js/widgets/wsdk.comments directory. Each widget directory contains a .shtml file, the widget layout definition, and the main entry point to the process of rendering the widget interface. For example, the comments_layout_view.shtml file is the main entry point for the Comments widget.
81.2.2.1.4 Model-View-Controller Pattern
To build a widget interface, the Community-Gadgets uses the Model-View-Controller (MVC) pattern. Therefore, each interface region includes three items corresponding to Model, View, and Controller. For example:
comments_layout_action.js (Controller)
comments_layout_model.js (Model)
comments_layout_view.shtml (View)
81.2.2.1.5 Model-View-Controller Regions
To build a widget interface, Community-Gadgets works with MVC definitions instead of template (.shtml) definitions.
For example, the Comments layout's MVC region can be identified by the /comments_layout ID in the cg.war/js/widgets/<WidgetName>/... directory. The "/" special character signifies a relative path in the widget folder. The comments_layout MVC prefix is used with suffixes such as _view.shtml (view contains HTML pages with bindings) for viewing and discovering other corresponding MVC entities. So, the MVC definition of a particular interface region is identified by its relative path in its widget folder and the prefix of MVC entities that are used to discover a particular model, view, or controller.
Understanding such MVC IDs is essential in building widgets interfaces because these IDs are heavily used across templates.
81.2.2.1.6 Nested Templates
When an MVC entity is processed and its template is rendered, another MVC entity can be recursively included in the template so that complex interfaces can be built by aggregating smaller interface pieces.
To enable nesting of templates, you can add the following tag to a template in which you want to nest other templates. For example, nesting the Login Bar widget in the Reviews widget.
<div attachPoint="/sample"></div>
When you include this tag in your template, Community-Gadgets searches for the sample_action.js and sample_view.shtml files in the widget's root folder: cg.war/js/widgets/<WidgetName>/.
In addition to the attachPoint="" syntax, the bindMvc="" directive also includes nested templates, for example bindMvc="wsdk.ui.input". However, this directive calls the templates that are located outside of a particular widget folder hierarchy, and therefore, does not include templates from the current widget folder hierarchy. This enables the reuse of components across multiple widgets in Community-Gadgets.
81.2.2.1.7 Customization Workflow
The previous section discussed how you can use attach points to nest templates. This section describes how to customize or override attach points via templates.
When Community-Gadgets compiles a JavaScript bundle for a widget, it downloads from WebCenter Sites any widget template customizations that are defined as a WebCenter Sites template, compiles them into JavaScript, and applies them to the widget. A contract for template names, which allows to make an association between Community-Gadgets and WebCenter Sites, is specified at the following location: http://{host}:{port}/cs/ContentServer?pagename={site name}/cg/{widget}/{attach point}_view.shtml&ft_ss=true. It also enables Community-Gadgets to discover specific templates.
To customize a template, for example the /sample template, you must first create the WebCenter Sites template asset on the production WebCenter Sites system on which the Community-Gadgets is configured.
To translate an attach point into a WebCenter Sites template name, use the following format:
http://{host}:{port}/cs/ContentServer
?pagename={site name}/cg/{widget}/{attach point}_view.shtml
&ft_ss=true
For instance, in one of the templates of the "hello-world" widget, the attachPoint="/sample" attach point is translated into the following HTTP request to WebCenter Sites:
http://{host}:{port}/cs/ContentServer
?pagename={site name}/cg/hello-world/sample_view.shtml
&ft_ss=true
For a custom Community-Gadgets template, you must create a corresponding template in WebCenter Sites by following the WebCenter Sites naming convention: "cos/hello-world/sample_view.shtml".
The bindMvc is a set of pre-defined attach points that can be potentially used for nesting templates. Table 81-3 lists the templates that you can nest using the bindMvc="" attribute syntax in the template you just created. You can find the default templates in the corresponding subfolders in the cg.war/js/widgets.commons directory in which reusable widget code is stored.
To override a component, use the mapping (Table 81-17) for binding the MVC names to the names of templates that you will create in WebCenter Sites.
Table 81-17 Mapping for Binding MVC Names To Template Names
| Bound MVC | Template Name to Override |
|---|---|
|
|
|
|
|
|
|
|
|
|
|
|
|
|
|
|
|
|
81.2.2.1.8 Attach Points in the Widget Template Structure
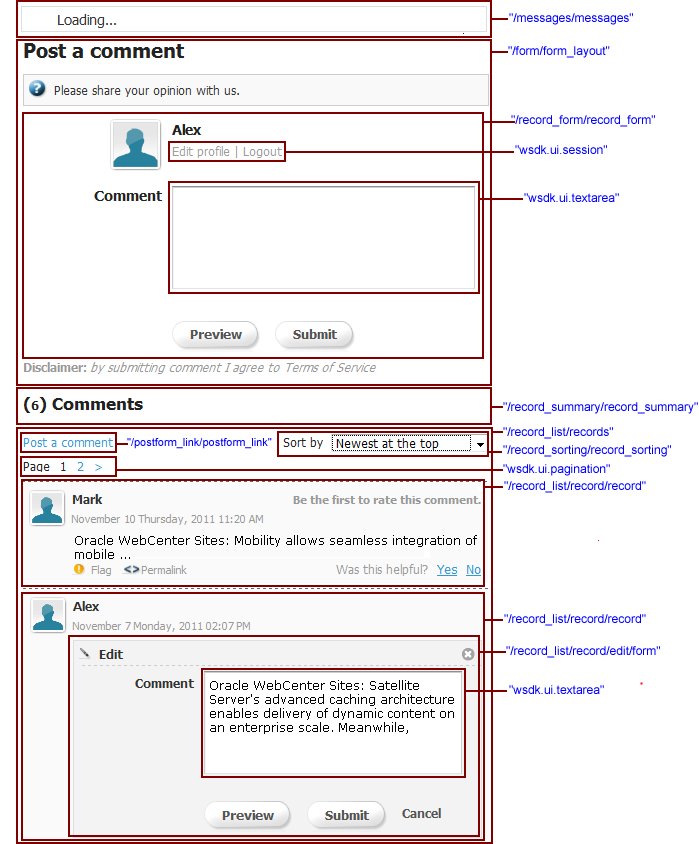
The interfaces and functionality of Community widgets are built with the help of templates structured in a certain way. Figure 81-8 shows the structure of the Comments widget. You can treat this structure as a navigation map while you are working with customizations.
Figure 81-8 Structure of the Comments Widget
Description of "Figure 81-8 Structure of the Comments Widget"
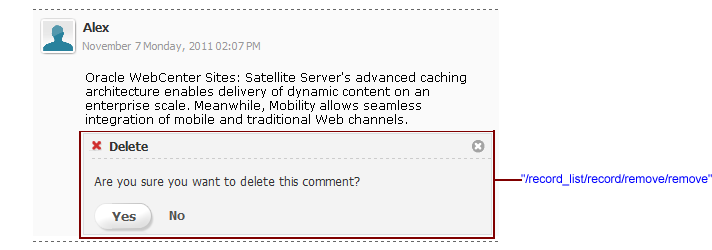
The attach points that are invoked and rendered dynamically by following a visitor's action are not referenced directly in templates. For example, the attach points that are invoked at the time when a visitor clicks edit or delete links on a comment. The dialog boxes for these events cannot be rendered during the initial widget load phase, and therefore, they are loaded programmatically later.
Some examples of attach points for such dynamic dialog boxes are:
-
The Delete dialog box (Figure 81-9) is displayed when a visitor clicks the delete link on a comment.
-
The Flag Content dialog box (Figure 81-10) is displayed when a comment is flagged.
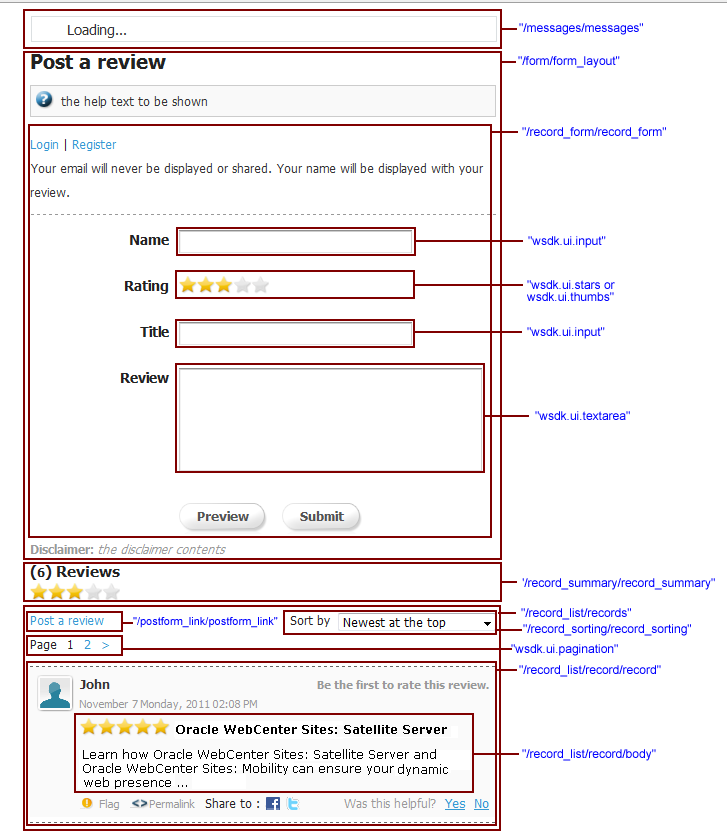
For the Reviews widget, the templates and their attach points are structured as shown in Figure 81-11. The attach points for flagging, editing, and removing a review are the same as for comments: /record_list/record/flag/flag, /record_list/record/edit/form , and /record_list/record/remove/remove respectively.
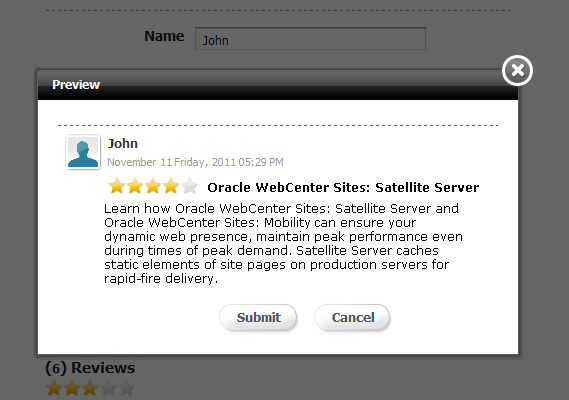
Forms for posting comments and reviews contain the Preview button. Clicking this button displays a context menu with the rendered comment or preview (Figure 81-12).
For both, comments and reviews, the /record_list/record/preview/preview attach point creates this pop-up functionality.
Tip:
The Community-Gadgets web application loads customized templates from the production WebCenter Sites instance. However, the production instance may not have editorial interface to manage these templates. Therefore, it is recommended to start with the development environment first, and point production and management Community-Gadgets server instances to the single instance of WebCenter Sites that has the editorial interface. Using this approach, you can compose templates and verify their look-and-feel in Community-Gadgets. Once you have created and tested your templates, you can either export/import them from development environment to production or publish your custom templates to the desired location.
81.2.2.2 Creating a Sample Template
To create a sample template using the WebCenter Sites Advanced interface:
-
Stop all Community-Gadgets servers, including those on production and management environments.
-
Start the production WebCenter Sites instance.
In the following steps, it is assumed that this server is running on the local host at port 8080.
-
Log in to WebCenter Sites at
http://localhost:8080/cs/login, then select the site in which templates need to be customized. -
Launch the Advanced interface application on that site.
-
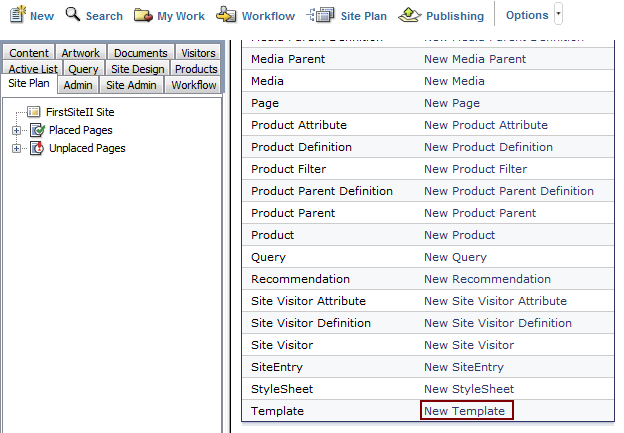
To create a customizable template, click New.
Figure 81-13 WebCenter Sites Advanced Interface: New

Description of "Figure 81-13 WebCenter Sites Advanced Interface: New"
-
In the table on the right side, click the New Template link next to Template.
-
Set Assignee to any value as this value is not relevant here, then click Continue.
-
In the Name field, specify the attach point to be overridden in the form
cg/{widget}/{attach point}_view.shtml. -
In the For Asset Type field, choose can apply to various asset types, then click Continue.
-
In the Usage field, choose Element defines a whole HTML page and can be called externally.
-
In the Create Template Element? field, click JSP.
-
In the Element Logic field, just before the
</cs:ftcs>closing tag, enter the content of the template. The template content must have the following statement, as well as its essentials for invalidating templates cached in Community-Gadgets:<%-- Record dependencies for the Template --%> <ics:if condition='<%=ics.GetVar("tid")!=null%>'><ics:then><render:logdep cid='<%=ics.GetVar("tid")%>' c="Template"/></ics:then></ics:if> -
For the content of the template, navigate to the Community-Gadgets file system and copy the default content available at
cg.war/js/widgets/{widget}/{attach point}_view.shtml. -
Click Continue.
-
On the Site Entry page, click Save.
-
To verify that the newly created template is available to Community-Gadgets over HTTP, enter the template's URL in a browser in the following format:
http://{host}:{port}/cs/ContentServer?pagename={site}/cg{attach point}_view.shtml&ft_ss=true -
Start Community-Gadgets servers, and verify that the customization has been applied to the deployed widgets.
81.2.2.3 Loading Custom Data Sets
In some scenarios, it is necessary to load the customized project-specific data in the existing templates. You can achieve this by exposing the data to Community-Gadgets as a REST service, in the JSONP format.
Once you have created a REST service, invoke it from the template using the system loader variable. To ensure that the custom data is loaded before the template is rendered, you must include the invocation in the {script.preload} section at the beginning of the page.
{script.preload}
       loader.loadData(url, params, key);
{/script.preload}
-
url: URL address of the JSONP endpoint that provides data. -
params: Parameters to be passed as GET parameters to the JSONP endpoint, if the query needs to be parameterized. -
key: Result set returned with data are included in this variable so that this variable is accessible at$stack.key.
-
As an example, create a
data.jspfile which you will use as the JSONP REST service endpoint. Include the following contents in this file:<%@ page language="java" contentType="text/html; charset=ISO-8859-1" pageEncoding="ISO-8859-1"%> <% out.write(request.getParameter("cosrestcallback")); %>({ responseCode : "OK", data : ["foo","bar"]});In this example, the response is provided in the JSON format, containing sample data as a response code and the data array. The JSON response is wrapped up by the callback name according to the JSONP protocol used by Community-Gadgets:
-
Deploy the
data.jspfile to the Community-Gadgetswebappfolder. -
Community-Gadgets has a sample widget that you can use as a sandbox for experimenting with the widget technology. Its source is located in the
cg.war/js/widget/sample.widgetcode. To create custom template in WebCenter Sites with thecg/sample.widget/layout_view.shtmlname, follow the procedure described in Section 81.2.2.2, "Creating a Sample Template." -
In the customized template, download the data given in the
script.preloadsection and then print it on a page. -
Replace the Community-Gadgets URL with your location.
Figure 81-1 shows the code for sample data after it is loaded.
Example 81-1 Sample Data Loaded
<%@ taglib prefix="cs" uri="futuretense_cs/ftcs1_0.tld" %><%@ taglib prefix="asset" uri="futuretense_cs/asset.tld" %><%@ taglib prefix="assetset" uri="futuretense_cs/assetset.tld" %><%@ taglib prefix="commercecontext" uri="futuretense_cs/commercecontext.tld" %><%@ taglib prefix="ics" uri="futuretense_cs/ics.tld" %><%@ taglib prefix="listobject" uri="futuretense_cs/listobject.tld" %><%@ taglib prefix="render" uri="futuretense_cs/render.tld" %><%@ taglib prefix="siteplan" uri="futuretense_cs/siteplan.tld" %><%@ taglib prefix="searchstate" uri="futuretense_cs/searchstate.tld" %><%@ page import="COM.FutureTense.Interfaces.*, COM.FutureTense.Util.ftMessage, COM.FutureTense.Util.ftErrors" %><cs:ftcs><%-- /cos/sample.widget/layout_view.shtml --%> <%-- Record dependencies for the Template --%> <ics:if condition='<%=ics.GetVar("tid")!=null%>'><ics:then><render:logdep cid='<%=ics.GetVar("tid")%>' c="Template"/></ics:then></ics:if> {script.preload} loader.loadData("http://localhost:8280/cg/data.jsp",{}, "customData"); {/script.preload} <div> <h1>Welcome to Sample Widget. Data Load Demo</h1> <br /> Data loaded with response code = "{$stack.customData.responseCode} " <br /> Custom data loaded: {script} var data = {$stack.customData.data}; for(var dataIdx in data) { var item = data[dataIdx]; {/script} {$$item}, {script} } {/script} </cs:ftcs>
81.3 Creating a Custom Word Filter
Community-Gadgets enables visitors to post their feedback on a web site on which the Community widgets are deployed. To prevent publishing of objectionable content, spam, or any fraudulent information on the web site, Community-Gadgets provides a User-Generated Content (UGC) filtering sub-system for content filtration.
The default configuration of the filtering system relies on a word filter file, a list of prohibited words, that can be uploaded via the Community interface by selecting Settings then Restricted Words. Once the list of prohibited words is uploaded and auto-moderation is enabled via the Community interface by selecting Settings and then Moderation, Community-Gadgets examines the content posted by visitors and compares each word with those in the list. If a posted comment or review contains any of the prohibited words, then it is marked "Inappropriate" and is not published on the web site.
Note:
To ensure that prohibited words containing special characters are marked "Inappropriate" and not "Approved," you must create a custom word filter with the syntax shown in Example 81-2.
There may be a need to customize the behavior of the default content filter. For example, to integrate with third-party libraries that provide a functionality for statistical inferences and advanced techniques for spam detection and prevention, Community-Gadgets provides a pluggable word filter model. It lets you create a custom word filter from scratch.
To create a custom word filter, you must first create a Java class containing the word filter logic, compile this class, and then assemble it as a JAR file so it can be plugged into the Community-Gadgets deployment.
-
Create a new Java project in your IDE.
-
Add a JAR library, which contains the
com.fatwire.cos.moderation.filter.WordFilterinterface, to your project's classpath. You can copy this library JAR from the Community-Gadgets web application atcg.war/WEB-INF/lib/cos-api-11.1.1.8.0.jar.Example 81-2 provides the WordFilter interface.
package com.fatwire.cos.moderation.filter; import java.util.Set; /** * The word filter interface that needs to be implemented * when developing and plugging-in a custom word filter * to Community-Gadgets Server. * The content is assigned to "Inappropriate" category and isn't * shown on web site once any of the filters registered in the system * reports an abuse. * @author e_shevchenko * * May 16, 2011 */ public interface WordFilter { /** * The filter method makes a decision whether content * specified can be shown on web site or not * @param text the content submitted by visitor * @param profanityWords the list of prohibited words uploaded on * "Moderation" page in the Community interface * @return true if an abuse detected and false if content * can be shown on web site */ boolean filter(StringBuffer text, Set<String> profanityWords); } -
Create a new Java class in your project, for example,
cos.demo.DemoFilter. -
Declare that this class implements the WordFilter interface:
package cos.demo; import java.util.Set; import com.fatwire.cos.moderation.filter.WordFilter; public class DemoFilter implements WordFilter { @Override public boolean filter(StringBuffer text, Set<String> profanityWords) { // Add filter logic here return false; } } -
Add your custom implementation inside the
filtermethod body.The
filtermethod takes two parameters: the source text submitted by visitors and the list of prohibited words uploaded as a text file via the Community interface. Based on your requirements, you can decide whether to use the existing list of prohibited words or use a third-party database of prohibited words.The following example shows how to verify whether user-generated content contains the word "demo":
package cos.demo; import java.util.Set; import com.fatwire.cos.moderation.filter.WordFilter; public class DemoFilter implements WordFilter { @Override public boolean filter(StringBuffer text, Set<String> profanityWords) { boolean result = false; if(null != text ) { result = text.toString().contains("demo"); } return result; } } -
Implement and then compile the contents of the filter class.
-
Package the compiled class as a JAR file,
filter-demo.jar. -
To make this custom filter available to Community-Gadgets web application's class loader, copy the
filter-demo.jarfile to thecg.war/WEB-INF/libdirectory in both management and production environments. -
To enable the Community-Gadgets web application to discover the custom filter, plug this filter into the
cos_word_filters.xmlconfiguration file located in thecg.war/WEB-INF/classesdirectory:<?xml version="1.0" encoding="UTF-8" ?> <word-filters> <word-filter className="com.fatwire.cos.records.moderation.filter.DefaultWordFilter" /> </word-filters>
-
Replace the default word filter. On both management and production environments, remove the existing
<word-filter/>element from thecos word filters.xmlfiles and add a new one that contains a reference to the class you created. The contents of the newcos word filters.xmlfiles will look like the following:<?xml version="1.0" encoding="UTF-8" ?> <word-filters> <word-filter className="cos.demo.DemoFilter"/> </word-filters> -
Restart the Community-Gadgets servers on both, management and production sytems.
-
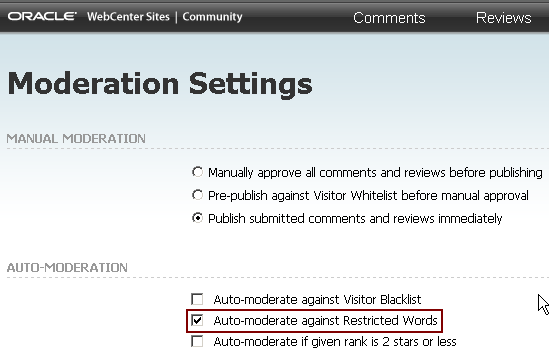
To enable automatic word filtering, go to the Community interface and select Settings, then Moderation and then Auto-moderate against Restricted Words in the "AUTO-MODERATION"section (Figure 81-15).
Figure 81-15 Auto Moderation Against Restricted Words
Description of "Figure 81-15 Auto Moderation Against Restricted Words"
-
On the web site, post a comment or review which includes the word "demo". You will notice that your post will be assigned to the "Inappropriate" category, and therefore, it will not be published.
81.4 Creating a CAPTCHA Generator
CAPTCHA technology helps identify robots of automated spamming systems that may attack a web site. Community-Gadgets provides a plug-in model for custom implementations of CAPTCHA.
This section describes the procedure for creating a simple CAPTCHA generator and plugging it into Community-Gadgets. This procedure is similar to the procedure for creating a custom word filter. To create a CAPTCHA generator, you will create a new class which implements the required interface, compile this class, package it as a JAR file, and then deploy it to Community-Gadgets server.
-
Create a new Java project, "demo-captcha" in your IDE.
-
Add a JAR library for your project to your project's classpath. You can copy the required JAR from the Community web application directory available here:
cg.war/WEB-INF/lib/cos-api-11.1.1.8.0.jar. -
From the
cos-api-11.1.1.8.0.jarfile, extract the interfacecom.fatwire.cos.captcha.CaptchaGeneratorto be implemented. Example 81-3 shows the contents of this interface.Example 81-3 com.fatwire.cos.captcha.CaptchaGenerator Interface
package com.fatwire.cos.captcha; /** * The interface that needs to be implemented when * creating plug-in that generates CAPTCHA to be shown to * visitors when UGC is submitted. * * It's a factory that generates complex Captcha objects that are managed * by Community-Gadgets Server and utilized when CAPTCHA is rendered for visitors * and when it's validated on content submission * * @author alex * * Oct 17, 2011 */ public interface CaptchaGenerator { /** * Factory method that creates a new captcha object * that consists of challenge text * and challenge image to shown to visitors * @return */ public Captcha generate(); } -
In the "demo-captcha" project, create a new Java class called
cos.demo.DemoGenerator(Example 81-4). -
Implement the
CaptchaGeneratorinterface. -
Implement the
generatemethod, as shown in Example 81-5.First, generate the challenge text, and then create the image displaying the generated text. Once text and image are ready, package them into the Captcha object with the help of the
CaptchaFactoryclass. It is highly recommended that you use this factory instead of creating a custom implementation of the Captcha object. This is because the Captcha object built by the factory is already serializable and can be safely shared across cluster members. If you choose to create a custom implementation, then make the Captcha object serializable.package cos.demo; import com.fatwire.cos.captcha.Captcha; import com.fatwire.cos.captcha.CaptchaFactory; import com.fatwire.cos.captcha.CaptchaGenerator; public class DemoGenerator implements CaptchaGenerator { @Override public Captcha generate() { String challenge = "foo_bar";// Add generation byte[] image = generateImage(challenge); // Generate image return CaptchaFactory.create(challenge, image); } } -
Package the compiled class into a JAR file,
captcha-demo.jar. -
To make the generator available to the Community-Gadgets class loader, copy the
captcha-demo.jarfile to thecg.war/WEB-INF/libdirectory on both management and production environments. -
To enable Community-Gadgets to discover the generator, plug it into the configuration file. Create the
cos_captcha.xmlfile in thecg.war/WEB-INF/classesdirectory with the following contents:<?xml version="1.0" encoding="UTF-8" standalone="yes"?> <captcha-generator className="cos.demo.DemoGenerator"/>
-
Restart the Community-Gadgets servers on both, management and production systems.
-
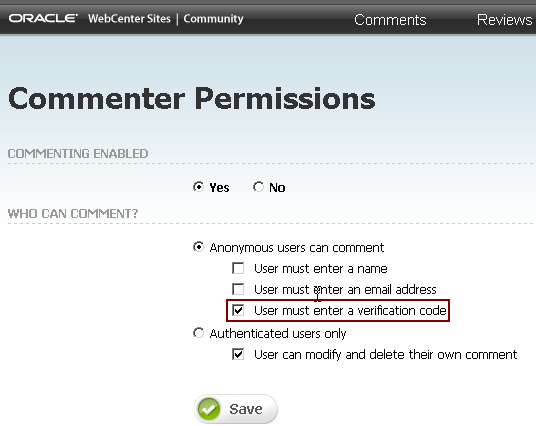
To enable CAPTCHA for comments, go to the Community interface, select Comments, then select Configure, then Permissions, and then User must enter a verification code in the "Who Can Comment?" section (Figure 81-16).
-
Repeat the previous step to enable CAPTCHA for reviews.
-
Deploy Comments or Reviews widgets with login bar support.
-
To verify that the field for the CAPTCHA challenge is displayed and the CAPTCHA image is rendered, click the Register link on the web site. You can also try to post a comment or review as a guest. CAPTCHA will be displayed in the form.
81.5 Customizing Dashboard Themes
As an administrator you can change the existent theme(s) in dashboard using CSS file.
To customize dashboard themes:
-
Open the Gadgets Interface.
-
From the Settings menu, choose Appearance Setting, as shown in Figure 81-17.
Figure 81-17 Gadgets Interface - Appearance Settngs Page
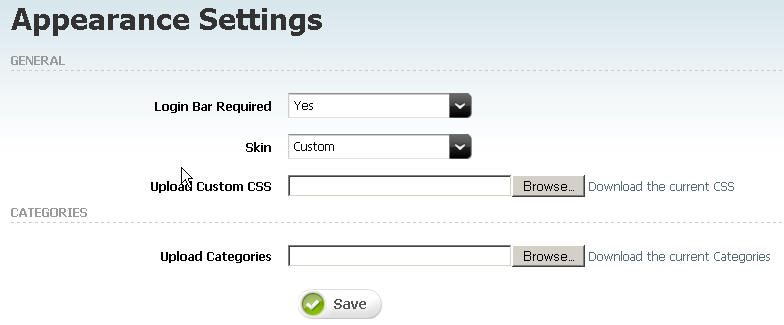
Description of "Figure 81-17 Gadgets Interface - Appearance Settngs Page"
-
On the Appearance Settings page, in the General section, next to the Upload Custom CSS field, click Download the current CSS link, then save the
gadgets_dashboard.cssfile on your computer. -
In this CSS file, modify the dashboard theme's CSS styles in the downloaded file. For example, to modify the Blue theme, find the following lines and change them as required.
Common dashboard background color:
.gas.gas_blue{
background-color: #d7e9f2;
}
Gadget header's left, right, and content picture:
.gas.gas_blue .gas_gadgetHeader_left {
background-image: url(../../admin-gadgets/images/BlueLeftTop.png);
}

.gas.gas_blue .gas_gadgetHeader_right {
background-image: url(../../admin-gadgets/images/BlueTopRight.png);
}

.gas.gas_blue .gas_gadgetHeader {
background-image: url(../../admin-gadgets/images/BlueStrip.png);
}
Gadget header action background:
.gas.gas_blue .gas_gadgetActions {
background-image: url(../../admin-gadgets/images/BlueStrip.png);
}
Gadget header action buttons:
.gas.gas_blue .gas_gadgetHeader_content a.gas_close {
background-image: url(../../admin-gadgets/images/BlueDeleteOff.png);
}

.gas.gas_blue .gas_gadgetHeader_content a.gas_expand {
background-image: url(../../admin-gadgets/images/BlueWSOpenOff.png);
}

.gas.gas_blue .gas_gadgetHeader_content a.gas_collapse {
background-image: url(../../admin-gadgets/images/BlueWSCollapsedOff.png);
}
User toolbar collors (gadget settings)

.gas.gas_blue .gas_UserPrefs_content {
background-color: #d7e9f2;
color: #ffffff;
}
Panel theme's icon:
.gas .gas_setup .gas_setupIcon_theme_blue { background-image: url(../../admin-gadgets/images/gasThemeBlue.png); } * html .gas .gas_setup .gas_setupIcon_theme_blue { background-image: url(../../admin-gadgets/images/gasThemeBlue.gif); } -
Save the modified file.
-
From the Skin drop-down list, choose Custom.
This enables the field through which you can upload the customized
gadgets_dashboard.cssfile, as shown in Figure 81-17. -
Next to the Upload Custom CSS field, click Browse.
-
In the File Upload dialog box, choose the modified
gadgets_dashboard.cssfile, then click Open. -
On the Appearance Settings page, click Save.
81.6 Community-Gadgets Events Handling
In Community-Gadgets, all events are inherited from the CoSEvent class. Examples of events that can be used for customer monitoring are CommentEvent, ReviewEvent, RatingEvent and ExternalAuthEvent.
Each event has a major type and a minor type. These types help identify specific events. Major types show the part of the system each event belongs to. This is represented with CoSEventMajorType. Possible values for are ALL, COMMENT, REVIEW, and RATING. ALL refers to all possible major types.
Event minor types show performed actions which lead to events appearing in and represented with CoSEventMinorType. Possible values are ALL, CREATED, MODIFIED, DELETED, and REPORTED. REPORTED appears when comments and reviews are flagged. ALL refers to all possible minor types.
Events are handled (processed) by listeners. All listeners are inherited from the CoSEventListener class. The listener should know which event (for example, CommentEvent or ReviewEvent) it handles.
This section contains the following topics:
81.6.1 Event Entities
The parent class for all event entities is CoSEvent; the full class name is com.fatwire.cos.events.CoSEvent. This class is located in the cg.war/WEB-INF/libs/cos-api-11.1.1.8.0.jar library.
This section contains the following topics:
81.6.1.1 CommentEvent Entity
The CommunityEvent entity is used with comment creation, modification and deletion. The full class name is com.fatwire.cos.records.events.CommentEvent. This class is located in the cg.war/WEB-INF/libs/cos-shared-11.1.1.8.0.jar library.
-
Supported major types:
ALL,COMMENT -
Supported minor types:
ALL,CREATED,MODIFIED,DELETED,REPORTED
Table 81-18 CommunityEvent Methods
| Method Declaration | Method Definition |
|---|---|
|
|
Link to CommentsFeed object |
|
|
Name of site on which the event happens |
|
|
Shows moderation state. Possible values:
|
81.6.1.2 ReviewEvent Entity
The ReviewEvent entity appears on review creation, modification and deletion. The full class name is com.fatwire.cos.records.events.ReviewEvent. This class is located in the cg.war/WEB-INF/libs/cos-shared-11.1.1.8.0.jar library.
-
Supported major types:
ALL,COMMENT -
Supported minor types:
ALL,CREATED,MODIFIED,DELETED,REPORTED
Table 81-19 ReviewEvent Methods
| Method Declaration | Method Definition |
|---|---|
|
|
Link to ReviewsFeed object |
|
|
Name of site on which the event happens |
|
|
Shows moderation state. Possible values:
|
81.6.1.3 RatingEvent Entity
The RatingEvent entity appears on ratings creation and deletion. The full class name is com.fatwire.cos.records.events.RatingEvent. This class is located in the cg.war/WEB-INF/libs/cos-shared-11.1.1.8.0.jar library.
-
Supported major types:
ALL,RATING -
Supported minor types:
ALL,CREATED,DELETED
Table 81-20 RatingEvent Methods
| Method Declaration | Method Definition |
|---|---|
|
|
Link to RatingFeed object |
|
|
Name of site on which the event happens |
|
|
Shows moderation state. Possible values:
|
81.6.1.4 ExternalAuthEvent Entity
The ExternalAuthEvent entity appears on successful authentication with an external authentication provider. The full class name is com.fatwire.cos.events.api.ExternalAuthEvent. The class is located in the cg.war/WEB-INF/libs/cos-api-11.1.1.8.0.jar library.
-
Supported major types:
ALL -
Supported minor types:
ALL
Table 81-21 ExternalAuthEventEvent Methods
| Method Declaration | Method Definition |
|---|---|
|
|
Identifier of external authentication provider |
|
|
Data received from external authentication provider in |
81.6.2 Event Listeners
Event listeners are used for listening to all events and logging the activity. All listeners are inherited from the CoSEventListener class. The listener should know which event (for example, CommentEvent or ReviewEvent) it handles.
The full class name is com.fatwire.cos.events.CoSEventListener. This class is found in the cg.war/WEB-INF/libs/cos-api-11.1.1.8.0.jar library.
This section contains the following topics:
-
Section 81.6.2.2, "Developing Event Notification Listeners - Process Method"
-
Section 81.6.2.3, "Developing Event Notification Listeners - Sending Email"
81.6.2.1 Creating a Simple Listener
This example shows the creation of a listener that logs all events. The cos-api-11.1.1.8.0.jar library is required.
-
Create a
SampleListenerclass by extending abstract classCoSEventListenerpublic class SampleListener extends com.fatwire.cos.events.CoSEventListener
-
Choose the major and minor types which the listener will record (in this example,
ALL) and set them in the class constructor.public SampleListener () { setMajorType(CoSEventMajorType.ALL); setMinorType(CoSEventMinorType.ALL); } -
Implement two functions -
void process (CoSEvent event)andint getTaskCount()- which are not implemented in the parent abstract class.private final static Logger LOG = Logger.getLogger(SampleListener.class); private AtomicInteger counter = new AtomicInteger(); @Override public void process(CoSEvent event) { counter.incrementAndGet(); try{ LOG.info("Process event: " + event.getClass() + ": " + event); } finally { counter.decrementAndGet(); } } @Override public int getTaskCount(){ return counter.get(); }Once completed, the full class file will look similar to this:
package com.example.listeners; import java.util.concurrent.atomic.AtomicInteger; import org.apache.log4j.Logger; import com.fatwire.cos.events.CoSEvent; import com.fatwire.cos.events.CoSEventListener; import com.fatwire.cos.events.CoSEventMajorType import com.fatwire.cos.events.CoSEventMinorType public class SampleListener extends CoSEventListener { private final static Logger LOG = Logger.getLogger(SampleListener.class); private AtomicInteger counter = new AtomicInteger(); public SampleListener () { setMajorType(CoSEventMajorType.ALL ); setMinorType(CoSEventMinorType.ALL ); } @Override public void process(CoSEvent event) { counter.incrementAndGet(); try{ LOG.info("Process event: " + event.getClass() + ": " + event); } finally { counter.decrementAndGet(); } } @Override public int getTaskCount(){ return counter.get(); } } -
Add the listener to Community-Gadgets configuration.
Open
listeners.xmlfile in thecg.war/WEB-INF/classesfolder and add the bean with listener class.<bean id="sampleListener" class="com.example.listeners.SampleListener" />
81.6.2.2 Developing Event Notification Listeners - Process Method
The process method can filter events if the event type is set to ALL.
@Override
public void process(CoSEvent event) {
    if(event instanceof CommentEvent) {
        sendCommentNotification(event);
    } else if (event instanceof ReviewEvent) {
        sendReviewsNotification(event);
    }
}
81.6.2.3 Developing Event Notification Listeners - Sending Email
The listener can send a MIME email to an address or group of addresses with the notification text. One way this can be done by developing a sender using the JavaMail API. However, it is possible send email using the Community-Gadgets Email Facility by including a pair of lines in the class file (This requires cos-core-11.1.1.8.0.jar in the classpath).
...
import com.fatwire.cos.core.CoS;
...
CoS.instance().getEmailFacility().send(mimeMessage);
...
For generating mimeMessage, code similar to the following would be used:
private MimeMessage generateEmail(CoSEvent event, String emails) throws
  AddressException, MessagingException {
        Session session = null;
        MimeMessage msg = new MimeMessage(session);
        msg.setFrom(new InternetAddress("noreply@samplenotify.example.com"));
        msg.setSentDate(new java.util.Date());
        msg.setRecipients(javax.mail.Message.RecipientType.TO,
            InternetAddress.parse(emails));
        msg.setSubject("==Notification subject==");

        Multipart multipart = new MimeMultipart("alternative");
        BodyPart messageBodyPart = new MimeBodyPart();
        messageBodyPart.setContent("<SOME NOTIFY TEXT>",
                                   "text/plain;charset=\"UTF-8\"");
        multipart.addBodyPart(messageBodyPart);

        msg.setContent(multipart);
        msg.saveChanges();

        return msg;
    }
Note:
Velocity library, or another template engine, can be used for message body content generation. Generated template must be used instead of "<SOME NOTIFY TEXT>" token above.
When the listener is created, the full class file may look similar to the following example. The class file requires cos-api-11.1.1.8.0.jar, cos-core-11.1.1.8.0.jar, and cos-shared-11.1.1.8.0.jar.
package com.fatwire.cos.shared;

import java.util.concurrent.atomic.AtomicInteger;

import javax.mail.BodyPart;
import javax.mail.MessagingException;
import javax.mail.Multipart;
import javax.mail.Session;
import javax.mail.internet.AddressException;
import javax.mail.internet.InternetAddress;
import javax.mail.internet.MimeBodyPart;
import javax.mail.internet.MimeMessage;
import javax.mail.internet.MimeMultipart;

import com.fatwire.cos.core.CoS;
import com.fatwire.cos.events.CoSEvent;
import com.fatwire.cos.events.CoSEventListener;
import com.fatwire.cos.events.CoSEventMajorType;
import com.fatwire.cos.events.CoSEventMinorType;
import com.fatwire.cos.records.events.CommentEvent;
import com.fatwire.cos.records.events.ReviewEvent;

public class NotificationListener extends CoSEventListener {

    private AtomicInteger counter = new AtomicInteger();

    public NotificationListener () {
       setMajorType(CoSEventMajorType.ALL );
       setMinorType(CoSEventMinorType.ALL );
    }

    @Override
    public void process(CoSEvent event) {
        counter.incrementAndGet();
        try {
            if(event instanceof CommentEvent) {
                sendCommentNotification((CommentEvent)event);
            } else if (event instanceof ReviewEvent) {
                sendReviewsNotification((ReviewEvent)event);
            }
        } finally {
            counter.decrementAndGet();
        }
    }

    @Override
    public int getTaskCount() {
        return 0;
    }

    private void sendCommentNotification(CommentEvent event) {
        MimeMessage mimeMessage = null;
        String site = event.getSiteId();
        try {
            mimeMessage = generateEmail(event, site ,
                "moderator_comments@samplenotify.example.com");
        } catch (Throwable e) {
            e.printStackTrace();
        }
        sendEmail(mimeMessage);
    }

    private void sendReviewsNotification(ReviewEvent event) {
        // send notification only for creating review event
        if (event.getMinorType().equals(CoSEventMinorType.CREATED)) {
            MimeMessage mimeMessage = null;
            String site = event.getSiteId();
            try {
                mimeMessage = generateEmail(event, site,
                    "moderator_reviews@samplenotify.example.com");
            } catch (Throwable e) {
                e.printStackTrace();
            }
            sendEmail(mimeMessage);
        }
    }

    private void sendEmail(MimeMessage mimeMessage) {
        CoS.instance().getEmailFacility().send(mimeMessage);
    }

    private MimeMessage generateEmail(CoSEvent event, String site,
        String emails) throws AddressException, MessagingException {
        Session session = null;
        MimeMessage msg = new MimeMessage(session);
        msg.setFrom(new InternetAddress("noreply@samplenotify.example.com"));
        msg.setSentDate(new java.util.Date());
        msg.setRecipients(javax.mail.Message.RecipientType.TO,
                          InternetAddress.parse(emails));
        msg.setSubject("==Notification subject== from " + site + " site");

        Multipart multipart = new MimeMultipart("alternative");
        BodyPart messageBodyPart = new MimeBodyPart();
        messageBodyPart.setContent("<SOME NOTIFY TEXT>",
                                   "text/plain;charset=\"UTF-8\"");
        multipart.addBodyPart(messageBodyPart);

        msg.setContent(multipart);
        msg.saveChanges();

        return msg;
    }

}
After the file is created, add the following bean to listentes.xml:
<bean id="sampleListener" class="com.example.listeners.NotificationListener" />
