1 Introduction
Many of your configuration tasks for Oracle WebCenter Sites and its applications require you to set or modify values for properties that are specified in property files. These files have either the .ini or .properties suffix.
A set of property files, along with the "Property Editor" utility, is provided with WebCenter Sites. At least one property file is associated with each component of WebCenter Sites, such as WebCenter Sites: Analytics, WebCenter Sites: Engage, and WebCenter Sites: Satellite Server.
This introduction describes the Property Editor and summarizes the property files that are presented in the rest of this reference.
This introduction contains the following sections:
1.1 Overview of the Property Editor
The Property Editor is used to set the values of properties in the Oracle WebCenter Sites property files. We recommend that you always use the Property Editor to set values, because using other editors can create problems. For example, the JumpStart Kit renames property files; launching the Property Editor ensures that the correct file will be displayed for modification. The Property Editor is also capable of encrypting password fields; modifying the fields outside the Property Editor can corrupt the property values. In addition, the Property Editor ensures that the files are correctly formatted; specifically, the correct property separator characters are used. Furthermore, the Property Editor organizes properties by function on tabs, and provides descriptive information about the properties, as well as default or possible values.
1.2 Starting the Property Editor
Execute the following scripts at the command line prompt or in a UNIX shell:
-
Windows:
propeditor.bat, typically located in<cs_install_dir>/ -
Solaris:
propeditor.sh, typically located in$HOME/<cs_install_dir>
1.3 Setting Properties
To set properties for WebCenter Sites and its applications
-
Start the Property Editor, as described in Section 1.2, "Starting the Property Editor"
-
Select File and then select Open.
-
Browse to the property file that you need to modify and then select it.
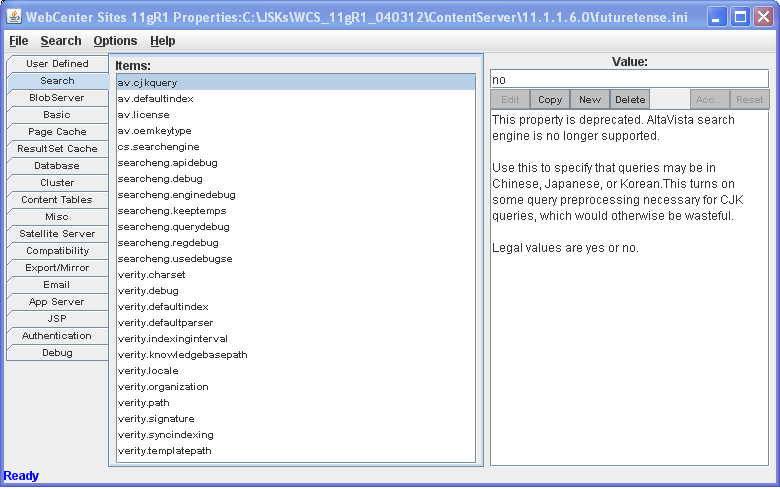
The Property Editor opens the file. For example, this is what the
futuretense.inifile looks like when it is first opened in the Property Editor:
-
The tabs (on the left-hand side) group properties by function.
-
The Items pane lists the properties in the selected tab.
-
The Value pane lists the current value for the selected property, a brief description of the property, and acceptable values for the property.
-
-
Select the tab representing the functional group that contains the property you want to configure.
The Property Editor displays the properties from that tab in the Items pane.
-
Select the property from the Items pane.
The Property Editor displays the value that is currently set for that property and provides a brief description of the property in the Values pane.
-
In the Values pane, enter the value for the property in the text field at the top.
-
Repeat steps 4 through 7 for each property you want to configure.
-
When you are finished, select File and then select Save.
-
Select File and then select Close.
-
Stop and restart the application server so the new values can take effect.
1.4 Adding Properties
Some configuration tasks require you to add new, custom properties for your system. For example, when you implement resultset caching, you can create up to three properties for any WebCenter Sites database table for which you want to set caching values. (For information about resultset caching, see the Oracle Fusion Middleware WebCenter Sites Developer's Guide.)
To add a property to the WebCenter Sites database
-
Start the Property Editor, as described in Section 1.2, "Starting the Property Editor."
-
Select File > Open.
-
Browse to the property file in which you need to add a property.
-
(Optional) Select the User Defined tab. (This step is optional because any property that you create is displayed on the User Defined tab the next time you open this property file in the Property Editor no matter which tab you select.)
-
In the Values pane, just under the text entry field, click New.
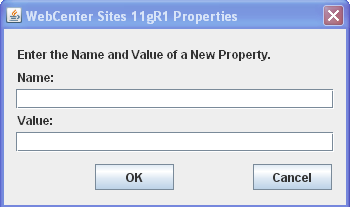
The Property Editor displays the WebCenter Sites Properties dialog box:

-
Click in the Name field and enter the name of the new property.
-
Click in the Value field and enter the value for the new property.
-
Click OK.
The new property appears in the Items pane and the value appears in the Values pane.
-
Select File > Save.
1.5 Deleting Properties
It is unlikely that you will ever have to delete a property. However, if you do have to delete a property, refer to the steps below.
Caution:
Never delete a required property.
-
Start the Property Editor. (See Section 1.2, "Starting the Property Editor.")
-
Select File and then select Open.
-
Browse to and select the property file containing the property you want to delete.
-
Select the tab representing the functional group that holds the property you want to delete.
-
Take note of the current value for this property just in case you need to restore it for any reason.
-
In the Values pane, under the text entry field, click Delete.
-
The Property Editor displays a confirmation message. Click Yes.
The property is deleted from the property file.