4 Migration
Migration configuration allows you to transfer documents that are stored in the SharePoint content database to WebCenter Content.
Conversely, you can also copy the documents that are stored in WebCenter Content back to the SharePoint content database. The documents stored in SharePoint content database are first externalized to the connector custom database. Depending on the scope configuration rules, the documents are then transferred to WebCenter Content.
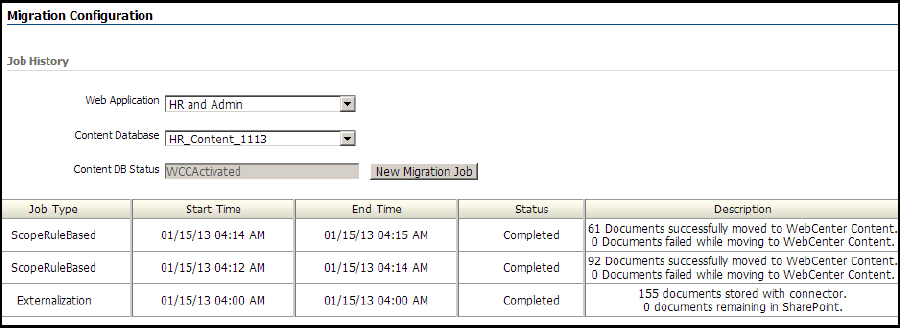
The Migration Configuration home page displays the migration history in a table.
The Migration Configuration page has a one-minute auto-refresh functionality that updates the status of the ongoing migration job.
A migration job can have one of the following status:
-
When you initiate a migration job, the status of the job appears as Initiated. The Initiated status implies that the initiation of the migration process is completed, but the migration of documents is yet to start.
-
When you initiate a migration job and the connector starts the migration process, the status of the job appears as In Progress.
-
When a migration job is complete, the status of the job appears as Completed.
-
If the migration process did not complete successfully, the status of the migration job appears as Aborted.
Note:
You can initiate only one migration job at a time.
This chapter covers the following topics:
4.1 Externalization Migration
With externalization migration, documents that are stored in the SharePoint content database are externalized to the connector custom database. Before you initiate an externalization migration job for a content database, you must ensure that there is no other migration job scheduled or running.
To initiate externalization migration:
-
Log on to WebCenter Content as an administrator.
-
In the Content Server portal, open the SharePoint Connector tray, and then click Migration Configuration. The Migration Configuration page appears.
Figure 4-1 Migration Configuration Home Page

Description of "Figure 4-1 Migration Configuration Home Page"
-
From the Web Application drop-down list, select a SharePoint web application.
-
From the Content Database drop-down list, select a content database whose contents you want to migrate to the connector custom database. The status of the content database that you selected appears in the Content DB Status field.
Note:
The content database that you selected must be in the WCCActivated status.
-
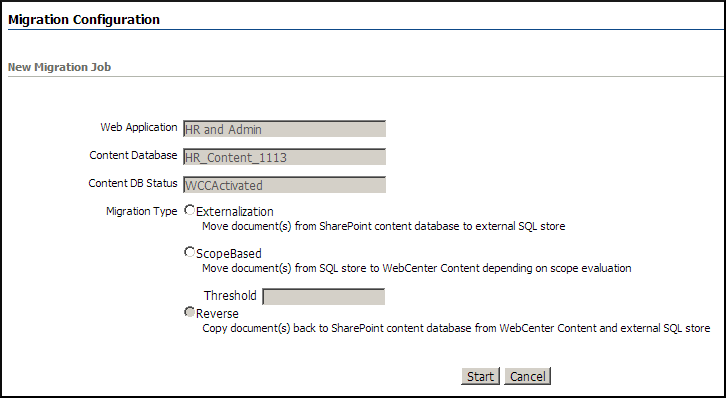
Click New Migration Job. The New Migration job page appears.
Note:
The New Migration Job button is available only if the status of the content database is WCCActivated or WCCDeactivated.
-
In the Migration Type options group, select Externalization.
-
Click Start. The connector initiates externalization migration process for the content database that you selected. You can view the status of the migration task in the Job History table on the Migration Configuration home page.
4.2 Scope-based Migration
With Scope-based migration, you can transfer documents from the connector custom database to WebCenter Content depending on whether the documents comply with scope configuration rules. The scope-based migration also allows you to set a failure threshold value. During the scope-based migration, when the document failure count reaches the threshold, the migration process is aborted.
Note:
If the documents are added to the SharePoint content database before activation, you must externalize the documents before proceeding with the scope-based migration. For more information, see Section 4.1
To initiate scope-based migration:
-
Log on to WebCenter Content as an administrator.
-
In the Content Server portal, open the SharePoint Connector tray, and then click Migration Configuration. The Migration Configuration page appears. See Figure 4-1.
-
From the Web Application drop-down list, select a SharePoint web application.
-
From the Content Database drop-down list, select a content database whose documents you want to migrate to WebCenter Content from the connector custom database. The status of the content database that you selected appears in the Content DB Status field.
Note:
The content database that you selected must be in the WCCActivated status.
-
Click New Migration Job. The New Migration Job page appears.
Note:
The New Migration Job button is available only if the status of the content database is WCCActivated or WCCDeactivated.
-
In the Migration Type options group, select ScopeBased.
-
In the Threshold field, enter a document failure count. If the number of documents that failed to be migrated reaches this threshold count, the migration is stopped. The status of the migration job appears as Aborted.
-
Click Start. The connector initiates scope-based migration process for the content database that you selected. You can view the status of the migration task in the Job History table on the Migration Configuration home page.
