You may be able to change the layout of the table, meaning that you can change the displayed metrics and dimensions.
If the Cross Tab is configured to allow you to change the table layout, then a Configure button is displayed at the top of the component. To change the layout of the Cross Tab table:
-
Click the
Configure button.
The Cross Tab Configuration View is displayed.
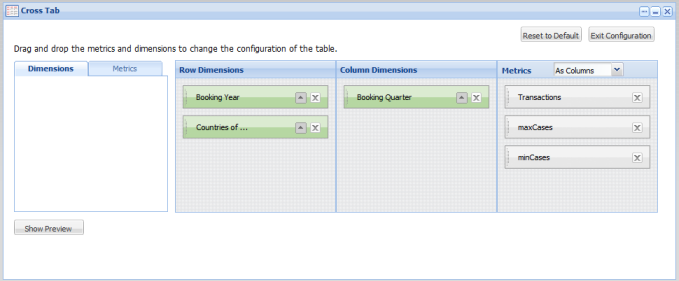
The tabbed list at the left contains the available dimensions and metrics that are not currently displayed on the Cross Tab.
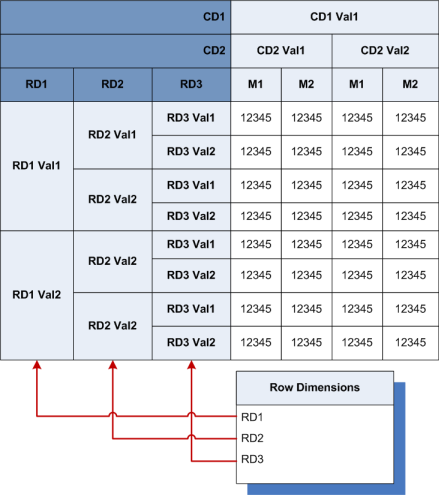
The Row Dimensions list contains the dimensions for which the values are displayed as the header columns to the left of the table.
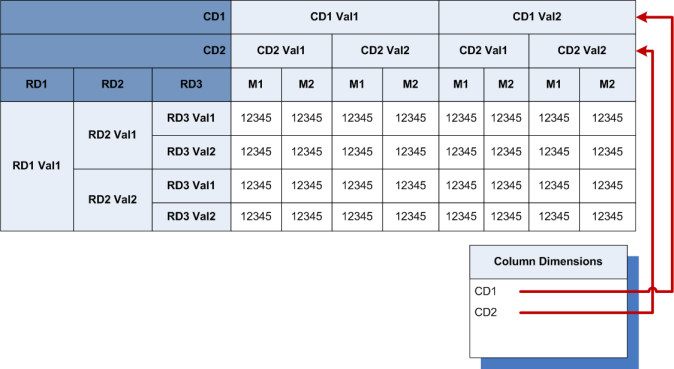
The Column Dimensions list contains the dimensions for which the values are displayed as header rows across the top of the table.
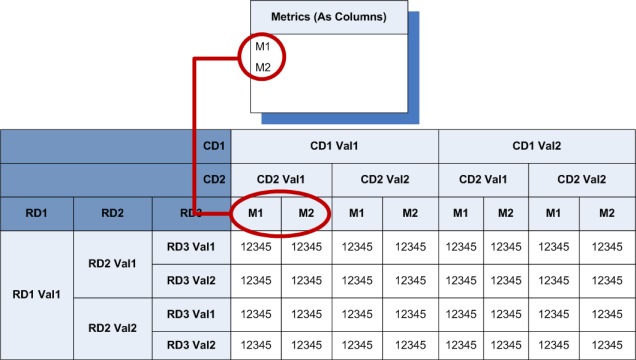
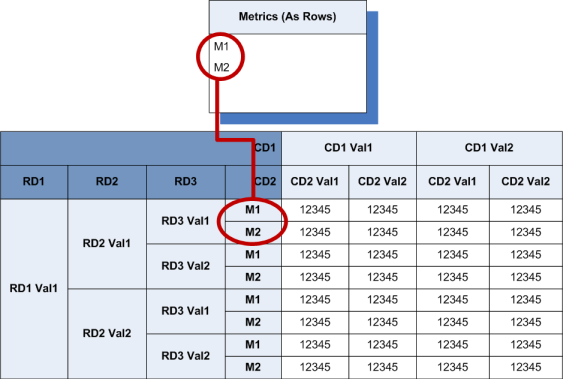
 The Metrics list contains the actual values to display. The metrics may be displayed either:
- In columns, with the
labels in the bottom header row on the table (below the column dimensions)
- In rows, with the
labels in the rightmost header column (after the row dimensions)
- In columns, with the
labels in the bottom header row on the table (below the column dimensions)
-
To display a preview of the table, click the
Show Preview button.
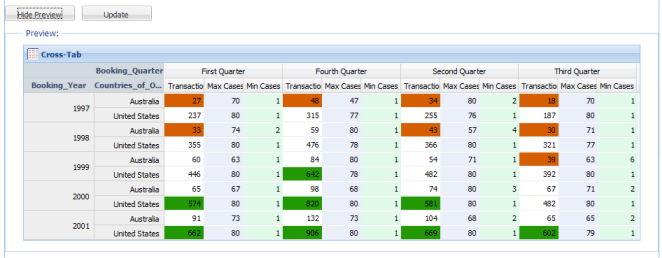
To hide the preview, click Hide Preview.
To update the preview after making changes, click Update.
-
To add a dimension from the
Dimensions tab to the
Cross Tab display, drag the dimension to the
Row Dimensions or
Column Dimensions list.
To determine the order in which the dimensions are displayed in the row or column dimensions, drag each dimension to its new location in the list.
- For row dimensions, the dimension at the top of the list is displayed at the far left.
- For column dimensions, the dimension at the top of the list is displayed at the top.
To remove a dimension from the Row Dimensions or Column Dimensions list, click its delete icon. The dimension is returned to the Dimensions tab at the left.
-
To add a metric to the
Cross Tab display, drag the metric from the
Metrics tab to the
Metrics list.
To determine the order in which the metrics are displayed, drag each metric to its new location in the list.
You use the drop-down list in the list heading to determine how the metrics are displayed.- To display the metrics as rows, select As Rows.
- To display the metrics as columns, select As Columns.
To remove a metric from the Metrics list, click its delete icon. The metric is returned to the Metrics tab at the left.
-
To determine the order in which to display the values for a
specific dimension or metric, click the arrow icon.
If the arrow is pointing up, then the values are displayed in ascending order.
If the arrow is pointing down, then the values are displayed in descending order.
- To save the changes to the configuration, click Save.
- To revert the layout back to the original default, click Reset to Default.
- To exit the configuration view, click Exit Configuration.
