| Oracle® Communications IP Service Activator User's Guide Release 7.2 E35290-01 |
|
|
PDF · Mobi · ePub |
| Oracle® Communications IP Service Activator User's Guide Release 7.2 E35290-01 |
|
|
PDF · Mobi · ePub |
This chapter describes how to work with transactions in Oracle Communications IP Service Activator. It explains how to create, commit, save and schedule, merge and unmerge, and delete transactions.
For an overview of transactions, see IP Service Activator Concepts.
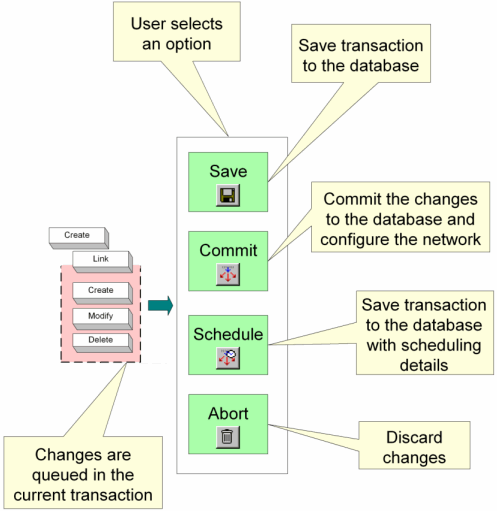
When you work in the IP Service Activator client, the changes that you make to the object model are held in the current transaction. This transaction acts as a cache, queuing the changes that you make. The options available for stopping the transaction can include some or all of the following:
Saving the transaction: details of the transaction are added to the database but the transaction's changes to the object model and device configuration are not implemented
Committing the transaction: the common object model is updated with the transaction's changes and any associated configuration is propagated to the network
Scheduling the transaction: similar to saving the transaction, but a date and time are set for implementing the transaction's changes
Discarding the transaction: the changes held in the current transaction are discarded
Some or all of these options might be available depending on your security rights. For example, some users can save only the current transaction, whereas users with a higher security level can commit or schedule transactions. For information about defining user security levels, see IP Service Activator System Administrator's Guide.
Figure 8-1 illustrates these options and how they are queued in the current transaction.
Note:
You can undo commands during the current transaction up to the start of the transaction.Network discovery and related tasks, such as fetching capabilities, cannot be done part way through the current transaction. These tasks can be done only immediately after a transaction is saved or committed and before a new transaction is started.
When you commit a transaction, IP Service Activator validates the transaction changes. The Transaction dialog box opens, showing details of the transaction, including any concrete objects or faults that will be generated by confirming the commit.
After reviewing the potential concrete objects and faults, you can choose whether to proceed with the commit or cancel.
If you proceed with the commit, IP Service Activator updates the common object model with the transaction's changes, and configuration changes are propagated to the network. If there are other users working on remote user interfaces, IP Service Activator updates the object model on each remote client according to the updated common object model. For information about local and common object models, see IP Service Activator Concepts.
If you cancel the commit, you can revise details of the policy or the points at which it is applied before trying to commit the transaction again.
Note:
Before you can commit a saved transaction, you must merge it. See "Merging or Previewing Transactions"for more information about merging.If a user on a remote machine is creating a transaction that conflicts with the updated object model, a warning message is displayed and unsaved changes made by that user are discarded.
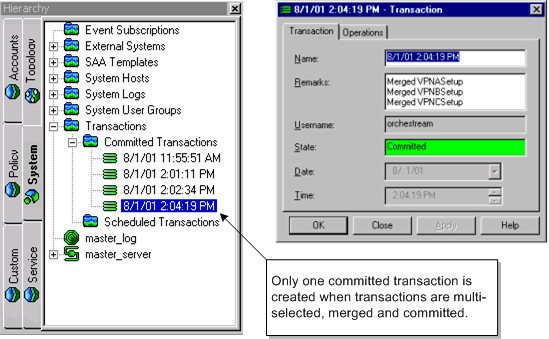
When you commit a transaction, IP Service Activator creates a new transaction object in the Committed Transactions folder. The transaction bundles the actions that have been committed.
A single committed transaction object might correspond to a number of previously saved and merged transactions. For example, if you select a number of transactions, merge them, and commit them, only one committed transaction object is created for those transactions.
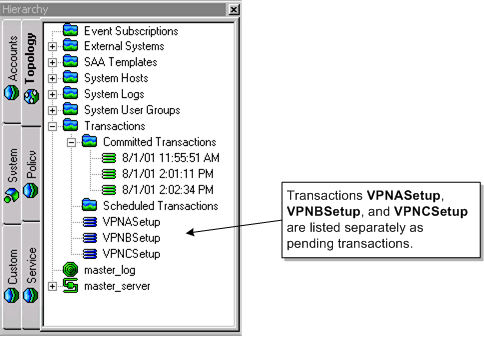
Figure 8-2 shows the Transactions folder with three pending transactions. Figure 8-3 shows the Committed Transactions folder with a single committed transaction object that represents the three merged transactions.
Figure 8-3 Merged and Committed Transactions
After you commit a transaction, the transaction buttons on the toolbar are disabled. When the next change is made in the client, IP Service Activator starts a new current transaction and the toolbar buttons are enabled.
If necessary, you can remove a committed transaction's changes from the object model and any related configuration from the network by unmerging the transaction. See "Unmerging or Rolling Back Transactions" for more information.
To commit a transaction:
From the toolbar, click the Commit icon.
The Commit icon is enabled only if you have unsaved changes in IP Service Activator, and your user security level permits you to commit transactions.
The Transaction dialog box opens.
IP Service Activator applies a default name that indicates the date and time at which the transaction was committed and populates the Remarks field with information about the committed transaction, listing and naming any merged transactions. Changes that are saved as a transaction before being committed are listed as ’unidentified user action(s)'.
(Optional) Select the Concretes property page and review the concrete objects that will be created if you proceed with the commit.
Double-clicking on a listed concrete object displays details of the relevant policy target in the Details pane.
(Optional) Select the Fault property page and review the faults that would result from committing the transaction.
If you want to cancel the commit as a result of your review, click Cancel.
(Optional) Change the transaction's default details on the Transaction property page based on the review of concretes and faults.
Click OK.
The transaction is saved to the database, the common object model is updated and any related configuration changes are propagated to the network. The common object model is pushed to remote user interfaces.
Saving a transaction suspends the transaction changes to a future date or time.
When you save the current transaction, IP Service Activator creates a transaction object and adds it to the common object model's transaction store. The object model changes associated with that transaction are not made and no configuration changes are propagated to the network.
For the user who saves or schedules the current transaction, the client shows the state of the network as it is currently configured, that is, the state of the system held by the common object model.
For example, five sites are created through the client and the current transaction is then saved and held in a pending state.
Figure 8-4 shows the Hierarchy pane before the transaction is started.
Figure 8-4 The Hierarchy Pane Before the Transaction
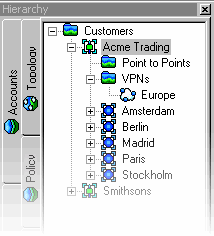
Figure 8-5 shows the Hierarchy pane after starting a new transaction and creating five sites: Amsterdam, Berlin, Madrid, Paris, and Stockholm. The client shows the changes made in the current transaction.
Figure 8-5 The Hierarchy Pane After Starting a New Transaction
After saving the transaction, the client reflects the network as it is currently configured. In the case of this example, the client reverts to Figure 8-4.
When you save the current transaction, its status changes to Pending.
After saving a transaction you can:
Merge it into the current model: this is an essential step before committing the transaction. See "Merging or Previewing Transactions" for information about merging.
Schedule the transaction. See "Scheduling Transactions" for information.
Delete the transaction. See "Deleting Transactions" for information.
To save a transaction:
On the toolbar, click the Save icon.
The Save icon is enabled only if there are unsaved changes in the client. The Transaction dialog box opens.
Enter the name and remarks.
Click OK.
The transaction is saved to the common object model's transaction store. The client reverts to show the state of the network as it is currently configured, that is, the state of the system held by the common object model.
Note:
If a transaction incorporates a merged transaction — for example, a pending transaction was merged during the current transaction — icons representing both the merged transaction and the saved transaction are displayed on the System tab when the ’parent' transaction is saved.Like saved transactions, a scheduled transaction's changes are put on hold but you can set the date and time for implementing the transaction's changes. Depending on your user security level, you may be able to:
Schedule the current transaction
Schedule a pending, merged, or unmerged transaction
When you schedule a transaction, its status changes to Scheduled.
If a scheduled transaction runs successfully, IP Service Activator updates the common object model and propagates the changes to the network. A new committed transaction object is added to the transaction store and is displayed in the Committed Transactions folder.
If a scheduled transaction fails, the transaction is moved to the list of pending transactions and its status changes to Failed.
After scheduling a transaction you can:
Leave the transaction to be committed at the allocated date and time
Merge and commit the transaction manually. See "Merging or Previewing Transactions" and "Committing Transactions" for information.
Unschedule the transaction. See "Scheduling Transactions" for information.
To schedule the current transaction:
From the toolbar, select the Schedule icon.
The Schedule icon is enabled only if you have started a transaction. The Transaction dialog box opens.
Enter the details, including name, remarks, date, and time.
Click OK.
The current transaction is saved to the database. The client reverts to show the state of the network as it is currently configured – that is, the state of the system held by the common object model.
To schedule a pending transaction:
On the System tab, open the Transactions folder.
Right-click a pending transaction and select Schedule.
The Transaction dialog box opens.
Enter a date and time to specify when to commit the transaction.
Click OK.
IP Service Activator moves the transaction to the Scheduled Transactions folder.
To unschedule a transaction:
On the System tab, open the Transactions folder and select a scheduled transaction.
From the transaction's context menu, select Unschedule.
IP Service Activator moves the transaction out of the Scheduled Transactions folder and changes its status to Pending.
Note:
You must select the Commit button after scheduling or unscheduling a transaction in order to implement the scheduling details.If a transaction is saved or scheduled, you can preview its changes before committing the transaction.
Note:
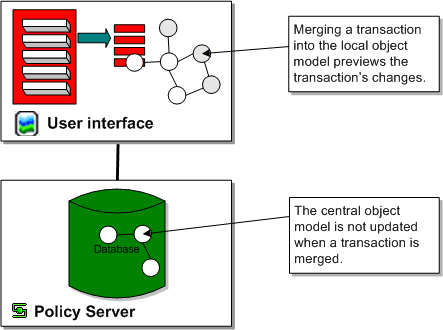
For saved transactions, you must merge the transaction before it can be committed.Previewing a transaction merges its changes into the local object model, that is, the object model maintained by the local client. The merge does not affect the common object model, and the results are therefore not reflected in remote user interfaces. This concept is illustrated in Figure 8-6. For information about local and common object models, see IP Service Activator Concepts.
Figure 8-6 Transaction Merged in Local Object Model but not in Common Object Model
During the merge, IP Service Activator tests the validity of the transaction against the local object model. If there is a conflict, IP Service Activator abandons the merge and reports an error; this occurs, for example, if you attempt to merge a transaction that creates an object that already exists.
You can merge pending or scheduled transactions. If you merge a scheduled transaction, IP Service Activator removes its associated schedule details. The transaction can be committed manually or rescheduled if required.
You can multi-select a number of transactions and merge them in one step. IP Service Activator merges the transactions in the order in which they were selected. See "Selecting Transactions" for information.
After merging a transaction you can do one of the following:
Commit the merged transaction's configuration changes. See "Committing Transactions" for more information.
Perform additional tasks and save or commit the new transaction. See "Saving Transactions" and "Committing Transactions" for more information.
Abort the current transaction: this unmerges the merged transaction and removes its changes from the local object model. See "Discarding the Current Transaction" for more information.
To merge a transaction:
On the System tab, open the Transactions folder.
Right-click a pending transaction and select Merge Changes.
The changes associated with the transaction are merged into the local object model. The merged transaction's icon is no longer displayed on the System tab.
When you roll back a transaction, its changes are removed from the object model and, where configuration has been installed on network devices, it is removed.
The ability to roll back a committed transaction depends on whether subsequent changes are dependent on that transaction's changes. For example, a transaction that creates a VPN to which sites and interfaces have subsequently been linked cannot be rolled back. In this case, the client displays an error message.
Rolling back a transaction is a two-step process that consists of:
Unmerging the transaction from the local object model.
Committing the unmerge to update the common object model and remove any associated configuration details from the network. See "Committing Transactions" for information about committing transactions.
To unmerge a transaction:
On the System tab, open the Transactions folder.
Right-click a committed transaction, and select Unmerge Changes.
IP Service Activator attempts to remove the transaction's changes from the local object model. A message indicates whether the action was successful.
Aborting a transaction stops the current transaction and discards its changes.To abort the current transaction:
On the toolbar, click the Abort icon.
IP Service Activator asks you whether you want to lose the changes.
Click Yes.
The current transaction is stopped and its changes discarded. The client reverts to show the state of the network as it is currently configured, that is, the state of the system held by the common object model.
You can delete a Pending, Failed, or Scheduled transaction.
Note:
If you want to undo the changes made by a transaction, unmerge the transaction and commit the change. See "Unmerging or Rolling Back Transactions" for information.To delete a transaction:
On the System tab, open the Transactions folder.
Right-click a transaction, and select Delete.
Click the Commit icon.
The deletion completes.
This section describes broad management tasks associated with transactions. It describes how to:
Run a client in confirmed commit mode
View a list of transactions
Search committed transactions
View transaction details
Check which user committed a transaction
Specify the transaction archive limit
By default, a transaction that has been committed is queued and processed by the policy server as a background task. This means that a user can continue working in the client and commit further transactions while the policy server saves data to the database. However, if the policy server fails, transactions that it has not written to the database are lost.
In confirmed transaction mode, a user who has committed a transaction cannot make any further changes in the client until the transaction is successfully saved to the database.
Note:
If your deployment integrates IP Service Activator with other OSS systems, it is particularly important that these systems are guaranteed persistence of data. This ensures synchronization between systems. You may therefore want to consider running IP Service Activator user interfaces in confirmed commit mode in this scenario.To run a client in confirmed transaction mode:
From the Tools menu, select Options.
The Options dialog box opens.
Select the Transactions property page and select the Confirmed transaction mode check box.
Click OK.
IP Service Activator supports the ability to search committed transactions.To search committed transactions directly from the Hierarchy pane:
In the Hierarchy pane, click the System tab.
Expand the Transactions folder.
Right-click the Committed Transactions folder, and select Find From Here.
The Find dialog box opens. The Search From field is populated with the Committed Transactions folder.
Enter search criteria and click Find.
To search committed transactions from the Find dialog box:
From the Tools menu, select Find.
Click Browse.
Navigate to the Committed Transactions folder and select it.
Enter search criteria and click Find.
To export all transactions:
From the Tools menu, select Options.
The Transactions dialog box opens.
Select the Transactions property page.
Click Export.
The transactions are exported to a text file. The Save As dialog box opens.
Enter the file name for the destination text file and click Save.
To export a single transaction:
Locate the single transaction that you want to export.
Right-click the transaction and select Properties.
The Transaction dialog box opens.
Select the Transactions property page.
Click Export.
The transaction is exported to a text file. The Save As dialog box opens.
Enter the file name for the destination text file and click Save.
IP Service Activator lists the transactions that are currently held in the transaction store on the System tab under the Transactions folder.
Depending on your organization, the transactions that are listed may include:
Transactions created by you
Transactions created by another user working remotely
Transactions created by a third-party tool through the OSS Integration Manager (OIM)
Note:
The number of transactions that are listed in the Committed Transactions folder is configurable. See IP Service Activator System Administrator's Guide for details.To view a list of transactions, on the System tab, open the Transactions folder.
Pending transactions are listed under the Transactions folder, and scheduled and committed transactions are grouped into subfolders.
You can view detailed information about all transactions in the Details pane and sort by any of the displayed columns. If you have adopted a naming convention for transactions based on the first letters of the transaction name, this is a way of sorting related transactions. See "Changing Views" for information about sorting by a column.
To view transaction details:
On the System tab, double-click the Transactions folder.
The Details pane lists transaction information under the following headings:
Name: Identifier for the transaction
Description: Additional transaction information (optional)
State: Transaction status (see "Transaction State")
Schedule: Time at which the transaction was or will be committed
Username: Name of the user who created the transaction, entered automatically by IP Service Activator.
Size: Size of the transaction in bytes
System Configuration: Number of concrete objects created by the transaction and their status.
Fault Level: Number and type of faults created by the transaction.
Owner: If ownership of the transaction has been specified, the owner's user name.
OwnerGroup: If ownership of the transaction has been specified, the group to which the owner belongs.
Every transaction has a state that indicates where it is in the transaction lifecycle. Table 8-1 describes these states.
| State | Description |
|---|---|
|
Pending |
A transaction that has been saved to the transaction store but whose changes have not been propagated to the network. Pending transactions are visible in all user interfaces. |
|
Scheduled |
A transaction that will be committed at a future date and time. |
|
Failed |
A scheduled transaction that IP Service Activator was unable to commit due to conflicts with the common object model. |
|
Committed |
A transaction whose changes have been saved to the database and related configuration changes propagated to the network. |
To check which user created a transaction, you can:
Open the relevant transaction's properties dialog box and check the Username field on the Transaction property page.
List all transaction details in the Details pane (see "Viewing Transaction Details").
Check the audit trail (viewable under the System tab's System Logs folder).
You can select a single transaction or multiple transactions listed in the Details pane and select an action to perform on them. For example, you can merge a number of transactions in one step by multi-selecting them and selecting Merge from the context menu. Where several transactions are selected, IP Service Activator processes them in the order in which they are selected.
See "Selecting Objects" for information about selecting objects in the Details pane.
All changes in IP Service Activator are transactions. The transaction entry, as a whole, has a provisioning status that you can view. Provisioning status applies to a transaction only if transaction status monitoring is enabled. See "Enabling Transaction Status Monitoring" for information about enabling transaction status monitoring.
To view provisioning status:
From the System menu, select Committed Transactions, then select Transaction Entry, and then select Properties.
The Transaction dialog box opens.
Table 8-2 lists possible Provisioning Status values and their meaning.
Table 8-2 Provisioning Status Values
| Provisioning Status Value | Meaning |
|---|---|
|
Pending |
No confirmation from the downstream components that the transaction was received |
|
Succeeded |
Confirmation received indicating successful creation, modification, or uninstallation of corresponding configuration |
|
Failed |
Confirmation received indicating the creation, modification, or uninstallation of the corresponding configuration change was rejected |
|
Timedout |
Confirmation not received during the timeout period specified by ConcreteActivationStatusTimeout (default: 30 minutes) |
You can view the concrete activation status in the client. Valid activation status values and their meanings are in Table 8-3.
Table 8-3 Activation Status Values
| Activation Status Value | Meaning |
|---|---|
|
Inactive |
A concrete is inactive as long as the transaction is not yet committed to the policy server |
|
Pending |
A concrete is pending when notification has not yet been sent |
|
Succeeded |
Notification is received that a concrete operation succeeded |
|
Failed |
Notification is received that a concrete operation failed |
|
Timedout |
Notification is received that a concrete operation timed out |
|
TestSucceeded |
Notification is received that a concrete operation succeeded, when the operation is run in offline, test mode |
|
TestFailed |
Notification is received that a concrete operation failed, when the operation is run in offline, test mode |
|
Conflicted |
Notification is received of a conflict that must be resolved |
Transaction status monitoring allows IP Service Activator to provide feedback regarding the success or failure of operations that result in deleted concretes.
Use the command line to configure the following component parameters:
Full transaction monitoring: controls whether the policy server sets the provisioning status and reason for failure of completed transactions
Timeout interval: represents the maximum time a transaction is allowed to stay in Pending state awaiting completion notifications for its concretes
Fault wait interval: represents the time that the policy server waits before collecting the faults for a failed transaction
Transaction monitoring poll interval: represents the frequency at which the policy server checks each in-flight transaction to determine if transactions have timed out
Note:
These parameters apply only to the policy server.Table 8-4 shows the transaction monitoring command line and component parameters.
Table 8-4 Transaction Monitoring
| Command Line Parameter | Component Parameter | Values | Range (Default) |
|---|---|---|---|
|
FullTransactionMonitoring |
TransactionMonitoring.FullMonitoring |
enabled/disabled |
Enabled |
|
TransactionMonitoringTimeout |
TransactionMonitoring.Timeout |
seconds |
60-14400 (900) |
|
FaultWaitTime |
TransactionMonitoring.FaultWaitTime |
seconds |
10-600 (10) |
|
TransactionMonitoringPollInterval |
TransactionMonitoring.PollInterval |
seconds |
10-3600 (60) |
|
Copyright © 2011, 2013, Oracle and/or its affiliates. All rights reserved. Legal Notices |
|