| Oracle® Communications IP Service Activator Installation Guide Release 7.2 E39355-02 |
|
|
PDF · Mobi · ePub |
| Oracle® Communications IP Service Activator Installation Guide Release 7.2 E39355-02 |
|
|
PDF · Mobi · ePub |
This chapter describes how to upgrade an existing system to the latest Oracle Communications IP Service Activator release. This chapter also includes procedures for performing IP Server Activator patch updates.
The upgrade procedure should be performed by qualified IP Service Activator administrators. You should be familiar with Oracle Database; IP Service Activator components; IP Service Activator client; IP Service Activator system configuration, including Network Processors, capabilities files, and options files; and details of any customizations to the IP Service Activator configuration.
Note:
Carefully review the procedures and topics in this chapter before performing the upgrade procedures. Ensure that the prerequisites are met and that during the procedure you perform all backup steps.In this chapter, the release you are upgrading from is called the old release and the release you are upgrading to is called the new release.
This release of IP Service Activator supports the following upgrade paths:
From release 7.0.0 to release 7.2.0.
From release 5.2.4 to release 7.2.0.
Note:
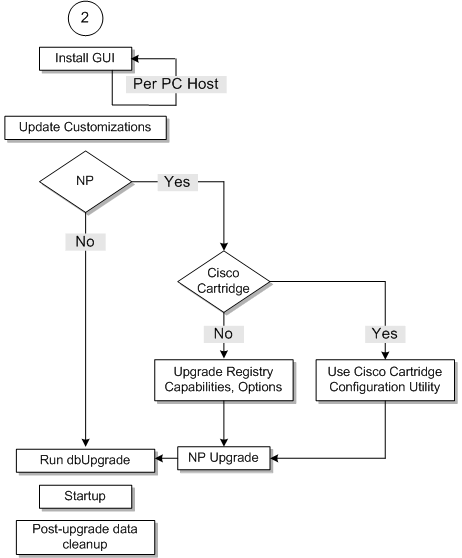
If you are using the Cisco Device Driver, you must migrate to the Cisco IOS cartridge technology prior to the upgrade.The flow charts in Figure 8-1 and Figure 8-2 illustrate the upgrade process.
npUpgrade performs the following tasks after the new version of IP Service Activator is installed:
Sets up the database schema or modifies it if one exists
Transitions all the network processor device data to the new database schema
Computes the commands generated by the new network processor for each device
Compares the commands that were generated by npSnapshot from the old release to the new commands and produces a report outlining which devices were upgraded successfully and which were not
The following files are created by the Network Processor Upgrade tool:
Service_Activator_home/logs/upgradetool*.log
upgrade_home/upgrade/reports/upgradeReport.txt
upgrade_home/upgrade/success/DeviceAudit_componentId.xml
upgrade_home/upgrade/failure/DeviceAudit_componentId.xml
where:
Service_Activator_home is the IP Service Activator home directory (typically: /opt/OracleCommunications/ServiceActivator)
upgrade_home is a configurable location anywhere on the server (the default value is Service_Activator_home/upgrade_home)
This section provides information about preparing to upgrade IP Service Activator from releases 5.2.4 and 7.0.0 to release 7.2.0.
Before upgrading:
Ensure that you have the Installer for your old IP Service Activator release, in case you need to roll back the upgrade and revert to your original system.
Ensure that you have the supplemental software components for your old IP Service Activator release.
It is recommended that your IP Service Activator installation be operating as normally as possible. Issues that you do not resolve prior to the upgrade will still exist in the upgraded system. It is recommended that you take the following actions:
Correct cartridge-managed devices that have any failed configuration (that is, they are in the Intervention Required state).
Correct cartridge-managed devices that have outstanding or pending configuration.
Minimize critical faults.
Ensure that the hardware meets the requirements for the new release. See "Planning an IP Service Activator Installation" for details.
Go to My Oracle Support to check for the latest patch set for your new release. Otherwise, go to the Oracle software delivery Web site and download the IP Service Activator media packs for the platforms that you require.
Download the supplemental software components for your new release.
Un-zip the IP Service Activator media pack on each server where you plan to install IP Service Activator.
Table 8-1 maps the terms used in this section with their corresponding default values for different versions of IP Service Activator.
| Terminology | Default values for new versions 5.2.4 and later | Default values for new versions 7.0.0 and later |
|---|---|---|
|
IPSA_admin_unix_account |
ipsaadm |
ipsaadm |
|
default_installation_directory |
/opt/OracleCommunications/ServiceActivator |
/opt/OracleCommunications/ServiceActivator |
|
database_SID |
IPSA |
IPSA.WORLD |
|
database_user_id |
- |
admin |
|
database_password |
- |
admin |
|
process_status_script |
ipsaps |
ipsaps |
|
naming_service_script |
ipsans |
ipsans |
|
component_manager_script |
ipsacm |
ipsacm |
|
DSN_Name |
IPServiceActivatorDb |
IPServiceActivatorDb |
Perform the general steps in this section on the old release prior to upgrading. For more specific information about some of these steps, see the relevant sections in this chapter as described in the following procedure.
To prepare to upgrade to the latest release:
Ensure that your old version of IP Service Activator is running.
Log in to IP Service Activator client using a Super User ID.
Ensure outstanding and scheduled transactions are completed.
Attempt to resolve all faults prior to upgrade.
Decide whether to delete or save committed IP Service Activator transactions.
Deleting committed transactions prior to upgrading speeds up IP Service Activator startup time. Saving truncated versions of committed transactions increases IP Service Activator startup time but maintains database records for business purposes. Truncation removes the operations associated with the committed transactions.To delete all committed transactions:
Set the transaction archive limit to zero. See the section about setting the archive limit for transactions in IP Service Activator System Administrator's Guide.
Export all transactions. See the section about exporting transactions in IP Service Activator User's Guide.
Commit the transaction. See the section about committing transactions in IP Service Activator User's Guide.
To save committed transactions:
You can save truncated versions of committed transactions during the upgrade process when you upgrade the database. See "Running dbUpgrade to Upgrade the Database" for more information.
Shut down the IP Service Activator processes. See IP Service Activator System Administrator's Guide for more information.
Run the Integrity Checker from the old IP Service Activator system.
For the Integrity Checker procedure and parameter details, see the Database Integrity Checker topic in IP Service Activator System Administrator's Guide.
Review Integrity Checker output files and correct errors.
If you correct errors, you might have to restart the system to implement the corrections. If you restart the system, return to the first step in this section.
Back up your IP Service Activator database instance.
Save the database back-up in a directory so that it is available for later restoration if a roll-back of the upgrade is required.
If your system has a Network Processor, run the npSnapshot script. This script performs a backup of Network Processor files prior to data migration. It takes a snapshot of the router commands generated by the Network Processor in your old IP Service Activator release.
For information about npSnapshot, see "Installing and Running the Network Processor npSnapshot Tool". Review the npSnapshot report. If you correct errors, you might have to restart the system to implement the corrections. If you restart the system, return to the first step in this section.
Back up custom cartridges, if installed. For more information, see "Backing Up Custom Configuration Policies and Cartridges".
Back up IP Service Activator. For more information, see "Backing Up IP Service Activator".
Uninstall the old IP Service Activator release using the documentation that corresponds to that release.
Perform the steps in this section only if you are running a Network Processor.
To install and run the npSnapshot tool:
Run the Config GUI.
Set the following upgrade parameters to improve performance of the npSnapshot tool:
Increase the processes up to the number of processor cores on the server
processes = number_of_processes
set the memory amount (which is expressed in MB) to 2048MB (i.e. 2GB)
totalMemory = 2048
Commit the changes.
This updates the Service_Activator_home/Config/networkProcessor/upgradeTool/default.properties
See "Network Processor Upgrade Tool default.properties File" for examples of the required entries.
In another window, as IPSA_admin_unix_account, run the npSnapshot script:
cd Service_Activator_home/bin
npSnapshot.sh
This performs the first half of the Network Processor upgrade.
Note:
The database details are read from the db.properties file. The db.properties file is created when you run the Configuration GUI.Look for reported errors by doing the following:
Check the npSnapshot report file:
upgrade_home/upgrade/reports/snapshotReport.txt
Check the upgradetool_Main.log file in Service_Activator_home/logs and look for errors or exceptions in the output folders. You can locate these by entering:
ls -lR Service_Activator_home/upgradeHome/upgrade
The listed folders contain the following information:
commands: contains CLI commands representing the current configuration of devices that were successfully processed.
failures: contains CLI commands representing the current configuration of devices that were not successfully processed. You must fix these before continuing the upgrade.
reports: contains npSnapshot reports
success: used in npUpgrade
The npSnapshot report contains a summary of results from the npSnapshot process. To see the report, enter:
cat Service_Activator_Home/upgradeHome/upgrade/reports/snapshotReport.txt
For more information, see the reference sections at the end of this chapter.
Check the upgradetool.log file in Service_Activator_home/logs for errors or exceptions.
Correct all the errors found.
Note:
If you have errors that you cannot fix, Oracle recommends that you contact Oracle GCS and create a service request for assistance. Attach the upgradetool.log file in Service_Activator_home/logs to the service request.After the npSnapshot.sh script has completed successfully:
In a new window, as IPSA_admin_unix_account, save a copy of the Service_Activator_home/upgradeHome directory.
Note:
The upgradeHome directory is needed on each Network Processor server on which you intend to install the new release of IP Service Activator, for the Network Processor upgrade (npUpgrade) process. You also need the directory in case you need to re-run the npUpgrade procedure later.To back up custom configuration policies and cartridges:
Copy custom service cartridges from the following path:
Service_Activator_home/lib/java-lib/cartridges/type/ServiceCartridges/
to a backup location. Where type is the cartridge type, for example, Cisco or Brocade. See IP Service Activator SDK Service Cartridge Developer Guide for more information.
Note:
Only back up custom service cartridgesCopy custom base cartridges from the following path:
Service_Activator_home/lib/java-lib/cartridges/type
to a backup location. Where type is the cartridge type, for example, Cisco or Brocade. See IP Service Activator SDK Service Cartridge Developer Guide for more information.
Note:
Only back up custom base cartridgesCopy custom cartridge configuration policies from the following path:
Service_Activator_home/lib/java-lib/configurationPolicies
to a backup location.
Note:
Only back up custom configuration policiesBack up the Service_Activator_home directory and all its contents.
Note:
The system must be shut down before you back up, in case of an upgrade failure.Files from these backups are needed to complete some of the upgrade steps and to reverse the upgrade in case of an upgrade failure.
Table 8-2 identifies some of the important backed up files from Network Processor hosts.
Table 8-2 Important Backed Up Files From Network Processor Hosts
| Files from Network Processor hosts | Location on the Network Processor host |
|---|---|
|
networkprocessor |
Service_Activator_home/bin/ |
|
MIPSA_registry.xml |
Service_Activator_home/Config/networkProcessor/ |
|
Capabilities files (for example: cisco12K_10K.xml juniper_M.xml) |
Service_Activator_home/Config/networkProcessor/com/metasolv/serviceactivator/cartridges/vendor/capabilities/XMLfile |
|
Options files |
Service_Activator_home/Config/networkProcessor/com/metasolv/serviceactivator/cartridges/vendor/option_file |
|
Pre-check files |
Service_Activator_home/Config/networkProcessor/com/metasolv/serviceactivator/cartridges/vendor/pre_check/pre-check_file |
|
AutoDiscovery.cfg |
Service_Activator_home/Config/ |
|
cman.cfg |
Service_Activator_home/Config/ |
|
logging.properties default.properties ErrorMessages.xml SuccessMessages.xml |
Service_Activator_home/Config/networkProcessor/com/metasolv/serviceactivator/networkprocessor |
Table 8-3 identifies some of the important backed up files from Policy Server hosts.
Table 8-3 Important Backed Up Files From Policy Server Hosts
| Files from Policy Server hosts | Location on the host |
|---|---|
|
policy_server.cfg |
Service_Activator_home/Config |
|
system_limits.cfg |
Service_Activator_home/Config |
|
AutoDiscovery.cfg |
Service_Activator_home/Config |
|
cman.cfg |
Service_Activator_home/Config |
|
config directory |
Service_Activator_home/modules |
If you are installing in the same location as the previous installation, follow these general steps. For more specific information, see the relevant sections.
Note:
Your system is still shut down when you proceed with upgrading steps.Note:
This section is to upgrade IP Service Activator when the old and new releases are in the same location. If you want to upgrade IP Service Activator where the new release is in a different location, see "Upgrading IP Service Activator to a New Location".To upgrade IP Service Activator to the latest release:
Install the new release of IP Service Activator (and all necessary components) using the Oracle Universal Installer. The installation is documented in "Installing IP Service Activator".
Note:
Because you are installing in the same location, the Service_Activator_home/config directory; Service_Activator_home/modules/config directories; and Service_Activator_home/upgrade_home directory are preserved from the previous installation.At the end of the installation procedure, you will be asked if you want to run the Configuration GUI. The Configuration GUI is used during the upgrade procedure to configure many system options. However, you should be aware that additional customizations may be needed for some of the files that the tool manages, and also for files that the Configuration GUI does not affect.
Run the Configuration GUI, setting parameters as described in "Updating Customizations".
For more information about the Configuration GUI, see IP Service Activator System Administrator's Guide.
Update the data and commit.
Update the MIPSA registry. See "Updating Cartridge Registry (MIPSA_registry.xml)".
Update capabilities, as needed. See "Updating Capabilities".
Update options, as needed. See "Updating Options".
Upgrade custom cartridges, if required.
Run npUpgrade. For more information, see "Running npUpgrade: Network Processor Upgrade Script".
Run dbUpgrade. For more information, see "Running dbUpgrade to Upgrade the Database".
Run Integrity Checker. Validate that there are no new errors from the old system. See IP Service Activator System Administrator's Guide for more information about running the Integrity Checker.
Manually run the Configuration GUI and configure your system:
Service_Activator_home/bin/ConfigGUI.sh
Ensure that the npUpgrade tool parameters are set:
Set the processes value to the number of processor cores on the server.
Set the memory amount (which is expressed in MB) to 2048MB (that is, 2GB).
Set the Network Processor Model Source to indicate where the network processor data was stored in the old IP Service Activator software.
Ensure that the database login parameters are set.
To update customizations:
Using the backed up Service_Activator_home/Config and Service_Activator_home/modules/Config directories, merge your old configuration files, such as cman.cfg, and so on, into the new files.
This ensures that you preserve any customized old configuration within the new configuration or settings.
After running the Configuration GUI as part of the upgrade process, you must propagate any system configuration file customizations that are not managed by the Configuration GUI (if any) by manually editing the new versions of the files.
See "Network Processor Upgrade Directory Structure" for more information.
Note:
Capabilities files, options files, and the cartridge registry are covered in a later step.As well, you need to produce a new, merged version of the Service_Activator_home/Config/AutoDiscovery.cfg file. In the new file:
New entries that were added to the new file must remain in the new, merged file
Added and changed entries that were in the old file must be propagated to the new, merged file.
Entries commented out from the old file must also be commented out in the new, merged file.
Produce new, merged versions of other system configuration files. Compare the backed up version of the following files against the new installed versions. For each file, identify any custom changes that you need to carry forward (that you need to merge into the 7.2.0 version of the file). You can refer to the backed up versions of the files you created in "Backing Up IP Service Activator".
Files included in this process for network processor installations only:
Capabilities files. Once updated, copy these files to the following directory:
Service_Activator_home/ Config/networkProcessor/com/metasolv/serviceactivator/cartridges/vendor/capabilities/XMLfile
See "Updating Capabilities" for more information on upgrading capabilities files.
Any other files configuration files including those that were extracted from the cartridge .jar files and customized including:
logging.properties
default.properties
ErrorMessages.xml
SuccessMessages.xml
Note:
If your IP Service Activator old installation does not use the network processor, run the dbUpgrade script. For information, see "Running dbUpgrade to Upgrade the Database".To update the MIPSA registry:
Inspect the backed up version of the custom MIPSA_registry.xml file (from the Service_Activator_home/Config/NetworkProcessor directory) for custom entries.
If you have the Cisco IOS Cartridge, use the Cisco Cartridge Configuration Utility to generate an initial MIPSA_registry.xml file. For more information, see IP Service Activator Cisco IOS Cartridge Guide.
Create a copy of this file and edit the copy to create the new version of the MIPSA_registry.xml file that is compatible with the new IP Service Activator version. (See IP Service Activator System Administrator's Guide for details on creating or editing a cartridge registry file.) Following is an example for regex used in MIPSA_registry.xml:
<osVersion useRegex="true">(12.2.*\)T.*|12.2.*\)ZH.*|12.2.*\)B)</osVersion>
Remove any cartridge units that do not point to custom capabilities files. That is, keep only the custom references.
Update the retained custom entries so that each entry properly points to the intended CU (Cartridge Unit) directory. You can see the new version of the cartridge unit structure in the sample MIPSA_registry.xml file in:
Service_Activator_home/samples/vendorSampleRegistry.
Edit the capabilities files for devices that used CU3 or CU5 cartridge units. For more information, see "Updating Capabilities".
Edit the options for devices that used CU3 or CU5 cartridge units. For more information, see "Updating Options".
Note:
In the MIPSA_registry.xml file, this '<dmMigration>com.metasolv.serviceactivator.cartridges.cisco.Migration.DmMigrator.class</dmMigration>', is not compatible with IP Service Activator 7.0 or later. If this statement exists, ensure you remove it from the file. The new version of the MIPSA_registry.xml file should not include it in any of the cartridge units.Note:
"Updating Options" is mandatory when upgrading the Cisco IOS cartridge; otherwise, it is optional.After the MIPSA_registry.xml file is updated, copy the capabilities files to the locations as specified in the MIPSA_registry.xml file. The default location for capabilities files is Service_Activator_home/Config/networkProcessor.
Note:
If you are using IPv6 functionality, see IP Service Activator Installation Guide for release 5.2.4 for more information about consolidating capabilities.You need to produce a new, merged version of the capabilities files. In the new files:
New entries that were added to the new files must remain in the new, merged files.
Added and changed entries that were in the old files must be propagated to the new, merged files.
Entries commented out from the old files must also be commented out in the new, merged files.
Some capabilities are now unused and will cause a validation failure of the capabilities.xsd file (at the device level). In order to avoid this, compare the capabilities in your old files with the capabilities in the capabilities.vsd file and remove any capabilities that are not in the capabilities.xsd file.
The following are examples of now unused capabilities:
- <caps:supports_gre_vpns>
 - <caps:ike_support>
   - <caps:ike_algorithms_supported>
   - <caps:dh_groups_supported>
   - <caps:supports_shared_keys>
 - <caps:ipsec_support>
   - <caps:esp_algorithms_supported>
   - <caps:ah_algorithms_supported>
   - <caps:compression_algorithms_supported>
   - <caps:ipsec_modes_supported>
 - <caps:ca_support>
   - <caps:supports_ca>
   - <caps:supports_ca_trusted_roots>
The error raised if capabilities files contain the above lines is similar to the example below:
20081119-165638|255|WARN|[main] (RegistryResourceLoader.java:42) - Resource failed validation should be valid:  /opt2/OracleCommunications/ServiceActivator/Config/networkProcessor/cisco_12K_10K.xml:0: error: cvc-complex-type.2.4a: Expected elements 'saa_support@http://www.metasolv.com/serviceactivator/capabilities lasserre_support@http://www.metasolv.com/serviceactivator/capabilities vlan_support@http://www.metasolv.com/serviceactivator/capabilities' instead of 'supports_gre_vpns@http://www.metasolv.com/serviceactivator/capabilities' here in element device@http://www.metasolv.com/serviceactivator/capabilities
. . .
20081119-165638|257|WARN|[main] (CartridgeLoader.java:1395) - Registration failure, registration entry: (resource=file:/opt2/OracleCommunications/ServiceActivator/Config/networkProcessor/MIPSA_registry.xml resourceName=com.metasolv.serviceactivator.cartridges.cisco.units.cu1.10008.12.0 line:-1).  Unable to load file "cisco_12K_10K.xml"
You must edit the options files for devices that used CU3 or CU5 cartridge units so that the behavior of these devices under the new IP Service Activator installation is consistent with the behavior under the old IP Service Activator installation.
See "Options Changes" to determine what the new options should be so that you maintain the behavior of the old IP Service Activator system after upgrading to the new IP Service Activator system.
To update options:
Locate the sample options file in the directory:
Service_Activator_home/samples/vendorSampleRegistry.
Make a copy of this options file and store it in the subdirectory:
Service_Activator_home/Config/networkProcessor.
Edit the copy to customize the options (for example, QoS, VPN, and SAA options) applicable to your implementation of IP Service Activator. Save the changes.
You may need to create and edit a number of options files applicable to different cartridge units.
You need to produce a new, merged version of the options files. In the new files:
New entries that were added to the new files must remain in the new, merged files.
Added and changed entries that were in the old files must be propagated to the new, merged files.
Entries commented out from the old files must also be commented out in the new, merged files.
Note:
This cisco IOS cartridge option is obsolete: cartridge.cisco.saa.rtr.reactionConfig.upperThreshhold.isSupported. The new, merged version of the cisco options files should not include it.Note:
Refer to Appendix A in the appropriate Cartridge Guide for the options.If you are deploying the Cisco IOS Cartridge, you must generate the required options files. For more information, see the Cisco Cartridge Configuration Utility procedures in IP Service Activator Cisco IOS Cartridge Guide.
Edit the options entries in your custom file to point to the applicable customized options file for each device.
Save the changes.
An example options entry (in bold text) follows:
<cartridgeUnit>
<name>[your_company_name].cisco.units.cu3.7505.12.2(25)S</name>
<driverType>cisco</driverType>
<deviceType>Cisco 7505</deviceType>
<osVersion>12.2(25)S</osVersion>
:
<capabilities>com/metasolv/serviceactivator/cartridges/cisco/capabilities/cisco_default.xml</capabilities>
<options>custom_options/cisco/7500-12.2_25_S_QoSoptions.xml</options>
:
</cartridgeUnit>
Remove the cartridge.cisco.saa.actionType.Nmvt.isDefault entry from the existing cisco options files before upgrading IP Service Activator.
Any previous changes made to the Service_Activator_home/Config/cisco_options.csv need to be reflected in the new cisco_options.csv files before regenerating the options using the Cisco Cartridge Configuration Utility. You must merge any changes to the version of the file that you backed up using the procedure in "Backing Up IP Service Activator".
You can upgrade a template created in schema versions 1, 2, or 3. Do this by exporting the file and then re-importing the file back into a new CTM template.
See the IP Service Activator online Help Configuration Template Module for information about how to import and export a template file.
The Network Processor upgrade and database upgrade tools are installed with the Installer for IP Service Activator 7.2. Perform the activities in this section to configure upgrade properties, and to run the upgrade.
If you are not running the Network Processor, you can run the dbUpgrade script. For more information, see "Running dbUpgrade to Upgrade the Database".
The npUpgrade script runs against the database. If you have the IP Service Activator Network Processor installed on multiple servers:
If they all use the same database connection parameters (as specified in the Configuration GUI), you need to run npUpgrade only once.
If they use different database connection parameters, you need to repeat the Network Processor Upgrade once for each Network Processor database.
This section provides information about running the Network Processor upgrade script.
Note:
In order to improve the performance of this process, set the log level for npUpgrade to info in the following file:Config/networkProcessor/upgradeTool/logging.properties
To run the npUpgrade script:
Run the npUpgrade script.
As the IPSA_admin_unix_account user, enter:
cd Service_Activator_home/bin
npUpgrade.sh -all
Important:
Do not run the npUpgrade script unless all required cartridges and service cartridges are installed. For example, if you are upgrading from an IP Service Activator Network Processor installation, which included the syslog service cartridge (which is installed by Configuration Management software), install Configuration Management 7.2 prior to running the npUpgrade script.Tip:
Troubleshooting tip: You may see the following error when you run the npUpgrade script:java.lang.ClassNotFoundException: com.metasolv.serviceactivator.cartridges.cisco.migration.DmMigrator
To avoid this error, remove all instances of
<dmMigration>com.metasolv.serviceactivator.cartridges.cisco.Migration.DmMigrator.class</dmMigration>
from Service_Activator_home/Config/networkProcessor/MIPSA_registry.xml.
Review the Service_Activator_home/upgradeHome/upgrade/reports/upgradeReport.txt file for errors.
Check the upgradetool.log for errors.
Refer to the reference sections at the end of this chapter for information about how to handle errors you encounter in the upgrade report or log files:
To analyze the Device Audit files for those devices identified as upgrade failures:
Copy the contents of the upgrade_home/upgrade/failures directory to a separate workstation with a browser.
For each device identified as an upgrade failure, open its DeviceAudit.xml file, check for red text, and analyze it against the failure cases listed in "Performing Post-Upgrade Data Cleanup". (Certain red text entries are acceptable.)
Important:
If the upgrade of some devices fails, the devices must be unmanaged in IP Service Activator before the next Network Processor restart. To unmanage the failed devices, start all the IP Service Activator components except the Network Processor(s), unmanage the devices that have failed upgrades, then start the Network Processor(s). You can then deal individually with the devices with failed upgrades without affecting other devices. To obtain help dealing with these failures, Oracle recommends that you contact Oracle GCS for assistance using the service request process. Attach a .zip file containing the contents of the upgrade_home/upgrade/failures directory to the service request.When problem devices have been fixed, you can use the npUpgrade script with appropriate options to upgrade individual devices, or a specified list of devices. For example:
Usage: npUpgrade.sh [-all] | [-device ipAddress1,ipAddress2,*] | [-file filename] | [-help]

Example 1: npUpgrade.sh -device 10.13.3.158,10.13.4.120
where the -device value can be one device IP address, or a comma-separated list of device IP addresses

Example 2: npUpgrade.sh -file <filename>
where <filename> contains a list of device IP addresses, with one IP address per line. <filename> must include the relative path from <upgradeHome>.
This section provides information about running the database upgrade script.
To run the dbUpgrade script:
Run the dbUpgrade script.
Caution:
Do not run the dbUpgrade script unless you backed up your old IP Service Activator data. For information, see "Backing Up IP Service Activator".Run the dbUpgrade database schema upgrade tool as described below to make the required changes to the database for upgrade to the new IP Service Activator release.
Truncating Transactions: If you decided to save committed transaction records, use the -truncate true option when you run the dbUpgrade script. This option keeps a database record of the archived transactions but removes the active operations associated with them, to reduce the database storage required. If you have already deleted the committed transaction records, then you do not need to use this option.
To run the database upgrade tool:
Do the following:
cd Service_Activator_home/bin
dbUpgrade.sh [required/optional parameters - see Table 8-4]
Table 8-4 Database Upgrade Tool Parameters
| dbUpgrade Parameter | Value | Information | Example |
|---|---|---|---|
|
-dbHost |
DatabaseHostname |
required |
localhost |
|
-dbUser |
DatabaseUsername |
required |
admin |
|
-dbPass |
DatabasePassword |
required |
admin |
|
[-dbPort] |
DatabasePort |
optional |
1521 |
|
[-dbSid] |
DatabaseSID |
optional |
IPSA.WORLD |
|
[-tmpDir] |
TempStorageDirectory |
optional |
default = WorkingData/dbUpgrade |
|
[-truncate] |
true|false |
optional ”true” truncates transactions; default = false |
false |
Ensure that dbUpgrade connects and runs. This may take a while. Check the console window for any errors and updates. Look for the result Completed in the messages, which indicates the database upgrade is done.
Note:
The dbUpgrade tool upgrades the database and any installed Configuration Policies.If your old IP Service Activator installation uses device driver technology, Oracle recommends that you contact Oracle GCS and create a support request to obtain assistance with updating your capabilities files. Attach the device driver mechanism files and the autodiscovery.cfg file from the old installation.
This section describes the configurations and explains the steps you need to take to start the new IP Service Activator system after an upgrade.
Configure device drivers for NoCommandDelivery mode.
Device drivers should be configured initially to start with the NoCommandDelivery flag enabled. (See IP Service Activator Juniper-M Device Driver Guide for details about how to do this.) This causes configuration modification commands to be sent to log files and not to the devices. This way, you can monitor for unwanted configuration changes upon initial startup.
Configure network processors for Offline Test mode.
Network processors should be configured initially to start in Offline Test mode. For more information, see ”Command Delivery Modes” in IP Service Activator System Administrator's Guide.
As the IPSA_admin_unix_account user, start the new IP Service Activator server software:
naming_service_script start
component_manager_script start
To start the naming service, run the following command:
ipsans start
To start the component manager, run the following command:
ipsacm start
To view the processes running for IP Service Activator, run the following command:
ipsaps
The the scripts ipsans and ipsacm are located at Service_Activator_home/bin.
Launch the new IP Service Activator client.
If you set the transaction archive limit to zero, reset the transaction archive limit:
In the IP Service Activator client, click Tools, and then select Options.
On the Options dialog box, Transactions page, set the Transactions archive limit to a number appropriate to your installation and click OK.
Commit the transaction.
Analyze the audit trails for both the device drivers and network processors
Copy the contents of the /opt/OracleCommunications/ServiceActivator/AuditTrails directory to a separate workstation with a browser.
For each device identified as an upgrade failure, open its DeviceAudit.xml file, check for red text, and analyze it against the failure cases listed in the following section "Performing Post-Upgrade Data Cleanup". (Certain red text entries are acceptable.)
Perform a network audit of all network processor devices.
On Solaris or Linux, run the auditdevice script with the -all parameter.
On a Windows machine, run auditdevice.bat with the -all parameter.
Refer to IP Service Activator System Administrator's Guide for details about auditing.
Review all discrepancies for acceptability for your network as in step 4.
Re-enable the IP Service Activator users that were disabled before starting the upgrade.
Manage devices which are in Offline Maintenance mode.
This causes the Network Processor to make any final adjustments to the device model for each device.
It may also raise faults that identify Interface Description mismatches.
Note:
At this point, the following error message may appear:"Internal Failure, could not find any failed associations to be isolated".
You can safely ignore this error message, but you must examine any other error messages that appear and fix the indicated problems.
If Interface Description mismatches are identified, perform the activity described in "Cleaning Up Interface Description Mismatches".
Examine the contents of the audit trail file for each vendor cartridge to ensure that the upgrade is complete. The startup should complete but you should not see any activity in the audit trails. These files are stored in the Service_Activator_home/AuditTrails directory.
Do "Performing Post-Upgrade Data Cleanup".
The IP Service Activator upgrade procedure is now completed.
This section describes how to upgrade an IP Service Activator installation from one server to another. The old and new servers can be on the same or different platforms. Note that Solaris 32-bit is not supported in IPSA 7.2.0.
To upgrade IP Service Activator to a new location:
Install the new version of IP Service Activator (and all necessary components) on a Solaris or Linux server using the Oracle Universal Installer (Solaris or Linux version). For more information about installing IP Service Activator, see "Installing IP Service Activator on an Oracle Solaris or Linux Server". For general installation information, see "Installing IP Service Activator".
Note:
Do not run the Configuration GUI when prompted by the Installer. You must restore your Config directory to the new installation directory before running the tool.Copy the Service_Activator_home/Config directory and Service_Activator_home/modules/config directories from the old server to the new Service_Activator_home directory on the new server.
Copy the Service_Activator_home/WorkingData directory from the old server into the new Service_Activator_home/WorkingData directory on the new server.
Remove omninames* from Service_Activator_home/WorkingData on the new server.
Manually run the Configuration GUI to configure your system and commit changes to the host.
(Optional) Update the CORBA parameters if the new server IP address has changed. Update the database parameters if the database was imported to a new database user. Update the upgrade home path to the new installation location. Service_Activator_home/bin/configGUI.sh
Note:
If you are upgrading your IP Service Activator installation and migrating to another platform at the same time, follow the upgrade instructions, and ensure that you restore your Service_Activator_home/upgradeHome directory from your backup to the new Service_Activator_home directory on the new server.To configure the connection to the new server:
From Windows, click Start, and then All Programs.
From the Oracle - OracleCommunications menu, select Service Activator, and then Configuration GUI (Local Host).
Click OK.
An information message indicates that the configuration is successfully loaded for the specified host.
Double-click the localhost folder.
Click CORBA.
Enter values for naming service IP address, and naming service port for connection to the new server.
This section includes recommended data cleanup activities to be performed after upgrade, if they apply to your system.
The Interface Description attribute can be set in either or both of two places:
in an Interface Creation Configuration Policy.
in the Site properties - Addressing page.
If set in both places, the interface descriptions must match or a fault is raised.
To solve this issue:
Check if the interface description set on the Interface Creation Configuration Policy matches the interface description for the same interface set on the Site properties - Addressing page.
Remove the contents of the Interface Description field on the Interface Creation Configuration Policy, -OR- on the Site properties - Addressing page, and submit the change.
Repeat for each mismatch identified.
If required, you can roll back the upgrade to the new IP Service Activator release and return the system to its previous state in the old IP Service Activator release.
You must have the Installer for the old IP Service Activator release to which you want to revert.
You must have taken proper backups of your old IP Service Activator system prior to running npSnapshot as is recommended in the upgrade procedure.
To roll back the upgrade:
Back up the new IP Service Activator database and the IP Service Activator installation directory (by default
opt/OracleCommunications/ServiceActivator/*) for diagnostic use.
Uninstall the new IP Service Activator software.
Delete the new install directories using rm -r (by default
opt/OracleCommunications/ServiceActivator).
Install the old IP Service Activator software. Include all required components.
Delete the directories that were created by the old IP Service Activator installation in Service_Activator_home. The reason for this is that you will be restoring these directories from your backup.
Restore /opt/Orchestream and /var/Orchestream from your old IP Service Activator backup.
Drop the old IP Service Activator database user.
Restore the old IP Service Activator Oracle Database information.
For example:
> imp
Import: Release 9.2.0.7.0 - Production on Fri Oct 20 14:31:39 2006
Copyright (c) 1982, 2002, Oracle Corporation. All rights reserved.
Username: <your_ipsa_user>
Password: <your_passwd>
Connected to: Oracle9i Enterprise Edition Release 9.2.0.7.0 - Production
With the Partitioning, OLAP and Oracle Data Mining options
JServer Release 9.2.0.7.0 - Production
Import file: <dmp_filename> > 510db.dmp
Start the system using the same precautions and steps outlined in "Starting the New IP Service Activator System".
This section describes the options changes in the different releases of IP Service Activator.
With release 5.2.4, the Weighted Round Robin (WRR) hardware queuing mechanism configuration policy was consolidated into CU1. If your deployment includes Cisco cartridges which use a CU4 cartridge unit and a WRR custom queuing configuration policy, replace all instances of CU4 with CU1 in the MIPSA_registry.xml file.
In previous releases:
Cisco options cartridge.cisco.qos.atmPvcVciRange.minimum and cartridge.cisco.qos.atmPvcVciRange.maximum took values between 1 and 65,535 (inclusive). They now take values between 0 and 65,535 (inclusive).
cartridge.cisco.qos.atmPvcVciRange.minimum defaulted to 0. It now defaults to 1
cartridge.cisco.saa.actionType.Nmvt.isDefault existed. It has now been removed
Table 8-5 lists the new Cisco cartridge options that were added in IP Service Activator 5.2.4. Add them to your options files with settings appropriate to your needs.
Table 8-5 Cisco Cartridge Unit Options added in Version 5.2.4
| Name | Values | Notes |
|---|---|---|
|
cartridge.cisco.vpn.ospf.maximumPath.minimum |
Integer |
1-16 |
|
cartridge.cisco.vpn.ospf.maximumPath.maximum |
Integer |
1-16 |
|
cartridge.cisco.qos.phbwfq.dropStrategy.wredType |
NA |
NA |
|
cartridge.cisco.qos.policingRule.rateLimit.roundoffCIRValue |
NA |
NA |
|
cartridge.cisco.qos.policingRule.rateLimit.roundoffCIRFactor |
NA |
NA |
|
cartridge.cisco.netflow.inactiveTimeout.immediately.isSupported |
Boolean |
NA |
|
cartridge.cisco.ppp.multilink.fragment.useDisableFlag |
Boolean |
NA |
|
cartridge.cisco.qos.classmap.useIPv6AclForMatchAny |
NA |
NA |
|
cartridge.cisco.qos.mapclass.deployOnInterface |
Boolean |
NA |
|
cisco.vlan.vlanIds.isDuplicateAllowed |
Boolean |
NA |
|
cartridge.cisco.vlan.mgmtVlanInterface.validate |
Boolean |
NA |
|
cartridge.cisco.vlan.portChars.xlflowControl.isSupported |
Boolean |
NA |
|
cartridge.cisco.vlan.portChars.udldEnable |
Boolean |
NA |
|
cartridge.cisco.vlan.portChars.srrQueueBandwidthShape.isSupported |
Boolean |
NA |
|
cartridge.cisco.vlan.portChars.mdixAuto.isSupported |
Boolean |
NA |
|
cartridge.cisco.vlan.portChars.speed.nonegotiate.isSupported |
Boolean |
NA |
|
cartridge.cisco.vlan.portChars.defaultSpeed.isSupported |
Boolean |
NA |
|
cartridge.cisco.vlan.portChars.negotiation.isSupported |
Boolean |
NA |
|
cartridge.cisco.vlan.vlanDefinition.isReduced |
Boolean |
NA |
|
cartridge.cisco.vpn.ospf.spfthrottle.commandSyntax |
NA |
NA |
|
cartridge.cisco.controller.au4tug3.isSupported |
NA |
NA |
|
cartridge.cisco.interface.suppressNoIPv6Enable |
NA |
NA |
There are no changes to the following options in IP Service Activator 5.2.4:
CatOS
JuniperXML
AlcatelSAMQoS
Cisco Syslog
Table 8-6 lists the new Cisco Cartridge options that were added in IP Service Activator 7.0.0. Add them to your options files with settings appropriate to your needs.
Table 8-6 Cisco Cartridge Unit Options Added in Version 7.0.0
| Name | Values | Notes |
|---|---|---|
|
cartridge.cisco.qos.policymap.police.twoRate.lineFormat |
String |
singleLine, multiLine default: multiLine |
|
cartridge.cisco.qos.policymap.police.percent.defaultCBSValue |
Integer |
1-2000 or -1 |
|
cartridge.cisco.qos.policymap.police.percent.defaultEBSValue |
Integer |
NA |
|
cartridge.cisco.qos.policymap.wredRemoveWithType |
Boolean |
default: false |
|
cartridge.cisco.qos.policymap.police.SRsingleLine.percentAndTimeBasedSyntax.isSupported |
Boolean |
default: false |
|
cartridge.cisco.qos.policymap.police.cisco10000SeriesSyntax.isSupported |
Boolean |
default: false |
|
cartridge.cisco.vpn.vrf.defaultVrfFormat |
String |
IP_VRF, MP_VRF default: IP_VRF |
|
cartridge.cisco.bgpce.ipv4.configurationMode |
String |
Router, Address-Family default: Router |
|
cartridge.cisco.alias.vrf.allowAliasIpVrf |
Boolean |
default: true |
|
cartridge.cisco.routing.allowNoSynchronization |
Boolean |
default: true |
This section contains helpful reference information for the upgrade process.
The default.properties file contains the IP Service Activator database login information and the directory location upgrade_home for the Network Processor Upgrade tool output. Device models are stored in an Oracle Database table. See sample content for various versions of the file.
Note:
After npSnapshot.sh has completed successfully, in a new window as IPSA_admin_unix_account user, save a copy of the Service_Activator_home/upgrade_home directory. The upgrade_home directory is needed on each Network Processor server, on which the new version of IP Service Activator software will be installed, for the Network Processor upgrade (npUpgrade) process. You will also need it in case you need to re-run the npUpgrade procedure later.Example 8-1 Example IP Service Activator default.properties File Content
###
#Copyright (c) 2008 Oracle. All rights reserved. Oracle is a trademark
# of Oracle Corporation and/or its affiliates. Other names may be trademarks
# of their respective owners.
#
# Auto-Generated by the IPSA Configuration Tool [ 2009-04-28 05:36:14 ]
###
# Full path name of the home directory that will hold the "upgrade" sub-directories.
upgradeHome = /opt/OracleCommunications/ServiceActivator/upgradeHome

# deviceList retrieval method = 'database' or explicit list (use one or the other). Explicit list: oid,name,ipa:oid,name,ipa:oid,name,ipa:oid,name,ipa:oid,name,ipa
deviceList = database

# Location of last device models to be upgraded:  'files' (if stored in cacheDD directory),  'database' (if stored in np_lds table) or  'np_ldm' (if stored in np_ldm table).
npModelSource = database

# Checks that saxon is the correct version  as is hardcoded in the network processor.
disableEnvCheck = false

# Number of concurrent processes (should be less than the number of processors)
processes = 2

# The total amount of memory (in MB) to be used by all children processes  (it will be divided among them)
totalMemory = 2048
Note:
The database details are read from the db.properties file. The db.properties file is created when you run the Configuration GUI.The logging.properties file contains the log file location (which defaults to Service_Activator_home/logs/upgradetool*.log) and the desired log level. The following log levels are commonly used:
error = any exceptions or null variable errors
info = tool progress and results
debug = more details
There may be some errors flagged in the audit reports by npUpgrade.sh which do not reflect problems which need resolution.
Audit failures listed below can be ignored.
You can ignore the configurations similar to the following displayed in red:
###ACTUAL VALUE ON DEVICE: t1-7/0/0:12 ###
next-hop t1-7/0/0:12.0;
The next-hop command changed from having 0:12 at the end to having 0:12.0. Juniper interfaces should be labelled with the subinterface of 0, so no changes are needed.
You can ignore the configurations similar to the following displayed in red:
ip load-sharing per-packet
If you had spaces in your old descriptions, they will be removed in the new descriptions. You can ignore the configurations similar to the following displayed in red:
description ... SD:123456789; UD:...
and the configurations similar to the following displayed in blue:
description ... SD:123456789;UD:...
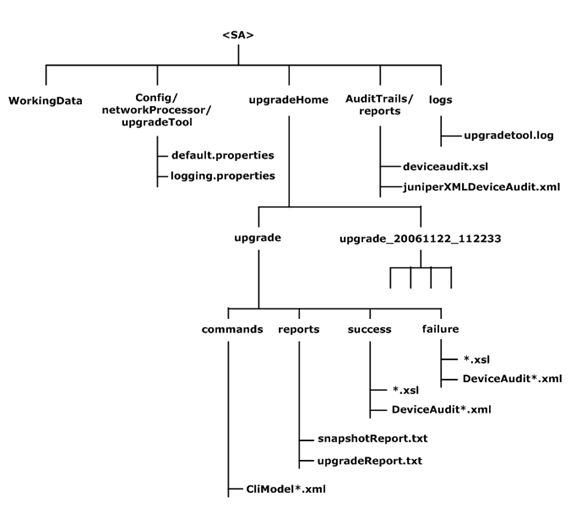
Figure 8-3 shows the directory structure of the files involved in the upgrade (assuming default file locations).
Figure 8-3 Network Processor Upgrade Directory Structure
Installing an IP Service Activator patch follows the same process as the original installation. You can customize the patch installation by selecting the Custom installation type. Components that are already installed are listed on a summary page and are not re-installed.
Before installing a patch:
Back up the Oracle Database. See "Backing Up IP Service Activator".
Decide whether to delete or save a truncated version of all committed transaction to avoid generating core files when IP Service Activator restarts. See step 5 in"Preparing to Upgrade".
To install a patch:
Login to Oracle Support at:
Select the Patches & Updates tab.
Search for the patch number and download the latest patch to the Solaris or Linux server (which has the IP Service Activator server installed) or Windows host (which has IP Service Activator client).
Stop IP Service Activator components.
Unzip the patch.
In the Solaris or Linux console, run the following command:
unzip IPServiceActivator-7.x.x.x.xBuild-xxx-.zip
In Windows, unzip the IPServiceActivator-7.x.x.x.xBuild-xxx-win.zip file.
The IP Service Activator directory is created.
In Windows, run setup.exe in the install directory to launch the Oracle Universal Installer and do the client upgrade and installation.
In Solaris and Linux, run the runInstaller in Disk1/install and complete the server upgrade and installation.
Select the installation type you want. To upgrade or reinstall components, select the Custom installation type and click the Required Components check box.
Note:
You can use silent installation to upgrade IP Service Activator. Previously recorded response files can be used to do the upgrade, or the response template can be used to install the patch. For information about using silent installation, see "About Silent Installations".After you install an IP Service Activator patch, you must ensure that the system is using the latest configuration policy definitions.
To update a configuration policy definition:
In the Global Setup window, select a domain in the Hierarchy pane.
Right-click Domain and select Properties.
In the Domain dialog box, select the Setup property page.
Click Browse.
Select the policy file that is related to the enhanced configuration policy and click Open.
Click Load.
The configuration policy loads and a confirmation dialog box opens.
Click OK.
The confirmation dialog box closes.
Click OK.
The Domain dialog box closes.
Commit the transaction.
Click the domain to open it.
Select the Policy tab and expand the Policy Types folder.
Find the sub-folder where your policy type is located.
For example, to locate LSP Policy Type, go to Policy Types, Service, LSP, LSP Tunnel.
Right-click the Policy Type and select Properties.
The Policy Types dialog box opens.
Click Import HTML.
Select the HTML file for the configuration policy that you want to import, and then click Open.
Click OK.
Commit the transaction.
|
Copyright © 2011, 2014, Oracle and/or its affiliates. All rights reserved. Legal Notices |
|