| Oracle® Communications IP Service Activator System Administrator's Guide Release 7.2 E39366-01 |
|
|
PDF · Mobi · ePub |
| Oracle® Communications IP Service Activator System Administrator's Guide Release 7.2 E39366-01 |
|
|
PDF · Mobi · ePub |
This chapter explains tasks you need to do immediately after installation to set up user groups and users. It also describes other menu setup tasks and tools.
Oracle Communications IP Service Activator allows you to control who has access to the system, and at what level. Access to the IP Service Activator user interface is controlled using user names and passwords. Every user who wants to gain access must be set up as a user with a user name and password. The ability to create new users and assign passwords is restricted to users with Super User access, the highest access level in IP Service Activator.
The actions a user can perform in IP Service Activator are dictated by the group to which he or she belongs. Every user is a member of a user group and the access rights specified for the group apply to the members of the group. The following group access levels are available:
Read Only: group members can view objects but not modify them
Read Write: group members may be able to view and/or modify objects
Super User: group members can view and modify all objects
For Read Write groups, you can specify exactly which elements of IP Service Activator its members can view and modify using permissions. This enables you to limit access according to the role a user performs, or the customer accounts he or she is managing. When you first install IP Service Activator, you might need to create a number of Read Write groups to apply the necessary access levels to all users.
Note that a user's access level affects the appearance of the user interface. For example, a Read Write user with access barred to policy cannot see the Policy tab or access menu items that relate to policy.
IP Service Activator also offers a concept of object ownership that allows a user to own specific objects and set permissions that apply to themselves, the group to which they belong, and all other users.
Figure 4-1 illustrates the relationship between user groups, users, and permissions.
Figure 4-1 Ownership Relationships Between User Groups, Users, and Permissions
You can set up user groups with the following access rights:
Read Only: Users can view all parts of IP Service Activator's object model but they cannot make any changes. Permissions cannot be set for a Read Only group.
Read Write: Users can view all or selected parts of IP Service Activator's object model. Group permissions may be defined that restrict the actions that group members can perform.
Super User: Users can view all parts of IP Service Activator's object model and perform unlimited actions. Only members of a Super User group can create new users and perform system configuration. Permissions cannot be set for a Super User group.
The access rights that are set for a Read Write user group apply to all members of the group.
Access rights associated with a Read Write user group can be fine tuned by setting detailed permissions on specific classes of object. These permissions may vary between Read Write groups. For example, one group may restrict its members to Read Only permissions for classes of service while another group may give access to classes of service but restrict access to VPN creation.
Note:
User groups can only be created by users who have Super User access.Note:
User groups can only be created by users who have Super User access.Every user in IP Service Activator is a member of a single user group. The level of access a user has to IP Service Activator's commands depends on the group to which he or she belongs. Members of a group that has Read Write access are more restricted in the actions they can perform than members of a group that has Super User access. This difference in access level is reflected in the user interface. IP Service Activator elements to which a user does not have access are hidden from the user. For example, users with restricted access may be unable to view selected tabs and menu options.
It is possible to create a user account that can be used by several users concurrently. So, for example, you can create a guest account that can be used by multiple users to log in to IP Service Activator at the same time.
Note:
Users can only be created by users who have Super User access.There must always be at least one user who has Super User access. IP Service Activator enforces this rule by preventing deletion of the last user with Super User access.
All users access IP Service Activator by username and password. Only users with Super User access can set up passwords.
A user can be forced to change his or her password at the next login to IP Service Activator and the password set to expire after a set number of days.
Note:
Password options are set in two different places.Global password options are set on the User Passwords property page of the Options dialog box. To access this dialog box, select Tools, and then select Options from the main menu of the IP Service Activator User Interface.
See "Creating Rules for Passwords".
Password options for particular users are set by accessing the Password property page of the System User dialog box for the user. To access this dialog box, right-click on the user in the System User Groups folder, and select Properties from the pop-up menu.
It is also possible to create rules for passwords. Users with Super User access can:
Specify the minimum and maximum length for passwords.
Set an expiry period that applies to all passwords.
Specify password complexity.
Specify the number of passwords that IP Service Activator remembers for each user.
Specify the number of login attempts IP Service Activator allows before barring a user. A user with Super User access can reinstate barred users.
Users with Super User access are never barred after successive failed logins, but IP Service Activator records the number of failed logins in the system log file and displays an error message in the current faults pane.
Note:
Passwords and password rules can only be created by users who have Super User access.Permissions define the actions that can be performed on a class of objects or an instance of an object or the ability to perform an operation, such as discovering devices. Permissions can be set at the following levels:
Group level: Super Users can set permissions for groups that have Read Write access rights.
Object level: users with Read Write or Super User access can set permissions on the objects they own. Different permissions can be set for themselves, the group to which they belong and to members of other groups.
Additional attributes of permissions include:
A permission that is set for a Read Write group applies to a class of object (object type). A permission that is set for a specific object applies to that object instance only.
A user who assigns permissions to a previously unowned object assumes ownership of the object by default, or can assign ownership to another user.
To calculate an object's actual permission for a user, the system combines the permission assigned to the object with the permission assigned to its class of objects, for that user.
In the following descriptions, "class of objects" is the same as "object type". Also, "objects of the class" is the same as "instances of an object type". The following permission levels are available:
Denied: the user cannot access the object or class of objects
Read: the user can view the object or class of objects
Link (Reference Only): objects or a class of objects can be linked to (referenced by) other objects, but cannot have other objects linked to them
Link: the user can link the object/class of objects to appropriate objects, and appropriate objects can be linked to the object/class of objects
Modify: the user can modify the object/class of object's properties
Write: combines the Modify and Link permissions
Create: the user has Write permission plus the user can create the class of objects
Execute: the user can perform the operation
For a more detailed description, refer to the IP Service Activator Online Help topic on object permissions. More detailed topics on Link, Link (Reference Only), and Execute are provided later in this section.
Table 4-1 summarizes how each permission level restricts the possible operations on objects:
Table 4-1 Permission Level Restriction Summary
| Permissionlevel | View | Link From | LInk To | Unlink | Modify | Create | Delete | Own |
|---|---|---|---|---|---|---|---|---|
|
Denied |
N |
N |
N |
N |
N |
N |
N |
N |
|
Read Only |
Y |
N |
N |
N |
N |
N |
N |
N |
|
Link (Reference Only) |
Y |
Y |
N |
N |
N |
N |
N |
N |
|
Link |
Y |
Y |
Y |
Y |
N |
N |
N |
N |
|
Modify |
Y |
N |
N |
N |
Y* |
N |
N |
N |
|
Write |
Y |
Y |
Y |
Y |
Y* |
N |
N |
N |
|
Create |
Y |
Y |
Y |
Y |
Y |
Y |
Y |
Y |
*Except the Ownership property page cannot be modified.
Instances of most object types can be owned and permissions can be set, except for the following object types:
User groups and users
Some rule components – 802.1p User Priority, IP Protocols, Packet Markings and Traffic Types
Device types
System logs
The policy server
A user who has been granted Read Only permission on a VPN can view the VPN but cannot link other objects to the VPN or unlink objects from it, modify, create, delete, or own the VPN.
A user who is a member of a Read Write group that has Modify permission on the policy area of the object model can view classes of service and modify their property values. However, the user cannot link the CoS to other objects, unlink existing associations, create, delete, or own classes of service.
Link permission refers to linking the target object to another object and also to linking another object to the target object. This means, for example, that if you have link access for a domain or a site, you can link to these objects without necessarily having permission to modify them.
Users can view objects of the selected class and folders and tabs that contain objects of the class. Objects of the class can be linked to other objects and can have other objects linked to them. Property pages are read-only. Options to create objects of the class are not shown and options to delete objects with this permission are disabled.
Link (Reference Only) is a more restrictive version of the Link permission:
Users can view objects of the selected class and folders and tabs that contain objects of the class.
Objects or classes of objects can be linked to (referenced by) other objects, but cannot have other objects linked to them. The referenced object can be unlinked from the other objects.
Property pages are read-only. Options to create objects of the class are not shown and options to delete objects with this permission are disabled.
When Link (Reference Only) is assigned to a parent object, this permission is not automatically enforced to all children in the hierarchy. The user is responsible for setting and controlling permissions down the hierarchy of objects.
On Ownership property pages of classification groups and compound traffic objects, the Objects below this level inherit the permissions check box does not apply. The children of these objects do not inherit their parents' permission level. This restriction prevents unintended overwriting of the permission on an object [with multiple parents] that inherits different permissions from each parent.
Primary purpose of Link (Reference Only) permission
The unidirectional linkage of this permission maintains the definition of a policy object while using it to create new policy objects. In a common application, users need to use globally defined policy objects to define customer-specific policy data. Link (Reference Only) permission allows users to create a new policy object by referring to an existing policy object, but prevents accidentally changing the existing policy object that could result from linking another object to it.
Follow the recommended usage guidelines to ensure secure access to classification group and traffic type elements.
Usage guidelines for classification groups
Use these Link (Reference Only) permission guidelines to secure the definition of your classification group and classification objects in the GUI:
Create two folders, Folder1 and Folder2.
Set Folder1 permission to Link (Reference Only) and select its ”inherit” check box. (The actual check box label is ”Objects below this level inherit the restrictions”.)
Move all existing top-level classification groups under Folder1.
Set Folder2 permission to Denied.
Under Folder2, create subfolder Subfolder2 with Link (Reference Only) permission and select its Inherit check box.
For each top-level classification group contained in Folder1, link every element of the classification group into Subfolder2. (That is, link every classification, sub-classification group, and sub-classification.)
These guidelines ensure that all elements in any top-level Link (Reference Only) classification group maintain the same permissions. Because inheritance is not supported within classification groups, other users will be unable to overwrite these permissions.
Note that a Link (Reference Only) classification or classification group that either does not have a parent, or does not have a parent with restricted permissions, is in danger of being unlinked from its original location. Placing the classification and classification group objects within restricted folders (according to the above guidelines) provides a secure location for the objects.
Usage guidelines for traffic types
Use these Link (Reference Only) permission guidelines to secure the definition of your traffic type policy objects in the GUI. Note that Traffic Groups behave like traffic folders.
Create 2 traffic groups: Group1 and Group2.
Set Group1 permission to Link (Reference Only) and select its Inherit check box. (The actual check box label is Objects below this level inherit the restrictions.)
Move all existing top-level traffic types and compound traffic under Group1.
Set Group2 permission to Denied.
Under Group2, create subgroup SubGroup2 with Link (Reference Only) permission and select its ”inherit” check box.
For each compound traffic object in Group1, link every traffic type contained in the compound traffic object into SubGroup2 (if the traffic type does not already exist directly under Group1).
These guidelines ensure that all traffic types in any top-level Link (Reference Only) compound traffic object maintain the same permissions.
The Execute permission level can only be set for Read Write groups and applies to:
Loading configuration data (policy files)
Accessing a device via Telnet
Managing a device
Discovering the network
Validating data
Creating site accounts
Finding system components
Saving, merging and committing user transactions
The object permissions assigned to a folder are inherited down to its sub-folders when the Inherit flag (Objects below this level inherit the restrictions check box) is selected. The inherited permission can be overwritten by assigning independent ownership to a sub-folder.
Permissions assigned to a Policy object folder are inherited by the top-level policy objects contained in that folder when the inherit flag is selected. Note that folder permissions are not inherited by classifications contained in a classification group within the folder. Similarly, the permission assigned to a traffic group is not inherited by traffic types contained in a traffic compound within the traffic group.
An object in a folder cannot be moved to another folder unless the user has Create permissions for the object, or the object is un-owned.
The user interface displays information relevant to the permissions that apply to the user group.
If access to an object class (object type) or instance of an object is denied, the object and any folders and tabs that exclusively contain that object are not displayed to the relevant users. In addition, objects do not appear on property pages, menus, and drop-down menus.
Because changes to permissions only take place the next time that a user logs in to IP Service Activator, it is possible for different permissions, and thus different views of the system, to apply to members of the same user group on two user interfaces.
Note:
Permissions set for Read Write groups are calculated and fixed for the duration of a user's login session. Changes to group permissions are not apparent to the group's members until the next time they log into IP Service Activator.Permissions set for an instance of an object are apparent to other users immediately. For information on owning and setting permissions on an object, see "Owning and Setting Permissions on an Object".
We recommend that a system Super User makes changes to permissions only when no other users are logged in. If necessary, the Super User should disable access to the relevant user group while changes are being made (see "Disabling or Re-enabling User Access").
Inheritance of permissions on faults
Note that faults inherit object permissions from the object on which the fault is reported. This ensures that users do not see faults that are reported on objects that they do not have access to.
For a Read Write user who has access to all parts of the system, the IP Service Activator user interface appears as shown in the following illustration.
Figure 4-2 IP Service Activator GUI: Topology View with Full User Access
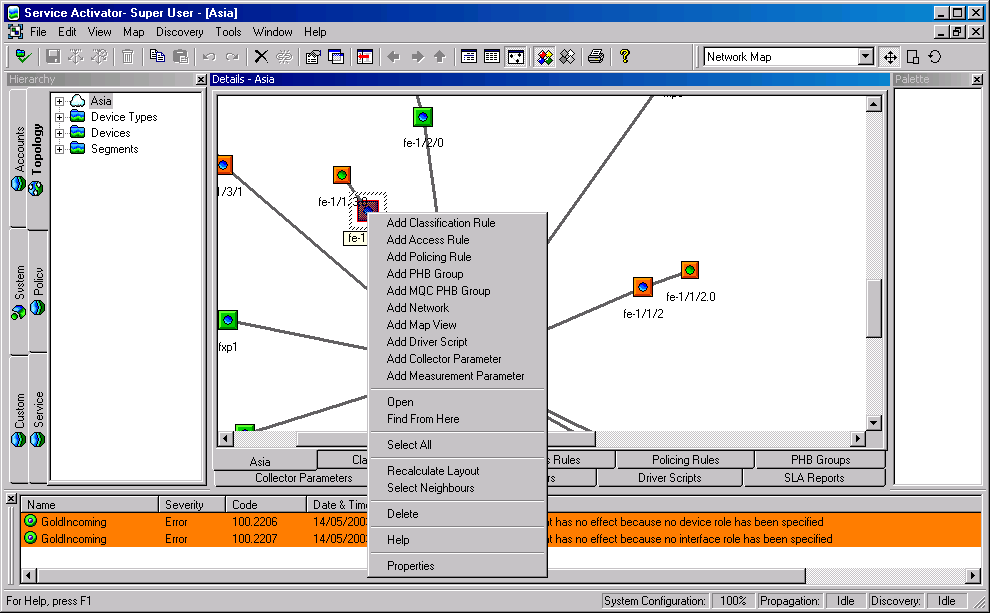
Note that all tabs are visible and options to add policy and measurement elements and driver scripts are available on the pop-up menu.
For a user who has Read Write access with access denied to policy objects, the user interface appears as follows:
Figure 4-3 IP Service Activator GUI: Limited User Access Topology View
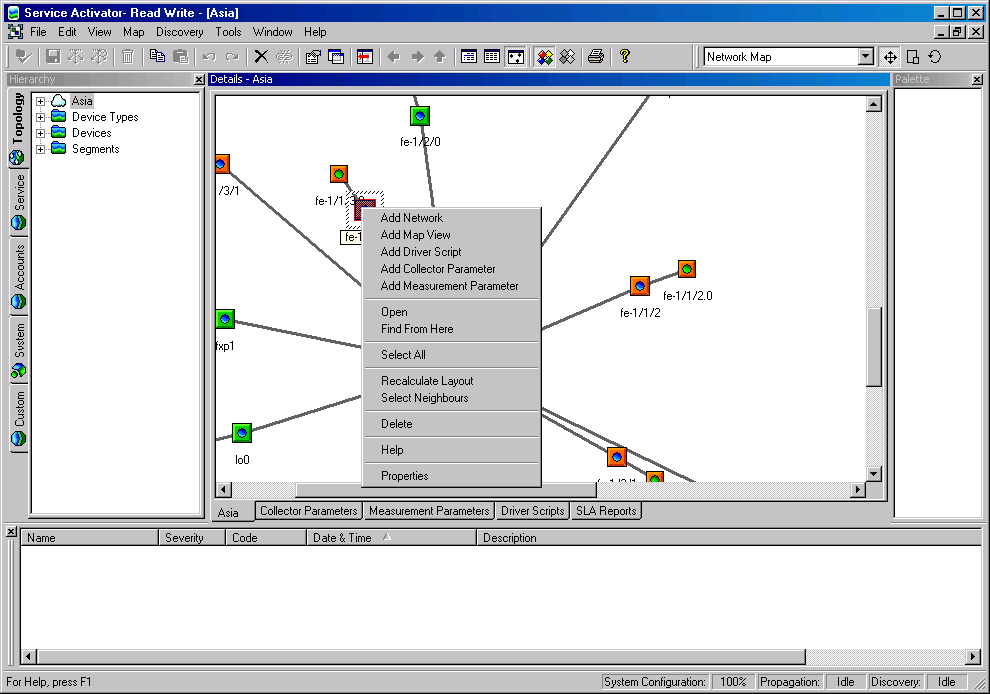
Note that the Policy tab is not displayed and the options to create PHB groups and rules are not available on the pop-up menu.
Note also that you cannot see faults associated with object types to which you do not have access. In this example, the warnings that relate to a PHB group with no roles associated with it cannot be seen in the second illustration.
The permissions set on a class of object for a group or on a specific object by its owner can be inherited by lower level objects. For example, applying Read permission at device level can be inherited so that a group's users also have Read permission for interfaces, sub-interfaces, and VC endpoints.
The IP Service Activator permission hierarchy is divided into three main areas: Custom, Domain, and System.
Within the Custom area, inheritance applies to driver scripts and script context.
Inheritance of permissions on sites and VPNs
Take care when setting up permissions for sites and VPNs to avoid sites being hidden from users. This can occur when sites that are a child of one customer are linked to multiple VPNs with different security permissions.
When sites that are already included in a VPN are subsequently added to a management VPN, to ensure that sites in the management VPN can be seen by the customer when logged in, do not select the Objects below this level inherit the restrictions check box on the Ownership property page of the management VPN object.
When sites owned by one customer are included in a VPN owned by another customer, to ensure that sites can be seen by any other customer, ensure that Access for other users for all Site objects is set to at least Read.
When the policy server is started for the first time after installation, it creates a default user with Super User access rights. Any user interface components that are subsequently started automatically use the default user's username and password details to provide access – the IP Service Activator main screen appears immediately and no username and password details are required.
We strongly recommend you change the default user group and default super user as soon as possible. After you change the default user, all users must enter a name and password each time they start the IP Service Activator user interface.
Note:
For complete dialog box and property page descriptions, refer to the Online Help.To change the default user:
Select the System User Groups folder on the Systems tab in a global setup or domain management window.
Select the Super Users group. Initially there is a single user named admin.
Select the admin user, then select Properties from the pop-up menu. The System User dialog box opens.
On the System User dialog box, System User property page, change the Username field to an appropriate unique entry.
Ensure that the Allow concurrent logins check box is selected.
Note:
Enabling the Allow concurrent logins option will allow you to log in to IP Service Activator using the same account from multiple user interfaces. As well, this option is required for some of IP Service Activator's optional modules to perform automated logins.Select the Password property page.
Change the Password to an appropriate unique password, and confirm the password by re-entering it in the Confirm Password field.
Click OK and commit the transaction.
We recommend that you set up additional users with different levels of access. To do this, you must first create additional user groups with the relevant access levels. You can then add users to these groups. For more information, see "Setting Up User Groups" and "Creating Users".
Users with Super User access can set rules for passwords, such as the minimum and maximum length a password must be and the period after which passwords expire.
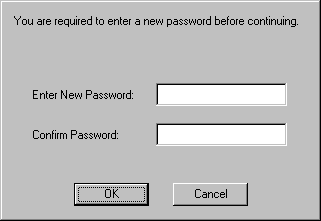
Note:
Password options can also be set for an individual user account.When a password expires, the user is prompted for a new password on the next login to IP Service Activator's user interface.
To edit global password rules:
From the Tools menu, select Options.
The Options dialog box opens.
Select the User Passwords property page.
Enter values for the password, including Minimum Length, Maximum Length, Password Complexity, Password Re-use, Passwords expire after, and Disable account after login failures.
Click OK.
For complete dialog box and property page descriptions, refer to the Online Help.
Users with Super User access can define access to the system by setting up new user groups and user logins.
A user group defines the access level that its members have to IP Service Activator. Every user is a member of a user group.
IP Service Activator automatically creates one user group on installation. The group has Super User access and contains a single user (see "Changing the Default User"). To create users with Read Write and Read Only access, you must set up additional user groups. For Read Write groups, you can also define the permissions that apply to the group – that is, which parts of IP Service Activator the group's members can view and/or modify.
Some example Read Write user groups might include:
Network engineers: group members can import topology files, define roles, create maps and create driver scripts
Policy engineers: group members can create traffic types and PHB groups
Customer service engineers: group members can manage customers and their associated VPN services
Demonstration users: group members can make changes but cannot save them
A user can only be a member of a single group.
To set up a user group:
Select the System User Groups folder on the Systems tab in a global setup or domain management window.
Select Add System User Group from the pop-up menu.
The System User Group dialog box opens.
On the System User Group property page specify details including Name, Access Rights, and Remarks, Disable all group users. Under Access Rights you can select the Read Write, Read Only, or Super User option.
Click OK.
For complete dialog box and property page descriptions, refer to the Online Help. Also, for more information about permissions, see "Setting Up Read Write Group Permissions".
For Read Write user groups, group permissions define what actions members of the group can perform on classes of object. Group permissions allow groups to be restricted according to the roles and responsibilities of the group's members.
Users with Read Write or Super User access can also own and set permissions on a specific instance of an object. The permissions set on a specific object may override those that apply to a class of objects for a group. For more information, see "Owning and Setting Permissions on an Object".
To set or change a permission for a user group:
On the System tab, open the System User Group folder and select Properties from the relevant user group's pop-up menu.
The System User Group dialog box opens.
Select the Permissions property page.
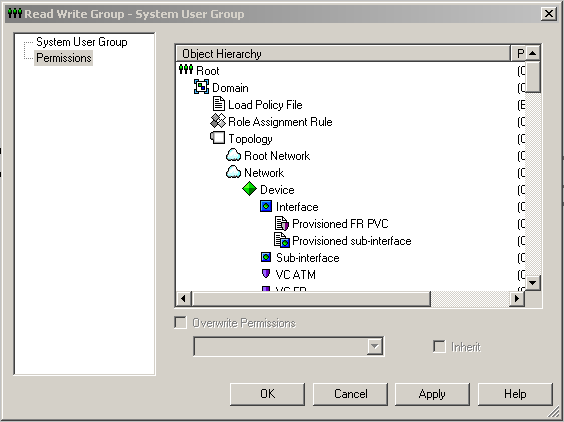
Group permissions are displayed in a fixed hierarchy, and the appropriate permissions are displayed for each level within the hierarchy. For more information about permissions and the permissions hierarchy, see "Permissions".
Select the object class whose permissions you want to set.
Click the Overwrite Permissions check box, and then select the permission level you require from the drop-down menu.
(Optional) If you want object classes at a lower level in the hierarchy to inherit the permission, select the Inherit check box.
Click OK.
Note:
You can select individual object classes at a lower level within the hierarchy and change the individual permissions as required.When you change permissions for a user group, the changes are only apparent to group members the next time they log into IP Service Activator.
Users with Super User access can set up new users, specifying their username and password details. It is possible to force users to change their password when they first log into IP Service Activator.
A user must be set up within a user group, and can be a member of only one group.
Note:
For complete dialog box and property page descriptions, refer to the Online Help.To set up a user:
Select the System User Groups folder on the Systems tab in a global setup or domain management window.
Select the group to which you want to add a new user.
Select Add System User from the pop-up menu.
The System User dialog box opens.
On the System User property page, enter details including Username, Remarks and Allow concurrent logins.
See "Changing the Default User" for more information on Allow concurrent logins.
Select the Password property page.
Enter details including Password, Confirm Password, User must change password at next login, and Expires after.
Click OK.
For complete dialog box and property page descriptions, refer to the Online Help.
You can disable access for all members of a group or for an individual user. Disabling access for a user who is logged in forces the user out of IP Service Activator.
To disable access for all members of a group:
On the Systems tab in a global setup or domain management window, select the System User Groups folder . ’
Click the relevant group.
Select Properties from the pop-up menu.
The System User Group dialog box opens.
On the System User Group property page, select the Disable all group users check box.
Click OK.
To disable access for an individual user:
Select the System User Groups folder on the Systems tab in a global setup or domain management window.
Select the group that contains the user whose access you want to disable, then click the relevant user.
Select Properties from the pop-up menu.
The System User dialog box opens.
On the System User property page, select the Disable user check box.
Click OK.
For complete dialog box and property page descriptions, refer to the Online Help.
If a user is locked out of IP Service Activator as the result of too many failed login attempts, a user with Super User access can re-enable the user by deselecting the Disable user check box on the user's properties pages. If necessary, you can increase the number of permitted login attempts; for more information, see "Creating Rules for Passwords".
You can view user group and user information and see which users are logged into IP Service Activator.
Users with Super User access can see all user group and user information. Users with Read Write or Read Only access can only view the group to which they belong and their own user details.
To view user group information:
Double-click on the System User Groups folder.
The information is displayed in the Details pane as follows:
Name: The name of the user group.
Access Rights: The access rights of the user group
Remarks: Any remarks that were entered when the user group was set up.
Active Users: For each user group, lists the number of users currently logged in to IP Service Activator.
To view user group member details:
Open the System User Groups folder and double-click the user group whose membership details you want to view.
The information is displayed in the Details pane:
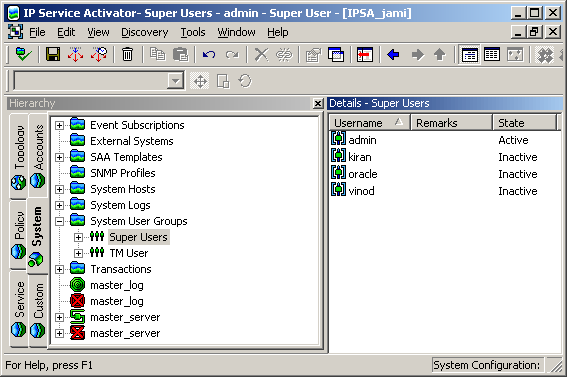
The details are as follows:
Username: The name of the user.
Remarks: Remarks that have been added about the user.
State: The state of the user:
Inactive: the user is enabled with no active sessions.
Active: the user has active sessions (if more than one session is active, the number of sessions appears in parentheses)
Disabled: the user's access has been disabled by a Super User
Denied: the user has been denied access because the prescribed number of login attempts was exceeded
Note:
You can also view the status of a user by selecting the required user, then select Properties from the pop-up menu. The status field shows the current status of the user.You can grant users access to Configuration Template Module (CTM) by assigning permissions to existing IP Service Activator user groups for a device, domain or network. It is recommended to restrict access to CTM functionality for some users based on their level of authorization.
Before you can allow users to access CTM, you must have already created user groups. See "Setting Up User Groups" for more information.
To allow a user group to access CTM:
In the IP Service Activator GUI, right-click the name of the device, domain, or network.
From the drop-down menu, select Modules, then Configuration Template, then Group Admin.
The CTM Group Permissions dialog box appears.
Select the correct group name.
Select any of the following check boxes:
Activation: the user group can access the Activation GUI and use a template to provision a device
Admin: the user group can access the Administration GUI to create and edit templates
Audit: the user group can access the Audit GUI to review template audit history
Note:
The Super User group has all permissions by default. You cannot change Super User permissions in the CTM Group Permissions dialog box.Click OK.
For more information about using CTM, see the IP Service Activator online Help topic about managing CTM user groups.
If you create an object, you can assume ownership of that object and specify which users can view and modify the object. You can set different permissions for yourself, other members of your user group and members of other groups. Ownership of an object can also be passed to another user.
Permissions can be set on most objects except user groups and users, some rule components, device types, system logs, and the policy server. For further information about permissions refer to "Permissions".
To set permissions on an object:
Select the object you want to set permissions on, then select Properties from the pop-up menu.
The object's dialog box opens.
Select the Ownership property page:
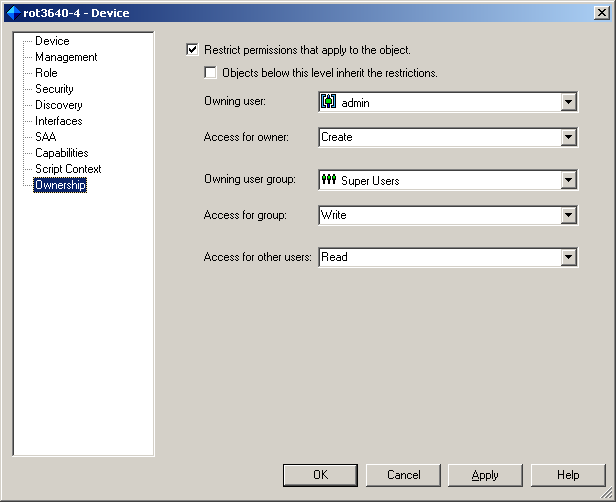
Enter details to specify permissions, ownership, and access. For complete dialog box and property page descriptions, refer to the Ownership Pages topic in IP Service Activator online Help.
Click OK.
Note:
If a user is deleted, any objects owned by that user are left ownerless.A user who assigns permissions to an unowned object assumes ownership of the object by default.
Ownership of an object can be changed by any user with Create permission on the object.
IP Service Activator uses a transaction-based model for updating the system and implementing configuration changes.
By default, a transaction that has been committed in the user interface is queued and processed by the policy server as a background task. This means that a user can continue working in the user interface and commit further transactions while the policy server saves data to the database. However, if the policy server fails any transactions that it had not yet written to the database will be lost.
In confirmed commit mode, a user who has committed a transaction can only make changes in the user interface when the transaction has been successfully saved to the database.
Note:
If your deployment integrates IP Service Activator with other OSS systems, it is particularly important that these systems are guaranteed persistence of data. This ensures synchronization between systems. You may therefore wish to consider running IP Service Activator user interfaces in confirmed commit mode in this scenario.To run a user interface in confirmed commit mode:
From the Tools menu, select Options.
The Options dialog box opens.
Select the Transactions tab and select the Confirmed transaction mode check box.
Click OK or Apply.
The Context Menu Extension Plugin lets you add new entries in the context menu, to launch external applications from the GUI. Additionally, the Context Menu Extension Plugin is used to supply IP Service Activator login attributes to the external application. This avoids the need to re-enter these attributes when the external application needs to communicate with IP Service Activator.
External applications can be written in any scripting language, including Perl, Python, or a Unix shell script. The external application can be applied only to the objects defined for it in the ExplorerScripts.xml file.
The context menu is the drop-down menu that appears when you right-click an object in the IP Service Activator GUI. A menu item appears in the Modules sub-menu when it is defined in the ExplorerScripts.xml file.
The following illustration shows the context menu for the Domain object, as defined in the example ExplorerScripts.xml file provided later in this section.
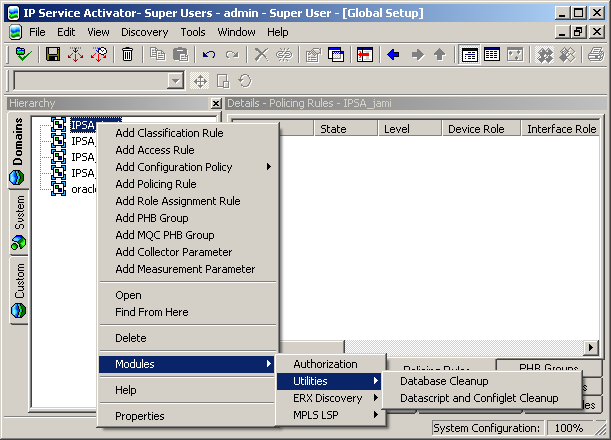
Examples of existing context menu extensions include the Module Authorization GUI, SSH Launch, Database Cleanup, and Datascript Cleanup.
The Context Menu Extension Plugin is installed with the Common module. Refer to IP Service Activator Installation Guide for the Common module installation procedure.
Use this procedure to add new menu items in the context menu drop-down list, in the Modules sub-menu. New menu items are implemented by modifying the ExplorerScripts.xml file.
To create new menu items
Edit the Service_Activator_Home/ExplorerScripts/ExplorerScripts.xml file to add a new menu entry. (Examples and notes follow this procedure.)
Log out of the GUI and log back in to view the new menu item.
The ExplorerScripts.xml file defines which applications you can launch from the context menu, the name of the menu item, and the object types on which each application will operate. An excerpt from the ExplorerScripts.xml file follows.
<?xml version="1.0" encoding="UTF-8"?>
<!DOCTYPE IpsaExplorerScripts [
<some definitions omitted here>
<!ELEMENT IpsaExplorerScripts (ScriptMenu,ObjectTypeList)>
]>
<IpsaExplorerScripts>
<!--List of scripts in main menu-insert a ScriptSubmenu tag for submenus-->
<!--Each submenu must have a name (which appears in the menu) -->
<!--Each script must have a name (which appears in the menu), command line->
<!--and list of affected OM object types - available types appear below-->
<ScriptMenu>
<Script command=""path; eeucommon.jar
com.mslv.osa.custom.executable.LaunchExec %1 %2 %3 %4 %5 start ssh.exe"
name="SSH" objects="Device"></Script>
<Script command=""path; eeucommon.jar
com.mslv.osa.custom.moduleauth.Authorization %1 %2 %3 %4 %5"
name="Authorization" objects="Domain"></Script>
<ScriptSubmenu name="Utilities">
<Script command=""path; eeucommon.jar
com.mslv.osa.gui.DatabaseCleanup %1 %2 %3 %4 %5 Domain"
name="Database Cleanup" objects="Domain"></Script>
<Script command=""path; eeucommon.jar
com.mslv.osa.gui.DatascriptCleanup %1 %2 %3 %4 %5 VPN"
name="Datascript Cleanup" objects="VPN"></Script>
<Script command=""path; eeucommon.jar com.mslv.osa.gui.DatascriptCleanup %1 %2 %3 %4 %5 Customer"
name="Datascript Cleanup" objects="Customer"></Script>
</ScriptSubmenu>
</ScriptMenu>
</IpsaExplorerScripts>
In this example, path is used instead of the following full path to the launcher file:
C:\Program Files\Oracle Communications\Service Activator\modules\bin\launcher.bat"
As indicated in Table 4-2, the menus resulting from this example file are context-specific to the object that is right-clicked. The screen illustration in "Context Menu Extension Plugin" shows the context menu for the Domain object.
Table 4-2 Description of Resulting Context-Specific Menus
| When you right click | You see this menu |
|---|---|
|
a device object |
Modules -> SSH |
|
a domain object |
Modules -> Authorization Modules -> Utilities -> Database Cleanup |
|
a VPN object |
Modules -> Utilities -> Datascript Cleanup |
|
a Customer object |
Modules -> Utilities -> Datascript Cleanup |
A menu item is visible in the context menu only if you right-clicked an object for which the menu item has been defined.
<Script command=""path; eeucommon.jar
com.mslv.osa.custom.executable.LaunchExec %1 %2 %3 %4 %5
start ssh.exe" name="SSH" objects="Device"></Script>
where
command=""path; eeucommon.jar
com.mslv.osa.custom.moduleauth.Authorization %1 %2 %3 %4 %5"
defines the external application (ssh.exe) and its parameters
%1: Object ID (ID of the object that was right-clicked in the GUI)
%2: UserID %3: Password %4: Host %5: Port
(Values for these login attributes are passed to the external application, permitting it to communicate with IP Service Activator without requiring relogin.)
name="SSH" defines the name of the item that appears in the menu
objects="Device" defines the object context (the object types for which, when right-clicked, this menu item appears). You can add more object types inside the quotation marks, with object types separated by a space. For example: objects="Device Interface Sub-interface"
Alternatively, you can replicate the command line for each object type.
The real ExplorerScripts.xml file lists the full set of objects to which menu items can be applied.
Notes on creating context menu items by editing ExplorerScripts.xml
Using the syntax described, a menu item is added even if the external application is disabled. For a menu item selection to work, ensure that its external application is properly enabled.
The sequence of items in the context menu is the same as the lines in the ExplorerScripts.xml file. To add a new menu entry, edit the section of the file between tags <ScriptMenu> and </ScriptMenu>.
The example file also shows creation of sub-menu Utilities. Sub-menu entries are entered between tags <ScriptSubmenu name="Utilities"> and </ScriptSubmenu>.
When using IP Service Activator modules, a separate Module Authorization GUI is used to control user group access to certain module functions. The Module Authorization GUI is used with the following modules:
Common module
MPLS LSP module
The Module Authorization GUI is installed automatically with the Common Module.
By default the Module Authorization GUI can only be accessed by users in the group Super Users. Note that users in the Super Users group are automatically granted access to all modules and are not restricted by settings in the Module Authorization GUI.
To access the Module Authorization GUI:
Right-click the Global Domain object for which you want to configure module permissions.
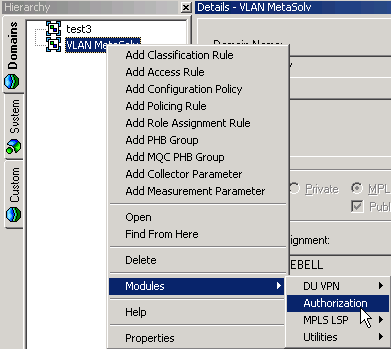
From the pop-up menu, select Modules, and then select Authorization.
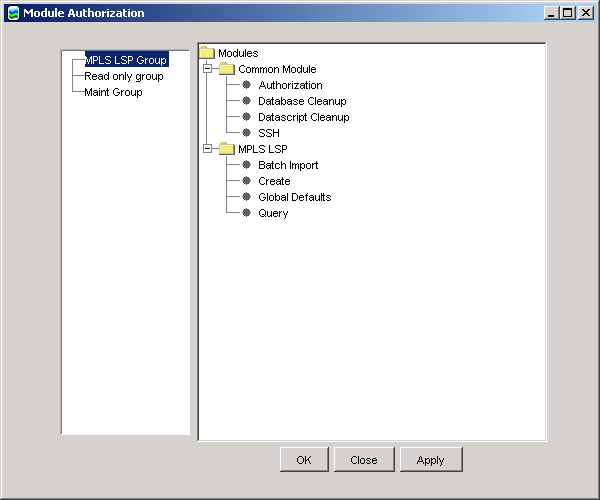
The Module Authorization GUI is displayed.
To change permissions for a particular user group, select it from the list in the left panel.
Hold the Ctrl key and click permissions to add or remove them for that group. When a permission is highlighted it is selected for the group.
In the following example, the MPLS LSP Group has access to none of the available functional areas of either the Common Module, or the MPLS LSP module.
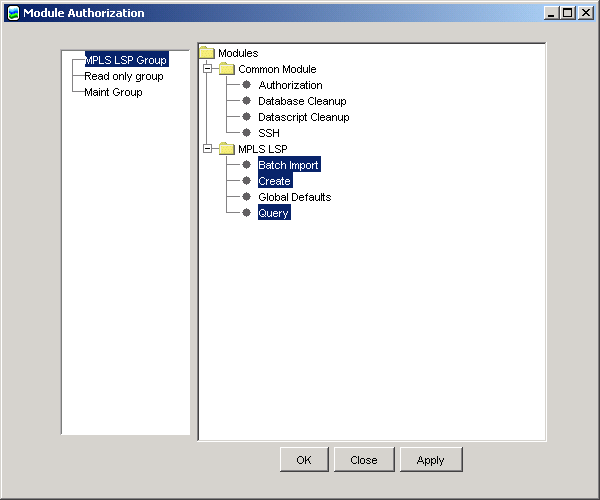
After selecting access to the Batch Import, Create and Query functions for the group (but not the Global Defaults function), the GUI looks like this:
The Module Authorization GUI has three buttons.
Click OK to commit changes and exit
Click Apply to commit your changes but leave the GUI open
Click Close to close the GUI. If you have made any changes that are not saved, you are prompted to save them, discard them, or return to the GUI.
|
Copyright © 2011, 2013, Oracle and/or its affiliates. All rights reserved. Legal Notices |
|