| Oracle® Communications IP Service Activator VPN User's Guide Release 7.2 E47719-01 |
|
|
PDF · Mobi · ePub |
| Oracle® Communications IP Service Activator VPN User's Guide Release 7.2 E47719-01 |
|
|
PDF · Mobi · ePub |
This chapter explains how to set up RFC4364bis multiprotocol label switching (MPLS) virtual private networks (VPNs) within your Cisco or Juniper M-series-based networks.
An IP virtual private network (VPN) is a means of creating a private network over a shared IP infrastructure. A VPN enables a secure, private connection between a number of geographically remote customer sites. VPNs can be used to implement corporate intranets, linking remote offices or mobile workers, and extranets, extending the services to customers, suppliers or other communities of interest.
Oracle Communications IP Service Activator supports VPNs based on RFC4364bis, a widely supported IETF standard. This is an architecture based on using MPLS to forward packets over the backbone and using BGP (Border Gateway Protocol) to distribute routes.
MPLS VPNs are based on Layer 3 connectionless technology. The primary advantage of this is that MPLS VPNs are much more scalable than other IP VPN technologies, as there is no need to create a full mesh of tunnels or permanent VCs between all sites in the VPN. Deploying and managing an MPLS VPN is therefore more straightforward than the VC-based or IP tunneling options.
Security and privacy within an MPLS VPN is achieved by limiting the distribution of routing information to all members of the VPN. Routes to VPN sites are only advertised to members of the same VPN, and are not shared with core devices or devices outside the VPN.
IP Service Activator allows you to set up VPNs quickly and easily by defining appropriate customer sites and specifying how they are linked together into VPNs. The relevant routers throughout the network are then configured automatically. VPN membership can be updated by adding and deleting customer sites when required.
Note:
Minimal manual configuration of routers is initially required.IP Service Activator supports MPLS VPNs implemented within Cisco, Juniper M-series, Brocade, Huawei AR, or Huawei NE networks. Oracle strongly recommends that you read the relevant device driver or device cartridge guide before setting up an MPLS VPN. Support for additional devices can be added by creating a new cartridge using the IP Service Activator Software Development Kit (SDK).
Note:
Not all services are supported by all equipment vendors. See IP Service Activator Installation Guide and the appropriate Cartridge or Device Driver guides to confirm support for the services you wish to implement.Consider the following points before setting up VPNs:
There are two types of VPN topology: fully-meshed, and hub and spoke.
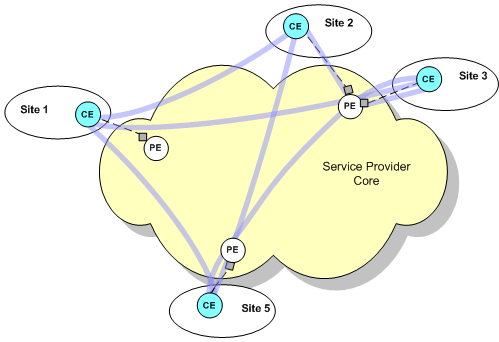
In a fully-meshed VPN, each customer site can communicate with all other sites. Figure 1-1 illustrates the way in which sites communicate in a fully-meshed VPN topology.
Figure 1-1 Site Communication in a Fully-meshed VPN Topology
A site can participate in any number of fully-meshed VPNs.
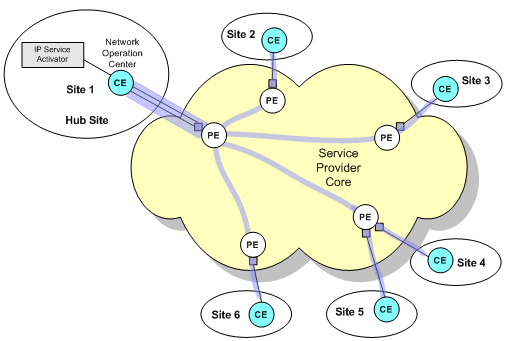
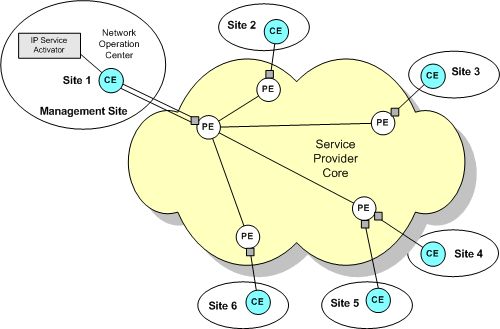
In a hub and spoke VPN, one or more sites act as a hub or management interface. Figure 1-2 shows the way in which sites use a hub to communicate in a hub and spoke VPN topology. Sites 2, 3, 4, 5, and 6 are only aware of Site 1, while Site 1 can communicate with all other sites.
Figure 1-2 Site Communication in a Hub and Spoke VPN Topology
Each site must be defined as a hub or a spoke. A site may be a member of several hub and spoke VPNs and act as a hub in one VPN and a spoke in another. There may be more than one hub site in a hub and spoke VPN or, alternatively, all sites may be defined as spokes.
A management VPN is a special type of hub and spoke VPN that provides connectivity to CE devices and reduces the risk of connectivity loss. Create a management VPN if you intend to apply QoS or Service Assurance Agent (SAA) to a hub and spoke or fully-meshed VPN. For more information, see "Management VPNs".
Note:
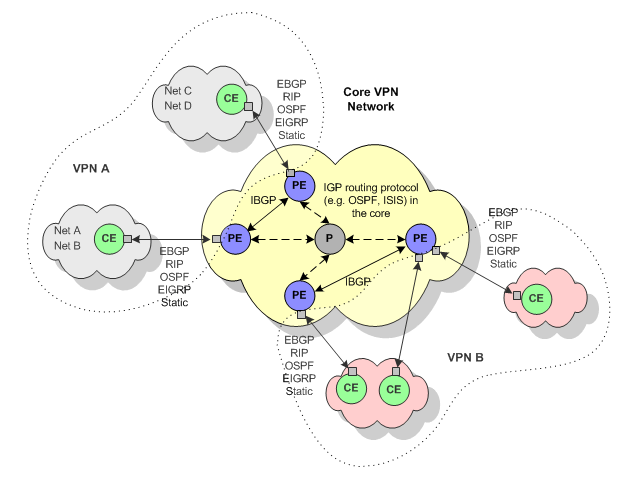
You can modify either fully-meshed or hub and spoke VPN topology by manipulating VPN route targets or using route policies and route maps.The various routers within the VPN need to communicate using a routing protocol. Figure 1-3 illustrates routing in an MPLS VPN.
A BGP autonomous system is a collection of networks. Each autonomous system is identified by an autonomous system number (ASN), which is required when running BGP. In order to configure BGP, you need to assign an ASN to each customer site network, in addition to the service provider core network. eBGP is a variant of BGP that connects the Provider Edge (PE) router to a Customer Edge (CE) router where both the provider and customer networks are running iBGP.
Each PE router also needs to communicate with its external neighbors (the CE routers to which it is connected).
In addition to static routing, IP Service Activator supports the following routing protocols:
External BGP (eBGP)
RIP (Routing Information Protocol)
OSPF (Open Shortest Path First)
EIGRP
EBGP & OSPF
EBGP & RIP
EBGP & EIGRP
None
For information on device support for routing protocols within IP Service Activator, see the appropriate Device Driver or Cartridge guide.
IP Service Activator can configure static routes between the PE and CE router. Static routes may be used in combination with any routing protocol. For multi-homed sites, you can configure a static route per PE interface. For eBGP and static routing, you must set up appropriate routing parameters so that the PE router can be configured appropriately.
You can specify a metric to associate with routes as they are distributed from the PE-CE routing protocol into other IGPs and BGP and vice versa. For more information, see "Specifying Metrics for Route Redistribution".
Note:
IP Service Activator supports multi-AS BGP VPN configurations. Refer to the Cartridge guides for your device types for detailsA VPN must be secure and maintain data separation; it must prevent communication between sites that are not in the same VPN. One way to do this is to ensure that VPNs have their own routing tables in the PE router, so a customer site that belongs to a VPN can access only the set of routes contained in that routing table.
Each PE router maintains a number of separate forwarding tables known as VRF (VPN Routing and Forwarding instance) tables, and each site (that is, each PE interface or sub-interface connected to a CE device) must be mapped to one of those VRF tables.
A VRF table does not necessarily correspond to a particular VPN. Its purpose is to hold the routes that are available to a particular site connected to a PE device. If a site is in multiple VPNs, the VRF table associated with that site contains routes within all the VPNs of which it is a member.
By default, IP Service Activator automatically generates a site-specific VRF table name and Route Distinguisher (RD) for each site that participates in a VPN. In a typical MPLS VPN setup, the RD uniquely identifies the site.
However, you can override the IP Service Activator default by specifying at the VPN level that the same VRF table name and RD number is applied to all sites that participate in the VPN. You can choose whether to use IP Service Activator-generated values or specify your own VRF table name and/or RD number. Sites that participate in the VPN must be set to inherit VRF\RD details from the VPN.
A site may be set to inherit VRF/RD details and be a member of more than one VPN that specifies VPN-wide VRF/RD details. In this situation, IP Service Activator's default behavior is to generate VRF/RD details for the site to avoid any conflict. However, it is possible to specify, in cases where a site inherits VPN-wide VRF/RD details from multiple VPNs, user-defined details specified at site level are used instead.
IP Service Activator allows you the following options for defining the VRF table name and RD. You can:
Specify that the same VRF table name and/or RD is used by all sites within a VPN.
You can choose whether to accept the identifiers generated by IP Service Activator or create user-defined identifiers.
Specify that each site has a manually-defined VRF table name and/or RD.
Using a single RD number for all sites in a VPN is suitable only where a site belongs to one intranet VPN. If the site may become a member of an extranet VPN in the future, this method is not recommended.
Specify that, if a site is member of only one VPN, its VRF table name and RD are derived from the VPN and, if a site is part of more than one VPN, its VRF table name and RD are manually defined at the site level.
For more information, see "Setting Advanced VRF Table Options" and "Using an RD Number per VPN or per Site".
VRF reduction helps minimize device resource usage. From a logical point of view, each VRF table maps onto an interface in a site (except with interface-less VRFs). However, having a VRF table for each PE interface in a site will create scalability problems on the router. Therefore, if multiple VRF tables contain exactly the same routing information (for example, if one site connects to two interfaces, or there are two sites that are members of the same VPN) and the routing protocol behaviors are identical or compatible between them, IP Service Activator normally reduces them to just one VRF table, in order to minimize resource usage. This is known as VRF reduction.
IP Service Activator uses different methods to perform this process depending on whether you are using system-generated or manually defined VRF table names.
Where system-defined VRF table names are used, VRF reduction is based on the site's RD number. Sites with lower RD numbers takes precedence over sites with higher RD numbers. Note that no reduction occurs under the Network Processor for VRFs on sites with different RD numbers.
Where user-defined VRF table names are used, IP Service Activator performs VRF reduction based on table names. If you are using user-defined VRF table names, VRFs can only be reduced into other VRFs that have matching table names.
When a new VRF table creation request is sent to the device driver, the driver first attempts to reduce the VRF table into an existing IP Service Activator provisioned VRF. If this is not possible, a new VRF is provisioned. In case of multiple concurrent VRF table creation requests, the driver evaluates the request in the order of increasing site RD numbers (for system-defined VRF table names) or in the ASCII sort order of the VRF table names (for user-defined VRF table names).
You can override VRF re-use by specifying that particular interfaces are always to have their own VRF table. You can also specify that other VRF tables are allowed to be merged with this VRF table by selecting Shareable VRF.
If a new VRF has the Force Install attribute set, it ensures that a VRF table is will be created for the selected site, but it will not be reduced into other VRFs. As a result, in some circumstances, identical VRF tables may be configured on the device. This attribute is set on the VRF property page of the Site dialog box, by selecting Force Install from the VRF table re-use panel. The default is for Force Install not to be set.
Using Force Install also ensures that an Interface/SiteAddress is the first one in its VRF.
Once Force Install is selected, you can optionally select Shareable.
If the Shareable attribute is turned on, then other VRF tables are allowed to be merged with the VRF. The default is for Shareable not to be set.
The Shareable attribute is only selectable when Force Install is also set for the site.
If VPN attributes or routing protocol attributes do not match or are incompatible no reduction is performed.
When a VRF is initially created, the site which triggered the creation of the new VRF is known as the VRF master site and the VRF is known as the VRF master. (This is a conceptual designation and is not reflected in the IP Service Activator client in any way.) If other VRF tables are reduced into this VRF, there is a dependency on the VRF master.
If the VRF master site is taken out of the VPN, the VRF master is de-provisioned. All remaining interfaces are reduced into a newly created VRF master. Accordingly, one of the interfaces' sites in the VPN will become the new VRF master site for the new VRF master.
If the VRF master site is modified such that its VRF (the VRF master) is no longer compatible with the other VRF tables which are reduced into it, the interfaces of the other sites are removed from the VRF master before the VRF master is modified to reflect the new VRF master site properties. The removed interfaces are reduced into a newly created VRF. Again, one of these interfaces' sites will become the new VRF master site for this new VRF master in accordance with the logic explained above.
During the re-provisioning which occurs as a result of either of the above scenarios, the interfaces moved to the new VRF temporarily lose connectivity and trigger routing re-convergence.
During VRF reduction, the Network Processor and Cisco Device Driver send alias commands to track which sites use the newly reduced VRF on the router. This information can help determine which site is the VRF master site, so you can ensure that a VRF master is not removed when there are still sites reduced into it.
Normally, when parameters supplied to a particular site match with another site in the same VPN, VRF reduction occurs into the VRF master. The VRF master is retained and the other VRFs which were reduced are removed since they are redundant.
The device driver and Network Processor will try to preserve configuration for already provisioned VRFs on the device in cases where performing VRF reduction would potentially cause a network outage.
When a valid parameter is changed on a merged VRF, the VRFs are unmerged. After that, the VRF will not reduce again, in accordance with the configuration preservation concepts described above. (If there is a need to merge VRF sites again, you can unlink the sites, and link them back.) There are some exceptions to this:
With the device driver, changing the VRF import/export map in multiple sites to the same name
On the Network Processor, changing a generated RD to a user-specified RD, and vice-versa
In both these cases non-reduced VRFs are reduced to a common VRF.
There are a number of parameters that don't affect reduction behavior - particularly, when route redistribution protocols and static routes match between VRFs.
The following do not affect VRF reduction behavior
RIP Properties, including Ignore Routes, Passive Interface
OSPF Properties, including Distribute-in Filter, Cost
EBGP: Neighbor data
Static routes
In general, commands that are not part of the actual VRF configuration commands on the device do not change VRF reduction behavior.
In addition to configuration parameters, an orthogonal combination of parameters does not stop VRFs from reducing.
Consider a scenario in which you have two sites with different routing protocols applied, EIGRP on one and OSPF on the other. These sites will reduce to single VRF, provided all the other parameters are equal.
However if two sites have the same routing protocols, but have different routing parameter values set, they will not reduce. An example of this is two sites both configured to use OSPF, but with different SpfThrottling parameter values.
In IP Service Activator, the default VPN topology is fully meshed. This can be changed as required.
Note:
If there is no reduction for VRFs in a mesh topology VPN, there will be no reduction for VRFs in a hub and spoke topology VPN.The VRF reduction behavior in hub and spoke topology is identical for the Cisco Cartridge and Cisco device driver. However, there is a difference in behavior when the topology is changed.
Table 1-1 shows VRF reduction behaviors for both the Cisco Cartridge and the Cisco device driver for source and target topologies. The target columns shows the changed behavior of the Cisco cartridge and the Cisco device driver when the topology changes to the target topology from the source topology. The table shows that the behavior between Cisco Cartridge and Cisco device driver changes when topology is changed from hub and spoke to Mesh.
Table 1-1 VRF Reduction Behaviors for Cisco Cartridge and Cisco Device Driver
| Source Topology | Source Topology Cisco Cartridge Behavior | Source Topology Cisco Device Driver Behavior | Target Topology | Target Topolgy Cisco Cartridge Behavior | Target Topology Cisco Device Driver Behavior |
|---|---|---|---|---|---|
|
Mesh |
Reduction |
Reduction |
Hub and spoke |
No Reduction |
No Reduction |
|
One hub, multiple spokes |
No Reduction |
No Reduction |
Mesh |
No Reduction |
No Reduction |
|
Mesh |
N/A |
N/A |
Multiple hubs, multipls spokes |
Reduction among hub sites, separate VRF for each spoke |
Reduction among hub sites, separate VRF for each spoke |
|
Multiple hubs, multiple spokes |
N/A |
N/A |
Mesh |
Reduction among hub sites, separate VRF for each spoke |
Reduction |
IP Service Activator supports the indirect creation of interface-less VRFs and therefore interface-less Sites. An interface-less VPN site models a VRF on a router where no interface points to the VRF.
For complete details about interface-less VRFs and sites, see the IP Service Activator online Help.
When an interface-less Site and VRF are created, an object called a Service Application Point is modelled in the background and linked to the Site. The Service Application Point object behaves similarly to an interface (and has a role of Access for purposes of supporting the interface-less Site and VRF) but it is not accessible or modifiable through the GUI. The PE device is displayed in the Access Points folder for the site in order to represent the Service Access Point.
Service Application Point objects are exposed in the EOM and are accessible through the OSS Integration Manager interface. See IP Service Activator OSS Integration Manager Guide for details.
Creating an Interface-less Site and VRF
To create an interface-less VRF, first create a VPN Site. Then, drag the entire PE device into the site as you normally would an interface. This creates the Service Application Point and causes the PE symbol to be displayed in the Access Points folder of the Site to represent it. (See below).
Once created, the Site can participate in VPNs in a similar fashion to site with an attached interface.
The router-id attribute is available on the Site dialog box, Site VRF property page. This attribute is used when OSPF routing is enabled on a device, becoming the configured OSPF router ID. The router-id attribute can be configured on Cisco, Alcatel, and Brocade devices only.
The router-id can be set on a VRF regardless of the routing protocol chosen for the site. However if OSPF or EBGP is chosen as routing protocol, a router-id must be set or an error is returned. This error indicates that the SiteAddress requires a router-id.
When a VPN is committed, the device driver attempts to reduce the number of VRFs. During this process IP Service Activator ignores all the router-id properties except for one: the selection of the router-id as discussed below. Once the VRF has been reduced, it is created on the device. Before setting the router-id parameter in the VRF, the driver creates a loopback interface and binds it to the VRF. The appropriate IP address will also be set on this newly created loopback interface.
If a VRF is initially created for one interface, this interface/SiteAddress will remain designated as ’the one containing the router-id' for the entire life of that VRF regardless of the number of interfaces that are subsequently added to it. The router-id can be added, if desired, to the first interface bound (and committed) to a VRF. Using Force Install also ensures that an Interface/SiteAddress is the first one in its VRF. See "VRF Parameters: Force Install and Shareable".
Unless loopback interfaces are filtered out during the discovery process, subsequent device re-discoveries may find the newly created loopback interfaces and display them in the client. Do not attempt to use them.
Some operations such as setting a specific VRF name, route distinguisher, or DHCP Helper to a SiteAddress may force a VRF ’split'. In this case, the router-id requirements may no longer be met for the target configuration. An error is returned indicating which SiteAddresses require an additional router-id.
Note:
If you unmanage a device, then make a change to it (such as a VRF parameter) and then commit these two actions in the same transaction, the change is saved in the IP Service Activator database, but is not propagated to the device.If you remanage the device in a subsequent transaction, there is loss of synchronization between the device and the IP Service Activator database. If this occurs, repeat the change in a new transaction.
Do not unmanage a device and make a change to the device in the same transaction.
Loss of synchronization also occurs if you make manual changes to a device which has been unmanaged, and is later remanaged. If this occurs, manually remove the incorrect configuration from the device.
If you require visibility of the customer's CE devices, for example, to apply QoS or measurement at the CE devices, you should set up a management VPN. The management VPN provides connectivity to CE or shadow devices and avoids potential loss of connectivity. Figure 1-4 illustrates a management VPN using hub and spoke topology.
Figure 1-4 Management VPN Using Hub and Spoke Topology
In IP Service Activator, a VPN is always associated with a customer object. One technique is to create a Customer named ’Management' and create the management VPN beneath this. Then create the ’real' Customer which maps to the real-world customer, and create a hub and spoke or fully-meshed VPN.
For a summary of the steps involved in setting up a management VPN, see "Setting Up Management and Customer VPNs".
IP Service Activator's policy management features allow you to apply Quality of Service (QoS) throughout the VPN. Network traffic can be divided into separate classes of service and allocated quality of service characteristics according to service level agreements with the customer. For more information see IP Service Activator Network and SLA Monitoring Guide.
Note:
When applying QoS to a VPN, policy that has been applied to a customer is inherited to a site, unless the site is a member of a VPN to which a policy element of the same type has been applied. In this case, the policy applied to the VPN overrides that applied to the customer.Measurement can also be applied to the VPN using Service Assurance Agent (SAA). SAA is a Cisco technology that enables you to apply measurement to point-to-point connections within an MPLS VPN or a measurement-only VPN. In a measurement-only VPN, devices are grouped solely for the purpose of applying measurement. For more information see IP Service Activator Network and SLA Monitoring Guide.
The following steps are involved in setting up a VPN within IP Service Activator:
Set up domain-specific parameters. See "Setting Up Domain Parameters".
Discover the network and assign roles. See "Discovering the Network and Assigning Roles".
Set up the customer sites that are to be connected by a VPN, including information about their routing parameters. See "Setting Up Customers" and "Setting Up Sites".
Associate each site with the appropriate access interface on a PE (gateway) router. See "Setting Up PE-CE Routing Parameters".
If you need to create interfaces and/or sub-interfaces to use as the access point on the PE router, use the appropriate interface creation policy. See "Registering Interface Policies and Creating Interfaces".
If you are creating interfaces off controllers, set up your discovery to discover controllers. For more information, see the discussion of customizing discovery using AutoDiscovery.cfg in IP Service Activator Administrator's Guide.
Set up a VPN object and link the customer sites to it by dragging and dropping. See "Setting Up the VPN".
Note:
Minimal manual configuration of routers is initially required. See "Manual Preconfiguration".This section explains the tasks to perform before setting up a VPN. The tasks are:
Before setting up VPNs, some manual configuration of routers will likely be required. You must have your MPLS core set up to support VPNs. Please refer to the vendor documentation for details.
You need to have a functional MPLS network in order to configure MPLS VPNs.
On all PE (gateway) and P (core) routers in the core network, you need to ensure that MPLS is enabled on core interfaces. An Interior Gateway Protocol (IGP) must be implemented in order to distribute IP routes.
Ensure also that all IP addresses are correctly assigned. It is a best practice to have a loopback interface set up.
The loopback interface specified at the domain level is used in the VPN context in that domain unless it is overridden at a lower level, that is, on the Site dialog box. If you have configured iBGP peering (which should be done manually, not using IP Service Activator), you should use the same loopback interface on all devices which will be included in the VPN.
The loopback interface should be reachable.
On Cisco devices, ensure that CEF (Cisco Express Forwarding) or dCEF (Distributed CEF) is configured, as it is a prerequisite for MPLS.
On Juniper M-series devices, you must configure LSPs between the loopback addresses of all PE and P devices.
User-defined VRF tables, export maps, prefix filters and route maps
You can manually preconfigure PE routers with your own data to allow greater flexibility or special operational requirements to be implemented for your MPLS VPNs.
VRF tables can be manually configured to invoke particular VPN behavior and other special requirements.
Note:
User-defined VRF tables are not supported on Juniper M-series devices that are managed by the Juniper M-series Device Driver.Export maps can be manually configured with the prefixes of VRF table routes which you want exported to other PE routers. A VRF table route is only exported to other PE routers if its prefix matches one of those specified in the export map. The exported routes are tagged with a route target specified by the export map. This ensures that routes are only advertised to sites that need to receive them.
You can also manually configure route maps, or policy statements on Juniper M-series routers, to filter the routes that are redistributed between the protocols used for PE-CE connectivity within the VPN.
Route maps can also be configured through the use of the vrfRoutePolicy configuration policy and referenced in the site configuration in the same way you would reference a manually configured route map.
For details about the vrfRoutePolicy configuration policy, refer to IP Service Activator online Help.
Prefix filters can be manually configured with the prefixes of eBGP routes which you can specify are to be either accepted or denied by a VRF table. You can associate a prefix filter with incoming and/or outgoing routes.
In an IP Service Activator installation, CE routers can either be unmanaged, or managed by IP Service Activator with some restrictions.
When CE routers are managed, IP Service Activator can handle modelling and provisioning QoS. However, other than static routing, aspects of the configuration relating to VPNs must be handled manually, (other than some basic provisioning of static routes).
Ensure that the appropriate routing protocol or static routing is configured in order to advertise reachability information between the CE and the PE.
IP Service Activator can be used to apply global static routes to the CE in order to set up routes between the PE and CE by using the staticRoutes configuration policy. Refer to the "Configuration Policy - staticRoutes" Online Help topic for details.
If you are using a routing protocol (such as eBGP or EIGRP) for communication between the PE and CE rather than 'hard-wired' static routes, there are a number of approaches that can be used to configure the CE. You can set up the routing protocol on the CE manually, use a Configuration Template Manager template to do it, or use the IP Service Activator SDK to create a configuration policy to do the needed configuration.
You should also set up a loopback interface on each CE router and configure it to carry IP traffic.
Before setting up the VPN, you should ensure the appropriate parameters are set up correctly on the tabs in the Domain dialog box (these may have been set up when the domain was created).
These parameters define:
The number of alternative routes held by each PE to peer PE devices
Whether BGP routes use the standard or extended community attribute or both
Whether secure TCP connections are configured between iBGP peers using MD5
Which interface is used as the loopback interface
Note:
The Network Processor does not support iBGP peering.For complete information about setting up and configuring domains, refer to IP Service Activator User's Guide.
For complete dialog box and property page descriptions, see IP Service Activator online Help.
To check the domain parameters:
Display the Global Setup window.
Select the Domain tab, right-click the relevant domain and select Properties from the context menu.
The Domain dialog box for the selected domain is displayed.
On the Domain property page, check the following parameters:
The domain Type must be MPLS VPN.
The Public PE to CE Addresses check box specifies whether public or private addresses are used on PE routers. If selected, it indicates that the PE interface connected to a CE router uses a public address. If deselected, the PE interface is assumed to use a private address.
Note:
The Manual config field enables you to specify how IP Service Activator handles manual preconfiguration on the device. This is valid for Device Driver only.IP Service Activator never deletes manually preconfigured VRF tables even if you select the Delete or Warn and delete options. If you select Fail and don't delete, no configuration is installed.
The value set in the Manual config field on the Domain and Device property pages, including Warn and Delete, only applies to devices managed through the Cisco Device Driver. For example, the Juniper M-series Device Driver cannot be set up to monitor for or warn when changes to device configuration are made by other users. However, IP Service Activator can co-exist with manually applied configuration.
Select the VPN BGP property page.
Specify values including Configure iBGP Peering, CE Site AS Override, Allow AS in, Maximum Paths, Send Communities, PE-PE MD5 Authentication, and Loopback ID.
If you want to use iBGP peering, it must be configured manually on your devices and not through IP Service Activator. Do not check Configure iBGP Peering. With this check box unselected, IP Service Activator leaves all iBGP configuration untouched. This means that whatever is installed will remain on the device.
Note:
On Juniper M-series devices, the loopback ID must always be specified as 0 through the client.You can specify the maximum number of routes that can be added to the VRF table maintained by each PE peer within the domain. You can also specify a threshold value at which a warning message is generated in the router log either when the limit is reached or when a percentage of the limit is reached. By default, no VRF route limit is specified.
You can also override the limit defined at the domain and specify a different setting for a particular site. For more information, see "Setting Advanced VRF Table Options".
To specify a VRF route limit:
Display the Domain dialog box and select the VPN MPLS property page.
Select the VRF Route Limit check box.
In the Max Route field, enter the maximum number of routes that can be added to a PE router's VRF table.
Select either Warn only or Warn at n% from the Notification combo box.
Note:
Enter the string Warn only at n% into the text field to the left of the Notification combo box to manually to push the warning-only keyword. The string Warn only at is case sensitive.To enable BGP communication throughout the VPN you must set the ASN for the domain.
To set the ASN for the domain:
Display the Domain dialog box and select the ASN property page.
Specify a value in the Internal BGP ASN field.
At this point you can run the discovery process to find all the P and PE routers in the network and include their details in IP Service Activator's database.
For information about running the discovery process, see the chapter about discovering and setting up the network in the IP Service Activator User's Guide.
Note the following:
In an MPLS domain, the core provider network is assumed to use public addresses, and a hop count can be specified to discover further connected devices. All CE routers are assumed to use private addresses and an IP address or DNS name must be specified in order to discover them.
All devices within the network must be correctly assigned system-defined roles, that is, PE routers must be classified as gateway devices, P routers classified as core devices and CE routers, if visible, as access devices. Assign roles manually for each device. For more information, see IP Service Activator User's Guide.
Note:
The system-defined Shadow role may be assigned to shadow routers associated with PE devices for the purpose of generating SAA measurement data. For more information, see IP Service Activator Network and SLA Monitoring Guide.All interfaces within the network must be correctly assigned system-defined roles:
On CE (access) devices, the interface connected to the PE device must be classified as an access interface. Interfaces connected to local segments must be classified as local interfaces.
On PE (gateway) devices, the interface connected to the CE device must be classified as an access interface. Interfaces connected to other PE devices or P (core) devices must be classified as core interfaces.
All interfaces on P (core) devices should be classified as core interfaces.
You need to assign a role manually for each interface. For information about defining and applying roles, see the IP Service Activator User's Guide.
Note:
If the PE interfaces connected to CE devices have private addresses, that is, if the Public PE to CE Addresses check box on the Domain dialog box is deselected, connectivity cannot be determined. Therefore, CE devices and access interfaces on PE devices will not automatically be connected to segments and interfaces will not automatically be assigned roles. The connections between the PE and CE can be applied manually by dragging one interface on to another on the map or set manually from the CE.All devices that are to be managed by IP Service Activator must be assigned to a proxy agent. This is generally performed automatically during device discovery, but if devices are not assigned to the correct proxy agents you must assign them manually. For information on assigning devices to proxy agents, see IP Service Activator User's Guide.
All devices to be configured by IP Service Activator must have their status set to Managed. When devices are first discovered, their status is Unmanaged.
To set all devices to Managed:
Select Manage All Devices from the network or network map's context menu.
To set an individual device to Managed:
Select Manage Device from the device's context menu.
The device's color changes to reflect its new status. A managed device is represented by a green icon, an unmanaged device is represented by a blue icon.
You must create a customer before you can create the sites and VPNs that feature in a service.
To set up a customer:
On the Service tab, right-click the Customers folder and select Add Customer from the context menu.
The Customer dialog box opens.
Enter values including Customer name, Remarks, and Reference.
Click OK.
Commit the transaction.
You must set up a site for each member of a VPN. Sites are created on a per-customer basis. You cannot create a site that is customer-independent. You can associate a site with more than one customer. Site are configured using the Site dialog box, which is accessible as described below when the Service tab is selected.
To set up a site:
On the Service tab, under the Customers folder, right-click the Sites folder and select Add VPN Site from the context menu.
The site object appears on the Service tab and the Site dialog box opens.
On the Site property page, specify an identifying Name for the site, and any additional comments. You can set up account and contact information if required, but this is optional.
Click OK.
Note:
Dragging a PE interface into a site adds the IP address of that interface to the Addressing property page and avoids the need to enter the address manually. See "Setting Up Private and Public Addresses for PE Interfaces".Each site within a VPN must be defined by a physical network component with the exception of interface-less sites (for more about interface-less sites, see "Interface-less VRFs and Sites"). Typically a specific interface or device must be attached to the site in order to enable full routing information to be distributed throughout the VPN.
You need to link the access interface of the appropriate gateway (PE) router to the site.
Once you link an interface with a site and define its routing details, IP Service Activator maintains that information even if you subsequently remove that interface from the site. This means that you can re-use routing details if you change the interface that is associated with a site.
For a multi-homed site, you can link one or many PE interfaces to the site.
To link a PE access interface:
Drag and drop the appropriate access interface on the gateway device onto the site.
If there are existing unused interface address details associated with the site, the Site Addresses dialog box opens:
Create a new Site Address: Create new public/private IP address details for the interface being linked.
Attach to an existing Site Address: Use existing address details; select an address from the list.
If IP Service Activator has visibility of site CE or virtual CE routers, you should also link the CE or virtual CE device directly to the site. This is only required if the service provider is offering a fully-managed VPN service and has complete visibility of the customer's devices.
When a configuration object (like QoS, configuration policies, and so on) is applied on the customer site or VPN, the configuration object is applied on the CE or virtual CE based on role-matching rules.
For a multi-homed site, you can drag multiple corresponding CE or virtual CEs into the site.
To link the CE device:
Drag and drop the access device on to the site.
Support for particular protocols is device dependent. Consult the relevant device driver guide for details of the protocols supported.
You must set up details of the routing protocol used between the PE router and the CE router. These can be either static or dynamic routing protocols. Different parameters are required for each. Static routing can be used in combination with other routing protocols. Static routes can be configured per PE interface for multi-homed sites.
For information on specifying the metrics to apply to routes as they are redistributed between protocols, see "Specifying Metrics for Route Redistribution".
You can also select a routing protocol type of ’None' to distribute routes to VPN peers without configuring PE to CE routing.
Note:
Site of Origin (SOO) is configured automatically for sites that have more than one CE to PE connection where eBGP is used for PE-CE connectivity. For configuration details, see the appropriate device driver and cartridge guides.For more information about setting up routing, see IP Service Activator online Help.
To select a PE-CE routing parameter:
Display the Site dialog box and select the Connectivity property page.
Specify the Routing Type. Select from EBGP, RIP, OSPF, EIGRP, EBGP & OSPF, EBGP & RIP, EBGP & EIGRP or None.
If EBGP is selected, you must supply additional routing parameters on the EBGP property page and, optionally, the EBGP Advanced, Route Maps, and EBGP Dampening property pages. See "Configuring eBGP Parameters".
If RIP is selected, additional parameters are available on the RIP property page. See "Setting Up RIP Properties for a Site".
If OSPF is selected, you may want to supply additional routing parameters. See "Setting Up OSPF Properties for a Site".
If EIGRP is selected, the EIGRP panel fields are available. See "Setting Up EIGRP Properties for a Site". You must specify redistribution of routes into BGP on the Redistribution into BGP property page and redistribution of routes into EIGRP on the Redistribution into EIGRP property page. Static Routing and its associated options are still supported as well, but options related to other routing protocols like BGP and OSPF are not.
If EBGP & OSPF is selected, both protocols are configured for the site. Static routing is still supported. Configure additional options for both protocols including route redistribution. See "Configuring eBGP Parameters" and "Setting Up OSPF Properties for a Site".
If EBGP & RIP is selected, both protocols are configured for the site. Static routing is still supported as well. Configure additional options for both protocols including route redistribution. See "Configuring eBGP Parameters" and "Setting Up RIP Properties for a Site".
If EBGP & EIGRP is selected, both protocols are configured on the interfaces in the site. See "Configuring eBGP Parameters" and "Setting Up EIGRP Properties for a Site". You must specify redistribution of routes into BGP on the Redistribution into EBGP property page, and redistribution of routes into EIGRP on the Redistribution into EIGRP property page.
If None is selected, directly-connected VPN routes can be automatically redistributed to VPN members without path configuration by a routing protocol. This option should be used with option Redistribute connected.
Select None if you wish to configure static routes between the PE and CE device instead of a routing protocol.
Specify values including Static Routing, Redistribute Routes, Local Routes, Domain Tag, and Generated Site of Origin.
For information on defining static routes, see "Configuring Static Routing Parameters".
You can also specify metrics for route redistribution between protocols. For information, see "Specifying Metrics for Route Redistribution".
IP Service Activator provides control over eBGP configuration. You can:
Specify the number of times the same ASN can occur in the AS_PATH attribute of a route prefix
Specify the local preference for each interface in a multi-homed site
Configure secure TCP connections between eBGP peers using authentication
Define route dampening parameters
Specify the number of alternative routes to the CE device that are maintained in the PE device's routing table
For more information about configuring eBGP parameters, see IP Service Activator online Help.
To specify eBGP parameters:
In the Site dialog box, select the EBGP property page.
Specify values including Neighbour Address, AS Override, Remove private AS, Authentication, and EBGP Multihop.
If Set at site is selected on the VPN BGP property page in the Domain dialog box, AS Override check box appears as selected.
In the Update Source drop-down, select default to use the PE Interface ID in the update-source interface. With the Network Processor, choose from <Default> and <None>. Selecting <None> avoids propagating the update source-interface EBGP command. Selecting <Default> (which is the default setting) propagates the update source-interface EBGP command using the PE interface itself as the source interface.
Under Allow AS in, select Use domain default check box to use the value specified on the VPN BGP property page in the Domain dialog box or select Use to specify a different value for the site. You can specify a value from 0 to 10 inclusive.
Under Local ASN, start configuring Local Autonomous System Numbers by selecting the Enable local ASN check box. In the Local ASN field, specify a numeric value to for the Autonomous Systems path attribute. Select No Prepend if required.
In the Neighbour Description field, enter a description of the neighbor or select default. Leaving this field empty avoids generating the neighbor description command.
If multiple PE interfaces or sub-interfaces are associated with a site, specify settings for each listed interface or sub-interface.
Edit entries using the Set button.
If you want to define advanced eBGP parameters, select the EBGP Advanced property page.
Specify values for each listed PE interface or sub-interface including Prefix Limit, Restart, Delay (minutes), Prefix filters, Send Communities, Timers, EBGP Attributes, Route Filters, Neighbor connection, TCP Transport Session Options, and Advertisement Interval.
On the EBGP Route Maps property page, specify eBGP Route-map parameters.
IP Service Activator supports inbound and outbound external BGP route-maps applied on a per-neighbor basis for the site.
Note:
Use a naming scheme different from IP Service Activator's for external inbound and outbound route-maps. IP Service Activator will remove route-maps with the same names as those which it generates when Use Autogenerated Route-map in the EBGP Route Maps property page of the Site dialog box is enabled. This can also occur when the device is unmanaged and remanaged depending on the setting of the Unmanage Action attribute.Route-map names specified on this property page are not validated against the names of route-maps provisioned on the router. You must correctly specify names of the externally defined route-maps.
EBGP Route maps can also be configured through the use of the bgpRoutePolicy configuration policy and referenced in the same way you would reference a manually configured route map.
Applying the bgpRoutePolicy configuration policy (at the Site level, for example) creates the route map but does not apply it to the site. Once the configuration policy is applied, you must still refer to it in the inbound/outbound fields of the Site dialog box for it to have any effect.
Refer to IP Service Activator QoS User's Guide for complete details on installing and applying configuration policies.
For more information about configuration policies, see IP Service Activator online Help. The Configuration Policy - bgpRoutePolicy topic contains details on the fields available in this configuration policy.
Set the options for each PE interface listed in the Addressing and routing details listbox including Inbound Route Map: Use External Route-Map, Use Generated Route-Map, Local Preference, Generated Site of Origin, Use Route Map Name, and Outbound Route Map: Use External Route-Map.
If you wish to specify eBGP dampening parameters, select the EBGP Dampening property page.
Route dampening is a mechanism that attempts to minimize instability by suppressing the advertisement of unstable routes. Penalties are applied when a route is withdrawn, re-advertised or changed. When a predefined penalty limit is reached, further advertisement of the route is suppressed. The penalty is reduced according to a defined ’half-life' setting, and once the penalty decreases below a limit, the route can be re-advertised.
EBGP dampening is supported on Cisco and Juniper M-series devices.
Select the EBGP Dampening check box and set options including Decay Half-life, Reuse Threshold, Suppression Threshold, and Max Suppression Time.
IP Service Activator supports VPNs which bridge more than one Autonomous System. However, in order to create this type of VPN, the eBGP and iBGP peering sessions must be configured manually.
When the VPN is configured on a device which already contains an ASN, and IP Service Activator is told not to configure iBGP peering, the iBGP configuration already on the device is left unaltered, as is the ASN.
To create a site that bridges multiple Autonomous Systems:
Manually assign ASNs to the PE devices.
Manually configure iBGP peering on your network.
Manually configure eBGP peering between PEs in different AS clouds.
Perform the remainder of the VPN configuration in IP Service Activator as normal.
You can specify how IP Service Activator configures the next-hop parameter in a static route. Choices include:
IP Address and Interface
IP Address Only
Interface Only
Null Interface
By default, IP Service Activator configures static routes with the interface name, next hop IP address and metric. Other configuration choices include:
Whether the next-hop-address is an address that is in the routing table and not the VRF table (Global check box)
Whether the static route will not be removed even if the interface shuts down (Permanent check box)
Whether a tag is to be associated with a static route, allowing it to be used by route map match statements controlling redistribution of routes (Use this tag field).
Note:
If you have manually configured static routes on the device, these routes are not removed by IP Service Activator provided the VRF table the routes are associated with is not controlled by IP Service Activator.Controlling Redistribution of Static Routes
You can control whether or not static routes are redistributed into dynamic routing protocols.
To redistribute static routes:
On the Connectivity property page of the Site dialog box, select Redistribute Routes.
To have static routes remain local:
On the Connectivity property page of the Site dialog box, select Local Routes.
To specify static routing parameters:
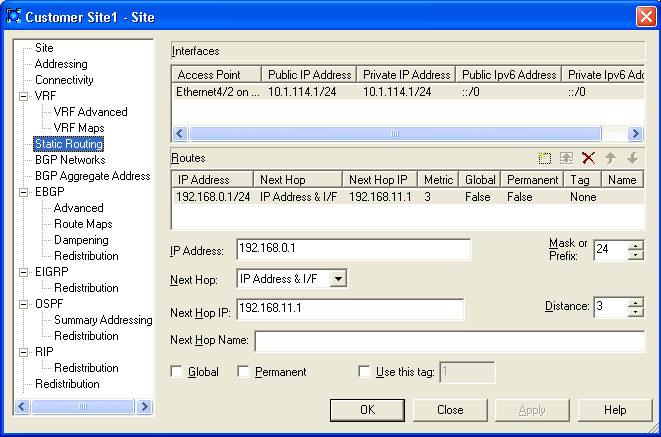
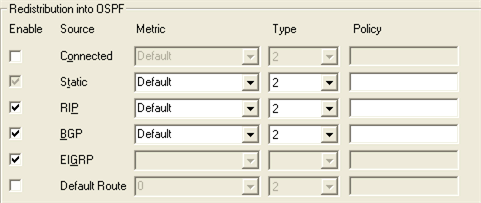
In the Site dialog box, select the Static Routing property page. Figure 1-5 shows the Static Routing property page.
Note:
The fields on the Static Routing property page are disabled until the Static Routing check box on the Connectivity property page is selected.Select a listed PE interface or sub-interface and specify values including IP Address, Mask, Next Hop (Type), Next Hop (IP Address), Distance, Global, Permanent, and Use this tag.
When an interface is added to a VPN it leaves the public IP space and becomes part of a private IP space. Therefore for the PE access interface you need to set up public and private addresses. The public address applies when the interface is outside the VPN, and the private address applies when it is within the VPN.
To set up private and public addressing:
Display the Site dialog box and select the Addressing property page.
Any PE interfaces or sub-interfaces that you have linked to the site are listed. If no PE interfaces or sub-interfaces have been linked to the site, no addresses appear.
Select the desired interface in the Addressing Details list, and supply values including Public IP: IPv4 Address and Mask, IPv6 Address, Prefix Length, Private IPv4 Address: IP Address and Mask, Private IPv6 Address: IP Address and Prefix Length, Unnumbered, and Description.
For additional important notes on the Description field, see IP Service Activator online Help.
IP Service Activator supports IP unnumbered Private PE addressing for certain serial point-to-point IP interfaces in VPN sites on Cisco devices. This allows you to enable IP on an interface and use it in a VPN without having to assign an explicit Private PE IP address and mask. Instead, the IP address of loopback address from the device is used.
To configure an interface for IP unnumbered addressing:
Display the Site dialog box and select the Addressing property page.
Select the Unnumbered check box for the Private PE IP address for the interface in the Site.
From the context menu, select the loopback interface that you want to provide an outgoing IP address for the interface.
Note:
When a site is created, by default, the Unnumbered addressing check box is unavailable. It becomes available when an interface is linked to the site. When the Unnumbered addressing check box is selected, you can then specify either a loopback interface, or other interface details.See "Setting Up Private and Public Addresses for PE Interfaces" for details.
Dynamic routing protocol OSPF can not be used in a site if any of the PE interfaces linked to the site use IP unnumbered. The Routing Protocol on the Site dialog, Connectivity property page must be set to None or EBGP. Static routing is permissible.
You can indirectly associate a dynamic routing protocol (EBGP, RIP, OSPF, and EIGRP for Cisco) with a site containing an IP unnumbered interface.
To configure indirect association of a dynamic routing protocol with a site containing IP unnumbered interfaces:
Link the loopback interface that the IP unnumbered interface references to another site that has the desired routing protocol configured.
The dynamic routing protocol applied to the loopback in the other site then applies to the IP unnumbered interface.
You can indirectly associate a dynamic routing protocol (EBGP, RIP, OSPF, and EIGRP for Cisco).
To indirectly associate a dynamic routing protocol with a site containing an IP unnumbered interface:
Link a loopback interface to a second site that has the desired routing protocol configured on it.
Refer to that loopback from the IP unnumbered interface in the first site.
An attempt to configure an interface's Private PE IP to IP unnumbered when the site has a PE-CE routing protocol or routing protocol other than EBGP configured will trigger the following error:
<object_id>, IP Unnumbered cannot be set if the site uses a Routing Protocol other than EBGP.
Configuring IP unnumbered on an unsupported interface type triggers the following error:
<object_id>, IP Unnumbered is not allowed for this type of Interface.
Few interface types support only IP unnumbered on their sub-interfaces (Frame Relay and ATM). An attempt to configure IP unnumbered on main (point-to-multipoint) interfaces will trigger the following error:
<object_id>, IP Unnumbered is not allowed for main interfaces of this type.
If the loopback used for the IP unnumbered address is removed from a device, the following fault is raised in the fault pane:
Site private PE ip unnumbered reference is invalid.
IP unnumbered can be configured on the following serial point-to-point interface (as reported during discovery):
ds1 (18)
e1 (19)
propPointToPointSerial(22)
ppp (23)
ds3 (30)
frameRelay (32)
atm (37)
sonet (39)
frameRelayService (44)
v35 (45)
aa15 (49)
async (84)
pppMultilinkBundle (108)
hdlc (118)
tunnel (131)
atmSubInterface (134)
rfc1483 (159)
aal2 (187)
Attempting to configure IP unnumbered on an unsupported interface type will trigger an error as described in "Error Messages and Warnings".
Before a loopback interface can be assigned to an IP unnumbered interface configuration:
It must be created.
An IP address assigned to it.
It must be discovered.
The loopback can also be created in the same transaction in which you are using it.
Note:
Switching an interface from an explicit private PE IP address and mask to IP unnumbered and back does not affect its connectivity into the VPN - the interface continues to belong to the VRF.You must have bridging configured for ATM devices to use IP unnumbered. The specific bridging protocols are device specific. Refer to the vendor documentation for your devices for details.
Advanced options give you finer control of the VRF table and route handling within the VPN.
The following options are available:
Specify whether the VRF table name and RD number are unique to the site or inherited from the VPN in which the site participates.
For information on using site-specific or VPN-wide VRF details, see "Using VPN-wide or Site-Specific VRF Details".
If using site-specific VRF and RD settings, specify whether to use the IP Service Activator default or a user-defined VRF table name.
Note:
By specifying a user or system-defined RD number or VRF table name, you can control how IP Service Activator handles manually preconfigured VRF tables. For more information, see "Options for Handling VRF Tables".For information on how user-defined VRF table names affect IP Service Activator's VRF reduction process, see "VRF Re-use and Reduction".
Control over the VRF table. You can specify whether every interface associated with a site has its own VRF table, or can be merged with the VRF table for another interface where routes in the table are identical.
Specify a manually preconfigured route map that filters the routes exported from one site to PE peers within the VPN.
Specify the maximum number of routes from a CE router that can be added to the VRF table. The maximum may be set for the site or inherited from the default defined for the domain. A warning message may be logged when the number of routes stored reaches a user-defined percentage of the maximum.
For more information about advanced VRF options, see IP Service Activator online Help.
To set advanced VRF table options:
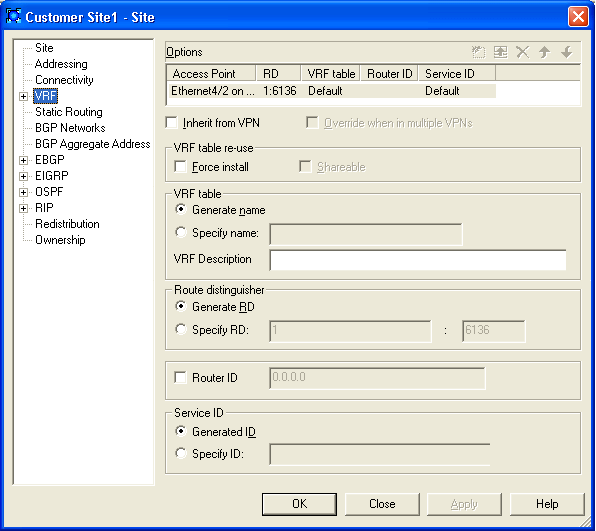
Display the Site dialog box and select the VRF property page, as shown in Figure 1-6.
Any PE interfaces or sub-interfaces that you have linked to the site are listed. If no PE interfaces or sub-interfaces have been linked to the site, no addresses appear.
Specify values for each listed PE interface or sub-interface including Inherit from VPN, Override when in multiple VPNs, Force install, Shareable, Generate name or Specify name, Generate RD or Specify RD, Router ID, Generated ID or Specify ID, and VRF Description.
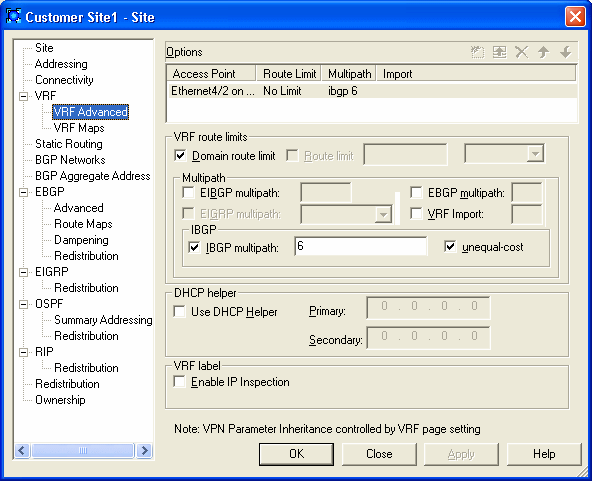
Under VRF, select the VRF Advanced property page, as shown in Figure 1-7.
Specify values for each listed interface including Domain route limit, Route limit, EIBGP multipath, EIGRP multipath, EBGP multipath, VRF Import, IBGP multipath, Use DHCP Helper, and Enable IP inspection.
Note:
Use DHCP Helper is not supported on Juniper ERX.Select the unequal-cost check box to allow unequal cost load balancing by selecting iBGP paths that do not have an equal cost.
To specify VRF import and export maps:
Display the Site dialog box, and under VRF, select the VRF Maps property page.
Any PE interfaces that you have linked to the site are listed. If no PE interfaces have been linked to the site, no addresses appear.
For each listed PE interface, specify values including Export map name and Import map name:
Selecting Export map name allows the specification of an export map name for the VRF selected in the Export map list.
Selecting Import map name allows the specification of an import map name for the interface selected in the VRF Map list.
VRF Route maps can also be configured through the use of the vrfRoutePolicy configuration policy and referenced in the same way you would reference a manually configured route map.
Applying the vrfRoutePolicy configuration policy (at the Site level, for example) creates the route map but does not apply it to the site. Once the configuration policy is applied, you must still refer to it in the inbound/outbound fields of the Site dialog box for it to have any effect.
The vrfRoutePolicy configuration policy can refer to prefix lists, which can in turn be configured using the prefixListEntries configuration policy.
Refer to IP Service Activator QoS User's Guide for details on installing and applying configuration policies.
For details about the configuration policies, see the IP Service Activator online Help. The Configuration Policy - vrfRoutePolicy topic contains details on the fields available in this configuration policy.
Note:
VRF Import is not supported on Juniper ERX devices.In the Site properties dialog box, you can access the BGP Networks and BGP Aggregate Address property pages to set up network and aggregate statements.
Note:
BGP Networks and BGP Aggregate Address are supported on Cisco but not on Juniper ERX.Network statements are used to advertise networks to other routers. For the information to be advertised by BGP, a route to the specified network must be present in the routing table. This routing information can come from connected routers and dynamic routing or static routing sources.
Aggregate statements summarize routes into a single advertisement that is sent to BGP peers.
For more detailed, conceptual information on network and aggregate statements, see IP Service Activator Cisco IOS Device Support Guide.
You can specify the metric to apply to routes distributed from the selected PE-CE routing protocol into other Internal Gateway Protocols (IGPs) and BGP, and vice versa.
To avoid introducing routing loops and convergence problems, you can filter and refine the redistribution of routes by associating a preconfigured route map through preconfigured configuration policies, or policy statement, with redistributed routes.
Directly-connected networks can also be redistributed into routing protocols. IP Service Activator supports direct redistribution of connected routes.
The default route may also be distributed through iBGP to peers within the VPN.
To specify metrics for route redistribution:
In the Site properties dialog box, select the Redistribution property page.
Deselect the Use default redistribution check box.
The Metric and Policy fields that are enabled on the <Destination-protocol> Redistribution property pages depend on the protocol selected for PE-CE connectivity.
Note:
If the Use default redistribution check box is selected, the IP Service Activator default metrics will be used. Otherwise, the metric, and policy attributes for redistribution of connected routes can be specified in the redistribution matrix.Select one of the following <Destination-protocol> Redistribution pages:
EBGP
EIGRP
OSPF
RIP
If you wish to specify a metric or route map for connected routes, select the Enable Connected check box.
Provide values for the fields in each column for each connectivity type as required.
For example, on the EBGP Redistribution property page:
Metric: The metric to apply to routes learned from the PE-CE protocol as they are redistributed into BGP.
Policy: The name of a manually preconfigured route map or, for Juniper M-series devices, policy statement to apply to routes distributed into BGP.
On the other <Destination-protocol> Redistribution property pages:
<Protocol> Metric: The protocol-specific metric to apply to routes distributed from another protocol into the protocol used for PE-CE connectivity.
<Protocol> Policy: The name of a manually preconfigured route map or, for Juniper M-series devices, policy statement to apply to routes distributed from another protocol into the protocol used for PE-CE connectivity.
If you wish to distribute the default route through iBGP to peers, select the Enable Default Route check box.
Click the Set button (shown in Figure 1-8) to confirm your changes.
Click OK to commit the changes and close the dialog box.
Note the following hints and tips:
On the OSPF Redistribution, RIP Redistribution, and EIGRP Redistribution property pages, only the value entered for BGP affects device configuration. A value specified for redistribution from any other protocol affects configuration only where two or more interfaces on the PE device participate in the same VPN, use different protocols for PE-CE connectivity and share the same VRF table.
The RIP metric is based on hop count. The maximum valid discrete metric is 15. A value of 16 is considered infinite.
If no values are specified on a <Destination-protocol> Redistribution property page, the device vendor default metrics are used.
As an example, with OSPF selected as the connectivity type, the column headings going across the redistribution matrix are interpreted as shown in Figure 1-9.
Figure 1-9 OSPF Redistribution Matrix Columns
To set up OSPF properties for a site:
Display the Site dialog box and select the OSPF property page.
Any PE interfaces or sub-interfaces that you have linked to the site are listed. If no PE interfaces or sub-interfaces have been linked to the site, no addresses appear.
Specify OSPF settings for each listed PE interface or sub-interface including Area, Distribute in filter, and Distribute out filter.
From the Area Type list, select the OSPF Area Type on Cisco/Brocade equipment. Area Type selections other than Normal are applicable only to OSPF instances configured within the context of a VRF.
If Normal is selected, the site connects to normal OSPF Area functionality.
If Stub is selected, the site connects to a Stub Area. Stub Areas do not accept external summary routes, or LSA type 4 or 5 packets.
If Totally Stub is selected, the site connects to a Totally Stubby Area. A Totally Stubby Area does not accept any external summary LSAs, or LSA type 3, 4 or 5 packets.
If NSSA is selected, the site connects to a Not So Stubby Area (NSSA) with a default route advertised into the site. With this selection, the Default Route into the site must be explicitly configured on the Redistribution into OSPF property page.
If NSSA (Totally Stub) is selected, the site connects into a Not So Stubby Area (NSSA) Totally Stub area with a default route advertised into the site and metric set. With this selection, the Default Route into the site is automatically generated as a Type 3 LSA. This Area Type is not supported on Brocade.
Select No NSSA Type 7 Redistribution to suppress NSSA behavior in which Type 7 LSAs are translated to Type 5 LSAs. With this selected, no translation will occur.
Under Spf Throttling, enable control of timing and execution of SPF recalculations by selecting Enable. If Enable is selected, you can specify the values in Min delay, Holdtime, and Max delay fields.
Specify the maximum redundant routes OSPF can use by selecting Maximum paths. The range of values is from 1 through 6.
Specify the cost of sending a packet on the selected interface by selecting Cost. Enter a value in the range from 1 to 65,535.
Enable the use of the tag value to identify routes redistributed into OSPF from BGP by selecting BGP redist tag. The value used is specified in the accompanying field.
Under MD5 Authentication, do one of the following:
Select Inherit from VPN. This inherits the interface's OSPF authentication settings from the parent VPN. Deselecting it allows for no authentication and allows selection of the Enable check box for MD5 Authentication.
Select Enable. This enables MD5 key authentication for OSPF for the selected interface. Entering the MD5 key in the Key field lets you use and re-enter it in the Confirm Key field.
Under Process ID, specify the ID of an OSPF process for the selected interface by selecting Generated ID or Specify ID. Selecting Specify ID lets you enter a value in the range from 1 to 65535.
There are additional details available on OSPF Area Types and MD5 Authentication in the IP Service Activator online Help.
To set up OSPF Summary Addressing for a site:
Display the Site dialog box and under OSPF, select the Summary Addressing property page.
Any PE interfaces or sub-interfaces that you have linked to the site are listed. If no PE interfaces or sub-interfaces have been linked to the site, no addresses appear.
Specify values for each listed PE interface or sub-interface including IP Address, Mask, Suppress Advertise, and Use this tag.
To set up a site's RIP properties:
Display the Site dialog box and select the RIP property page.
Any PE interfaces or sub-interfaces that you have linked to the site are listed. If no PE interfaces or sub-interfaces have been linked to the site, no addresses appear.
Configure the following for each listed PE interface or sub-interface:
Ignore Routes From
Passive Interface
There is detailed information available on these two panels in the IP Service Activator online Help.
Note:
On Cisco and Brocade devices, the RIP version is always configured as version 2.To set up a site's EIGRP properties:
Display the Site dialog box and select the EIGRP property page.
Any PE interfaces or sub-interfaces that you have linked to the site are listed. If no PE interfaces or sub-interfaces have been linked to the site, no addresses appear.
Configure the MD5 Authentication for each listed PE interface or sub-interface.
The EIGRP ASN settings are configured on the Site properties - Connectivity property page.
Use this panel to enable MD5 Authentication.
To inherit the interface's EIGRP authentication settings from the parent VPN:
Select the Inherit from VPN check box
The default settings for the VPN can be set on the VPN properties - Connectivity property page.
To allow selection of the Enable check box for MD5 Authentication, or for no authentication:
Deselect the Inherit from VPN check box.
EIGRP MD5 Authentication uses Key Chains which must be present on the device either through previous manual configuration, or through the keychains configuration policy.
In order to set up a VPN, you need to create a VPN object and link the appropriate sites to it.
If you need to apply QoS to CE devices, or SAA or other IP Service Activator-configured services to a VPN, the order of setup tasks is significant and must be as follows:
Create a management VPN and propagate it to the network.
The management VPN type provides control of the CE devices.
Create the fully-meshed or hub and spoke customer VPN and propagate it to the network.
Apply QoS, SAA, or other IP Service Activator-configured services to the fully-meshed or hub and spoke customer VPN.
For an outline of the steps required to set up a management VPN, see Appendix A.
Note:
The best practice to use when removing a VPN to which QoS, SAA, or other IP Service Activator-configured service has been applied, is to remove the policy, measurement, or other IP Service Activator-configured services before deleting the VPN.VPNs are created for IP Service Activator customers – you cannot create an MPLS VPN that is customer-independent. For information on creating customers, see "Setting Up Customers".
For more information about creating an MPLS VPN, see the IP Service Activator online Help.
To create a VPN:
On the Service tab, open the relevant customer folder and select the VPNs folder.
Right-click and select Add VPN from the context menu.
The VPN dialog box opens.
Specify values including Name, Remarks, Level, and VPN Protocols.
Select the Address Family from the drop-down list. You can select IPv4 or IPv6.
Select the Connectivity property page and specify the Connectivity Type:
Mesh: Each site can communicate with all other sites.
Hub and Spoke: One or more sites act as a controlling interface.
Management: Hub and spoke topology that provides connectivity to the CE device where QoS or SAA will be implemented on the VPN.
If you are setting up a hub and spoke or a management VPN you can specify that at least one of the sites is defined as a hub. For more information, see "Specifying a Hub Site".
The import and export policies of a VRF table are defined by route target (RT) numbers. An import policy only allows iBGP routes whose RTs match the RTs of the import policy to be imported into the VRF table. An export policy specifies which RTs are attached to iBGP routes exported from the VRF.
By default, IP Service Activator automatically creates two RT numbers per VPN called Default and Default+1.
The Default value is based on the domain's Autonomous System Number (ASN) and the unique object ID assigned to the VPN by IP Service Activator. By default, this value defines the import and export policies of all sites if the VPN is fully-meshed (Mesh), or the import and export policies of the hub site if the VPN is a hub and spoke or management VPN.
The Default+1 value is the Default value incremented by 1. By default, this value defines the import policy of all hub sites and the export policy of all spoke sites if the VPN is a hub and spoke or management VPN. This value is not used if the specified VPN connectivity is Mesh.
You can define additional RT numbers, and assign to each RT number any combination of import/export policy and site behavior.
IP Service Activator supports Custom or user-defined RT numbers in the following formats:
ASN:Number where ASN is an integer from 1 to 65,535 and Number is an integer from 1 to 4,294,967,295.
IP_Address:Number where IP_Address is an IP address and Number is an integer from 1 to 65,535.
Note:
IP Service Activator checks that system-generated RT numbers are unique. However, no such check is made on user-defined RT numbers and non-unique numbers are permitted.To define and allocate an RT number:
Display the VPN dialog box and select the MPLS property page.
Specify the Route Target. Select from Default, Default+1 or Custom.
For information about Route Target values, see "Setting Route Target Numbers".
Specify values including Hub, Spoke and Mesh. Select from None, Import, Export or Both.
If None is selected, the RT value is not used.
If Import is selected, the site will import iBGP routes tagged with the specified RT value. This is the default for spoke sites in a fully-meshed VPN and for hub sites in a hub and spoke or management VPN.
If Export is selected, the site will attach the specified RT value to export iBGP routes. This is the default for spoke sites in a hub and spoke or management VPN.
If Both is selected, the site will import iBGP routes tagged with the specified RT number and attach the RT value to exported iBGP routes. This is the default for hub sites in a hub and spoke or management VPN and all sites in a fully-meshed VPN.
Select the Vrf-Target (JUNOS only) check box if appropriate. When selected, the Juniper JUNOS cartridge will generate VPN configuration using the VRF-Target format. This selection applies to the selected Route Target in the above list. See the Online Help for more details.
Click Apply.
Create the VPN by linking the appropriate customer sites to the VPN object. A site can be in more than one VPN and can be a hub in one VPN and a spoke in another. A site can be a spoke in more than one VPN.
To link a site to a VPN:
Drag and drop the site object onto the VPN to create a link.
If the VPN is a hub and spoke or management VPN, added sites are spokes by default.
Note:
On device driver technology, problems occur if spoke sites with separate VRF tables on a single PE device are added to a fully-meshed VPN while the device driver is down. The next time a transaction is committed after the driver has re-started the PE device is put into the ’Intervention Required' state and an error is raised. The problem does not occur if the VPN topology change is made after the device driver has re-started, however.By default, IP Service Activator automatically generates a site-specific VRF table name and RD number for each site that participates in a VPN.
At the VPN level, you can override the IP Service Activator default by specifying that the same VRF table name and RD number is applied to all sites that participate in the VPN. You can choose whether to use IP Service Activator-generated values or specify your own VRF table name and/or RD number.
Note:
If you wish to use this feature, in addition to setting a VPN-level option you must also select the Inherit from VPN option in each relevant site's property pages. For more information, see "Setting Advanced VRF Table Options".Using a single RD number for all sites in a VPN is suitable only where a site belongs to one intranet VPN. If the site may become a member of an extranet VPN in the future, this method is not recommended.
Use the Override when in multiple VPNs option for more control over how RD numbers are assigned. If both Inherit from VPN and Override when in multiple VPNs are selected:
if the site is a member of only one VPN, the VRF table name and RD are derived from the parent VPN
if the site is a member of multiple VPNs, the VRF table name and RD are derived using the site specific options
To use the same RD number for all sites in a VPN:
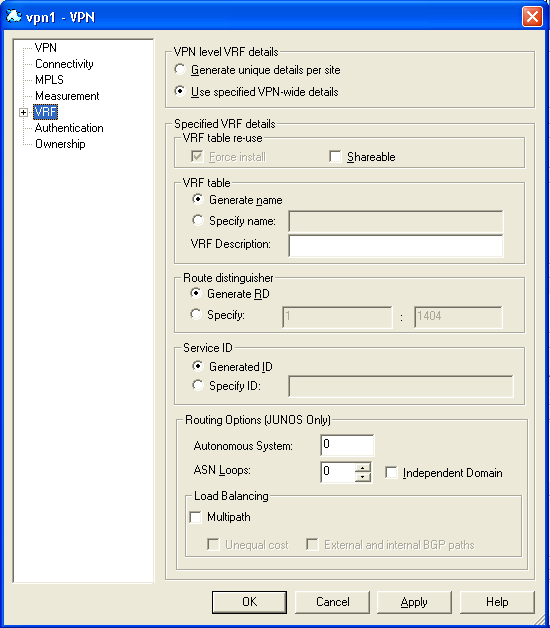
Display the VPN dialog box and select the VRF property page, as shown in Figure 1-10.
Select Use specified VPN-wide details.
Select values including Force install, Shareable, Generate name, Generate RD, and VRF Description.
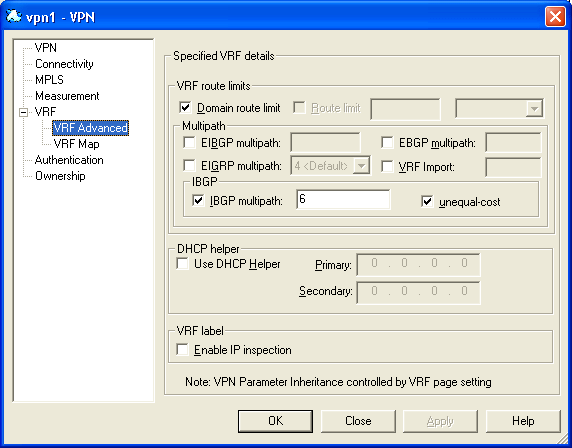
Under VRF, select VRF Advanced property page, as shown in Figure 1-11.
Select Domain route limit, Route limit, EIBGP multipath, EBGP multipath, EIGRP multipath, VRF Import, IBGP multipath, Use DHCP helper, and Enable IP inspection.
Note:
Use DHCP Helper is not supported on Juniper ERX.Select the unequal-cost check box to allow unequal cost load balancing by selecting iBGP paths that do not have an equal cost.
The VRF description can also be set at the Site level. See "Setting Advanced VRF Table Options".
If you are setting up a hub and spoke or management VPN, you can specify one or more sites as the hub site.
To specify that a site is a hub:
From the VPN context menu, select Properties and select the Connectivity property page.
Sites that have been added to the VPN are listed on the page.
In the Connectivity field, select Hub and Spoke or Management from the drop-down menu.
To specify that a site is a hub, select the check box next to the relevant site's name in the Hub Sites in VPN panel.
Each VPN can be shown as a map view, which shows the sites within the VPN. You can choose whether the sites are laid out automatically or arrange them manually. In the manual layout option, you can specify whether objects snap to a grid layout and the granularity of the grid. The default is manual layout.
To display the VPN map:
Double-click on the relevant VPN in the Hierarchy pane.
A representation of the VPN is shown in the Details pane. Initially it consists of the VPN object only. Sites linked to the VPN are listed in the palette.
To specify layout options for a VPN map:
If no map exists for this VPN, then from the VPN icon's pop-up menu, select Add Map View.
Add the map name. Optionally, you can also add a description, change the zoom level, and deselect Default Palette Visible.
If a map exists for this VPN, in the Details pane in Map View, right-click the background and select Properties.
The Map View dialog box opens.
Note:
If a map has a background image, you may need to click on the map's tab at the bottom of the Details pane to display its context menu.Select the Layout property page.
If you want to lay out sites manually, select Manually lay out items on map.
To specify that sites snap to a grid, select the Snap to grid option and specify the granularity of the Grid in millimeters.
If you want to lay out sites automatically, select Automatically lay out items on map and select items to be shown including Networks, Sites, Devices, Interfaces, VCs, VC End Points, and Segments.
You can specify Max nodes, Max fan and Max Devices values to control the automatic layout. For information about these settings, see IP Service Activator User's Guide and IP Service Activator online Help.
Click OK.
If you specified automatic layout, all previously unmapped sites are added to the VPN map.
You can list the sites that are associated with a VPN and display summary information for each site.
To list the sites in a VPN:
Select the relevant VPN from the hierarchy tree or the topology map.
On the toolbar, click the Report View button.
IP Service Activator lists the sites that are associated with the VPN and displays the properties for each site.
After the site and VPN details are set up and the relevant devices are managed, the entire configuration can be applied by committing the transaction.
When you commit the transaction, any concrete VPNs that will be created are listed in the Concretes property page of the Transaction dialog box.
Any validation errors are reported in the Fault property page of the Transaction dialog box and the Current Faults pane.
To cancel the transaction after reviewing the concrete VPNs that will be created and the faults generated by the transaction, click Cancel.
To proceed with the transaction, click OK. Configuration details are sent to the proxy agent/Network Processor and on to the appropriate device driver/cartridge. For information about committing a transaction, see IP Service Activator User's Guide.
Use the built-in transaction status monitoring feature to track the provisioning status of the transaction. Optionally, once the transaction is provisioned successfully, if the device is managed by the Network Processor, you can perform a device audit.
For details on transaction monitoring, and performing audits, see IP Service Activator Administrator's Guide.
You can view a list of the VPNs that have been propagated to the network and installed on an interface or subinterface.
To view implemented VPN details in the IP Service Activator client:
In the Hierarchy pane, select the Service tab.
Expand the Customer folder and select the required customer from the displayed customer list. The list of related sites and VPNs is displayed.
Expand the VPNs folder. The list of implemented VPNs is displayed.
Double-click the required VPN. The Details pane for that VPN is displayed on the right.
In the Details pane, click the VPNs tab to view VPNs implemented on the selected object. All concrete VPNs appear on a yellow background.
VPN details are listed under the following headings:
VPN: name of the VPN
Site: the site associated with the VPN
Access Point: the interface or sub-interface associated with the site
Device: this column remains blank for MPLS VPNs
State: current state of the VPN:
Inactive: the VPN has been created but has not been propagated to the proxy agents
Active: the VPN has been propagated to the proxy agents
Rejected: the VPN configuration was rejected
Installed: VPN configuration has been installed on the designated device
Conflict: there is a configuration error in the VPN
ID: internal ID number by which the VPN is identified.
You can see the inactive, active, installed, and failed states by viewing the Statistics Summary.
To view the Statistics Summary:
When the Details pane for an implemented VPN is open, click View in the menu bar.
Select Statistics Summary. The Statistics Summary for that VPN is displayed at the bottom of the Details pane.
|
Copyright © 2010, 2013, Oracle and/or its affiliates. All rights reserved. Legal Notices |
|