| Oracle® Communications IP Service Activator Configuration Development Kit Guide Release 7.2 E47724-01 |
|
|
PDF · Mobi · ePub |
| Oracle® Communications IP Service Activator Configuration Development Kit Guide Release 7.2 E47724-01 |
|
|
PDF · Mobi · ePub |
This chapter explains how experienced Python developers can use the Oracle Communications IP Service Activator Configuration Development Kit to develop their own scripts.
Driver scripts are a powerful way of configuring your network. Please consider the following before creating scripts:
The driver script feature is intended for experienced system developers only. You should only produce scripts if you are familiar with writing Python code.
You must be familiar with the relevant device functions and commands that you intend to apply to the network.
You should always test scripts thoroughly before applying them to devices.
For full documentation on Python, see the Python website at:
You can either create a script by using a text editor and importing the script into Oracle Communications IP Service Activator, or by entering the text directly within the IP Service Activator client.
To ensure that driver scripts are displayed correctly on the client and present a consistent approach, we recommend that a standard template is used when writing scripts. A suitable text file, script_template.py, is installed in the DriverScripts directory.
This template is as follows:
#Title: title
Version = "n.n"
#IP Service Activator version #.#.#
#Date: dd-mmm-yyyy
#Copyright statement
#<Short description of purpose and use of script, up to 3 lines>

#begin preamble section
#N/A

#begin behavior section
script_name = ""
script_driver_type = "cisco"
script_type = Device
script_device_role = All
script_interface_role = All
script_apply_when = After
script_repeat = False
script_apply_on_restart = False

#begin common section
#N/A

#begin install section

#begin remove section
#N/A
Using a text editor is the preferred method of producing driver scripts as it enables scripts to be written, compiled and checked outside IP Service Activator.
Note the following:
Oracle recommends that you base the scripts you create on the template file outlined in "Using the Template File".
To ensure consistency, follow the guidelines given in "Structure of a Script".
Import the completed script into IP Service Activator, as described in "Importing Scripts".
If necessary, you can edit the scripts from the client.
The client provides only a basic text editor and does not provide any of the features available in more advanced code editing software. We recommend that you create driver scripts (apart from very simple scripts), using other third-party software and import them using the driver script import feature as described in "Importing Scripts".
If you create a script from within the client, you can either create a standalone script (that is, not initially linked to any object) or a script that is directly associated with an object.
To create a standalone script:
From the Custom tab, select the Driver Scripts folder, or a folder within it.
Right-click and choose Add Driver Scripts from the context menu.
On the Driver Script page, enter a name for the script in the Name box, and select the driver type from the drop-down list.
On the Role page, choose the target objects that the script will configure. For all scripts, you must select the device role to which the script is to apply. You can choose one system-defined device role (Core, Access, Gateway or Shadow) and one user-defined device role. Choosing Any Role applies the script to any device assigned a role.
For Interface, Sub-interface, ATM PVC and Frame PVC scripts, select the interface role to which the script is to apply. You can choose one system-defined interface role (Local, Access, Core or Disabled) and one user-defined interface role. Choosing Any Role applies the script to any interface assigned a role.
If roles are not defined, the script will not be implemented.
On the Schedule page, specify when the script is to be run: before or after standard configuration changes, once or repeatedly, and whether or not it is to be run when a device is restarted. When you specify to run the driver script once only, you can further specify to create concretes once only, on first execution.
Enter the lines of the script directly on the Preamble, Common, Install and Remove pages, following the guidelines described in "Structure of a Script".
It is also possible to create a script for a particular object, for example, to create a script specific to a single device.
To create a script for a specific object:
Select the appropriate network object and choose Add Driver Script from the context menu.
Enter the details of the script on the Driver Script dialog box property pages, as described in "To create a standalone script:".
The script is automatically linked to the selected network object, and will be installed when the appropriate transaction is run.
The script also appears in the Driver Scripts folder on the Custom tab, allowing it to be easily re-used.
A driver script consists of the following sections:
The Preamble Section identifies the script and defines any variables used.
The Behavior Section defines standard values that define the objects that the script applies to and the scheduling parameters..
The Common Section contains common functions that can be called from both the Install and Remove sections. This section is optional.
The Install Section consists of Python code that is only run when a script is installed on a device. Install code is mandatory.
The Remove Section consists of Python code that is only run when a script is removed from a device. Remove code is optional.
In the source file, the different sections are delimited by comments within the Python script. In raw text format, the script therefore has the following format:
#begin preamble section
Preamble header
Python code for preamble section
#begin behavior section
Behavior parameter definitions
#begin common section
Python code for common section
#begin install section
Python code for install section
#begin remove section
Python code for remove section
Even if a section does not include any code, it is important to include these comment lines to ensure that when the script file is imported the script works properly and is displayed correctly on the Driver Script dialog box in the client. The comment line at the start of each section must be followed by a new line (CRLF), and there must not be a space or any other character after the word ”section”.
If you export a driver script from the client to a file, the sections will be combined in the correct order and the relevant delimiters inserted.
The rest of this section defines the information that you should include in each of the five sections of a script.
The preamble section is used to identify the script and define any variables used. It is Python code, and by convention should have the following format:
#Title: <Script Name>
Version = "<Version>"
#IP Service Activator version: #.#.#
#Date: <Date>
#Copyright (c) <Company> <Year>
#<Short description of purpose and use of script, up to 3 lines>
#
#
#begin preamble section
default definitions of any variables used in the script from the object context
The first eight lines of the Preamble section appear on the Driver Script page of the Script dialog box in the read-only Preview field. By convention these lines should therefore contain only the header comments. These lines must always be as follows:
Line 1 provides a short title for the script.
Line 2 sets the Version variable, which identifies the version of the script. The version umber must be amended whenever the script is updated.
Line 3 specifies the IP Service Activator release for which this script was written. Scripts may need to be amended for different releases.
Line 4 lists the date that the script was last amended in dd-mmm-yyyy format.
Line 5 provides the copyright statement, if applicable.
Lines 6 to 8 explain the script. It is useful to limit the width of text so that it displays correctly in the client.
Line 9 must always include the comment #begin preamble section. Unlike the other section comments, this line is not used as a section delimiter, but indicates the start of the variable definition section.
If there is no preamble, then the comment #N/A should appear on the next line.
If the script uses variables that are expected to be set in the context of objects to which the script is applied, then by convention the preamble section should set each to a default value, one per line.
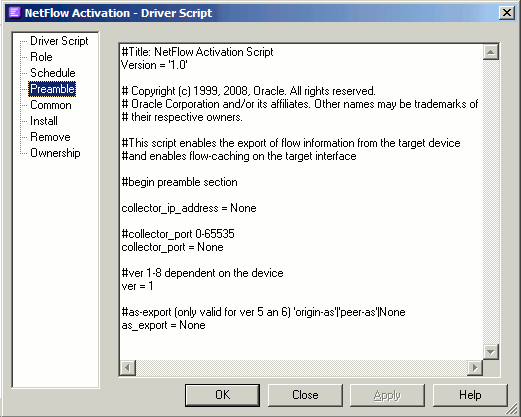
On the IP Service Activator client, the Preamble section can be viewed (and edited if necessary) on the Preamble page of the Driver Script dialog box as in Figure 4-1.
The Behavior section of a script is a set of variable definitions that control when and how the script is run. When a script is imported, this section is parsed and the various fields on the Role and Schedule pages of the Driver Script dialog box are set. When a script is exported to a file, the current field settings are written out in the definitions. If a Behavior section is not specified in a script, default values are applied.
Table 4-1 displays the variables that can be set in the Behavior section. The variables are case-sensitive.
The Behavior section cannot be viewed directly on a property page, but the settings can be viewed (and edited if necessary) on the Driver Script, Role, and Schedule property pages of the Driver Script dialog box.
Table 4-1 Variables Set in the Behavior Section
| Variable | Property Page | Purpose | Default |
|---|---|---|---|
|
script_name |
Driver Script |
String; the name of the script. Should be the same as the title defined on line 1 of the script. |
" " |
|
script_driver_type |
Driver Script |
String identifying device driver. This must match the name of the appropriate driver component. |
"cisco" |
|
script_type |
Role |
Must be one of Device, Interface, Subinterface, Atmpvc, or Frpvc |
Device |
|
script_device_role |
Role |
Must be one of Access, Gateway, Core, Shadow, or All. |
All |
|
script_interface_role |
Role |
Must be one of Access, Core, Local, Disabled, or All. |
All |
|
script_apply_when |
Schedule |
Either Before (script is run before other configuration) or After (script is run after other configuration). |
Before |
|
script_repeat |
Schedule |
Either True (script is run on every subsequent command) or False (script is run once only, on next commit). |
False |
|
script_create_concretes_once |
Schedule |
Either True (concretes are created only on the first successful run) or False (concretes are created on every run). |
False |
|
script_apply_on_restart |
Schedule |
Either True (script is run whenever a device restart is detected) or False (script is not run on a device restart). |
False |
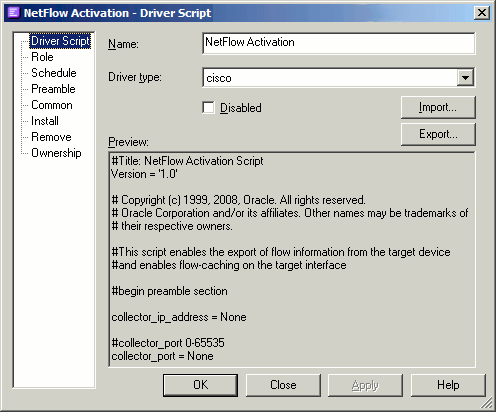
For example, Figure 4-2 shows the setting of script_name and script_driver_type in the Driver Script page.
The Common section is Python code available whenever the script is run. It is used to define functions that can be called from both the Install and Remove sections.
By convention, the Common section should start with the comment:
#begin common section
The Common section is optional; if you do not need to define any common functions, the comment #N/A should appear on the next line.
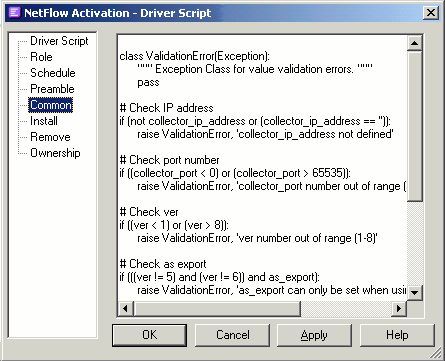
On the IP Service Activator client, the Common section can be viewed (and edited if necessary) on the Common page of the Driver Script dialog box, as shown in Figure 4-3.
The Install section is Python code that is run when the driver script is associated with an object. This will be at the first propagate after the script is associated with the object and optionally on each subsequent propagate or device restart (for details, see "About Scheduling of Scripts").
By convention, the Install section should start with the comment
#begin install section
Note:
An Install section is mandatory.On the IP Service Activator client, the Install section can be viewed (and edited if necessary) on the Install page of the Driver Script dialog box, as shown in Figure 4-4.
The Remove section is Python code that is run when the association between the driver script and an object is removed, either by unlinking the script from an object or by deleting the script. Its purpose is to remove any configuration that was installed by the Install section.
The Remove section is not mandatory, but for a script that installs configuration on devices, Oracle strongly recommends that you define code that removes the configuration that has been placed by the Install code.
Note:
If a script is set to run once only, and is not set to run when a device is restarted, the Remove section can never be run as the device driver does not preserve the script. If the script is set to run on a restart, then the Remove section can be run.By convention, the Remove section should start with the comment:
#begin remove section
If you do not need to define a Remove section, the comment #N/A should appear on the next line.
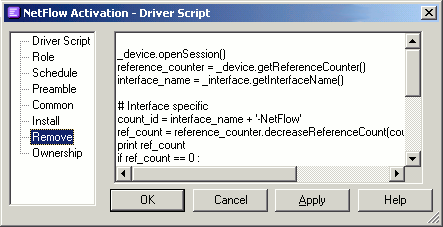
On the IP Service Activator client, the Remove section can be viewed (and edited if necessary) on the Remove page of the Driver Script dialog box, as shown in Figure 4-5.
For examples of actual scripts, see "Pre-defined Scripts".
You can export any scripts created or amended within the client. This allows you to save an existing script under a different name.
To export a script:
On the Custom tab, within the DriverScripts folder, select the script that you have created or amended within the client.
Choose Properties from the context menu.
Click Export. A standard file selection window appears.
Specify the filename for the Python script. By default, files are saved in the DriverScripts folder; you can choose another location if you wish.
Click Save.
The exported script file can be viewed and edited using a text editor. The exported file will include a Behavior section, created from the attributes set on the Driver Script, Role and Schedule property pages.
Note:
When a script is exported, no user-defined roles are saved within the exported script.This section gives tips to help when developing scripts.
When writing scripts, do not define variables starting with an underscore character as this is restricted to variables defined by IP Service Activator, such as _result and _device.
For a general discussion about Python programming style, see the official Python style guide at:
When applying commands to a router, use the full form of all commands rather than abbreviated commands. As well as helping to ensure compatibility with different operating system versions, using full commands makes the script more understandable.
The device driver explicitly catches all errors and returns a status of Failed, together with the error and line number. For more fine-grained error handling, use multiple Try/Except blocks for specific exceptions.
In the following example, a call is made to an exception handler defined in the Common section.
#begin common section
def handleException(details):
  _result.setCode(_result.FAILED)
  _result.setDetails(details)

#begin install section
try:
  _device.openSession()
except RuntimeError, err:
  handleException(err)
  return
Because IP Service Activator can display only one line of text in an error message, when diagnosing script errors it can be useful to copy the text of the error into a text editor, which can display multiple lines including end-of-line characters.
To copy the error text into a text editor:
Open the Device Configuration Log.
Locate the relevant CDK error.
Right-click on the error and select Copy.
Open the text editor.
Select Paste.
The error is then displayed correctly formatted.
If the script is to apply commands to a router by calling deliverCommand(''), then it must first call _device.openSession() and finish by calling _device.closeSession().
For example:
_device.openSession()
_device.deliverCommand('copy running-config startup-config')
_device.closeSession()
It is good practice to validate all the values that can be set by users, since if a value is set incorrectly no command is delivered. Oracle recommends including validation checks in the Common section of a script to ensure that no configuration is installed until all the values have been checked. Checking each command in turn in the Install section can result in the router being left in a partially-configured state if one command fails.
The -NoCommandDelivery flag on the Cisco driver typically prevents the driver from sending a configuration to a device, sending it to the audit log files (pre-pended by no-command-delivery) instead.
Commands sent by scripts are not executed when the driver is in NoCommandDelivery mode.
An optional second parameter to deliverCommand lets script writers identify commands as read or write. This is useful when developing scripts with the driver in NoCommandDelivery mode to prevent accidental changes.
Read commands should not modify the device and so are valid to send when not delivering commands. This is similar to the behavior of the device driver itself which will send show commands regardless of state. (While this is the intent, it is on the honor system. IP Service Activator does not try to validate whether or not the command will actually modify the device.)
The command access can be specified with _device.deliverCommand(command. _device.read) or _device.deliverCommand(command, _device.write)
A read command is always executed. A write command is logged in the audit log with a prefix of CDK-no-command-delivery if the driver is not delivering commands and is executed normally otherwise.
Script writers can check if write commands will be delivered:
_device.deliveringCommands() returns true or false to reflect the driver state.
They can also check the result of deliverCommand which is always NoCommandDelivery enabled if the driver is not delivering commands.
If you want to get and process the output of an operating system command, then you need to store the result of deliverCommand('').
For example:
Result = _device.deliverCommand('show running-config')
You can then use normal Python techniques to extract the information you need.
By default the return code will be TRUE. You need to write the script to catch exceptions and deal with any other errors by returning FAILED. You can also provide a detail string which is logged by the server.
For example:
_result.setCode(_result.OK)
_result.setDetails('An error has occurred')
When writing a script, bear in mind that the configuration you wish to place on the device might already be there. If possible you therefore need to write a script that is intelligent enough to check for and deal with configuration that is already applied.
Any variable created in Python outside the scope of a Python class or method is considered a global variable. This fact can cause a variable that is only applicable to the current script to be misapplied to subsequent scripts. This section describes a method to ensure that local variables are applied to the local context only.
The recommended method is to wrap any CDK script in a function definition before execution. In this way, all classes, functions and variables defined will be local to the wrapper function.
For example, you can wrap script context code in a class definition, as follows:
class ScriptContext:
  x=5
  y=6
  z=7
and then in the CDK script you would reference those variables as follows:
ScriptContext.x
ScriptContext.y
ScriptContext.z
A Python script is typically formatted as follows:
import DriverScript
import OrchestreamExceptions
import traceback
_scriptInfo = "user's cdk script (including script context)"

try:
     exec(_scriptInfo.getScript())\n"
except:\n"
     traceback.print_exc(file = _scriptInfo)\n"
To manage script context, the Python script should be formatted as follows:
import DriverScript
import OrchestreamExceptions
import traceback

def runPython():
    _scriptInfo = "user's cdk script (including script context)"
    try:
         exec(_scriptInfo.getScript())\n"
    except:\n"
         traceback.print_exc(file = _scriptInfo)\n"

runPython()
|
Copyright © 2011, 2013, Oracle and/or its affiliates. All rights reserved. Legal Notices |
|