10 Helpset Authoring Wizard
This chapter describes the Helpset Authoring Wizard, its various screens, and how to use it to create help system.
This chapter includes the following sections:
10.1 About Helpset Authoring Wizard
The Helpset Authoring Wizard, also known as OHJ Authoring Wizard, generates certain control files used by Oracle Help. The functionality of the authoring wizard is limited: it is primarily intended to be used to convert help systems created using other formats, not to be a full-featured help authoring tool. For example, you can use the helpset wizard to create an Oracle Help system from files generated by an old release of RoboHelp HTML which did not yet support Oracle Help.
The current version of the wizard can generate a helpset file, a search index file, and a map file. It also converts certain JavaScript pop-up links to the Oracle Help format. However, the wizard does not currently convert RoboHelp HTML associative links to their Oracle Help equivalents (despite the option being present).
10.2 Starting the Wizard
When you install OHJ on Windows, a batch file and an initialization file for starting the wizard are generated, using the path into which you installed OHJ. A shortcut for starting the wizard is also added to the Windows Start menu. Select this shortcut to start the wizard. Alternatively, you can issue the following command at the command prompt:
<OHJ_HOME>\bin\authoringWizard.bat
For example, if you have installed OHJ in D:\ohelp folder, you can run the wizard with the following command:
D:\ohelp\bin\authoringWizard.bat
When you run the above command, you are greeted with a Welcome screen of OHJ Authoring Wizard. Click Next to continue.
Figure 10-1 OHJ Authoring Wizard: Welcome
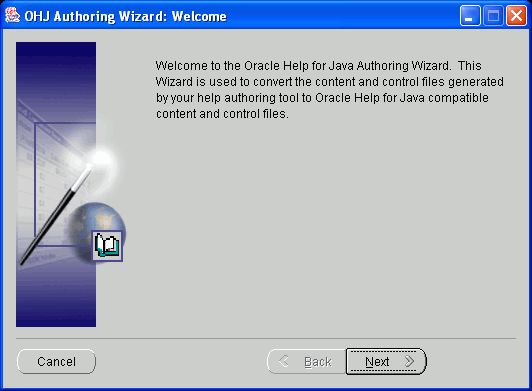
Description of "Figure 10-1 OHJ Authoring Wizard: Welcome "
10.3 Creating a Helpset File
The first step of the OHJ Authoring Wizard is to create a helpset (.hs) file. You may also open an existing helpset file, and edit it later. For more information about helpsets, see Section 5.2, "Helpset File".
Figure 10-2 OHJ Authoring Wizard: HelpSet File
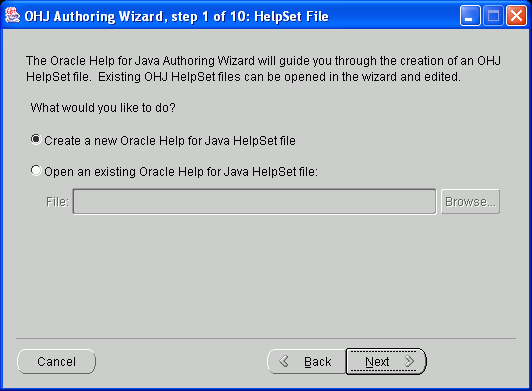
Description of "Figure 10-2 OHJ Authoring Wizard: HelpSet File"
Use the following information to enter data in each field of the HelpSet File page:
| Field | Description |
|---|---|
|
Create a new Oracle Help for Java HelpSet File |
Select the option to create a helpset file. |
|
Open an existing Oracle Help for Java HelpSet File |
Select the option if you have a helpset file ready and want to edit it. |
|
File |
Click Browse and select the helpset file you want to edit. |
When you are done, click Next to continue.
10.4 Specifying Authoring Tool and HTML Browser
The Select Source and Target page of OHJ Authoring Wizard enables you to choose the authoring tool and the browser to display the help files.
Figure 10-3 OHJ Authoring Wizard: Select Source and Target
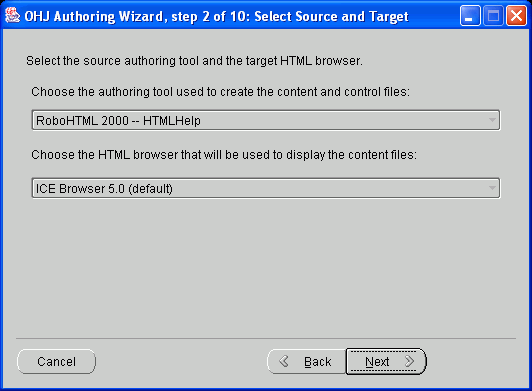
Description of "Figure 10-3 OHJ Authoring Wizard: Select Source and Target"
Use the following information to enter data in each field of the Select Source and Target page:
| Field | Description |
|---|---|
|
Choose the authoring tool |
Select the authoring tool used to create the help files. |
|
Choose the HTML browser |
Select the browser you want to use to display the html files. |
When you are done, click Next to continue.
10.5 Specifying Source Directory
The Specify Directory page of OHJ Authoring Wizard enables you to choose the directory containing the html files and other control files.
Figure 10-4 OHJ Authoring Wizard: Specify Directory
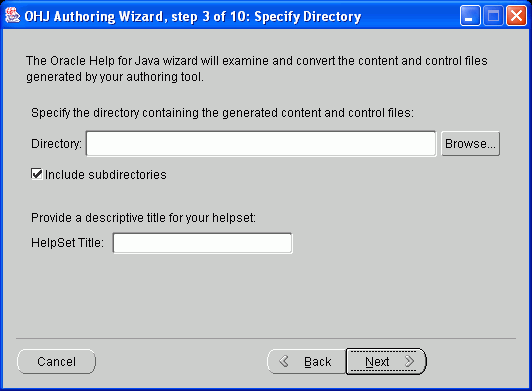
Description of "Figure 10-4 OHJ Authoring Wizard: Specify Directory"
Use the following information to enter data in each field of the Specify Directory page:
| Field | Description |
|---|---|
|
Directory |
Click Browse and select the source directory of the html files. If you have specified an existing helpset file, the field is not available for editing and displays the directory location of the helpset file. |
|
Include Subdirectories |
Select the checkbox to include subdirectories of the selected Directory. |
|
HelpSet Title |
Specify the title of the helpset file |
When you are done, click Next to continue.
10.6 Defining Views
The Define Views page of OHJ Authoring Wizard enables you to define views in the OHJ Help Navigator window. You can create views for table of contents, keyword index, and define custom views.
Figure 10-5 OHJ Authoring Wizard: Define Views
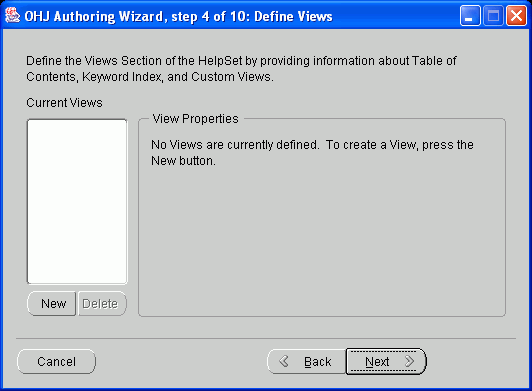
Description of "Figure 10-5 OHJ Authoring Wizard: Define Views"
| Field | Description |
|---|---|
|
New |
Creates a new view and adds the name of the view in Current Views list. |
|
Delete |
Deletes the selected view from the Current Views list. |
When you are done, click Next to continue.
10.6.1 Defining a New View
OHJ Authoring Wizard enables you to create multiple views in your help. By default, no views are defined. To define a new view, click New. Figure 10-6 shows the fields available in the Define Views page of the wizard when a new view is created.
Figure 10-6 OHJ Authoring Wizard: Define New Views
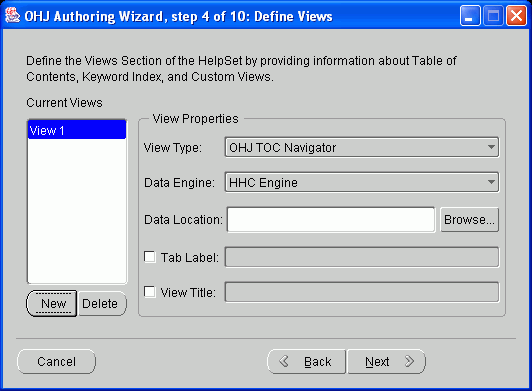
Description of "Figure 10-6 OHJ Authoring Wizard: Define New Views"
Use the following information to enter data in each field of the Define Views page:
| Field | Description |
|---|---|
|
View Type |
Select the view type of new view defined. You can choose the view type as OHJ TOC Navigator, OHJ Keyword Navigator, OHJ Search Navigator, or define a custom navigator. |
|
Data Engine |
Select the data engine for the new view. You can choose the engine as HHC Engine, HHK Engine, XML TOC Engine, XML Index Engine, TOC Engine, TOK Engine, Search Engine; or define a custom data engine. |
|
Data Location |
Click Browse and select the location of the control file. |
|
Tab Label |
Select the checkbox and enter the label of the tab displayed in OHJ Help Navigator window. |
|
View Title |
Select the checkbox and enter the title of the view. |
10.6.2 Defining a Custom View Type
You can define a custom view if the available views do not meet your requirements.
To create a custom view type, select Custom from the View Type dropdown list of Define Views page. The Define the Custom Type dialog appears.
Figure 10-7 OHJ Authoring Wizard: Define Custom View Type
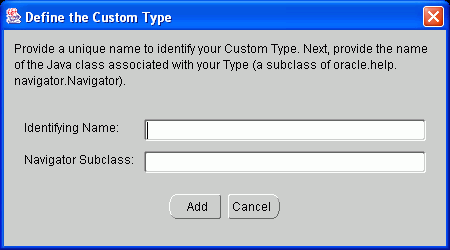
Description of "Figure 10-7 OHJ Authoring Wizard: Define Custom View Type"
Use the following information to enter data in each field of the Define Views page:
| Field | Description |
|---|---|
|
Identifying Name |
Specify the unique name of the view. |
|
Navigator Subclass |
Specify the name of the Java class. The class must be a subclass of |
10.6.3 Defining a Custom Data Engine
You can define a custom data engine if the available data engines do not meet your requirements.
To create a custom data engine, select Custom from the Data Engine dropdown list of Define Views page. The Define the Custom Data Engine dialog appears.
Figure 10-8 OHJ Authoring Wizard: Define Custom Data Engine
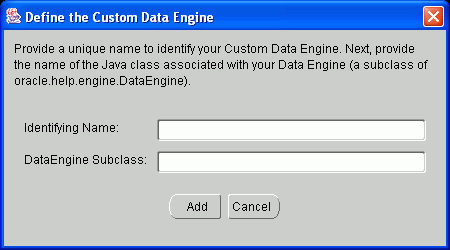
Description of "Figure 10-8 OHJ Authoring Wizard: Define Custom Data Engine"
Use the following information to enter data in each field of the Define Views page:
| Field | Description |
|---|---|
|
Identifying Name |
Specify the unique name of the data engine. |
|
DataEngine Subclass |
Specify the name of the Java class. The class must be a subclass of |
10.7 Defining Full-Text Search View
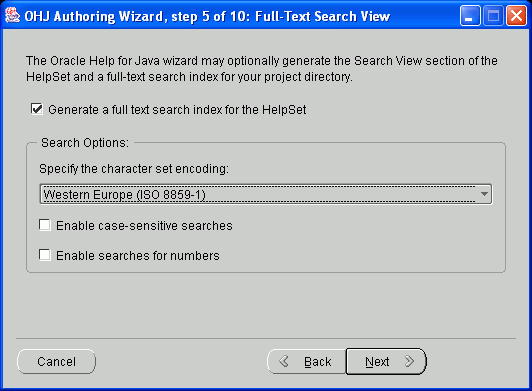
The Full-Text Search View page of OHJ Authoring Wizard enables you to create a Search View and generate a full-text search index for the help.
To create a full-text search index, select the Generate a full text search index for the HelpSet checkbox.
Figure 10-9 OHJ Authoring Wizard: Full-Text Search View
Description of "Figure 10-9 OHJ Authoring Wizard: Full-Text Search View"
Use the following information to enter data in each field of the Full Text Search View page:
| Field | Description |
|---|---|
|
Generate a full text search index for the HelpSet |
Select the checkbox to create a full-text search index. |
|
Specify the character set encoding |
Select the desired character set encoding from the dropdown list. By default, Western Europe (ISO 8859-1) is selected. |
|
Enable case-sensitive searches |
Select the checkbox to allow case sensitive search feature in your help. |
|
Enable searches for numbers |
Select the checkbox to allow numeric search feature in your help. |
When you are done, click Next to continue.
10.8 Defining Map File
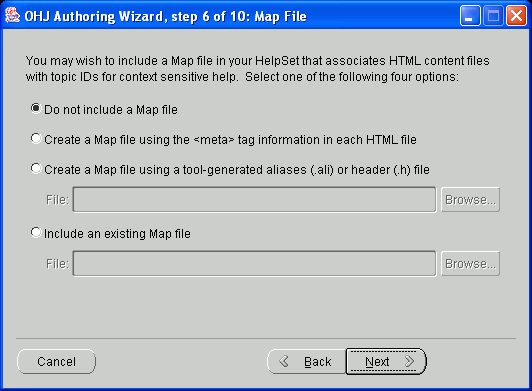
The Map File page of OHJ Authoring Wizard enables you to create a map file for your help and associate unique topic ids with your help topics.
Figure 10-10 OHJ Authoring Wizard: Full-Text Search View
Description of "Figure 10-10 OHJ Authoring Wizard: Full-Text Search View"
Use the following information to enter data in each field of the Full Text Search View page:
| Field | Description |
|---|---|
|
Do not include map file |
Specifies that you do not want to provide a map file. This option is helpful if your help is not a context-sensitive help. |
|
Create a Map file using the <meta> tag information in each HTML file |
Specifies to create a map file from <meta> tags. Some help authoring tools (such as RoboHelp) insert topic-ids in meta tags in the HTML file. This wizard option finds the meta tags and creates a map file from them |
|
Create a Map file using tool generated aliases (.ali) or header (.h) files |
Specifies to create a map file from generated aliases or header files. Click Browse to specify the map file name and location. |
|
Include an existing Map file |
Specifies to use an existing map file. Click Browse to specify the map file name and location. |
When you are done, click Next to continue.
10.9 Converting Associative Links
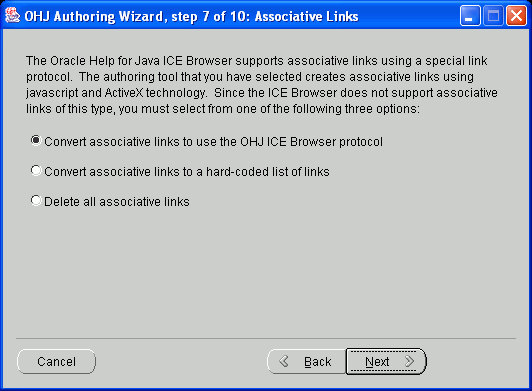
The Associative Links page of OHJ Authoring Wizard enables you to convert the associative links defined in the existing help system to it's own associative link protocol.
Figure 10-11 OHJ Authoring Wizard: Associative Links
Description of "Figure 10-11 OHJ Authoring Wizard: Associative Links"
Use the following information to enter data in each field of the Associative Links page:
| Field | Description |
|---|---|
|
Convert associative links to use OHJ ICEbrowser protocol |
Specifies to convert all associative links into ICEbrowser supported |
|
Convert associative links to a hard coded list of links |
Specifies to convert all associative links into hard coded list of links. |
|
Delete all associative links |
Specifies to remove all associative links from the help pages. |
When you are done, click Next to continue.
10.10 Converting Popup Window Links
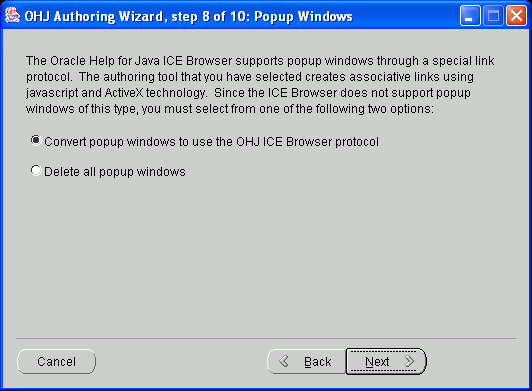
The Popup Windows page of OHJ Authoring Wizard enables you to convert the popup window links defined in the existing help system to it's own popup link protocol.
Figure 10-12 OHJ Authoring Wizard: Popup Windows
Description of "Figure 10-12 OHJ Authoring Wizard: Popup Windows"
Use the following information to enter data in each field of the Popup Windows page:
| Field | Description |
|---|---|
|
Convert popup windows to use the OHJ ICEbrowser protocol |
Specifies to convert all popup window links into ICEbrowser supported protocol. |
|
Delete all popup windows |
Specifies to remove all popup window links from the help pages. |
When you are done, click Next to continue.
10.11 Defining Window Types
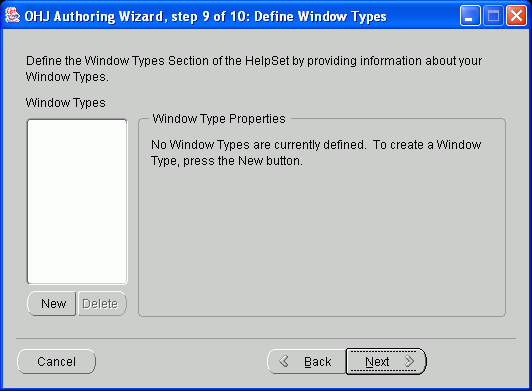
The Window Types page of OHJ Authoring Wizard enables you to define window types. By default, no window types are defined. When you define a new window type, you can configure the window's identity, it's placement on the screen, color attributes, and the toolbar buttons available on the window.
Figure 10-13 OHJ Authoring Wizard: Define Window Types
Description of "Figure 10-13 OHJ Authoring Wizard: Define Window Types"
Use the following information to enter data in each field of the Define Window Type page:
| Field | Description |
|---|---|
|
New |
Creates a new window type and adds the name of the window in Window Types list. |
|
Delete |
Deletes the selected window type from the Window Types list. |
To define a new window type, click New and configure its attributes. You can configure following attributes:
10.11.1 Window Identity
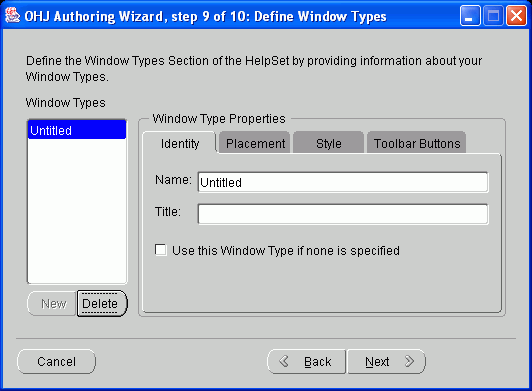
The Identity tab of the Define Window Types page enables you to define the window name and title.
Figure 10-14 OHJ Authoring Wizard: Window Type Identity Property
Description of "Figure 10-14 OHJ Authoring Wizard: Window Type Identity Property"
Use the following information to enter data in each field of the Identity tab of the Define Window Type page:
| Field | Description |
|---|---|
|
Name |
Specifies the unique window name. |
|
Title |
Specifies the window title. |
|
Use this Window Type if none is specified |
Select the checkbox to make the window as default window. |
10.11.2 Placement Attributes
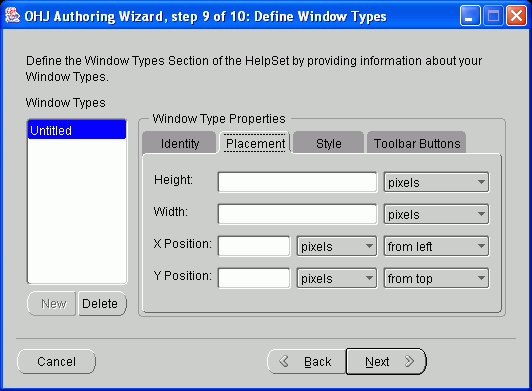
The Placement tab of the Define Window Types page enables you to configure the window size and position on the screen.
Figure 10-15 OHJ Authoring Wizard: Window Type Placement Property
Description of "Figure 10-15 OHJ Authoring Wizard: Window Type Placement Property"
Use the following information to enter data in each field of the Placement tab of the Define Window Type page:
| Field | Description |
|---|---|
|
Height |
Specifies the windows height, and choose the desired unit as pixels or percent. |
|
Width |
Specifies the windows width, and choose the desired unit as pixels or percent. |
|
X Position |
Specifies the windows X coordinate, choose the desired unit as pixels or percent, and direction as from left or from right. |
|
Y Position |
Specifies the windows Y coordinate, choose the desired unit as pixels or percent, and direction as from top or from bottom. |
10.11.3 Style Attributes
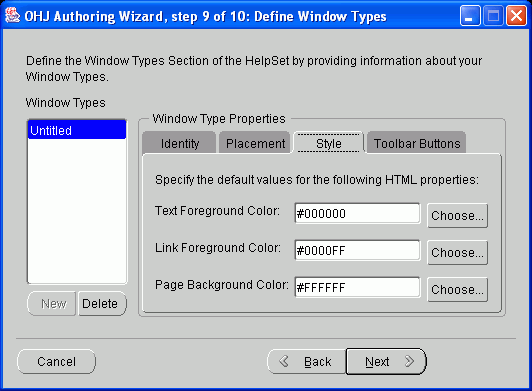
The Style tab of the Define Window Types page enables you to configure the window colors, text and background.
Figure 10-16 OHJ Authoring Wizard: Window Type Style Property
Description of "Figure 10-16 OHJ Authoring Wizard: Window Type Style Property"
Use the following information to enter data in each field of the Style tab of the Define Window Type page:
| Field | Description |
|---|---|
|
Text Foreground Color |
Specifies the hexadecimal color code of text in the window. To choose a color, click Choose and select your desired text color. |
|
Link Foreground Color |
Specifies the hexadecimal color code of link text in the window. To choose a color, click Choose and select your desired link text color. |
|
Page Background Color |
Specifies the hexadecimal color code of page background in the window. To choose a color, click Choose and select your desired page background color. |
10.11.4 Toolbar Buttons
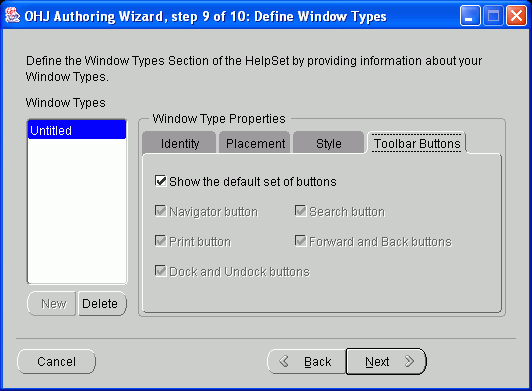
The Toolbar Buttons tab of the Define Window Types page enables you to configure the toolbar buttons available in the Help Topic window.
Figure 10-17 OHJ Authoring Wizard: Window Type Toolbar Buttons Property
Description of "Figure 10-17 OHJ Authoring Wizard: Window Type Toolbar Buttons Property"
Use the following information to enter data in each field of the Toolbar Buttons tab of the Define Window Type page:
| Field | Description |
|---|---|
|
Show the default set of buttons |
Select the checkbox to show the default set of toolbar buttons. By default, all toolbar buttons are available. To customize toolbar buttons, clear the checkbox. |
|
Navigator Button |
Select the checkbox to add the Navigator toolbar button in the window. The Navigator button enables you to open the Help Navigator window. |
|
Search Button |
Select the checkbox to add the Search toolbar button in the window. The Search button enables you to search for a text across the help pages. |
|
Print Button |
Select the checkbox to add the Print toolbar button in the window. The Print button enables you to print a topic. |
|
Forward and Back Buttons |
Select the checkbox to add the Forward and Backward toolbar buttons in the window. The Forward and Backward buttons allow you to navigate to previously opened topics, and return back to current topic. |
|
Dock and Undock Buttons |
Select the checkbox to add the Dock and Undock toolbar buttons in the window. The Dock and Undock buttons allow you to dock and undock the Help Topic and Help Navigator windows. |
10.12 Finalizing the HelpSet
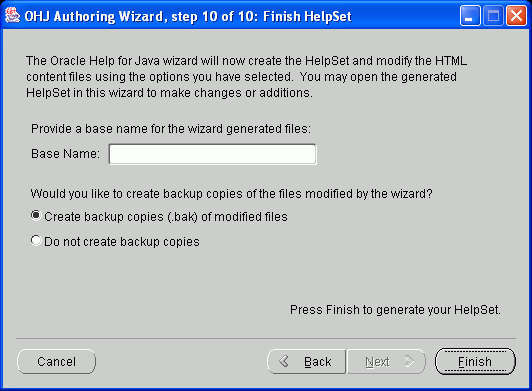
The Finish page of the OHJ Authoring Wizard creates the helpset according to options selected in the wizard.
Figure 10-18 OHJ Authoring Wizard: Finish Helpset
Description of "Figure 10-18 OHJ Authoring Wizard: Finish Helpset"
Use the following information to enter data in each field of the Finish HelpSet page:
| Field | Description |
|---|---|
|
Base Name |
Specify the base name of the help set. The base name is without the file name extension, and defines the name of control files. For example, if the base name is |
|
Create backup copies |
Specifies to create backup copies of the updated files. The files are saved with |
|
Do not create backup copies |
Specifies not to create backup copies of the updated files. |
When you are done, click Finish to generate the helpset file.