| Oracle® Enterprise Data Quality for Product Data AutoBuild Reference Guide Release 11g R1 (11.1.1.6) Part Number E29129-02 |
|
|
PDF · Mobi · ePub |
| Oracle® Enterprise Data Quality for Product Data AutoBuild Reference Guide Release 11g R1 (11.1.1.6) Part Number E29129-02 |
|
|
PDF · Mobi · ePub |
This chapter provides an end-to-end example of how to use AutoBuild to read structured metadata containing item information and generate a working data lens for use in the Knowledge Studio. It uses a sample structured data set that contains several records of standard writing instruments like pens and pencils.
The following sections describe where to find the information to use AutoBuild with Oracle PIM metadata as your source.
The EDQP solution with the Fusion PIM Data Hub is fully integrated and the process of using them together with AutoBuild is detailed in Oracle Enterprise Data Quality for Product Data Fusion PIM Integration Implementation and User's Guide at
http://docs.oracle.com/cd/E35636_01/doc.11116/e29148/toc.htm
The EDQP R12 PIM Connector is integrated with most Oracle R12 PIM systems and the process of using them together with AutoBuild is detailed in Oracle Enterprise Data Quality for Product Data R12 PIM Connector User's Guide at
http://docs.oracle.com/cd/E35636_01/doc.11116/e29140/toc.htm
You start the AutoBuild process by opening the Excel workbook file that contains your structured metadata. Once the workbook is open, locate the Services for Excel Add-In toolbar. For more information about installation or the AutoBuild Wizard, see "The AutoBuild User Interface".
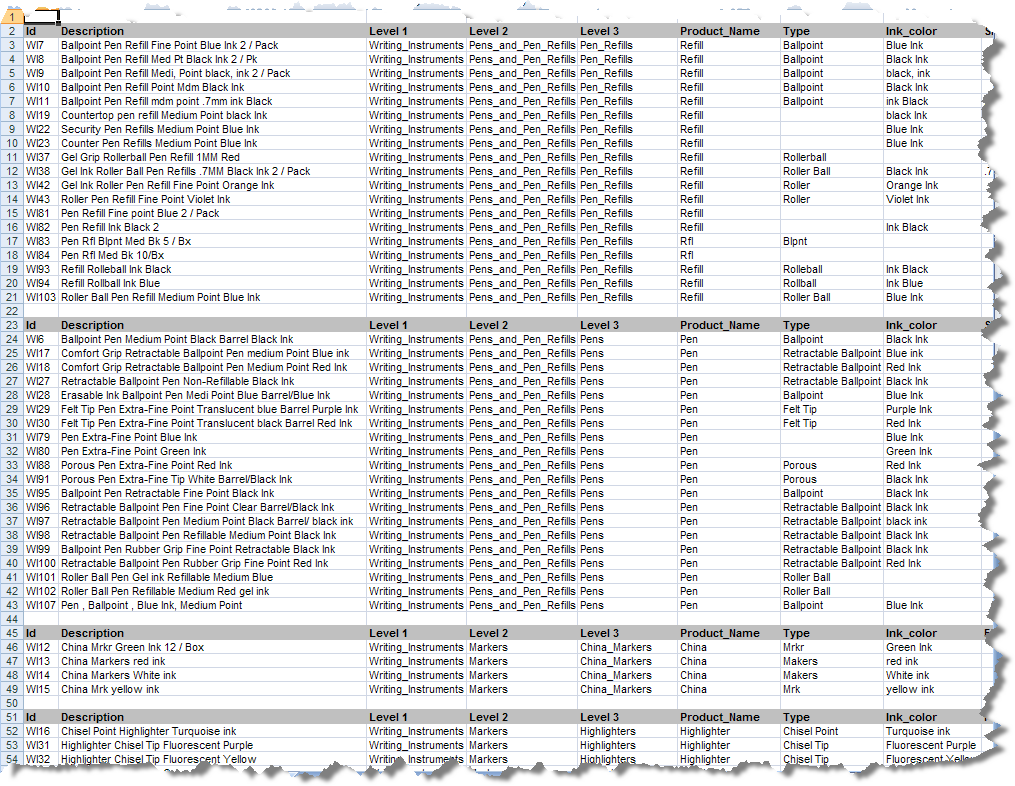
When creating your structured data file using Excel, it is important to note Excel interprets certain data as Excel specific formats for formulas, dates, and so on. It is best to ensure that Excel interprets the data as strictly text by using a leading single quote character (') in every data cell. The leading single quote indicates to Excel that the information in the cell is to be treated as text. For example, if the cell contains a part number with slashes, dashes, leading spaces, or periods.
Click the AutoBuild button or select the DataLens Tools menu, and then click the AutoBuild button.
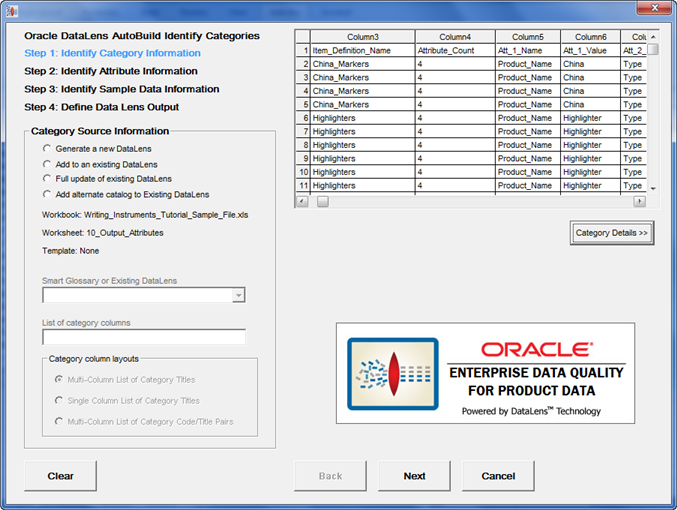
The first time the AutoBuild application is started and the wizard is displayed, the active Excel worksheet is chosen by default as the data source. The AutoBuild wizard remembers the settings chosen in all of the four wizard steps as long as Excel remains open. The settings are saved permanently as long as the workbook is saved. At any time, to clear the current option selections, just return to the first step and click Clear.
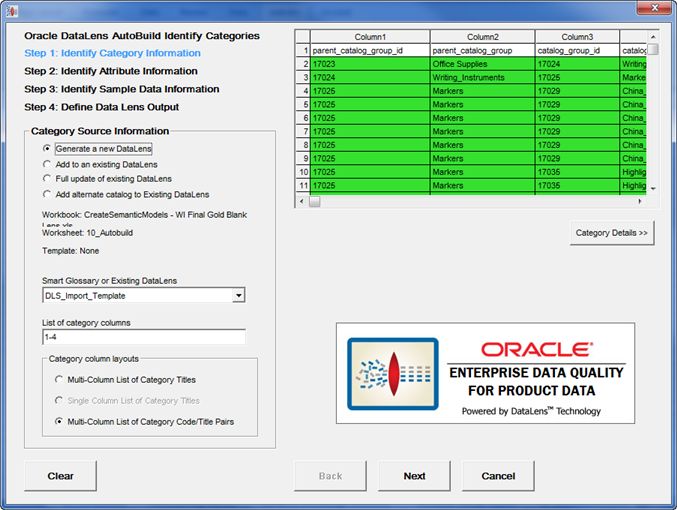
Select the whether you want to generate a new data lens, add to an existing one, update (synchronize) an existing data lens, or add an alternate catalog to an existing data lens. In the example in the following sections, Generate a new DataLens is selected to show how to create a new data lens.
You must identify which of the columns of your structured metadata contain the category information. These category columns are used by AutoBuild to create data lens Item Definitions, which automatically synchronizes the data lens knowledge to your category hierarchy. The Item Definition hierarchy is defined by either the layout of the category columns in the worksheet or by the hierarchy defined in a separate taxonomy reference file, such as the UNSPSC industry standard.
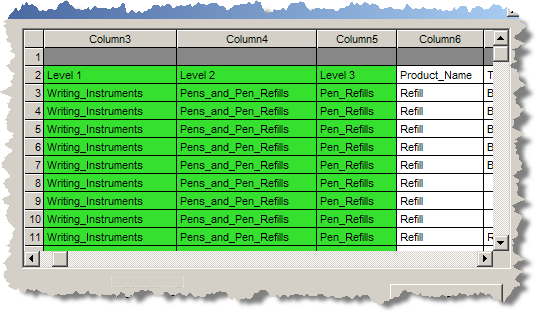
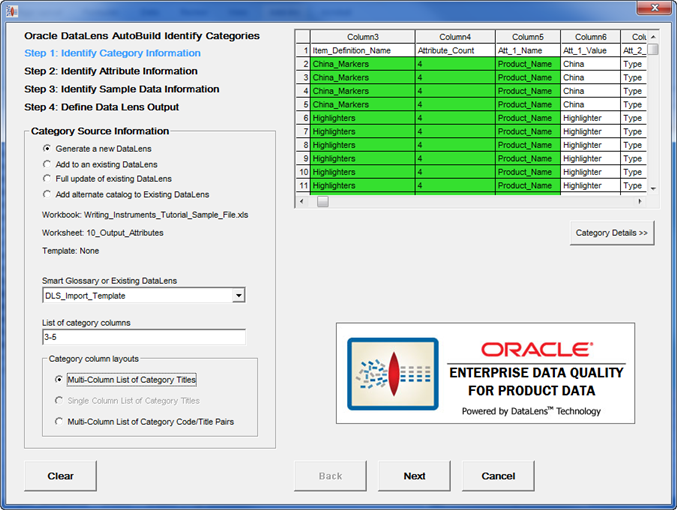
To identify the category columns in the selected worksheet, enter the list of columns in the List of category columns field. The category column(s) may contain a single column number, column ranges like "1-10", or a combination of column numbers and ranges that are comma separated like "1,5-10,16".
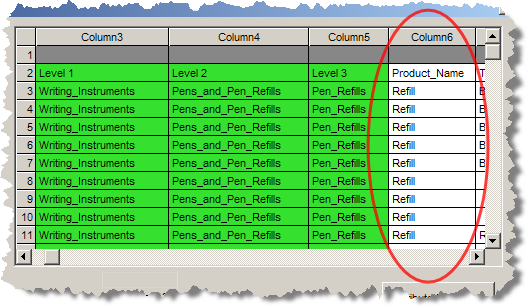
Once the list of category columns is entered, pressing the Tab key or clicking on another control causes the Category/Attribute Data table to redisplay the information. The selected columns are colorized green.
There are three possible category column layouts to choose. First and most commonly used, is the Multi-Column List of Category Titles option. This column layout assumes that there are multiple levels in the category hierarchy and that each column represents one level in the hierarchy. AutoBuild assumes that the category hierarchy is expressed left to right with the first column starting from the left as the highest level in the category hierarchy, and the last column on the right is the lowest level in the hierarchy. This layout is selected by default whenever the column list contains more than one column.
The second category layout is the Single Column List of Category Titles option. This layout is selected automatically when you list only one category column.
The third category layout is Multi-Column List of Category Code/Title Pairs. This layout is similar to the multi-column list previously described with the addition that each category is expressed as pair of columns. The first column contains a category code and the second column contains the category name.
This example uses the automatically selected Multi-Column List of Category Titles option.
Click Next to advance to the next step.
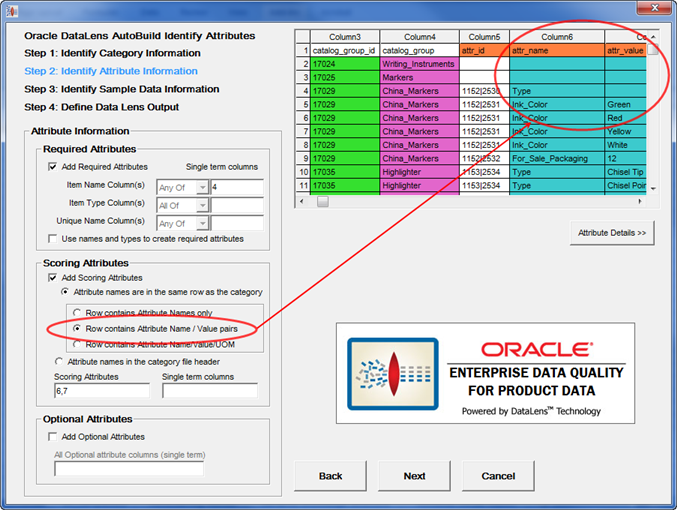
You must identify the location and layout of the attribute and attribute value information found in the structured data. This attribute information is used by AutoBuild to create the data lens Item Definitions attributes and automatically synchronize the data lens knowledge to your business domain schema. The attribute value information is used by AutoBuild to create data lens phrases and terminology for automatic text recognition. Additionally, AutoBuild automatically associates the proper data lens phrases to the correct Item Definition attributes thus providing automatic attribute extraction.
First, you identify the attribute columns that are used for the Item Definition required attributes. These required attribute columns typically consist of item names, types, and brands.
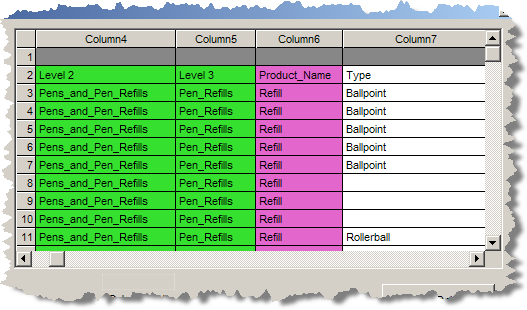
In this example, column 6 contains the product name as in the following:
As each required logic column specification is entered, the Category/Attribute Data table is updated, colorizing the selected columns in purple as in the following:
Sometimes structured metadata columns can be used for more than one purpose. For example, name and type information often overlaps with category information.
The attribute information is laid out as a set of columns just to the right of the category information as in the following example.
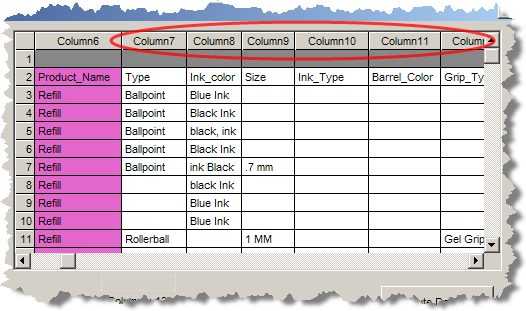
In this example, columns 7 through 13 are used as the attribute scoring information.
To add attribute scoring, select the Add Scoring Attributes check box. In this example, the Attribute names in the category file header option must be selected because the names are in a header row.
Next, you must enter the attribute column list in the Scoring Attribute field. You can supply a comma-separated list of column numbers, as well as column ranges.
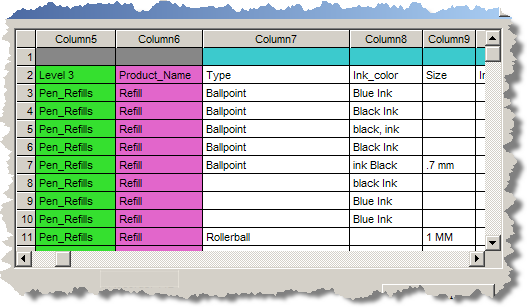
Once the list of attribute columns is accepted, the selected scoring attributes are colorized blue as previously described.
The example selections are as follows:
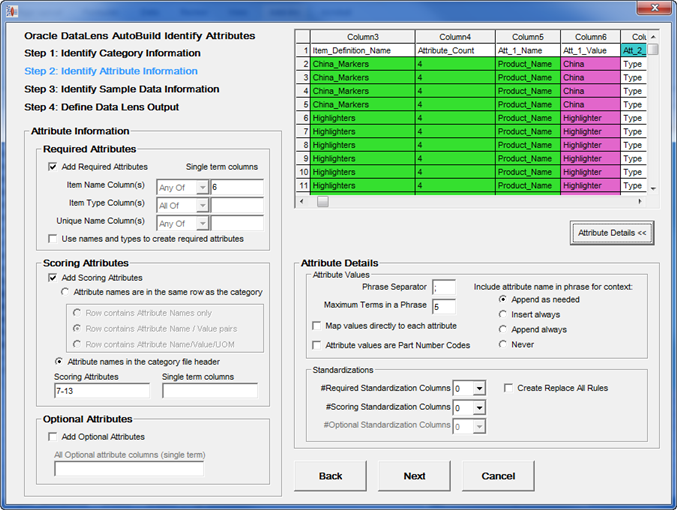
Click Next to advance to the next step.
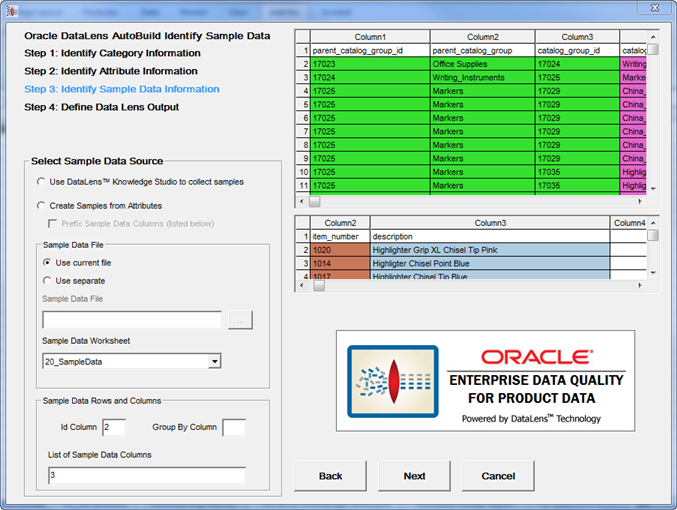
You must identify the location and layout of any available sample data that can be used by AutoBuild when creating a data lens. This sample data information is used by AutoBuild to add both category-based sample data files and 100 record random sample data files to the resulting data lens. The random sample files allow a data analyst to determine the convergence of the data lens knowledge. The category-based files allow a content expert to perform maintenance easily by focusing on specific item commodities. When no sample data is available, you can use the option to create a sample from the available attribute information.
First, select the data source for the sample data information. You have the options of using the Knowledge Studio to collect the sample data, create sample data from the attribute information identified in the previous wizard step, or by selecting sample data from a separate file.
This example creates the samples from attributes so the appropriate option is selected, as well as the Prefix Sample Data Columns (listed below) check box.
With these selections, the system automatically creates the sample data descriptions for use in the Knowledge Studio from the available attribute information. This can be very useful when example descriptions are not available. In addition, the generated descriptions are prefixed with other columns from our structured metadata source. In this example, the name, type, and brand name columns are included in the generated descriptions.
In order to generate sample descriptions effectively from the supplied attribute information, the attribute information must be linked together through a unique key. These columns are columns 5 through 7 and this information is entered in the List of Sample Data Columns field.
The source metadata in the 10_Output_Attributes worksheet of the open workbook is used in this example.
In this example, the Id number is used as the unique key and the column number is entered in the Id Column field.
The example selections are as follows:
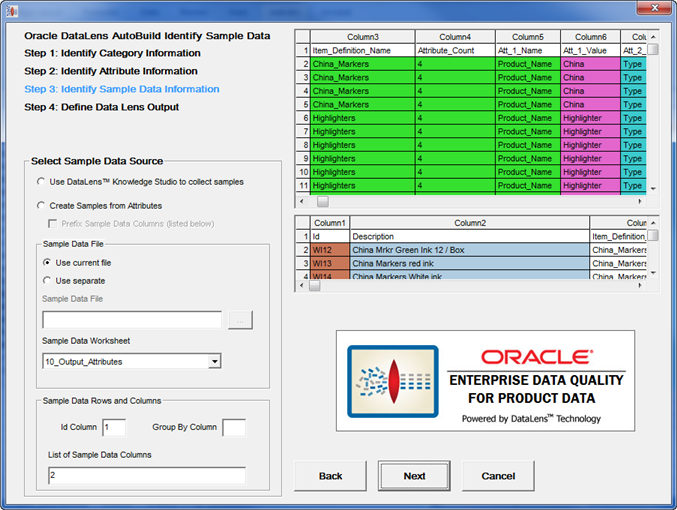
Click Next to advance to the final step.
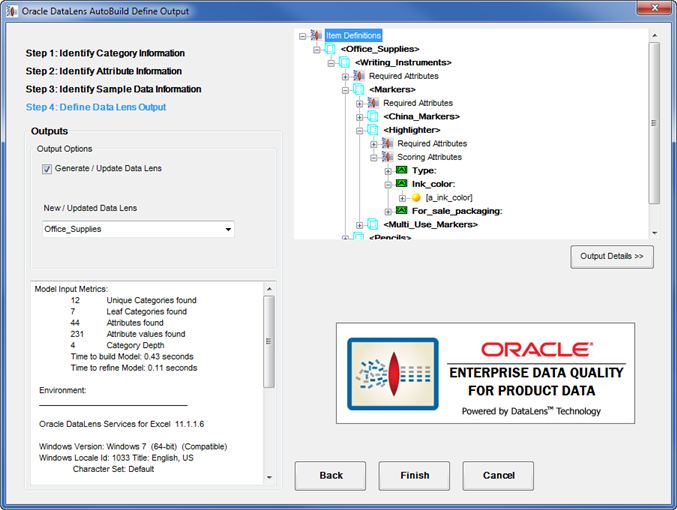
Before advancing, AutoBuild reads the category and attribute information that you have identified using the wizard and a model is generated containing the resulting Item Definitions, Item Definition attributes, attribute to phrase associations, and related phrases and terms.
The final step of the wizard enables you to review the structure of the data lens that will be created, name it, and select any specific options before generating the data lens.
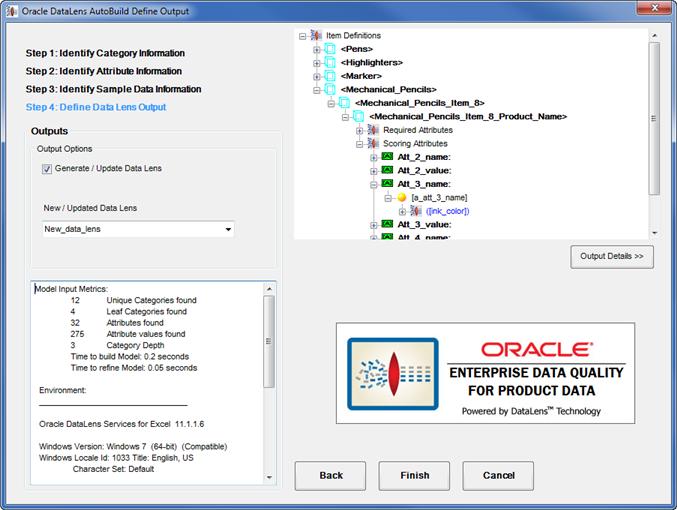
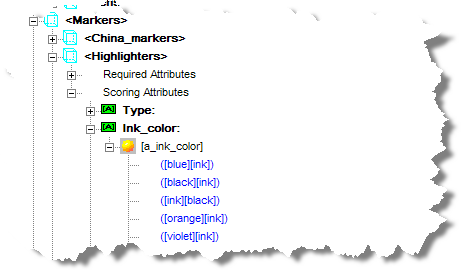
Review the Item Definitions and their associated attributes to ensure that the expected results will be built into the data lens. In this example, the 'Writing_Instruments' Item Definition displays the entire set of child Item Definitions. Expanding 'Mechanical_Pencils', and then the Scoring Attributes allows you to view these attributes as in the following:
You can drill even further. Expanding the 'Ink_color' attribute, and then the '[a_ink_color]' phrase allows you to view the entire phrase production as in the following:
If your item definition hierarchy did not turn out as expected, then select the Back button and return to the prior AutoBuild dialogs to refine your selections.
You should review the messages in the status pane to ensure that the metrics reported make sense and that there are no warning or error messages.
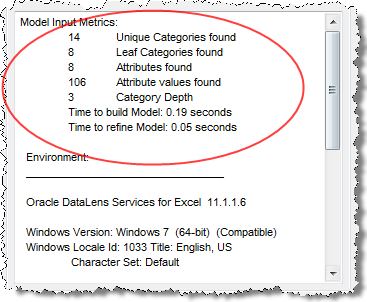
Typically, when warnings or errors are displayed AutoBuild allows you to continue to create a new data lens. Most often AutoBuild reports duplicate or conflicting category information that was found in your structured metadata examples. You should review the warnings to determine whether the structured input should be corrected.
Note:
Do not use the "DLS_" prefix to any data lens name as this is reserved to indicate that a data lens is a Smart Glossary.The example selections for the final wizard step are as follows:
To complete the AutoBuild process and create your new data lens, click Finish.
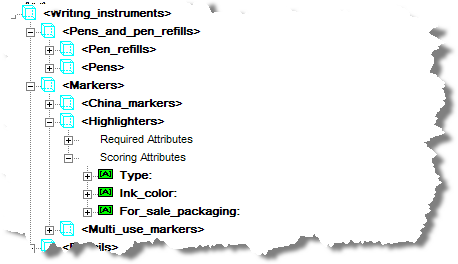
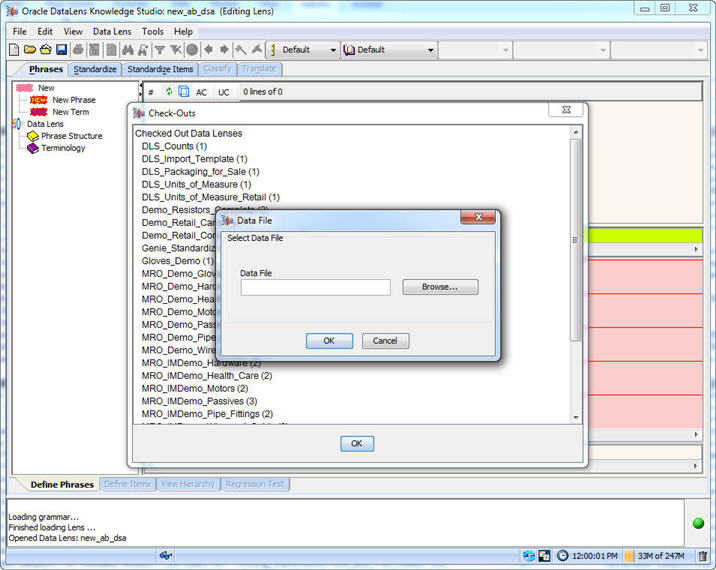
The new data lens is created from the category and attribute information provided in your structured data. When the AutoBuild process completes, you are returned to your worksheet. You can now start Knowledge Studio and open the data lens you just created as in the following:
You are now ready to modify and extend your data lens to meet your application requirements.
The data lens generated by AutoBuild contains the structure you need in order to complete your data lens development effort. The Item Definitions, attributes, phrases and terms generated by AutoBuild function as a guide for the finishing steps of the development process. You should become familiar with the generated data lens structure before proceeding.
During the completion of your data lens, you should reuse as much of the generated components as possible to remain consistent with the original intent of the structured item information.
The following is an overview of the steps you should take in completing your new data lens using the Knowledge Studio:
Complete the Item Definition recognition logic.
This is particularly important when no identifying item name or item type information is available. Once you have completed the Item Definition recognition logic many of the initial recognition ambiguities are resolved by the Knowledge Studio. This ensures that the remaining steps are successful.
Examine all of the phrase level ambiguities in your data lens.
You should review each of the standard random sample files and remove or resolve these multiple references.
Use standard sample convergence to complete the item recognition.
Apply the standard data lens development methodology for completing the data lens recognition using random sample files.
Add standardization rules.
Create the standardization rules that are required by your data quality standards and/or the data application that you are developing. This effort can be minimized using a standard Smart Glossary in the AutoBuild process. The Smart Glossary can provide immediate standardization for all of your global terms and phrases. The Smart Glossary can also be used to provide all of your unit conversions up front. For the terms that are unique to this data lens, you can use the Copy Full Form function found on the Standardize tab to jump-start your standardization efforts.
Once you have completed your term and phrase standardization, you can finish your standardization efforts by selecting the desired attributes for output and setting up any required matching rules.
Note:
If you selected Create Replace all Rules option, the preceding standardization occurs automatically.Create and validate data lens regression test sets.
Use the Knowledge Studio to create regression test set(s) in the data lens so that future maintenance efforts can be proper tested. You should also check the regression set carefully the first time through to make sure that the results are all as expected and make adjustments as needed.
Check in, deploy to development, and test your new data lens against the application test cases.
Each data application created with the Application Studio has associated test cases that need to be executed whenever a data lens is added or updated.
Improve the AutoBuild configuration.
Use the results from the preceding steps to update and improve the AutoBuild Smart Glossary that you use to create new data lenses. When possible, you should use the process results to improve the content of the structured item information. Refining the information used by AutoBuild provides clear improvements in the AutoBuild generated data lenses.
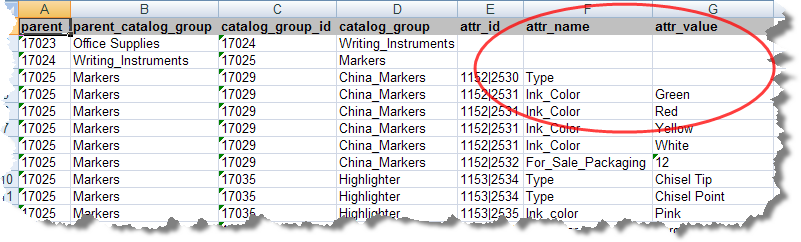
This section provides an example of using data that contains both the attribute name and value in each record. This paired metadata is used in the AutoBuild process in the same manner as previously described though the Attribute Information options are different.
An example of a paired metadata Excel worksheet is as follows:
Selecting the category information could look like the following:
To indicate that the source metadata is paired occurs in Step 2 of the AutoBuild wizard as in the following:
In this example, the scoring attributes are columns 6 and 7, which is the attribute name and value pair.
In the final step of the wizard, the Item Definitions appear similar in structure to the example that did not have paired metadata in the Step 4: Define Data Lens Output section.
Your metadata can be organized into columns in a myriad of ways in an Excel worksheet. How you select the AutoBuild options defines the knowledge structure that is built in the resulting data lens.
You are encouraged to review the following to make the most of the use of the AutoBuild application.
Categories can be used for sample descriptions, item names, and item types while item names and types can be used for categories.
Create a new data lens from your structured item information then refine your data lens as appropriate. Rerun AutoBuild using one of the add or update an existing data lens options in "Step 1: Identify Category Information" to modify your existing data lens.
When there is no well-structured, gold data, creating just a few example records per category can greatly decrease data lens development time. Additionally, you should use the data lens terminology importing function to close the gaps in data recognition. For more information about importing phrases and terms, see Oracle Enterprise Data Quality for Product Data Knowledge Studio Reference Guide.
In general, category names should only use item names and types; those that contain additional information are considered overloaded. For example, the overloaded category name "Surgical Gloves Latex-Free Powder-Free Nitrile Size 7" should be "Surgical Gloves" to avoid overloading.
You should standardize your category names or use the correct category level because this reduces effort and optimizes the data lens attribute centric matching.
Similar to category names, attribute names should not be overloaded. For example, 'Heart Rate Monitor Operating Voltage' should be 'Voltage'
You should standardize attribute names before using AutoBuild to create a data lens because this reduces effort and optimizes the data lens attribute centric matching.
|
Copyright © 2001, 2013, Oracle and/or its affiliates. All rights reserved. Legal Notices |
|