| Oracle® Enterprise Data Quality for Product Data Knowledge Studio Reference Guide Release 11g R1 (11.1.1.6) Part Number E29134-02 |
|
|
PDF · Mobi · ePub |
| Oracle® Enterprise Data Quality for Product Data Knowledge Studio Reference Guide Release 11g R1 (11.1.1.6) Part Number E29134-02 |
|
|
PDF · Mobi · ePub |
The primary reason to classify data is to learn about it in a general way. You might want to find data without knowing a specific key or unique attributes or SKU that defines it. Often, you want to find data about a product in terms of the characteristics that define its properties or usage. For example, classifying parts data helps buyers find the parts they need to purchase. This is accomplished by defining or attaching the part to some type of classification system.
A classification system is typically a hierarchical structure where you can categorize the data for future retrieval. It may be broad covering a wide range of items, but having minimal granularity to differentiate similar items. Conversely, a classification system may consist of company-specific hierarchies that define the scope of the data.
The following sections describe the classification schemas that you can use in your Knowledge Studio data lens. Each data lens includes a sample set of e@Class, UNSPSC, and sample user-defined schemas.
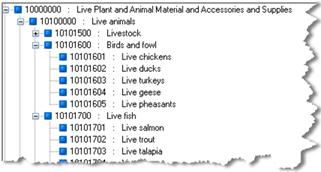
The Universal Standard Product and Services Code (UNSPSC) classification type was developed, and is maintained by the United Nations through the Electronic Commerce Code Management Association (ECCMA). The UNSPSC is a schema that classifies and identifies commodities. It is used in buy-side and sell-side catalogs and as a standardized account code in analyzing expenditure (Spend Analysis). It is a four-level classification system with provision for you to add a fifth level as needed. The Knowledge Studio is shipped with several versions of UNSPSC Classification Types for your use.
You can obtain the latest version from the UNSPSC Web site at
To use the downloaded zip file:
Extract the Excel file from the downloaded zip file.
Open the Excel File.
Delete the 'BTI' column
Save the file as a .csv file.
You can now uses this file to create a UNSPSC schema Classification Type. See "Classification Type"
The following is a sample from the UNSPSC classification schema, which is a hierarchical structure.
For more information about this classification system and the organization that supports it the UNSSPC Web site:
Developed in Germany, eCl@ss has become the standard classification type for information exchange between suppliers and their customers. eCl@ss is characterized by a 4-level hierarchical classification system. eCl@ss maps market structure for industrial buyers and provides support for engineers during development, planning and maintenance. This is a schema that classifies and identifies commodities. It is used in sell side and buy side catalogs and as a standardized account code in analyzing expenditure (Spend Analysis). The Knowledge Studio is shipped with the latest available version of eCl@ss. For more information about this classification system and the organization that supports it, see the eCl@ss Web site:
Enterprise DQ for Product provides file formats that allows you to build custom (user-defined) classification types. You can examine the sample user defined classification schema templates to decide which format will work best for you. For details, see "Creating User-Defined Classification Types".
In order to activate the Classify tab, you must first create a classification type.
From the Data Lens menu, select Classification Types….
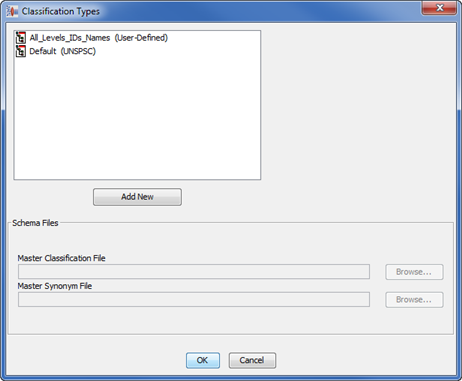
Click the Add New button.
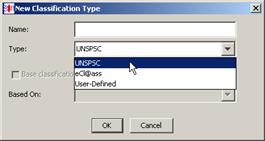
Enter the name for the Classification Type. This name is be added as a selection to the Classification Types list.
Select the type of schema to use to create your new classification type from the list.
If you already have a classification type created and you want to reuse that knowledge in a new version of the same classification, select the Base classification on other classifications check box, and then select the appropriate classification type from the Based On: list.
Note:
This check box is not active if there are no other classification types.Click OK.
You are returned to the Classification Type dialog.
If you are creating a User-Defined classification type, you have the option to select either or both of these options:
Global Classification File—Allows the update by a single user of the classification schema and these changes are made available to any data lens that is using that user-defined classification schema.
Multi Classify—Allows a line of data to be classified to more than one category. The categories may be at different levels, but the classification rules must based on Item Definition, whether direct or indirect (for example, through the parent.) Any classification rule based only on terms and phrases is ignored.
Select a Master Classification File, and if applicable, a Master Synonym File using the Browse button.
Click OK to create the classification type.
Note:
If there is a problem creating the classification type it is likely that the schema did not load. Review theC:\Users\user_name\AppData\Roaming\DataLens\log\workbench.log file for problem details.The first time you create a classification type, the Classify tab becomes active.
The selected classification type is displayed in the classification type list on the toolbar. When you select a classification type from this list, the classification rules associated with the selected type appear on the Classify tab ready for maintenance. As you maintain your phrases and terms on the Define Phrases sub-tab of the Phrases tab, all classification types are updated. When you save your project, all changes to classification types are saved.
You can delete classification types if necessary.
Ensure that you have checked in the latest version of your data lens.
From the Data Lens menu, select Classification Types….
Select the classification type that you want to delete, and then right-click on it.
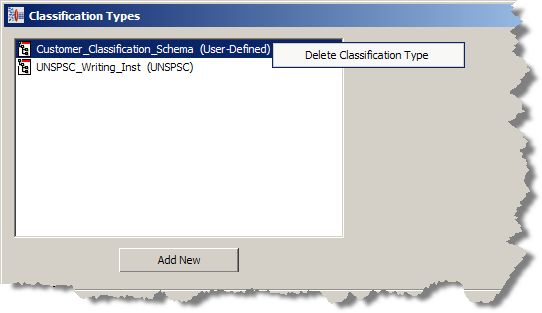
Click Delete Classification Type.
A deletion verification dialog is displayed.
If you want to delete the selected classification type, click OK otherwise click Cancel.
Click OK.
If you delete the only classification type in your data lens, the Classify tab is rendered inactive.
The Classify tab and the associated sub-tabs provide you with all of the functionality needed to classify your data.
Note:
You may want to set the Classification Context data lens option to ensure that parent-child classification relationships are maintained. See "Setting Data Lens Options".The Classify from Data sub-tab is the primary mechanism for classifying content against specific data.
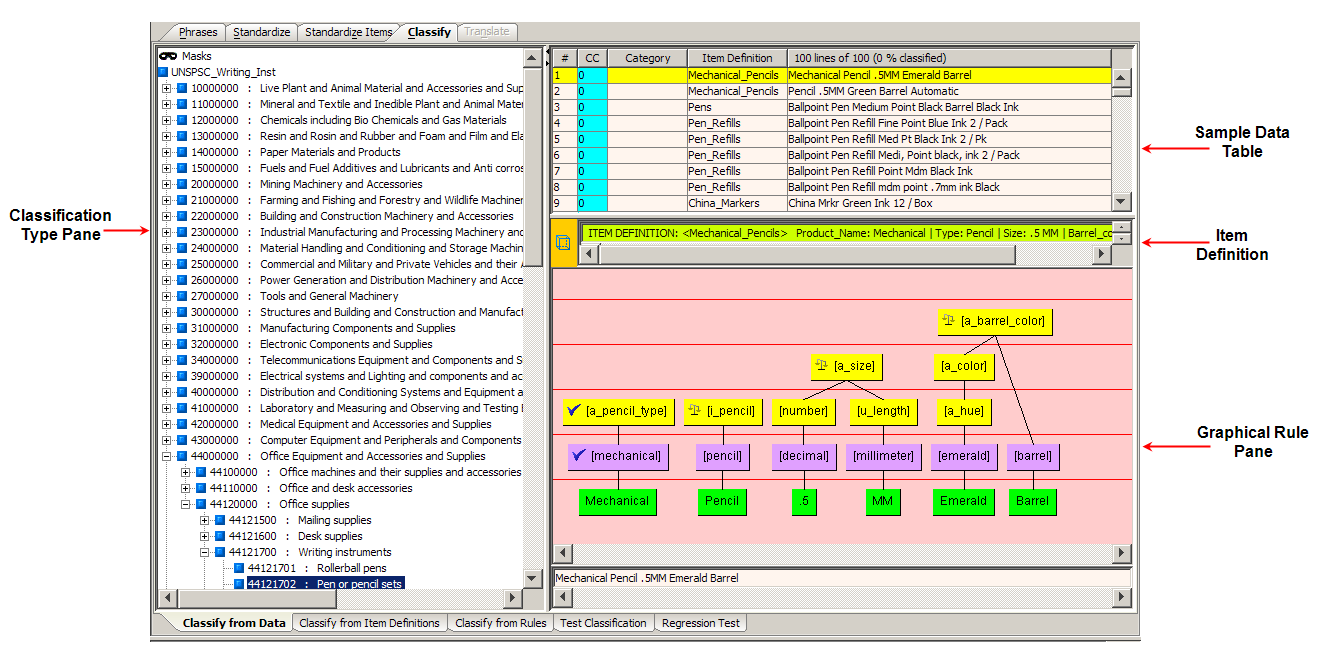
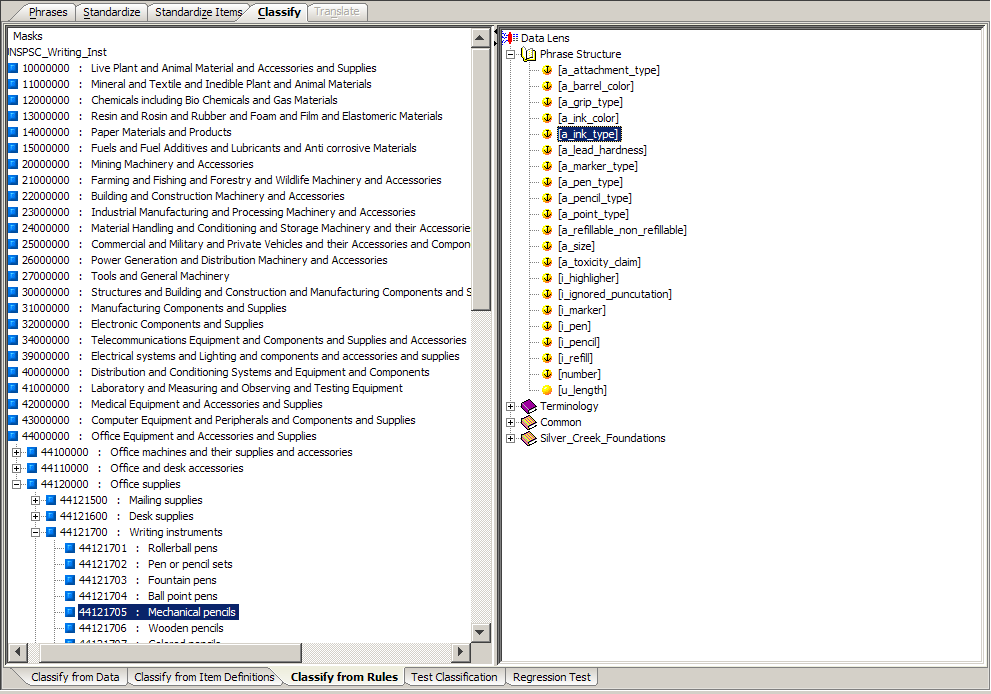
The Classification Type pane displays the categories contained in the selected classification schema. A colored icon, the code number of the category, and the name of the category represent each category in the tree-type schema. The top-level category of the tree displays the name of the classification type, in this case 'UNSPSC_Writing_Inst'.
The use of Masks is described in "Advanced Classification Rule Functions".
The Sample Data pane contains the lines of sample data for the selected sample data file. The columns of the table, left to right, indicate the following:
The unique number assigned to that line of data.
This column is zero when the line of data has not been classified. If the line has been classified to one category then this column displays a '1'. If the line has been classified to two different categories, then this column displays a '2', etc. This column is colorized in pink when the line of data has been classified to more than one category.
When a line has been classified, the category number for the line is displayed. Double-clicking on the category identifier navigates to the specified category in the Classification Type pane.
The Item Definition for a line for which an Item Definition has been triggered. Not all records may have an Item Definition defined for it. In that case, there is not an Item Definition for a line of data in this column.
The product description.
The standardized form of the original line of data.
Each of the columns that contain data can be used to sort the table, both ascending and descending, by clicking on the column title. Clicking a column heading once sorts the table, by the items in the selected column, in ascending alphabetically order. Clicking the same column heading a second time sorts the table again in descending alphabetical order.
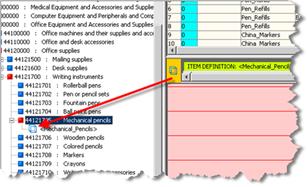
The field in this section displays the Item Definition for the line selected in the Sample Data pane. Double-clicking anywhere in the field automatically selects the Define Items sub-tab of the Phrases tab so that you can modify the selected Item Definition.
You can classify using the Item Definition by dragging the Item Definition icon to a category in the Classification Type pane.
The Graphical Rule pane displays the phrase structure, for the selected line in the Sample Data pane, and allows you to see the full context and consequence of a classification action.
This pane is used as the source for linking the data with the classification system to create the classification transformation. To link data, you drag and drop the rule or Item Definition onto categories in the Classification Type pane, thus creating a classification rule.
Note:
The category node icons change from blue to red in the classification hierarchy of the item you just classified when you classify an Item Definition.The Classification by Item Definitions sub-tab is the primary mechanism for classifying content against an external taxonomy or schema. If the Item Definition contains all the information required to classify a line of data, there is no need to use rules in the classification of data. However, if the Item Definition structure is less granular than the classification schema, then term and phrase rules may also be needed to perform the classification.
You can use multi-classification to classify from Item Definitions or Item Definitions + Rules. Multi-classification will not function if you drag only rules to multiple classification nodes. While you can classify rules to two different nodes on the classification hierarchy, only the first classification will output in, for example, a DSA or DGS project.
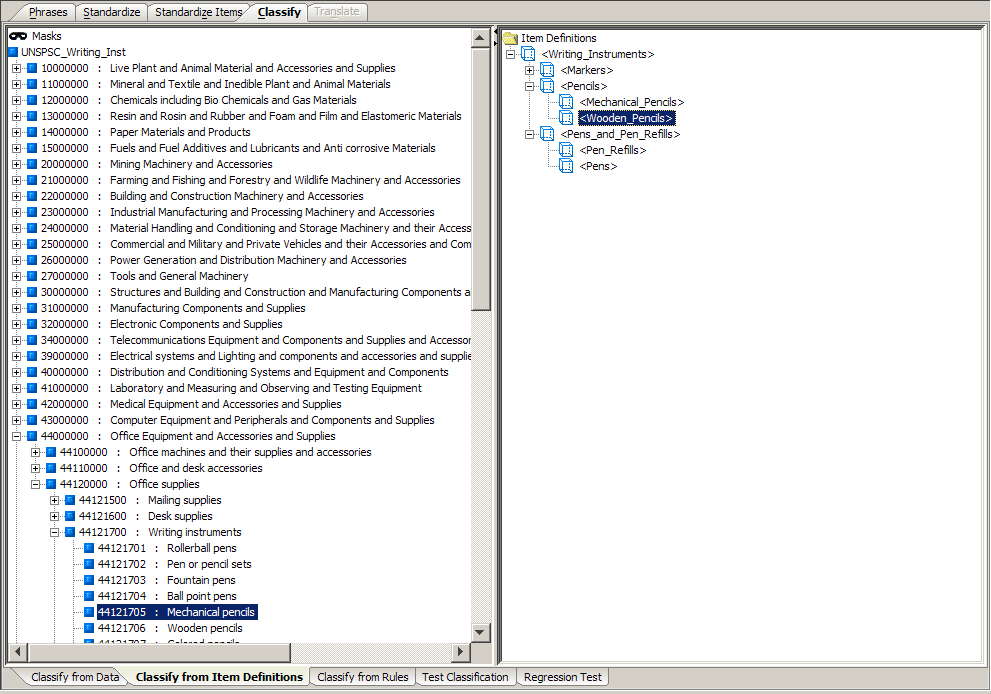
You can classify the Item Definitions in the right pane to a category in the Classification Type pane by dragging the Item Definition icon to the appropriate category on the left.
Item Definitions can be classified into any number of categories in the classification hierarchy using the same method. This is known as multiple-classification.
These Excel template files are installed on the user's system in the C:\Users\user_name\AppData\Roaming\DataLens\system\schemas directory.
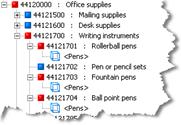
The Classify from Rules sub-tab allows you to link phrases and terms to categories.
By selecting phrases in the right pane and dragging and dropping them onto categories in the Classification Type pane on the left, you create a classification rule. The Classify from Data sub-tab displays the line of data you were classifying while this sub-tab displays the data lens phrases.
When classifying data you want to be as selective as possible. Since the UNSPSC classification type is a four level system, it is recommended that you classify Item Definitions to the fourth level whenever possible. However, classification systems are not always complete, so there are times when you may be forced to classify items to more general categories.
The Test Classification sub-tab enables you to review the Classification of your sample data to validate your results:
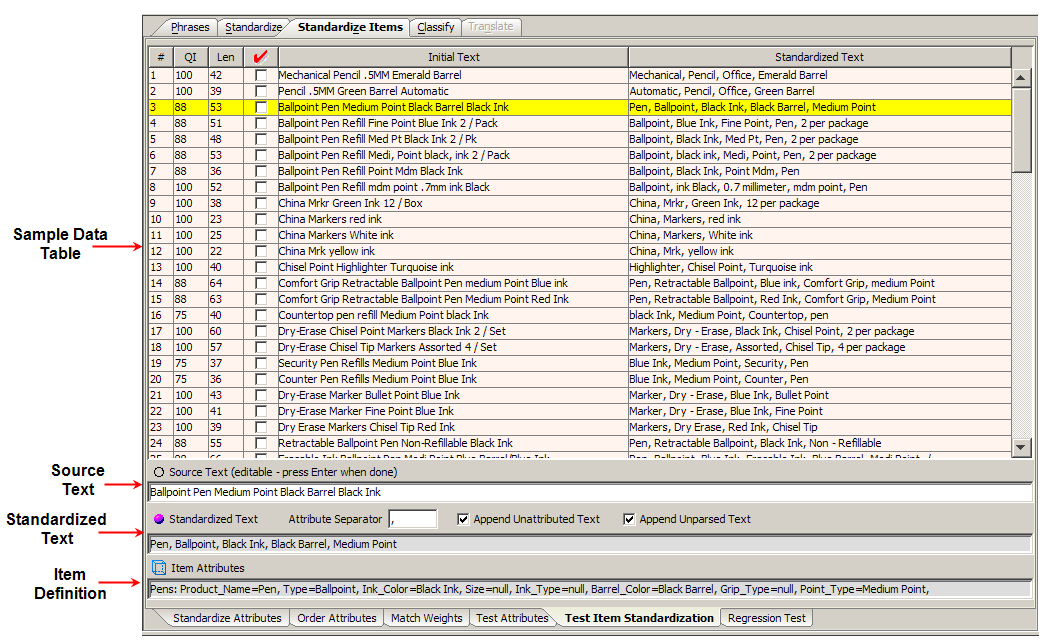
This table displays the original data and the same data after it has been classified. The columns are the same as in the Sample Data table on the Classify from Data sub-tab (see "Classify from Data Sub-Tab") with the exception of the last column on the right, which shows the standardized data.
This field contains the original data. This field can be edited and when you press Enter, you can review the immediate effects on the data lens.
The standardized version of the original data is displayed in the field; it cannot be edited.
A subset of the Classification Type pane showing where the selected line item is classified.
If the classification count is greater than one, the Next/Previous arrows on the toolbar are active. You can use the arrows to change which classification is visible in the Classification pane. The category name in the Sample Data pane does not change, however it does change in the test pane to display the next classification. The CC column, in the Sample Data pane, displays the multi-classification count.
Regression testing is an important part of data standardization so that you can be sure that your data is classified as you expect.
If the tab is not active, set the Regression Testing Active data lens option. See "Ensuring Regression Testing is Active".
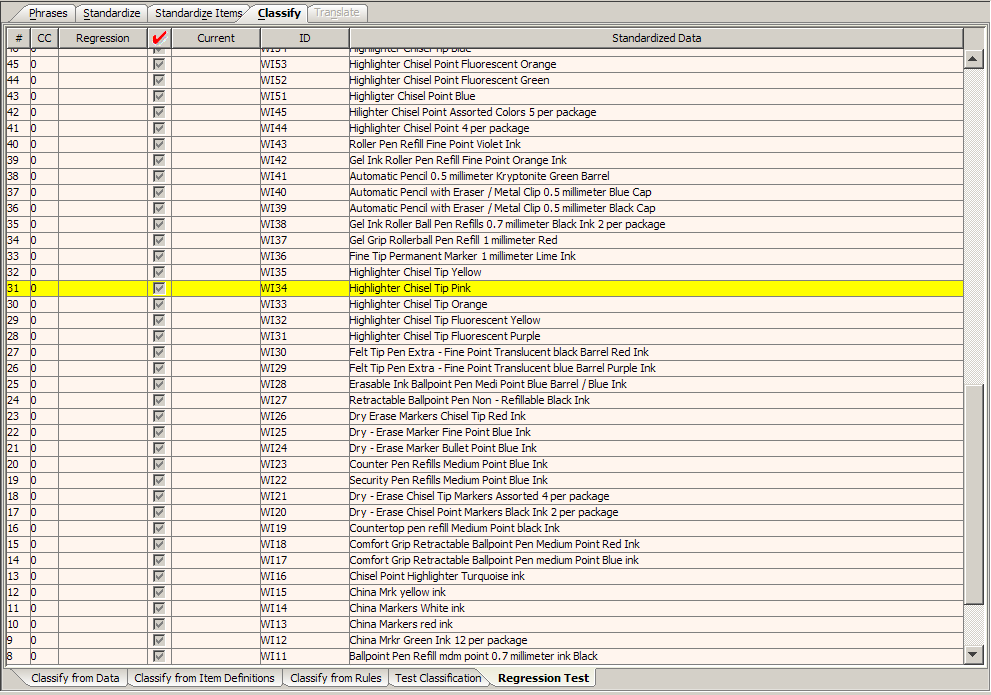
The Sample Data pane comprises this sub-tab and is the same as the same pane on the Test Classification sub-tab.
If there is no data displayed in the Sample Data Table, the sample data has not been initialized; a regression base does not exist. For information about initializing the regression base, see "Creating and Updating the Regression Base".
The best practice in creating a regression base is to combine your sample data into a one file. See "Combining Sample Files".
Combining files does not remove any data; it simply combines the selected sample files into a new, larger file.
Next, make single changes to your regression base sample data file, check your regression sets, and update them as appropriate. Making multiple changes can make the regressions hard to read, which increases the chance that an error is overlooked or is much harder to fix.
To create the regression base, select the Create New Regression Base option on the File menu, and then select the sample data file that you want to use for regression testing. This initializes the regression base and displays the results in the After pane.
You can update the regression base with the reviewed and accepted lines of text (as previously described in red check mark column) using the Update Regression Base option on the File menu.
Note:
You should only initialize or update the regression base if you have reviewed or accepted the sample data.
|
Copyright © 2001, 2013, Oracle and/or its affiliates. All rights reserved. Legal Notices |
|