| Oracle® Enterprise Data Quality for Product Data Endeca Connector Installation and User's Guide Release 11g R1 (11.1.1.6) E29135-03 |
|
|
PDF · Mobi · ePub |
| Oracle® Enterprise Data Quality for Product Data Endeca Connector Installation and User's Guide Release 11g R1 (11.1.1.6) E29135-03 |
|
|
PDF · Mobi · ePub |
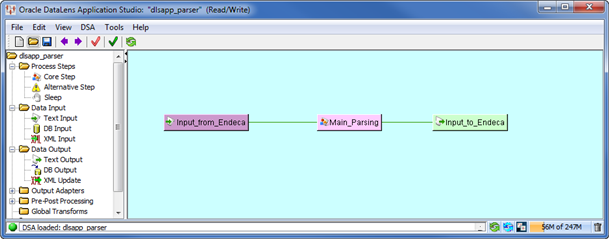
The 'dlsapp' project is a fully self-contained Endeca Connector project and DSA package that you can copy into place to illustrate how the Endeca Connector Adapter works within the Endeca pipeline. This appendix explains how to use the example files included in the opdq-connector-endeca directory.
First, you extract the example files and check-in the DSA package in the Application Studio:
On your Endeca server, go to the edqp directory you created during installation.
Change directories to exampleProject directory.
Extract all of the files in the dlsapp.zip into this directory.
Start the Application Studio.
From the File menu, select Import Package.
Select the dlsapp_parser.pmap DSA package from the exampleProject directory and click OK.

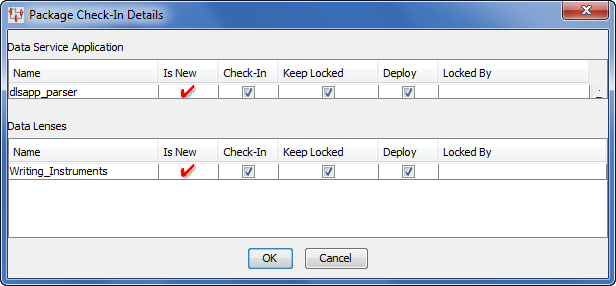
From the DSA menu, select Check-In Package so that you can check in this DSA and the data lens associated with it at one time.

Ensure that Writing_Instruments data lens is selected for check in and click OK. A progress dialog box appears so that you can view the check ins as they occur and details any errors found.
Next, you create a project to setup the necessary structure and then replace it with the Endeca Connector 'dlsapp' project:
Open a Windows Command Prompt (cmd.exe).
Change directories to C:\Endeca\Solutions\deploymentTemplate-3.2\bin.
Enter deploy.bat and press Enter to create the project structure.
Enter the following values to the program prompts:
| Program Prompt | Response Value |
|---|---|
|
Deployment type: |
1 (Dgraph deployment) |
|
Application name: |
dlsapp |
|
Deployment directory: |
C:\Endeca\applications |
|
EAC port: |
8888 |
|
Enable IAP Workbench integration: |
Y |
|
IAP Workbench port: |
8086 |
|
Port for Dygraph1: |
15000 |
|
Port for Dygraph2: |
15002 |
Now, an empty version of a dlsapp project has been created in the Development Studio directory and makes that project known to the Endeca server, which is very important. Next, you replace this initial dlsapp project version with the Endeca Connector pre-populated project.
Change directories to C:\Endeca\DeveloperStudio\projects.
Delete dlsapp directory.
To replace the initial dlsapp project version, you create a new copy of the dlsapp folder with all of the project values in place. Copy the dlsapp.zip into the projects folder and extract all files from it.
Note:
The dlsapp.zip file is contained in the Endeca Connector file, opdq-endeca-connector.zip that is installed as part of the EDQP11g R1 (11.1.1.6.1) release.
Next, confirm that the project is available for use.
Start the Endeca Developer Studio.
From the File menu, select Open.
Locate the C:\Endeca\DeveloperStudio\projects\scstrain\config\pipeline directory and select the dlsapp.esp project to open it.
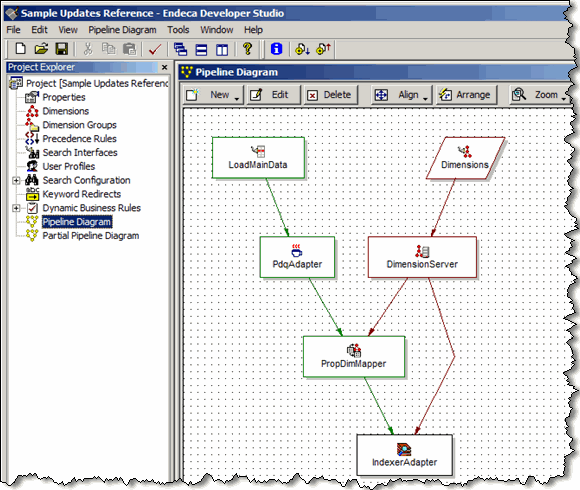
Select Pipeline Diagram from the Project Explorer options to inspect the structure of the dlsapp pipeline.

Note:
For Linux, you must open the PdqAdapter then change the Class path separator from a semi-colon ';' as the separator between the paths for each Endeca Connector jar file to a colon ':' as the separator as in the following:
/Endeca/edqp/lib/opdq-api1.jar;/Endeca/edqp/lib/jdom-1.0.jar;/Endeca/edqp/lib/opdq-core.jar;/Endeca/edqp/opdq-connector-endeca.jar

For more information, see
This pipeline diagram is a very simple one though they can get far more complex. The purpose is to illustrate the placement of the PdqAdapter in the overall pipeline flow and provide an example of the configuration necessary for the Endeca Connector to operate correctly.