| Oracle® Enterprise Data Quality for Product Data Oracle DataLens Server Installation Guide Release 11g R1 (11.1.1.6) Part Number E29137-05 |
|
|
PDF · Mobi · ePub |
| Oracle® Enterprise Data Quality for Product Data Oracle DataLens Server Installation Guide Release 11g R1 (11.1.1.6) Part Number E29137-05 |
|
|
PDF · Mobi · ePub |
This chapter describes how to prepare to install your Oracle DataLens Servers, as well as raises topics that the you should consider and be familiar with before installation begins, including the following:
The following types of Oracle DataLens Server installers are available:
Generic Package installer—This type of installer is a .zip file. It does not include the Oracle Java Platform, Standard Edition Development Kit (JDK). You can use this type of installer to install the product on any supported platform on which Java is already installed. Additionally, it includes each of the supported operating system-specific installers that are either the dlsinstall_linux.sh or dlsinstall_solaris.sh files or the dlsinstall_windows.bat file, depending on your platform.
For information on how to obtain the appropriate installer for your platform, see Section 2.2, "Product Distribution."
The Oracle DataLens Server installers are distributed in the following ways:
Download from the Oracle Software Delivery Cloud web site at http://edelivery.oracle.com/. Only the Generic Package installer is available from this site; Upgrade installers are not available here. These files are downloaded as ZIP files. For information about how to download from this site, see Section 2.2.1, "Downloading the Software From the Oracle Software Delivery Cloud."
To download the installer from the Oracle Software Delivery Cloud web site:
Enter the Oracle Software Delivery Cloud URL into a web browser:
Sign into the site.
If prompted, choose your language and click Continue.
Complete the Export License Agreement as instructed on the site, and then click Continue.
On the Media Pack Search page, select E-Business Suite from the Select a Product Pack drop-down list.
From the Platform list, select your operating system.
Click Go.
Select the Oracle Enterprise Data Quality for Product Data 11 Media Pack option and click Continue.
Click the Download button.
Browse to the directory where you want to save the file. Click Save to start the file download. A compressed ZIP file is downloaded.
Extract the ZIP file to the following directory:
On Linux and UNIX: /opt/edqp_install
On Windows: C:\edqp_install
The installation directory now contains the edqp directory. The installers are in the edqp/Disk1 directory. You have all of the files necessary to install Enterprise DQ for Product though additional software is may be required as described in the following section.
The following sections describe the installation prerequisites:
You must ensure that the following Oracle DataLens Server hardware and software requirements are observed. These requirements represent the certified and supported server configurations.
Verify that you have met the minimum server requirements using the Oracle Enterprise Data Quality for Product Data Hardware and Software Specification found at the Oracle Enterprise Data Quality for Product Data Documentation web site:
http://download.oracle.com/docs/cd/E20593_01/index.htm
That document contains all necessary specifications including example server configurations. Oracle DataLens Servers have been certified with these hardware and software requirements. For list of certified platforms and versions for Enterprise DQ for Product prior to installation, see Oracle Enterprise Data Quality for Product Data Certification Matrix at
http://www.oracle.com/technetwork/middleware/ias/downloads/fusion-certification-100350.html
Locate Oracle Enterprise Data Quality in the Product Area column and then click the System Requirements and Supported Platforms for Oracle Enterprise Data Quality for Product Data 11gR1 (11.1.1.x) Certification Matrix (xls) link.
Three different types of user accounts are required to install and maintain EDQP. You must establish the user accounts described in the following sections.
Note:
All administration user accounts created must be unique to ensure a secure environment.A unique administrator user account (dlsadmin for example) is used for all of the servers in the EDQP Server Topology. You then use this administrative user throughout your Oracle DataLens Server Topology to install or maintain these servers.
Contact your system administrator for assistance in creating a new or identifying an existing administrator user account (dlsadmin or other) on the servers that you want to use in the EDQP Server Topology. The administrator user must also adhere to the WebLogic Server security requirements. See Oracle Fusion Middleware Getting Started With Installation for Oracle WebLogic Server 11g Release 1 (10.3.6) and Oracle Fusion Middleware Securing a Production Environment for Oracle WebLogic Server 11g.
Additionally, this administrator user must have full permissions (read, write and execute) to the directories that will contain the EDQP installation files, target installation directory, and all database directories.
Always use this administrator user when logging into any of the Oracle DataLens Servers to perform installation, upgrades, or maintenance. This is applicable to all operating systems. Each full installation results in a separate WebLogic Server instance. When installing an Oracle DataLens Administration Server and a Transform Server, separate WebLogic Server instances are created for each and the login credentials are not shared across the two servers. Logging into a Transform Server or WebLogic Server requires the Administration Server user name and password.
Note:
When installing EDQP (or WebLogic) on a UNIX or Linux operating system, do not use the root user as your administrator user account.A WebLogic administrator user account is necessary to install WebLogic and create the EDQP domain during installation. This is the user account you will then use to administer the domain in the WebLogic Administration Console.
You can use the default WebLogic administrator user (dlsadmin), create a new user, or specify an existing WebLogic administrator user during the installation.
If you are not installing WebLogic as part of your EDQP installation, then you must ensure that you specify the WebLogic administrator user that was used to install the WebLogic instance you want to use with EDQP.
You can create a new database administrator user account or use an existing one that has the privileges to access to the database and ability to create schemas and run the database product. This is applicable to any supported database that you want to use with EDQP.
You must install a supported JDK since both the EDQP and WebLogic Server products rely on it. The JDK provides the Java run-time environment (JRE) and tools for compiling and debugging Java applications.
Install an EDQP supported JDK (see Section 2.3.1, "Hardware and Software Requirements") by downloading and installing it using the instructions provided at
http://www.oracle.com/technetwork/java/javase/downloads/index.html
On Windows systems, ensure that you do not install the JDK into a directory that contains spaces, which is the default. For example, you could install the JDK into C:\Programs\Java\jdk1.7.0_13.
On Solaris systems, you must install both the 32-bit and 64-bit JDKs in order to run java applications. Install these JDKs by following the instructions at the Oracle Java SE documentation website at
http://docs.oracle.com/javase/7/docs/webnotes/install/solaris/solaris-jdk.html
It is necessary to download the WebLogic Server installer and save it to the same directory that contains the EDQP console mode installer, as described in Section 2.5, "Choosing the Type of Installation." You can automatically install the Weblogic Server and configure the necessary domain using the EDQP console mode installer (recommended) or you can install it.
To download the installer from the Oracle Technology Network:
Enter the Oracle Technology Network WebLogic Server Installers URL in a web browser:
http://www.oracle.com/technetwork/middleware/ias/downloads/wls-main-097127.html
Click OTN License Agreement and read the license agreement.
Select the Accept License option. You must accept the license agreement before you can download the installer.
Scroll down to the Oracle WebLogic Server Previous Releases section of the page, expand the Oracle WebLogic Server 10.3.6 files by clicking the plus sign adjacent to See all files.
Locate the Oracle WebLogic Server 11gR1 (10.3.6) + Coherence - Package Installer and click the File1 link under the Generic file.
The generic installer file, wls1036_generic.jar, must be downloaded because it contains the installers for all supported operating systems.
If prompted, sign into the Oracle Technology Network.
Browse to the EDQP install directory and click Save to start the file download:
On Linux and UNIX: /opt/edqp_install/edqp/Disk1
On Windows: C:\edqp_install\edqp\Disk1
This is the default location for wls1036_generic.jar file for the EDQP installers so that it can be used to install the WebLogic Server. You can download the file into a different directory and specify this directory during the installation.
Note:
Installing in console allows you to choose to automatically install WebLogic Sever and the domain necessary for EDQP to operate; to use the graphical mode installation, you must install and configure WebLogic and the EDQP domain.The Derby database that is installed with your Oracle DataLens Administration Server contains all of the operational information for the server, such as jobs, users, tasks, DSAs, data lenses, FTP and database connections, and other configuration information. Derby is supported only in a development environment; Derby is not supported for production.
If you plan to install the EDQP server in a production environment, you should change the Derby database to another supported database (see Section 2.3.1, "Hardware and Software Requirements"), such as an Oracle Database to create a production environment with optimal system performance and maximum system security of your Oracle DataLens Administration Server. Oracle recommends that you make this change immediately after installation if the server is going to be used in a production environment. If you do not change the database immediately after installation, you will need to reestablish all configuration settings and assets (data lenses and DSAs) in the new database on your Oracle DataLens Administration Server. You will then need to redeploy all assets to all Oracle DataLens Transform Servers in your topology.
In addition, any database that want to interact with your Oracle DataLens Administration Server must have a JDBC database driver configured on the server so that you can create a database connection. Oracle provides WebLogic-branded versions of DataDirect drivers for DB2 and MySQL Server though they are not configured for use in the classpath. For information about configuring databases besides Derby and Oracle Database, see Appendix B, "Known Issues."
During the installation process, you must specify locations for the following home directories:
Oracle JDK
Oracle Fusion Middleware
WebLogic Server
The following illustration shows the default Middleware home and the Middleware products directory structure post-installation. In this case, both EDQP and WebLogic Server are installed.
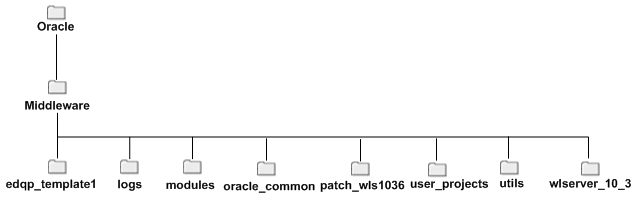
Additional directories and files are also located in the Middleware home directory, as described in Table 2-1. The user_projects directory is not present until the first WebLogic domain is created.
When the WebLogic Server is being installed, you are prompted to specify a Middleware home directory. This directory serves as a repository for common files that are used by multiple Fusion Middleware products installed on the same machine. For this reason, the Middleware home directory can be considered a central support directory for all the Fusion Middleware products installed on your system.
The files in the Middleware home directory are essential to ensuring that WebLogic Server operates correctly on your system. They facilitate checking of cross-product dependencies during installation.
When you are installing EDQP, you are prompted to choose an existing Middleware home directory or specify a path to create a new Middleware home directory. If you choose to create a new directory, the installation program automatically creates it for you.
The Middleware home directory is referenced as MW_HOME in Fusion Middleware documentation and this guide.
Middleware Home Considerations
Consider the following information when creating the Middleware home directory and installing Fusion Middleware products:
Do not include spaces in the name of your Middleware home directory. If the name of this directory contains spaces, the CLASSPATH may not be resolved properly.
You can install only one instance of each version of a WebLogic Server product in a single Middleware home directory. If you need to maintain separate versions of WebLogic Server on the same machine, each version must be in its own Middleware home directory.
For example, you can install only one instance of the current version of WebLogic Server in a Middleware home directory, but you can have an earlier version of WebLogic Server in a separate Middleware home directory.
If the home directory is not empty and it does not contain registry.xml, or if any of the product installation directories are not empty, one of the following messages is displayed:
For home directory selection task—Middleware home directory is not empty. Proceed with installation?
For product installation directory selection task—One or more installation directories are not empty. Proceed with installation?
Functions of the Home Directory
The directories in the Middleware home directory vary depending on the installer that you are using and the products you selected for installation.
For example, the EDQP installer creates the directories and files listed in the following table.
Table 2-1 Directory Description for Middleware Home
| Directory or file | Description |
|---|---|
|
|
This is the EDQP home directory. |
|
|
This directory contains a history file, which has information about installation and uninstallation for the Middleware home directory. |
|
|
This directory contains the modules installed in the home directory. |
|
|
This directory contains directories common to all Fusion Middle ware products, such as OUI. |
|
|
The WebLogic Server 10.3.6 patch directory containing the patch necessary to EDQP. |
|
|
Once you create WebLogic domains and applications, this directory is created to store them. This directory contains applications and domains sub-directories. The applications directory contains a sub-directory for each application you create, and the domains directory contains a sub-directory for each domain you create. |
|
|
This directory contains utilities that are used to support the installation of all products installed in this home directory. For more information on installing patches and patch sets, see Oracle Smart Update Installing Patches and Maintenance Packs. |
|
|
The WebLogic Server home directory. |
|
. |
This file contains the information about the Middleware home directory. |
|
|
This response file contains information about the Oracle Configuration Manager (OCM) installation. |
|
|
This registry file contains a persistent record of all WebLogic products installed on the target system. This registry contains product-related information, such as version number, patch set level, patch level, and location of the product installation directories. It also contains the name of the installed JDK(s) and the Java home. Note: Do not edit this file manually. Doing so may cause operating problems for the currently installed WebLogic products, or result in installation problems when future products or maintenance upgrades are installed. |
|
|
This is an encrypted version of the |
|
|
This registry file contains the location of all domains currently registered with this WebLogic Server installation. Whenever you add a new domain, it is registered in this file. |
During the installation, you will be prompted to enter the home directories for the following products:
EDQP
The EDQP home directory contains all the components necessary to the product, including the Developers Toolkit that includes APIs and Command Line Interface, the Endeca Connector, and the Oracle Fusion and R12 Product Information Management (PIM) installation files. The default installation directory for EDQP is:
On Linux and UNIX: /opt/Oracle/Middleware/edqp_template1
On Windows: C:\Oracle\Middleware\edqp_template1
This directory path is referenced as the EDQP_HOME directory in this document.
WebLogic Server
The default installation directory for WebLogic Server 10.3.6 is:
On Linux and UNIX: /opt/Oracle/Middleware/wls_server_10.3
On Windows: C:\Oracle\Middleware\wls_server_10.3
This directory path is referenced as the WL_HOME directory in this document.
JDK
You must locate the directory into which you installed the JDK/JRE. For example, the directories may be:
On Linux and UNIX: /opt/jdk1.6.0_30
On Windows: C:\Program Files\Java\jdk1.6.0_30
You can run the installation program in the following modes:
Console mode
Console mode installation is an interactive, text-based method for installing your software from the command line, on either a UNIX system or a Windows system. For information about using this method, see Chapter 3, "Running the Installation Program in Console Mode."
When performing a console mode installation, the installation program provides two types of installations:
In a full installation, all EDQP components are installed including the WebLogic Server. Each full installation results in a separate WebLogic Server instance. When installing an Oracle DataLens Administration Server and a Transform Server, separate WebLogic Server instances are created for each and the login credentials are not shared across the two servers.
In a dls (datalens server) installation, only the EDQP components are installed. You must have WebLogic Server installed and operating so that the EDQP domain can be configured.
Note:
Console mode installation is recommend for all installations.Graphical mode
Graphical-mode installation is an interactive, GUI-based method for installing your software and requires additional manual configuration thus it is not the recommended installation mode. It can be run on all supported platforms. For installation procedures, see "Oracle DataLens Server Graphical Installation".
In either mode, a sample domain is preconfigured to use the Derby database are created only for the installed components. Derby is supported only in a development environment. Derby is not supported for production
|
Copyright © 2001, 2013, Oracle and/or its affiliates. All rights reserved. Legal Notices |
|