| Oracle® Enterprise Data Quality for Product Data Services for Excel Reference Guide Release 11g R1 (11.1.1.6) Part Number E29143-03 |
|
|
PDF · Mobi · ePub |
| Oracle® Enterprise Data Quality for Product Data Services for Excel Reference Guide Release 11g R1 (11.1.1.6) Part Number E29143-03 |
|
|
PDF · Mobi · ePub |
Transforming your data records using a DSA with Services for Excel is a simple step-by-step process as shown in the following diagram:
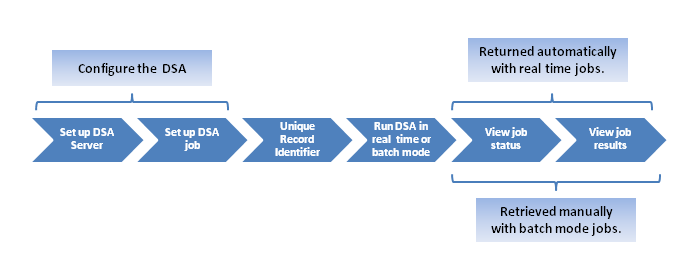
All of these steps are described in this chapter.
Each Excel worksheet must be configured to use a DSA for data transformation. When you save the Excel workbook, your worksheet configurations are saved along with the workbook as a hidden worksheet for future reuse by the Services for Excel application.
Always start by opening the desired Excel workbook, and then selecting the specific worksheet containing the data that you want to process using a DSA.
From the Services for Excel toolbar, click DataLens Tools, and then select the Job Options… option.
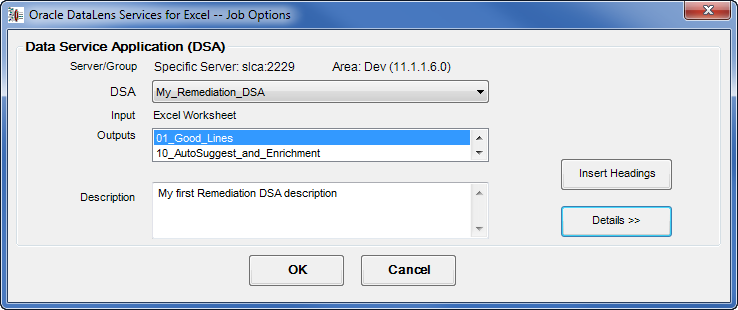
The Job Options dialog box is displayed.
The basic job options and server information is displayed.
This list is automatically populated with the names of the DSA available on the server for processing data. You can select a different DSA from the list of available DSAs.
DSAs are created using the Application Studio. After you deploy a DSA to an Oracle DataLens Server, it is available to Services for Excel and other external applications. The use of DSAs can be restricted to specific users using the Oracle DataLens Server Web pages and Application Studio. All DSAs are displayed in the DSA list including restricted DSAs. If you select a restricted DSA and do not have permission to run it, an error is displayed and a job is not created when you attempt to process your data records. For more information about how to restrict a DSA, see Oracle Enterprise Data Quality for Product Data Application Studio Reference Guide and Oracle Enterprise Data Quality for Product Data Oracle DataLens Server Administration Guide.
Note:
If the DSA names do not display properly (as is sometimes the case with full-width characters), ensure that your Windows region and language options are set properly. For more information, see Windows Help.This list is automatically populated to display each of the DSA outputs, which are known as result sets. Selecting a result set changes the information and section title displayed in the Result Set for Output section.
This field is informational and supplies the description of the DSA that you are using to process your data. It is blank if no description for the DSA exists.
This button will insert headings in the open spreadsheet corresponding to the input and output fields of the selected DSA. This will overwrite any headings that might have appeared on the spreadsheet.
All other job options are initialized with default values and typically do not require your attention though you can change them by clicking Details >>.
The options you can change are described as follows:
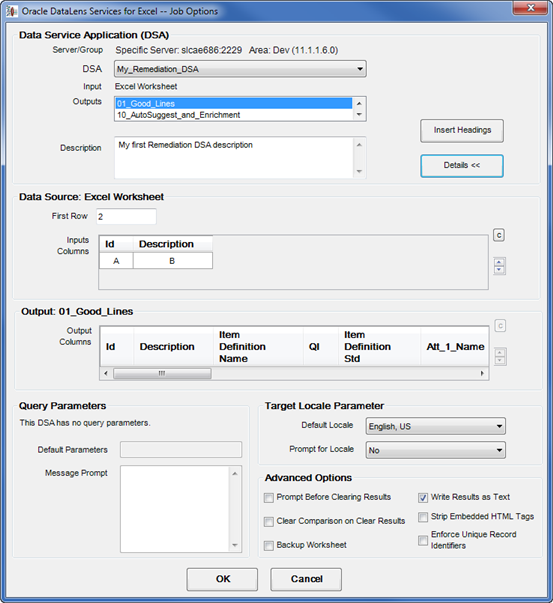
The type of data source is displayed as part of the title of this section and is based on the properties of the selected DSA. The data sources can be Excel, file input, or may be generated directly by the DSA. If the data source is the DSA, then the data may be coming from an external data source, such as a database or XML file. In this example, the title is Data Source: Excel Worksheet thus indicating the data source is Excel.
This supplies a single valid Excel row to the system and represents the starting point for the input data. Your DSA reads the Excel input columns starting with this row.
This table is automatically populated with an editable list of the Excel columns that are to be sent to the Oracle DataLens Server for processing. This is a list of valid Excel column names. The inputs are the expected input fields from the DSA while the column names are Excel alphabetic columns. From the previous illustration, that would be 'ID', 'DESCRIPTION', 'MANUFACTURER', and 'PART_NUMBER' with the corresponding columns of 'A, B, C, and D'.
Note:
The default Excel Column list has the same number as the input fields and is in alphabetical order starting with A.You can edit the automatically assigned column letters by clicking the specific column letter cell in the table, clicking Backspace to delete the active column letter, and then entering a new valid Excel column letter or letters. You can navigate between cells from left to right and right to left by using the arrow keys on your keyboard.
The arrow buttons to the right of the table allow you to move all of the columns as a group to the right or left. All of the column letter assignments can be cleared at once by selecting the clear button above the arrow buttons to the right of the table.
You can ensure that the columns in your Excel worksheet match the input data columns expected by the DSA you have selected by shifting or editing these columns.
The selected Result Set is displayed as part of the title of this section. In this example, the title is Result Set for Output LOAD thus indicating the selected 'LOAD' Result Set.
This table is automatically populated with an editable table of Excel columns that are to be populated with the outputs from a DSA. This is a list of valid Excel Column names derived from the selected DSA. When the special 'Output' result set is selected, you can edit the output column letters for the Data Source as previously described. The 'Output' result set is written directly back to the input worksheet.
This section contains any DSA query parameter options.
Use when a DSA receives its input from a database query and the user must supply one or more parameters to the query.
To enter multiple default parameters, use the pipe character (|) to separate the list of parameters. Ensure that you avoid putting extra spaces around the pipe characters.
Use to enter a help message to be displayed during runtime when the user is prompted for the database query parameter(s). The message prompt can be used to inform the user of the expected parameters and their valid values.
Target Locale Parameter Section
This section contains language translation options.
The default locale is used when a DSA needs a run-time language translation setting. A different locale can be selected from the list of available locales.
Use if your DSA has a run-time translation setting and you want the user to select the translation locale with each separate run by setting this parameter to Yes. When set to Yes, the user is prompted for the target locale for each job. The user receives no prompts when this parameter is set to No.
This section contains advance job option settings.
Provides a dialog confirmation before clearing results prior to running a job. By default, this is off.
When creating regression tests, this will clear comparisons. By default, this setting is off.
Creates a backup copy of the worksheet before overwriting it with the job results. By default, this setting is turned off.
Enables the writing of all DSA results to Excel using Excel 'Text' cell format. For example, this feature could be used to prevent the Excel auto-formatting feature from turning ratios and part numbers into dates or to prevent the loss of leading zeros.
Enables the stripping of embedded HTML tags often found in product data. This feature does not strip tags from full HTML Web pages. For example, it will remove HTML break and list tags often found inside product data stored in databases.
Enables the verification that column A contains unique identifiers before the job is run to avoid job errors.
To set up a DSA, use the following steps:
Open your Excel workbook and select the tab associated with the Excel worksheet that contains your data.
From the Services for Excel toolbar, click DataLens Tools, and then select Job Options….
Select the DSA you want to use from the list.
The Data Source will automatically be entered by the system. Input and output columns are also automatically populated when the DSA is selected.
Modify any other options on this tab or the Advanced Settings tab.
Select OK on either tab to accept your changes.
Save your Excel workbook.
Your DSA configuration is now saved with the active workbook; this configuration will be available the next time you open this workbook.
As record data is routed through a DSA, records may be routed by the DSA to a variety of output steps. Some outputs represent exceptions that must be reviewed by product experts. Other output record sets are ready for production use in your enterprise and may be targeted to several different enterprise applications.
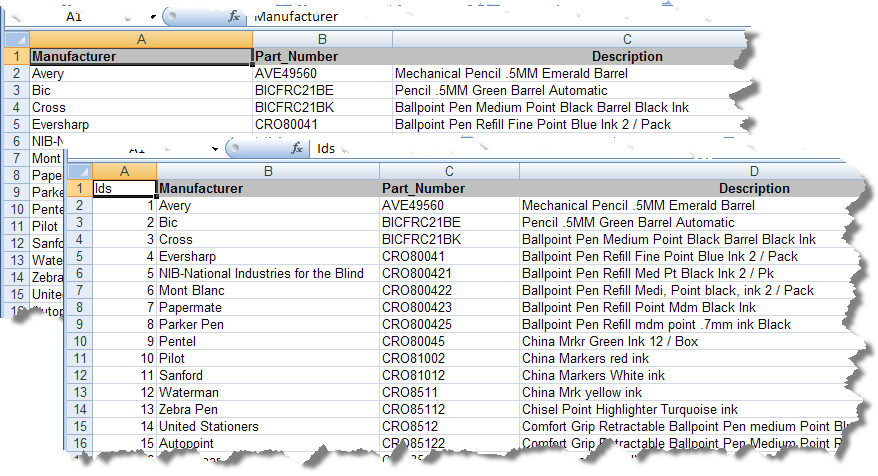
In order to effectively track records as they flow through a DSA, each record must carry with it a unique identifier. The Services for Excel application assumes that the first column of the input data, also known as column 'A' in Excel, contains the unique identifier.
The Services for Excel Add-In makes it easy to add a unique identifier column if one does not exist. From the Services for Excel toolbar, click Jobs, and then select Insert Line Item Id Column. This automatically inserts a new column A to the left of your existing data columns and then inserts a unique set of record identifiers into column A, as in the following:
If your data already has a unique identifier column, you should move that column so that it is the first data column in your spreadsheet.
Additionally, you can check the uniqueness of your column A identifiers to ensure proper record processing. From the Services for Excel toolbar, click Jobs, and then select Fill-in Line Item Ids.
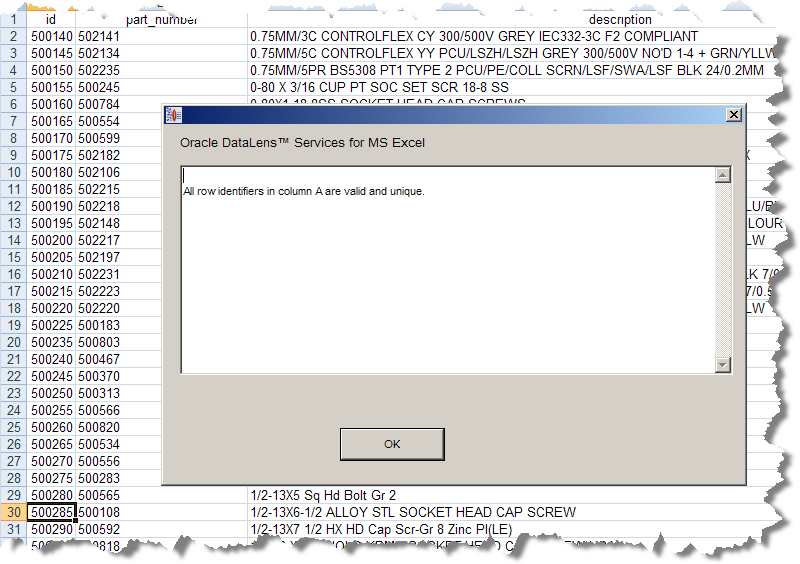
A report about the uniqueness of your record identifiers is displayed. This report can be saved to a text file by clicking Save Report and entering a file name.
If there are id duplicates, you can the option of allowing the Services for Excel application to correct them by clicking OK; click Cancel to exit the dialog box without changing any records. In addition to fixing the duplicate identifiers, the application fills in any null or missing identifiers.
Note:
The maximum valued unique identifier found in column A is used as the starting point for creating additional unique identifiers.If desired, you can also enforce unique item identifiers from the Job Options dialog. For more information, see "Advanced Options Section".
Each record set associated with a DSA output is written to a separate Excel spreadsheet, which are known as a result set. Each Excel worksheet is named the same as the DSA output step. Whether you get results from Process Job or Get Job Results, the new results overwrite the previous results on the corresponding spreadsheet. The worksheet headers in row 1 are automatically created from the DSA output columns. While the data values are overwritten each time results are retrieved, any worksheet formatting is preserved so that any formatting you add is not lost.
The Services for Excel application treats a DSA output named Output a little differently than any other named output step. DSA records routed to the Output step are written to columns on the input worksheet. By default, the data in these result records are written to columns to the right of the input columns. In other words, the results data are appended to each corresponding input record or row.
A DSA job is immediately executed on the Oracle DataLens Server. The job execution does the following:
Sends the input data found on the active worksheet in (columns A and B are used in the example in this section) to the configured Oracle DataLens Server for processing.
Retrieves the transformation results from the server after the job has completed.
Writes the retrieved results to the Excel worksheet(s) specified by the DSA.
The worksheet columns that are used for input to the job and where the results are placed back into your Excel workbook after the job has completed are all determined by the design of the DSA. For more information, see Oracle Enterprise Data Quality for Product Data Application Studio Reference Guide.
There are two ways that you can process data records using your DSA, real time (synchronous) and batch (asynchronous) mode. Both of these DSA run methods are described in this section.
To run a configured DSA, click the Run Job button on the toolbar.
When processing the data records, job status messages are displayed to inform you of the progress and completion as in the following:
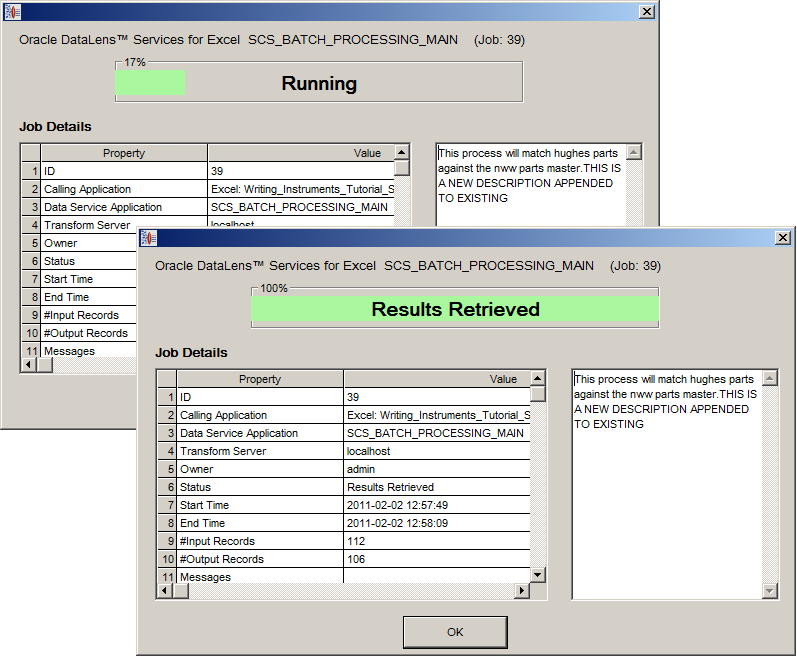
When the job is finished and the results have been retrieved, you should review the job statistics. Once you have done so, click OK. Your transformed data is included in your Excel workbook as defined by your DSA.
Note:
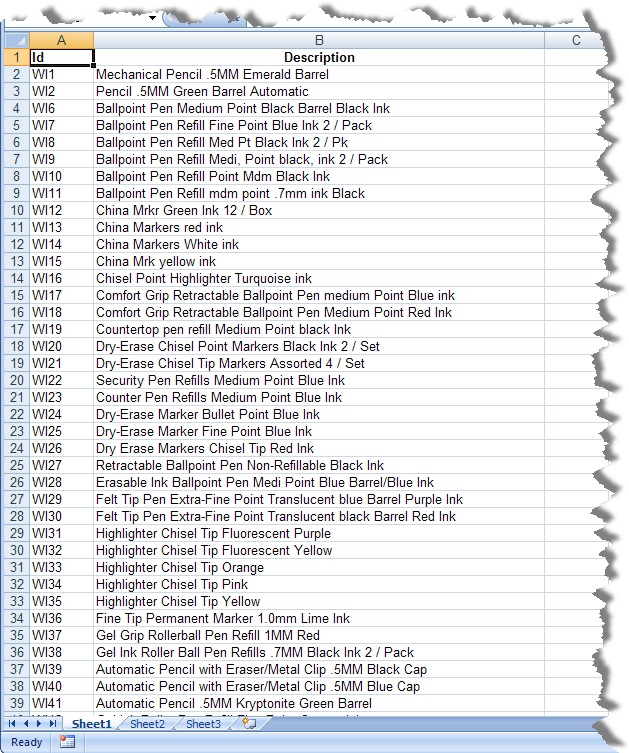
A job is finished when 'Results Retrieved' is displayed rather than 'Complete'. For jobs that are processing a great deal of data, retrieving all results and finishing the job can take some time.In the following example, the input data records contain a unique id and a description:
After processing this data, the results are placed in new worksheets as in the following:
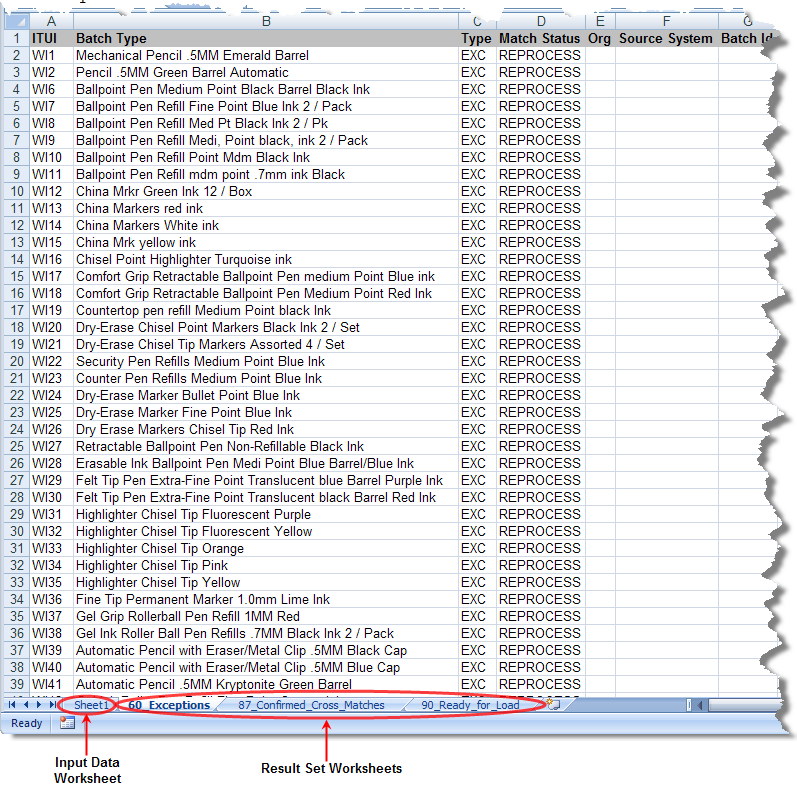
The original input data has been transformed, exceptions are identified, and subsequent columns contain any extracted attribute information.
To run a configured DSA, click the Submit Job button on the Services for Excel toolbar.
While a batch mode job is running, you can use Excel for your other tasks. The results of job can be retrieved later. After a job is submitted, you can even save the Excel workbook and close Excel, and when you return to the same workbook, you can retrieve the job results.
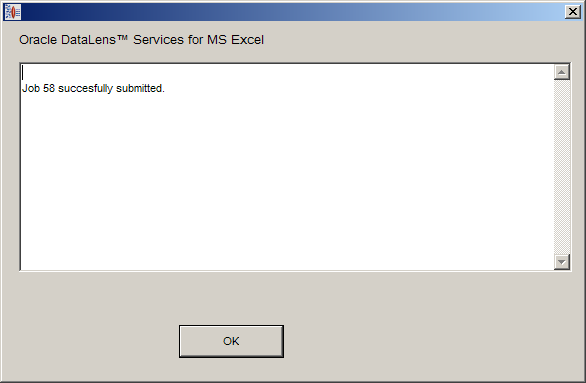
When you use the Submit Job button to start a job, the input records are first read from Excel and then the job is submitted to the Oracle DataLens Server for processing. If you have a large amount of data, a status message is displayed to show you the data read progress. When the job has successfully started to run at the Oracle DataLens Server, a status message is displayed:
To check on the status of your job, view the job status as described in "Viewing the Job Status". These results are displayed the same way as real time records processing.
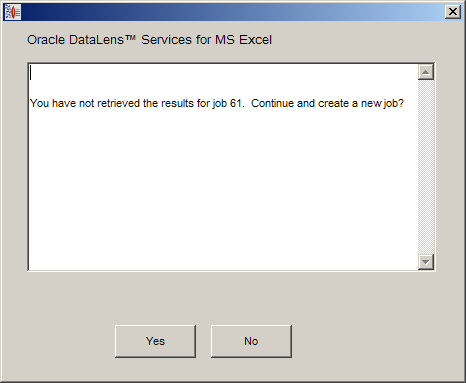
You must review the job status before attempting to re-run your data, in real time or batch mode, or you are prompted to choose to overwrite the current results by creating a new job or you can click No so that you can review your results.
Tip:
You can also use the Oracle DataLens Server Administration Web pages to check on job status. For more information, see Oracle Enterprise Data Quality for Product Data Oracle DataLens Server Administration Guide.You can clear your job result data all at once from each of your result worksheets. From the Services for Excel toolbar, click DataLens Tools, and then select Clear Job Results. The data on all worksheets is deleted though the worksheets remain.
To remove all of the result worksheets, use the Remove All Result Worksheets option from the same menu.
To view the status of all of the jobs that you submitted (synchronous or asynchronous) to the Oracle DataLens server, click the Jobs button on the on the Services for Excel toolbar, and then select Job Status….
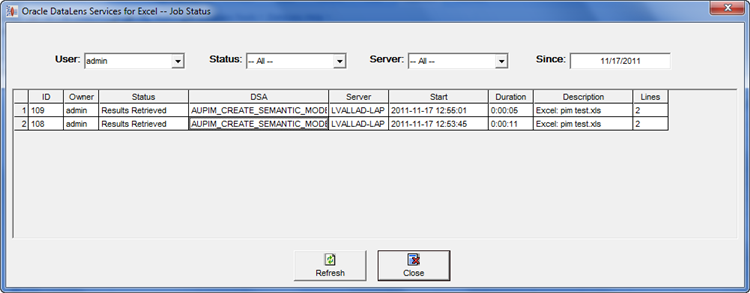
Any job that was created within the Services for Excel or the Oracle DataLens Server is displayed including those that are pending or have failed. By default, only the jobs of user that is logged into the server are listed.
The view can be changed using the User, Status, Server, and Since lists. These controls filter the displayed data based on your selections. For example, you could use the Since list to change the date that you want to set as the starting point for data retrieval. Alternatively, selecting Failed from Status filters all failed jobs from the data retrieved.
If a job is running, you can select it and click Cancel to stop it.
Use the Refresh button to retrieve any additional job status information from the server and redisplay the job information.
Caution:
When a DSA returns the results of a processing job (synchronous or asynchronous), you must retrieve the data immediately, particularly for those jobs that return large amounts of data. Failure to do so can eventually result in an Oracle DataLens Server crash once the server memory is exhausted. The memory can be exhausted from many jobs where the results are not retrieved. In order to improve response time, the server keeps all job results in memory when the job results are less than the DSA maximum memory setting, until the user or calling application retrieves the results or the server is restarted. For information about setting these values, see Oracle Enterprise Data Quality for Product Data Oracle DataLens Server Administration Guide.
|
Copyright © 2001, 2013, Oracle and/or its affiliates. All rights reserved. Legal Notices |
|