4 Creating Sync Application for Android
The following sections use the simple_sync_android sample project to describe the steps to create an Android application that invokes Oracle Database Mobile Server sync APIs.
Note:
This chapter assumes that you know how to use Eclipse to build an Android project and how to appropriately develop and sign an Android application.-
Section 4.2, "Import the Oracle Database Mobile Server Android Project into Eclipse"
-
Section 4.3, "Build Oracle Database Mobile Server Android Project"
4.1 Prerequisites
The following are the prerequisites for enabling synchronization for a SQLite or BDB Android application:
-
Install Eclipse IDE with the ADT plug-in, as detailed at the following site:
http://developer.android.com/sdk/eclipse-adt.html#installing
-
Install the latest Android SDK, as detailed at the following site:
http://developer.android.com/sdk/index.html
-
Install the Mobile Server Development Kit.
4.2 Import the Oracle Database Mobile Server Android Project into Eclipse
Import the Oracle Database Mobile Server simple_sync_android sample Android project into your Eclipse Workspace.
The following steps show how to import the mobile server sample Android project.
-
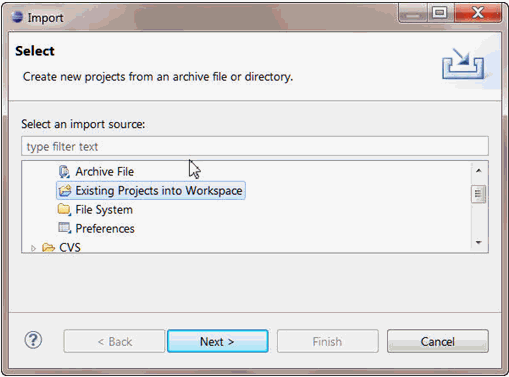
In Eclipse, with your Workspace open, select File->Import and choose Existing Projects into Workspace. Click Next.
Figure 4-1 Import Existing Projects into Eclipse Workspace

Description of "Figure 4-1 Import Existing Projects into Eclipse Workspace"
-
In the project location point to
<MDK_ROOT>\Mobile\Sdk\samples\Sync\android\simple_sync_android
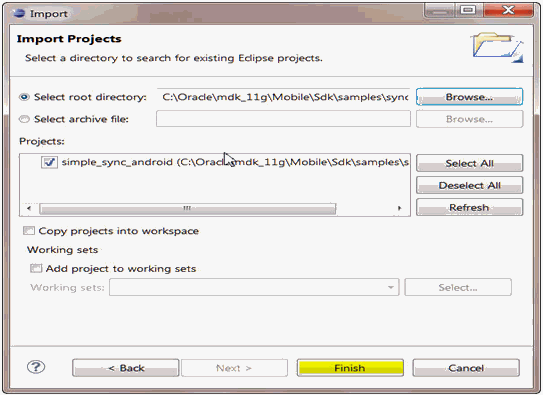
Replace <MDK_ROOT> with the full path where Oracle Database Mobile Server Development Kit was installed. In Figure 4-2, for example, it is C:\oracle\mdk_11g
Figure 4-2 Select Root Directory for Eclipse Project

Description of "Figure 4-2 Select Root Directory for Eclipse Project"
-
Click on "Browse…" button which should find the project files. Select the
simple_sync_androidproject and click Finish. Thesimple_sync_androidproject is now imported into your Eclipse Workspace.
4.3 Build Oracle Database Mobile Server Android Project
The following steps show how to build Oracle Database Mobile Server Android project:
-
Since the project references sync classes, in order to build it, you must copy the sync library file (s) to the libs subdirectory of the project.
-
For BDB client, copy the contents of <MDK_ROOT>\Mobile\Sdk\android\lib\bdb to <MDK_ROOT>\Mobile\Sdk\samples\Sync\android\simple_sync_android\libs. The libs directory should contain:
-
<MDK_ROOT>\Mobile\Sdk\samples\Sync\android\simple_sync_android\libs\osync_bdb_android.jar
-
<MDK_ROOT>\Mobile\Sdk\samples\Sync\android\simple_sync_android\libs\sqlite.jar
-
<MDK_ROOT>\Mobile\Sdk\samples\Sync\android\simple_sync_android\libs\armeabi\liboracle-jdbc.so
-
-
For SQLite client, copy osync_android.jar from <MDK_ROOT>\Mobile\Sdk\android\lib\ to <MDK_ROOT>\Mobile\Sdk\samples\Sync\android\simple_sync_android\libs\. The libs directory should contain: <MDK_ROOT>\Mobile\Sdk\samples\Sync\android\simple_sync_android\libs\osync_android.jar.
-
Build the project.
-
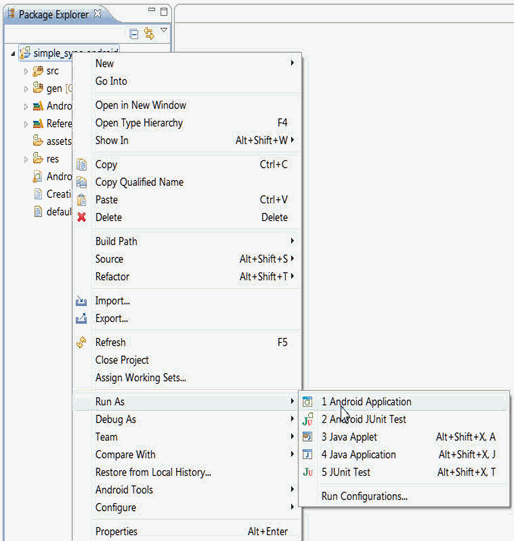
Run/Debug the simple_sync_android on a device emulator. After a successful build, to run the application, right click on the “simple_sync_android” project. Go to “Run As” item, and select “Android Application.” This will bring up the Android Emulator, where you should find “Mobile Sync” application.
-
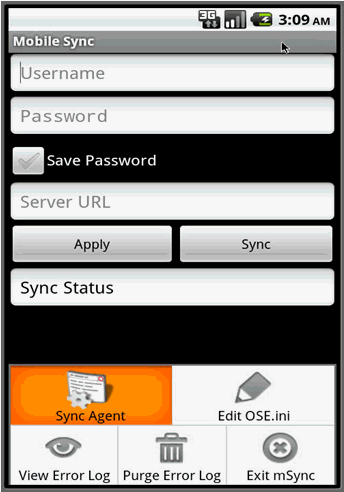
Once the Android emulator is loaded, the mSync application will be started. To sync with a Mobile Server, provide a sync client's authentication information, the Mobile Server's http url (for example, myhost: 8090) and select the "Sync" button.
Several menu options are available when you select the "Device Menu" button. For more information, see Table 4-1.
Table 4-1 Menu Options for "Device Menu" Button
Button Functions Sync Agent
Brings up the automatic Sync Agent screen
Edit OSE.ini
Allows users to modify contents of parameter file, OSE.ini
View Error Log
View the contents of the sync error log
Purge Error Log
Remove all contents from the sync error log
Exit mSync
Exit the application and terminate the mSync process.
Selecting the Android device's "Back" button puts the sync process in the background.
-
Examine the data after sync.
-
Use the Android SDK tool adb shell (located at <Android SDK root>\android-sdk\platform-tools) , to connect to the running instance of a device or an emulator.
-
For SQLite client, use the sqlite3 tool, included with Android SDK, to connect to the synchronized database(s). For more information on sqlite3 utility, see Android documentation. The simple sync client, by default, creates databases under:
/data/data/tests.sync/app_oracle.sync/sqlite_db/<SYNC USERNAME>
For example, if the user name is S11U1 and the user is subscribed to "SAMPLE11" publication, to connect to the database sample11.db and list all of its tables, the following commands are required: adb shell, cd /data/data/tests.sync/app_oracle.sync/sqlite_db/S11U1, sqlite3 sample11.db, and .tables
-
For BDB client, you can use dbsql utility for Android platform to examine the synchronization data. The dbsql utility is located at <MDK_ROOT>\Mobile\Sdk\android\tools\bdb. You can use the Android SDK tool adb push (located at <Android SDK root>\android-sdk\platform-tools), to copy it into the running instance of a device or an emulator. For more information on dbsql utility, see BDB documentation. The simple sync client, by default, creates databases under:
/data/data/tests.sync/app_oracle.sync/bdb/data/<SYNC USERNAME>
-
Examine MainAct.java
The sample consists of the UI layout code (found in the res\layout subdirectory) and the main application Java class file: MainAct.java. All the logic of initializing sync structures and calling the sync functions is located here. Examine this file for detailed explanation of the required sequence of calls to the sync API.
-

