
Oracle® Insurance Policy Administration 9.6.0.0 E35883-01
The Shadow feature is provided to shadow, or delete, a policy. This may be used if a policy was added by mistake or has not been processed and needs to be deleted.
There are two ways that a policy can be placed in shadowed status. The first involves clicking the Shadow option on the Policy screen. The second is to add and process a StatusChange activity to the policy.
When a policy is configured to support shadowing, a Shadow Policy option displays on the secondary menu of the Policy screen. When selected, the configuration tells the system to perform checks to confirm that there are no active or pending activities, no segments, no roles and no disbursements applied to the policy. If none of these conditions exist, then the policy will be shadowed.
The Shadow Policy option will only be displayed in configured Policy statuses, such as Pending. If processing has begun or the policy is no longer pending and the policy should be shadowed, then the activities, segment, roles and disbursements must be removed before the user will be allowed to shadow the policy.
Shadow Policy Option on the Policy Secondary Menu
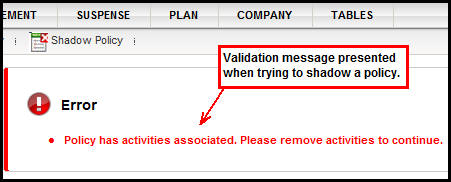
Shadow Policy Validation Message
The StatusChange activity that places a policy in a shadowed status is a non-reversible activity. This activity is added through the Add Activity link on the secondary menu on the Policy screen. When the activity is added, the user is presented with a message confirming that the policy was shadowed. . Validations are performed to ensure the policy meets the criteria to be shadowed. If it does not, then error messages will display and the errors identified must be resolved before the activity can process. When the activity successfully processes, the user is taken back to the main OIPA screen.
Once a policy is shadowed, it will no longer be available through OIPA. If the policy needs to be referenced, then the user can find it in the database.
Open the policy. The Shadow Policy option displays on the secondary menu.
Click Shadow Policy on the Secondary menu.
Select OK to continue, or Cancel to cancel the Shadow policy action.
If OK is selected, then the system performs all configured validations. If the policy fails any validations, then the system displays a list of the validation failures and the actions required to correct them.
If any errors are listed, then correct the errors so the policy will pass validation. Once the policy passes validation, the policy is deleted and a confirmation message appears.
Select OK to continue. The system will display the OIPA initial screen. The activity will no longer be found in OIPA. It is still listed in the database.
Open the policy.
Click Add Activity on the Secondary menu. The Add Activity window will open.
Copyright © 2009, 2013, Oracle and/or its affiliates. All rights reserved. Legal Notices