| Oracle® Fusion Middleware Federated Portals Guide for Oracle WebLogic Portal 10g Release 3 (10.3.5) Part Number E14235-06 |
|
|
View PDF |
| Oracle® Fusion Middleware Federated Portals Guide for Oracle WebLogic Portal 10g Release 3 (10.3.5) Part Number E14235-06 |
|
|
View PDF |
User Name Token, or UNT, is an alternative to SAML and provides the same basic single sign-on capability as SAML provides. User Name Token lets you map the local user on the consumer to a user on the producer. This chapter explains how to configure User Name Token security for a federated portal.
This chapter includes the following sections:
On the consumer, you need to set up credential mappings. Credential mapping is the process whereby a legacy system's database is used to obtain an appropriate set of credentials to authenticate users to a target resource. In WebLogic Server, a Credential Mapping provider is used to provide credential mapping services and bring new types of credentials into the WebLogic Server environment. For more information on credential mapping, see the WebLogic Server topic, "Credential Mapping Providers" in Oracle Fusion Middleware Developing Security Providers for Oracle WebLogic Server.
Log in to the WebLogic Server Administration Console on the consumer. The URL for the console is:
http://servername:portnumber/console
where servername is your server's IP name, and portnumber is the server's port. For example:
http://localhost:7001/console
Click the Security Realms link in the Domain Structure window, as shown in Figure 16-1.
Select myrealm (or the name of the security realm you are using).
Select the Credential Mappings tab.
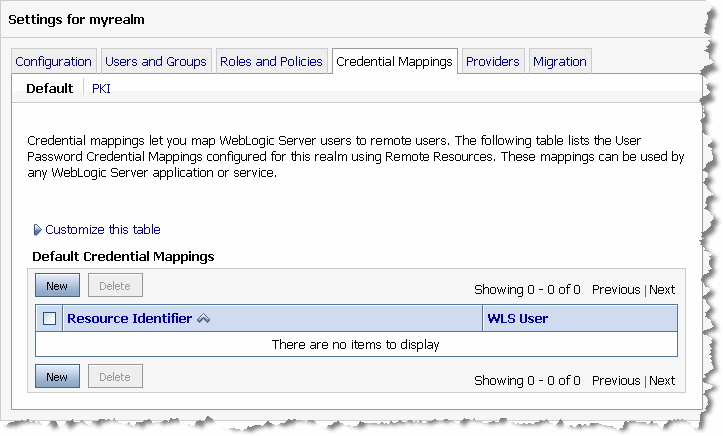
Select the Default link to open the Default Credential Mappings dialog, as shown in Figure 16-2.
Figure 16-2 Default Credential Mappings Dialog

Click New.
In the Create a New Security Credential Mapping dialog, shown in Figure 16-6, complete the fields listed below.
Protocol – The protocol for the remote resource, such as HTTP or HTTPS.
Remote Host – The name of the remote resource. For example: myproducer
Remote Port – The port number of the remote resource. For example: 7001
Remote Path – The path of the remote resource. You need to enter the markup path for the producer. Be sure to begin the path with a "/". For example:
/myProducerWebProject/producer/wsrp-1.0/markup
/myProducerWebProject/producer/wsrp-1.0/portletManagement
/myProducerWebProject/producer/wsrp-1.0/registration
/myProducerWebProject/producer/wsrp-wlp-ext-1.0/markup
/myProducerWebProject/producer/wsrp-1.0/serviceDescription
To obtain this path, you can enter the WSDL address of the producer in a browser. For example, if the producer web application is called myProducerWebApp, the WSDL URL is:
http://producerHost:producerPort/myProducerWebApp/producer?wsdl
where producerHost is the host name of the producer server and producerPort is the port number of the producer server.
The producer's WSDL definition appears in the browser. Locate the service description, and copy the markup path, as shown in Figure 16-3.
Click Next.
In the Create a New Security Credential Map Entry dialog, enter the local (consumer) user name and the user name on the producer to which you want to map that local name. Also, enter the password for the user name on the producer, as shown in Figure 16-4.
Note:
The local user you enter must exist on the consumer. If the user does not exist, you need to create it using the User Management feature of the WebLogic Portal Administration Console.
Tip:
The local user name and the user name on the producer can be the same name or different names.
Click Finish. The new mapping appears in the Default Credential Mappings table, as shown in Figure 16-5.
Checkpoint: You have configured a credential mapping on the consumer. The next step is to configure the producer to recognize that mapping.
This section explains how to configure the producer. On the producer, you need to set up the authentication and change the WSDL templates to include the UNT policy.
You set up authentication using WebLogic Server Administration Console.
Tip:
The WebLogic Authentication provider allows you to manage users and groups in one place, the embedded LDAP server. Note that the Administration Console refers to the WebLogic Authentication provider as the Default Authenticator. For more information on authentication, see the WebLogic Server topic, "Configure Authentication and Identity Assertion Providers" in the Oracle WebLogic Server Administration Console Online Help.
To set up authentication:
Log in to the WebLogic Server Administration Console on the consumer. The URL for the console is:
http://servername:portnumber/console
where servername is your server's IP name, and portnumber is the server's port. For example:
http://localhost:7001/console
Click the Security Realms link in the Domain Structure tree, as shown in Figure 16-1.
Select myrealm (or the name of the security realm you are using).
Select the Providers tab.
Select the Authentication tab.
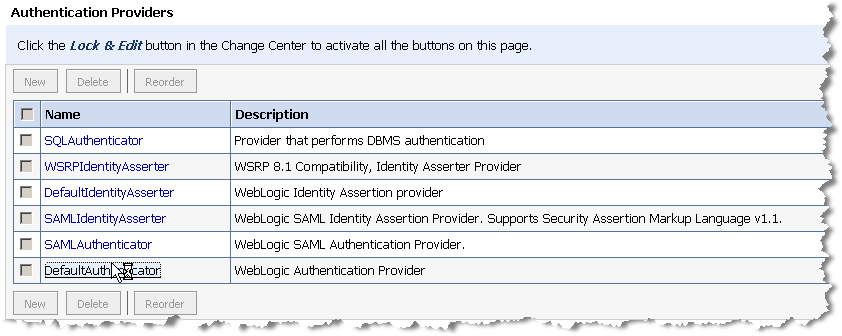
Select DefaultAuthenticator, as shown in Figure 16-8.
Tip:
If the DefaultAuthenticator selection is not present, you need to add it and restart the server.
Figure 16-8 Select the DefaultAuthenticator

In the Configuration tab, select Provider Specific.
Select the Enable Password Digest checkbox, as shown in Figure 16-9. You must select this checkbox to enable the WebLogic Authentication Provider to store the password in a two-way encrypted (reversible) form.
Select the Users and Groups tab.
Select Users.
Note:
The existing user name and password will not work.
Click New, as shown in Figure 16-10. The Create a New User dialog appears.
In the Create a New User dialog, complete the Name and Password fields.
Select DefaultAuthenticator from the dropdown menu, as shown in Figure 16-11, and click OK. Note that you must use the DefaultAuthenticator for users on the producer. The user you create must match the user you mapped to when you configured the consumer (as explained previously).
You must update WSDL templates of your producer web application to include the UNT policy.
To update WSDL templates to include the UNT policy:
Open your producer web application in Oracle Enterprise Pack for Eclipse (OEPE).
Open the Merged Projects view for your web application.
Right-click wsrp-wsdl-template.wsdl and select Copy to Workspace.
In the Copy to Workspace dialog, click OK.
Right-click wsrp-wsdl-template-v2.wsdl, and select Copy to Workspace.
In the Copy to Workspace dialog, click OK.
In your workspace, open both files for editing.
In both files, replace the following entries:
<wsp:Policy wsu:Id="ProducerDefaultPolicy">
        <wsp:All>
            <wssp:Identity>
                <wssp:SupportedTokens>
                    <wssp:SecurityToken
TokenType="http://docs.oasis-open.org/wss/2004/01/oasis-2004-01-saml-token-profile-1.0#SAMLAssertionID">
                        <wssp:Claims>
<wssp:ConfirmationMethod>sender-vouches</wssp:ConfirmationMethod>
                        </wssp:Claims>
                    </wssp:SecurityToken>
                </wssp:SupportedTokens>
            </wssp:Identity>
        </wsp:All>
    </wsp:Policy>
With:
<wsp:Policy wsu:Id="ProducerDefaultPolicy">
        <wsp:All>
            <wssp:Identity>
              <wssp:SupportedTokens>
                <wssp:SecurityToken
TokenType="http://docs.oasis-open.org/wss/2004/01/oasis-200401-wss-username-token-profile-1.0#UsernameToken">
                    <wssp:UsePassword
Type="http://docs.oasis-open.org/wss/2004/01/oasis-200401-wss-username-token-profile-1.0#PasswordDigest"/>
                </wssp:SecurityToken>
              </wssp:SupportedTokens>
            </wssp:Identity>
        </wsp:All>
    </wsp:Policy>
Save your changes to the two files.