For each column in a Results Table, power users can configure the format used to display the value, and whether to allow users to click the value in order to refine data or display related information. For an EQL-based table, power users also configure the column heading and summary options.
From the Configuration tab of the Results Table edit view, to configure a column:
-
Click the edit icon for the column.
The Edit Attribute Options dialog is displayed.
-
For columns from an EQL query, in the
Attribute name field, type the label to use
for the
Results Table column.
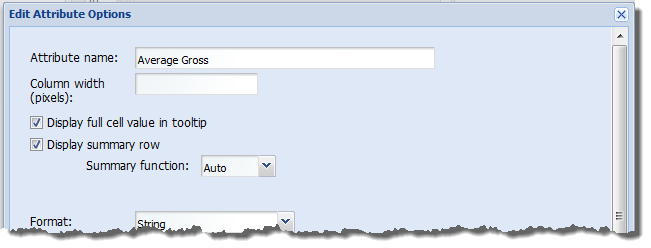
For attribute values in a records-based table, the display name is used, and you cannot change the column heading.
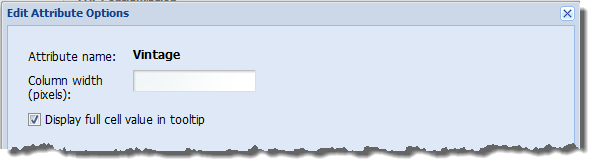
- In the Column width (pixels) field, type the default width of the column. End users can then adjust the width.
-
When end users hover the mouse over a value, to display the full
text of the value in a tooltip, check the Display full cell value in
tooltip checkbox.
This is particularly useful for longer text strings such as descriptions.
-
For EQL-based tables, if you have enabled the summary row, then
for a generated metric, to display the summary value in the summary row:
- Check the Display summary row checkbox.
- From the Summary function drop-down list, select the function used to generate the value in the summary row.
Note that you cannot display a summary value for a grouping attribute.
-
From the
Format drop-down list, select the format to
use to display the column value.
For more information on the formats and their available configuration options, see Formatting values displayed on a component.
When you select a format, the Formatter options section is updated to display the fields to use to configure that format type.
-
From the
Column action drop-down list, select the
action to perform when users click the column value.
When you select an option, the Action options section is updated to display the fields to use to configure that action type. The available actions are:
None Indicates that the value is not a hyperlink. This is the default value.
Link to record details Indicates that when end users click the icon or link, a Record Details component is populated with the values for that row. For records-based tables, the attributes are displayed in their attribute groups.
For EQL-based tables:- The group-by attributes are displayed in their attribute groups.
- The generated metrics are displayed in the Other group.
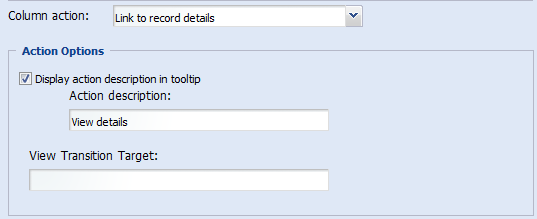 For the Link to record details action, you can configure:
- Whether to display a tooltip when the end user hovers the mouse over the value
- The text to display in the tooltip
- The page on which the Record Details component is located. If you do not specify a page, the end user stays on the current page.
Enable drill down by refinement on this field Indicates that when end users click the value, the value is used to refine the data. For an EQL-based table, this option can only be used for the grouping attributes. It cannot be used for the generated metrics. The attribute also must be an attribute that is present in the physical data. It cannot be a derived or aliased attribute.
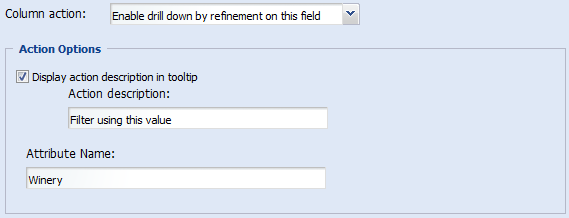 For the Enable drill down by refinement on this field action, you can configure:
- Whether to display a tooltip when the end user hovers the mouse over the value
- The text to display in the tooltip
You also must provide the name of the attribute. Make sure the attribute specified here is the attribute displayed in the column.
Hyperlink Indicates that the value is a hyperlink to another page or file. 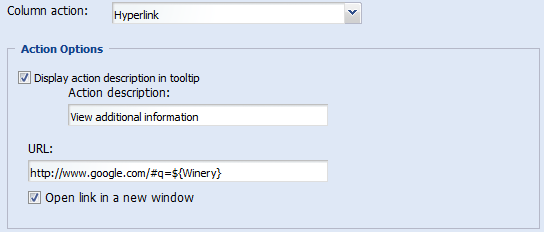 For the Hyperlink action, you can configure:
- Whether to display a tooltip when the end user hovers the mouse over the value
- The text to display in the tooltip
- The URL for the hyperlink
- Whether to display the hyperlink in a new browser window
To insert an attribute value in the URL,- To encode the inserted value, use ${<attribute name>}
- To not encode the inserted value, use ${{<attribute name>}}
In both cases, <attribute name> is the name of the attribute.
For details on component hyperlinks and encoding inserted attribute values, see Configuring hyperlinks from Studio components.
Note that if you have also configured the column to display the full value in a tooltip, when end users hover over the value, both tooltips are displayed.
- To save the column configuration, click Save.
