The Repository Wizard in the configuration console allows you to create a new repository or upgrade a repository. For information on upgrading, see Upgrading an Existing Data Relationship Management Application.
 To create a new repository:
Select Create a new repository.
Optional: Select Estimate size based on existing repository to create a new repository based on the size of an existing repository.
Optional: Select Generate SQL scripts to create and download database creation scripts to run at a later time
If you selected to generate scripts in the previous step, go to Generating SQL Scripts.
If you select any other option in the previous step, continue to the next step.
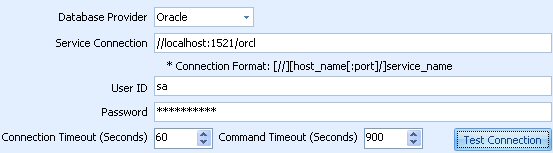
Select the database provider: Oracle or SqlServer.
Enter the connection to the target database where the new repository will reside.
Enter the user ID and password for an administrator who has rights to create a database schema and data files.
Optional: Change the Connection Timeout or Command Timeout.
Note:
These settings are saved in the drm-config.xml and are used by the engines when they start. To perform large operations (such as a large version delete), set the Command Timeout to a larger value than the default.
Click Test Connection.
If you selected Oracle for the database provider, continue to the next step.
If you selected SqlServer, go to Creating a SQL Server Database.
Enter the user id and password which will be created as the schema owner for the Data Relationship Management repository.
Accept the default tablespace settings or make changes and click Next.
Note:
It is highly recommended that dedicated tablespaces be used for Data, Indexes, Transactions, and Properties. The default tablespace names may already be in use, and will be re-used if a new tablespace name is not specified.
On the Application Administrator Creation page, enter a password for the Administrator user and click Next.
On the Create Repository Confirmation page, review the settings and click Next to start the creation process.
When the database has been created a success message is displayed.
On the completion page, click Save Log to save the log file.
On the Repository Operation Complete screen, click Finish.
You are returned to the main screen of the console where you can review the settings.
Note:
If you entered the Repository Wizard from the menu bar, Finish exits the wizard. If you entered the wizard from the button on the application tab, clicking Finish applies the settings to the selected application. If you click Cancel, the repository is still there, but the settings are not applied to any application. The new database is applied when you save the configuration.
Click Save Configuration, otherwise connection information is lost when the console is closed.