Use these steps to create Planning applications. When specifying application information, ensure that:
The application has a name, and it is assigned to at least one plan type.
The Default Currency property is defined.
The Fiscal Year Start Date property is defined. The year must be four digits long, such as 2010.
The first year member in the Year dimension and the Fiscal Start Year property describe the same year. For example, if the Fiscal Start Year is 2010, the first year in the Year dimension is FY10.
Year members start with FY, followed by a two-digit year, such as FY10.
The Fiscal Year First Month property is defined.
 To create Planning applications:
Select File, then New, and then Application.
The first screen of the wizard displays.
Names must not contain any special characters and must contain no more than eight characters.
Optional: Select Create Blank Application to create an empty application and use the Dimension Library to drag and drop dimensions into the application. Optionally, click Finish. See Manually Adding Dimensions.
If you are creating a blank application, define the plan types, default currency, and enable multiple currencies. See Defining Plan Types and Specifying the Default Currency.
Optional: Select Auto Create Local Dimensions if you want to create a local application, creating all required dimensions locally using the default name of the dimension class.
For example, this creates an Entity dimension named Entity, an Account dimension named Account, and so on. With this setting, dimensions are selected as local dimensions on the Dimension Selection screen, and you can add dimensions under Custom Dimensions and Other Dimensions, if necessary.
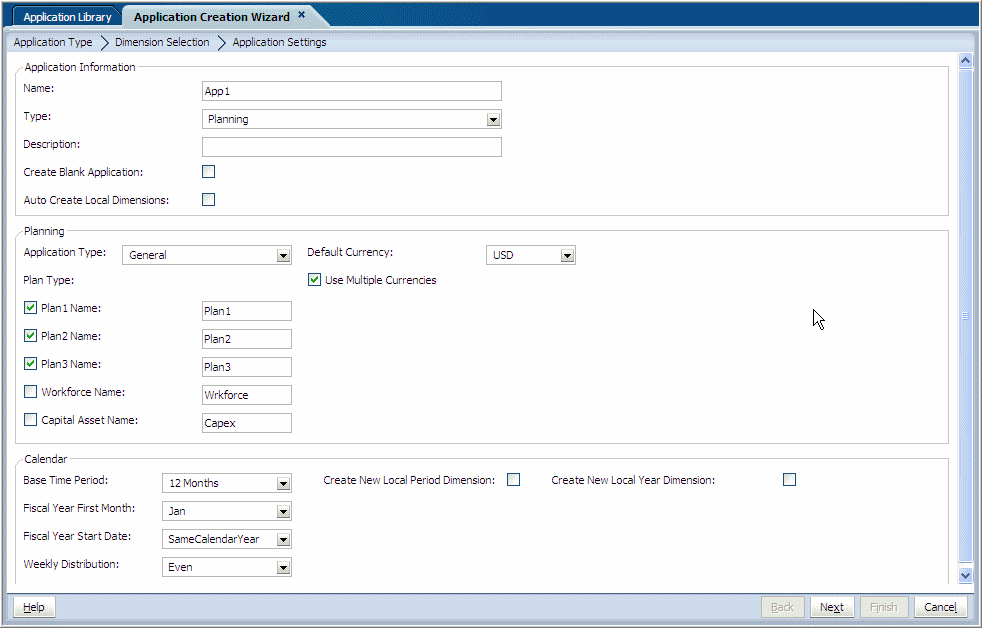
For Application Type, select General.
Define the plan types: see Defining Plan Types.
Specify the default currency: see Specifying the Default Currency.
Set calendar options for the base time period. If you select 12 Months, enter the fiscal start month and weekly distribution. See Defining Calendar Ranges.
Optional: Perform these actions:
If the application supports multiple currencies, select Use Multiple Currencies.
Select Create New Local Period Dimension.
If you want to create a local Period dimension, enter the period name for the new dimension in the Calendar area. If you select Custom for Base Time Period, enter the period name, prefix, and periods per year.
Select Create New Local Year Dimension.
If you want to create a local Year dimension, enter the appropriate information for the new dimension in the Calendar area, including the year name, first fiscal year, and total number of years.
The Dimension Selection screen is displayed. See Selecting Dimensions.