This topic covers deployment of Essbase ASO and BSO application. If you are redeploying an Essbase (ASO) or Essbase (BSO) application, see Redeploying Essbase (ASO) and Essbase (BSO) Applications.
Before deploying Essbase applications, you must complete the following:
You must have successfully configured Performance Management Architect, Essbase, and Oracle Essbase Studio using the EPM System Configurator. See EPM System Installation and Configuration Guide for information on configuration.
You must be provisioned in Shared Services with the user role of Essbase Application Creator (in the User Management Console, Hyperion Shared Services, Global Roles, Application Creator, Essbase Application Creator). Refer to the Shared Services documentation for information on provisioning.
The following are guidelines to consider when deploying or redeploying Essbase applications:
Essbase applications do not require a fixed set of dimensions. For example, you can create and deploy an Essbase application containing just one generic dimension and one member.
Empty dimensions are allowed.
You cannot use Performance Management Architect to create Hybrid Analysis or Advanced Relational Access cubes.
A common validation error is that an invalid character exists in a member name. This often occurs when member names contain square brackets ( [] ) or other invalid characters. To work around this, you can do one of the following:
If the members are in a shared dimension, clear the members using the Exclude Member command, described in Excluding Members.
If the members are local members, clear the members using the Remove Members command described in Removing Members, or the Delete Members command, described in Deleting Members.
If you want to allow duplicate member names, you must set the Allow Duplicates property flag at the application level. Once the application has been deployed with this property set, the Allow Duplicates property is permanently set for the application; you cannot later clear the property. Essbase Studio does not allow updates to the Allow Duplicates property when you redeploy an application.
Note: | After a successful initial deployment of an Essbase ASO or BSO application, the user performing the deployment is not automatically provisioned as an application administrator. To redeploy an Essbase ASO or BSO application, you need to be provisioned as an Application Administrator for the Essbase application in Shared Services. |
Note: | There is no difference in the deployment process for Essbase (ASO) or Essbase (BSO) applications. |
Properties for Essbase applications, dimensions and members are described in Working with Essbase Properties.
Information on Essbase requirements for applications and databases is available in the Oracle Essbase Database Administrator’s Guide and the Oracle Essbase Administration Services Online Help.
Note: | For information on deploying business rules, see the Oracle Hyperion Calculation Manager Designer’s Guide. |
 To deploy an Essbase (ASO) or Essbase (BSO) application:
Click Navigate, then Administer, and then Application Library.
Right-click an Essbase (ASO) or Essbase (BSO) application, and select Deploy.
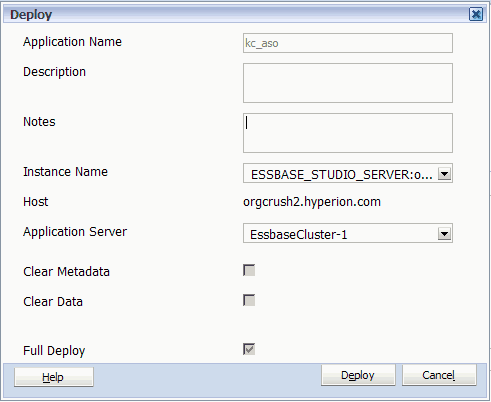
The Deploy dialog box is displayed.
If there are errors, the Job Task dialog box is displayed. Perform these steps:
Optional: In the Deploy dialog box, add notes about this deployment in the Notes box.
The notes you enter are appended to the application description in the Job Console. There is a 150 character limit (because it is appended to the description), and can contain any characters.
Select the Instance Name of the Essbase Studio Server instance which you want to use to deploy the application.
This is the name of a machine where an Essbase Studio Server instance is installed and configured. See the EPM System Installation and Configuration Guide for configuration information.
Note:
You can only deploy Essbase applications using Essbase Studio Server.
Click Deploy.
The Full Deploy, Clear Metadata, and Clear Data check boxes do not apply to a first-time deployment. These options apply to redeployments only. See Redeploying Essbase (ASO) and Essbase (BSO) Applications for information on using these check boxes during redeployment.
Note:
If a deployment is interrupted or deleted, the status may show “deploy pending” and the deployment may time out. The default time out is 480 minutes (8 hours). You can change the default in awbconfig.properties. If a deployment times out, you should deploy the application again. Even though the status may indicate that it is in sync with deployment; it may not be because of the time out.
View and edit the deployed application outline in Essbase Administration Services Console; query the application database using either Smart View or Oracle Essbase Spreadsheet Add-in.