One frequent requirement of budgeting and planning applications is to send worksheets to various functional areas of an organization. After the worksheets are distributed, the recipients can review, modify, and return content updates to the distributor.
Using the Essbase Cascade feature, you can create multiple worksheet files based on one database view. You can specify at what level of detail you want to replicate the worksheets to tailor the information to each recipient’s needs.
The Sample Basic database contains data for beverage products sold in states across the U.S. For example, assume that all product managers review and respond to a proposed budget and return their changes to the finance department. You must create a worksheet for each combination of budget and P&L data to distribute to the product managers for their respective products.
 To create this set of worksheets:
From EPM_ORACLE_HOME/products/Essbase/EssbaseClient/client/sample, open P&l.xls.
This file contains the data to replicate for each worksheet.
Select Essbase, and then Retrieve.
Notice that the retrieval uses the Use Aliases option, which is set for this file in the Essbase Options dialog box. In this example, product 200 changes to Root Beer, which is its preassigned alias.
Select Central (in cell B1) and Root Beer (in cell B2) as the members to be represented in the resulting worksheets.
The Cascade Information page contains the list of members that you selected and the options for specifying the level at which the selected members are retrieved into the cascaded worksheets.
In Member, select Root Beer, and then select Next Level (the default setting) .
The replicated, or cascaded, spreadsheet reports now provide data for members at the same level as Central (East, West, and South) and for members at the level below Root Beer (Old Fashioned, Diet Root Beer, Sarsaparilla, and Birch Beer).
Select Destination Options, and then select only these options.
Click Format Options, and select only these options:
Sheet to Sheet Replication—Copy Formatting
Sheet Formatting—Suppress Missing Rows
Table of Contents—Include Table of Contents
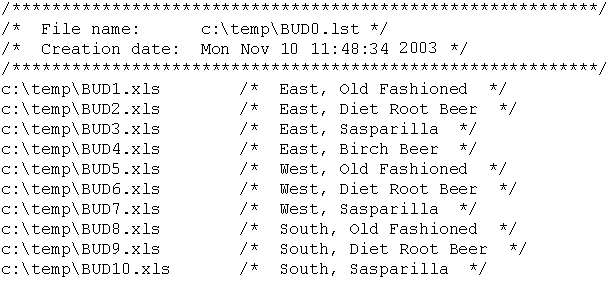
This creates a Table of Contents text file that lists all replicated worksheets, their creation dates, and their member content. By default, Essbase names the Table of Contents file with the extension .lst.
Essbase creates the cascaded worksheets, and then automatically saves, closes, and logs them in the Table of Contents. Each individual file is saved in the directory that you specified, named Bud1.xls through Bud10.xls. When the Cascade is completed, Essbase returns you to the original worksheet view (that is, the source file).
Using a text editing application, open the Table of Contents file (BUD0.LST) from the destination directory that you specified earlier.
This file contains a list of all cascaded worksheets.
Creating Multiple Worksheets from Data
Cascade Information Page (Essbase Cascade Options Dialog Box).
