| Oracle® Fusion Applications Installation Guide 11g Release 7 (11.1.7) Part Number E16600-24 |
|
|
PDF · Mobi · ePub |
| Oracle® Fusion Applications Installation Guide 11g Release 7 (11.1.7) Part Number E16600-24 |
|
|
PDF · Mobi · ePub |
This appendix presents the Provisioning Wizard interview screens for the Provision an Applications Fusion Applications Environment option and describes the purpose of each of the following screens:

No action is necessary on this read-only screen.
Click Next to continue.
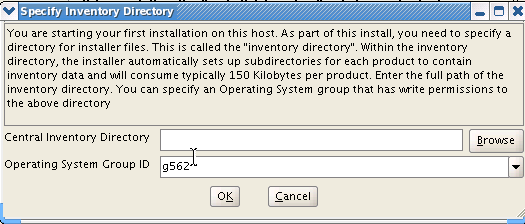
This screen displays only if one or more of the following conditions are not met:
The -invPtrLoc option is used to specify the central inventory location on non-Windows platforms, so the default value for your platform is not used. The default values for platforms follows:
Linux and AIX: /etc/oraInst.loc
Solaris and HP: /var/opt/oracle/oraInst.loc
The Central Inventory Pointer File is readable.
The Central Inventory Pointer File contains a value for inventory_loc.
The inventory_loc directory is writable.
The inventory_loc directory has at least 150K of space.
inventory_loc is not an existing file.
Specify the location of the Central Inventory Directory that meets the previous criteria. The inventory_loc directory can be created by the createCentralInventory.sh script and does not have to exist at the time you specify its location.
For non-Windows platforms, in the Operating System Group ID field, select or enter the group whose members will be granted access to the inventory directory. All members of this group can install products on this host. Click OK to continue.
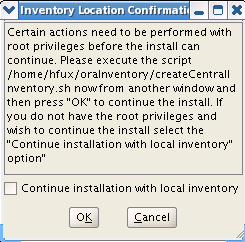
The Inventory Location Confirmation dialog prompts you to run the inventory_directory/createCentralInventory.sh script as root, to confirm that all conditions are met and to create the default inventory location file, such as /etc/oraInst.loc. After this script runs successfully, return to the interview and click OK to proceed with the installation.
If you do not have root access on this host but want to continue with the installation, select Continue installation with local inventory and click OK to proceed with the installation.
For Windows platforms, this screen displays if the inventory directory does not meet requirements.
For more information about inventory location files, see "Oracle Universal Installer Inventory" in the Oracle Universal Installer and OPatch User's Guide.
Click Next to continue.
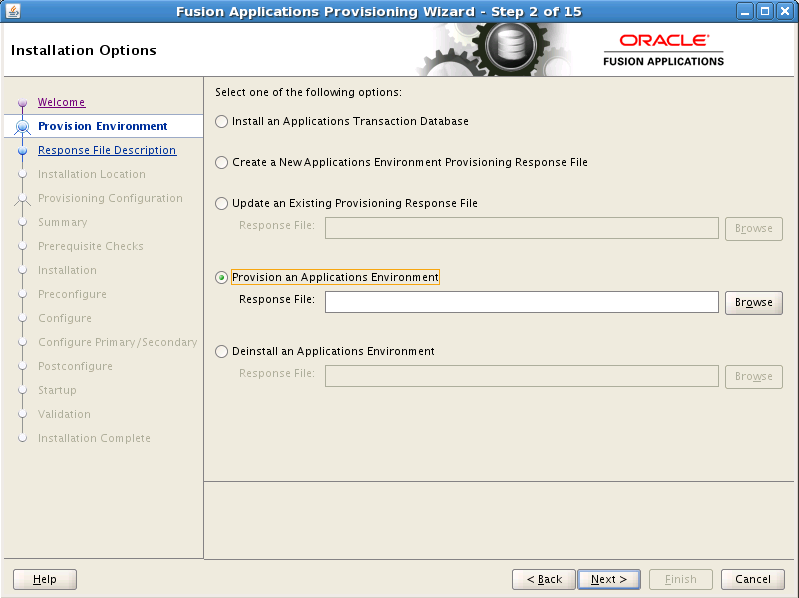
Select the task that you want to perform from the list of options. When prompted, enter a directory path in the Response File field to access a completed response file to use as a base for one of the actions. Or, click Browse to navigate to the response file location.
Install an Applications Transaction Database: Install an empty, single-instance Oracle Database Enterprise Edition using the nonseeded database template shipped with this release.
Create a New Applications Environment Provisioning Response File: Create a response file for a new Oracle Fusion Applications environment.
Update an Existing Provisioning Response File: Add or change details in a completed response file that has not yet been implemented or in a partially completed response file.
Provision an Applications Environment: Initiate and track the processes that install, configure, and deploy product offerings in a new Oracle Fusion Applications environment.
Deinstall an Applications Environment: Remove applications and middleware components from an existing applications environment.
Click Next to continue.
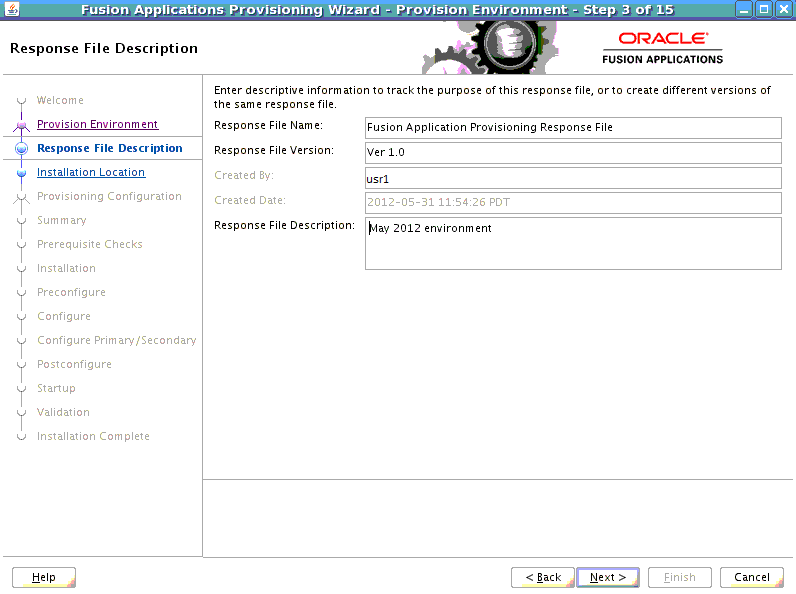
Specify descriptive information to identify this response file. This description is not associated in any way with the executable plan file, or the summary file, that you save at the end of the response file creation process.
Response File Name: Specify a name to identify this response file.
Response File Version: Assign a version number to the response file.
Created By: Defaults to the operating system user who invoked the wizard. Set when the response file is initially created and cannot be modified for the current response file.
Created Date: Defaults to the date that the response file was initially created. Set when the response file was initially created and cannot be modified for the current response file.
Response File Description: Provide a description of this response file.
Click Next to continue.
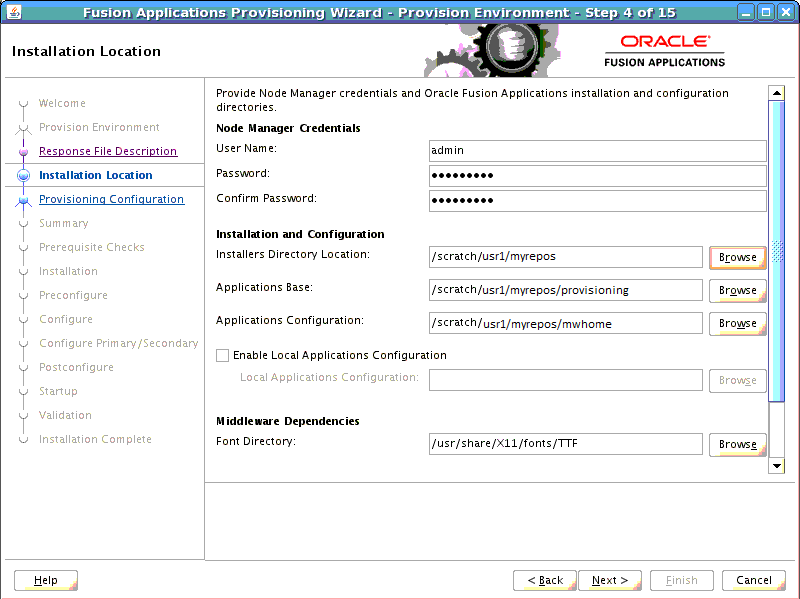
Specify credentials for the Node Manager and supply the location of the various directories required for installation and configuration actions.
Node Manager Credentials
User Name: Specify a user name for the Node Manager role.
Password: Specify a password for the Node Manager and retype it in the Confirm Password field.
Provide locations of various directories that the administrator needs access to.
Installation and Configuration
Installers Directory Location: Enter the path to the repository_location directory you created when you downloaded the provisioning repository. For Windows, the location must be a symbolically linked directory. See "Set Up the Server and the shared Area Permissions" in Oracle Fusion Applications Installation Guide. Note that a symbolic link is not necessary if the repository and the database are on the same node.
Applications Base: Enter the directory path to the Oracle home that you specified when you installed the provisioning framework. This is the Fusion Applications Oracle home. It is the root directory for all Oracle Fusion Applications and Oracle Fusion Middleware products.
The applications base directory must not be set to the system root directory or set to the root directory of a logical drive. Some lifecycle management tools computed directory names by backing up one directory level from the applications base directory and then appending the appropriate subdirectory name. These tools will fail if the applications base directory is set to the system root directory or set to the root directory of a logical drive because it is not possible to back up one directory level from the system root directory or from the root directory of a logical drive.In a Unix environment, this name cannot exceed 59 characters.
In a Windows environment, this name cannot exceed eight characters, and must be a symbolically linked directory. See "Set Up the Server and the shared Area Permissions" in Oracle Fusion Applications Installation Guide.
Applications Configuration: This directory is automatically populated based on the value you specify in the Applications Base field. It is the path to the directory where the configuration files for the domain will be written. For Windows, the location must be a symbolically linked directory. See "Set Up the Server and the Shared Area Permissions" in Oracle Fusion Applications Installation Guide.
Enable Local Applications Configuration: Select this check box if you want Managed Servers to run from a non-networked (local) disk on the host, visible only to the processes running on that host. If you enable this option, the wizard copies the domain configuration from the shared location and places it on the local disk you specify. This configures all Managed Servers to run from the non-networked location.
Local Applications Configuration: Specify the location for the local domain directory that you want to set up. This field is required if you selected Enable Local Applications Configuration. The specified directory must be empty.
Middleware Dependencies
Font Directory: Appears only if you have selected Oracle Sales, Oracle Marketing, or Oracle Financials offerings. Enter the directory where the TrueType fonts are installed. The location varies on different operating systems, but is typically found here:
Microsoft Windows x64 (64-Bit): C:\WINDOWS\Fonts
Linux x86-64: /usr/X11R6/lib/X11/fonts/TTF
Oracle Solaris: /usr/X11R6/lib/X11/fonts/TrueType
IBM AIX on POWER Systems (64-Bit): /usr/X11R6/lib/X11/fonts/TrueType
Some systems may not have TrueType fonts installed. If you cannot locate the fonts on your system, verify that they have been installed. In addition, you can use the fonts directory shipped as part of the JRE installed in the repository. Regardless of which path you specify, you must have access to .ttf (.TTF) files.
Oracle Business Intelligence Repository Password
RPD Password: Specify and Confirm a password to allow access to the metadata repository (RPD) for both Oracle Business Intelligence Applications and Oracle Transactional Business Intelligence. The password must be between 8 and 30 characters and contain at least one digit. It can include letters, numbers, pound sign (#), dollar sign ($), or underscore (_). If you want to include a dollar sign ($) in the RPD password, enter one additional dollar sign ($) as the escape character before the dollar sign ($) in the password. Provisioning sets up this password, but does not actually access the repository.
If the environment created is Windows-based, the wizard prompts for these values:
Windows Domain\Windows User Name: Specify a user name to use for running provisioning.
Windows Domain Password: Specify a password for running provisioning. Retype the password to Confirm it.
Click Next to continue.
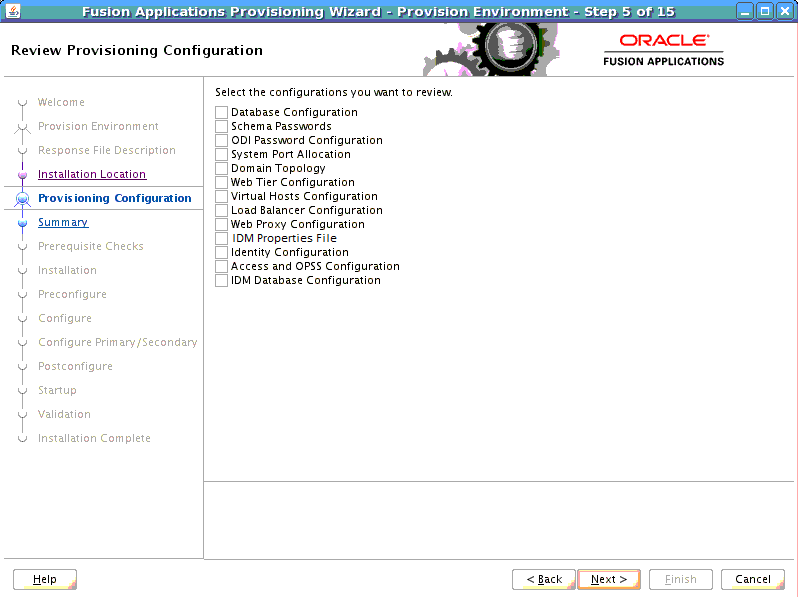
Lists the wizard interview screens where you originally specified domain-specific parameters for this response file. You can make changes to this information if necessary.
Note: If you ignored any warnings during the creation of this response file, you must fix all issues stated in the warnings before you can successfully provision an environment. Select any of the screens displayed here to make changes for a product domains with warnings. All validations must pass before you can run the install phase.
You cannot add or delete product offerings to this response file. To change product offerings, you must create a new response file.
Select one or more options from the list. When you click Next, the screens you select are added to the flow. Note that if you return to this screen after running the preverification checks, those verification checks are invalidated. You must run the Preverify phase again.
Click Next to continue.
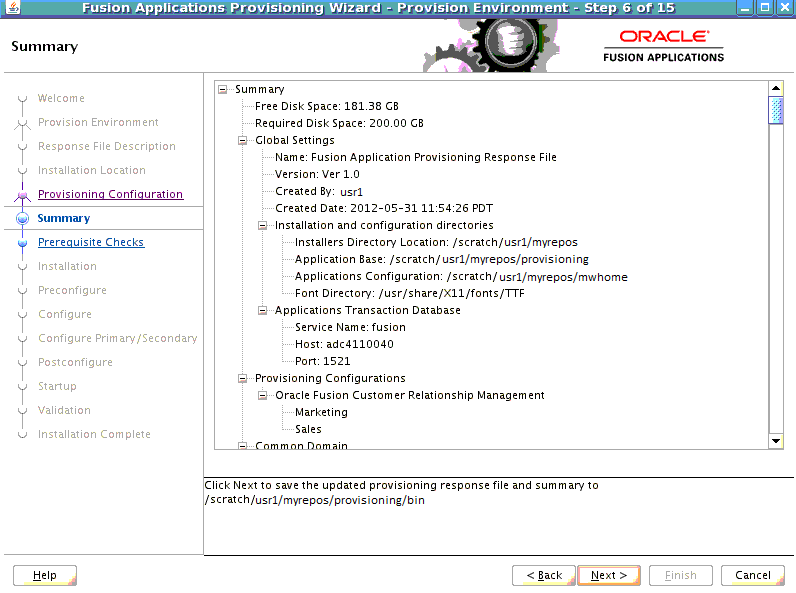
Review the information displayed to ensure that the installation details are what you intend. To make changes, click Back to return to previous screens in the interview.
Click Next to initiate the preverify phase. The wizard displays the Prerequisite Checks screen, and creates a current copy of this response file. The response file is saved in the directory indicated in the message pane.
Click Next to continue.
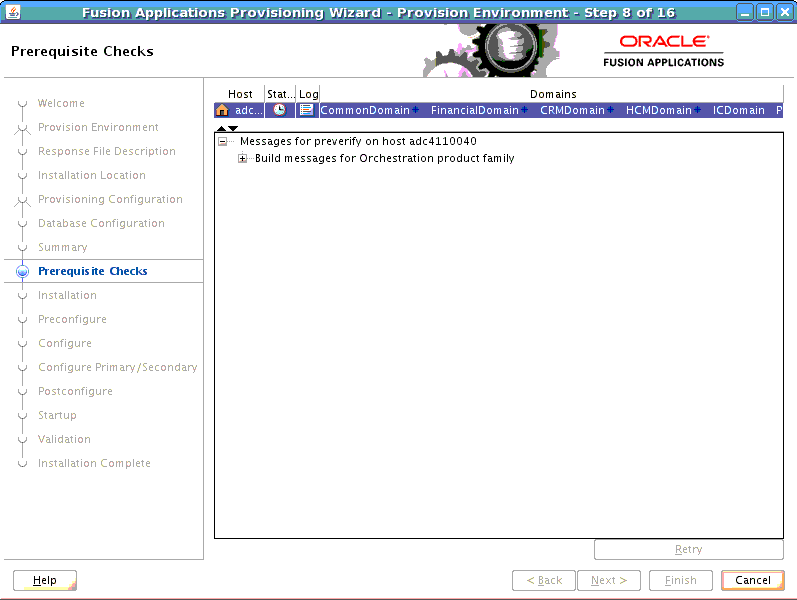
The preverify phase checks to see that all prerequisites are present on the host where you run the phase. The Primordial host is marked with a Home symbol in the Host column. The Domains column lists the domains that are being deployed.
In the terminal session for the Primary host and Secondary host (if present), run the preverify phase with this command:
(UNIX) path_to_script/runProvisioning.sh -responseFile provisioning_response_file_location -target preverify
(Windows) path_to_script\runProvisioning.bat -responseFile provisioning_response_file_location -target preverify
Note: This phase can run in parallel on all hosts and is tracked on this screen. Each new phase must run sequentially; that is, you cannot start a new phase until the previous phase has been completed successfully on all the hosts.
The Status of each build on each host is indicated by one of these icons:
Block: Processing has not yet started on this host for the named phase.
Clock: Performing the build for a phase.
Check mark: The build was completed successfully.
x mark: The build has failed for this phase. You must correct the errors before you can continue.
Restricted symbol: The process has stopped due to a failure within another process.
Click an x or a Restricted symbol to display information about failures. Click the host-level Log file for details about this phase. Click a build Log file to see details specific to that build.
You can make changes to the interview screens and rerun the preverify phase as many times as is necessary. Click Retry to rerun this phase if errors are reported. You must fix all errors before you continue. See "Troubleshooting the Provisioning Process" in Oracle Fusion Applications Installation Guide for details about recovery from failures.
Note: After you click Next on this screen, you can no longer modify the response file.
Click Next. The wizard starts the install phase on the primordial host and displays the Installation screen.
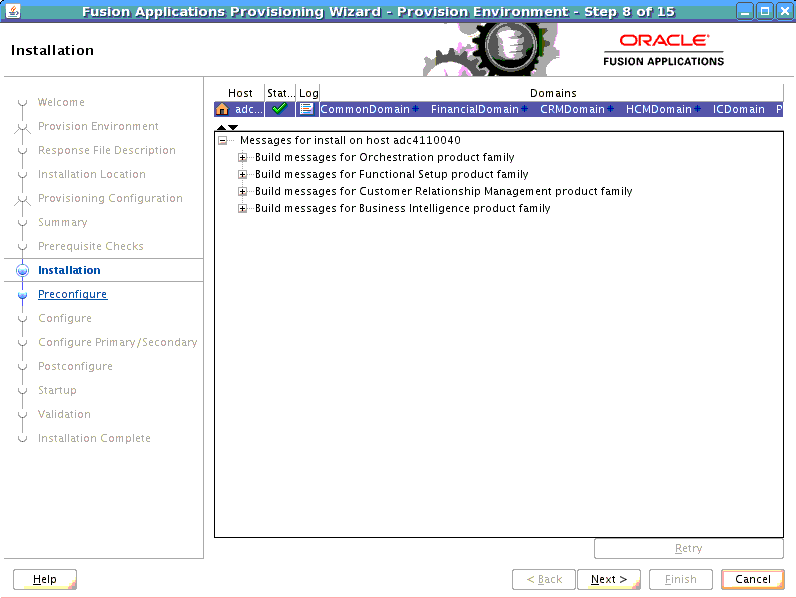
The install phase installs the Oracle Fusion Applications, Oracle Fusion Middleware, and Oracle Database products. The primordial host is marked with a Home symbol in the Host column. The Domains column lists the domains deployed in the new environment.
In the terminal session for the primary, secondary, and DMZ host (if present), run the install phase with this command:
(UNIX) path_to_script/runProvisioning.sh -responseFile provisioning_response_file_location -target install
(Windows) path_to_script\runProvisioning.bat -responseFile provisioning_response_file_location -target install
Note: This phase can run in parallel on all hosts and is tracked on this screen. Each new phase must run sequentially; that is, you cannot start a new phase until the previous phase has been completed successfully on all the hosts.
The Status of each build on each host is indicated by one of these icons:
Block: Processing has not yet started on this host for the named phase.
Clock: Performing the build for a phase.
Check mark: The build was completed successfully.
x mark: The build has failed for this phase. You must correct the errors before you can continue.
Restricted symbol: The process has stopped due to a failure within another process.
Note: You cannot view the build processes on the DMZ host on the primordial host interface because the DMZ host does not have access to the shared network drive.
Click an x or a Restricted symbol to display information about failures. Click the host-level Log file for details about this phase. Click a build Log file to see details specific to that build.
Click Retry to rerun this phase if errors are reported. You must fix all errors before you continue. See "Troubleshooting the Provisioning Process" in Oracle Fusion Applications Installation Guide for details about recovery from failures.
Note: If a DMZ host is present, copy the webtier_dmz_artifacts.zip file from the APPLICATIONS_BASE/ directory on the non-DMZ host to the APPLICATIONS_BASE/ directory on the DMZ host.
Click Next. The wizard starts the Preconfigure phase on the primordial host and displays the Preconfigure screen.
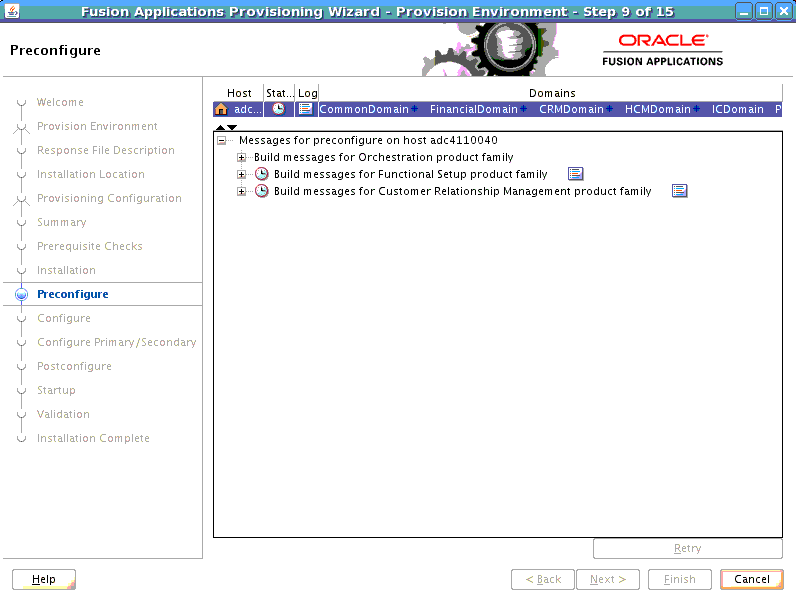
The preconfigure phase prepares application and middleware components for deployment and creates appid users and groups. It modifies the Oracle Application Development Framework (Oracle ADF) configuration file to use the database, based on Oracle Metadata Services (MDS) in the applications enterprise archive (EAR) files. It also updates the connections.xml file in all applications EAR files with endpoint information. The primordial host is marked with a Home symbol in the Host column. The Domains column lists the domains deployed in the new environment.
In the terminal session for the primary, secondary, and DMZ host (if present), run the preconfigure phase with this command:
(UNIX) path_to_script/runProvisioning.sh -responseFile provisioning_response_file_location -target preconfigure
(Windows) path_to_script\runProvisioning.bat -responseFile provisioning_response_file_location -target preconfigure
Note: This phase can run in parallel on all hosts and is tracked on this screen. Each new phase must run sequentially; that is, you cannot start a new phase until the previous phase has been completed successfully on all the hosts.
The Status of each build on each host is indicated by one of these icons:
Block: Processing has not yet started on this host for the named phase.
Clock: Performing the build for a phase.
Check mark: The build was completed successfully.
x mark: The build has failed for this phase. You must correct the errors before you can continue.
Restricted symbol: The process has stopped due to a failure within another process.
Note: You cannot view the build processes on the DMZ host on the primordial host interface because the DMZ host does not have access to the shared network drive.
Click an x or a Restricted symbol to display information about failures. Click the host-level Log file for details about this phase. Click a build Log file to see details specific to that build.
Click Retry to rerun this phase if errors are reported. You must fix all errors before you continue. See "Troubleshooting the Provisioning Process" in Oracle Fusion Applications Installation Guide for details about recovery from failures.
Note: If a DMZ host is present, recopy the response file to the DMZ host.
Click Next. The wizard starts the configure phase on the primordial host and displays the Configure screen.
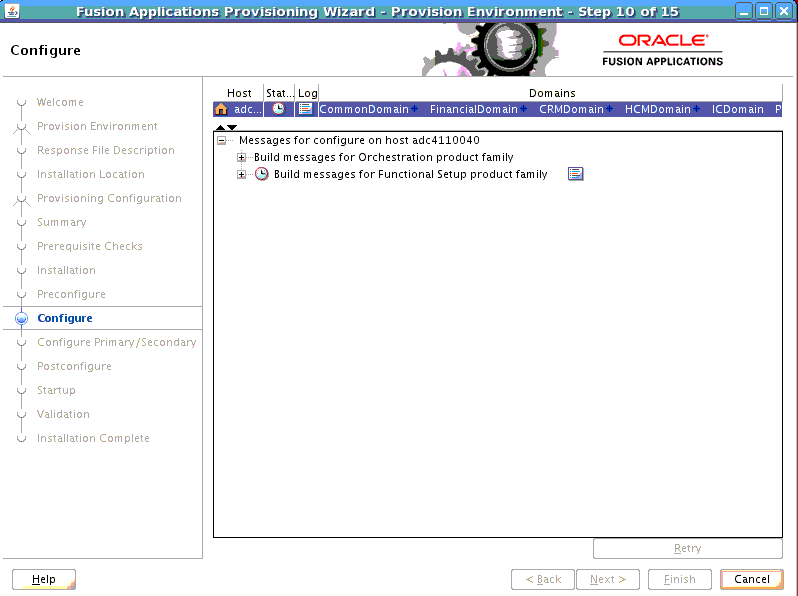
The configure phase creates Oracle WebLogic Server domains, Managed Servers, and clusters for Oracle Fusion Applications; applies templates; creates and configures data sources, queues, and topics; configures middleware (wiring); and deploys applications product offerings to domains. The primordial host is marked with a Home symbol in the Host column. The Domains column lists the domains deployed in the new environment.
In the terminal session for the primary, secondary, and DMZ host (if present), run the configure phase with this command:
(UNIX) path_to_script/runProvisioning.sh -responseFile provisioning_response_file_location -target configure
(Windows) path_to_script\runProvisioning.bat -responseFile provisioning_response_file_location -target configure
Note: This phase can run in parallel on all hosts and is tracked on this screen. Each new phase must run sequentially; that is, you cannot start a new phase until the previous phase has been completed successfully on all the hosts.
The Status of each build on each host is indicated by one of these icons:
Block: Processing has not yet started on this host for the named phase.
Clock: Performing the build for a phase.
Check mark: The build was completed successfully.
x mark: The build has failed for this phase. You must correct the errors before you can continue.
Restricted symbol: The process has stopped due to a failure within another process.
Note: You cannot view the build processes on the DMZ host on the primordial host interface because the DMZ host does not have access to the shared network drive.
Click an x or a Restricted symbol to display information about failures. Click the host-level Log file for details about this phase. Click a build Log file to see details specific to that build.
Click Retry to rerun this phase if errors are reported. You must fix all errors before you continue. See "Troubleshooting the Provisioning Process" in Oracle Fusion Applications Installation Guide for details about recovery from failures.
Click Next. The wizard starts the Configure-secondary phase on the primordial host and displays the Configure Secondary screen.
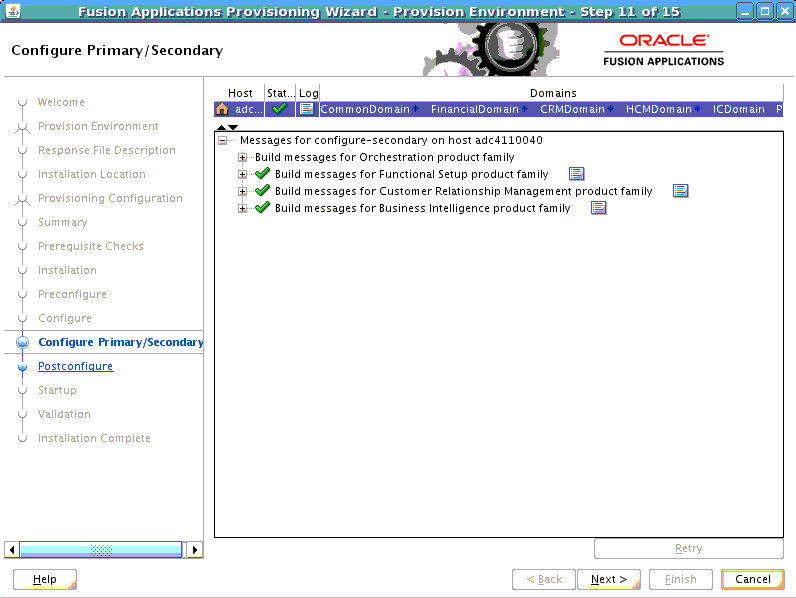
The configure-secondary phase performs configure actions on the primary and secondary host, if either is present. It there is no primary or secondary host, the phase runs, but takes no action. The Domains column lists the domains deployed in the new environment.
In the terminal session for the primary, secondary, and DMZ host (if present), run the configure-secondary phase with this command:
(UNIX) path_to_script/runProvisioning.sh -responseFile provisioning_response_file_location -target configure-secondary
(Windows) path_to_script\runProvisioning.bat -responseFile provisioning_response_file_location -target configure-secondary
Note: This phase can run in parallel on the primary and secondary hosts and is tracked on this screen. Each new phase must run sequentially; that is, you cannot start a new phase until the previous phase has been completed successfully on all the hosts.
The Status of each build on each host is indicated by one of these icons:
Block: Processing has not yet started on this host for the named phase.
Clock: Performing the build for a phase.
Check mark: The build was completed successfully.
x mark: The build has failed for this phase. You must correct the errors before you can continue.
Restricted symbol: The process has stopped due to a failure within another process.
Note: You cannot view the build processes on the DMZ host on the primordial host interface because the DMZ host does not have access to the shared network drive.
Click an x or a Restricted symbol to display information about failures. Click the host-level Log file for details about this phase. Click a build Log file to see details specific to that build.
Click Retry to rerun this phase if errors are reported. You must fix all errors before you continue. See "Troubleshooting the Provisioning Process" in Oracle Fusion Applications Installation Guide for details about recovery from failures.
Click Next. The wizard starts the Postconfigure phase on the primordial host and displays the Postconfigure screen.
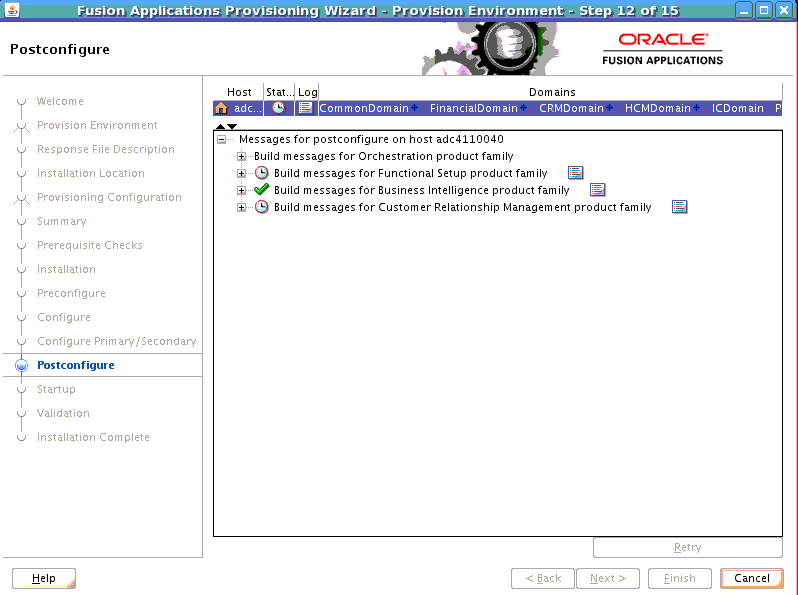
The postconfigure phase performs online tasks, such as configuring the Node Manager, SOA composite deployment, establishing Oracle HTTP Server wiring, seeding policies, and setting up postdeployment security configuration. The primordial host is marked with a Home symbol in the Host column. The Domains column lists the domains deployed in the new environment.
In the terminal session for the primary, secondary, and DMZ host (if present), run the postconfigure phase with this command:
(UNIX) path_to_script/runProvisioning.sh -responseFile provisioning_response_file_location -target postconfigure
(Windows) path_to_script\runProvisioning.bat -responseFile provisioning_response_file_location -target postconfigure
Note: This phase can run in parallel on all hosts and is tracked on this screen. Each new phase must run sequentially; that is, you cannot start a new phase until the previous phase has been completed successfully on all the hosts.
The Status of each build on each host is indicated by one of these icons:
Block: Processing has not yet started on this host for the named phase.
Clock: Performing the build for a phase.
Check mark: The build was completed successfully.
x mark: The build has failed for this phase. You must correct the errors before you can continue.
Restricted symbol: The process has stopped due to a failure within another process.
Note: You cannot view the build processes on the DMZ host on the primordial host interface because the DMZ host does not have access to the shared network drive.
Click an x or a Restricted symbol to display information about failures. Click the host-level Log file for details about this phase. Click a build Log file to see details specific to that build.
Click Retry to rerun this phase if errors are reported. You must fix all errors before you continue. See "Troubleshooting the Provisioning Process" in Oracle Fusion Applications Installation Guide for details about recovery from failures.
Click Next. The wizard starts the Startup phase on the primordial host and displays the Startup screen.
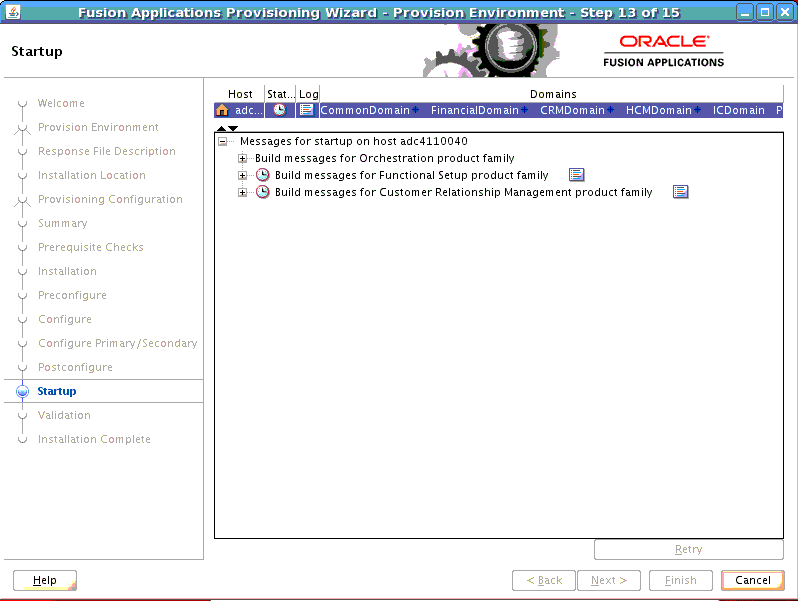
The Startup phase starts the Administration Server and Managed Servers for each domain on the host. The primordial host is marked with a Home symbol in the Host column. The Domains column lists the domains deployed in the new environment.
In the terminal session for the primary, secondary, and DMZ host (if present), run the startup phase with this command:
(UNIX) path_to_script/runProvisioning.sh -responseFile response_file_location -target startup
(Windows) path_to_script\runProvisioning.bat -responseFile provisioning_response_file_location -target startup
Note: This phase can run in parallel on all hosts and is tracked on this screen. Each new phase must run sequentially; that is, you cannot start a new phase until the previous phase has been completed successfully on all the hosts.
The Status of each build on each host is indicated by one of these icons:
Block: Processing has not yet started on this host for the named phase.
Clock: Performing the build for a phase.
Check mark: The build was completed successfully.
x mark: The build has failed for this phase. You must correct the errors before you can continue.
Restricted symbol: The process has stopped due to a failure within another process.
Note: You cannot view the build processes on the DMZ host on the primordial host interface because the DMZ host does not have access to the shared network drive.
Click an x or a Restricted symbol to display information about failures. Click the host-level Log file for details about this phase. Click a build Log file to see details specific to that build.
Click Retry to rerun this phase if errors are reported. You must fix all errors before you continue. See "Troubleshooting the Provisioning Process" in Oracle Fusion Applications Installation Guide for details about recovery from failures.
Click Next. The wizard starts the Validate phase on the primordial host and displays the Validation screen.
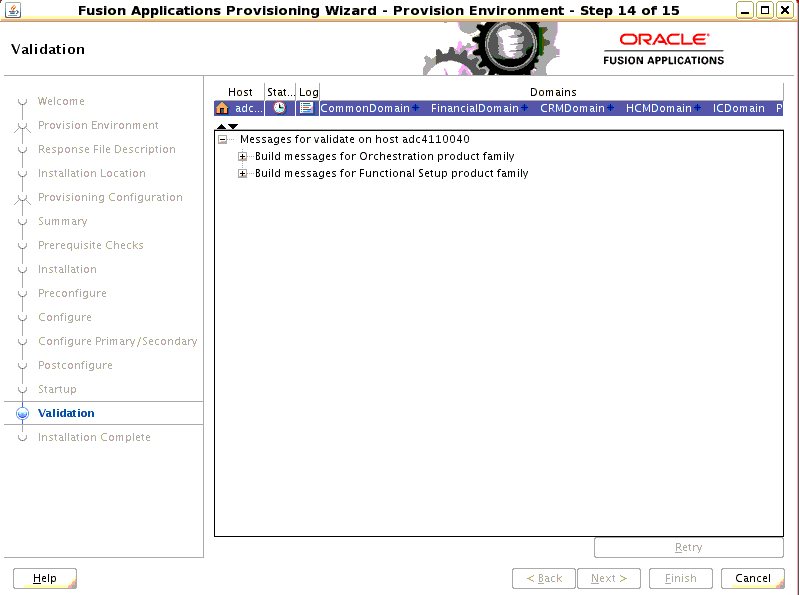
The validate phase performs a variety of postprovisioning validation tasks, such as server and application availability, successful loading of identity credentials, and validation of the data source. The primordial host is marked with a Home symbol in the Host column. The Domains column lists the domains deployed in the new environment.
In the terminal session for the primary and secondary host (if present), run the validate phase with this command:
(UNIX) path_to_script/runProvisioning.sh -responseFile provisioning_response_file_location -target validate
(Windows) path_to_script\runProvisioning.bat -responseFile provisioning_response_file_location -target validate
Note: This phase can run in parallel on all hosts and is tracked on this screen. Each new phase must run sequentially; that is, you cannot start a new phase until the previous phase has been completed successfully on all the hosts.
The Status of each build on each host is indicated by one of these icons:
Block: Processing has not yet started on this host for the named phase.
Clock: Performing the build for a phase.
Check mark: The build was completed successfully.
x mark: The build has failed for this phase. You must correct the errors before you can continue.
Restricted symbol: The process has stopped due to a failure within another process.
Click an x or a Restricted symbol to display information about failures. Click the host-level Log file for details about this phase. Click a build Log file to see details specific to that build.
Click Retry to rerun this phase if errors are reported. You must fix all errors before you continue. See "Troubleshooting the Provisioning Process" in Oracle Fusion Applications Installation Guide for details about recovery from failures.
After this phase has completed successfully on all hosts, click Next to continue.
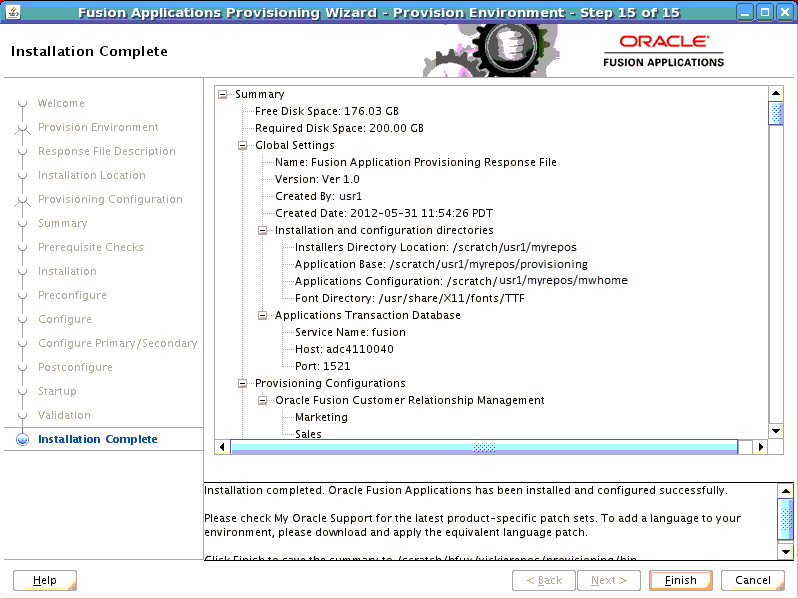
This screen displays the configuration of the new environment.
Click Finish. The wizard automatically saves a summary file that describes this installation. The file is saved to the response file directory as follows:
framework_location/provisioning/provisioning-responseFile/provisioning_response_file_name-timedate.summary.