11g Release 7 (11.1.7)
Part Number E20372-07
Home
Contents
Book
List
Contact
Us
|
Oracle® Fusion Applications Marketing Implementation Guide 11g Release 7 (11.1.7) Part Number E20372-07 |
Home |
Contents |
Book List |
Contact Us |
|
Previous |
Next |
This chapter contains the following:
Common Implementation: Overview
Define Synchronization of Users and Roles from LDAP
Define Currencies and Currency Rates
Define Enterprise Structures for Marketing
Define Security for Customer Relationship Management
Define Automated Governance, Risk, and Performance Controls
Define Approval Management for Customer Relationship Management
Define Application Toolkit Configuration
Maintain Common Reference Objects
Common implementation involves accessing tasks that are available in multiple offerings, or that apply to multiple products and product families. The Define Common Applications Configuration task list and other activities include these common setup and implementation tasks.
You can find other information in support of common implementation in the Oracle Fusion Applications Concepts Guide.
In addition, you can customize and extend applications using various tools. For more information, see the Oracle Fusion Applications Extensibility Guide.
Use the Define Common Applications Configuration task list to set up and administer an implementation of behaviors across offerings.
Most Oracle Fusion Applications offerings include the Define Common Applications Configuration task list for implementing what is common in multiple or all Oracle Fusion applications. The task lists and tasks within Define Common Applications Configuration can be present in all offerings, some, or just a single offering.
Common implementation includes such tasks as setting up security, defining enterprise structures, configuring Oracle Fusion Applications Help, and setting options. Many of the common implementation tasks involve configuring reference objects provided by Oracle Fusion Middleware Extensions for Applications (Applications Core), such as messages, flexfields, document sequences, and profile options. Some common implementation tasks involve configuring features provided by Oracle Application Toolkit (ATK), such as the Watchlist. Other common implementation tasks involve Oracle Fusion Applications products such as the Assign Balancing Segment Values to Ledger task in Oracle Fusion General Ledger.
Other setup and maintenance tasks exist in multiple offerings but not in the Define Common Applications Configuration task list. Use these other task lists to define an Oracle Fusion Transactional Business Intelligence configuration, and to define extensions such as custom Oracle Enterprise Scheduler jobs.
You can access common implementation tasks and task lists by starting in the Setup and Maintenance Overview page and searching for task lists by name. Setup and Maintenance is available from the Administration menu to users provisioned with appropriate roles. The Administration menu provides access to other tasks, such as for customization.
Oracle Identity Management (OIM) maintains Lightweight Directory Access Protocol (LDAP) user accounts for users of Oracle Fusion applications. OIM also stores the definitions of abstract, job, and data roles and holds information about roles provisioned to users. During implementation, any existing information about users, roles, and roles provisioned to users must be copied from the LDAP directory to the Oracle Fusion Applications tables. Once the Oracle Fusion Applications tables are initialized with this information, it is maintained automatically. To perform the initialization, you run the process Retrieve Latest LDAP Changes.
Note
For security and audit best practice, implementation users have person records and appropriate role-based security access. So that appropriate roles can be assigned to implementation users, you must run the process Retrieve Latest LDAP Changes before you create implementation users.
During initial implementation, the installation super user performs the task Run User and Role Synchronization Process to run the Retrieve Latest LDAP Changes process.
Tip
The user name and password of the installation super user are created during installation provisioning of Oracle Fusion Applications. For details of the user name and password, contact your system administrator or the person who installed Oracle Fusion Applications.
To start an Oracle Fusion Applications implementation, you must set up one or more initial users using the super user that was created during installation and provisioning of the Oracle Fusion Applications environment, or using the initial administrator user provided by Oracle for Oracle Cloud Application Services implementations. Because Oracle Fusion Applications is secure as delivered, the process of enabling the necessary setup access for initial users requires several specialized steps when getting started with an implementation.
The following high level steps are required for starting an implementation.
If you are not starting an Oracle Cloud Application Services implementation, sign into Oracle Identity Manager (OIM) as the OIM Administration users and provision the IT Security Manager job role with roles for user and role management. This enables the super user account, which is provisioned with the IT Security Manager job role, to create implementation users.
For starting all implementations, sign in as the user with initial access: either the Oracle Fusion Applications installation super user or the initial Oracle Cloud Application Services administrator user.
Select an offering to implement, and generate the setup tasks needed to implement the offering.
Perform the following security tasks:
Synchronize users and roles in the Lightweight Directory Access Protocol (LDAP) store with HCM user management by using the Run User and Roles Synchronization Process task.
Create an IT security manager user by using the Create Implementation Users task.
Provision the IT security manager with the IT Security Manager role by using the Provision Roles to Implementation Users task.
As the newly created IT security manager user, sign in to Oracle Fusion Applications and set up at least one implementation user for setting up enterprise structures.
Create an implementation user by using the Create Implementation Users task.
Provision the implementation user with the Application Implementation Manager job role or the Application Implementation Consultant job role by using the Provision Roles to Implementation Users task. The Application Implementation Consultant job role inherits from all product-specific application administrators and entitles the necessary View All access to all secured object.
Optionally, create a data role for an implementation user who needs only the limited access of a product-specific Application Administrator by using the Create Data Role for Implementation Users. Then assign the resulting data role to the implementation user by using the Provision Roles to Implementation Users task.
The figure shows the task flow from provisioning the IT Security Manager job role with the user and role management entitlement to creating and provisioning implementation users for enterprise setup.
After installation and provisioning, and before setting up enterprise structures and implementing projects, you must establish required entitlement for the super user account and at least one implementation user to proceed with the implementation. Once initial enterprise structure setup is complete, additional users may be created through processes available in Human Capital Management (HCM).
Initial security administration consists of the following.
Preparing the IT Security Manager job role
Synchronizing users and roles from Lightweight Directory Access Protocol (LDAP) with HCM
Creating implementation users
Optionally creating data roles for implementation users
Provisioning implementation users with roles
Once the first implementation project begins and the enterprise work structure is set up, use standard user and security management processes such as the Manage Users task to create and manage additional users. Do not use the Create Implementation Users task after your enterprise has been set up.
Initially the super user is not provisioned to manage users and roles.
You must add the following Oracle Identity Management (OIM) roles to the IT Security Manager job role's role hierarchy to enable the super user to create one or more initial implementation users.
Identity User Administrators
Role Administrators
Additionally, you must assign the Xellerate Users organization to the IT Security Manager role.
After configuring an offering and setting up the task lists for implementation, the Run User and Roles Synchronization Process task is available to the super user for synchronizing users and roles in the LDAP store with Oracle Fusion Human Capital Management (HCM).
The super user is provisioned with roles that provide broad access to Oracle Fusion Middleware and Oracle Fusion Applications administration, and is not suitable as an implementation user in most enterprises. The super user should define at least one implementation user, which consists of creating the user account and provisioning it with at least the Application Implementation Consultant and Application Implementation Manager job roles.
As a security guideline, define an IT security manager user who in turn defines one or more implementation users to set up enterprise structures. The IT security manager users can provision the implementation user with the Application Implementation Consultant role, which entitles access to all enterprise structures. Or the IT security manager can create a data role that restricts access to enterprise structures of a specific product and provisioning that role.
Depending on the size of your implementation team, you may only need a single implementation user for security administration, implementation project management, enterprise structures setup, and application implementation. That single user must then be provisioned with all indicated roles, and therefore broad access.
The super user creates one or more implementation users by performing the Create Implementation Users task.
Note
This initial implementation user is a user account created in Oracle Identity Management only, specifically for setting up enterprise structures, and is not related to a real person or identity such as a user defined in HCM.
As an alternative to provisioning an implementation user with the Application Implementation Consultant role to access all enterprise structures, you may need implementation users with access restricted to enterprise structures for specific products. In this case, use the Create Data Roles for Implementation Users task to create a data role based on a job role with less broad access, such as the HCM Application Administrator job role.
After creating an implementation user, you must provision the user with one or more roles by performing the Provision Roles to Implementation Users task.
For example, assign a role to the implementation user that provides the access necessary for setting up the enterprise. Depending on need, provision to the implementation user the predefined Applications Implementation Consultant role or a product family-specific administrator data role, such as a data role based on the predefined Financials Applications Administrator.
Caution
The Application Implementation Consultant has broad access. It is a very useful role for experimentation or setting up a pilot environment, but may not be suitable for implementation users in a full implementation project.
This example illustrates initial security administration after having installed and provisioned an Oracle Fusion Applications environment.
In Oracle Fusion Applications, you manage users and security through Oracle Fusion Human Capital Management (HCM) user management flows, which are included in each of the offering task lists. However, the HCM task flows require that enterprise structures have been set up, and yet to add users who can set up enterprise structures you need to have set up HCM. Therefore, you need to create one or more initial implementation users who are responsible for providing the following.
Users and their applications security management
Implementation project management
Initial enterprise structures management
The following table summarizes key decisions for this scenario.
|
Decision |
In this Example |
|---|---|
|
How to sign in to Oracle Fusion Applications for the first time |
Use the super user account that was created when installing and provisioning Oracle Fusion Applications (for example, FAADMIN). |
|
How to ensure that the roles and users in the Lightweight Directory Access Protocol (LDAP) store match what is available for selection when defining implementation users |
Perform the Run User and Roles Synchronization Process task. |
|
How to create a first implementation user |
Prepare the IT Security Manager job role for user and role management so the super user and any other user provisioned with the IT Security Manager job role can manage users and roles. |
|
How to establish security administration users |
Define an IT security manager user provisioned with the IT Security Manager job role. |
|
How to establish an implementation user with access to set up enterprise structures |
Define an implementation user provisioned with the Application Implementation Consultant job role. |
You create an initial implementation user by performing the following tasks.
The Oracle Identity Management System Administrator user provisions the IT Security Manager job role with roles for user and role management.
The Oracle Fusion Applications super user synchronizes LDAP users with HCM user management so that users can be provisioned with roles through HCM.
The Oracle Fusion Applications super user performs the Create Implementation Users task to create one or more IT security manager and administrator users provisioned with security administrative entitlement.
The IT Security Manager user signs in to Oracle Fusion Applications and performs the Create Implementation Users task to create implementation managers and users.
The IT Security Manager user provisions implementation users for enterprise structure setup.
Note
The following tasks assume that the super user has configured an offering and set up task lists. When not following a task flow within an activity, you can find tasks in Navigator > Tools > Setup and Maintenance > All Tasks. Search for the task and click its Go to Task icon in the search results.
The super user that was created when installing and provisioning Oracle Fusion Applications (for example, FAADMIN), or the initial administrator user provided by Oracle for Oracle Cloud Application Services, has all necessary access for implementing Oracle Fusion Applications and administering security. This access is provided by the following roles:
Application Implementation Consultant
IT Security Manager
Neither of these roles provides access needed for creating and managing Oracle Fusion Applications users. Therefore, you must add the following two OIM roles to the IT Security Manager role:
Identity User Administrators
Role Administrators
The following procedure is prerequisite to an IT security manager or administrator creating an initial one or more implementation users.
This accesses the Welcome to Identity Manager Delegated Administration menu.
In the Search Results, click the role's Display Name.
Click the arrow icon to show the list of available roles. Select IT Security Manager and move it to the Roles to Add list. Click Save.
In the Welcome to Identity Manager Delegated Administration menu (see step 1, above), in the Organizations list of tasks, click Advanced Search - Organizations.
Search for the Xellerate Users organization by entering Xellerate Users in Display Name and clicking Search.
In the Search Results, click the organization's Display Name. The Xellerate Users page appears.
Click the Administrative Roles link in the row of links above the Xellerate Users.
In Filter By Role Name of the Details window, enter the following string:
*IT_SECURITY_MANAGER*
Click Find.
Enable Read, Write, Delete, and Assign.
Click Assign.
Click Confirm.
Lightweight Directory Access Protocol (LDAP) must be synchronized with HCM user management so that users can be provisioned with roles through HCM.
If you do not know the super user name and password, check with your system administrator or the person who installed Oracle Fusion Applications. For more information about account creation in Oracle Fusion Applications provisioning, see the Oracle Fusion Applications Installation Guide.
The Retrieve Latest LDAP Changes process takes some time to complete the first time it is run.
The super user has broad access to Oracle Fusion Middleware and Oracle Fusion Applications administration. Due to this broad access, your enterprise needs users dedicated to managing users and applications security, such as an IT security manager user.
The Oracle Identity Manager appears.
For details, see the Creating Users section in the Oracle Fusion Middleware User's Guide for Oracle Identity Manager.
|
Attribute |
Value |
Example |
|---|---|---|
|
Last name |
<any valid string> |
Smith |
|
Organization |
Xellerate Users |
N/A |
|
User type |
Non Worker |
N/A |
|
User login |
<any valid string> |
IT_SECURITY_MANAGER |
|
Login password |
<any valid string> |
SeKur1TyPa$$w0Rd |
Note
In Oracle Fusion Applications, an implementation user is a user account created in OIM only, specifically for implementation tasks, and is not related to a real person or identity such as a user defined in HCM.
Application Implementation Manager
Application Implementation Consultant
Note
For an implementation to begin, at least one user must be provisioned with the Application Implementation Manager role, and another or the same user must be provisioned with the Application Implementation Consultant role. The Application Implementation Consultant has broad access to set up all enterprise structures.
When creating or editing currencies, consider these points relevant to entering the currency code, date range, or symbol for the currency.
You cannot change a currency code after you enable the currency, even if you later disable that currency.
Users can enter transactions denominated in the currency only for the dates within the specified range. If you do not enter a start date, then the currency is valid immediately. If you do not enter an end date, then the currency is valid indefinitely.
Even if you enter a symbol for a currency, the symbol is not always displayed when an amount is displayed in this currency. Some applications use currency symbols when displaying amounts. Others, like Oracle Fusion General Ledger, do not.
Use the Derivation Type, Derivation Factor, and Derivation Effective Date fields to define the relationship between the official currency (Euro) of the European Monetary Union (EMU) and the national currencies of EMU member states. For each EMU currency, you define its Euro-to-EMU fixed conversion rate and the effective starting date.
Note
If you need to use a different currency code for Euro, you can disable the predefined Euro currency and create a new one.
The Euro currency derivation type is used only for the Euro, and the Euro derived derivation type identifies national currencies of EMU member states. All other currencies do not have derivation types.
The derivation factor is the fixed conversion rate by which you multiply one Euro to derive the equivalent EMU currency amount. The Euro currency itself should not have a derivation factor.
The derivation effective date is the date on which the relationship between the EMU currency and the Euro begins.
Maintain different conversion rates between currencies for the same period with the Oracle Fusion General Ledger conversion rate types functionality. Four predefined daily conversion rate types are seeded: Spot, Corporate, User, and Fixed, allowing you to use different rate types for different business needs. During journal entry, the conversion rate is provided automatically by the General Ledger based on the selected conversion rate type and currency, unless the rate type is user. For user rate types, you must enter the conversion rate. Define additional rate types as needed. Set your most frequently used rate type as the default. Conversion rate types cannot be deleted.
Assign conversion rate types to automatically populate the associated rate for your period average and period end rates for the ledger. For example, you can assign the predefined rate type Spot to populate your period average rates and the predefined rate type Corporate to populate your period end rates. Period average and period end rates are used in translation of account balances.
Conversion rate types are used to automatically assign a rate when you perform the following accounting functions:
Convert foreign currency journal amounts to ledger currency equivalents
Convert journal amounts from source ledgers to reporting currencies or secondary ledgers
Run Revaluation or Translation processes
In creating new conversion rates, decide whether to do the following:
Enforce inverse relationships
Select pivot currencies
Select contra currencies
Enable cross rates and allow cross rate overrides
Maintain cross rate rules
Check the Enforce Inverse Relationship check box to specify whether or not to enforce the automatic calculation of inverse conversion rates when defining daily rates.
|
Action |
Results |
|---|---|
|
Checked |
When you enter a daily rate to convert currency A to currency B, General Ledger automatically calculates the inverse rate, currency B to A, and enters it in the adjacent column. If either rate is changed, the application automatically recalculates the other rate. You can update the application calculated inverse rate, but once you do, the related rate is updated. The check box enforces that the inverse relationship is maintained but does not prevent you from updating the rates. |
|
Unchecked |
General Ledger calculates the inverse rate but you can change the rate and update the daily rates table without the corresponding rate being updated. |
Select a pivot currency that is commonly used in your currency conversions. A pivot currency is the central currency that interacts with contra currencies. For example, you set up a daily rate between the US dollar (USD) and the Euro currency (EUR) and another between the USD and the Canadian dollar (CAD). USD is the pivot currency in creating a rate between EUR and CAD. EUR and CAD are the contra currencies. Select the pivot currency from the list of values which contains those currencies that are enabled, effective, and not a statistical (STAT) currency. The description of the pivot currency is populated automatically based on the currency definition.
If you want the application to create cross rates against a base currency, define the base currency as the pivot currency. Selected pivot currencies can be changed in the Rate Types page.
Select currencies available on the list of values as contra currencies. The available currencies are those currencies which are enabled, effective, not STAT currency, and not the pivot currency selected earlier. The description of the contra currency is populated automatically based on the currency definition. Add or delete contra currencies in the Contra Currencies region of the Rate Types page.
Check the Enable Cross Rates check box to calculate conversion rates based on defined currency rate relationships. General Ledger calculates cross rates based on your defined cross rate rules. Associate your cross rate rules with a conversion rate type, pivot currency, and contra currencies. Cross rates facilitate the creation of daily rates by automatically creating the rates between contra currencies based on their relationship to a pivot currency. If the Enable Cross Rates check box is changed to unchecked after entering contra currencies, the application stops calculating cross rates going forward for that particular rate type. All the earlier calculated cross rates for that rate type remain in the database unless you manually delete them.
For example, if you have daily rates defined for the pivot currency, USD to the contra currency, EUR, and USD to another contra currency, CAD, the application will automatically create the rates between EUR to CAD and CAD to EUR. This prevents the need to manually define the EUR to CAD and CAD to EUR rates.
Check the Allow Cross Rates Override check box to permit your users to override application generated cross rates. If you accept the default of unchecked, the application generated cross rates cannot be overridden
Define or update your cross rate rules at any time by adding or removing contra currency assignments. Add a contra currency to a cross rate rule and run the Daily Rates Import and Calculation process to generate the new rates. If your remove a cross rate rule or a contra currency from a rule, any cross rates generated previously for that contra currency remain unless you manually delete them. Changes to the rule are not retroactive and will not affect previously stored cross rates. The Cross Rate process generates as many rates as possible and skips currencies where one component of the set is missing.
Note
With a defined web service that extracts daily currency conversion rates from external services, for example Reuters, currency conversion rates are automatically updated for the daily rates and all cross currency relationships.
There are four seeded conversion rate types in Oracle Fusion applications:
Spot
Corporate
User
Fixed
You are the general ledger accountant for InFusion America Inc. You are entering a journal entry to capture three transactions that were transacted in three different foreign currencies:
Canadian dollar (CAD): A very stable currency
Mexican Peso (MXP): A fluctuating currency
Hong Kong dollar (HKD): An infrequently used currency
You enter two lines with accounts and amounts for each foreign currency transaction. Based on your company procedures, you select the appropriate rate type to populate the rate for Corporate and Spot rate types from your daily rates table. You manually enter the current rate for the User rate type.
|
Currency Selected |
Rate Type Selected |
Reason |
|---|---|---|
|
CAD |
Corporate |
Entered a periodic type of transaction. Your company has established a daily rate to use for the entire month across divisions for all transactions in CAD. CAD is a stable currency that only fluctuations slightly over the month. |
|
MXP |
Spot |
Entered a periodic type of transaction. Your company enters daily rates each day for MXP because this currency is unstable and fluctuates. |
|
HKD |
User |
Entered a one time transaction. Your company does not maintain daily rates in HKD. |
Note
Your company does not currently use the Fixed rate type. From January 1, 1999, the conversion rate of the French franc (FRF) against the euro currency (EUR) was set at a fixed rate of 1 EUR to 6.55957 FRF. Your French operations were started in 2007, so you maintain all your French business records in the EUR.
You are required to enter the daily rates for currency conversion from Great Britain pounds sterling (GBP) to United States dollars (USD) each day for your company InFusion America Inc.
Oracle Application Development Framework (ADF) Desktop Integration is an Excel add-in that must be loaded onto each client. Because ADF Desktop Integration is an add-in to Microsoft Office products, you can use this feature only if they have Microsoft Excel 2007 or above, Internet Explorer 7 or above, and Microsoft Windows 7, XP Professional SP2, or Vista. Users must download the installation files from Navigator - Tools - Download Desktop Integrator Installer.
Use the Period Close work area to link to close processes and currency process.
Use the Currency Rates Manager page to create, edit, and review currency rate types, daily rates, and historical rates.
Use the Daily Rates tab to review and enter currency rates.
Use the Create Daily Rates spreadsheet to enter daily rates in a template that you can save and reuse.
You are required to change today's daily rates that were already entered. The rates you are changing are for currency conversion from Great Britain pounds sterling (GBP) to United States dollars (USD) for your company InFusion America Inc.
Currency conversion rates were entered by an automatic load to the Daily Rates table. They can also be entered through a spreadsheet.
Use the Period Close work area to link to close processes and currency process.
Use the Currency Rates Manager page to create, edit, and review currency rate types, daily rates, and historical rates.
Use the Daily Rates tab to review and enter currency rates.
Create currencies to use, for example for reporting purposes, if they are not already provided. All currencies from the International Organization for Standardization (ISO) 4217 standard are provided.
Enable any currency other than USD for use in Oracle Fusion Applications, for example for displaying monetary amounts, assigning to sets of books, entering transactions, and recording balances. Only USD is enabled by default.
Precision is the number of digits to the right of the decimal point used in regular currency transactions. Extended precision is the number of digits to the right of the decimal point used in calculations for this currency, and it must be greater than or equal to the standard precision. For example, USD would have 2 for precision because amounts are transacted as such, for example $1.00. For calculations, for example adding USD amounts, you might want the application to be more precise than two decimal digits, and would enter an extended precision accordingly.
Note
Some applications use extended precision. Others, such as Oracle Fusion General Ledger, do not.
Minimum accountable unit is the smallest denomination for the currency. For example, for USD that would be .01 for the cent. This unit does not necessarily correspond to the precision for all currencies.
The statistical unit currency type is used only for the Statistical (STAT) currency. The Statistical currency is used to record statistics such as the number of items bought and sold. Statistical balances can be used directly in financial reports, allocation formulas, and other calculations.
Spot, corporate, user, and fixed conversion rate types differ based on the fluctuations of your entered foreign currency and your company procedures for maintaining daily rates.
|
Rate Type |
Usage |
|---|---|
|
Spot |
For currencies with fluctuating conversion rates or when exact currency conversion is needed. |
|
Corporate |
For establishment of a standard rate across your organization for a stable currency. |
|
User |
For infrequent entries where your daily rates for the entered foreign currency are not set up. |
|
Fixed |
For rates where the conversion is constant between two currencies. |
If you have infrequent foreign currency transactions, the user rate type can simplify your currency maintenance while providing an accurate conversion rate on the date of the transaction.
Oracle Fusion Applications have been designed to ensure your enterprise can be modeled to meet legal and management objectives. The decisions about your implementation of Oracle Fusion Applications are affected by your:
Industry
Business unit requirements for autonomy
Business and accounting policies
Business functions performed by business units and optionally, centralized in shared service centers
Locations of facilities
Every enterprise has three fundamental structures, legal, managerial, and functional, that are used to describe its operations and provide a basis for reporting. In Oracle Fusion, these structures are implemented using the chart of accounts and organizations. Although many alternative hierarchies can be implemented and used for reporting, you are likely to have one primary structure that organizes your business into divisions, business units, and departments aligned by your strategic objectives.
The figure above shows a typical group of legal entities, operating various business and functional organizations. Your ability to buy and sell, own, and employ comes from your charter in the legal system. A corporation is a distinct legal entity from its owners and managers. The corporation is owned by its shareholders, who may be individuals or other corporations. There are many other kinds of legal entities, such as sole proprietorships, partnerships, and government agencies.
A legally recognized entity can own and trade assets and employ people in the jurisdiction in which it is registered. When granted these privileges, legal entities are also assigned responsibilities to:
Account for themselves to the public through statutory and external reporting
Comply with legislation and regulations
Pay income and transaction taxes
Process value added tax (VAT) collection on behalf of the taxing authority
Many large enterprises isolate risk and optimize taxes by incorporating subsidiaries. They create legal entities to facilitate legal compliance, segregate operations, optimize taxes, complete contractual relationships, and isolate risk. Enterprises use legal entities to establish their enterprise's identity under the laws of each country in which their enterprise operates.
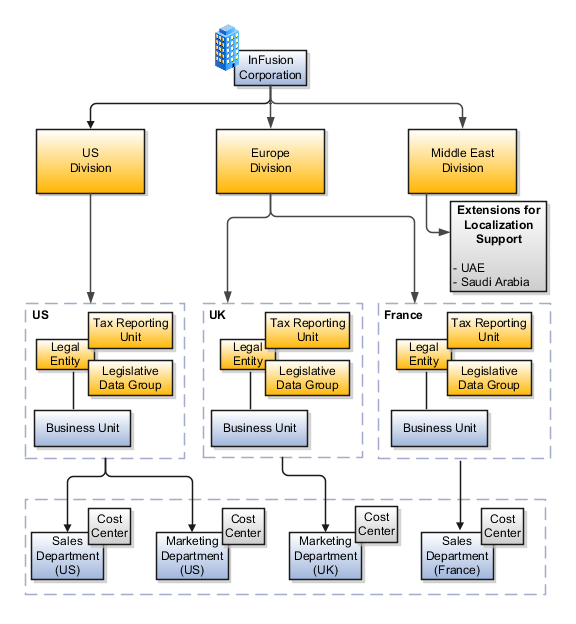
In the figure above, a separate card represents a series of registered companies. Each company, including the public holding company, InFusion America, must be registered in the countries where they do business. Each company consists of various divisions created for purposes of management reporting. These are shown as vertical columns on each card. For example, a group might have a separate company for each business in the United States (US), but have their United Kingdom (UK) legal entity represent all businesses in that country. The divisions are linked across the cards so that a business can appear on some or all of the cards. For example, the air quality monitoring systems business might be operated by the US, UK, and France companies. The list of business divisions is on the Business Axis. Each company's card is also horizontally striped by functional groups, such as the sales team and the finance team. This functional list is called the Functional Axis. The overall image suggests that information might, at a minimum, be tracked by company, business, division, and function in a group environment. In Oracle Fusion Applications, the legal structure is implemented using legal entities.
Successfully managing multiple businesses requires that you segregate them by their strategic objectives, and measure their results. Although related to your legal structure, the business organizational hierarchies do not need to be reflected directly in the legal structure of the enterprise. The management structure can include divisions, subdivisions, lines of business, strategic business units, and cost centers. In the figure above, the management structure is shown on the Business Axis. In Oracle Fusion Applications, the management structure is implemented using divisions and business units.
Straddling the legal and business organizations is a functional organization structured around people and their competencies. For example, sales, manufacturing, and service teams are functional organizations. This functional structure is represented by the Functional Axis in the figure above. You reflect the efforts and expenses of your functional organizations directly on the income statement. Organizations must manage and report revenues, cost of sales, and functional expenses such as research and development (R&D) and selling, general, and administrative (SG&A) expenses. In Oracle Fusion Applications, the functional structure is implemented using departments and organizations, including sales, marketing, project, cost, and inventory organizations.
In Oracle Fusion Applications, the Enterprise Performance and Planning Business Process Model illustrates the major implementation tasks that you perform to create your enterprise structures. This process model includes the Set Up Enterprise Structures business process, which consist of implementation activities that span many product families. Information Technology is a second Business Process Model which contains the Set Up Information Technology Management business process. Define Reference Data Sharing is one of the activities in this business process and is important in the implementation of the enterprise structures. This activity creates the mechanism to share reference data sets across multiple ledgers, business units, and warehouses, reducing the administrative burden and decreasing the time needed to implement.
The following figure and chart describes the Business Process Model structures and activities.
|
BPM Activities |
Description |
|---|---|
|
Define Enterprise |
Define the enterprise to capture the name of the deploying enterprise and the location of the headquarters. There is normally a single enterprise organization in a production environment. Multiple enterprises are defined when the system is used to administer multiple customer companies, or when you choose to set up additional enterprises for testing or development. |
|
Define Enterprise Structures |
Define enterprise structures to represent an organization with one or more legal entities under common control. Define internal and external organizations to represent each area of business within the enterprise. |
|
Define Legal Jurisdictions and Authorities |
Define information for governing bodies that operate within a jurisdiction. |
|
Define Legal Entities |
Define legal entities and legal reporting units for business activities handled by the Oracle Fusion Applications. |
|
Define Business Units |
Define business units of an enterprise to allow for flexible implementation, to provide a consistent entity for controlling and reporting on transactions, and to be an anchor for the sharing of sets of reference data across applications. |
|
Define Financial Reporting Structures |
Define financial reporting structures, including organization structures, charts of accounts, organizational hierarchies, calendars, currencies and rates, ledgers, and document sequences which are used in organizing the financial data of a company. |
|
Define Chart of Accounts |
Define chart of accounts including hierarchies and values to enable tracking of financial transactions and reporting at legal entity, cost center, account, and other segment levels. |
|
Define Ledgers |
Define the primary accounting ledger and any secondary ledgers that provide an alternative accounting representation of the financial data. |
|
Define Accounting Configurations |
Define the accounting configuration that serves as a framework for how financial records are maintained for an organization. |
|
Define Facilities |
Define inventory, item, and cost organizations. Inventory organizations represent facilities that manufacture or store items. The item master organization holds a single definition of items that can be shared across many inventory organizations. Cost organizations group inventory organizations within a legal entity to establish the cost accounting policies. |
|
Define Reference Data Sharing |
Define how reference data in the applications is partitioned and shared. |
Note
There are product specific implementation activities that are not listed here and depend on the applications you are implementing. For example, you can implement Define Enterprise Structures for Human Capital Management, Project Management, and Sales Management.
Start your global enterprise structure configuration by discussing what your organization's reporting needs are and how to represent those needs in the Oracle Fusion Applications. Consider deployment on a single instance, or at least, on as few instances as possible, to simplify reporting and consolidations for your global enterprises. The following are some questions and points to consider as you design your global enterprise structure in Oracle Fusion.
Enterprise Configuration
Business Unit Management
Security Structure
Compliance Requirements
What is the level of configuration needed to achieve the reporting and accounting requirements? What components of your enterprise do you need to report on separately? Which components can be represented by building a hierarchy of values to provide reporting at both detail and summary levels? Where are you on the spectrum of centralization versus decentralization?
What reporting do I need by business unit? How can you set up your departments or business unit accounts to achieve departmental hierarchies that report accurately on your lines of business? What reporting do you need to support the managers of your business units, and the executives who measure them? How often are business unit results aggregated? What level of reporting detail is required across business units?
What level of security and access is allowed? Are business unit managers and the people that report to them secured to transactions within their own business unit? Are the transactions for their business unit largely performed by a corporate department or shared service center?
How do you comply with your corporate external reporting requirements and local statutory reporting requirements? Do you tend to prefer a corporate first or an autonomous local approach? Where are you on a spectrum of centralization, very centralized or decentralized?
This example uses a fictitious global company to demonstrate the analysis that can occur during the enterprise structure configuration planning process.
Your company, InFusion Corporation, is a multinational conglomerate that operates in the United States (US) and the United Kingdom (UK). InFusion has purchased an Oracle Fusion enterprise resource planning (ERP) solution including Oracle Fusion General Ledger and all of the Oracle Fusion subledgers. You are chairing a committee to discuss creation of a model for your global enterprise structure including both your US and UK operations.
InFusion Corporation has 400 plus employees and revenue of $120 million. Your product line includes all the components to build and maintain air quality monitoring (AQM) systems for homes and businesses. You have two distribution centers and three warehouses that share a common item master in the US and UK. Your financial services organization provides funding to your customers for the start up costs of these systems.
The following are elements you need to consider in creating your model for your global enterprise structure.
Your company is required to report using US Generally Accepted Accounting Principles (GAAP) standards and UK Statements of Standard Accounting Practice and Financial Reporting Standards. How many ledgers do you need to achieve proper statutory reporting?
Your managers need reports that show profit and loss (revenue and expenses) for their lines of business. Do you use business units and balancing segments to represent your divisions and businesses? Do you secure data by two segments in your chart of accounts which represents each department and legal entity or one segment that represents both to produce useful, but confidential management reports?
Your corporate management requires reports showing total organizational performance with drill down capability to the supporting details. Do you need multiple balancing segment hierarchies to achieve proper rollup of balances for reporting requirements?
Your company has all administrative, account payables, procurement, and human resources functions performed at their corporate headquarters. Do you need one or more business unit in which to perform all these functions? How will your shared service center be configured?
The following figure and table summarize the model that your committee has designed and uses numerical values to provide a sample representation of your structure. The model includes the following recommendations:
Creation of three separate ledgers representing your separate legal entities:
InFusion America Inc.
InFusion Financial Services Inc.
InFusion UK Services Ltd.
Consolidation of results for system components, installations, and maintenance product lines across the enterprise
All UK general and administrative costs processed at the UK headquarters
US Systems' general and administrative costs processed at US Corporate headquarters
US Financial Services maintains its own payables and receivables departments

In this chart, the green globe stands for mandatory and gold globe stands for optional setup. The following statements expand on the data in the chart.
The enterprise is mandatory because it serves as an umbrella for the entire implementation. All organizations are created within an enterprise.
Legal entities are also mandatory. They can be optionally mapped to balancing segment values or represented by ledgers. Mapping balancing segment values to legal entities is mandatory if you plan to use the intercompany functionality.
At least one ledger is mandatory in an implementation in which you record your accounting transactions.
Business units are also mandatory because financial transactions are processed in business units.
A shared service center is optional, but if used, must be a business unit.
Divisions are optional and can be represented with a hierarchy of cost centers or by a second balancing segment value.
Departments are mandatory because they track your employees.
Optionally, add an item master organization and inventory organizations if you are tracking your inventory transactions in Oracle Fusion Applications.
Note
Some Oracle Fusion Human Capital Management and Customer Relationship Management implementations do not require recording of accounting transactions and therefore, do not require implementation of a ledger.
Note
The InFusion Corporation is a legal entity but is not discussed in this example.
The Enterprise Structures Configurator is an interview-based tool that guides you through the process of setting up a basic enterprise structure. By answering questions about your enterprise, the tool creates a structure of divisions, legal entities, business units, and reference data sets that reflects your enterprise structure. After you create your enterprise structure, you also follow a guided process to determine whether or not to use positions, and whether to set up additional attributes for jobs and positions. After you define your enterprise structure and your job and position structures, you can review them, make any necessary changes, and then load the final configuration.
This figure illustrates the process to configure your enterprise using the Enterprise Structures Configurator.

To be able to use the Enterprise Structures Configurator, you must select the Enterprise Structures Guided Flow feature for your offerings on the Configure Offerings page in the Setup and Maintenance work area. If you do not select this feature, then you must set up your enterprise structure using individual tasks provided elsewhere in the offerings, and you cannot create multiple configurations to compare different scenarios.
To define your enterprise structures, you use the guided flow within the Establish Enterprise Structures task to enter basic information about your enterprise, such as the primary industry and the location of your headquarters. You then create divisions, legal entities, business units, and reference data sets. The Establish Enterprise Structures task enables you to create multiple enterprise configurations so that you can compare different scenarios. Until you load a configuration, you can continue to create and edit multiple configurations until you arrive at one that best suits your enterprise.
You also use a guided process to determine whether you want to use jobs only, or jobs and positions. The primary industry that you select in the Establish Enterprise Structures task provides the application with the information needed to make an initial recommendation. You can either accept the recommendation, or you can answer additional questions about how you manage people in your enterprise, and then make a selection. After you select whether to use jobs or positions, the guided process prompts you to set up a descriptive flexfield structure for jobs, and for positions if you have chosen to use them. Descriptive flexfields enable you to capture additional information when you create jobs and positions.
Finally, you can review a summary of the results of the two interview processes. For each configuration, the online summary lists the divisions, legal entities, business units, reference data sets, and job and position structures that the application will create when you load the configuration.
For a more detailed analysis of a configuration, you can access the Technical Summary Report. This report lists the same information as the online summary, but also lists the following information that will be created by the application when you load the configuration, based on your configuration:
Legislative data groups (the application creates one legislative data group for each country that is identified in the configuration.)
Name of the legislative data group that will be assigned to the payroll statutory unit that is generated for each legal entity.
Organization hierarchy.
The Technical Summary report also lists the default settings that will be loaded for these fields, which you access from the Manage Enterprise HCM Information task: Worker Number Generation, Employment Model and Allow Employment Terms Override. You can print the Technical Summary Report for each of your configurations and compare each scenario.
Note
If your PDF viewer preferences are set to open PDFs in a browser window, the Technical Summary report replaces the Oracle Fusion application. Use your browser's Back button to return to the application.
You can load only one configuration. When you load a configuration, the application creates the divisions, legal entities, business units, and so on. After you load the configuration, you then use individual tasks to edit, add, and delete enterprise structures.
This example illustrates how to set up an enterprise based on a global company operating mainly in the US and the UK with a single primary industry.
InFusion Corporation is a multinational enterprise in the high technology industry with product lines that include all the components that are required to build and maintain air quality monitoring (AQM) systems for homes and businesses. Its primary locations are in the US and the UK, but it has smaller outlets in France, Saudi Arabia, and the United Arab Emirates (UAE).
In the US, InFusion employs 400 people and has a company revenue of $120 million. Outside the US, InFusion employs 200 people and has revenue of $60 million.
InFusion requires three divisions. The US division will cover the US locations. The Europe division will cover the UK and France. Saudi Arabia and the UAE will be covered by the Middle East division.
InFusion requires legal entities with legal employers, payroll statutory units, tax reporting units, and legislative data groups for the US, UK, France, Saudi Arabia, and UAE, in order to employ and pay its workers in those countries.
InFusion requires a number of departments across the enterprise for each area of business, such as sales and marketing, and a number of cost centers to track and report on the costs of those departments.
InFusion requires business units for human capital management (HCM) purposes. Infusion has general managers responsible for business units within each country. Those business units may share reference data. Some reference data can be defined within a reference data set that multiple business units may subscribe to. Business units are also required for financial purposes. Financial transactions are always processed within a business unit.
Based on this analysis, InFusion requires an enterprise with multiple divisions, ledgers, legal employers, payroll statutory units, tax reporting units, legislative data groups, departments, cost centers, and business units.
This figure illustrates the enterprise configuration that results from the analysis of InFusion Corporation.
Managing multiple businesses requires that you segregate them by their strategic objectives and measure their results. Responsibility to reach objectives can be delegated along the management structure. Although related to your legal structure, the business organizational hierarchies do not need to reflect directly the legal structure of the enterprise. The management entities and structure can include divisions and subdivisions, lines of business, and other strategic business units, and include their own revenue and cost centers. These organizations can be included in many alternative hierarchies and used for reporting, as long as they have representation in the chart of accounts.
A division refers to a business oriented subdivision within an enterprise, in which each division organizes itself differently to deliver products and services or address different markets. A division can operate in one or more countries, and can be comprised of many companies or parts of different companies that are represented by business units.
A division is a profit center or grouping of profit and cost centers, where the division manager is responsible for attaining business goals including profit goals. A division can be responsible for a share of the company's existing product lines or for a separate business. Managers of divisions may also have return on investment goals requiring tracking of the assets and liabilities of the division. The division manager reports to a top corporate executive.
By definition a division can be represented in the chart of accounts. Companies may choose to represent product lines, brands, or geographies as their divisions: their choice represents the primary organizing principle of the enterprise. This may coincide with the management segment used in segment reporting.
Oracle Fusion Applications supports a qualified management segment and recommends that you use this segment to represent your hierarchy of business units and divisions. If managers of divisions have return on investment goals, make the management segment a balancing segment. Oracle Fusion applications allows up to three balancing segments. The values of the management segment can be comprised of business units that roll up in a hierarchy to report by division.
Historically, divisions were implemented as a node in a hierarchy of segment values. For example, Oracle E-Business Suite has only one balancing segment, and often the division and legal entity are combined into a single segment where each value stands for both division and legal entity.
Divisions are used in HCM to define the management organization hierarchy, using the generic organization hierarchy. This hierarchy can be used to create organization based security profiles.
A legal entity is a recognized party with rights and responsibilities given by legislation.
Legal entities have the right to own property, the right to trade, the responsibility to repay debt, and the responsibility to account for themselves to regulators, taxation authorities, and owners according to rules specified in the relevant legislation. Their rights and responsibilities may be enforced through the judicial system. Define a legal entity for each registered company or other entity recognized in law for which you want to record assets, liabilities, expenses and income, pay transaction taxes, or perform intercompany trading.
A legal entity has responsibility for elements of your enterprise for the following reasons:
Facilitating local compliance
Taking advantage of lower corporation taxation in some jurisdictions
Preparing for acquisitions or disposals of parts of the enterprise
Isolating one area of the business from risks in another area. For example, your enterprise develops property and also leases properties. You could operate the property development business as a separate legal entity to limit risk to your leasing business.
In configuring your enterprise structure in Oracle Fusion Applications, you need to understand that the contracting party on any transaction is always the legal entity. Individual legal entities own the assets of the enterprise, record sales and pay taxes on those sales, make purchases and incur expenses, and perform other transactions.
Legal entities must comply with the regulations of jurisdictions, in which they register. Europe now allows for companies to register in one member country and do business in all member countries, and the US allows for companies to register in one state and do business in all states. To support local reporting requirements, legal reporting units are created and registered.
You are required to publish specific and periodic disclosures of your legal entities' operations based on different jurisdictions' requirements. Certain annual or more frequent accounting reports are referred to as statutory or external reporting. These reports must be filed with specified national and regulatory authorities. For example, in the United States (US), your publicly owned entities (corporations) are required to file quarterly and annual reports, as well as other periodic reports, with the Securities and Exchange Commission (SEC), who enforces statutory reporting requirements for public corporations.
Individual entities privately held or held by public companies do not have to file separately. In other countries, your individual entities do have to file in their own name, as well as at the public group level. Disclosure requirements are diverse. For example, your local entities may have to file locally to comply with local regulations in a local currency, as well as being included in your enterprise's reporting requirements in different currency.
A legal entity can represent all or part of your enterprise's management framework. For example, if you operate in a large country such as the United Kingdom or Germany, you might incorporate each division in the country as a separate legal entity. In a smaller country, for example Austria, you might use a single legal entity to host all of your business operations across divisions.
Using the Enterprise Structures Configurator (ESC), you can create legal entities for your enterprise automatically, based on the countries in which divisions of your business operate, or you can upload a list of legal entities from a spreadsheet.
If you are not certain of the number of legal entities that you need, you can create them automatically. To use this option, you first identify all of the countries in which your enterprise operates. The application opens the Map Divisions by Country page, which contains a matrix of the countries that you identified, your enterprise, and the divisions that you created. You select the check boxes where your enterprise and divisions intersect with the countries to identify the legal entities that you want the application to create. The enterprise is included for situations where your enterprise operates in a country and acts on behalf of several divisions within the enterprise and is a legal employer in a country. If you select the enterprise for a country, the application creates a country holding company.
The application automatically creates the legal entities that you select, and identifies them as payroll statutory units and legal employers. For each country that you indicated that your enterprise operates in, and for each country that you created a location for, the application also automatically creates a legislative data group.
Any legal entities that you create automatically cannot be deleted from the Create Legal Entities page within the Enterprise Structures Configurator. You must return to the Map Divisions by Country page and deselect the legal entities that you no longer want.
InFusion Corporation is using the ESC to set up their enterprise structure. They have identified two divisions, one for Lighting, and one for Security. The Lighting division operates in Japan and the US, and the Security division operates in the UK and India.
This figure illustrates InFusion Corporation's enterprise structure.
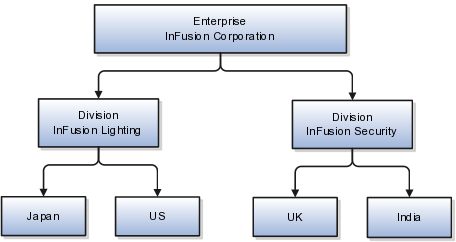
This table represents the selections that InFusion Corporation makes when specifying which legal entities to create on the Map Divisions by Country page.
|
Country |
Enterprise |
InFusion Lighting |
InFusion Security |
|---|---|---|---|
|
Japan |
No |
Yes |
No |
|
US |
No |
Yes |
No |
|
UK |
No |
No |
Yes |
|
India |
No |
No |
Yes |
Based on the selections made in the preceding table, the ESC creates the following four legal entities:
InFusion Lighting Japan LE
InFusion Lighting US LE
InFusion Security UK LE
InFusion Security India LE
If you have a list of legal entities already defined for your enterprise, you can upload them from a spreadsheet. To use this option, you first download a spreadsheet template, then add your legal entity information to the spreadsheet, and then upload directly to your enterprise configuration. You can export and import the spreadsheet multiple times to accommodate revisions.
Oracle Fusion Applications support the modeling of your legal entities. If you make purchases from or sell to other legal entities, define these other legal entities in your customer and supplier registers, which are part of the Oracle Fusion Trading Community Architecture. When your legal entities are trading with each other, you represent both of them as legal entities and also as customers and suppliers in your customer and supplier registers. Use legal entity relationships to determine which transactions are intercompany and require intercompany accounting. Your legal entities can be identified as legal employers and therefore, are available for use in Human Capital Management (HCM) applications.
There are several decisions that need to be considered in creating your legal entities.
The importance of legal entity in transactions
Legal entity and its relationship to business units
Legal entity and its relationship to divisions
Legal entity and its relationship to ledgers
Legal entity and its relationship to balancing segments
Legal entity and its relationship to consolidation rules
Legal entity and its relationship to intercompany transactions
Legal entity and its relationship to worker assignments and legal employer
Legal entity and payroll reporting
Legal reporting units
All of the assets of the enterprise are owned by individual legal entities. Oracle Fusion Financials allow your users to enter legal entities on transactions that represent a movement in value or obligation.
For example, the creation of a sales order creates an obligation for the legal entity that books the order to deliver the goods on the acknowledged date, and an obligation of the purchaser to receive and pay for those goods. Under contract law in most countries, damages can be sought for both actual losses, putting the injured party in the same state as if they had not entered into the contract, and what is called loss of bargain, or the profit that would have made on a transaction.
In another example, if you revalued your inventory in a warehouse to account for raw material price increases, the revaluation and revaluation reserves must be reflected in your legal entity's accounts. In Oracle Fusion Applications, your inventory within an inventory organization is managed by a single business unit and belongs to one legal entity.
A business unit can process transactions on behalf of many legal entities. Frequently, a business unit is part of a single legal entity. In most cases the legal entity is explicit on your transactions. For example, a payables invoice has an explicit legal entity field. Your accounts payables department can process supplier invoices on behalf of one or many business units.
In some cases, your legal entity is inferred from your business unit that is processing the transaction. For example, your business unit A agrees on terms for the transfer of inventory to your business unit B. This transaction is binding on your default legal entities assigned to each business unit. Oracle Fusion Procurement, Oracle Fusion Projects, and Oracle Fusion Supply Chain applications rely on deriving the legal entity information from the business unit.
The division is an area of management responsibility that can correspond to a collection of legal entities. If desired, you can aggregate the results for your divisions by legal entity or by combining parts of other legal entities. Define date-effective hierarchies for your cost center or legal entity segment in your chart of accounts to facilitate the aggregation and reporting by division. Divisions and legal entities are independent concepts.
One of your major responsibilities is to file financial statements for your legal entities. Map legal entities to specific ledgers using the Oracle Fusion General Ledger Accounting Configuration Manager. Within a ledger, you can optionally map a legal entity to one or more balancing segment values.
Oracle Fusion General Ledger supports up to three balancing segments. Best practices recommend that one of these segments represents your legal entity to ease your requirement to account for your operations to regulatory agencies, tax authorities, and investors. Accounting for your operations means you must produce a balanced trial balance sheet by legal entity. If you account for many legal entities in a single ledger, you must:
Identify the legal entities within the ledger.
Balance transactions that cross legal entity boundaries through intercompany transactions.
Decide which balancing segments correspond to each legal entity and assign them in Oracle Fusion General Ledger Accounting Configuration Manager. Once you assign one balancing segment value in a ledger, then all your balancing segment values must be assigned. This recommended best practice facilitates reporting on assets, liabilities, and income by legal entity.
Represent your legal entities by at least one balancing segment value. You may represent it by two or three balancing segment values if more granular reporting is required. For example, if your legal entity operates in multiple jurisdictions in Europe, you might define balancing segment values and map them to legal reporting units. You can represent a legal entity by more than one balancing segment value, do not use a single balancing segment value to represent more than one legal entity.
In Oracle Fusion General Ledger, there are three balancing segments. You can use separate balancing segments to represent your divisions or strategic business units to enable management reporting at the balance sheet level for each division or business unit. For example, use this solution to empower your business unit and divisional managers to track and assume responsibility for their asset utilization or return on investment. Using multiple balancing segments is also useful when you know at the time of implementation that you are disposing of a part of a legal entity and need to isolate the assets and liabilities for that entity.
Note
Implementing multiple balancing segments requires every journal entry that is not balanced by division or business unit, to generate balancing lines. Also, you cannot change to multiple balancing segments easily after you have begun to use the ledger because your historical data is not balanced by the new multiple balancing segments. Restating historical data must be done at that point.
To use this feature for disposal of a part of a legal entity, implement multiple balancing segments at the beginning of the legal entity's corporate life or on conversion to Oracle Fusion.
If you decided to account for each legal entity in a separate ledger, there is no requirement to identify the legal entity with a balancing segment value within the ledger.
Note
While transactions that cross balancing segments don't necessarily cross legal entity boundaries, all transactions that cross legal entity boundaries must cross balancing segments. If you make an acquisition or are preparing to dispose of a portion of your enterprise, you may want to account for that part of the enterprise in its own balancing segment even if it is not a separate legal entity. If you do not map legal entities sharing the same ledger to balancing segments, you will not be able to distinguish them using the intercompany functionality or track their individual equity.
In Oracle Fusion Applications you can map legal entities to balancing segments and then define consolidation rules using your balancing segments. You are creating a relationship between the definition of your legal entities and their role in your consolidation.
Use Oracle Fusion Intercompany functionality for automatic creation of intercompany entries across your balancing segments. Intercompany processing updates legal ownership within the enterprise's groups of legal entities. Invoices or journals are created as needed. To limit the number of trading pairs for your enterprise, set up intercompany organizations and assign then to your authorized legal entities. Define processing options and intercompany accounts to use when creating intercompany transactions and to assist in consolidation elimination entries. These accounts are derived and automatically entered on your intercompany transactions based on legal entities assigned to your intercompany organizations.
Intracompany trading, in which legal ownership isn't changed but other organizational responsibilities are, is also supported. For example, you can track assets and liabilities that move between your departments within your legal entities by creating departmental level intercompany organizations.
Note
In the Oracle Fusion Supply Chain applications, model intercompany relationships using business units, from which legal entities are inferred.
Legal entities that employ people are called legal employers in the Oracle Fusion Legal Entity Configurator. You must enter legal employers on worker assignments in Oracle Fusion HCM.
Your legal entities are required to pay payroll tax and social insurance such as social security on your payroll. In Oracle Fusion Applications, you can register payroll statutory units to pay and report on payroll tax and social insurance on behalf of many of your legal entities. As the legal employer, you might be required to pay payroll tax, not only at the national level, but also at the local level. You meet this obligation by establishing your legal entity as a place of work within the jurisdiction of a local authority. Set up legal reporting units to represent the part of your enterprise with a specific legal reporting obligation. You can also mark these legal reporting units as tax reporting units, if the legal entity must pay taxes as a result of establishing a place of business within the jurisdiction.
A business unit is a unit of an enterprise that performs one or many business functions that can be rolled up in a management hierarchy. A business unit can process transactions on behalf of many legal entities. Normally, it will have a manager, strategic objectives, a level of autonomy, and responsibility for its profit and loss. Roll business units up into divisions if you structure your chart of accounts with this type of hierarchy. In Oracle Fusion Applications, you assign your business units to one primary ledger. For example, if a business unit is processing payables invoices they will need to post to a particular ledger. This assignment is mandatory for your business units with business functions that produce financial transactions.
In Oracle Fusion Applications, use business unit as a securing mechanism for transactions. For example, if you run your export business separately from your domestic sales business, secure the export business data to prevent access by the domestic sales employees. To accomplish this security, set up the export business and domestic sales business as two separate business units.
The Oracle Fusion Applications business unit model:
Allows for flexible implementation
Provides a consistent entity for controlling and reporting on transactions
Anchors the sharing of sets of reference data across applications
Business units process transactions using reference data sets that reflect your business rules and policies and can differ from country to country. With Oracle Fusion Application functionality, you can choose to share reference data, such as payment terms and transaction types, across business units, or you can choose to have each business unit manage its own set depending on the level at which you wish to enforce common policies.
In countries where gapless and chronological sequencing of documents is required for subledger transactions, define your business units in alignment with your ledger definition, because the uniqueness of sequencing is only ensured within a ledger. In these cases, define a single ledger and assign one legal entity and business unit.
In summary, use business units in the following ways:
Management reporting
Processing of transactions
Security of transactional data
Reference data definition and sharing
Business units are used by a number of Oracle Fusion Applications to implement data security. You assign data roles to your users to give them access to data in business units and permit them to perform specific functions on this data. When a business function is enabled for a business unit, the application can trigger the creation of data roles for this business unit based on the business function's related job roles.
For example, if a payables invoicing business function is enabled, then it is clear that there are employees in this business unit that perform the function of payables invoicing, and need access to the payables invoicing functionality. Therefore, based on the correspondence between the business function and the job roles, appropriate data roles are generated automatically. Use Human Capital Management (HCM) security profiles to administer security for employees in business units.
Business units are used within Oracle Fusion applications for management reporting, processing of transactions, and security of transactional data. Using the Enterprise Structures Configurator (ESC), you create business units for your enterprise either automatically or manually.
To create business units automatically, you must specify the level at which to create business units. Business units within your enterprise may be represented at the business function level, such as Sales, Consulting, Product Development, and so on, or they may be represented at a more detailed level, where a business unit exists for each combination of countries in which you operate and the functions in those countries.
You can automatically create business units at the following levels:
Country
Country and Division
Country and business function
Division
Division and legal entity
Division and business function
Business function
Legal entity
Business function and legal entity
Select the option that best meets your business requirements, but consider the following:
If you use Oracle Fusion Financials, the legal entity option is recommended because of the manner in which financial transactions are processed.
The business unit level that you select determines how the application automatically creates reference data sets.
After you select a business unit level, the application generates a list of business units, and you select the ones you want the application to create. If you select a level that has two components, such as country and division, then the system displays a table listing both components, and you select the check boxes at the intersections of the components.
The business units listed by the application are suggestions only, and are meant to simplify the process to create business units. You are not required to select all of the business units suggested. When you navigate to the next page in the ESC guided flow, which is the Manage Business Units page, you cannot delete any of the business units that were created automatically. You must return to the Create Business Units page and deselect any business units that you no longer want.
InFusion Corporation is using the Enterprise Structures Configurator to set up their enterprise structure. They have identified two divisions, one for Lighting, and one for Security. They operate in four countries: US, UK, Japan, and India, and they have created a legal entity for each of the countries. The sales and marketing functions are based in both India and Japan, while the US and the UK have only the sales function.
This figure illustrates InFusion Corporation's enterprise structure.
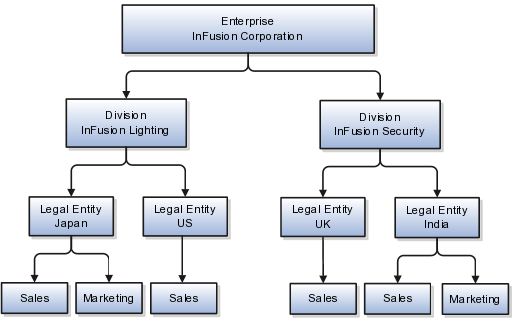
The following table lists the options for business unit levels and the resulting business units that the application suggests for InFusion Corporation.
|
Business Unit Level |
Suggested Business Units |
|---|---|
|
Country |
|
|
Country and Division |
|
|
Country and business function |
|
|
Division |
|
|
Division and Legal Entity |
|
|
Division and Business Function |
|
|
Business Function |
|
|
Legal Entity |
|
|
Legal Entity and Business Function |
|
If none of the levels for creating business units meets your business needs, you can create business units manually, and you create them on the Manage Business Units page. If you create business units manually, then no reference data sets are created automatically. You must create them manually as well.
Jobs and positions represent roles that enable you to distinguish between tasks and the individuals who perform those tasks. The key to whether to use jobs or positions is how each is used. Positions offer a well-defined space independent of the person performing the job. Jobs are a space defined by the person. A job can be defined globally in the Common Set, whereas a position is defined within one business unit.
You can update the job and department of a position at any time. This is useful if you hire someone into a new role and want to transfer the position to another department.
During implementation, one of the earliest decisions you will make is whether to use jobs or a combination of jobs and positions. The determinants for this decision are:
The primary industry of your enterprise
How you manage your people
Primary industries and how they usually set up their workforce are listed in the table below.
|
Primary Industry |
Workforce Setup |
|---|---|
|
Mining |
Positions |
|
Utilities |
Positions |
|
Manufacturing |
Positions |
|
Retail Trade |
Positions |
|
Transportation and Warehousing |
Positions |
|
Educational Services |
Positions |
|
Public Transportation |
Positions |
|
Agriculture, Forestry, Fishing, and Hunting |
Jobs |
|
Construction |
Jobs |
|
Wholesale Trade |
Jobs |
|
Information |
Jobs |
|
Finance and Insurance |
Jobs |
|
Professional, Scientific, and Technical Services |
Jobs |
|
Management of Companies and Enterprises |
Jobs |
|
Administrative and Support and Waste Management and Remediation Services |
Jobs |
|
Arts, Entertainment, and Recreation |
Jobs |
|
Accommodation and Food Services |
Jobs |
|
Other Services (Except Public Administration) |
Jobs |
The following table displays suggestions of whether to use jobs or a combination of jobs and positions based on your industry and how you manage your employees when there is turnover.
|
Industry |
We always replace employees by rehiring to same role |
We replace the head count, but the manager can use the head count in a different job |
We rehire to the same position, but the manager can request a reallocation of budget to a different post |
|---|---|---|---|
|
Project (An industry that supports project-based forms of organization in which teams of specialists from both inside and outside the company report to project managers.) |
Positions |
Jobs |
Jobs |
|
Controlled (An industry that is highly structured in which all aspects of work and remuneration are well organized and regulated.) |
Positions |
Positions |
Positions |
|
Manufacturing |
Positions |
Jobs |
Positions |
|
Retail |
Positions |
Jobs |
Positions |
|
Education |
Positions |
Jobs |
Positions |
|
Other |
Positions |
Jobs |
Jobs |
Positions are typically used by industries that use detailed approval rules, which perform detailed budgeting and maintain head counts, or have high turnover rates.
ABC Corporation has high turnover. It loses approximately 5% of their cashiers monthly. The job of cashier includes three positions: front line cashier, service desk cashier, and layaway cashier. Each job is cross trained to take over another cashier position. When one cashier leaves from any of the positions, another existing cashier from the front line, service desk or layaway can assist where needed. . But to ensure short lines and customer satisfaction, ABC must replace each cashier lost to turnover.
Since turnover is high in retail it is better for this industry to use positions. There is an automatic vacancy when an employee terminates employment. The position exists even when there are no holders. This is important if the person who leaves the company is a manager or supervisor with direct reports. All direct reports continue reporting to the position even if it is empty. You do not need to reassign these employees to another manager or supervisor; the replacement manager is assigned to the existing position.
Also, an advantage to using positions is that when you hire somebody new many of the attributes are defaulted in from the position. This speeds up the hiring process.
This figure illustrates the retail position setup.
The hospital has a structured head count and detailed budgeting. For example, a specific number of surgeons, nurses, and interns of various types are needed. These positions need to be filled in order for the hospital to run smoothly. Use jobs and positions if you need to apply detailed head count rules.
Health care is an industry that needs to regulate employment, roles, and compensation according to strict policies and procedures. Fixed roles tend to endure over time, surviving multiple incumbents. Industries that manage roles rather than individuals, where roles continue to exist after individuals leave, typically model the workforce using positions.
This figure illustrates the hospital position setup.
Jobs are typically used without positions by service industries where flexibility and organizational change are key features.
For example, XYZ Corporation has a director over the departments for developers, quality assurance, and technical writers. Recently, three developers have left the company. The director decides to redirect the head count to other areas. Instead of hiring all three back into development, one person is hired to each department, quality assurance, and technical writing.
In software industries, the organization is fluid. Using jobs gives an enterprise the flexibility to determine where to use head count, because the job only exists through the person performing it. In this example, when the three developers leave XYZ Corporation, their jobs no longer exist, therefore the corporation has the flexibility to move the headcount to other areas.
This figure illustrates the software industry job setup.
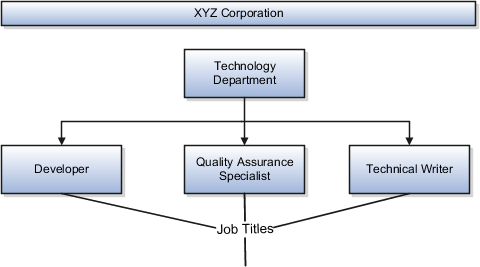
Job and position structures identify the descriptive flexfield structure that enables you to specify additional attributes that you want to capture when you define jobs and positions. Job and position attributes provide further detail to make jobs and positions more specific. You also use attributes to define the structure of your jobs and positions. You can specify attributes at the enterprise level for jobs and positions, at the business unit level for positions, and at the reference data set level for jobs. Job and position structures are optional.
When you define a job, you enter a value for the name of the job. To make job names more specific, set up attributes that enable you to identify additional details about the job, such as the nature of the work that is performed or the relative skill level required for the job. If these attributes apply to all jobs within your enterprise, set up enterprise-level job attributes. Standard capabilities mean that you can use the different segments of the name to identify common jobs or job holders for analysis or compensation, or for grouping records in reports, for example, to find all jobs of a specific job type. You should not use attributes with values that change regularly, for example, salary ranges or expense approval levels that change every year.
This figure illustrates how job type and job level provide further details for the HR Application Specialist job.
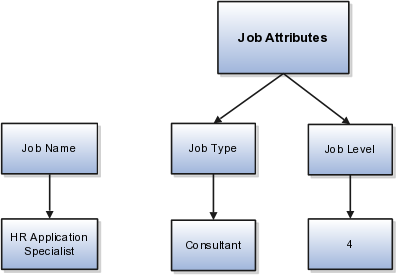
Position attributes at the enterprise level are similar to those for jobs. Each position that you define identifies a specific role in the enterprise, which you can manage independently of the person in the position, and it will belong to one specific department or organization. The name of each position must be unique. To simplify the process of managing unique names for positions, set up enterprise-level attributes to identify separate components of the position name. For example, you can set up an attribute for position title and one for position number. When defining the attributes that make up the structure of a position name you should also consider if any of your attributes are part of the definition of a common job type. Using job types for a position can help you manage common information that applies to many different positions. For example you can define a job type of Manager.Level 1 and use this for comparison of positions across departments or lines or business, or for setting common job requirements. You can then define multiple manager type positions in your HR department, each of which has responsibility for a different management function or group.
This figure illustrates how title and position number provide further details for the manager position.
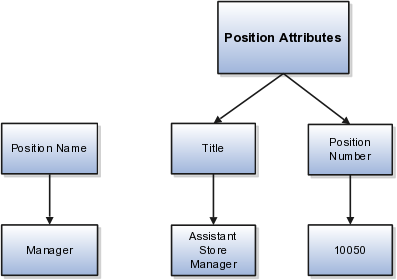
If you have information that you want to capture for positions that is specific to each business unit, then you can define attributes at the business unit level for positions. When you create positions, these attributes appear in addition to any enterprise-level attributes. For example, you may want to identify the sales region for all positions in the sales business unit. You can set up a text attribute called Sales Region and use it to enter the necessary information when creating positions for the sales business unit.
If you have information for jobs that applies to specific reference data sets, set up attributes for jobs at the reference data set level. When you create jobs, these attributes appear in addition to any enterprise-level attributes. For example, you may want to identify all information technology (IT) jobs within a specific set. You can set up a text attribute called Function and use it to enter IT in jobs that you create that perform an IT function within a specific set.
The Enterprise Structures Configurator is an interview-based tool that guides you through setting up divisions, legal entities, business units, and reference data sets. The tool also enables you to assign reference data sets to business units and locations. You can set up multiple configurations to perform what-if scenarios, and then print each configuration to compare the resulting enterprise structure. If you do not use the Enterprise Structures Configurator, then you must set up your enterprise structure using the individual tasks that correspond to each enterprise component. In addition, you will not be able to set up multiple configurations and compare different scenarios. It is recommended that you use the Enterprise Structures Configurator.
The legal entity that represents the top level in your organization hierarchy, as defined by the legal name entered for the enterprise. This designation is used only to create an organization tree, with the ultimate holding company as the top level, divisions and country holding companies as the second level, and legal employers as the third level.
An enterprise consists of legal entities under common control and management.
When implementing Oracle Fusion Applications you operate within the context of an enterprise that has already been created in the application for you. This is either a predefined enterprise or an enterprise that has been created in the application by a system administrator.
An enterprise organization captures the name of the deploying enterprise and the location of the headquarters. There is normally a single enterprise organization in a production environment. Multiple enterprises are defined when the system is used to administer multiple customer companies, for example, multiple tenants, or when a customer chooses to set up additional enterprises for testing or development.
Oracle Fusion Applications offers capabilities for multiple tenants to share the same applications instance for some human resources processes. If you offer business process outsourcing services to a set of clients, each of those clients may be represented as an enterprise within an Oracle Fusion Application instance. To support this functionality, system owned reference data such as sequences, sets, and flexfields are also defined within an enterprise.
In Oracle Fusion Applications, an organization classified as an enterprise is defined before defining any other organizations in the HCM Common Organization Model. All other organizations are defined as belonging to an enterprise.
The Manage Enterprise HCM Information task includes default settings for your enterprise such as the employment model, worker number generation, and so on. If you are not implementing Oracle Fusion Human Capital Management (HCM), then the only action you may need to perform using this task is to change the enterprise name, if necessary. The other settings are HCM-specific and are not relevant outside of Oracle Fusion HCM.
A location identifies physical addresses of a workforce structure, such as a department or a job. You can also create locations to enter the addresses of external organizations that you want to maintain, such as employment agencies, tax authorities, and insurance or benefits carriers.
The locations that you create exist as separate structures that you can use for reporting purposes, and also in rules that determine employee eligibility for various types of compensation and benefits. You enter information about a location only once. Subsequently, when you set up other workforce structures you select the location from a list.
When you create a location, you must associate it with a set. Only those users who have access to the set's business unit can access the location set and other associated workforce structure sets, such as those that contain departments and jobs.
You can also associate the location to the common set so that users across your enterprise can access the location irrespective of their business unit. When users search for locations, they can see the locations that they have access to along with the locations in the common set.
The following figure shows how locations sets restrict access to users.
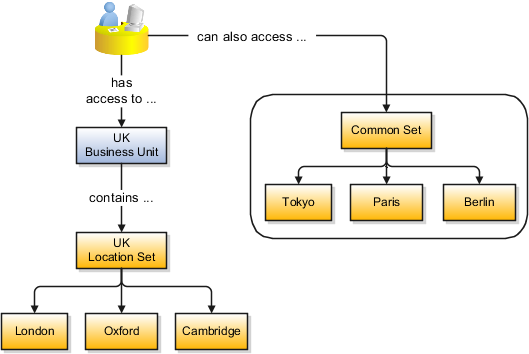
If you have a list of locations already defined for your enterprise, you can upload them from a spreadsheet. To use this option, you first download a spreadsheet template, then add your location information to the spreadsheet, and then upload directly to your enterprise configuration. You can upload the spreadsheet multiple times to accommodate revisions.
You can search for approved locations only. Also, if you created a location in Oracle Fusion Trading Community Model, then you can't access that location from Oracle Fusion Global Human Resources. For use in Oracle Fusion HCM, you must recreate the location from the Manage Locations page.
The calendar events that were created for the geographical node start to apply for the location and may impact the availability of worker assignments at that location. The geographical hierarchy nodes available for selection on the Locations page display from a predefined geographic hierarchy.
The location is available for selection in purchase documents of that inventory organization in Oracle Fusion Inventory Management. If you don't select an inventory organization, then the location is available in purchase documents across all inventory organizations.
Starting from the effective date that you entered, you can no longer associate the location with other workforce structures, assignments, or applications. If the location is already in use, it will continue to be available to the components that currently use it.
From the Manage Locations page in Oracle Fusion Global Human Resources.
To appear on the Create or Edit Location pages, your inventory organization must be effective on today's date and must exist in the location set that you selected.
There are three components that are dependent on each other when defining a country: geography structure, geography hierarchy, and geography validation. Every country has to have the geography structure defined first before the hierarchy can be defined, and the geography hierarchy has to be defined before the validation can be defined.
Firstly, you need to create a geography structure for each country to define which geography types are part of the country structure, and how the geography types are hierarchically related within the country structure. For example, you can create geography types called State, City, and Postal Code. Then you can rank the State geography type as the highest level within the country, the City as the second level, and the Postal Code as the lowest level within the country structure. Geography structure can be defined using the Manage Geographies task, or can be imported using tasks in the Define Geographies activity.
Once the geography structure is defined, the geographies for each geography type can be added to the hierarchy. For example, below the United States you can create a geography called California using a State geography type.
As part of managing the geography hierarchy you can view, create, edit, and delete the geographies for each geography type in the country structure. You can also add a primary and alternate name and code for each geography. A geography hierarchy can be created using the Manage Geographies task, or can be imported using tasks in the Define Geographies activity.
After defining the geography hierarchy, you need to specify the geography validations for the country. You can choose which address style formats you would like to use for the country, and for each selected address style format you can map geography types to address attributes. You can also select which geography types should be included in geography or tax validation, and which geography types will display in a list of values during address entry in other user interfaces. The geography validation level for the country, such as error or warning, can also be selected.
A geography structure is a hierarchical grouping of geography types for a country. For example, the geography structure for the United States is the geography type of State at the top, then followed by the County, then the City, and finally the Postal Code.
You can use the geography structure to establish:
How geographies can be related
The types of geographies you can define for the country
You can determine how a country's geographies are hierarchically related by creating the hierarchy of the geography types in the geography structure. When you define a country's structure the country geography type is implicitly at the top of the geography structure, and the numbering of the subsequent levels start with 1 as the next geography level after country.
You must add a geography type as a level in the country structure before you can define a geography for that geography type in a country. For example, before defining the state of California, the State geography type must be added to the United States country structure. Only one geography type can be used for each level, you cannot define more than one geography type at the same level.
Note
After you first define a country structure you can only add geography types below the current lowest level, and delete geography types without defined geographies.
To simplify the creation of a country structure you can copy a structure from another country, and then amend the geography type hierarchy for the country.
The application provides you with a set of available master reference geography types. If required, you can create a geography type before adding it to the country structure. Each geography type is added below the current lowest level.
Note
If you want to delete a geography type that is not at the lowest level in the country structure, then you have to delete the geography type level and all the levels below it.
A geography type that you create within the country structure can be used for other country structures as well.
Geography hierarchy is a data model that lets you establish conceptual parent-child relationships between geographies. A geography, such as Tokyo or Peru, describes a boundary on the surface of the earth. The application can extrapolate information based on this network of hierarchical geographical relationships.
For example, in the geography hierarchy the state of California is defined as the parent of San Mateo county, which is the parent of Redwood City, which is the parent of the postal code 94065. If you enter just 94065, the application can determine that the postal code is in California, or that the corresponding city is Redwood City.
The application leverages geography hierarchy information to facilitate business processes that rely on geography information, for example, tax calculation, order sourcing rules, sales territory definition. The geography hierarchy information is centrally located in the Trading Community Model and shared among other application offerings.
The top level of the geography hierarchy is Country, so the hierarchy essentially contains countries and their child geographies. Other aspects of the geography hierarchy include:
Geography
Geography type
Geography usage
Master reference geography hierarchy
User defined zones
A geography is a boundary such as a country, state, province or city. It is a physical space with boundaries that is a defined instance of a geography type. For example, San Jose is a geography of the City geography type.
Geography types are a divisional grouping of geographies, which can be either geopolitical (for example, City, Province, and District) or user defined (for example, Continent, Country Regions, Tax Regions).
Geography usage indicates how a geography type or geography is used in the application. A master reference geography always has the usage of Master Reference. User defined zones can have the usages of Tax, Shipping, or Territory, based on what is relevant for their purpose.
The geography hierarchy data is considered to be the single source of truth for geographies. It is all the data, including geography types and geographies, that you define and maintain in the Trading Community Model tables.
The geography usage for the entire hierarchy is the master reference, and defined geography types and geographies are considered as master reference geography types and geographies. For example, Country is a universally recognized geography type, and United States is considered a master geography.
User defined zones are a collection of geographical data, created from master reference data for a specific purpose. For example, territory zones are collections of master reference geographies ordered in a hierarchy. Tax and shipping zones are collections of master reference geographies without a hierarchical grouping.
Geography validation determines the geography mapping and validation for a country's address styles, as well as the overall geography validation control for a country.
The No Styles Format address style format is the default address style format for a country. By defining the mapping and validation for this format you will ensure that validations can be performed for any address in the country. After the No Styles Format is defined you can set up additional mapping for specific address styles.
For each address style format, you can define the following:
Map to attribute
Enable list of values
Tax validation
Geography validation
Geography validation control
For every address style format, you can map each geography type to an address attribute. For example, you can map the State geography type to the State address attribute for the United States, or map the State geography type to the County address attribute for the United Kingdom. The geography types that appear are based on how the country structure is defined. The list of address attributes that appear are based on address formats delivered with the application, or your customer defined address formats.
Note
You only need to map geography types that you want to use for geography or tax validation purposes.
Once a geography type is mapped to an attribute, then you can specify whether the geography type will appear in a list of values during address entry in user interfaces. It is very important to review carefully if you want to enable a list of values. You should only enable a list of values if you have sufficient geography data imported or created for that geography. Once you have enabled a list of values for an address attribute, you can only select the geography data available for the geography type. This means that if a specific geography value is not available in the geography hierarchy, you cannot create an address with a different geography value.
You can also specify whether a geography type will be included in tax validation. For example, for the United States North America address style format you specify that County, State, and City are used for tax validation. This will mean that when a transaction involves an address with the North America address style, the address must have the correct county, state, and city combination based on the geography hierarchy data, to be considered valid for tax calculation.
You can specify whether a geography type will be included in geography validation. This will mean that, for example, when the user enters a United States address using the North America address style format, the address must have the correct country, state, and postal code combination based on geography hierarchy data to be considered geographically valid.
If an address element is mapped to a geography type, but not selected for geography validation usage, then during address entry suggested values will be provided for the address element, but the address element will not be validated.
Note
For either the tax or geography validation, do not skip more than one consecutive level unless you are certain that the selected geography types can uniquely identify geographies. For example, the United States country structure is: State, County, City, and Postal Code, and you want to select just State and Postal Code for geography or tax validation. However, for the combination of California and 94065, the city can be either Redwood Shores or Redwood City. In this case, you should also select at least the City geography type for geography or tax validation.
You can select the geography validation level for a country. Validation will check if the entered address maps to the geography hierarchy data available for the country, and the geography validation control determines whether you can save an address that did not pass validation during address entry. For example, if the validation level is Error, then an address cannot be saved if the values do not match the geography hierarchy data.
These are the geography validation levels you can choose:
Error - only completely valid addresses can be saved, with all mandatory address elements entered.
No Validation - all addresses can be saved including incomplete and invalid addresses.
Regardless of the result of validation, the validation process will try to map any address attribute to a geography of the country, and store any mapping it could establish based on the available data. This is called Geography Name Referencing and it is executed as part of validation. The result of this referencing is used in several business processes in the application to map an address to a specific geography or zone.
Note
The Geography Dimension value in territories is derived from sell-to addresses of sales accounts. To use geography dimensions in territories, ensure that the geography elements in addresses, such as state, city, and postal code, are validated. You can do so by enabling geography validation for each country using the Manage Geographies task. While doing so, ensure that at least one level in the geography hierarchy is enabled for geography validation. It is recommended that you enable geography validation for all geography levels that you intend to use for territory definition for each country. You can enable a list of values containing specific geography elements. This will help users search and select appropriate geography values during addresses entry and eliminate all possibilities of wrong address entry. You can also set geography validation control to Error in the Manage Geography Validation page. This ensures that users can only use valid geography elements in addresses. If you have already created addresses before setting up geography validation for a country, you must execute the Run Maintain Geography Name Referencing task for that country after enabling geography validation to ensure that all your geography elements are validated.
Address cleansing provides a way to validate, correct, and standardize addresses that are entered in a user interface. Geography validation only validates the geography attributes of an address, for example, State, City, and Postal codes; address cleansing validates both the geography attributes and the address line attributes.
Address cleansing can only be used through the Oracle Fusion Trading Community Data Quality product, because the feature is delivered using Data Quality integration. You need to ensure that you have a license for the countries that will use Trading Community Data Quality data cleansing.
You can specify the real time address cleansing level for each country by choosing either None, meaning that there is no real time address cleansing, or by choosing Optional, meaning that you will have the choice to cleanse addresses. Once you have enabled address cleansing for a country a Verify Address icon appears at address entry points in the application. You can then click the icon to perform address cleansing and receive a corrected, standardized address. If Trading Community Data Quality does not find a matching address the application will alert you.
This example shows how to configure the geography structure, hierarchy, and validation for a country geography, using the United Kingdom country geography as an illustration.
The following table summarizes the key decisions for this scenario.
|
Decisions to Consider |
In This Example |
|---|---|
|
Copy an existing country structure? |
No, create a new country structure. |
|
What is the structure of the geography types? |
Create geography types with the following ranking structure:
|
|
What is the geography hierarchy? |
Create the following hierarchy:
|
|
Which address style format will you use when mapping geography validations? |
The default address style format, called the No Styles Format. |
|
Are you using Oracle Fusion Tax for tax purposes? |
No, do not select Tax Validation for the geography types. |
Add the County and Post Town geography types to the geography structure. Next, add the geographies for the County and Post Town geography types to define the geography hierarchy. Finally, specify the geography validations for the geography types you have added to the geography structure.
Add the County and Post Town geography types to the United Kingdom geography structure.
To begin creating the geography hierarchy for the United Kingdom, you add the geographies for the County and Post Town geography types using the geography hierarchy user interfaces. You can also use the Manage File Import Activities task to import geography hierarchies using a csv or xml file.
Now you want to specify the geography validations for the geography types you have added to the United Kingdom. Define the geography mapping and validation for the United Kingdom default address style format. Then map the geography types to attributes, enable the geography types for Lists of Values and Geography validation, and set the geography validation level.
When address data entered into the application needs to conform to a particular format, in order to achieve consistency in the representation of addresses. For example, making sure that the incoming data is stored following the correct postal address format.
You can only update a geography structure by adding existing geography types, or by creating new geography types and then adding them to the geography structure. You can only copy an existing country structure when you are defining a new country structure.
If a geography exists for a country geography structure level then you cannot delete the level. For example, if a state geography has been created for the United States country geography structure, then the State level cannot be deleted in the country geography structure.
Yes. However, the geography type for the geography that you want to add must be already added to the country geography structure.
Yes. In the Manage Geography Hierarchy page you can edit details such as the geography's date range, primary and alternate names and codes, and parent geographies.
Select the geography that you want your geography to be created below, and then click the Create icon. This will allow you to create a geography for a geography type that is the level below the geography type you selected. The structure of the country's geography types are defined in the Manage Geography Structure page.
The Define File-Based Data Import group of tasks relies on integration with different Oracle Fusion Applications and architecture components, such as interface tables and application base tables. This topic provides an overview of these components to help you understand the import process and the different import activity statuses.
The following figure provides an overview of the major application components used when you import data from a file. These components include
Import object
Import mapping
Import activity
File repository
Oracle Fusion CRM Application Composer
Interface tables
Application tables

The import objects you select when you create an import activity are provided by Oracle. They are managed using the Manage File Import Objects task.
When you create an import activity, you must specify a mapping of the fields in your file to the attributes of the import object You can create the mapping either while creating an import activity or separately using the Manage File Import Mappings task. The mapping is stored and managed as a separate object.
The text or XML data file you upload for import is stored in a file repository so that it is available for import processing when you schedule an import activity. Any attachments you upload are stored in the same repository.
When you create additional attributes for import using Oracle Fusion CRM Application Composer, these extensions are stored in a separate repository and are available when you create your mapping.
The import activity populates the application interface tables with your data. This is an intermediate holding area for your data that permits you to correct any import errors. Oracle Fusion CRM application data is not changed at this point.
The import activity loads your data into Oracle Fusion CRM application tables to complete the import.
This topic explains how to prepare and import country structure data from an external data source into Oracle Fusion Applications using the File-Based Data Import feature. A country structure is a hierarchical grouping of geography types for a country. For example, the geography structure for the United States has the geography type of State at the top, followed by the County, then the City, and finally the Postal Code.
You can use the country structure to set up the following:
The relationships between geographies within a country
The types of geographies that you can define for a country
Consider the following questions when importing your data:
How does your legacy system or source system represent the country structure compared to how Oracle Fusion Applications represent the same data?
Do you have to configure values in Oracle Fusion Applications to map to your data values?
Do you have to customize Oracle Fusion Applications to capture additional attributes that are critical to the way you do business?
What import features are available for importing your business object?
How do you verify your imported data?
You must understand how your country structure data corresponds with the data in Oracle Fusion Applications in order to be able to map your legacy data to the data needed by Oracle Fusion Applications. First, you must understand how Oracle Fusion Applications represent the structure of the data for a country structure.
You must import a separate country structure import object for each country. Each of these import objects must contain the geography types that are used in the country's structure, organized in a hierarchy using geography level numbers. For example, if you are importing the country structure of Australia, the country structure could be the following: 1: Country, 2: State, 3: County, 4: Town, 5: ZIP.
To facilitate the import of country structures, Oracle Fusion Applications incorporate the structure of the country structure into import objects. The import object for country structures is GeoStructureLevel.
Each import object is a collection of attributes that helps to map your data to the Oracle Fusion Applications data and to support one-to-many relationships between the structural components that make up the country structure.
A good understanding of the attribute details of the import objects is critical to preparing your import data. For information about the Oracle Fusion Applications attributes, see the Oracle Enterprise Repository. The reference files contain descriptions, logic used to choose default values, and validation information for each of the Oracle Fusion Applications attributes. The validation information includes the navigation to the task where you can define values in Oracle Fusion Applications. For example, if you have values in your data that correlate to a choice list in Oracle Fusion Applications, then the validation information for that attribute provides the task name in the Setup and Maintenance work area where you can define your values. For additional information, including a list of reference file names and locations that you need to complete this task, see the following table.
|
Import Object |
Related Import Object Topic |
|---|---|
|
Country Structure |
Country Structure Import Objects: How They Work Together |
If you need to extend the Oracle Fusion Applications object to import your legacy or source data, you must use Oracle Fusion CRM Application Composer to design your object model extensions and to generate the required artifacts to register your extensions and make them available for importing. The corresponding import object is updated with the extensible attributes, which can then be mapped to your source file data. You can use the same source file to import both extensible custom attributes and the standard import object attributes.
For the country structure business object, you must use the File-Based Data Import feature. You prepare XML or text source data files in a form that is suitable for file-based import. The file-based import process reads the data included in your source file, populates the interface tables according to your mapping, and imports the data into the application destination tables.
The Define File-Based Data Import Setup and Maintenance task list includes the tasks needed to configure the import objects, to create source-file mappings, and to schedule the import activities. You submit file-based import activities for each import object. When creating a new country structure, you import the Country Structure object.
You must be assigned the Master Data Management Administrator job role to access and submit the import activities for country structures.
You can view the list of import activities from the Manage Import Activities page. You can verify your imported data by clicking the Status column for your import activity.
This topic describes the Country Structure import object. You use the Country Structure import object when you submit a file-based import activity to import your country structure information. This topic introduces the following:
Target import object concepts
Target objects for the Country Structure import object
Target import object attributes
Target object attribute reference guide files
The Country Structure import object is used to import a country structure hierarchy, including details, such as geography type, geography type name, parent geography type, geography level numbers, and so on. To map the source data in your import file to the target attributes in Oracle Fusion Applications, you must understand how the target objects are related and what attributes are included in each target object.
The Country Structure import object contains one target import object that organizes the individual attributes of the different aspects of the geography structure. When updating an existing country structure, you must provide the parent reference information of the existing country structure. This reference information connects the imported geography structure to the existing one. Use the ImpGeoStructureLevel target import object to create and update country structure information.
You must compare the attributes that you want to import with the target object attributes that are available and their valid values. To evaluate your source data and Oracle Fusion Applications attributes for mapping and validation, you use an Oracle Enterprise Repository reference guide, which is available for each target import object. The reference guide file includes attribute descriptions, default values, and validations performed by the import process. Review the validation for each attribute to determine whether there are functional prerequisites or setup tasks that are required.
To import your source file data, you define a mapping between your source file data and the combination of the target object and target object attribute. You can predefine and manage import mappings using the File-Based Import Mapping task, or you can define the mapping when you define the import activity using the File-Based Import Activity task. Both tasks are available in the Setup and Maintenance work area.
Note
If any of the attributes you want to import does not have an equivalent target object attribute, then review the Oracle Fusion CRM Application Composer extensibility features for country structures.
To access the reference guide files for the country code's target import objects, see the File-Based Data Import assets in Oracle Enterprise Repository for Oracle Fusion Applications (http://fusionappsoer.oracle.com).
For detailed information on importing geographies using file-based import, refer to Document No. 1481758.1, Importing Master Reference Geography Data, on the Oracle Support site.
The following table lists the reference guide files that are available from the Documentation tab for the Country Code File-Based Data Import asset.
|
Target Import Object |
Description |
Reference Guide File Names |
|---|---|---|
|
ImpGeoStructureLevel |
Contains information that specifies a country's geography structure. Sample attributes: GeographyType, GeographyTypeName, LevelNumber, and ParentGeographyType. Reference attribute: CountryCode |
HZ_IMP_GEO_STRUCTURE_LEVELS_Reference |
This topic describes the tasks you must perform to import geography information. A geography is any region with a boundary around it, regardless of its size. It might be a state, a country, a city, a county, or a ward. You must create or import geographies before you can associate them with custom zones and addresses.
Consider the following questions when importing your data:
How does your legacy system or source system represent the geography compared to how Oracle Fusion Applications represent the same data?
Do you have to configure values in Oracle Fusion Applications to map to your data values?
What import features are available for importing your business object?
How do you verify your imported data?
You must understand how your geography data corresponds with the data in Oracle Fusion Applications in order to be able to map your legacy data to the data needed by Oracle Fusion Applications. First, you must understand how Oracle Fusion Applications represent the structure of the data for a geography.
You must import a separate country structure import object for each country. Each of these import objects must contain the geography types that are used in the country's structure, organized in a hierarchy using geography level numbers. For example, if you are importing the country structure of Australia, the country structure could be the following: 1: Country, 2: State, 3: County, 4: Town, 5: ZIP.
To facilitate the import of geographies, Oracle Fusion Applications incorporate the structure of the geography into import objects. The import object for the geography is ImpGeography.
Each import object is a collection of attributes that helps to map your data to the Oracle Fusion Applications data and to support one-to-many relationships between the structural components that make up the geography.
A good understanding of the attribute details of the import objects is critical to preparing your import data. For information about the Oracle Fusion Applications attributes, see the Oracle Enterprise Repository. The reference files contain descriptions, logic used to choose default values, and validation information for each of the Oracle Fusion Applications attributes. The validation information includes the navigation to the task where you can define values in Oracle Fusion Applications. For example, if you have values in your data that correlate to a choice list in Oracle Fusion Applications, then the validation information for that attribute provides the task name in the Setup and Maintenance work area where you can define your values. For additional information, including a list of reference file names and locations that you need to complete this task, see the following table.
|
Import Object |
Related Import Object Topic |
|---|---|
|
ImpGeography |
Geography Import Objects: How They Work Together |
Hint: You can use the keyword importing geographies to search for related topics in Oracle Fusion Applications Help.
Oracle Fusion Applications do not support extensible attributes for geographies. You can only import data for attributes provided by Oracle Fusion Applications.
For the geography business object, you must use the File-Based Data Import feature. You prepare XML or text source data files in a form that is suitable for file-based import. The file-based import process reads the data included in your source file, populates the interface tables according to your mapping, and imports the data into the application destination tables.
The Define File-Based Data Import Setup and Maintenance task list includes the tasks needed to configure the import objects, to create source-file mappings, and to schedule the import activities. You submit file-based import activities for each import object. When creating a new geography, you import the Geography object. You must be assigned the Master Data Management Administrator job role to access and submit the import activities for geographies.
When importing geography information, you must provide the parent reference information for all parent levels for the entity.
Oracle Fusion Applications provide File-Based Import activity reports, which can be used to verify imported data. Users with the Master Data Management Administrator job role can also navigate to the Manage Geographies work area to view the imported geographies.
This topic describes the Geography import object. You use the Geography import object to import geography information.
This topic introduces the following:
Target import object concepts
Target objects for the Geography import object
Target import object attributes
Target import object attribute reference guide files
The Geography import object is used to import geography hierarchy information to create or update the geography data of a country. To map the source data in your import file to the target attributes in Oracle Fusion Applications, you must understand how the target objects are related and what attributes are included in each target object.
The target import objects in the Geography import object contain information about the geography hierarchy. When updating an existing geography, you must provide the parent reference information of the existing geography, which connects the geography to the country of which it is a part.
Use the ImpGeography target import object to create and update geography information.
Note
Before you import geography data for a country, you must define the country's geography structure.
You must compare the attributes that you want to import with the target object attributes that are available and their valid values. To evaluate your source data and Oracle Fusion Applications attributes for mapping and validation, you use an Oracle Enterprise Repository reference guide, which is available for each target import object. The reference guide file includes attribute descriptions, default values, and validations performed by the import process. Review the validation for each attribute to determine whether there are functional prerequisites or setup tasks that are required.
To import your source file data, you define a mapping between your source file data and the combination of the target object and target object attribute. You can predefine and manage import mappings using the File-Based Import Mapping task, or you can define the mapping when you define the import activity using the File-Based Import Activity task. Both tasks are available in the Setup and Maintenance work area.
To access the reference guide files for the geography's target import objects, see the File-Based Data Import assets in Oracle Enterprise Repository for Oracle Fusion Applications (http://fusionappsoer.oracle.com).
For detailed information on importing geographies using file-based import, refer to Document No. 1481758.1, Importing Master Reference Geography Data, on the Oracle Support site.
The following table lists the reference guide files that are available from the Documentation tab for the Geography File-Based Data Import asset.
|
Target Import Object |
Description |
Attribute Reference Guide File Names |
|---|---|---|
|
ImpGeography |
Contains information that captures a country's geography hierarchy details. Sample attributes: CountryCode, GeoDataProvider, GeographyType, PrimaryGeographyCode, PrimaryGeographyCodeType, and PrimaryGeographyName. Reference attribute: CountryCode |
HZ_IMP_GEOGRAPHIES_T_Reference |
This example demonstrates how to import data using the File-Based Data Import tool. In this particular example you have a source file containing geography data that you want to import into the application, so that the geography data can be used for uses related to locations, such as real time address validation and tax purposes.
The following table summarizes the key decisions for this scenario:
|
Decisions to Consider |
In This Example |
|---|---|
|
What type of object are you importing? |
Geography |
|
What file type are you using for your source data? |
Text file |
|
Where are you uploading your source data file from? |
Your desktop |
|
What data type is your source data file? |
Comma separated |
|
Which fields are you importing into Oracle Fusion applications? |
All, except for the RecordTypeCode field |
|
When do you want to process the import? |
Immediately |
These are the steps that are required to create an import activity and submit the import:
Determine what information is in the source file.
Create and schedule the import activity.
Monitor the import results.
|
Geography Level |
Name |
Source ID |
Parent Source ID |
|---|---|---|---|
|
1 (Country) |
US |
1 |
|
|
2 (State) |
CA |
11 |
1 |
|
3 (County) |
Alameda |
111 |
11 |
|
4 (City) |
Pleasanton |
1111 |
111 |
|
4 (City) |
Dublin |
1112 |
111 |
You create an import activity, enter the import details, and schedule the import. An import activity definition provides the instructions for the import processing - this includes selecting the source file, or file location; mapping fields from the source file to the Oracle Fusion object and attribute; and scheduling the import.
|
Field |
Value |
|---|---|
|
Name |
Master Reference Geographies |
|
Object |
Geography |
|
File Type |
Text File |
|
File Selection |
Specific file |
|
Upload From |
Desktop |
|
File Name |
Choose relevant file from desktop |
|
Data Type |
Comma separated |
Note
Ensure that the file type that you select in the Create Import Activity: Set Up page matches the file type of the source data file.
|
Column Header |
Example Value |
Ignore |
Object |
Attribute |
|---|---|---|---|---|
|
Primary Geography Name |
Primary Geography Name |
United States |
Imp Geography |
Primary Geography Name |
|
Country Code |
US |
No |
Imp Geography |
Country Code |
|
Record Type Code |
0 |
Yes |
Imp Geography |
Record Type Code |
|
Source ID |
10265 |
No |
Imp Geography |
Source ID |
|
Parent Source ID |
1053 |
No |
Imp Geography |
Parent Source ID |
If you do not want to import a column in the text file you can select Ignore.
Note
If you have any difficulties mapping the fields from your source file to the relevant Oracle Fusion applications object, you can use the import object spreadsheets for reference.
Instead of immediately importing the data, you can choose a date and time to start the import. You can also specify if the import will be repeated, and the frequency of the repeated import.
You monitor the progress of the Import Activity processing, and view completion reports for both successful records and errors.
Once the import activity has completed, the Status field value will change to Completed.
Import objects represent the application and attribute information for business objects that can be imported using external source files.
This topic describes the following:
Import object management options
Custom objects
A single import object can have multiple associated components that are considered objects by themselves. An object and associated objects that can be imported within the same source file are grouped together within the application module class.
Note
Each object includes the Import Activity object (MktImpJobs1). The Import Activity object is a required component of the application module but is not mapped to a source file. All values for this object are derived from the Import Activity definition. Consequently, do not update the Map, Required, and Default Value settings for the Import Activity object.
The following table includes information about the import object:
|
Option |
Description |
|---|---|
|
Attributes |
A view-only listing of object attributes that represent each column in the interface table for the object. |
|
Length |
A view-only listing of widths for the columns in the interface tables. If the source file values for the attribute have more characters than the attribute length, the source file row will not be imported. |
|
Default Value |
Optionally, specify an attribute value to use if a value is not available from the source file or Import Activity constant value. |
|
Map |
Enable the list of attributes that can be mapped to a source file or constant value in the Import Mapping and Import Activity Map Fields step. |
|
Required |
Specify the list of attributes that must be mapped to source file columns. Consequently, if you have selected an attribute as required, you must also enable the Map option for that attribute. When mapping the external source file, the required target attribute defined for the object are displayed with an asterisk. |
To use the file-based import feature for custom objects, you must first generate the artifacts required for import. You generate these required artifacts within Oracle Fusion CRM Application Composer, after making your object model extensions.
Import mapping enables you to predefine a mapping between the columns provided in a source file and the attributes pertaining to the objects being imported. Once you create a mapping, it can be reused in the Import Activity definition.
This topic contains the following sections:
Import options
Source file options
Target options
The following attributes pertain to the import mapping.
|
Attribute |
Description |
|---|---|
|
Object |
The business object to be imported. |
|
Name |
The name that identifies the mapping in the Import Mapping and Import Activity UIs. If the mapping was initially created while mapping fields directly in the Import Activity user interface and automatically saved without providing a user-defined mapping name, the mapping name is derived from the Import Activity name and date. |
|
Decimal Separator |
The format of the fractional portion of numerical values in columns mapped to attributes with a decimal attribute type. |
|
Date Format |
The format of values in columns mapped to attributes with a date attribute type. |
|
Timestamp Format |
The format of values in columns mapped to attributes with a time stamp attribute type. |
|
Lock |
If selected, prevents any user, other than the creator of the mapping, from editing the mapping. |
Map each column that the source file is expected to contain with a specific attribute.
The following table describes the details pertaining to columns provided in the source file:
|
Source Column |
Description |
|---|---|
|
Sequence |
The sequence number in which the columns are expected to be provided in the source file. Two rows cannot have the same sequence number. |
|
Column Name |
The column name expected in the source file if a header row is included, or more generic values such as Column A, Column B, and so on, if the header row is not included for Text file types. The tagging structure is represented for XML file types. |
|
Column Width |
Use when the delimiter value is fixed width for Text file types only. |
|
Ignore |
Ignore the source file column to exclude the data from being imported. |
|
Required |
If selected, a value must exist in the source file or the row will not be imported. |
The following table describes the details pertaining to corresponding attributes in the target application table:
|
Target Attributes |
Description |
|---|---|
|
Object |
The group of import objects that represent the components of the business object being imported. |
|
Attribute |
The attribute name that represents the corresponding interface table column for the object. |
|
Duplicate Validation |
If selected, the attribute, along with other selected attributes, determines what constitutes a duplicate object when comparing objects in the interface tables and existing objects in the target application tables. For example, to validate the uniqueness of an object in the target application tables by the combination of an object's name and date, select Duplicate Validation for both attributes in the mapping. |
The Import Activity consists of a step by step guided process to assist you with creating an import activity for a given object.
This topic describes the source file options defined in the Import Activity that are used by the import process to locate and parse the source file data.
Enter attribute details pertaining to the source file as follows:
|
Option |
Description |
|---|---|
|
File Type |
Source file must be either Text or XML. |
|
Data Type, Delimiter, and Header Row Included |
A Text file type can further be defined based on how the data is delimited and if the source file is expected to include a row of headings for each column. |
|
Import Mapping |
Displays a list of predefined mappings for the object selected for this import activity. The selected mapping will be used as the basis for mapping your source file in the next Import Activity step. |
The following outlines the options that are available to you when locating your source file for import.
|
Option |
Description |
|---|---|
|
File Selection |
Select from the following file selections:
|
|
Upload From |
You can upload the source file from three locations:
If you select Desktop, a File Name field with an associated Update button is displayed. Click Update and browse to search for and select the file you want to upload. If you select URL, enter the address location as in
the following example format: If you select Network, enter the file name path as
in the following example format: Note If you selected the Specific File as your file selection option, then you will have to include the file name for both URL and Network file path locations. |
This topic describes the import options available while creating import activities.
The following options are used to identify the formatting of source file data so the data can be correctly interpreted and transformed by the import process:
|
Option |
Description |
|---|---|
|
Decimal Separator |
The format of the fractional portion of numerical values in columns mapped to attributes with a decimal attribute type. |
|
Date Format |
The format for values in columns mapped to attributes with a date attribute type. |
|
Time Stamp Format |
The format for values in columns mapped to attributes with a time stamp attribute type. |
|
File Encoding |
The overall encoding of the characters within the file. |
Depending on the object you are importing and the application modules you have implemented, you can select one or more of these options.
|
Option |
Description |
|---|---|
|
Import Mode |
For importing leads and employee resources only, you have the option of specifying if you want to create and update records or update only. If you select update, then any new records will be ignored by the import process. For all other import objects, both create and update are available. |
|
Allowable Error Count |
An error count above the threshold will stop the import process for all records. If the error count is below the threshold, records without errors are imported. In either case, records with errors will be reported in the Error and Exception files. Validation errors include:
Duplicates found using matching configurations for Customer Data Management objects do not contribute to the error count. |
|
Notification E-Mail |
The e-mail of the intended recipient of import processing notifications. |
|
Customer Data Management Duplicates |
Using this option, which is available only if you have licensed Oracle Fusion Trading Community Data Quality, you can select different options for handling duplicates when you are importing customers, consumers, and legal entities either alone or as part of another object. The duplicates are determined using the following matching configurations:
You can select from one of the following:
|
|
Duplicate Look Back Days |
This option applies only to the Lead import object. Only existing leads created within the period determined by the look back days value are evaluated for duplicates based on the attributes selected for duplicate validation in the predefined import mapping. If a duplicate is found, the lead will not be imported and the duplicate record will be reported on the Exception report. Duplicate leads are included in the calculation of the allowable error count threshold. |
After entering your import options, the second step of the import activity process is to map fields in the source file to the corresponding target attributes.
This topic explains:
Map Fields
Saving the Import Mapping
Constant Values
The Map Fields section can be subdivided into source file columns and target attribute columns.
The source column header value is derived from one of the following:
Predefined mapping, if one is selected
The source file, if the Header Row Included option is selected in the first step of the Import Activity definition (for Text file type only)
Generic values of Column A, Column B, and so on, if the Header Row Included option is not selected (for Text file type only)
XML tagging structure (for XML file type only)
The following table outlines the source columns:
|
Source Column |
Description |
|---|---|
|
Column Header |
Represents the column header for Text file types and the tagging structure for XML file types. |
|
Example Value |
Values are derived from the first source file saved with the predefined mapping. If you did not select a predefined mapping, the example values are taken from the first data row in the source file selected in the first step of the Import Activity definition. |
|
Ignore |
Select this option if you do not want to import the source file data in that column. |
The following table outlines the target columns:
|
Target Column |
Description |
|---|---|
|
Object |
The group of import objects that represent the components of the business object being imported. |
|
Attribute |
The attribute name that represents the corresponding interface table column for the object. |
The mapping between source file information and target attributes is saved as a reusable mapping when the Import Activity is saved, using the import activity name and date to derive a mapping name. If you selected a predefined mapping, modifications made in the Import Activity to an unlocked mapping will update and save to the predefined mapping. If the predefined mapping is locked, a modified mapping will be saved as a new mapping. To specify a mapping name for new mappings, select the Save As option from the Map Fields Actions menu.
Constant values provide a way to specify a value for a target attribute that all imported objects will inherit. For example, if a source file does not contain a column for business unit and all of the objects in the file belong to the same business unit, enter a constant value for the object and business unit attribute.
This topic explains the meaning of the different import activity statuses when you import data from a file using the Manage File Import Activities task.
The following table lists and describes the import activity statuses.
|
Status |
Description |
|---|---|
|
No status displayed for the activity |
The new import activity definition is not complete. |
|
New |
The import activity definition is complete, but the activity is not yet scheduled to run. |
|
Scheduled |
The import activity definition is complete and scheduled to run later. |
|
Interface table upload in progress |
The data file is being loaded into the interface tables. |
|
Base table upload in progress |
The data file is being loaded from the interface tables into the application tables. |
|
Completed |
All records were processed and loaded into the application tables. |
|
Completed with errors |
The import activity found errors in the data file that you must correct. You can view details about the errors by clicking the status link. |
You can monitor all file import activities that are currently scheduled to run, have completed successfully, or failed with errors. For each import activity, you can view the details pertaining to each underlying process and make necessary updates for any failed records to import again.
You can view the list of import activities from the Manage Import Activities page. Select the import activity that you want to monitor by clicking on the hyperlink in the corresponding Status column. The View Import Status results page is displayed which contains the following sections:
Files Processed
Import Processes
The Files Processed section displays a row for each source file that is processed.
The import processing details are summarized and displayed for each source file and include the following:
|
File Processing Summary Information |
Description |
|---|---|
|
Records Read From File |
The number of records read from the source file. |
|
Format Errors |
The number of errors found when processing data to insert into the interface tables from the source file, Import Activity constants, and Import Object value default values. View the error details in the Exception and Error files attached to the process. |
|
Load Errors |
The number of errors found when importing data from the interface tables to the destination application tables. View the error details in the Exception and Error files attached to the process. |
|
Successfully Loaded |
The number of import objects imported to the application destination tables. If the import object is made up of multiple components, each component is counted as successfully loaded. Consequently the Successfully Loaded count may be larger than the Records Read From File count. View the successful record details in the Log file attached to the process. |
|
Attachments |
Once an Import Activity process has completed, processing reports are included in the Attachments column. The Log file includes the records that were successfully imported plus the unique destination application table identifiers for the objects. The Exception file includes the records that were not imported plus a reference to one of the errors for each record that failed. The Error file includes all the errors for each record that failed validation. |
From the Import Processes section, you can view details pertaining to each process involved in importing the objects in the source file. A listing of brief messages provides information on processing steps within each underlying process.
A single import object can have multiple associated components that are considered objects by themselves. Whether or not an associated object can be grouped as a component of another object for the purpose of file import is determined by the complexity of the object structure and how it is stored in the data model. Oracle Fusion provides import objects predefined to meet the file processing import requirements. Consequently, in some cases, more than one source file may be required to capture all associated components of an object.
The Import Activity will not stop the currently running process. However, it will stop the next process that has not started plus any future repeating file import activities. You can always activate the process at a later stage.
A legal entity is a recognized party with rights and responsibilities given by legislation.
Legal entities have the right to own property, the right to trade, the responsibility to repay debt, and the responsibility to account for themselves to regulators, taxation authorities, and owners according to rules specified in the relevant legislation. Their rights and responsibilities may be enforced through the judicial system. Define a legal entity for each registered company or other entity recognized in law for which you want to record assets, liabilities, expenses and income, pay transaction taxes, or perform intercompany trading.
A legal entity has responsibility for elements of your enterprise for the following reasons:
Facilitating local compliance
Taking advantage of lower corporation taxation in some jurisdictions
Preparing for acquisitions or disposals of parts of the enterprise
Isolating one area of the business from risks in another area. For example, your enterprise develops property and also leases properties. You could operate the property development business as a separate legal entity to limit risk to your leasing business.
In configuring your enterprise structure in Oracle Fusion Applications, you need to understand that the contracting party on any transaction is always the legal entity. Individual legal entities own the assets of the enterprise, record sales and pay taxes on those sales, make purchases and incur expenses, and perform other transactions.
Legal entities must comply with the regulations of jurisdictions, in which they register. Europe now allows for companies to register in one member country and do business in all member countries, and the US allows for companies to register in one state and do business in all states. To support local reporting requirements, legal reporting units are created and registered.
You are required to publish specific and periodic disclosures of your legal entities' operations based on different jurisdictions' requirements. Certain annual or more frequent accounting reports are referred to as statutory or external reporting. These reports must be filed with specified national and regulatory authorities. For example, in the United States (US), your publicly owned entities (corporations) are required to file quarterly and annual reports, as well as other periodic reports, with the Securities and Exchange Commission (SEC), who enforces statutory reporting requirements for public corporations.
Individual entities privately held or held by public companies do not have to file separately. In other countries, your individual entities do have to file in their own name, as well as at the public group level. Disclosure requirements are diverse. For example, your local entities may have to file locally to comply with local regulations in a local currency, as well as being included in your enterprise's reporting requirements in different currency.
A legal entity can represent all or part of your enterprise's management framework. For example, if you operate in a large country such as the United Kingdom or Germany, you might incorporate each division in the country as a separate legal entity. In a smaller country, for example Austria, you might use a single legal entity to host all of your business operations across divisions.
Oracle Fusion Applications support the modeling of your legal entities. If you make purchases from or sell to other legal entities, define these other legal entities in your customer and supplier registers, which are part of the Oracle Fusion Trading Community Architecture. When your legal entities are trading with each other, you represent both of them as legal entities and also as customers and suppliers in your customer and supplier registers. Use legal entity relationships to determine which transactions are intercompany and require intercompany accounting. Your legal entities can be identified as legal employers and therefore, are available for use in Human Capital Management (HCM) applications.
There are several decisions that need to be considered in creating your legal entities.
The importance of legal entity in transactions
Legal entity and its relationship to business units
Legal entity and its relationship to divisions
Legal entity and its relationship to ledgers
Legal entity and its relationship to balancing segments
Legal entity and its relationship to consolidation rules
Legal entity and its relationship to intercompany transactions
Legal entity and its relationship to worker assignments and legal employer
Legal entity and payroll reporting
Legal reporting units
All of the assets of the enterprise are owned by individual legal entities. Oracle Fusion Financials allow your users to enter legal entities on transactions that represent a movement in value or obligation.
For example, the creation of a sales order creates an obligation for the legal entity that books the order to deliver the goods on the acknowledged date, and an obligation of the purchaser to receive and pay for those goods. Under contract law in most countries, damages can be sought for both actual losses, putting the injured party in the same state as if they had not entered into the contract, and what is called loss of bargain, or the profit that would have made on a transaction.
In another example, if you revalued your inventory in a warehouse to account for raw material price increases, the revaluation and revaluation reserves must be reflected in your legal entity's accounts. In Oracle Fusion Applications, your inventory within an inventory organization is managed by a single business unit and belongs to one legal entity.
A business unit can process transactions on behalf of many legal entities. Frequently, a business unit is part of a single legal entity. In most cases the legal entity is explicit on your transactions. For example, a payables invoice has an explicit legal entity field. Your accounts payables department can process supplier invoices on behalf of one or many business units.
In some cases, your legal entity is inferred from your business unit that is processing the transaction. For example, your business unit A agrees on terms for the transfer of inventory to your business unit B. This transaction is binding on your default legal entities assigned to each business unit. Oracle Fusion Procurement, Oracle Fusion Projects, and Oracle Fusion Supply Chain applications rely on deriving the legal entity information from the business unit.
The division is an area of management responsibility that can correspond to a collection of legal entities. If desired, you can aggregate the results for your divisions by legal entity or by combining parts of other legal entities. Define date-effective hierarchies for your cost center or legal entity segment in your chart of accounts to facilitate the aggregation and reporting by division. Divisions and legal entities are independent concepts.
One of your major responsibilities is to file financial statements for your legal entities. Map legal entities to specific ledgers using the Oracle Fusion General Ledger Accounting Configuration Manager. Within a ledger, you can optionally map a legal entity to one or more balancing segment values.
Oracle Fusion General Ledger supports up to three balancing segments. Best practices recommend that one of these segments represents your legal entity to ease your requirement to account for your operations to regulatory agencies, tax authorities, and investors. Accounting for your operations means you must produce a balanced trial balance sheet by legal entity. If you account for many legal entities in a single ledger, you must:
Identify the legal entities within the ledger.
Balance transactions that cross legal entity boundaries through intercompany transactions.
Decide which balancing segments correspond to each legal entity and assign them in Oracle Fusion General Ledger Accounting Configuration Manager. Once you assign one balancing segment value in a ledger, then all your balancing segment values must be assigned. This recommended best practice facilitates reporting on assets, liabilities, and income by legal entity.
Represent your legal entities by at least one balancing segment value. You may represent it by two or three balancing segment values if more granular reporting is required. For example, if your legal entity operates in multiple jurisdictions in Europe, you might define balancing segment values and map them to legal reporting units. You can represent a legal entity by more than one balancing segment value, do not use a single balancing segment value to represent more than one legal entity.
In Oracle Fusion General Ledger, there are three balancing segments. You can use separate balancing segments to represent your divisions or strategic business units to enable management reporting at the balance sheet level for each division or business unit. For example, use this solution to empower your business unit and divisional managers to track and assume responsibility for their asset utilization or return on investment. Using multiple balancing segments is also useful when you know at the time of implementation that you are disposing of a part of a legal entity and need to isolate the assets and liabilities for that entity.
Note
Implementing multiple balancing segments requires every journal entry that is not balanced by division or business unit, to generate balancing lines. Also, you cannot change to multiple balancing segments easily after you have begun to use the ledger because your historical data is not balanced by the new multiple balancing segments. Restating historical data must be done at that point.
To use this feature for disposal of a part of a legal entity, implement multiple balancing segments at the beginning of the legal entity's corporate life or on conversion to Oracle Fusion.
If you decided to account for each legal entity in a separate ledger, there is no requirement to identify the legal entity with a balancing segment value within the ledger.
Note
While transactions that cross balancing segments don't necessarily cross legal entity boundaries, all transactions that cross legal entity boundaries must cross balancing segments. If you make an acquisition or are preparing to dispose of a portion of your enterprise, you may want to account for that part of the enterprise in its own balancing segment even if it is not a separate legal entity. If you do not map legal entities sharing the same ledger to balancing segments, you will not be able to distinguish them using the intercompany functionality or track their individual equity.
In Oracle Fusion Applications you can map legal entities to balancing segments and then define consolidation rules using your balancing segments. You are creating a relationship between the definition of your legal entities and their role in your consolidation.
Use Oracle Fusion Intercompany functionality for automatic creation of intercompany entries across your balancing segments. Intercompany processing updates legal ownership within the enterprise's groups of legal entities. Invoices or journals are created as needed. To limit the number of trading pairs for your enterprise, set up intercompany organizations and assign then to your authorized legal entities. Define processing options and intercompany accounts to use when creating intercompany transactions and to assist in consolidation elimination entries. These accounts are derived and automatically entered on your intercompany transactions based on legal entities assigned to your intercompany organizations.
Intracompany trading, in which legal ownership isn't changed but other organizational responsibilities are, is also supported. For example, you can track assets and liabilities that move between your departments within your legal entities by creating departmental level intercompany organizations.
Note
In the Oracle Fusion Supply Chain applications, model intercompany relationships using business units, from which legal entities are inferred.
Legal entities that employ people are called legal employers in the Oracle Fusion Legal Entity Configurator. You must enter legal employers on worker assignments in Oracle Fusion HCM.
Your legal entities are required to pay payroll tax and social insurance such as social security on your payroll. In Oracle Fusion Applications, you can register payroll statutory units to pay and report on payroll tax and social insurance on behalf of many of your legal entities. As the legal employer, you might be required to pay payroll tax, not only at the national level, but also at the local level. You meet this obligation by establishing your legal entity as a place of work within the jurisdiction of a local authority. Set up legal reporting units to represent the part of your enterprise with a specific legal reporting obligation. You can also mark these legal reporting units as tax reporting units, if the legal entity must pay taxes as a result of establishing a place of business within the jurisdiction.
These examples illustrate different models for human capital management (HCM) organizations. Each example includes a legislative data group (LDG). LDGs are not an organization classification, but they are included in the example to show how you associate them with a payroll statutory unit to partition payroll data.
This example illustrates a simple configuration that does not include any tax reporting units. The legal employer and payroll statutory units are the same, sharing the same boundaries. Reporting can only be done at a single level. Countries such as Saudi Arabia and the United Arab Emirates (UAE) might use this type of model, as reporting in these countries is done at the legal entity level.
This figure illustrates a simple configuration where the enterprise has only one legal entity that is both a payroll statutory unit and a legal employer.
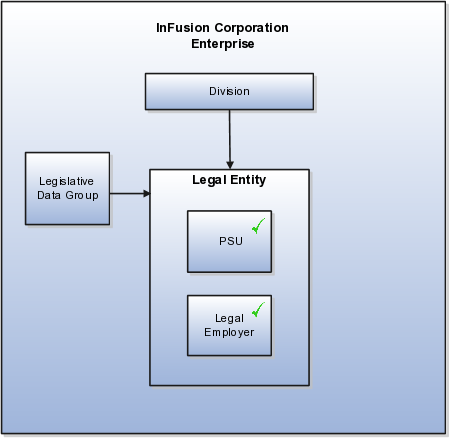
This example illustrates a more complex configuration. In this enterprise, one legal entity, InFusion US, is defined as a payroll statutory unit and has two separate legal entities, which are also legal employers. This model shows multiple legal employers that are associated with a single payroll statutory unit, and how tax reporting units are always associated with a specific legal employer (or employers) through the payroll statutory unit. The implication is that payroll statutory reporting boundaries vary from human resources (HR) management, and the balances can be categorized separately by either payroll statutory unit, legal employer, or tax reporting unit. This configuration is based on tax filing requirements, as some tax-related payments and reports are associated with a higher level than employers. An example of a country that might use this model is the US.
This figure illustrates an enterprise that has one payroll statutory unit and multiple legal employers and tax reporting units.
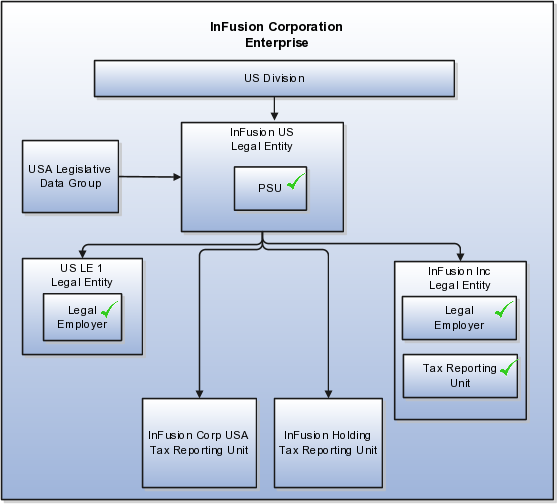
This model makes no distinction between a legal employer and a payroll statutory unit. Tax reporting units are defined as subsidiaries to the legal entity. In this enterprise, legal entity is the highest level of aggregation for payroll calculations and reporting, and statutory reporting boundaries are assumed to be the same for both payroll and HR management. An example of a country that might use this model is France.
This figure illustrates an example of an organization with one legal entity that is both a legal employer and a payroll statutory unit and that has two tax reporting units.
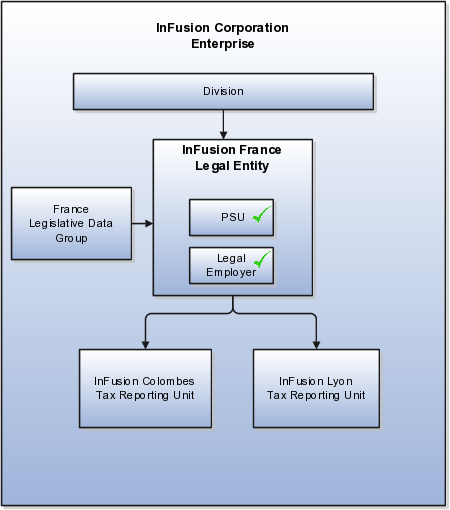
In this model, the enterprise has one legal entity, and legal employers and tax reporting units are independent from each other within a payroll statutory unit, because there is no relationship from a legal perspective. Therefore, you can run reporting on both entities independently. Using this model, you would not typically need to report on tax reporting unit balances within a legal employer, and balances can be categorized by either or both organizations, as required. An example of a country that might use this model is India.
This figure illustrates an enterprise with one legal entity that is a payroll statutory unit and a legal employer, and the tax reporting units are independent from the legal employer.
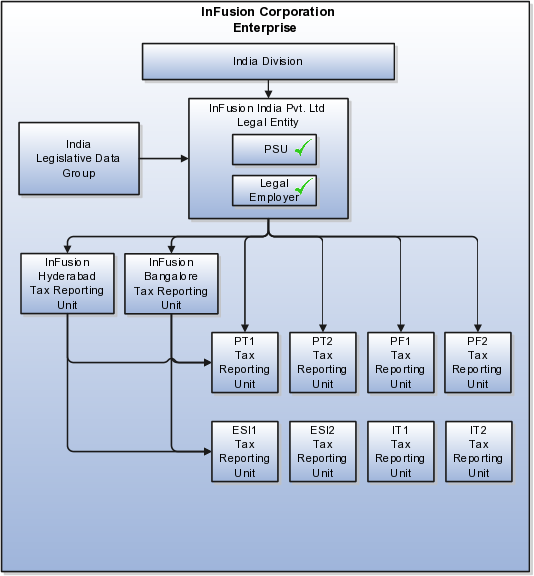
In this model, the enterprise has two legal entities, and legal employers and tax reporting units are independent from each other within a payroll statutory unit, because there is no relationship from a legal perspective. Therefore, you can run reporting on both entities independently. Using this model, you would not typically need to report on tax reporting unit balances within a legal employer, and balances can be categorized by either or both organizations, as required. An example of a country that might use this model is the United Kingdom (UK).
This figure illustrates an enterprise with two legal entities, and legal employers and tax reporting units are independent from each other.
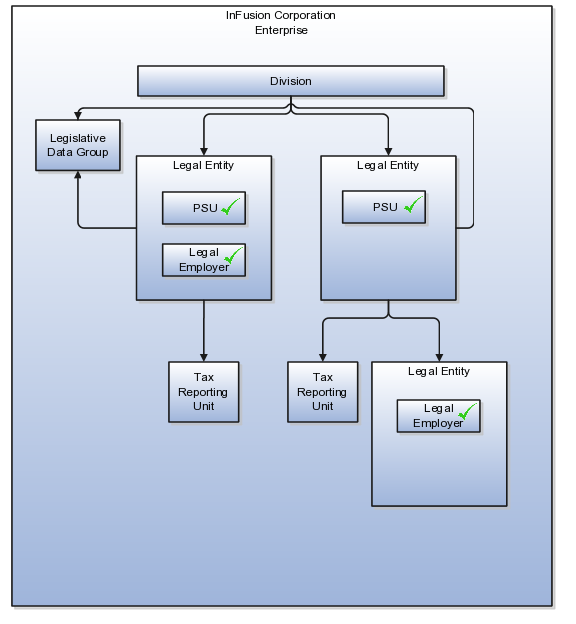
When you set up legal entities, you can identify them as legal employers and payroll statutory units, which makes them available for use in Oracle Fusion Human Capital Management (HCM). A tax reporting unit is created automatically when you add a legal entity and identify it as a payroll statutory unit. Depending on how your organization is structured, you may have only one legal entity that is also a payroll statutory unit and a legal employer, or you may have multiple legal entities, payroll statutory units, and legal employers.
Payroll statutory units enable you to group legal employers so that you can perform statutory calculations at a higher level, such as for court orders or for United Kingdom (UK) statutory sick pay. In some cases, a legal employer is also a payroll statutory unit. However, your organization may have several legal employers under one payroll statutory unit. A legal employer can belong to only one payroll statutory unit.
Payroll statutory units and tax reporting units have a parent-child relationship, with the payroll statutory unit being the parent.
Tax reporting units are indirectly associated with a legal employer through the payroll statutory unit. One or more tax reporting units can be used by a single legal employer, and a tax reporting unit can be used by one or more legal employers. For example, assume that a single tax reporting unit is linked to a payroll statutory unit. Assume also that two legal employers are associated with this payroll statutory unit. In this example, both legal employers are associated with the single tax reporting unit.
A legal employer is a legal entity that employs workers. You define a legal entity as a legal employer in the Oracle Fusion Legal Entity Configurator.
The legal employer is captured at the work relationship level, and all employment terms and assignments within that relationship are automatically with that legal employer. Legal employer information for worker assignments is also used for reporting purposes.
Payroll statutory units are legal entities that are responsible for paying workers, including the payment of payroll tax and social insurance. A payroll statutory unit can pay and report on payroll tax and social insurance on behalf of one or many legal entities, depending on the structure of your enterprise. For example, if you are a multinational, multicompany enterprise, then you register a payroll statutory unit in each country where you employ and pay people. You can optionally register a consolidated payroll statutory unit to pay and report on workers across multiple legal employers within the same country. You associate a legislative data group with a payroll statutory unit to provide the correct payroll information for workers.
A business unit is a unit of an enterprise that performs one or many business functions that can be rolled up in a management hierarchy. A business unit can process transactions on behalf of many legal entities. Normally, it will have a manager, strategic objectives, a level of autonomy, and responsibility for its profit and loss. Roll business units up into divisions if you structure your chart of accounts with this type of hierarchy. In Oracle Fusion Applications, you assign your business units to one primary ledger. For example, if a business unit is processing payables invoices they will need to post to a particular ledger. This assignment is mandatory for your business units with business functions that produce financial transactions.
In Oracle Fusion Applications, use business unit as a securing mechanism for transactions. For example, if you run your export business separately from your domestic sales business, secure the export business data to prevent access by the domestic sales employees. To accomplish this security, set up the export business and domestic sales business as two separate business units.
The Oracle Fusion Applications business unit model:
Allows for flexible implementation
Provides a consistent entity for controlling and reporting on transactions
Anchors the sharing of sets of reference data across applications
Business units process transactions using reference data sets that reflect your business rules and policies and can differ from country to country. With Oracle Fusion Application functionality, you can choose to share reference data, such as payment terms and transaction types, across business units, or you can choose to have each business unit manage its own set depending on the level at which you wish to enforce common policies.
In countries where gapless and chronological sequencing of documents is required for subledger transactions, define your business units in alignment with your ledger definition, because the uniqueness of sequencing is only ensured within a ledger. In these cases, define a single ledger and assign one legal entity and business unit.
In summary, use business units in the following ways:
Management reporting
Processing of transactions
Security of transactional data
Reference data definition and sharing
Business units are used by a number of Oracle Fusion Applications to implement data security. You assign data roles to your users to give them access to data in business units and permit them to perform specific functions on this data. When a business function is enabled for a business unit, the application can trigger the creation of data roles for this business unit based on the business function's related job roles.
For example, if a payables invoicing business function is enabled, then it is clear that there are employees in this business unit that perform the function of payables invoicing, and need access to the payables invoicing functionality. Therefore, based on the correspondence between the business function and the job roles, appropriate data roles are generated automatically. Use Human Capital Management (HCM) security profiles to administer security for employees in business units.
A business unit can perform many business functions in Oracle Fusion Applications. Prior to Oracle Fusion Applications, operating units in Oracle E-Business Suite were assumed to perform all business functions, while in Oracle PeopleSoft , each business unit had one specific business function. Oracle Fusion Applications blends these two models and allows defining business units with one or many business functions.
A business function represents a business process, or an activity that can be performed by people working within a business unit and describes how a business unit is used. The following business functions exist in Oracle Fusion applications:
Billing and revenue management
Collections management
Customer contract management
Customer payments
Expense management
Incentive compensation
Marketing
Materials management
Inventory management
Order fulfillment orchestration
Payables invoicing
Payables payments
Procurement
Procurement contract management
Project accounting
Receiving
Requisitioning
Sales
Although there is no relationship implemented in Oracle Fusion Applications, a business function logically indicates a presence of a department in the business unit with people performing tasks associated with these business functions. A business unit can have many departments performing various business functions. Optionally, you can define a hierarchy of divisions, business units, and departments as a tree over HCM organization units to represent your enterprise structure.
Note
This hierarchy definition is not required in the setup of your applications, but is a recommended best practice.
Your enterprise procedures can require a manager of a business unit to have responsibility for their profit and loss statement. However, there will be cases where a business unit is performing only general and administrative functions, in which case your manager's financial goals are limited to cost containment or recovering of service costs. For example, if a shared service center at the corporate office provides services for more commercially-oriented business units, it does not show a profit and therefore, only tracks its costs.
In other cases, where your managers have a responsibility for the assets of the business unit, a balance sheet can be produced. The recommended best practice to produce a balance sheet, is to setup the business unit as a balancing segment in the chart of accounts. The business unit balancing segment can roll up to divisions or other entities to represent your enterprise structure.
When a business function produces financial transactions, a business unit must be assigned to a primary ledger, and a default legal entity. Each business unit can post transactions to a single primary ledger, but it can process transactions for many legal entities.
The following business functions generate financial transactions and will require a primary ledger and a default legal entity:
Billing and revenue management
Collections management
Customer payments
Expense management
Materials management
Payables invoicing
Project accounting
Receiving
Requisitioning
For example, your InFusion America Company provides:
Air quality monitoring systems through your division InFusion Air Systems
Customer financing through your division InFusion Financial Services
The InFusion Air Systems division further segments your business into the System Components and Installation Services subdivisions. Your subdivisions are divided by business units:
System Components by products: Air Compressors and Air Transmission
Installation Services by services: Electrical and Mechanical
Oracle Fusion applications facilitates independent balance sheet rollups for legal and management reporting by offering up to three balancing segments. Hierarchies created using the management segment can provide the divisional results. For example, it is possible to define management segment values to correspond to business units, and arrange them in a hierarchy where the higher nodes correspond to divisions and subdivisions, as in the Infusion US Division example above.
A location identifies physical addresses of a workforce structure, such as a department or a job. You can also create locations to enter the addresses of external organizations that you want to maintain, such as employment agencies, tax authorities, and insurance or benefits carriers.
The locations that you create exist as separate structures that you can use for reporting purposes, and also in rules that determine employee eligibility for various types of compensation and benefits. You enter information about a location only once. Subsequently, when you set up other workforce structures you select the location from a list.
When you create a location, you must associate it with a set. Only those users who have access to the set's business unit can access the location set and other associated workforce structure sets, such as those that contain departments and jobs.
You can also associate the location to the common set so that users across your enterprise can access the location irrespective of their business unit. When users search for locations, they can see the locations that they have access to along with the locations in the common set.
The following figure shows how locations sets restrict access to users.
If you have a list of locations already defined for your enterprise, you can upload them from a spreadsheet. To use this option, you first download a spreadsheet template, then add your location information to the spreadsheet, and then upload directly to your enterprise configuration. You can upload the spreadsheet multiple times to accommodate revisions.
Managing multiple businesses requires that you segregate them by their strategic objectives and measure their results. Responsibility to reach objectives can be delegated along the management structure. Although related to your legal structure, the business organizational hierarchies do not need to reflect directly the legal structure of the enterprise. The management entities and structure can include divisions and subdivisions, lines of business, and other strategic business units, and include their own revenue and cost centers. These organizations can be included in many alternative hierarchies and used for reporting, as long as they have representation in the chart of accounts.
A division refers to a business oriented subdivision within an enterprise, in which each division organizes itself differently to deliver products and services or address different markets. A division can operate in one or more countries, and can be comprised of many companies or parts of different companies that are represented by business units.
A division is a profit center or grouping of profit and cost centers, where the division manager is responsible for attaining business goals including profit goals. A division can be responsible for a share of the company's existing product lines or for a separate business. Managers of divisions may also have return on investment goals requiring tracking of the assets and liabilities of the division. The division manager reports to a top corporate executive.
By definition a division can be represented in the chart of accounts. Companies may choose to represent product lines, brands, or geographies as their divisions: their choice represents the primary organizing principle of the enterprise. This may coincide with the management segment used in segment reporting.
Oracle Fusion Applications supports a qualified management segment and recommends that you use this segment to represent your hierarchy of business units and divisions. If managers of divisions have return on investment goals, make the management segment a balancing segment. Oracle Fusion applications allows up to three balancing segments. The values of the management segment can be comprised of business units that roll up in a hierarchy to report by division.
Historically, divisions were implemented as a node in a hierarchy of segment values. For example, Oracle E-Business Suite has only one balancing segment, and often the division and legal entity are combined into a single segment where each value stands for both division and legal entity.
Divisions are used in HCM to define the management organization hierarchy, using the generic organization hierarchy. This hierarchy can be used to create organization based security profiles.
This example shows how to restructure your enterprise after acquiring a new division.
You are part of a senior management team at InFusion Corporation. InFusion is a global company with organizations in the United States (US), the United Kingdom (UK), France, China, Saudi Arabia, and the United Arab Emirates (UAE). Its main area of business is in the high tech industry, and it has just acquired a new company. You must analyze their current enterprise structure and determine what new organizations you need to create to accommodate the new company.
The acquired company is a financial services business based in Germany. Because the financial services business differs significantly from the high tech business, you want to keep the financial services company as a separate business with all the costs and reporting rolling up to the financial services division.
The following table summarizes the key decisions that you must consider when determining what new organizations to set up and how to structure the enterprise.
|
Decision to Consider |
In This Example |
|---|---|
|
Create location? |
The financial services company is based in Frankfurt as are the departments, so you need to create only one location. |
|
Create separate division? |
Yes. Although the new division will exist within the current enterprise structure, you want to keep the financial services company as a separate line of business. Creating a separate division means you can manage the costs and reporting separately from the InFusion Corporation. It also means you do not have to modify any existing organizations in the enterprise setup. |
|
Create business unit? |
Yes. The financial services business requires you to create several jobs that do not exist in your high tech business. You can segregate the jobs that are specific to financial services in a new business unit. |
|
How many departments? |
The financial services company currently has three departments for sales, accounting, and marketing. As you have no plans to downsize or change the company, you can create three departments to reflect this structure. |
|
How many cost centers? |
Although you can have more than one cost center tracking the costs of a department, you decide to create one cost center for each department to track costs. |
|
How many legal entities? |
Define a legal entity for each registered company or other entity recognized in law for which you want to record assets, liabilities, and income, pay transaction taxes, or perform intercompany trading. In this case, you need only one legal entity. You must define the legal entity as a legal employer and payroll statutory unit. As the new division operates in Germany only, you can configure the legal entity to suit Germany legal and statutory requirements. Note When you identify the legal entity as a payroll statutory unit, the application transfers the legal reporting unit that is associated with that legal entity to Oracle Fusion HCM as a tax reporting unit. |
|
Create legislative data group? |
Yes. Because you currently do not employ or pay people in Germany, you must create one legislative data group to run payroll for the workers in Germany. |
Based on the analysis, you must create the following:
One new division
One new location
Three new departments
Three new cost centers
One new legal entity
One new legislative data group
The following figure illustrates the structure of InFusion Corporation after adding the new division and the other organizations.
A cost center represents the smallest segment of an organization for which costs are collected and reported. A department is an organization with one or more operational objectives or responsibilities that exist independently of its manager and has one or more workers assigned to it.
The following two components need to be considered in designing your enterprise structure:
Cost centers
Departments
A cost center also represents the destination or function of an expense as opposed to the nature of the expense which is represented by the natural account. For example, a sales cost center indicates that the expense goes to the sales department.
A cost center is generally attached to a single legal entity. To identify the cost centers within a chart of accounts structure use one of these two methods:
Assign a cost center value in the value set for each cost center. For example, assign cost center values of PL04 and G3J1 to your manufacturing teams in the US and India. These unique cost center values allow easy aggregation of cost centers in hierarchies (trees) even if the cost centers are in different ledgers. However, this approach will require defining more cost center values.
Assign a balancing segment value with a standardized cost center value to create a combination of segment values to represent the cost center. For example, assign the balancing segment values of 001 and 013 with cost center PL04 to represent your manufacturing teams in the US and India. This creates 001-PL04 and 013-PL04 as the cost center reporting values.
The cost center value of PL04 has a consistent meaning. This method requires fewer cost center values to be defined. However, it prevents construction of cost center hierarchies using trees where only cost center values are used to report results for a single legal entity. You must specify a balancing segment value in combination with the cost center values to report on a single legal entity.
A department is an organization with one or more operational objectives or responsibilities that exist independently of its manager. For example, although the manager may change, the objectives do not change. Departments have one or more workers assigned to them.
A manager of a department is typically responsible for:
Controlling costs within their budget
Tracking assets used by their department
Managing employees, their assignments, and compensation
Note
The manager of a sales department may also be responsible for meeting the revenue targets.
The financial performance of departments is generally tracked through one or more cost centers. In Oracle Fusion Applications, departments are defined and classified as Department organizations. Oracle Fusion Human Capital Management (HCM) assigns workers to departments, and tracks the headcount at the departmental level.
The granularity of cost centers and their relationship to departments varies across implementations. Cost center and department configuration may be unrelated, identical, or consist of many cost centers tracking the costs of one department.
A department can be classified as a project organization, sales and marketing organization, or cost organization.
Oracle Fusion Human Capital Management (HCM) uses trees to model organization hierarchies. It provides seeded tree structures for department and other organizational hierarchies that can include organizations with any classification.
Classify departments as a project owning organization to enable associating them with projects or tasks. The project association is one of the key drivers for project access security.
In addition, you must classify departments as project expenditure organizations to enable associating them to project expenditure items. Both project owning organizations and project expenditure organizations can be used by Oracle Fusion Subledger Accounting to derive accounts for posting Oracle Fusion Projects accounting entries to Oracle Fusion General Ledger.
In Oracle Fusion Customer Relationship Management (CRM), you can define sales and marketing organizations. Sales organization hierarchies are used to report and forecast sales results. Sales people are defined as resources assigned to these organizations.
In some enterprises, the HCM departments and hierarchies correspond to sales organizations and hierarchies. It is important to examine the decision on how to model sales hierarchies in relationship to department hierarchies when implementing customer relationship management to eliminate any possible redundancy in the definition of the organizations.
The following figure illustrates a management hierarchy, in which the System Components Division tracks its expenses in two cost centers, Air Compressors and Air Transmission. At the department level, two organizations with a classifications of Department are defined, the Marketing Department and Sales Department. These two departments can be also identified as a Resource Organizations, which will allow assigning resources, such as sales people, and other CRM specific information to them. Each department is represented in the chart of accounts by more than one cost center, allowing for granular as well as hierarchical reporting.
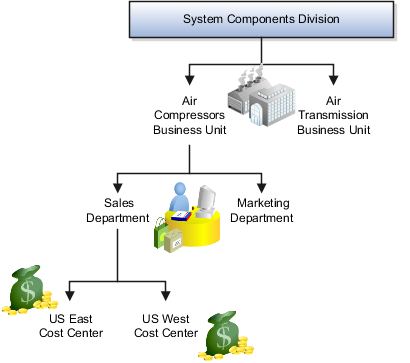
Oracle Fusion Costing uses a cost organization to represent a single physical inventory facility or group of inventory storage centers, for example, inventory organizations. This cost organization can roll up to a manager with responsibility for the cost center in the financial reports.
A cost organization can represent a costing department. Consider this relationship when determining the setup of departments in HCM. There are no system dependencies requiring these two entities, cost organization and costing department, be set up in the same way.
As part of your initial implementation, you specify whether to use jobs and positions, or only jobs. Jobs are typically used without positions by service industries where flexibility and organizational change are key features.
Basic details for a job include an effective start date, a job set, a name, and a code.
A job code must be unique within a set. Therefore, you can create a job with the code DEV01 in the US set and another job with the same code in the UK set. However, if you create a job with the code DEV01 in the Common set, then you cannot create a job with the same code in any other set.
You can identify a job as being a benchmark job. A benchmark job represents other jobs in reports and salary surveys. You can also select the benchmark for jobs. Benchmark details are for informational purposes only. A progression job is the next job in a career ladder.
Progression jobs enable you to create a hierarchy of jobs and are used to provide the list of values for the Job field in the Promote Worker and Transfer Worker tasks. The list of values includes the next three jobs in the progression job hierarchy. For example, assume that you create a job called Junior Developer and select Developer as the progression job. In the Developer job, you select Senior Developer as the progression job. When you promote a junior developer, the list of values for the new job will include Developer and Senior Developer. You can select one of these values, or select another one.
You can assign grades that are valid for each job. If you are using positions, then the grades that you specify for the job become the default grades for the position.
You can define evaluation criteria for a job, including the evaluation system, a date, and the unit of measure for the system. One predefined evaluation system is available, and that is the Hay system. An additional value of Custom is included in the list of values for the Evaluation System field, but you must add your own criteria and values for this system.
If you have a list of jobs already defined for your enterprise, you can upload them from a spreadsheet. To use this option, you first download a spreadsheet template, then add your job information to the spreadsheet, and then upload directly to your enterprise configuration. You can upload the spreadsheet multiple times to accommodate revisions.
Jobs are typically used without positions by service industries where flexibility and organizational change are key features.
For example, XYZ Corporation has a director over the departments for developers, quality assurance, and technical writers. Recently, three developers have left the company. The director decides to redirect the head count to other areas. Instead of hiring all three back into development, one person is hired to each department, quality assurance, and technical writing.
In software industries, the organization is fluid. Using jobs gives an enterprise the flexibility to determine where to use head count, because the job only exists through the person performing it. In this example, when the three developers leave XYZ Corporation, their jobs no longer exist, therefore the corporation has the flexibility to move the headcount to other areas.
This figure illustrates the software industry job setup.
You can search for approved locations only. Also, if you created a location in Oracle Fusion Trading Community Model, then you can't access that location from Oracle Fusion Global Human Resources. For use in Oracle Fusion HCM, you must recreate the location from the Manage Locations page.
From the Manage Locations page in Oracle Fusion Global Human Resources.
To appear on the Create or Edit Location pages, your inventory organization must be effective on today's date and must exist in the location set that you selected.
The location is available for selection in purchase documents of that inventory organization in Oracle Fusion Inventory Management. If you don't select an inventory organization, then the location is available in purchase documents across all inventory organizations.
The calendar events that were created for the geographical node start to apply for the location and may impact the availability of worker assignments at that location. The geographical hierarchy nodes available for selection on the Locations page display from a predefined geographic hierarchy.
Starting from the effective date that you entered, you can no longer associate the location with other workforce structures, assignments, or applications. If the location is already in use, it will continue to be available to the components that currently use it.
A job family is a group of jobs that have different but related functions, qualifications, and titles. They are beneficial for reporting. You can define competencies for job families by associating them with model profiles.
A job set is an organizational partition of jobs. For example, a job set can be global and include jobs for use in all business units, or it can be restricted to jobs for a specific country or line of business. When you select a job, for a position or an assignment, the available jobs are those in the set associated with the business unit in which you are working, and also those in the Common set.
Schedules are comprised of workday patterns and exceptions. Workday patterns are comprised of shifts. You can also create exceptions, nonworking days, to the schedules.
Begin by creating shifts and then assigning those shifts to workday patterns. Next, create a schedule that is a collection of workday patterns and any exception dates.
A shift is a period of time, typically expressed in hours, and it can be defined by a start time and an end time, or a duration. A shift can be for a work period or a off period. You can create time, duration, and elapsed shifts.
A workday pattern is a collection of shifts for a specific number of days. You can create time, duration, and elapsed workday patterns.
An exception is a record of a date that overrides the availability of a resource to which a schedule has been assigned. For example, a resource is assigned a schedule that includes December 25 as a working day. An exception can be created for December 25 and applied to that schedule to override resource availability for that date. Exceptions can also be for a date time period such as 9 a.m. to 11 a.m. on December 25th.
A schedule is defined by a start date, an end date, and a sequence of workday patterns to be followed between those dates. A schedule can also contain exception dates that override the availability of resources to which the schedule is assigned. Quarter types such as 4-4-5, 4-5-4 are supported.
A shift is a period of time, typically expressed in hours, that is used to build workday patterns. Workday patterns are used to build schedules. There are multiple types of shifts you can create. The following scenarios illustrate each type.
Next month you are adding a second shift for your manufacturing operations. This new shift will start right after your regular first shift. You can create a time shift that starts at 4:00 p.m. and ends at 12:00 a.m. There are restrictions in updating existing shifts and patterns. Shifts and patterns cannot be updated if the change affects a schedule, that is they are associated to a schedule. If a shift is created but not assigned to a pattern (or assigned to a pattern but the pattern is not assigned to a schedule) it can be updated. If a pattern is created and not assigned to a schedule it can be updated.
Your division has decided that the employees in the office must clock in and out for lunch starting next week. All employees will take the same lunch hour. Add punch shift details to the existing shift so that employees punch in at 8:00 a.m.; they punch out for lunch from 11:30 a.m. to 12:30 p.m.; they punch back in at 12:30 p.m.; and they punch out for the day at 5:00 p.m.
Jorge Sanchez is a contractor who is starting work in your department next week. His hours will be flexible, so you need to create a new time shift with flexible details that he can use to record his time. He will have a flexible start time from 7:00 a.m. to 9:00 a.m. and a flexible end time from 4:00 p.m. to 6:00 p.m. His core work hours will be from 9:00 a.m. to 4:00 p.m.
One of the divisions in your organization does not use fixed start and end times for its daily shifts; the division only records the total duration of the shift and indicates if resources are available or not during that time. All of the employees in the division are available for 24 hours straight, and then they are not available for the next 24 hours. You should create a duration shift that indicates that resources are available for 24 hours, and create a second duration shift that indicates that resources are not available for 24 hours.
The employees in the Human Resources department all work 8 hours a day, but the start and end times vary by employee. Some employees start at early as 6:00 a.m., while others don't start until 9:00 a.m. Create an elapsed shift with a duration of 8 hours, where all employees are assumed to be available for the number of hours in the shift at any time during the day.
A workday pattern is a collection of shifts for a specific number of days. There are multiple types of workday patterns you can create. The following scenarios illustrate each type.
Your department works a Monday through Friday workweek with 8 hour shifts each day. Time patterns always have time shifts. That is, the shift will have start time and end time. You can create a time workday pattern with a length of 7 days and details of an 8 hour time shift for days 1 through 5. Days 6 and 7 are considered nonworking days.
A new group of employees starts next month, and each employee will work a schedule where he or she is available for 10 hours, and then not available for the next 16 hours, and then available for 10 hours again, and so on. This pattern starts on midnight of the first day of the next month. Create a duration workday pattern with a 10-hour available duration shift, followed by a 16-hour not available duration shift. Do not specify the pattern length or start and end days, and the pattern will repeat for the length of the schedule to which it is associated.
In the summer, several divisions in your organization work only 4 hours on Fridays. They work extended hours on Wednesdays and Thursdays to cover the 4 hours they will not work on Fridays. Create an elapsed workday pattern with a length of 7 days. Days 1 and 2 will have an 8-hour shift assigned, while days 3 and 4 will have a 10-hour shift assigned. Finally, day 5 will have a 4-hour shift assigned. As in the time workday pattern, days 6 and 7 are considered nonworking days.
An item organization defines an item when inventory balances are not stored and inventory storage or inventory movement is not reflected in the Oracle Fusion Applications. For example, you would use an item organization in a retail scenario, if you need to know the items that are listed by and sold through each retail outlet even though inventory and transactions are recorded in another system. In Oracle Fusion Customer Relationship Management (CRM), item organizations are used to define sales catalogs.
Note
Items belong to an item organization.
Item attributes that are associated with financial and accounting information are hidden from the item if it exists within the item organization.
Item organizations can be changed by administrators to an inventory organization by updating the necessary attributes. There is no difference in the way items are treated in these two types of organizations except that there cannot be any financial transactions in the downstream applications for items that are assigned to an item organization.
An item master organization lists and describes items that are shared across several inventory organizations or item organization.
The following example shows the choice between inventory organizations that track inventory transactions, stored in two warehouses, and item organizations that just track items, listed in two sales catalogs.
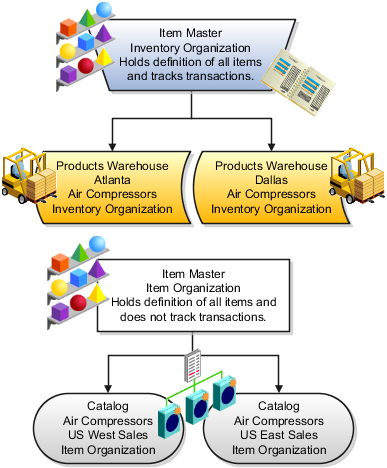
For the most efficient processing, you should:
Have a single item master
Include an item and its definition of form, fit, and function only once in the item master
Separate the item master organization from organizations that store and transact items
Note
Oracle Fusion allows multiple item masters, however, use this capability cautiously. If you acquire a company, there may be value in allowing the old item master to exist for a transition period. If you manage your subsidiaries as separate businesses, there may be reduced value in a single item master.
Oracle Fusion CRM Collaboration is a collection of features of the Oracle WebCenter product. Employees in an organization can use these features to collaborate and stay informed of the latest information.
Employees can use Oracle Fusion CRM Collaboration features to do the following business tasks:
Access real-time feeds of business transactions.
Engage in contextual discussions around key business goals.
Leverage group spaces to enhance team collaboration.
Enhance virtual team communication by staying up-to-date on peer activities, deals, connections, and community updates.
Gain greater visibility into opportunities and best practices.
Make informed decisions with peer feedback.
Access critical information to streamline the sales process.
From Oracle WebCenter, Oracle Fusion CRM Collaboration leverages the following features.
Activity streams provide an ongoing view of activities from connections, actions taken in group spaces, and other business activities. Within Oracle Fusion CRM Collaboration, activity streams have been enabled for opportunities and customer business events, as displayed in the following Oracle Fusion CRM areas:
Welcome page
Sales Dashboard
Customer Center overview page
Employees can use activity streams to:
Stay current on relevant business updates or updates from the communities of which the user is a member.
Stay up-to-date on what others are working on and what is happening in your organization.
Make timely decisions with real-time contextual insight.
Overcome organizational and geographical boundaries that make it hard to find help and expertise.
Increase employee interaction and collaboration.
For more information, see "Tracking Your Connections Activities" in the Oracle Fusion Middleware User's Guide for Oracle WebCenter Spaces.
Blogs are typically personal records of an individual user's experience and opinions. In Oracle WebCenter Spaces, users can create blogs to group related blog posts, for example to group topics by the same author or otherwise related topics. Each blog contains various blog posts. Although, blogs have not been exposed in Oracle Fusion CRM, users can access blogs by way of Oracle Web Center Spaces. For more information, see "Working with Blogs" in the Oracle Fusion Middleware User's Guide for Oracle WebCenter Spaces.
You can use a discussion forum to post, respond to, and preserve topical information, and other users can post information relevant to those topics. All of this information is preserved within the discussion forum so that teams of users can collaborate on opportunities and customer records. Everyone who is part of the opportunity or customer team can post and reply to discussions. Within Oracle Fusion CRM Collaboration, discussions are enabled for opportunities and customer business objects. For more information, see "Creating a Discussion Forum" in the Oracle Fusion Middleware User's Guide for Oracle WebCenter Spaces.
Discussions has been enabled for:
Opportunity
Customer
References
Competitors
Teams of employees can use group spaces to collaborate in the context of an opportunity or customer record. Within a group space, employees can collaborate by engaging in existing discussions or creating new ones, and they can create new wikis. They can also create new group spaces and leverage available features, such as discussions, blogs, wikis, announcements, and so on. By using group spaces, employee groups can contend with work blockages, such as:
Unstructured sales activities that are not captured.
Information that is locked in silos.
Hard-to-find successful or useful content.
Numerous e-mail threads used for collective content authoring.
For more information, see "Understanding Space Basics" in the Oracle Fusion Middleware User's Guide for Oracle WebCenter Spaces.
Tags categorize business objects in Oracle Fusion Applications, for example specific invoices and opportunities, with your own keywords. You can share tags so that anyone searching or browsing for items can find them based on common tags. For more information, see "Working with the Tags Service" in the Oracle Fusion Middleware User's Guide for Oracle WebCenter Spaces.
Wikis are Web sites of interlinked Web pages that members of a group can create and edit in a Web browser. Members who have the appropriate permissions can add and edit information to share it with their group. For more information, see "Working with Wikis" in the Oracle Fusion Middleware User's Guide for Oracle WebCenter Spaces.
Wikis have been enabled for:
References
Competitors
Oracle Fusion CRM Collaboration includes the following features.
Across all Fusion applications, the Fusion Welcome page shows all activity stream messages:
The Sales Dashboard shows activity stream messages for the following functions:
The Customer Center Dashboard shows activity stream messages for the following functions:
You can post a status update message from the Oracle Fusion Welcome page. This message can be posted to Everyone, to members of a specific group space, or to members of a specific opportunity or customer sales team. A user can also post a message from an Oracle WebCenter group space. Within a group space, the same field is available for users to post a status update.
Group spaces bring people together in a virtual environment for ongoing interaction and information sharing, enabling the formation and support of social networks. Teams can use group spaces to collaborate through discussions, in the context of an opportunity or customer record, and create new wikis. Users can also create a new group space and leverage available features, such as discussions, blogs, wikis, announcements, and so on. Group spaces support the collaboration of project teams and communities of interest by providing a dedicated and readily accessible area for relevant services, pages, and content, and by supporting the inclusion of specified members. A member can invite you to join a space, in which case you receive a notification. To see all the spaces that you can join, use the Spaces link in the global area or go to the Spaces dashboard, which contains a list of the spaces to which you belong, a list of any recommended spaces, and a tool to search for all public spaces that you can join.
The available features in a group space depend on the template that was selected when the group space was created. Out-of-the-box templates provide a variety of features. Spaces are an Oracle WebCenter feature that is used not only in the Oracle WebCenter Spaces application but also throughout Oracle Fusion Applications.
You can access group spaces by the Spaces link in the global navigation area. From there, you can access the existing public group spaces or the group space of which you are a member. From within the Edit Opportunity page of an opportunity record, you can also access an existing group space or create a new group space. Click an icon to display a popup window where you can do the following group space activities:
You can associate existing group spaces to an object, or you can create new ones. These associations have no impact on any embedded group spaces within the object, nor do they create a new embedded forum or wiki for that object. You can make associations in the following ways:
Users need specific security permissions to enable or view group space widgets, such as forums, wikis, and so on, for the following objects:
Deploying organizations have a choice of enabling embedded forums and wikis for sales objects by using two profile options:
To embed group space widgets, use the following actions:
For more information on group spaces, see the Oracle Fusion Middleware User's Guide for Oracle WebCenter. As you read that guide, note the following points:
Teams of users can use discussion forums to collaborate on opportunities and customer records. Everyone who is part of an opportunity or customer team can collaborate and take part in discussions by posting and replying to discussions. When someone posts a new discussion entry or replies to an existing discussion, the users who are members of the opportunity or customer team are notified by an activity stream message.
Members can drill into a discussion to read all replies, watch the forum where discussions are created, and view, edit, reply, and create their own discussions by accessing the group space. Members can also create and participate in text-based discussions with other users within the scope of specific business objects, an application, or a space. For example, in Oracle Fusion Applications Help, you can post questions or comments regarding topics covered by a specific help file and view posts from other members regarding the same help.
The Discussions feature is an Oracle WebCenter service used within and outside of spaces in Oracle Fusion Applications. Discussions are fully described in the Oracle Fusion Middleware User's Guide for Oracle WebCenter Spaces. As you read that guide, note the following points:
In Oracle Fusion Applications, discussions can exist outside of spaces. Content that is specific to spaces applies to spaces within Oracle Fusion Applications, but discussions work similarly outside of spaces.
Various user interfaces, or task flows, are described in the guide. The interfaces and flows that are available to you depend on the pages that you can access.
Moderators can create discussion forums in which members can view and participate in topics and threads. Set up and use discussion forums in the following ways:
A wiki is a Web site of interlinked Web pages that allows members of a group to create and edit the Web pages in a Web browser. Members of a group who have the appropriate permissions can add and edit information and share it among the group. Wikis are available by way of CRM References and Competitors.
In Oracle WebCenter Spaces, you can create and manage wiki documents by using the Documents service. To support the wiki functionality, the Documents service stores all wiki documents on Oracle Content Server. For this feature to work, the Oracle Content Server needs to be set up.
This option is available only to users at the level of full access, for example, someone like an opportunity owner.
Use tags to categorize business objects in Oracle Fusion Applications, for example specific invoices and opportunities, with your own keywords. You can share tags so that anyone searching or browsing for items can find them based on common tags. For example, members collaborating on a project can tag all related work with a particular term. Although tags are available to anyone who has access to the item, when you create tags you can designate them to be private .
The tags feature is an Oracle WebCenter service.
Tags are fully described in the Oracle Fusion Middleware User's Guide for Oracle WebCenter Spaces. As you read that guide, note the following points:
Disregard discussions specific to the Oracle WebCenter Spaces application, for example the global search in the application.
Although the guide describes tagging Oracle WebCenter pages and documents, in Oracle Fusion Applications you tag specific business objects.
Not all tag features are available in Oracle Fusion Applications, for example the Tags and Similarly Tagged Items user interfaces.
Aside from the Tags icon and the Tag Center dialog box, tags are available in Oracle Fusion Applications from applicable Oracle Fusion Applications Search results. The search considers tags in finding matching results. The search results do not indicate the number of times a particular tag was applied, and not all searches retrieve private tags. You can access the Tag Center dialog box from the global area or other places in Oracle Fusion Applications, for example in Oracle Fusion Applications Help. The Tag Center shows all tags, not only those relevant to what you are working on. For example, the tag center in Oracle Fusion Applications Help displays all tags, not only the tags for help files. Use tags to do the following actions:
Activity streams show a continuous view of activities from connections, actions in group spaces, and other business activities. For example, you might see that specific users have created, edited, or deleted specific business objects, such as customers or opportunities, and you can use activity streams to access more information about that user or object. Additionally, similar to social networking Web sites, the activity stream displays messages that other users want to broadcast.
Activity Stream is an Oracle WebCenter feature, available in Oracle Fusion Applications on the Welcome dashboard and various other locations within and without the context of spaces. The types of activities that are tracked vary depending on each Activity Stream region.
You can set up activity streams from the Navigator link by selecting Setup and Maintenance under Tools. In the Search: Tasks field, type "Activity". In the Search Results list select Set Activity Streams Options. Click the icon in the Go to Task column to open the Setup and Maintenance page. Expand Service Categories. In the rows for Customer and Opportunity select the following check boxes:
Activity stream messages are only displayed to users who are:
Users can start receiving activity streams for opportunities or customer records by accessing the Opportunity or Customer Edit page. Under the header, click Follow. The system starts displaying the activity stream for changes to the records that the user is following. When using activity streams, note the following points:
Activity streams are described fully in the Oracle Fusion Middleware User's Guide for Oracle WebCenter Spaces. As you read that guide, note the following points:
In an activity stream message, click a person's name or picture to open the Portrait tab giving general information about that person, such as contact information and areas of expertise. If you click on your own name or picture, then the My Portrait tab opens, showing more detailed, human resources-related information about you, such as your professional development goals.
Blogs are typically personal records of an individual user's experience and opinions. The word "blog" is a contraction of the term "Web log". In Oracle WebCenter Spaces, you can create blogs to group related blog posts, for example to group topics by the same author or related subjects.
In Oracle WebCenter Spaces, each blog contains various blog posts, with the most recently added blog post displayed at the top. In a Blog page style mode, the Archives pane on the right provides controls for navigating to blog posts. Blog posts are categorized automatically by year and subcategorized by month. Next to the date of a year, the number in parenthesis represents the total number of blog posts created during that year. The number next to a month represents the total number of blog posts created during that month. For example, the designation December (2) shows that two blog posts were created in the month of December. Clicking any month displays all blog posts that were created during that month. You can view all blog posts available in a blog, regardless of the month or year they were created, by clicking the View All link. If there are more blog posts than can be displayed on one page, typically 10 posts, you can use the Next and Previous buttons to navigate through the list of blog posts.
Set the Social Networking Features Enabled profile option to "Y" on the Manage Social Networking Profile Option Values page. If you enable this profile option, users can access the following features:
Kudos
Message board
Activity stream
Connections
Personal status
Note
If you disable social networking features, users can continue to access the bookmarks they created from the Bookmarks region in the Activities and Interests card on the My Portrait tab. Also, the spaces that users are a member of continue to appear in the Spaces region.
Profile management provides a framework for developing and managing talent profiles that meet your industry or organizational requirements. Profiles summarize the qualifications and skills of a person or a workforce structure such as a job or position. Profiles are valuable for tracking workers' skills, competencies, and accomplishments, and for various talent management activities, such as career planning, identifying training needs, performance management, and in the recruitment process for identifying job requirements and suitable applicants.
This topic discusses:
Profile search
Profile comparison
Best-fit analysis
You can search profiles for workers, jobs, and positions with certain criteria. For example, an HR (Human Resources) specialist in London who is looking to fill an applications developer position from within the company can search for profiles of all workers who are based in London and have experience with Java and PL/SQL.
Using the comparison feature, you can compare profiles to determine next career moves or training needs for workers, and identify suitable candidates for jobs. For example, if John is looking for his next career move, he can compare his profile to that of a job to determine whether his competency ratings match the targeted competency ratings in a job profile. For example, if his Teamwork rating is 3 and the Product Strategy Teamwork requirement is 4, he has a deficiency of -1. John and his manager can use this gap to drive development plans and for other talent management-related functions.
Use the best-fit analysis to determine the person profile that most closely matches a job profile, or the job profile that is the best match for a person profile. For example, if you are trying to fill a Developer vacancy, and the job profile requires a B.S. degree in Computer Science, level 4 expertise coding Java, and a Teamwork rating of at least 3, you can review an automatically-generated list of workers who most closely match this set of requirements. You can also use the best-fit analysis to find workers who are similar to a selected worker, or jobs that are similar to a selected job.
You can configure Oracle Fusion Profile Management to meet your business requirements using these components: the content library, profiles and profile types, content subscribers, educational establishments, instance qualifier sets, and rating models.
This figure illustrates how the components of Profile Management fit together.
The content library provides the foundation for profiles as it stores both content types and content items.
Profile types are templates that you use to create profiles. Profile types determine whether the profile is for a person or for a workforce structure such as a job or a position, and the content of the profile. You select content types from the content library to create content sections for the profile type.
You create person profiles for individual workers and model profiles for workforce structures, such as a jobs or positions. The information that you complete for the profile is determined by how the profile type has been set up. For example, a person profile might contain information about a person's education, language skills, competencies, and activities and interests. A job profile might contain information about the requirements for the job, such as competencies, language skills, degrees, or certifications.
Content subscribers are applications external to Oracle Fusion Profile Management that use content types.
You can define educational establishments for workers to use when they add education information, such as degrees, to their profile.
You assign instance qualifiers to content types. Instance qualifier sets uniquely identify multiple instances of a content item on a profile. For example, if multiple people update a performance rating for a competency on a worker's profile, instance qualifiers provide a unique identifier to each instance of the competency so that you can determine who provided each rating.
When you create content types in the content library, you can attach rating models to determine the scale for measuring performance and proficiency. You can also use rating models to measure the risk and impact of loss for workers, and to measure their potential.
Oracle Fusion Profile Management supports talent management business processes in these products:
Oracle Fusion Performance Management
Oracle Fusion Goal Management
Oracle Fusion Talent Review
Oracle Fusion Performance Management uses the rating models that you define in Profile Management to rate workers on their performance. When you define a performance document template, you can specify whether the ratings and comments from managers and workers are uploaded automatically to workers' profiles when the performance document is finalized. Instance qualifier sets distinguish the manager ratings from the workers' self ratings. Performance Management also uses competencies from the content library in performance documents.
You can set up a content type relationship between the Goals content type and other content types, such as the Competencies content type and the Memberships content type. Using these relationships, you can then set up target outcomes for goals. Target outcomes are the content items within the content type that is related to the Goals content type. For example, if you set up a relationship between the Goals content type and the Competencies content type, workers can add a target outcome of a specific competency to their goals. In this case, the specific competency is the content item within the Competencies content type. When workers complete the goal, their profiles are updated to include the competency.
Oracle Fusion Talent Review uses information from the Performance and Potential and Risk of Loss sections within a worker's profile to build the analytics that are part of the talent review process. These sections are defined as content types within the content library and included in the person profile type. When a talent review is complete, workers' profiles are updated automatically with the performance and potential ratings given during calibration discussions. Instance qualifier sets enable you to distinguish the talent review rating from ratings given by the worker's manager, a peer, or perhaps the worker's self-evaluation.
This topic identifies common lookups that are profile management-related and have user or extensible customization levels. Review these lookups, and update them as appropriate to suit enterprise requirements.
Profile management lookups are described in the following table.
|
Lookup Type |
Description |
Customization Level |
|---|---|---|
|
HRT_CONTENT_SUPP_CODE |
Codes to identify where the content type originated, such as from the customer or from a third party. HR specialists assign supplier codes when setting up new content types. |
Extensible |
|
HRT_COMPETENCY_EVAL_TYPE |
Types of competency ratings, such as self, supervisor, and peer. Evaluation types are used in instance qualifier sets to identify the role of the person who provided a competency rating for a worker. |
User |
|
HRT_DEGREE_LEVEL |
Required levels of education for a job or position profile, such as a Bachelor's Degree or Masters degree. |
User |
|
HRT_DURATION |
Time periods for when a worker would like to make a career move. Workers select a duration for their career move in the career preferences information on the career planning card. |
User |
|
HRT_EDUCATION_LEVEL |
Types of education that a degree provides, such as a Bachelor's degree or one year college. HR specialists use education levels when creating content items in the Degrees content type. |
User |
|
HRT_IMPORTANCE |
Values for the importance level of each content type. Importance values are used in the best-fit analysis calculation. |
User |
|
HRT_NOTES_TYPE |
Values for categories of notes, such as external, internal, and so on. |
User |
|
HRT_PAY_FREQUENCY |
Frequencies at which a worker is paid. Workers specify a preferred pay frequency when they edit their work requirements on the experience and qualifications card. |
User |
|
HRT_READINESS |
Time periods in which a worker will be ready for advancement to a specified job or position profile. Managers and human resource (HR) specialists use readiness levels when editing the talent ratings information on workers' career planning cards. |
User |
|
HRT_RISK_REASON |
Reasons for why a worker is at risk for leaving the company. Managers and HR specialists use risk reasons when editing the talent ratings information on workers' career planning cards. |
User |
|
HRT_SATISFACTION_METHOD |
Methods by which an item such as a competency is verified, such as assessment or demonstration. Managers and HR specialists use these values to identify the method that was used to evaluate the proficiency of a worker in a particular skill or quality. |
User |
|
HRT_TASK_PRIORITY |
Codes for the priority of a task, such as High, Medium, and so on. Talent review facilitators specify a priority when assigning tasks during a talent review. |
Extensible |
|
HRT_TASK_TYPE |
Categories of tasks, such as Preparation, Presentation, and so on. Talent review facilitators specify a task type when assigning tasks during a talent review. |
Extensible |
|
HRT_TRAVEL_FREQUENCY |
Percentages of time a worker is expected to travel for a job or position, for example, 25 percent or 50 percent. Managers and HR specialists specify the required travel frequency on job and position profiles. Workers also specify a travel frequency when they edit their work requirements on the experience and qualifications car |
User |
|
HRT_VALIDITY_PERIOD |
Periods of time for which content items such as licenses and certifications are valid. Managers and human resource (HR) specialists select validity periods when setting up content items for the Licenses and Certifications content type. |
User |
|
HRT_WORK_DAYS |
Work days for a job or position, such as Monday through Friday. Managers and HR specialists specify the expected work days on job and position profiles. |
User |
|
HRT_WORK_HOURS |
Work hours for a job or position, such as 9:00 a.m. to 5:00 p.m. Managers and HR specialists specify the expected work hours on job and position profiles. |
User |
A value set is a set of valid values that you assign to a flexfield segment.
An end user enters a value into a flexfield segment while using the application. The flexfield validates the segment against the set of valid values that you configured as a value set and assigned to the segment.
For example, you can define a required format, such as a five digit number, or a list of valid values, such as green, red, and blue.
Flexfield segments are usually validated, and typically each segment in a given flexfield uses a different value set. You can assign a single value set to more than one segment, and you can share value sets among different flexfields.
Caution
Be sure changes to a shared value set are compatible with all flexfields segments using the value set.
Defining value sets involves making decisions about the following.
Validation
Security
Precision and scale
Usage and deployment
The following types of validation are available for value sets.
Format only, where end users enter data rather than selecting values from a list
Independent, a list of values consisting of valid values you specify
Dependent, a list of values where a valid value derives from the independent value of another segment
Subset, where the list of values is a subset of the values in an existing independent value set
Table, where the values derive from a column in an application table and the list of values is limited by a WHERE clause
A segment that uses a format only value set does not present a list of valid values to users.
You can build a tree structure from the values in an independent value set whose data type is character.
Note
Adding table validated value sets to the list of available value sets available for configuration is considered a custom task.
For more information, see the Oracle Fusion Applications Extensibility Guide.
Value set security only works in conjunction with usage within flexfield segments. If a value set is used standalone, meaning outside a flexfield, value set security is not applied, but Oracle Fusion data security is enforced.
You can specify that data security be applied to the values in flexfield segments that use a value set. Based on the roles provisioned to users, data security policies determine which values of the flexfield segment end users can view or modify.
Value set security applies at the value set level. If a value set is secured, every usage of it in any flexfield is secured. It is not possible to disable security for individual usages of the same value set.
Value set security applies to independent, dependent, or table-validated value sets.
Value set security applies mainly when data is being created or updated, and to key flexfield combinations tables for query purposes. Value set security does not determine which descriptive flexfield data is shown upon querying.
Security conditions defined on value sets always use table aliases. When filters are used, table aliases are always used by default. When predicates are defined for data security conditions, make sure that the predicates also use table aliases.
For key flexfields, the attributes in the view object that correspond to the code combination ID (CCID), structure instance number (SIN), and data set number (DSN) cannot be transient. They must exist in the database table. For key flexfields, the SIN segment is the discriminator attribute, and the CCID segment is the common attribute.
For a value set with the data type Number, you can specify the precision (maximum number of digits user can enter) or scale (maximum number of digits following the decimal point).
The usage of a value set is the flexfields where that value set is used. The deployment status of flexfields in which the value set is used indicates the deployment status of the value set instance.
The figure shows a value set used by a segment in a key flexfield and the context segment of a descriptive flexfield.
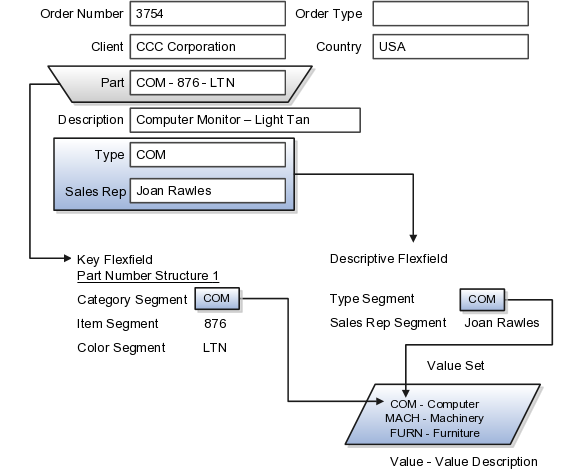
For most value sets, when you enter values into a flexfield segment, you can enter only values that already exist in the value set assigned to that segment.
Global and context-sensitive segment require a value set. You can assign a value set to a descriptive flexfield context segment. If you specify only context values, not value sets for contexts, the set of valid values is equal to the set of context values.
Validation and usage of value sets determine where and how end users access valid values for attributes represented by flexfield segments.
Tip
You can create value sets while creating descriptive and extensible flexfield segments. However, define value sets before configuring key flexfield segments that use them, because you assign existing value sets while configuring key flexfield segments.
When assigning a value set to a context segment, you can only use table-validated or independent value sets. The data type must be character and the maximum length of the values being stored must not be larger than column length of the context.
The format only validation type enables end users to enter any value, as long as it meets your specified formatting rules. That is, the value must not exceed the maximum length you define for your value set, and it must meet any format requirements for that value set.
For example, if the value set allows only numeric characters, your user could enter the value 456 (for a value set with maximum length of three or more), but could not enter the value ABC. A format only value set does not otherwise restrict the range of different values that users can enter. For numeric values, you can also specify if a numeric value should be zero filled or how may digits should follow the radix separator
You cannot specify a dependent value set for a given segment without having first defined an independent value set that you apply to another segment in the same flexfield. You use a dependent value set to limit the list of values for a given segment based on the value that the end user has chosen for a related independent segment. The available values in a dependent list and the meaning of a given value depend on which value was selected for the independently validated segment.
For example, you could define an independent value set of U.S. states with values such as CA, NY, and so on. Then you define a dependent value set of U.S. cities, with values such as San Francisco and Los Angeles that are valid for the independent value CA, and New York City and Albany that are valid for the independent value NY. In the UI, only the valid cities can be selected for a given state.
Because you define a subset value set from an existing independent value set, you must define the independent value set first. End users do not need to choose a value for another segment first to have access to the subset value set.
Typically, you use a table-validated set when the values you want to use are already maintained in an application table (for example, a table of vendor names). Table validation allows you to enable a segment to depend upon multiple prior segments in the same context or structure.
Table-validated value sets have unique values across the table, irrespective of bind variables. The WHERE clause fragment of the value set is considered if it does not have bind variables. If it has bind variables, the assumption is that the values are unique in the value set.
In the case of format, independent, or dependent value sets, you can specify a range to further limit which values are valid. You can specify a range of values that are valid within a value set. You can also specify a range validated pair of segments where one segment represents the low end of the range and another segment represents the high end of the range
For example, you might specify a range for a format-only value set with format type Number where the user can enter only values between 0 and 100. If you use a table value set, you cannot reference flexfield segments in the WHERE clause of the value set . For example, the WHERE clause cannot reference a segment or a value set.
In the case of independent and dependent values, you can specify that data security be applied to the values in segments that use a value set. Based on the roles provisioned to users, data security policies determine which values of the flexfield segment end users can view or modify.
When you enable security on a table-validated value sets, the security rule that is defined is absolute and not contingent upon the bind variables (if any) that may be used by the WHERE clause of the value set. For example, suppose a table-validated value set has a bind variable to further filter the value list to x, y and z from a list of x, y, z, xx, yy, zz. The data security rule or filter written against the value set should not assume anything about the bind variables; it must assume the whole list of values is available and write the rule, for example, to allow x, or to allow y and z. By default in data security all values are denied, and show only rows to which access has been provided.
There is no need to define or maintain values for a table-validated or subset value set, as the values are managed as part of the referenced table or independent value set, respectively.
If your application has more than one language installed, or there is any possibility that you might install one or more additional languages for your application in the future, select Translatable. This does not require you to provide translated values now, but you cannot change this option if you decide to provide them later.
For more information about defining value sets, see the Oracle Fusion Applications Extensibility Guide.
Use rating models to rate workers on their performance and level of proficiency in the skills and qualities that are set up on the person profile. You can also use rating models to specify target proficiency levels for items on a model profile, so that the model profile can be compared to workers' profiles.
To rate workers on their performance and proficiency, you attach rating models to the content types that are included in the person profile, and then workers can be rated on the items within the type. For example, you can rate workers on the Communication content item within the Competencies content type.
For model profiles, you can specify target proficiency levels for items on the profile, so that the model profile can be compared to workers' profiles. Using the ratings, managers can compare a model profile to workers' profiles to determine the best person suited to fill a position. Workers can compare their profile to model profiles to identify other positions within the organization that they are suited for, or to identify gaps in skills that they need to fill before applying for other positions.
Rating models that measure workers' potential and the impact and risk of loss are also available.
Rating models can include some or all of the following components, depending on the use for the model:
Rating levels
Review points
Rating categories
Distributions
Rating levels identify the qualitative values, such as 1, 2, 3, or 4, that you use to rate a worker.
For rating models that are used by Oracle Fusion Performance Management, the following applies:
You must define numeric ratings for rating models that you use with performance documents that use calculated ratings.
You must define rating levels using whole numbers, with the highest number indicating the best rating, for the Performance Management analytics to render correctly. Rating levels determine high and low ratings in the analytics.
Define review points for rating models that you use with performance documents that use the sum or band calculation method. The review points and point ranges that you define for the rating model are used to calculate ratings.
Rating categories enable you to group rating levels together for analysis tools used in the talent review process, such as the box chart that is used in the talent review process. You can group rating levels into categories such as low, medium, and high, and those categories then become the labels for the analytic. You should not change rating categories after setting them up, as the changes could affect the analytic.
Oracle Fusion Compensation Management and Oracle Fusion Performance Management both use rating model distributions to determine the targeted minimum and maximum percentage of workers that should be given each rating level. Compensation Management uses the distribution values that you set up directly on rating models. However, you can set up distributions at the performance template level for rating models that are used in Performance Management.
Content types are the skills, qualities, and qualifications that you want to track in talent profiles. The content library contains predefined content types such as competencies, languages, and degrees, but you can create new content types as needed. You can also create free-form content types.
Content types contain:
Properties
Relationships
Subscribers
Note
Free-form content types do not contain relationships or properties. You add properties for free-form content types when you add them to a profile type.
For each content type, you define the properties that all content items of the content type can or must have. To define properties of the content type, you select fields to be displayed when setting up the content items and the attributes of those fields. The attributes that you specify for each field are: field label, default value, whether the field is required, and whether the field is hidden, display-only, or editable. If the field is attached to a predefined list of values, you also specify the source of the list.
Specify where one content type is a parent of another, or where one content type supports another. Content items of content types with relationships inherit the relationship. You cannot create two kinds of relationships between two types or create a relationship between a type and itself. For example, content type A cannot be both the parent and child of content type B. A content type cannot be related to itself.
Specify the subscriber codes of the applications or other Oracle Fusion products that use each content type. If you do not specify a subscriber code for the content type, you cannot view the content type in other applications. For example, if you add a new content type called Corporate Citizenship to the person profile type, you cannot view the content section for Corporate Citizenship in person profiles until you add the new content type to the HRMS content subscriber code.
Content relationships enable you to associate content items of related content types with each other. The following scenarios illustrate the use of content type relationships.
The Resource Manager component of Oracle Fusion Trading Community Model uses content type relationships to track the areas of expertise of workers. Using the predefined content type relationship where the Categories content type is a parent of Products, and Products is a parent of Components, resource managers can keep track of the categories, products, and components that are considered to be their areas of expertise for their resources.
Note
Because these content types and relationships are applicable only to the Resource Manager component of Oracle Fusion Trading Community Model, this product is the only predefined content subscriber to these content types.
To help your workers manage their goals, you want them to associate their goals with target outcomes, which are content types such as Competencies and Memberships. To accomplish this, you can set up a relationship on the Competencies content type where Competencies is supported by Goals. Workers can then set up goals that have a specific competency as a target outcome.
Content items are the individual skills, qualities, and qualifications within the content types in the content library. For example, within the Competencies content type, communication is a content item. You can create content items to meet your business needs.
This topic discusses:
Item properties
Related content items
Proficiency descriptions
Content items inherit the fields and field properties that you define for the content type to which the item belongs. For example, one of the fields defined for the Memberships content type is ITEM_DESCRIPTION field. The attributes of this field are set up so that the label is Description, the field is editable, and the field does not require an entry. When you set up a content item for the Memberships content type, you will see a field labeled Description, in which you can enter text to describe the agency, but the field will not be required.
If the content type for which you are creating an item has related content types, then you can enter the related content items for the item. For example, if you have a content type relationship where the Competencies content type is supported by the Goals content type, then on the content items for competencies, you can enter the related goals.
If the content item belongs to a content type that has a rating model defined for it, then you can either use the existing descriptions for the ratings within the model, or define descriptions for the ratings that are specific to the content item. When ratings are given for the content item, the descriptions defined for the item are used instead of those on the rating model.
This example demonstrates how to set up a new content type and content items to track the corporate citizenship activities of your workers so that you can rate them on their involvement in the organization. This example also demonstrates how to set up a rating model to be used with the content type and add the new content type to the person profile.
The following table summarizes key decisions for this scenario.
|
Decisions to Consider |
In This Example |
|---|---|
|
Can a predefined rating model be used to rate corporate citizenship? |
No. The predefined rating models do not have relevant rating descriptions. |
|
Should the content type be a free-form content type? |
No. Content items are needed, and the content should be stored in the content library. |
|
What field and properties should the content type contain? |
Add two fields to the content type:
The ITEM_TEXT_20 field will have a label of Comments, and will be used to enter comments about the workers' corporate involvement. The RATING_MODEL_ID field will have a label of Company Contribution and will be used to attach the rating model for corporate citizenship to the content type. Both fields should require entry and should be editable. |
|
Does the content type need any content subscribers? |
Yes. In order to be visible on the person profile, the new content type must be added to the HRMS content subscriber code. |
|
What content items are needed to track the required information? |
|
|
When the content type is added to the person profile as a content section, what properties should the fields contain? |
Both the Comments field and the Company Contribution fields should display in the detail view of the content section, they should be required, and they should be included in search results. |
To track corporate citizenship for your workers, complete the following tasks:
Create a rating model.
Create a content type.
Create content items.
Add the content type to the person profile type.
|
Field |
Value |
|---|---|
|
Code |
Citizenship |
|
Rating Name |
Corporate Citizenship |
|
Description |
Rating model for corporate citizenship |
|
Rating Level |
Name |
Short Description |
|---|---|---|
|
1 |
Demonstrates limited or unused influence. |
Limited |
|
2 |
Demonstrates clear evidence of influence. |
Clear Evidence |
|
3 |
Provides a successful image of the company as socially responsible in limited environments. |
Successful Image |
|
4 |
Actively called upon to use influence as a corporate representative in selected environments. |
Influential in Selected Environments |
|
5 |
Demonstrates high level of influence and is able to operate effectively in all environments. |
High Level of Influence |
|
Field |
Value |
|---|---|
|
Code |
Citizenship |
|
Name |
Corporate Citizenship |
|
Description |
Ratings for corporate citizenship behaviors for workers. |
|
Field Name |
Field Label |
Required |
Display Option |
|---|---|---|---|
|
ITEM_TEXT_20 |
Comments |
Selected |
Editable |
|
RATING_MODEL_ID |
Company Contribution |
Selected |
Editable |
|
Field |
Value |
|---|---|
|
Content Type |
Corporate Citizenship |
|
Content Item |
Corporate Social Responsibility |
|
Column Name |
Display Flag |
Required |
Searchable |
|---|---|---|---|
|
ITEM_TEXT240_1 |
Detail |
Selected |
Selected |
|
RATING_LEVEL_ID1 |
Detail |
Selected |
Selected |
This example demonstrates how to set up a free-form content type, add it to the HRMS content subscriber code, and then add the content type to the person profile type.
Your company wants to track the previous employment information for workers, including employer name, dates of employment, and job description. However, you do not want to set up and maintain content items for each employer, and this information applies only to person profiles. You decide to use a free-form content type for this information. You can set up the free-form content type with minimal information, and then when you add it to the person profile as a content section, you can define properties for employer name, dates of employment, and job description. Workers can complete their employment information on their profile based on how you set up the content section. The following table summarizes key decisions for this scenario.
|
Decisions to Consider |
In This Example |
|---|---|
|
Should the content type be a free-form content type? |
Yes. Content items are not needed, and the content should not be stored in the content library. |
|
Does the content type need any content subscribers? |
Yes. In order to be visible on the person profile, the new content type must be added to the HRMS content subscriber code. |
|
When the content type is added to the person profile as a content section, what fields are needed? |
To capture the previous employer, a text field is needed. To capture employment dates, two date fields are needed. To capture job description, another text field is needed. Therefore, the following fields must be added:
|
|
What properties are needed for the ITEM_TEXT30_1 field? |
The field should not be required and the information should not be available as search criteria, so you need only set up these field properties as follows:
|
|
What properties are needed for the ITEM_DATE_1 field? |
The field should not be required and the information should not be available as search criteria, so you need only set up these field properties as follows:
|
|
What properties are needed for the ITEM_DATE_2 field? |
The field should not be required and the information should not be available as search criteria, so you need only set up these field properties as follows:
|
|
What properties are needed for the ITEM_TEXT240_1 field? |
The field should not be required and the information should not be available as search criteria, so you need only set up these field properties as follows:
|
|
What role access should be granted for the content section? |
Employees, managers, and HR specialists should all have access to update the section. |
To set up a free-form content type to track previous employment information for workers, you must:
Set up a free-form content type
Add the free-form content type to the person profile type
|
Field |
Value |
|---|---|
|
Code |
PREVEMP |
|
Name |
Previous Employment |
|
Description |
Track previous employment information for workers. |
|
Column Name |
Label |
Display |
|---|---|---|
|
ITEM_TEXT30_1 |
Previous Employer |
Detail |
|
ITEM_DATE_1 |
From Date |
Detail |
|
ITEM_DATE_2 |
To Date |
Detail |
|
ITEM_TEXT240_1 |
Job Description |
Detail |
A label for a grouping of rating levels. Rating categories are used in talent management processes such as performance management and talent reviews to group ratings for analysis tools such as the performance and potential box chart.
You can edit any content type relationships that you define. However, the relationships that are predefined cannot be changed.
Set up the relationship on the content type that you want to relate to goals using the relationship type: Is supported by. For example, if you want to define a relationship between the Goals content type and the Competencies content type, set up the relationship on the Competencies content type, instead of the Goals content type.
Free-form content types enable you to capture information in a profile that you do not need to store in the content library. For example, you can set up a free-form content type to store information about the previous employment information for your workers.
A free-form content type contains only a code, name, and a description, and does not have any properties defined for it until you add it to a profile type. Free-form content types do not include any content items.
A content item's relationship type is derived from its content type, and you cannot change it. You can only change relationships at the content type level. You cannot change predefined relationships.
Profile types include person profile types and model profile types. The person profile type is the template that you use to create profiles of your workers. The person profile contains the skills, qualities, and qualifications that you want to track for your workers. The person profile type is predefined, and you can have only one. Model profile types are templates for workforce structures such as jobs and positions. Model profiles identify the targeted and required skills and qualifications for a job or position, and also identify work requirements, such as work schedule and travel frequency. You can set up multiple model profile types.
To define profile types, you first specify whether the profile type is a person or model profile. For model profiles, you also specify the workforce structures for which the model profile can be used. For example, if you specify that the model profile can be used for jobs and positions, then you can use the profile type to create both job and position profiles. To define the structure of the profile type, you add one or more content sections using content types from the content library and free-form content types. Define the following for each content section:
Instance qualifier sets
Section properties
Role access
If you have defined instance qualifier sets for the content type, you select the instance qualifier set to use for the sections.
The properties determine the fields and how they are displayed when you create profiles based on the type. For example, properties determine the label for the field, whether the field is required, and whether the field should be included in profile searches. For sections with content types from the content library, you can use the field properties as they have been defined in the content library, or add, remove, or change the properties to suit the content section. You define all of the properties for free-form content types.
You can specify the user roles, such as Employee or Manager, that can view the content section, and which user roles have access to update the section.
When defining content sections for a profile type, you can associate common lookup types with a content section property, enabling you to provide a list of values for the content section property. For example, you can add a list of industries to a content section called Industry Expertise. You can use existing common lookup types, or create your own. Common lookups can be associated with these content section properties: ITEM_TEXT30_6 through ITEM_TEXT30_15.
Note
This functionality does not apply to these content section properties when they are associated with the following content sections: Career Preferences, Potential, Risk, Advancement Readiness, Career Statement, Talent Score, Performance Rating, and Work Requirements.
An instance qualifier set is a group of codes that you use to uniquely identify different occurrences of the same profile item within the Competency content type. Instance qualifiers typically identify the role of the person who edited a competency. For example, if a worker, the worker's peer, and the worker's manager all enter a rating for a competency on the worker's profile, instance qualifier sets uniquely identify each instance, or, the rating given by each different role. Uniquely identifying different instances of competencies enables you to specify which instance is used when you view or compare profiles.
Each instance qualifier contains a code and a description, which indicate the role or the application that updated the competency. For example, P is the code that is used when an employee's peer rates the employee and T is used for the rating that results from the talent review meeting. You can use the predefined codes and descriptions, or you can create your own.
In addition to the code and description, each instance qualifier has the following properties:
Priority
Employer and manager views
Search ability
Default instance qualifier for employer and manager
Priority determines the order in which different instances of a competency are displayed, and also determines which instance to use when searching and comparing profiles. The lowest number indicates the highest priority.
Employer and manager views determine which instances are visible to employees and to managers.
You can specify whether items that have been assigned the instance qualifier code should be included in profile searches. For example, you might not want the ratings for competencies given by peers to display when other workers are searching person profiles.
You can specify the default instance qualifier to use when managers and employees update a competency. Each time an employee or manager updates a competency, the record is assigned the instance qualifier code that is identified as the employee or manager default code.
You must have the human resource (HR) specialist role to hide or delete an attribute on the person profile.
Note
You can hide predefined attributes, but you cannot delete them.
To hide an attribute on the person profile, use the Manage Profile Types task in the Setup and Maintenance work area and edit the person profile. On the Edit Profile Type page, select a content section that includes the attribute you want to hide. To hide the attribute, select None as the Display value for that attribute. For example, to hide the attribute School Name, select Degrees from Content Sections on the Edit Profile Type page, and set the Display value of the attribute School Name to None.
To delete an attribute that is not a predefined attribute on the person profile, you navigate to the Manage Profile Types task in the Setup and Maintenance work area, edit the person profile, and delete the attribute. For example, to delete the attribute School Name, you navigate to the Manage Profile Types task in the Setup and Maintenance work area. Edit the person profile, select Degrees from Content Sections, and then from the Content Properties section, click Delete to delete the attribute School Name.
Oracle Fusion CRM Applications come secured using the industry standard for access control that is called role-based access control (RBAC). This topic discusses key aspects of the RBAC approach that are specific to an Oracle Fusion CRM implementation. You must review other documentation to understand how RBAC is designed to handle a broad range of security needs.
The RBAC standard supports the enforcement of user access control that is based on the role of the user within the organization rather than the user's individual identity. In RBAC, you assign users with roles that represent the job functions in your enterprise. These roles provide access both to the application functions that users need to perform their jobs as well as the permissions to access the data where they need to perform those functions.
Oracle Fusion Applications, including Oracle Fusion CRM, are secured with a predefined set of enterprise roles. This security reference implementation fulfills the needs of midsize horizontal enterprises, generally between 250 and 10,000 employees. To enable users to perform specific jobs in your CRM enterprise, you provision them with the appropriate enterprise roles. For example, when you provision sales managers with the sales manager job role, they can perform all their job duties, including managing sales teams and their forecasts, setting quotas, and managing sales leads and opportunities.
You can change this security reference implementation if the roles in your enterprise are different or if you want to accommodate expansion into vertical industries, such as health care, insurance, automobiles, or food manufacturing. Application patching does not affect your changes.
The following graphic provides an overview of the key components that determine what functions users can perform in the application (functional security) and on what data they can perform those functions (data security).

For Oracle Fusion CRM, the relevant security components are the following:
User
This document refers to security for human users, not background processes and other system users that are also secured with RBAC.
Autoprovisioning rules
Rules automatically provision users with enterprise roles that carry all the security settings that are appropriate for their duties. You can provision users based on their role in your organization and other factors, such as their status as an employee or contractor.
Enterprise roles
There are two types of enterprise roles:
Job roles
Job roles permit users to perform activities specific to their job. For example, providing users with the Sales Manager job role permits them to manage salespersons within the organization, follow up on leads, generate revenue within a territory, build a pipeline, manage territory forecasts, and assist salespersons in closing deals.
Abstract roles
Abstract roles permit users to perform functions that span the different jobs in the enterprise. For example, each user who is an employee must be provisioned with the Employee abstract role to be able to update their employee profile and picture. For CRM, you must also provision users with the Resource abstract role, this permits users to be assigned to work on leads, opportunities, and other CRM work.
Duty roles
Job and abstract roles permit users to carry out actions by virtue of the duty roles they include. For example, the Sales Manager job role includes the Sales Lead Follow Up Duty and the Quota Management Duty. The Sales Management Duty makes it possible for the managers to create and update a sales lead, qualify a sales lead, and convert a sales lead into an opportunity. The Quota Management Duty enables the management of sales territory quotas and territory quota formulas.
Functional security policies
Duty roles include functional security policies that provide access to user interface elements, Web services, tasks flows, and other functions. For example, a sales manager who has the Delete Opportunity functional policy can view and click the Delete button. Removing that policy removes the button from view.
A functional policy is made up of the duty role name and the Delete Opportunity functional privilege. The functional privilege specifies the application features that are being secured. In the security reference manuals, functional privileges are listed in the Privileges section.
Data security policies
Duty roles also include data security policies that specify which roles can perform an action under what conditions. For example, the Opportunity Sales Manager Duty includes a data security policy that specifies that sales managers can view opportunities if they are in the management chain or are members of the sales team on the opportunity.
Each data security policy represents an underlying SQL query. Oracle Fusion CRM Applications evaluate the query at run time, and permit access to data that meets the condition.
A data security policy is composed of the name of the duty where it applies, a data privilege, and a condition. A data privilege is the combination of the action users can take, the conditions under which they can carry them out, and the object they can act on. Data privileges are listed in the Data Security Policies section of the security reference manuals.
Note
Unlike other Oracle Fusion Applications, Oracle Fusion CRM Applications do not use data roles (not shown in this diagram) to provide users with data access. They rely strictly on data security policies.
Data roles, which inherit enterprise roles, are used in many Oracle Fusion Applications to restrict user access to a dimension of data, such as a business unit or a data reference set.
How enterprise roles work in practice is best illustrated with an example from the Sales Manager job role outlined in the following diagram:
A provisioning rule automatically provisions employee sales managers with the enterprise roles they need to do their jobs.
The rule provisions the Sales Manager job role and the Employee and Resource abstract roles.
The Sales Manager job role includes the Quota Viewing Duty and the Sales Manager Duty.
Duty roles inherit other duty roles. For example, the Sales Manager Duty inherits many other duty roles including the Marketing Lead Analysis Duty and the Opportunity Sales Manager Duty.
The duty roles are associated with functional security policies and data security policies. For example, the inherited Opportunity Sales Manager Duty comes with the following:
Functional security policies that specify which application pages and functions sales managers can access for deleting, assigning, closing, creating, and viewing an opportunity. For example, the view opportunity policy permits sales managers to view all UIs, Web services, and task flows that are related to opportunities.
Data security policies that specify what actions opportunity sales managers can take on what opportunities and under what conditions.
For example, opportunity sales managers can view all data related to opportunities where they are opportunity sales team members with view, edit, or full access.
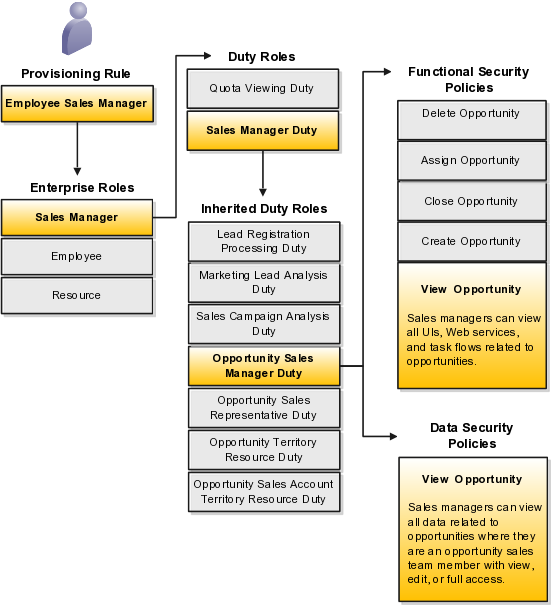
The following diagram provides more detail about the composition of a policy. Each policy, such as the View Opportunity policy, is composed of a duty role name and a privilege:
The view opportunity functional security policy is composed of the duty name and the View Opportunity functional privilege.
The view opportunity data security policy is composed of the duty name, the View Opportunity data privilege, and a condition. It specifies that sales managers can view all data related to opportunities where they are an opportunity sales team member with view, edit, or full access.
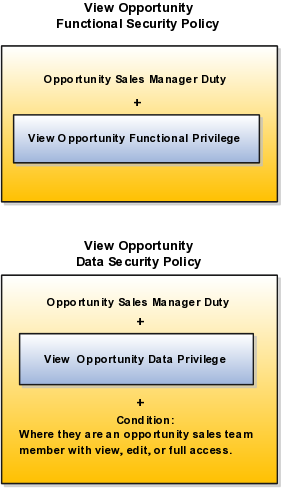
Details about the available enterprise roles, duty roles, and policies in the security reference implementation are described in reference manuals organized by business process.
Each of the enterprise roles provided by Oracle is composed of a hierarchy of other roles and duties. The following diagram displays a portion of the hierarchy for the Sales Manager job role from the Oracle Fusion Applications Sales Security Reference Manual as an illustration.

The Sales Manager job role inherits the Business Intelligence Applications Worker abstract role. This abstract role comes with the Business Intelligence Applications Analysis Duty that permits the viewing of business analysis reports.
The Sales Manager job role also inherits the Sales Manager duty role. All job roles include a top-level duty role with the same name as the job role. This top-level duty role is the container for all of the duty roles assigned to a job role. As a general rule, the permissions are attached to the duties at the lowest level of the hierarchy.
The top-level duty roles make it easier for you to create job roles of your own. For example, if you want to create a new job role because you want to give additional functionality to a special class of sales managers, then you can assign the top-level Sales Manager duty to the new job role to give the users all the same permissions as a regular sales manager and then add whatever additional duty roles you want. (For an example of how to do this task, see the Enabling Salespeople to Obtain Microsoft Outlook Access to All Sales Accounts: Worked Example help topic.)
This topic explains how the security reference implementation provided by Oracle determines who can access what opportunity information in your CRM organization.
Your CRM application data comes secured with Oracle's security reference implementation. The following diagram illustrates who can access what opportunity information:
Named agents in the diagram (A, B, and C) can access the opportunity because they have created it, are on the sales team, or own a territory related to the opportunity.
Unnamed agents (highlighted in yellow) cannot view the opportunity although they have the same manager as their peers who can view them.
Managers can view the opportunity because a salesperson in their management chain can view it.
This figure shows who in a sales hierarchy can access an opportunity:
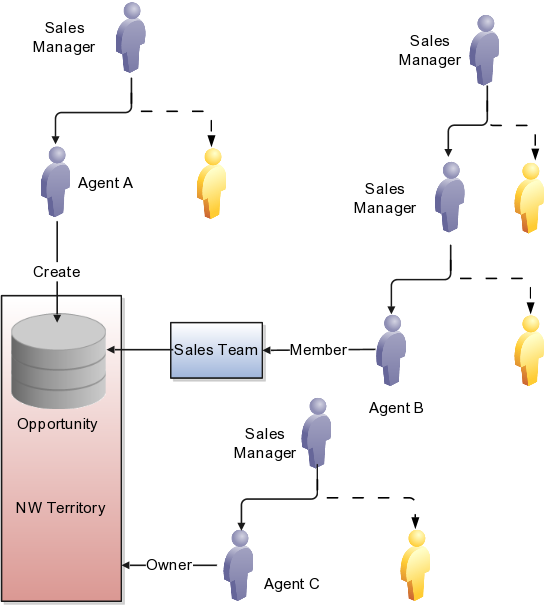
You can see the opportunity in this figure if you do the following:
You create the opportunity.
Agent A can access the opportunity because she created it. When you create an opportunity, you are the initial owner.
You are on the opportunity sales team.
Agent B can access the opportunity because he is on the sales team.
You are the owner of the territory.
Agent C can access the opportunity because he is the owner of the NW territory.
The opportunity owner is your direct or indirect report in the resource hierarchy.
Sales managers who are higher up in the management chain can also see the opportunity because access is provided through the resource hierarchy. Agent C's manager can access the opportunity information, but agent C's colleagues cannot.
You can also access the opportunity if you are assigned to a territory for the sales account associated with the opportunity or if a territory is assigned to the revenue lines on the opportunity. (Revenue lines and sales accounts are not shown in this diagram).
Access differs between territory members and opportunity members:
An opportunity owner gets full access to the opportunity, which includes the ability to edit as well as add and remove team members.
Owners and members of territories assigned to the sales account of the opportunity get read-only access to the opportunity and are not added to the opportunity sales team.
Owners and members of territories assigned to the opportunity revenue lines are added as a distinct list of territories to the opportunity sales team. Owners and members of these territories get full access to the opportunity. Depending on a profile option, either only the owner or all the members of the territory are added as resources to the opportunity sales team. Regardless of the access level for these members as a resource on the opportunity team, they will always have full access.
Some access is not affected by the management hierarchy and membership in sales teams or territories. This special access includes:
Administrators: Administrators get access to opportunities and other objects. This access is based on their privileges, regardless of where the administrators are in the management hierarchy. Administrators do not have to be on the sales team or members of territories.
Deal Protection: Salespersons assigned to an opportunity retain the sales credit on an opportunity even if they are moved to another opportunity.
Team Selling: You can configure the application to allow salespersons to see all opportunities related to their sales accounts.
Setting up Oracle Fusion CRM security involves the use of multiple application components outlined in this topic. For example, you create duty roles and enterprise roles in separate Oracle Fusion Middleware applications and the rules to provision them in Oracle Human Capital Management (HCM). While you can access all of these application components from the Setup and Maintenance work area, understanding what components are used for what purpose and terminology differences in these applications will help you with your setup.
This diagram provides an overview of the key security setups and the application components that you use to configure them.
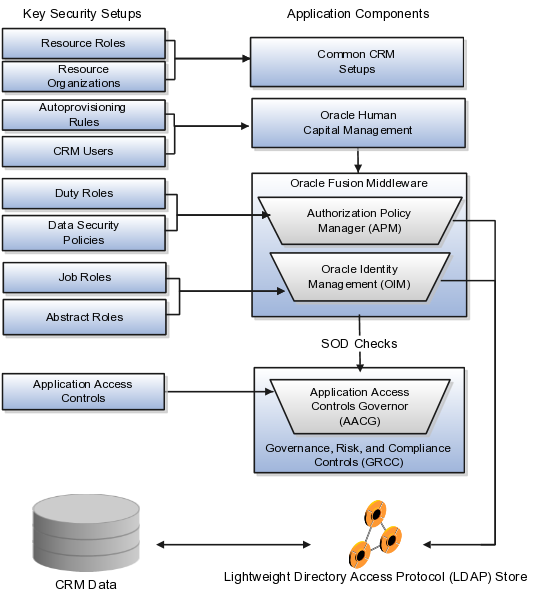
The following table provides an explanation of the application components:
|
Application Component |
What It Is Used For |
|---|---|
|
Common CRM Setups |
Tasks such as creating resource roles and resource organizations are part of common CRM configuration tasks. |
|
Oracle Fusion Human Capital Management (HCM) |
Oracle Fusion HCM tasks permit you to manage CRM application users and create the rules that automatically provision users with the enterprise roles they need to do their jobs. |
|
Oracle Authorization Policy Manager (APM) |
You use Oracle Authorization Policy Manager to create duty roles and data security policies in a separate browser window. The Authorization Policy Manager is a separate Oracle Fusion Middleware application with many features that are not used in Oracle Fusion CRM. You can access this application from the Setup and Maintenance work area by using the Manage Duty Roles task. |
|
Oracle Identity Management (OIM) |
Use Oracle Identity Management to create new job and abstract roles for on-premise applications in a separate browser window. You can access this Oracle Fusion Middleware application from the Setup and Maintenance work area by using the Manage Job Roles task. OIM is a separate Oracle Fusion Middleware application with few features used by Oracle Fusion CRM. Because this application has not been extended to Oracle Sales and Marketing Cloud Service, you must ask your Service Administrator to create any new job roles for you. Note Creating a user in Oracle Identity Management is different from creating CRM application users in HCM. |
|
Application Access Controls Governor (AACG) |
The Governance, Risk, and Compliance Controls supports segregation of duties (SOD) using the Application Access Controls Governor. You can use the Application Access Controls Governor to manage application access controls designed to prevent conflicts of interest and potential fraud that could result from the duties you assign to job roles. For example, if you want to prevent the same users from being able to both create items and ship them to customers, then you can review the access controls provided by Oracle in the Segregation of Duties Policies Respected section of the security reference guides. When you assign incompatible duties to a job role that you are creating, the Application Access Controls Governor generates error messages and prevents the assignment. |
|
Lightweight Directory Access Protocol (LDAP) Store |
The security settings you create are stored in the Lightweight Directory Access Protocol (LDAP) store for quick access. If you are implementing Oracle Fusion CRM on premise, then you must ensure that you synchronize the LDAP store with any of the changes you make by using the Run User and Roles Synchronization Process task, available from the Setup and Maintenance work area. If you are implementing Oracle Fusion CRM in the Oracle Sales and Marketing Cloud Service, then this step is done for you. |
Oracle Fusion CRM applications use different terminology from Oracle Fusion Middleware applications. The key differences are described in the following table:
|
Oracle Fusion CRM Term |
Definition |
Equivalent Oracle Identity Management Term |
Equivalent Oracle Authorization Policy Manager Term |
|---|---|---|---|
|
Job role |
Job roles permit users to perform activities required for their job. |
Role. You can distinguish preconfigured job roles by their technical names. Job roles include the term JOB at the end. |
External role. You can distinguish preconfigured job roles by their technical names. Job roles include the term JOB at the end. |
|
Abstract role |
Abstract roles permit users to perform functions that span the different jobs in the enterprise. |
Role. |
External role. |
|
Duty role |
Duty roles provide all the privileges for the actions required to carry out a job. |
Not applicable. |
Application role. Duty roles include the term DUTY at the end of the technical name. |
Users gain access to application functionality when you provision them with enterprise roles. Oracle provides you with the enterprise roles required for all the standard jobs in a CRM organization. This topic outlines the steps you must complete to provision users with the enterprise roles provided by Oracle and what additional steps you must complete if you are planning to make changes.
Follow these steps if you want to provision users with the preconfigured enterprise roles provided by Oracle:
Create resource roles if the existing resource roles do not match the job titles in your organization.
Resource roles indicate the role the resource plays in the CRM organization. When you create users for Oracle Fusion CRM applications, you must specify their resource role, which appears as the job title of the person in the resource directory and in social applications, such as the Activity Stream.
You also use resource roles to trigger the provisioning rules you will set up in the next step.
Oracle supplies the resource roles that correspond to the preconfigured job roles. For example, Oracle includes the Sales Vice President and the Marketing Vice President resource roles, which correspond to the Sales VP and the Marketing VP job roles.
If your organization uses different titles, then you must create additional resource roles.
You can review a list of the existing resource roles and create additional resource roles by navigating to the Setup and Maintenance work area and searching for the Manage Resource Role Lookups task.
See the Creating Resource Roles: Worked Example help topic for step-by-step instructions on creating resource roles.
Create rules that automatically provision users with job roles and abstract roles.
When you create users, the provisioning rules automatically provision users based on the user resource role and employment status.
You must create the provisioning rules from the Setup and Maintenance work area, by using the Manage HCM Role Provisioning Rules task.
See the following help topics for information on best practices to create the rules and step-by-step instructions:
Rules to Automatically Provision Oracle Fusion CRM Users with Enterprise Roles: Explained
Creating Rules to Automatically Provision Enterprise Roles to Oracle Fusion CRM Users: Worked Example
You are now ready to create users.
The following steps will help you plan your security implementation if you decide to make changes to the preconfigured job roles and abstract roles provided by Oracle:
Review the enterprise roles provided by Oracle.
Details on the available job roles, abstract roles, duty roles, privileges, and data security roles are described in reference manuals organized by different business areas, such as sales, marketing, and partner relationship management.
If the jobs in your organization do not match the job roles provided by Oracle, then you can modify access for users by assigning them with multiple existing job roles or creating new job roles. Creating new job roles makes it possible for you to select which duty roles to include and, in some cases, to configure new data security policies that govern on what data those duty roles grant access to.
Create any additional job roles.
You create additional job roles in Oracle Identity Manager, an Oracle Fusion Middleware application, which can be accessed from the Setup and Maintenance work area by using the Manage Job Roles task.
Note
If you are implementing security in the Oracle Sales and Marketing Cloud Service, then you must request the Oracle provision administrator to create job roles for you because access to this functionality has not been extended to the Oracle Sales and Marketing Cloud Service.
Before creating job roles, review the hierarchy of job roles and duty roles in the security reference manuals. The hierarchy of duty roles is not visible when you view them in Oracle Identity Manager.
Each job role includes a top-level duty role with the same name, which inherits all the other duty roles. If you want to give additional functionality to a group of users, for example, sales managers, then assign the Sales Manager Duty role to the job role you are creating to inherit all the current permissions and data access, and then add whatever additional duty roles you needed.
Tip
Oracle Identity Manager uses different terminology from Oracle Fusion CRM. Job roles and abstract roles are referred to as roles.
Create duty roles and add them to the job roles that you created.
If you do create a job role, then use the Oracle Authorization Policy Manager, which is a separate Oracle Fusion Middleware application, to do the following:
Create a top-level duty role for the job role.
Add the duty roles that you want to inherit to that top-level duty role.
Associate the job role that you created with your duty role on the External Role Mapping tab.
Tip
Oracle Authorization Policy Manager uses different terminology from Oracle Fusion CRM. Duty roles are referred to as application roles and job roles as external roles. You can identify duty roles by the word DUTY at the end of their names.
You can access Oracle Authorization Policy Manager from the Setup and Maintenance work area using the Manage Duties task.
Detailed steps on how to create a job role and duty role are provided in the following help topic: Enabling Sales Representatives to Obtain Microsoft Outlook Access to All Sales Accounts: Worked Example.
The duty role that you create inherits all of the data security policies from the duty roles that you add. You can create additional data security policies if you want to change user access to specific data. For example, the predefined data security policies for the duty roles inherited by the Sales Representative Duty permit salespeople to view only sales accounts if they are on the sales account team. If you want to give salespeople access to all sales accounts, then you can create a data security policy. The same example, Enabling Sales Representatives to Obtain Microsoft Outlook Access to All Sales Accounts: Worked Example, provides the detailed steps.
Retrieve any security changes made in Oracle Identify Manager (stored in the Lightweight Directory Access Protocol (LDAP) store) so they are available for creating users.
Modifications to the reference become available only after the LDAP store is synchronized. The Oracle Sales and Marketing Cloud Service takes care of the synchronization for you. If you are implementing on premises, then you must run the synchronization process from the Setup and Maintenance work area using the Run User and Roles Synchronization Process task.
Follow the steps for implementing the preconfigured security described in the Implementing Security If You Plan to Use Enterprise Roles Provided by Oracle section.
This topic explains what happens if you omit the security setups and highlights the differences between implementing security on premises and in the Oracle Sales and Marketing Cloud Service.
If you plan to use only the preconfigured enterprise roles provided by Oracle, then you must:
Review the existing resource roles to see if they correspond to the titles of the different resources in the CRM organization, and create any additional resource roles you need.
Create the provisioning rules to automatically provision the required job roles and abstract roles.
If you are implementing on premises, then you must Synchronize the Lightweight Directory Access Protocol (LDAP) store by using the Run User and Roles Synchronization Process task from the Setup and Maintenance work area.
If you are implementing in the Oracle Sales and Marketing Service, then the process is run for you.
The following table highlights the differences between implementing security on premises and in the Oracle Sales and Marketing Cloud Service:
|
Task |
On Premises |
Oracle Sales and Marketing Cloud Service |
|---|---|---|
|
Creating additional job roles |
You can create additional job roles from the Setup and Maintenance work area using the Manage Job Roles task. |
You must request the service administrator to create additional job roles. |
|
Synchronizing the LDAP store |
You must synchronize any changes to security by using the Run User and Roles Synchronization Process task from the Setup and Maintenance work area. |
This process is run for you. |
Siebel CRM and Oracle Fusion CRM implement different methods of securing access to application functionality and data. This topic outlines the mechanisms provided by Siebel CRM to control the privileges or resources that users are entitled to after they have accessed a Siebel application and been authenticated. For additional information on Siebel CRM security, see Siebel Security Guide on Oracle Technology Network.
Siebel CRM uses two primary access-control mechanisms:
View-level access control to manage the application functionality that a user can access
Record-level access control to manage the data items that are visible to each user on a view
In Oracle Fusion CRM, access to functionality is provided by assigning enterprise roles to users. In Siebel CRM, access to functionality is provided by assigning responsibilities to users.
Within each Siebel application, screens provide a broad area of functionality. A screen is composed of views, and the collection of views to which users have access determines the application functionality available to them. Access to views is determined by responsibilities.
Organizations are generally arranged around job functions, with employees being assigned one or more functions. In Siebel CRM, these job functions are called responsibilities. Each responsibility is associated with more or more views, which represent data and functionality needed for a job function. Each user must be assigned at least one responsibility to access the Siebel application.
Siebel Business Applications ship with many predefined responsibilities. However, you can also define any additional responsibilities that you require that correspond to the major job functions in your organization.
Record-level access control is used to assign permissions to individual data items within an application so that only authenticated users who need to view particular data records have access to that information. In Oracle Fusion CRM, access to data is primarily determined by the data security policies that apply to specific enterprise roles. In Siebel CRM, the access control mechanism that applies to a view determines the data records that a user sees in a view.
Siebel CRM uses the following types of record-level access control mechanisms:
Personal access control. Access to data associated with a user's Person record in the database is restricted to that user.
Position access control. Access to data that is specific to a job title is restricted to users assigned that job title, to their team members, or to their subordinates.
Organization access control. Employees assigned to a position within an organization are granted access to the data assigned to that organization.
Access-group access control. Access groups are used to control access to master data by diverse groups of individuals.
All-access control. All-access control provides access to all records in a view that has a valid owner. If a view applies all-access control, then all users with access to the view see the same data in the view.
Within Siebel CRM, views are based on business components and must use one of the view modes specified for the business component. A business component's view mode determines which access control mechanisms can be applied to the business component in any view. Applet and view properties also determine the data available in a view. Applet visibility properties define the business component on which a view is based, and a view's access control properties determine what access control mechanism is applied to the business component on which the view is based. For example, a business component might have personal or position access control available. The view access control property specifies which of these to use.
Follow the steps in this topic to create resource roles. Resource roles, for example, Sales Manager, Salesperson, or Vice President of Marketing, describe the role that a resource plays in the CRM organization and appear as job titles in the resource directory and in social applications, such as Activity Stream. Resource roles are also used to assign users with the enterprise roles they need to carry out the duties of their job.
After you create a resource role, you must create the appropriate provisioning rules to provision the user with the required enterprise roles. The resource role by itself is only a title.
Note
Common CRM resource roles are already set up for you. These are labeled as System roles in the application. To obtain a list, click Search in the Manage Resources page without entering any search criteria.
The Manage Resource Roles page appears.
The Create Resource Role page appears.
By creating rules using the Manage HCM Role Provisioning Rules task from the Setup and Maintenance work area, you can automatically provision users with all the enterprise roles they need for their job. These roles ensure the users have access to all the application functions and data they need to carry out their job duties. The rules automatically provision the users when they are created or move positions within your organization. If resources leave your company, the roles can be automatically removed so the resources can no longer access the application.
You must ensure that the rules you create assign Oracle Fusion CRM application users with:
One or more job roles required to perform their job in the organization.
If the users work in the CRM organization, then you must assign them the Resource abstract role. This role permits users to be assigned to sales teams, territories, and other CRM work.
If the users are employees, then you must also assign them with the Employee abstract role. If they are temporary workers, then you must instead assign them with the Contingent Worker abstract role.
In CRM, both abstract roles assure that users can update their personal profiles and other common tasks.
As a best practice:
Create rules that provision the Resource abstract role and the job roles users need to perform their job based on the resource role assigned to them. Most resource roles will require just one job role, but some may have more than one. For example, the Sales and Marketing Vice President may require both the Sales VP and the Marketing VP job roles.
Create one rule that provisions all users who are employees (Person Type of Employee) with the Employee abstract role.
If you hire contractors, then create a separate rule to provision the Contingent Worker abstract role to all users with the Person Type of Contingent Worker.
For all rules you create, ensure that the privileges the users are granted are automatically removed when they are no longer with the company. You can do this by stipulating the condition that the rule apply only when the user has the Assignment Status of Active.
If you plan to create users to perform implementation tasks who are not resources in the CRM organization, then you must create a provisioning rule that is based not on the resource role but some other user attribute. For example, you can create a rule to provision the required Application Implementation Consultant and IT Security Manager job roles based on the user's job assignment.
The following figure provides an example of the rules you would create to provision employee users who are assigned the Sales Manager resource role:
Rule one assigns the Employee abstract role to users who are employees with an Assignment Status of Active.
Rule two assigns the Sales Manager job role and the Resource abstract role to users with the Sales Manager resource role and an Assignment Status of Active.

Follow the steps in this example to create rules that automatically provision Oracle Fusion CRM application users with the necessary enterprise roles. The provisioning is based on the resource role that you assign to a user.
In this example, you create a rule to provision users with the Sales Vice President resource role with the enterprise roles they need to perform their jobs.
The Manage HCM Role Provisioning page appears.
The Create Role Mapping page appears.
This additional condition ensures that the provisioned enterprise roles are automatically removed if the user is terminated.
Sales Vice President
Resource
Note
Each CRM resource who is an employee must be provisioned with both the Resource and Employee abstract roles. You must create a separate rule that assigns the required Employee abstract role to all users who are employees. You must always provision the Resource role along with the appropriate job roles. This provisioning ensures that the user can be assigned work in your CRM application.
On premises implementations of Oracle Fusion CRM can use this example as a template for creating a new job role that provides sales representatives with the ability to use Microsoft Outlook to access and copy information on all sales accounts.
Provisioning sales representatives with the Sales Representative job role provides the ability to use Microsoft Outlook to access and copy sales account information if they are on the sales account sales team. You are a member of the sales account sales team if you own the sales account or if someone else adds you to the sales team.
Note
If you are implementing in the Oracle Fusion Sales and Marketing Cloud Service, then you must request the service administrator to have new job roles created for you.
If you want to enable a special class of inside sales representatives to use Microsoft Outlook to access all sales accounts regardless of assignment, then you must:
Create a new Inside Sales Representative job role for this special class of sales representatives.
Create an Inside Sales Representative Duty role.
Inherit the Sales Party Management Duty role. This is the duty role that provides the functional and data permissions for the Microsoft Outlook integration.
Associate to the Inside Sales Rep job role to the new duty role.
Create the data security policy to provide this job role with the additional access you want.
After you have completed the setup outlined in this example, you must then provision the new job role to the inside sales representatives along with the regular Sales Representative job role. The steps for setting up autoprovisioning rules are outlined in related topics.
The Identity Manager - Delegated Administration page appears.
Note
If the application instead displays the Identity Manger - Self Service page, select the Administration link at the top right of the page to navigate there.
The Create Role region appears in the right hand pane of the tab.
Enter the following in the Basic Role Information region:
|
Field |
Value |
Comment |
|---|---|---|
|
Name |
INSIDE_SALES_REP_JOB |
This internal technical name must be unique and contain no spaces. |
|
Display Name |
Inside Sales Representative |
|
|
Role Category Name |
CRM - Job Roles |
|
The page displays a confirmation message that the role was created for you. You can now close the browser window.
The Oracle Entitlements Server page appears in a new browser window.
The Untitled role creation page appears.
|
Field |
Value |
Comments |
|---|---|---|
|
Display Name |
Inside Sales Representative Duty |
|
|
Role Name |
|
This internal technical name must be unique and contain no spaces. |
|
Role Category |
CRM_ENTERPRISE_DUTY |
|
The new Inside Sales Representative Duty is created for you.
On the Application Role Hierarchy tab of the Inside Sales Representative Duty role you just created, add the Sales Party Management Duty. This inherits all the functional and data access for the Microsoft Outlook integration normally assigned to sales representatives.
Note
The duty roles that come with the preconfigured job roles in the security reference implementation are organized in a hierarchy which is documented in the security reference guides available in Oracle Fusion Applications Help or in the Oracle Fusion Applications Technology Library.
The duty role at the top of the hierarchy includes the name of the job role, so you can easily inherit all the duties of an existing job role. For example, the Sales Manager job role includes the Sales Manager Duty, which inherits all the duties required for the job role. You can choose to inherit duty roles at any level in the duty hierarchy. However you must consult the security reference guides to see how the hierarchy is organized. The application does not display the hierarchy, it shows all the duty roles as a list.
The Add a Role dialog appears.
Now that you have created the duty role and added all the duty roles it inherits, you will associate the job role you created.
TheAdd a Role dialog appears.
The predefined data security policies for the Sales Party Management Duty you inherited permit sales representatives to view only sales accounts if they are on the sales account team. To provide Inside Sales Managers access to all sales accounts, you will create a new data security policy to permit this.
Note
Creating data security policies may require assistance from your Service Administrator.
The Search Authorization Policies tab appears.
The Create Data Security Policy page appears.
|
Field |
Value |
|---|---|
|
Name |
|
|
DB Resource |
Trading Community Person |
|
Module |
Trading Community Model |
Note
Understanding which condition and action to select may require Service Administrator assistance.
This topic outlines concepts that will help you understand and plan the creation of Oracle Fusion CRM applications users.
The types of users that are available to you differs for Oracle Sales and Marketing Cloud Service implementations and on-premises implementations.
On-premises implementations can use Oracle Identity Manager, an Oracle Fusion Middleware application, to create and provision enterprise roles to implementation users outside Oracle Fusion CRM applications.
Oracle Sales and Marketing Cloud Service implementations do not have access to Oracle Identity Manager, so you must create and provision implementation users within Oracle Fusion CRM. The term setup users distinguishes the implementation users created from within the Oracle Fusion CRM applications from those created in Oracle Identity Manager.
The following table lists the different user types. Because permissions granted to users depend on the enterprise roles you assign them, you are not restricted to the user types listed in the table.
|
Type of User |
Description |
Available in On-Premises Implementations of Oracle Fusion CRM |
Available in the Oracle Sales and Marketing Cloud Service |
|---|---|---|---|
|
Superuser (FAADMIN) |
The initial superuser who sets up the Oracle Fusion Applications environment. |
Yes, provided by Oracle after installation. |
No. |
|
Implementation Users |
The FAADMIN superuser can create other implementation users outside Oracle Fusion CRM applications using Oracle Identity Manager. These implementation users complete the enterprise setup required for Oracle Fusion Applications and are enabled to manage user security and carry out DBA tasks, such as environment maintenance as well as creating and managing user accounts. Implementation users are not created as employees or resources in Oracle Fusion CRM, so you cannot assign them CRM application job roles. They cannot view CRM transaction data or reports. Implementation users are provisioned with the following enterprise roles:
|
Yes. |
No. Oracle Sales and Marketing Cloud Service implementations do not have access to Oracle Identity Manager. |
|
Setup Users |
Users with the same privileges as implementation users but who are created within Oracle Fusion Applications, using the same Create User page that is used to create other application users. Setup users can perform all of the same implementation setups for your CRM implementation, including managing security, setting up other users, and editing enterprise information. Setup users are not created as resources in Oracle Fusion CRM and are not provisioned with the Resource abstract role, so you cannot assign them CRM application job roles and they cannot view CRM transaction data or reports. Setup users are provisioned with the following enterprise roles:
|
Setup users are not provided for on-premises implementations. If you want to create a setup user, then you must create a provisioning rule to provision enterprise roles based on a property other than the resource role. See the Creating Setup Users for Oracle Fusion CRM: Worked Example help topic for details. |
Oracle provides you with one initial user with the same access as a setup user based on the information you provided when you signed up with the service. If you want to create additional setup users, then you must create a provisioning rule to provision enterprise roles based on a property other than the resource role. See the Creating Setup Users for Oracle Fusion CRM: Worked Example help topic for details. |
|
Sales Administrators |
Sales administrators are CRM application users who are provisioned with the Sales Administrator job role. They can create other CRM application users, manage data import from legacy systems, and customize the application. Unlike setup users, sales administrator users can view CRM transactional data and reports. They cannot configure CRM application security or perform tasks related to the enterprise setup. Sales administrator users are provisioned with the following enterprise roles:
|
Yes. |
Yes. |
|
CRM Application Users |
Implementation users, setup users, and sales administrators can create CRM application users such as marketing managers and salespersons. Application users are provisioned using their role in the organization with the security settings they need to perform their jobs. They can perform only functional setup within the application, depending on their role. Application users are provisioned with the following enterprise roles:
|
Yes. On premises implementations can create application users in any of three ways:
|
Yes. Because the loader option is not available, Oracle Sales and Marketing Service Cloud implementations can create application users in one of two ways:
|
You can create Oracle Fusion CRM application users in multiple ways. You can:
Create users individually in the user interface
Use this method for creating implementation and sales administrator users and for creating application users unless the number of the number users you are creating is very large.
Import users from a file
Import users from a file using the file-based import feature only if you have a very large number. You cannot import implementation users because the import process requires you to import CRM resources.
Load user records into the database tables
If you are implementing CRM on premises and you are creating a large number of users, then you can load users into the application using a loader of your choice.
When you create CRM implementation and application users, you are accomplishing multiple tasks at the same time, depending on the type of user. The following table lists the tasks:
|
Task Accomplished |
CRM Application Users |
Setup User |
Description |
|---|---|---|---|
|
Sends automatic e-mail notifications with user names and automatically generated temporary passwords |
Yes |
Yes |
The application sends the notifications to the user or to an administrator only once, either on creation or at a later time, depending on the setup. |
|
Provisions the enterprise roles that provide the security settings that users need to do their jobs |
Yes |
Yes |
Enterprise roles are provisioned based on the autoprovisioning rules you create as part of the security setup. |
|
Creates resources that can be assigned CRM work |
Yes |
No |
Only users created as resources can be assigned to sales teams and view reports. |
|
Creates the resource reporting hierarchy used by Oracle Fusion CRM for reporting, forecasting, and work assignment |
Yes |
No |
You create the hierarchy by specifying a manager for each resource. |
|
Creates resource records that users can update with personal information to complete a directory of your CRM organization |
Yes |
No |
Only resources have their information appear in the CRM directory. |
|
Creates the hierarchy of resource organizations |
Yes |
Not applicable |
Each resource is assigned to a resource organization. The application uses the resource reporting hierarchy to build a hierarchy of these organizations. |
|
Creates rudimentary employee records for use by Oracle Fusion HCM. |
Yes |
Yes |
All users you create in the user interface or by importing generate employee records. |
For each CRM user that you create, you must enter a unique e-mail address. By default, the application automatically sends an e-mail notification with the user name and temporary password to this address immediately after the user is created. Users then sign in and change their passwords.
If you do not want users to receive the notification e-mail right away because you are in the trial phase of your implementation project, then you can disable the automatic notification using the following steps:
Navigate to the Setup and Maintenance work area.
Search for the task Manage Enterprise HCM Information on the All Tasks tab of the Overview page.
Click the Go to Task button.
In the Enterprise page, click the Edit button, and select Update.
In the User and Role Provisioning Information region, set the Send User Name and Password option to No.
Click Done.
When users are ready to receive their temporary passwords, you can send all of the notifications at the same time, using the following steps:
In the Navigator menu, select Scheduled Processes under the Tools heading.
In the Scheduled Processes Overview page, click Schedule New Process.
In the Schedule New Process dialog box, make sure the Job option is selected for Type.
Enter Send User Name and Password E-Mail Notifications in the Name field.
Click OK.
In the Process Details window, click Submit.
Click Close.
Note
The Send User Name and Password E-Mail Notifications process sends the notification e-mail only to those users who have never been sent the notification. The process does not reset passwords or resend the notification.
Alternately, you can send a notification to an individual user:
While editing the user in the Create User or Edit User page, select the Send User Name and Password check box in the User Notification Preferences region.
The resource reporting hierarchy provides the basis for CRM data security. The resource reporting hierarchy need not mirror the formal reporting hierarchy, which is captured separately in the Oracle Fusion HCM application if it has been implemented.
Note
In Oracle Fusion CRM, you can have only one hierarchy reporting to one person.
You build a resource reporting hierarchy when you create CRM application users by specifying the manager for each user. If you are creating users one-by-one in the user interface, then you must start by creating the user at the top of the hierarchy and work your way down. If you are importing users using file-based import, then the order does not matter provided that all of your users are in the same file.
In Oracle Fusion CRM, you must assign each manager that you create as a user with his or her own resource organization. All direct reports who are individual contributors inherit their manager's organization.
In Oracle Fusion CRM, resource organizations serve a limited purpose. Their names appear in the application's Resource Directory, which users can access to obtain information about their coworkers, and in social media interactions. Resource organizations are not used for work assignment.
The following screen capture shows the Resource Directory, which is available on the application Navigator. The resource organization names appear under each person's title.
The application automatically builds a resource organization hierarchy, using the resource reporting structure.
Suppose, for example, that your CRM enterprise includes sales and marketing departments that report to the Executive VP of Sales and Marketing and its members as follows:
Mathew Fullerton, Executive VP Sales and Marketing
Bob Doyle, Sales VP
Mateo Lopez, Sales Manager
Gabrielle Lee, Sales Manager
Jillian Henderson, Sales Representative (reporting to Mateo Lopez)
Joseph Kerr, Sales Analyst (reporting to Gabrielle Lee)
A diagram of the reporting hierarchy looks like the following:
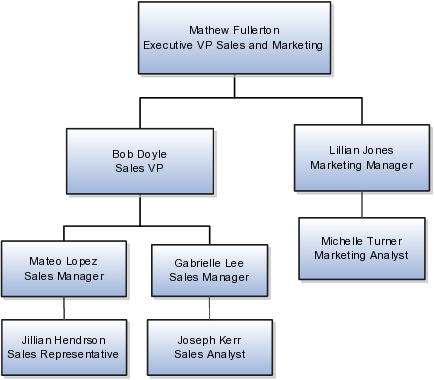
Now, also suppose that you create the following resource organizations and assign them to the managers.
|
Manager |
Assigned Resource Organization |
|---|---|
|
Mathew Fullerton |
Sales and Marketing |
|
Bob Doyle |
Sales |
|
Lillian Jones |
Marketing |
|
Mateo Lopez |
Sales West |
|
Gabrielle Lee |
Sales East |
The application automatically builds the resource organization hierarchy, shown in the following figure, using the hierarchy of managers.
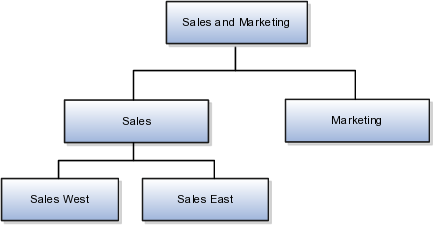
The resource organizations remain even if managers leave. You can reassign the resource organizations to their replacements.
The resource organization names do not have to reflect the names of departments. Departments are tracked along with employee records in the Oracle Fusion HCM application if it has been implemented. The resource organizations are not used in application security or to assign work to users. For example, you cannot include a resource organization on an opportunity sales team or as a territory owner.
When you create application users, you must include information that is used to create basic employee records for the Oracle Fusion HCM application. This requirement is part of the CRM application architecture. These records are used only if you are implementing this application now or plan to do so.
|
Attribute |
Definition |
On Premises |
Oracle Fusion Sales and Marketing Cloud Service |
|---|---|---|---|
|
Person Type |
Enter either Employee or Contingent Worker, depending on whether the user you are creating is an employee or a contractor. The selection you make is used for provisioning either the Employee or the Contingent Worker abstract role. |
Enter either Employee or Contingent Worker. |
Enter either Employee or Contingent Worker. |
|
Legal Employer |
Enter the name of the legal entity that is the user's employer. |
Enter the name of the legal entity that you defined as part of the enterprise setup. |
Enter the legal entity that was set up for you based on the information you provided when you signed up with the service. |
|
Business Unit |
The business unit where your CRM applications are being used. All CRM applications must be implemented in the same business unit. |
Enter the business unit that you defined as part of enterprise setup. |
Enter the business unit that was set up for you based on the information you provided when you signed up with the service. |
This topic describes the different applications and application modules that you use when you create Oracle Fusion Customer Relationship Management (CRM) users. These include Oracle Fusion Human Capital Management (HCM), File-Based Data Import, Universal Messaging Service, and Oracle Identity Management, which is an Oracle Fusion Middleware application.
The following figure outlines the different application components that you use when you are creating and managing users:
Creating users
You can create CRM application users in one of three ways. Each method involves different application components.
To create users individually in the user interface, you select the Manage Users option in the application Navigator.
The Create User page is part of the Oracle Fusion HCM application, but you are not required to purchase or to implement Oracle Fusion HCM. The core Oracle Fusion HCM features that are required to create and manage CRM users are provided with Oracle Fusion CRM.
To import users from a file, use the tasks in the setup task group Define File-Based Data Import. You can search for this task group from the Setup and Maintenance work area. You can use the File-Based Data Import task group, which is described in a separate topic, to import many application objects, including customer records, opportunities, and leads.
If you are implementing CRM on premises, then you can also create users by importing them using a loader of your choice. To use a loader, select Data Import under the Customer Data Management heading in the Navigator menu, or use the Define Trading Community Import task list in the Setup and Maintenance work area.
Managing notifications
When you create users using any of these methods, you can automatically send an e-mail notification with the user name and temporary password. The e-mails are sent by the User Messaging Service, a part of the Oracle Service-Oriented Architectures Suite, which is a separate Oracle Fusion Middleware application. If you are implementing your CRM application on premises, then a superuser can also manage the notifications and the notification templates from the User Messaging Service application.
Managing users
When you create users, basic user information is copied to Oracle Identity Management, which is a separate Oracle Fusion Middleware application. If you are implementing CRM on premises, then you can use Oracle Identity Management for user management. For example, you can use Oracle Identity Management to reset user passwords and manage the enterprise roles that provision users with the security settings they require to carry out their duties. On premises implementations can use Oracle Identity Management to create implementation users, but not CRM application users.

The following table provides a breakdown by task or component:
|
Component or Application |
Description |
Navigation |
|---|---|---|
|
Define File-Based Data Import task group |
Use the Define File-Based Data Import task group, which is a common component of Oracle Fusion Applications, to import users from a file. |
Navigate to the Setup and Maintenance work area and search for the Define File-Based Data Import task group. |
|
Oracle Fusion HCM |
Use the Manage Users task to create and manage user records. |
Select the Manage Users link in the Navigator.. |
|
User Messaging Service |
If you are implementing CRM on premises, then you can use this application to manage the e-mail server that sends notifications to users. The notifications contain the user names and temporary passwords. |
Sign in to the User Messaging Service as described in that application's documentation. |
|
Oracle Identity Management |
If you are implementing CRM on premises, then you can use Oracle Identity Management to create and manage job roles, as well as manage users and passwords. Although you can create users, you cannot create users as resources. This restriction means that you cannot create Oracle Fusion CRM application users in Oracle Identity Management alone. |
You can use the Manage Job Roles task from the Setup and Maintenance work area to start the application in a separate browser window. |
This topic provides an overview of how to create Oracle Fusion Customer Relationship Management (CRM) application users and their resource organizations.
This topic covers:
Creating the resource organization at the top of the CRM organizational hierarchy
Creating the resource organizations that you must assign to each manager
Creating the users
Before you create CRM users you must:
Make sure that all enterprise information has been set up.
Complete the security setup. Make sure you have all the resource roles, enterprise roles, and autoprovisioning rules you need for the users you are creating.
Before you can create resource organizations for your users, you must create the top-level organization in your hierarchy.
To create the top-level organization, do the following:
Create the top-level organization as you would create any other resource organization by using the Manage Sales and Marketing Organizations task from the Setup and Maintenance work area.
Specify the resource organization that you created as the top of your sales and marketing hierarchy by using the Manage Resource Organization Hierarchies task from the Setup and Maintenance work area.
For more information, see the Creating the Top Level of the CRM Resource Organization Hierarchy: Worked Example help topic.
If you are creating users individually in the user interface using the Create User page, then you can create the resource organizations while you are creating the users, or you can create them before using the Manage Sales and Marketing Organizations task from the Setup and Maintenance work area.
If you are importing users, then you must have the resource organizations created before you import any data.
Note
When creating resource organizations:
Do not use the name of the manager in the name of your resource organization because you can reassign the organization to a new manager if the current one changes or leaves.
Create a separate resource organization for each manager user. This requirement applies even if the managers work in the same organization.
For more information, see the Creating Resource Organizations for Oracle Fusion CRM: Worked Example help topic.
This section provides an overview of the different methods of creating Oracle Fusion CRM users:
To create users individually in the user interface:
Navigate to the Manager Users work area, which is available as a selection on the application's Navigator.
The Create User page, displays up to six regions, depending on your release version, your enterprise defaults, and the enterprise roles assigned to you. The following screen capture shows the page.
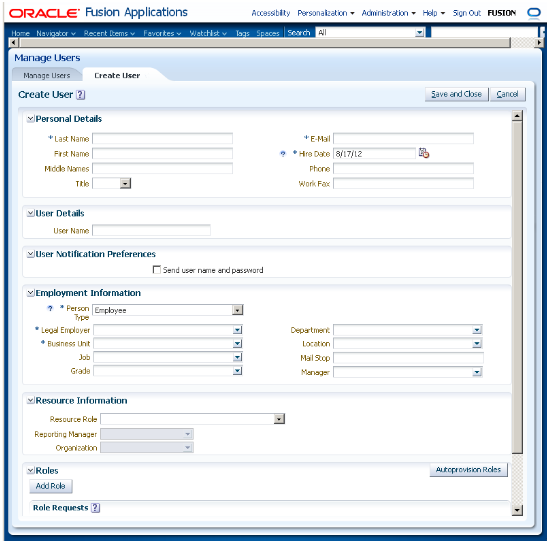
The following table describes the regions.
|
Create User Page Region |
Description |
|---|---|
|
Personal Details |
You are required to enter the user's last name, hire date, and a unique e-mail address for the initial e-mail notification. |
|
User Details |
Enter the user name that the user will use to sign in. |
|
User Notification Preferences |
Select the option in this region if you want to send the user name and password to the user you are creating. This region appears only if you decided to turn off automatic notifications by setting the Send User Name and Password option to No while editing the enterprise information using the Manage Enterprise HCM Information task. |
|
Employment Information |
The information you enter in this region is used to create the basic employee record for use with the Oracle Fusion Human Capital Management (HCM) application. Only the required fields are relevant to CRM. |
|
Resource Information |
Make entries in this region if you are creating a CRM application user who is a CRM resource. Leave this region blank for setup users who are not members of the CRM organization. You must enter a resource role and a manager for every CRM application user, because access to application data depends on the resource hierarchy. For every user with a manager resource role, you must enter a resource organization. The resource role you select determines the job roles that the user will be assigned when you click the Autoprovision Roles button |
|
Roles |
Clicking the Autoprovision Roles button provisions the user with the enterprise roles that provide access to the application functions and data. If you are importing resources from a file, then the autoprovisioning is done automatically. |
To import users from a file:
Use the Manage File Import Activities task from the Setup and Maintenance work area, and create an import activity. To import users, you must select the Employee Resource object when creating the import activity. Before you can import users, you must:
Understand what attributes are required, and what values are permitted.
Create a mapping between the user data that you are importing and the attributes in the application.
Refer to Define File-Based Data Import topics for more information on how to import users and other data.
If you are implementing CRM on premises, then you can load user data into the application by using a loader of your choice.
Use the Import Worker Users task from the Setup and Maintenance work area.
This topic summarizes the main differences between creating users when you are implementing Oracle Fusion CRM on premises and in the Oracle Sales and Marketing Cloud Service.
The following table summarizes the main differences.
|
Feature |
On Premises |
Oracle Sales and Marketing Cloud Service |
|---|---|---|
|
Using Oracle Identity Manager to create and manage users. |
Yes. |
No. |
|
Loading users directly into interface tables using a loader of your choice |
Yes. |
No. |
In Oracle Fusion CRM, you must assign a resource organization to each manager user that you create. All direct reports of that manager inherit the organization. You can create resource organizations before you create users according to the steps in this example.
The Manage Sales and Marketing Organization page appears.
The Create Organization: Select Creation Method page appears.
The Create Organization: Enter Basic Information page appears.
Specifying a usage determines whether the organization is visible when creating a sales manager or a marketing manager.
Use this example as a guide for creating the resource organization at the top of the resource organization hierarchy. You must complete this setup before you create users.
When you create users who are managers in the Oracle Fusion CRM organization, you must assign a resource organization to each of them. The application automatically builds a resource organization hierarchy for you from the management hierarchy that you create.
Before you can create the resource organizations for the managers, you must create the top-level resource organization in your hierarchy following the steps in this example.
Creating the top-level resource organization in the resource organization hierarchy involves the following:
Creating the resource organization
Specifying the organization as the top of your sales and marketing hierarchy
The Create Organization: Select Creation Method page appears.
This step identifies how the organization is being used.
The Manage Resource Organization Hierarchies page appears.
You will associate the resource organization you created with the predefined hierarchy type.
The Edit Organization Hierarchy Version page appears.
The Add Tree Node window appears.
The Search Node window appears.
The application returns you to the Edit Organization Hierarchy Version page.
Follow the steps in this example to create a setup user, an application user with the privileges to set up application security, make changes to the enterprise setup, create other users, and complete most setup tasks. Because setup users are not created as CRM resources, they cannot view CRM data or reports and cannot be assigned to sales teams and territories.
Setup users do not work in the CRM organization and so should not appear in the CRM application directory or be available as resources for assignment to sales teams. For this reason, you do not specify a resource role or any other resource information for this type of user.
To provision these users with the required Application Implementation Consultant and IT Security Manager job roles, you must create a provisioning rule that is triggered not by the resource role assigned to the user, but by some other attribute. In this example, you will trigger the rule on the user's job.
To create the setup user, you will:
Sign in as a user with implementation privileges. This can be another setup user.
Create the job that will trigger the rule, Customer Administrator in this example.
Synchronize the Lightweight Directory Access Protocol (LDAP) directory with any changes to the security setups by running a scheduled process.
The LDAP directory enables quick access by CRM Fusion Applications to security settings, so it is a good idea to update the directory to make sure it reflects all the latest security changes.
Create the provisioning rule to provision the required enterprise roles to users with the Customer Administrator job.
Create a rule to provision the Employee abstract role to all employee users. This is a one-time setup, so you can ignore this step if you created the rule previously.
Create the user.
To create the job:
The Manage Job page appears.
The Create Job: Details page appears.
To update the LDAP directory:
The Schedule New Process window appears.
To set up the provisioning rule that automatically assigns the appropriate enterprise roles:
The Manage HCM Role Provisioning page appears.
Application Implementation Consultant
IT Security Manager
You must create one rule to provision all users who are employees with the Employee abstract role. This is a one-time-only setup.
To create the provisioning rule for employees:
The Manage HCM Role Provisioning page appears.
To create the setup user:
The Manage Users page appears.
The Create User page appears.
|
Field |
Entry |
|---|---|
|
Last Name |
Enter the user's last name. Entry is required. |
|
First Name |
Optionally, enter the user's first name. |
|
|
Enter a unique e-mail address. This e-mail address is used to send the initial notification to the user and can be changed later. |
If this region is not present in the page, then the notification will be sent automatically.
|
Field |
Entry |
|---|---|
|
Person Type |
Select Employee. Do not select Contingent Workerbecause enterprise role provisioning is based on the employee's job, a field that appears only for employees. |
|
Legal Employer |
Select the legal employer created as part of enterprise setup. If you are implementing in the Oracle Sales and Marketing Cloud Service, then the legal employer was set up for you based on the information that you provided when you signed up for the service. |
|
Business Unit |
Select the business unit created as part of enterprise setup. If you are implementing in the Oracle Sales and Marketing Cloud Service, then the business unit was set up for you based on the information that you provided when you signed up for the service. |
|
Job |
Select the job you created earlier. |
The Roles region should now display the following roles:
Application Implementation Consultant
IT Security Manager
Employee
Segregation of duties (SOD) separates activities such as approving, recording, processing, and reconciling results so an enterprise can more easily prevent or detect unintentional errors and willful fraud. SOD policies, called access control policies in Application Access Controls Governor (AACG), exert both preventive and detective effects.
SOD policies constrain duties across roles so that unethical, illegal, or damaging activities are less likely. SOD policies express constraints among roles. Duty role definitions respect segregation of duties policies.
You manage, remediate, and enforce access controls to ensure effective SOD using the Application Access Controls Governor (AACG) product in the Oracle Enterprise Governance, Risk and Compliance (GRC) suite.
AACG applies the SOD policies of the Oracle Fusion Applications security reference implementation using the AACG Oracle Fusion Adapter.
AACG is integrated with Oracle Identity Management (OIM) in Oracle Fusion Applications to prevent SOD control violations before they occur by ensuring SOD compliant user access provisioning. SOD constraints respect provisioning workflows. For example, when provisioning a Payables role to a user, the SOD policy that ensures no user is entitled to create both an invoice and a payment prevents the conflicting roles from being provisioned. AACG validates the request to provision a user with roles against SOD policies and provides a remediating response such as approval or rejections if a violation is raised.
Use AACG to for the following.
Define SOD controls at any level of access such as in the definition of an entitlement or role.
Simulate what-if SOD scenarios to understand the effect of proposed SOD control changes.
Use the library of built-in SOD controls provided as a security guideline.
SOD policies express incompatible entitlement or incompatible access points into an application. In GRC, an access point is the lowest level access for a particular application. In GRC, entitlement is a grouping of access points. As a security guideline, group the lowest level access points or define the SOD policy at the access level causing the least amount of change. Business activities are enabled at access points. In Oracle Fusion Applications, the hierarchy of access points in descending levels is users, roles, and entitlement.
Note
AACG entitlements are logical groupings of security objects that represent Oracle Fusion Application access points such as roles or entitlement.
Note
In AACG, segregation of duties policies are called access controls.
Oracle Fusion Applications does not predefine business logic for dealing with SOD conflicts. Oracle Fusion Applications does define a set of states where role requests are suspended pending resolution of SOD violations the role request introduces. In most cases, Oracle Fusion Applications invokes OIM to handle role requests. Enterprises define SOD resolution rules when defining SOD policy.
The risk tolerance of your enterprise determines what duties must be segregated and how to address violations.
AACG assists in remediation of violations with a guided simulation that identifies corrective action. You determine the exact effects of role and entitlement changes prior to putting them into production, and adjust controls as needed.
For information on managing segregation of duties, see the Oracle Application Access Controls Governor Implementation Guide and Oracle Application Access Controls Governor User's Guide.
Segregation of duties (SOD) is a special case of function security enforcement. A segregation of duties conflict occurs when a single user is provisioned with a role or role hierarchy that authorizes transactions or operations resulting in the possibility of intentional or inadvertent fraud.
The predefined SOD policies result in duty separation with no inherent violations. For example, an SOD policy prevents a user from entitlement to create both payables invoices and payables payments.
However, the most common duties associated with some job and abstract roles could conflict with the predefined segregation of duties. A predefined role hierarchy or job or abstract role may include such common duties that are incompatible according to a segregation of duties policy. For example, the predefined Accounts Payable Supervisor job role includes the incompatible duties: Payables Invoice Creation Duty and Payables Payment Creation Duty.
Every single predefined duty role is free from an inherent segregation of duties violation. For example, no duty role violates the SOD policy that prevents a user from entitlement to both create payables invoices and payables payments.
Jobs in the reference implementation may contain violations against the implemented policies and require intervention depending on your risk tolerance, even if you define no additional jobs or SOD policies.
Provisioning enforces segregation of duties policies. For example, provisioning a role to a user that inherits a duty role with entitlement to create payables invoices enforces the segregation of duties policy applied to that duty role and ensures the user is not also entitled to create a payables payment. When a role inherits several duty rules that together introduce a conflict, the role is provisioned with a violation being raised in the Application Access Controls Governor (AACG). If two roles are provisioned to a user and introduce a segregation of duties violation, the violation is raised in AACG.
Note
SOD policies are not enforced at the time of role definition.
Aspects of segregation of duties policies in the security reference implementation involve the following.
Application Access Controls Governor (AACG)
Conflicts defined in segregation of duties policies
Violations of the conflicts defined in segregation of duties policies
AACG is a component of the Oracle Enterprise Governance, Risk and Compliance (GRC) suite of products where segregation of duties policies are defined.
Define SOD controls at any level of access such as in the definition of an entitlement or role.
Simulate what-if SOD scenarios to understand the effect of proposed SOD control changes.
Use the library of built-in SOD controls provided as a security guideline.
Your risk tolerance determines how many duties to segregate. The greater the segregation, the greater the cost to the enterprise in complexity at implementation and during maintenance. Balance the cost of segregation with the reduction of risk based on your business needs.
An intra-role conflict occurs when a segregation of duties policy expresses constraints within the construct of a single role (entitlement and duties) that creates violations.
Tip
As a security guideline, use only the predefined duty roles, unless you have added new applications functions. The predefined duty roles fully represent the functions and data that must be accessed by application users and contain all appropriate entitlement. The predefined duty roles are inherently without segregation of duty violations of the constraints used by the Application Access Controls Governor.
A segregation of duties violation occurs when a policy is defined that allows a segregation of duties conflict to occur.
Notifications report conflicts to the requester of the transaction that raised the violation. Oracle Identity Management (OIM) shows the status of role requests indicating if a segregation of duties violation has occurred.
For information on configuring audit policies, see the Oracle Fusion Applications Administrator's Guide.
For more information on managing segregation of duties, see the Oracle Application Access Controls Governor Implementation Guide and Oracle Application Access Controls Governor User's Guide.
Segregation of duties (SOD) policies express incompatibilities enforced to control access in defined contexts.
In Oracle Fusion Applications, SOD policies protect against the following incompatibilities.
Privilege X is incompatible with privilege Y
Role A is incompatible with role B
Any privileges in role A are incompatible with any privileges in role B.
Privilege X is incompatible with any privileges in role B.
The following examples of SOD policies illustrate incompatible entitlement.
No user should have access to Bank Account Management and Supplier Payments duties.
No user should have access to Update Supplier Bank Account and Approve Supplier Invoice entitlement.
You can extend SOD policies to control access to specific data contexts.
For example, no single individual must be able to source a supplier in a business unit and approve a supplier invoice in the same business unit.
SOD policies may include exclusion conditions to narrow the SOD scope and reduce false positive violations, or inclusion conditions to broaden the scope.
Conditions apply to access points globally, to policies, or to access paths defined by policies. Access path conditions can exclude a user from a role, an Oracle Fusion Applications entitlement from a role, or a permission from an Oracle Fusion Applications entitlement.
The following global exclusion conditions are predefine in Oracle Fusion Applications and available when creating SOD policies.
User Status
User Name
Enterprise Role
Action
Business Unit
Within Same Business Unit
Oracle Fusion Applications enforces SOD policies under the following circumstances.
When granting entitlement to a role
When provisioning a role to a user
For information on managing segregation of duties, see Oracle Application Access Controls Governor Implementation Guide and Oracle Application Access Controls Governor User's Guide.
Note
SOD policies are not enforced at the time of role definition.
A single SOD policy can include entitlement from multiple instances of a single enterprise resource planning environment. For example, one SOD policy is enforced in implementation, test, and production instances of Oracle Fusion Applications.
You assess and balance the cost of duty segregation against reduction of risk based on the requirements of your enterprise.
The types of people who resolve SOD conflicts include the following.
Administrator of an external program such as the Procurement Administrator for the supplier portal or the Partner Manager for the PRM Program
Senior executive spanning multiple organizations in an enterprise with opposing interests
Risk management professional implementing an Oracle Enterprise Governance, Risk and Compliance (GRC) initiative
Predefines a set of conditions and informs access provisioning staff to approve requests and prove the exception based on certain conditions
Allows defining rules to route SOD violations for approval
You view and respond to risks and violations in the Application Access Controls Governor (AACG).
You may wish to override an SOD violation. For example, the Accounts Payable Supervisor includes incompatible duties to create both invoices and payments. When you provision this job role to a user, you may waive the violation in the AACG. You may waive the violation for the currently provisioned user, for the SOD policy that raised the violation, or for the SOD policy within a particular data set, such as a business unit.
The risk tolerance of your enterprise guides how you respond to conflicts. For example, a user may be provisioned with both the role of Order Manager and Shipping Agent. The Order Manger role entitles the user to enter orders, which could result in exploitation when filling shipping quotas. You can remove the entitlement to enter orders that the Order Manger job role inherits from the Orchestration Order Scheduling Duty role. Or you could segregate the shipping and order entry duties by defining an SOD policy that allows a user to have either job role but not both.
False positives can be SOD policy violations that are not actually violations, or are violations within your risk tolerance and therefore do not require corrective action.
You can reduce false positives by the following methods.
Define exclusion conditions that can be applied to individual or groups of policies.
Define logically complex SOD policies that enforce more exacting specifications.
Determine whether conflicts should be prevented, monitored, or subjected to approval during provisioning.
Conflict analysis detects a user's multiple paths to one or more conflicting access points.
For example, a user may be able to reach a single access point through one or more roles, or by one entitlement leading to another through submenus to a function that represents a risk. The resulting conflict path shows if the conflict is generated by inappropriate role provisioning or configuration of applications. The audit shows the paths from any number of users to any number of access points involved in conflicts, which lets you visualize the root cause and remediate effectively.
AACG assigns one or more users to review all paths involved in a given conflict so that the entire conflict can be addressed in a coherent way.
AACG lets you accept or waive a violation. Your reasons may include that you accept the risk or will define compensating controls.
A waiver may apply to the current user, constraint, or constraint within a dimension such as the business unit.
The risk tolerance of the enterprise determines whether a segregation of duties conflict must be removed from the security reference implementation.
The following approaches resolve conflicts.
Change the segregation of duties policy.
Ensure a job role does not contain incompatible duties.
Define data security policies that restrict authorized access by incompatible duties.
Changing a segregation of duties policy may not be possible in most cases. For example, a policy that segregates creation of payables invoice from making payables payments should be preserved, even if the Accounts Payables Manager job role includes a duty role for each activity. To prevent an accounts payables manager from being authorized to perform both duties, or from being authorized to make payables payments to self and direct reports, the Accounts Payables Manager job role must be changed. The security implementation can be changed to include two job roles that segregate the incompatible duties. Added data security policy grants can restrict the access to at risk data.
For information on managing segregation of duties, see the Oracle Application Access Controls Governor Implementation Guide and Oracle Application Access Controls Governor User's Guide.
Segregation of duties (SOD) checks occur when roles are assigned to users. The checks are based on Oracle Application Access Controls Governor (AACG) policies in Oracle Enterprise Governance, Risk and Compliance (GRC). The Oracle Identity Management (OIM) integration includes predefined routing rules for remediation in the Manage IT Security business process.
External users such as suppliers or partners need to be provisioned with roles to facilitate access to parent company interfaces and data. The process by which such provisioning requests are approved in Oracle Fusion Applications helps explain the request flows and possible outcomes.
Note
In Oracle Identity Management (OIM), external users means users who are not specific to applications, such as enterprise roles or the absence of entitlement to access an application.
The figure shows the role provisioning request flow. OIM uses AACG to check segregation of duties violations.

A supplier or partner requests admission to a program using an implementation of the Supplier Portal Submission. The submission is captured in one or both of the following tables in advance of approving or rejecting the supplier or partner.
Oracle Fusion Trading Community Model
Interface Staging
Oracle Fusion Applications collects the employee names for the supplier or partner company at the time the company submits its request to join the program so that all employees accessing Oracle Fusion Applications on behalf of the supplier or partner are provisioned.
AACG in the Oracle Enterprise Governance, Risk and Compliance (GRC) suite is certified to synchronize with the policy and identity stores for all pillars or partitions of Oracle Fusion Applications and integrated with the Oracle Fusion Applications security approach to roll up entitlements (by means of duty roles) to the roles that are provisioned to internal users. SOD policies can be defined and enforced at any level of authorization. For external users, SOD policies use attribute information stored in the Trading Community Model tables.
Enterprise business logic may qualify the requester and initiate a role provisioning request by invoking the Services Provisioning Markup Language (SPML) client module, as may occur during onboarding of internal users with Human Capital Management (HCM), in which case the SPML client submits an asynchronous SPML call to OIM. Or OIM handles the role request by presenting roles for selection based on associated policies.
OIM recognizes the role provisioning request and initiates a call to AACG.
OIM apprises the SPML client of the current state of the role provisioning request as SOD_CHECK_IN_PROGRESS.
OIM stores the SOD check result as part of OIM audit data.
OIM apprises SPML client of the current state of the SPML request. The provisioning is either still in progress with segregation of duties being checked, or conflicts were found. If conflicts exist, AACG rejects the request and notifies the application.
|
Status |
Conflicts |
Current State |
|---|---|---|
|
SOD_CHECK_IN_PROGRESS |
Unknown |
Request sent to AACG and waiting for response |
|
SOD_REMEDIATION_IN_PROGRESS |
Conflict found |
AACG detected violations and remediation is in progress |
|
SOD_CHECK_APPROVED |
No conflict found |
No SOD violations found |
|
SOD_CHECK_REJECTED |
Conflict found |
AACG detected violations that cannot be remediated |
|
SOD_REMEDIATION_APPROVED |
Conflict found |
AACG detected violations that are approved |
|
SOD_REMEDIATION_REJECTED |
Conflict found |
AACG detected violations that are rejected by approver |
In the absence of an SOD exception, OIM provisions all relevant users.
Note
When a partner user is provisioned, all employees of the partner enterprise are provisioned. SOD checks occur when an external user requests to join a program, because SOD policies operate across Oracle Fusion Applications, not at the individual level. Supplier or partner company user requests are not approved if there is an SOD conflict against the supplier company.
OIM provides AACG with the details of SOD exception approval workflow. AACG audits the outcome for use in future detective controls and audit processes.
AACG may respond with the following.
Roles may be provisioned to the external user or its employees because no SOD conflict is found
SOD conflict is found and request is denied because the relevant SOD policy is to be strictly enforced and no exception approval should be allowed
SOD conflict is found and the exception to the policy is allowed, so the request goes through additional processing, such as an approval process.
Supplier or Partner Relationship Management responds to an SOD exception by updating Trading Community Model tables with the current state. An enterprise may elect to implement a landing pad that offers external users a means of addressing the SOD problem by providing more information or withdrawing the request.
SOD violation checking occurs during role implementation and provisioning, and can be turned on or off if AACG is provisioned and enabled as part of the Oracle Fusion Applications deployment.
Depending upon status, OIM kicks off an auditable SOD exception resolution workflow. Resolution can be conditional based on approval or requirements such as contracts being met.
If one of the paths for exception resolution is to get an approval, then the SOD exception resolution drives the approval using AMX. Standard AMX rules, not business rules, resolve the approval for the SOD exception, including the following.
Organizational hierarchies
Multiple mandatory and optional approvers
Rerouting and approval delegation
The approver resolution uses AMX Rules Designer to access various user attributes and organizational hierarchies managed in Oracle Fusion Applications repositories. This information is typically not available in OIM or the LDAP identity store repository. Enterprises can define additional approval rules using AMX Thin Client.
The SOD Exception Approver gets a notification through supported channels that a new request is awaiting approval. The approver signs in to the global SOA federated worklist application that aggregates all pending worklist items for the user from all Oracle Fusion applications and logical partitions or pillars of applications. The SOD exception approval tasks show up in the same list.
The SOD exception approval task shows the details of the SPML request and SOD Provisioning results in a page rendered by OIM. The approver may take one of the following actions.
Approve the request as it is
Reject the request
If the approver approves the request, OIM sends an SOD_REMEDIATION_APPROVED status to the SPML client.
If the approver rejects the request, OIM sends an SOD_REMEDIATION_REJECTED status to the SPML client. The provisioning request is considered completed with a failure outcome and the external users is notified. Oracle Fusion Applications updates the Trading Community Model tables with the rejected status
The SOD remediation tasks are assigned based on the role being requested.
If the role requested is Chief Financial Officer, the SOD remediation task is assigned to the IT Security Manager role.
If the SOD violation results from a policy where the SOD control tag is the Information Technology Management business process and the control priority is 1, the SOD remediation task is assigned to Application Administrator role.
In all other scenarios, the SOD remediation task is assigned to the Controller role.
For more information about configuring audit policies, see the Oracle Fusion Applications Administrator's Guide.
For information on managing segregation of duties, see the Oracle Application Access Controls Governor Implementation Guide and Oracle Application Access Controls Governor User's Guide.
When you create a partner user, you enable the partner member to access and use the deploying company's resources for working on assigned tasks. You also assign job and security roles to the partner member's user profile and specify the organization to which the new user needs to belong.
Every partner user needs to have an assigned job role. This job role can be used to create security roles for the user. Based on the security roles you assign, the user can access applications, locations, and data within the deploying company. You may choose to assign security roles automatically to a user; you can also assign additional security roles individually if needed.
While assigning non-manager partner users to organizations, you can either select an organization or a manager. Once you select an organization, the manager of the selected organization becomes the new user's manager. Similarly, once you select a manager, the new user automatically becomes a member of the organization to which the manager belongs.
If the role of the new user is that of a manager, you need to assign the new user to an organization even after specifying a manager. This is because you granted the new user a managerial role, and you now need to specify the organization that the new user needs to manage. You can either select an organization from the list of available organizations, or you can create a new one if required.
Use approval management to determine the policies that apply to approval workflows for particular business objects such as expense reports. For example, you can specify levels of approval for expense reports over a particular amount, to reflect your own corporate policies. You also determine the groups of users who act on these workflow tasks, for example, the chain of approvers for expense reports.
Approval management is fully described in the Oracle Fusion Middleware Modeling and Implementation Guide for Oracle Business Process Management. Though the concepts described there apply also to Oracle Fusion Applications, the only setup relevant to Oracle Fusion Applications involves approval groups and task configuration. Customization of approval workflows themselves is described in the Oracle Fusion Applications Extensibility Guide.
The Define Help Configuration task list contains tasks that let you set up and maintain Oracle Fusion Applications Help for all users. Use the Set Help Options task to determine if certain aspects of Oracle Fusion Applications Help are available to users and to control how aspects of the help site work. Use the Assign Help Text Administration Duty and Manage Help Security Groups tasks to set up customization of help content.
After performing the help configuration tasks, you can review the predefined help and consider whether to add or customize any content. You can also customize help that is embedded in the application, for example hints and help windows, using other tools such as Oracle JDeveloper and Oracle Composer.
Use the Setup and Maintenance work area to access the tasks in the Define Help Configuration task list.
Help feature choices on the Configure Offerings page in the Setup and Maintenance work area control the look and behavior of Oracle Fusion Applications Help, and also determine which help options are available. Help options are setup options on the Set Help Options page.
Select the Local Installation of Help feature choice so that the Define Help Configuration task list appears in your implementation project, and you can select two additional features (Access to Internet-Based Help Features and Help Customization) to control the fields available on the Set Help Options page.
Select this feature choice to provide users access to features that involve navigation to sites on the Web. If you select this feature choice, then the Web Sites Available from Help Site section is available on the Set Help Options page. For Oracle Cloud, always leave this feature choice selected so that your users can access the Cloud Learning Center.
Important
For non-Cloud implementations only: Some help includes links to the Oracle Fusion Applications Technology Library. If you select this feature, then these links open the library on the Oracle Technology Network Web site. If you do not select this feature, then your system administrator must download the library from Oracle Technology Network (http://www.oracle.com/technetwork/documentation/fusion-apps-doc-1508435.html) and put all the content from within the extracted folder (for example E28271_01) directly into the appmgr/APPLTOP/fusionapps/applications/ahc/afh/reference/TechLib folder.
Select the Help Customization feature choice if you intend to customize predefined help or add your own files to help. For example, you can add internal policies or procedures as help, and Oracle User Productivity Kit content, if any. Only users with job roles containing the Application Help Text Administration duty role have access to customize help.
If you select this feature choice, then the Custom Help Security feature choice is available, as well as all these sections on the Set Help Options page:
Custom Help
User Productivity Kit
Privacy Statement
Select this feature choice if you want certain help files to be available only to a restricted set of users. You can define the user groups allowed to view corresponding help files. Do not select this feature choice if you do not have this requirement, because the feature can have an impact on performance.
If you select the Custom Help Security feature choice, then the Manage Help Security Groups task is available in the Define Help Configuration task list in your implementation project. There are no help options associated with this feature choice.
Announcements and collaboration features (discussions, ratings and comments) allow users to share information regarding help and the subjects that particular help files cover. The collaboration features are also used elsewhere in Oracle Fusion Applications. Discussions may not be available in Oracle Cloud implementations.
Use the Set Help Options page in the Setup and Maintenance work area to enable the announcements and discussions features and to set options about ratings. When administering these features, consider the purpose of each feature and points that are specific to Oracle Fusion Applications Help.
Use announcements to broadcast information to all users of your help site. You can provide information about help, for example new custom help that was recently added, or about anything that users should take note of, for example a change in company policy. Announcements can appear on any of the tabs on the home page of Oracle Fusion Applications Help. You can target specific user groups by posting announcements to specific tabs, for example, posting information related to implementation to the Functional Setup tab.
Only users with the Application Help Text Administration duty role have access to the Manage Announcements icon button in the Announcements sections. They can create, edit, and delete announcements for the tab that they are on, and set the date range for when each announcement is to be displayed.
Note
Use the full URL, for example http://www.oracle.com, when creating links.
Users can use discussions to post questions or comments about subjects covered in specific help files. For example, after reading help on expense reports, users might have questions or comments about company policies or processes for expenses. Other users who later access this help file would benefit from the information in the discussion.
You can set a help option to enable discussions. Each help file would contain a Discuss link that all users can use to read discussions about that file. They can also start a discussion topic or post to existing topics. These discussions are visible only to users in your enterprise.
Important
Do not enable discussions until servers for discussions are up and running.
Only users with the appropriate administrator role can moderate discussions. For more information on granting the administrator role on the discussions server, see the Oracle Fusion Middleware Administrator's Guide for Oracle WebCenter Portal.
Users can rate any help file on a five star system and provide feedback about the content. This information is helpful to other users in deciding which help file to open. Help files with a higher average rating are listed first in help windows, and in the help listings you see as you browse using the help navigators.
The scope of ratings and reviews is limited to your enterprise.
This example demonstrates how to create a help security group to define a set of job roles that have access to help. The help security group can then be assigned to particular help files so that only users with any of the defined roles have access to the help.
The following table summarizes key decisions for this scenario.
|
Decisions to Consider |
In This Example |
|---|---|
|
What type of users do you need to limit help access to? |
Human resources (HR) specialists |
|
Is there a specific time period for which this access is needed? |
No, the help files should always be viewed only by the HR specialists |
|
Where do you want this group to appear in the list of values for help security groups? |
First |
Define a help security group and assign a duty role to the group.
|
Field |
Value |
|---|---|
|
Help Security Group |
HR |
|
Meaning |
HR Only |
|
Description |
Viewing by HR specialists only |
|
Display Sequence |
1 |
You have created a new lookup code for the Help Security Groups lookup type, which is a standard lookup. The lookup code has the name, meaning, and description that you defined for the help security group.
You have also created a data security policy for the help database resource, specifying that the Human Resource Specialist role can view help that is defined with the HR security group. If you go to the Manage Database Resources and Policies page and find the database resource, or object, ATK_KR_TOPICS, then you can see the policy for the Human Resource Specialist role, with the condition that the column name, SECURITY_CODE, is equal to the value HR.
If you have the appropriate job roles, then you can customize the help files in the help site. Use the Manage Custom Help page to maintain both predefined and custom help files. You can create, duplicate, edit, and delete custom files, or set their status to Active or Inactive. For predefined files, you can only duplicate them or set their status. For each help file, predefined or custom, use help locations to determine where the help file appears in the application and in the help site. You have various options in how you add custom help, for example by uploading a file or specifying a URL.
Note
To make a copy of all custom help for testing, migration, or other purposes, use the export and import feature in the Setup and Maintenance work area.
There are various ways to access help customization.
Many help files can be accessed from help windows in the application. If you want to customize help in the context of a help window, for example create a custom help file and add a link to it from a specific help window, then start by opening that help window. When you click the Manage Custom Help link, you go to the Manage Custom Help page, and the help location fields are automatically populated with values that correspond to the help window. This way you can easily select existing files to add to the same help location, and when you create a new file, the same help location appears by default.
Open the Manage Custom Help page directly from the home page of Oracle Fusion Applications Help or from search result pages.
To edit a specific file, you can either find it in the Manage Custom Help page, or open the file itself and click the Edit link.
Likewise, you can find glossary terms in the Manage Custom Help page, or click the Glossary link in the global area to open the Glossary tab, search for the term, and click Edit.
Note
When you search in the Manage Custom Help page, make sure that the Custom Help Only check box is not selected if you are looking for predefined help.
If your enterprise has purchased Oracle User Productivity Kit (UPK) content, then your administrator can also add a UPK item to the Help menu in the global area of Oracle Fusion Applications. When users select this menu item, they access UPK content specific to the page that they are on.
Oracle Fusion Applications Help contains various types of help content, including demos, examples, FAQs, glossary terms, help topics, and PDF guides. A business process or product can be supported by some or all of these help types.
Demos are Oracle User Productivity Kit (UPK) topics that visually demonstrate how to use the application to complete a short task or portion of a task. Demos can also provide an introduction to complex dashboards and work areas.
Examples provide real use cases of features to illustrate how and when to use the feature, or scenarios to illustrate abstract concepts. Worked examples show exactly what you need to do to achieve a specific result, emphasizing decisions that you make and values that you enter.
FAQs, or frequently asked questions, provide brief answers to questions that you might have regarding a task or page. For example, they can briefly explain what a term means, why something happened, how you can perform an action, or what happens if you perform the action.
Glossary terms provide definitions for words or phrases used in help. You can search or browse glossary terms in the Glossary tab of Oracle Fusion Applications Help. Where the links are available, you can also see the definition when you hover over the term in help content for other help types.
Help topics explain key concepts, illustrate how application components work together, or assist in decision-making by explaining points to consider or the options you have. Help topics can also provide reference, overview, and other information.
PDF guides present a collection of help content from the other help types, except demos, in an organized and logical format. For example, there are guides addressing specific business processes and setup offerings. You can see lists of all guides from the Guides menu in Oracle Fusion Applications Help.
Help locations determine where users can find help files, custom or not, from either the application or the help site.
Help locations include:
Page or section values
Help hierarchies
Primary locations
The value in the Page or Section field on the help customization pages represents where users can click a help icon to open a help window that contains a link to the help file. In most cases, this value represents a page or region header in the application. Help windows are also available on specific tabs or windows, and in the Setup and Maintenance work area for specific task lists or tasks. You can associate a help file with multiple page or section values, or with none at all.
The page or section value reflects the logical navigation to the help window. For example, Edit Opportunity page, Revenue tab, Recommendations window does not mean that the help file is available in three different places. The help icon is in the Recommendations window, which is accessed from the Revenue tab on the Edit Opportunity page.
If the value suggests multiple locations, for example Create and Edit Opportunity pages, then the help file is available from the page header of both the Create Opportunity and Edit Opportunity pages. If the page or section value is, for example, a dashboard region that appears in multiple dashboards, then the value does not specify the page name but just the region. The help file is available from that region in multiple dashboards.
Help files are associated with help hierarchies, which are used to categorize help files and aid users in finding help. Each help file can have multiple hierarchies, with at least one of type Business Processes. The business process hierarchy is based on the Business Process Management model. Every page or section value is predefined with a specific business process hierarchy. If you select a page or section without entering a business process hierarchy, the predefined hierarchy appears by default.
The Search by Business Process navigator in the help site is based on the business process hierarchy. For example, if you assign two business process hierarchies to a help file, users can find the file in both locations in the navigator. When the user clicks More Help from a help window, all help files assigned to the same business process hierarchy as the page or section value are returned as search results.
Similarly, the Search by Product navigator is based on the Product hierarchy type, in which level 1 is the product family, level 2 is the product, and level 3 is the business activity owned by that product.
The Search by Functional Setup navigator is based on the Functional Setup hierarchy type. The level 1 nodes for this hierarchy are:
Functional Setup Manager, which includes help about using the Setup and Maintenance work area.
Guides, which contains level 2 nodes that correspond to business areas and setup offerings. All the user reference and functional setup PDF guides are included.
Offerings, which contains level 2 nodes for each setup offering, and lower levels for the main task lists in the offerings. Help for the task lists and tasks are included.
The Search by Common Tasks navigator is based on the Welcome hierarchy type. The level 1 nodes represent categories of functional areas common to all users.
The primary location of a help file designates the hierarchy that is displayed for the help file in search results and within the help content as breadcrumbs. You cannot change the primary location of a help file that came with your help installation. Primary locations of predefined help are based on the business process hierarchy, while custom help files can have primary locations based on hierarchies of any type.
When you open any predefined help file, including glossary terms, that came with Oracle Fusion Applications Help, you can see an edit option if you have roles allowing edit access. When you edit predefined help, keep in mind:
What happens to the original help file
Where predefined help appears
Considerations specific to glossary terms
When you edit predefined help, you are actually creating a new custom help file based on the original file, with the same help locations. The customized version replaces the original, which becomes inactive and hidden from users. You can display both versions by reactivating the original in the Manage Custom Help page.
Note
In the Search Results: Existing Help region on the Manage Custom Help page, there is no option to edit predefined help. You can duplicate a predefined help file, edit the copy, and optionally inactivate the original.
All predefined help comes with preassigned help locations, including at least one based on the hierarchy of type Business Processes. Many also have predefined page or section values that indicate where the help can be accessed from help windows in the application.
To change where predefined help appears, either in the help site navigators or in the application, create a duplicate in the Manage Custom Help page. Change or add help locations to your custom copy, and inactivate the original.
Even though glossary terms do not appear in the help site navigators, you still need to enter at least one help location to categorize the glossary term.
When you edit a predefined glossary term, the original term becomes inactive. Existing links to the glossary term, from other predefined and custom help files, will automatically point to your custom version. If you later inactivate the custom glossary term, make sure to activate the original term so that the links still work.
When you create or edit custom help, follow best practices when you include links to help files or other content. If you are working on custom help created by duplicating a predefined help file, then you may see existing links from the original file in the Help Content section. The types of links that you can work with include:
Related help links
Standard hypertext links
Links to documentation library content
Glossary term links
For all link types, except the standard hypertext links, you must create or edit custom help with a Text or Desktop source type. In other words, you must type the help content directly in the application or use an HTML file that you upload to help. For standard hypertext links, the source type can also be URL.
Related help is the section at the end of help files that contains links to other help files. The syntax for related help contains a comma-separated list of title IDs that represent help files.
This figure provides an example of related links code.

You can delete this code to remove
all related help, or delete title IDs to remove individual links (for
example, CREATE_AUTOMATIC_POSTING_CRITERIA_S_0000).
To replace existing links or add new links, you need to retain the code syntax and enter desired title IDs. To find title IDs, search for the help files on the Manage Custom Help page. Title IDs are displayed in the search results, but the Title ID column is hidden by default.
You can create standard hypertext links to any file or Web site as long as you ensure the stability and validity of the links, including links to other help files, custom or not. These links can appear anywhere in the body of your help file as long as they come before any related help links.
In the Help Content section, highlight the text that you want to use as link text and click the Add Link icon button.
For links to other help files, open the file to which you want to link, and click the E-Mail link. Use the URL in the autogenerated e-mail text as the link to the file.
Note
Use the full URL, for example http://www.oracle.com, when creating links.
The syntax for links to HTML files in documentation libraries, for example the Oracle Fusion Applications Technology Library, is:
<span class="HP_topic-link_bridgeDocument-linkToSTDoc_"><?ofa
linkToSTDoc(WCSUG4636) ?><span class="HP_topic-linktext_">Understanding
Tags</span><?ofa endLink ?></span>
.
WCSUG4636 is the anchor
ID and Understanding Tags is the link
text. You can:
Modify the link by replacing the existing anchor ID or editing the link text, or both.
Remove the link by deleting all the code for it.
Create links to documentation library content by following the same syntax. These links can appear anywhere in the body of your help file as long as they come before any related help links.
Important
To ensure that you are linking to a supported documentation library, enter anchor IDs only from documentation libraries that are linked from predefined help topics.
Glossary term links provide definitions in a note box when users hover over the term in help files.
This figure shows an example of code for a glossary term link.

In this example, accounting period is the link text, or glossary term, and ACCOUNTING_PERIOD_001 is
the identifier, or title ID.
To remove the link but retain the text, delete all the code except the term itself.
To add glossary term links, you must follow the link syntax and use the correct title ID for the glossary term. You can find title IDs in the search results of the Manage Custom Help page.
Note
If your custom help has glossary terms and the source
type is Desktop File, then make sure before uploading that the quotes
around the glossary term are actual quotation marks in raw HTML, not ". Otherwise, quotation marks will appear
when users view the help file.
This example demonstrates how to customize a PDF guide that came with Oracle Fusion Applications Help. This guide is currently not available from any help window in the application.
The following table summarizes key decisions for this scenario.
|
Decisions to Consider |
In This Example |
|---|---|
|
What changes do you need to make to the guide? |
Change the title of a chapter and remove a section in that chapter, to hide content about a particular subject |
|
Which help window should the customized guide appear in? |
The help window for the entire Welcome dashboard of Oracle Fusion Applications |
|
Which help navigators should the customized guide appear in, and on which node? |
Same as the original guide, plus the path associated with the help window |
|
Do you want to limit access to the customized guide? |
No, same as the original guide |
Edit a copy of the original PDF guide, and use the Manage Custom Help page to replace the original PDF guide with your new file.
This example demonstrates how to add custom Oracle User Productivity Kit (UPK) topics as demo help files. These help files function like any predefined help file for demos. You can search and include these files in help windows and navigators as you would other help.
In this scenario, you are adding two demos about social networking, to appear in help windows on the Welcome dashboard.
Note
Your demo must be made with UPK 3.6.1 or later to be added as help.
The following table summarizes key decisions for this scenario.
|
Decisions to Consider |
In This Example |
|---|---|
|
What UPK content do you want to add to help? |
From a UPK module containing five topics, add two as custom demos on the help site |
|
Which help navigators should each demo appear in, and on which node? |
Because the two demos are about social networking:
|
|
Which help window should each demo appear in? |
On the Welcome dashboard of Oracle Fusion Applications, one demo goes in the help window in the Activity Stream region, and the other in the People Connection region |
|
Do you want to limit access to the help files for the demos? |
No |
|
Do you want the help files to appear in the New and Updated pane? |
Yes |
Generate a report of UPK document IDs, which you will use when creating custom help, to identify the UPK topics that you want to add. Publish the UPK module as a player package, then create custom help for the UPK topics that you want to use as help demos.
|
Field |
Value |
|---|---|
|
Title |
The name of the UPK topic. |
|
Source Type |
Oracle User Productivity Kit |
|
File Location |
The full URL of the player package folder on the Web
server, for example, |
|
Document ID |
The document ID of the UPK topic to add to the help window in the Activity Stream region. You can copy and paste this ID from the Microsoft Excel file that you generated earlier. |
|
Help Type |
Demo |
|
Help Security Group |
Unsecured |
|
Keywords |
Terms relevant to the demo. |
|
Description |
Summary of the demo. |
|
Include in New and Updated pane |
Selected |
The Help Location section contains values for the help window in the Activity Stream region. This help file will also appear in the Search by Business Process navigator under this predefined hierarchy.
You can customize help that is embedded in the application, for example hints and help windows, for all users of Oracle Fusion Applications.
Embedded help customization is fully described in the Oracle Fusion Applications Extensibility Guide.
Provide a link to your Oracle User Productivity Kit (UPK) library if you have UPK licensed and custom UPK content to share with your users. You give them access to a library of custom UPK content in addition to any custom UPK demos that you added to the help site itself. UPK demos that you add as custom help are available only in the See It mode, so the library can include the same demo in other modes. If you have UPK versions earlier than 3.6.1, then you cannot add UPK demos as custom help, so the link is the only way for users to access custom UPK content from the help site.
The URL to enter on the Set Help Options page
should be the full path from the Web server where you
are hosting your Oracle User Productivity Kit (UPK) content to the
index.html file that opens the table of contents for the library,
for example, http://<your domain>.com/UPKcontent/PlayerPackage/index.html. In this example, you or your UPK administrator would publish one
UPK player package that contains all the content to be linked to from
Oracle Fusion Applications Help, as well as the index.html file, and
place the PlayerPackage folder in a manually created folder called
UPKcontent on the Web server.
Users with the Application Help Text Administration duty role have access to customize help in Oracle Fusion Applications Help. This duty is assigned by default to various job roles, in particular the administrators for product families.
You can assign the duty role to other users who need access to customize help. Use the Manage Duties task in the Setup and Maintenance work area to search for the Application Help Text Administration duty role on the Role Catalog page, and map additional job roles to this duty role.
When you create or edit help, select a help security group that represents the set of roles that you want to have access to the help. If you do not see the Security Group field, then your administrator has not selected the Custom Help Security feature choice. The Unsecured group has no associated roles, so anyone can view the help. The predefined Secured group includes all internal employees and contingent workers, unless this group has been edited. You can create security groups and associate roles using the Manage Help Security Groups page, which you can access by starting in the Setup and Maintenance Overview page and searching for the Manage Help Security Groups task. Your new security groups are immediately available for use to secure new or edited help files.
You must specify a page or section to add the existing help to. To ensure that help is added to the correct help window, go to the page or section in the application, click the Help icon, and click the Manage Custom Help link in the help window. Alternatively, in the Manage Custom Help page, search for at least a page or section and a level 1 value for the Business Processes hierarchy type before selecting the Select and Add option.
You cannot select and add help to a particular hierarchy, on the Manage Custom Help page, without a page or section. To add just a hierarchy, search for the help file, add a new help location, and specify only the hierarchy information.
Oracle Fusion Applications Help patches update all help files, both active and inactive, except custom help. Custom help files are not affected by patches. Consider reviewing inactive files to see if you want to activate the updated version, or to make similar edits to the custom versions of those files, if any.
Oracle Fusion Application Toolkit (ATK) is an application that provides various core components of Oracle Fusion Applications, including the Welcome dashboard, Oracle Fusion Applications Help, the Reports and Analytics pane, and the Watchlist feature. Use the Define Application Toolkit Configuration task list to set up and maintain some of these components for all users, and the Define Help Configuration task list for Oracle Fusion Applications Help.
Note
The Define Application Toolkit Configuration task list is available in implementation projects only if the Application Toolkit Component Maintenance feature choice is selected.
Use the Setup and Maintenance work area to access the tasks in the Define Application Toolkit Configuration task list.
Aside from determining which work areas a specific report is mapped to, you can perform additional setup for reports in the context of the Reports and Analytics pane. You can set up report permissions, and enable Oracle Business Intelligence (BI) Publisher reports for scheduled submission.
This additional setup is described in the Oracle Fusion Middleware User's Guide for Oracle Business Intelligence Enterprise Edition (Oracle Fusion Applications Edition) and the Oracle Fusion Applications Extensibility Guide.
You can remove any currently mapped report from the Reports and Analytics pane, or add mappings to reports from the Oracle Business Intelligence (BI) Presentation catalog. To access the setup, click Edit Settings in the Reports and Analytics pane, or use the Map Reports to Work Areas task in the Setup and Maintenance work area. If you do the former, then you can set up only the Reports and Analytics pane on the work area that you are in.
If you do the latter, then you can select a work area to set up. If you do not see the desired work area, most likely you do not have access to it due to security. You can request to be granted a role that has access to the work area, or another administrator or business user with access to the work area can be granted the Reports and Analytics Region Administration Duty to be able to map reports to the work area.
Tip
On the Map Reports to Work Areas page only, you can also use the Synchronize button to remove mappings to reports that are no longer in the catalog, for all work areas at once.
Any changes you make in either UI apply to all users with access to the mapped work area.
It is possible that there are no reports currently mapped to the work area that you select in the Map Reports to Work Areas page. Alternatively, reports are mapped, but you do not see them due to security.
Similarly, in the list of all available reports from the catalog, you can see only the reports that you have access to. You can request to be granted a role that has access to the reports that you want to map, or another administrator or business user with access to those reports can be granted the Reports and Analytics Region Administration Duty to be able to map reports to work areas.
In the Edit Settings window, you may not be able to see a currently mapped report because you do not have access to it due to security.
Similarly, in the list of all available reports from the catalog, you can see only the reports that you have access to. You can request to be granted a role that has access to the reports that you want to map, or another administrator or business user with access to those reports can be granted the Reports and Analytics Region Administration Duty to be able to map reports to work areas.
For all users across the site, you can disable or enable predefined Watchlist categories and items, edit their names, and determine how often item counts refresh. You cannot delete predefined Watchlist categories and items, nor create any for the site. Users can create their own Watchlist items through saved searches.
Access the Set Watchlist Options page by starting in the Setup and Maintenance Overview page and searching for the Set Watchlist Options task.
Use the Set Watchlist Options page to enable or disable predefined Watchlist categories and items. Disabling any category or item also disables associated processes involved in calculating the Watchlist item counts for all users. These processes include creating data caches, performing security checks, invoking services across domains, running queries, and so on.
An item with the Predefined type represents the actual predefined Watchlist item that appears in the Watchlist. If you disable this type of Watchlist item, then:
The item is not available for users to display in their watchlist
The item is removed from any watchlist where it is currently displayed
A Watchlist item with the User-created saved search type does not appear in the Watchlist; it controls the display of the Manage Watchlist button or menu item in pages with saved searches. If you disable this type of Watchlist item, then:
The Manage Watchlist option is not available to users in the corresponding work area, so users cannot use their own saved searches as Watchlist items. A message is displayed to users when they try to use this option.
Any user-defined saved searches from that work area already used as Watchlist items are no longer available in the users' watchlist. The user-defined saved searches are still available to be used for searching, but not for the Watchlist.
If you disable a Watchlist category, then the category is not available for users to include in their watchlist, and all Watchlist items within the category are also disabled.
Ultimately, the Watchlist for any user contains the subset of categories and items that are enabled in the Set Watchlist Options page:
Plus any items based on user-defined saved searches
Minus any categories or items that the user chooses to hide using Watchlist preferences
Minus any items with no results found, if the user chooses to hide such items using Watchlist preferences
All Watchlist items have a predefined refresh interval, which controls how often the query that calculates the count for a Watchlist item can be run. Use the Set Watchlist Options page to edit the interval values. What you specify as the refresh interval for a Watchlist item of type User-created Saved Search applies to all Watchlist items based on saved searches created by users on the corresponding search page.
When the user is in the Welcome dashboard with the Watchlist open for at least two and a half minutes, the query automatically runs for all Watchlist items if no refresh already ran in this user session. To subsequently run the query again, users can manually refresh the Watchlist region. The Refresh icon is enabled after five minutes since the last refresh.
Note
During a refresh, the query runs for an individual Watchlist item only if the time since the last query for this item is equal to or greater than the specified refresh interval. Since the manual refresh of the entire Watchlist is not available until five minutes after the last refresh, you should not set a Watchlist item refresh interval that is less than five minutes.
When users open Watchlist from the global area, a refresh automatically runs if five minutes have passed since the last refresh. During this refresh, the query runs for an individual Watchlist item only if the time since the last query for this item is equal to or greater than the specified refresh interval.
For example, you set the interval to eight minutes for a particular Watchlist item. When the user signs in and goes to the Welcome dashboard, with the Watchlist open, the query automatically runs for this Watchlist item after two and a half minutes. Every two and a half minutes after, a check is performed for stale counts and new cached counts are displayed.
Five minutes after the query ran, the Refresh icon is enabled and the user performs a manual refresh. However, the query does not run for this Watchlist item, because the refresh interval is eight minutes. The user navigates away from the Welcome dashboard and opens the Watchlist from the global area six minutes later. A refresh automatically runs because more than five minutes have passed since the last refresh. This time, the query runs for this Watchlist item because it has been more than eight minutes since the query last ran for this item.
Predefined Watchlist category and item names are stored as meanings of standard lookups. Lookup types for predefined categories end with WATCHLIST, for example EXM_EXPENSES_WATCHLIST. Edit the lookup type meaning to change the category name. To change item names, edit lookup code meanings for that lookup type.
The Maintain Common Reference Objects task list contains Oracle Fusion Middleware Extensions for Applications (Applications Core) tasks that support implementation of common behaviors, such as data security or reference data sets.
Use this task list to manage common reference objects that are defined centrally and shared across applications, in addition to those that are specific to Applications Core functionality. You can access this task list by starting in the Setup and Maintenance Overview page and searching for common reference object task lists.
Note
Offerings also include application-specific tasks for managing Applications Core objects. For example, the Financials offering includes tasks such as Manage Receivables Descriptive Flexfields, and Manage Receivables Lookups.
For more information on configuring custom objects, see the Oracle Fusion Applications Extensibility Guide.
To make the Maintain Common Reference Objects task list available in your implementation project, go to Setup and Maintenance Overview - Configure Offerings, and for a specific offering, select the Maintain Common Reference Objects feature choice.
Application taxonomy is the organization of Oracle application components and functions in a hierarchical structure, from product lines to logical business areas. This hierarchy represents a breakdown of products into units based on how applications are installed and supported. Maintain this hierarchy on the Manage Taxonomy Hierarchy page, which you can access by starting in the Setup and Maintenance Overview page and searching for the Manage Taxonomy Hierarchy task.
A detailed introduction to application taxonomy is provided in the Oracle Fusion Applications Developer's Guide.
A module is any node in the application taxonomy hierarchy. The top level of the hierarchy is product line, followed by product family, application, and logical business area. There can be multiple levels of logical business areas, with one or more nested within a parent logical business area.
A product line is a collection of products under a single brand name, for example, Oracle Fusion.
A product family is a collection of products associated with a functional area that may or may not be licensed together as a single unit, for example Financials.
An application is a single product within a product family, containing closely related features for a specific business solution, for example General Ledger.
A logical business area is a collection of business object definitions organized into a logical grouping. It contains the model objects, services, and UI components for those business objects. Logical business areas have their own hierarchy levels and in some cases can be two or three levels deep. Each leaf node has at least one business object and service, up to a maximum of four business objects and associated services. A logical business area with more than four business objects are further refined with child logical business area levels. Each of these parent-child levels is represented by a directory in the physical package hierarchy.
Manage modules on the Create Child Module or Edit Module page, which you can access by starting in the Setup and Maintenance Overview page and searching for the Manage Taxonomy Hierarchy task. When you create a module, it is a child of the currently selected node in the application taxonomy hierarchy. This determines which values are available, for example for module type. Once created, you cannot delete the module or move it elsewhere in the hierarchy. As you create or edit modules, consider the following points regarding specific fields.
Module ID is the unique primary key for nodes in the taxonomy table. When you create a module, an ID is automatically generated. Once the module is created, you cannot update the ID.
Module key and alternative ID are additional identifiers of the module, presented in a way that is easier to read than the module ID. The module key is a string identifier, for example AP for the Oracle Fusion Payables application. The alternative ID is a numeric identifier, for example 1 for the Oracle Fusion product line. These IDs are provided for the product line, product family, and application modules, but you can optionally add them for logical business areas and new custom modules.
Note
Do not change the module key or alternative ID for predefined modules.
The product code is relevant only to application and logical business area modules. You can leave the field blank for other module types. The product code for applications is the short name that can be displayed in lists of application values, for example FND for Oracle Fusion Middleware Extensions for Applications.
Module name is the logical name for the module and is always available. The name must be unique among nodes in the same hierarchy level with the same parent, but try to make it as unique in the whole hierarchy as possible.
The user name and description can appear to users in other parts of Oracle Fusion Applications, so make sure that the values are something that users know to represent the module.
Though you can update the usage type to reflect the current state of the module, just doing so does not affect the actual state. For example, setting a module as installed does not mean it is actually installed if the installation itself has not taken place. Installation refers to operations related to laying down all the components needed to create an Oracle Fusion Applications environment, while deployment is the process that starts the managed servers and clusters and facilitates the actual use of product offerings. A licensed module is available for installation and deployment, and a deployed module is considered actively used when actually used by users.
If seed data is allowed, then seed data such as flexfields and lookups can be extracted for the module using seed data loaders. By default, extract is allowed for all predefined modules of type application and logical business area.
You can associate a logical domain to modules of type product family, as well as one or more enterprise applications to modules of type application. This association represents the relationship between the taxonomy modules and the corresponding domain and enterprise applications stored in the Oracle Fusion Applications Functional Core (ASK) tables.
Lookups are lists of values in applications. You define a list of values as a lookup type consisting of a set of lookup codes, each code's translated meaning, and optionally a tag. End users see the list of translated meanings as the available values for an object.
Lookups provide a means of validation and lists of values where valid values appear on a list with no duplicate values. For example, an application might store the values Y and N in a column in a table, but when displaying those values in the user interface, Yes or No (or their translated equivalents) should be available for end users to select. For example, the two lookup codes Y and N are defined in the REQUIRED_INDICATOR lookup type.
In another example, a lookup type for marital status has lookup codes for users to specify married, single, or available legal partnerships.
|
Lookup Type |
Lookup Code |
Meaning |
Tag |
|---|---|---|---|
|
MAR_STATUS |
M |
Married |
|
|
S |
Single |
|
|
R |
Registered Partner |
+NL |
|
DP |
Domestic Partner |
-FR, AU |
In this case, tags are used for localizing the codes. All legislations list Married and Single. Only the Dutch legislation lists Registered Partner. And all legislations except France and Australia also list Domestic Partner.
When managing lookups, you need to understand the following.
Using lookups in applications
Customization levels
Accessing lookups
Enabling lookups
The three kinds of lookups: standard, common, and set enabled
Use lookups to provide validation or a list of values for a user input field in a user interface.
An example of a lookup used for validation is a flexfield segment using a table-validated value set with values from a lookup type. An example of a lookup in a list of values is a profile option's available values from which users select one to set the profile option. Invoice Approval Status gives the option of including payables invoices of different approval statuses in a report. The lookup code values include All so that users can report by all statuses: Approved, Resubmitted for approval, Pending or rejected, and Rejected.
The customization level of a lookup type determines whether the lookups in that lookup type can be edited. This applies data security to lookups.
Some lookup types are locked so no new codes and other changes can be added during implementation or later, as needed. Depending on the customization level of a lookup type, you may be able to change the codes or their meanings. Some lookups are designated as extensible, so new lookup codes can be created during implementation, but the meanings of predefined lookup codes cannot be modified. Some predefined lookup codes can be changed during implementation or later, as needed.
The customization levels are user, extensible, and system. The following table shows which lookup management tasks are allowed at each customization level.
|
Allowed Task |
User |
Extensible |
System |
|---|---|---|---|
|
Deleting a lookup type |
Yes |
No |
No |
|
Inserting new codes |
Yes |
Yes |
No |
|
Updating start date, end date, and enabled fields |
Yes |
Yes, only if the code is not predefined data |
No |
|
Deleting codes |
Yes |
Yes, only if the code is not predefined data |
No |
|
Updating tags |
Yes |
No |
No |
|
Updating module |
Yes |
No |
No |
Predefined data means LAST_UPDATED_BY = SEED_DATA_FROM_APPLICATION.
If a product depends on a lookup, the customization level should be system or extensible to prevent deletion.
Once the customization level is set for a lookup type, it cannot be modified. The customization level for lookup types created using the Define Lookups page is by default set at the User level.
The available kinds of lookups are as follows.
|
Lookup |
Description |
|---|---|
|
Standard |
Lists the available codes and translated meanings |
|
Set enabled |
Additionally associates a reference data set with the lookup codes |
|
Common |
Legacy lookups |
Standard lookups are the simplest form of lookup types consisting only of codes and their translated meaning. They differ from common lookups only in being defined in the standard lookup view.
Common lookups exist for reasons of backward compatibility and differ from standard lookups only in being defined in the common lookup view.
Set enabled lookup types store lookup codes that are enabled for reference data sharing. At runtime, a set-enabled lookup code is visible because the value of the determinant identifies a reference data set in which the lookup code is present.
Standard, set-enabled, and common lookups are defined in the Standard, Set-enabled, and Common views, respectively. Applications development may define lookups in an application view to restrict the UI pages where they may appear.
In lookups management tasks, lookups may be associated with a module in the application taxonomy to provide a criteria for narrowing a search or limiting the number of lookups accessed by a product specific task such as Manage Purchasing Lookups.
A lookup type is reusable for attributes stored in multiple tables.
Enable lookups based on the following.
Selecting an Enabled check box
Specifying an enabled start date, end date, or both
Specifying a reference data set determinant
If you make changes to a lookup, users must sign out and back in before the changes take effect. When defining a list of values for display rather than validation, limit the number of enabled lookup codes to a usable length.
For more information on the predefined lookups and lookup codes, see assets with the Lookup type in the Oracle Enterprise Repository for Oracle Fusion Applications (http://fusionappsoer.oracle.com).
Creating a new standard lookup involves creating or selecting a lookup type to which the lookup code belongs, and determining appropriate values for the lookup codes and their meanings.
Note
You can only create or edit the lookup codes for a particular lookup type if its customization level supports it.
Your enterprise needs a list of values for status to be used on various objects such as processes or users. The lookups are colors, so the lookup type you create is COLORS.
|
Lookup type parameters |
Value |
|---|---|
|
Lookup type name |
COLORS |
|
Meaning |
Status |
|
Description |
Status by color |
|
Module |
Oracle Fusion Middleware Extensions for Applications |
The lookup codes you define for the COLORS lookup type are, BLUE, RED, GREEN, and YELLOW.
|
Lookup Code |
Meaning |
Enabled |
Display Sequence |
|---|---|---|---|
|
BLUE |
Urgent |
No |
4 |
|
RED |
Stop |
Yes |
1 |
|
GREEN |
Go |
Yes |
3 |
|
YELLOW |
Caution |
Yes |
2 |
Users need to respond to a process question by indicating whether to stop it, use caution, go ahead, or complete it urgently.
The list of values for the COLORS lookup type includes the meanings for the enabled codes.
|
Displayed Value |
Hidden ID |
|---|---|
|
Stop |
RED |
|
Caution |
YELLOW |
|
Go |
GREEN |
The BLUE lookup code was not enabled and does not appear in the list of values. The display sequence of values in the list of values is alphabetical unless you enter a number manually to determine the order of appearance. Number 1 indicates the value listed first in the list of values.
Note
Only lookups that are enabled and active, meaning between start and end dates, are visible.
When users enter one of the values from the list of values for the lookup type COLORS, the transaction table records the lookup code. In this example, the code is stored in the Status column
|
Transaction number |
User name |
Status |
|---|---|---|
|
1 |
Jane |
RED |
|
2 |
Bob |
YELLOW |
|
3 |
Alice |
BLUE |
The status for one user is BLUE because at the time they entered a value, BLUE was enabled. Disabling a lookup code does not affect transaction records in which that code is stored. Data querying and reporting have access to disabled lookup codes in transaction tables.
You can edit the existing lookup codesof a lookup type or add new lookup codes on the Define Lookups pages, which you can access by starting in the Setup and Maintenance work area and searching for lookup tasks. You can edit the existing lookup codes of a lookup type, or add new lookup codes to a lookup type, if the customization level for the lookup type supports editing
Lookups are listed by lookup type. Typically lookup types are managed using tasks that handle a group of related lookups, such as Manage Geography Lookups. Each task gives you access only to certain lookup types. The generic tasks provide access to all lookups types of a kind, such as all common lookups using the Manage Common Lookups task.
If existing lookups are not available to the tasks of the Define Lookups activity, they may be validated for use in a lookup view that is not central to all applications or whose owning application has not been specified in a lookup view.
Lookups can only be managed in the Define Lookups tasks if the lookup's view application is the standard lookups view, common lookups view, or set-enabled lookups view. Lookups defined in an application view can only be managed by following instructions provided by the owning application.
Note
A lookup type and its codes can only be defined in one lookup view.
A lookup type consists of lookup codes that are the values in a static list of values. Lookup code validation is a one to one match.
A table-validated value set can consist of values that are validated through a SQL statement, which allows the list of values to be dynamic.
Tip
A table validated value set can be defined based on any table, including the lookups table. This allows a lookup type to be made into a table-validated value set that can be used in flexfields.
|
Area of Difference |
Lookup Type |
Value Set |
|---|---|---|
|
List of values |
Static |
Dynamic if Table validation type |
|
Validation of values |
One to one match of meaning to code included in a lookup view, or through the determinant of a reference data set |
By format or inclusion in a table |
|
Format type of values |
char |
varchar2, number, and so on |
|
Length of value |
Text string up to 30 characters |
Any type of variable length from 1 to 4000 |
|
Duplication of values |
Never. Values are unique. |
Duplicate values allowed |
|
Management |
Managed by both administrators and end-users, except system lookups or predefined lookups at the system customization level, which cannot be modified. |
Maintained by administrators, except some product flexfield codes, such as GL for Oracle Fusion General Ledger, which are maintained by end users |
A lookup type cannot make use of a value from a value set.
Value sets can make use of standard, common, or set-enabled lookups.
Both lookup types and value sets are used to create lists of values from which users select values.
Tags on lookup codes allow you to add a label to your lookup codes.
Lookup tags are unvalidated and uninterpreted by lookups. A tag can be used to categorize lookups based on facilitating searches or guiding how a lookup should be used.
Document what the tag on a lookup represents and how to use it.
The message dictionary contains messages that tell users about business rule errors, such as missing or incorrect data, and how to resolve them, to warn users about the consequences of intended actions, and provide information in log files. These messages are defined for specific applications and modules, but a few are common messages that can be used in any application. All applications also use messages stored outside of the message dictionary.
The message dictionary is described in the Oracle Fusion Applications Developer's Guide, and other messages in the Oracle Fusion Middleware Web User Interface Developer's Guide for Oracle Application Development Framework.
Each message in the message dictionary has many attributes and components, including message properties, text, and tokens, that you define when creating or editing the message.
Details about these messages are described in the Oracle Fusion Applications Developer's Guide.
Common messages, which have message names that begin with FND_CMN and message numbers between 0 and 999, are used throughout Oracle Fusion Applications. Each common message can appear in multiple places in any product family. For example, the FND_CMN_NEW_SRCH message can be used for any search to indicate that no results were found. Common messages that are of type error or warning are part of the message dictionary.
Because a common message can be used in any application, consider the ramifications if you edit any aspect of the message, including incident and logging settings. Changes would be reflected in all instances where the message is used. For example, if you change the message text, make sure that the text would make sense to all users across Oracle Fusion Applications who might see it.
You can create custom common messages for use in multiple places within a single product. Do not begin the message name with FND_CMN, but use another suitable convention. The message number should be within the range that is designated for the product.
When creating or editing currencies, consider these points relevant to entering the currency code, date range, or symbol for the currency.
You cannot change a currency code after you enable the currency, even if you later disable that currency.
Users can enter transactions denominated in the currency only for the dates within the specified range. If you do not enter a start date, then the currency is valid immediately. If you do not enter an end date, then the currency is valid indefinitely.
Even if you enter a symbol for a currency, the symbol is not always displayed when an amount is displayed in this currency. Some applications use currency symbols when displaying amounts. Others, like Oracle Fusion General Ledger, do not.
Use the Derivation Type, Derivation Factor, and Derivation Effective Date fields to define the relationship between the official currency (Euro) of the European Monetary Union (EMU) and the national currencies of EMU member states. For each EMU currency, you define its Euro-to-EMU fixed conversion rate and the effective starting date.
Note
If you need to use a different currency code for Euro, you can disable the predefined Euro currency and create a new one.
The Euro currency derivation type is used only for the Euro, and the Euro derived derivation type identifies national currencies of EMU member states. All other currencies do not have derivation types.
The derivation factor is the fixed conversion rate by which you multiply one Euro to derive the equivalent EMU currency amount. The Euro currency itself should not have a derivation factor.
The derivation effective date is the date on which the relationship between the EMU currency and the Euro begins.
Natural languages are all the languages that humans use, written and spoken. If a language is enabled, then users can associate it with entities, for example as languages spoken by sales representatives. When managing natural languages, consider tasks to perform and best practices for entering particular values.
Once you add a language, it cannot be deleted, just disabled. You can optionally associate natural languages with International Organization for Standardization (ISO) languages and territories, just for reference.
When you create a natural language, use the alpha-2 ISO code as the language code, or, if not available, then alpha-3. If the language is not an ISO language, then use x- as a prefix for the code, for example x-ja for a Japanese dialect. Use the sgn code of ISO-639-2 for sign languages, followed by territory code, for example sgn-US for American Sign Language. You can also use Internet Assigned Numbers Authority (IANA) language tags.
The natural language description should be the language name with territory name in parenthesis where needed, for example English (Australia) and English (Canada).
Edit territory descriptions to determine how they are displayed in lists of country values throughout Oracle Fusion Applications. The predefined territories are all countries from the International Organization for Standardization (ISO) 3166 standard. You usually would not edit territory names or codes.
Do not edit National Language Support (NLS) territory codes, which are identifiers used in the system, unless you need to change the association between ISO and system territory. You usually would not edit the default currency, which is the value that defaults in the Currency field in Oracle Fusion Applications user preferences after the user first selects a territory.
Create territories if new countries emerge and the system has not yet been patched with the latest ISO country values.
Edit industry descriptions to determine how they are displayed in Oracle Fusion Applications. You usually would not edit industry names, which are from the North American Industry Classification System (NAICS). Enabled industries are mainly used in the context of customization, though these values can also appear in any application.
Create industries if you have particular ones you need, for example for customization, that are not included in the NAICS standard.
Optionally associate industries with territories to provide an industry in territory value, used for customization. For example, administrators can customize a page in one way for users within an industry in one country, and another way for users within the same industry in another country. The administrator would select the appropriate industry in territory value to set the customization context.
Create currencies to use, for example for reporting purposes, if they are not already provided. All currencies from the International Organization for Standardization (ISO) 4217 standard are provided.
Enable any currency other than USD for use in Oracle Fusion Applications, for example for displaying monetary amounts, assigning to sets of books, entering transactions, and recording balances. Only USD is enabled by default.
Precision is the number of digits to the right of the decimal point used in regular currency transactions. Extended precision is the number of digits to the right of the decimal point used in calculations for this currency, and it must be greater than or equal to the standard precision. For example, USD would have 2 for precision because amounts are transacted as such, for example $1.00. For calculations, for example adding USD amounts, you might want the application to be more precise than two decimal digits, and would enter an extended precision accordingly.
Note
Some applications use extended precision. Others, such as Oracle Fusion General Ledger, do not.
Minimum accountable unit is the smallest denomination for the currency. For example, for USD that would be .01 for the cent. This unit does not necessarily correspond to the precision for all currencies.
The statistical unit currency type is used only for the Statistical (STAT) currency. The Statistical currency is used to record statistics such as the number of items bought and sold. Statistical balances can be used directly in financial reports, allocation formulas, and other calculations.
You can edit the names and descriptions of International Organization for Standardization (ISO) languages to determine how they are displayed in lists of ISO language values in Oracle Fusion Applications. The ISO languages are from the ISO 639 standard. If there were changes to the ISO standard and the system has not yet been patched with the latest ISO values, you can update the ISO alpha-2 code or add languages as needed.
Installed languages automatically appear on the Manage Languages page, so you do not manually enter newly installed languages. This page contains all languages available for installation and translation in Oracle Fusion Applications. Each dialect is treated as a separate language. The language codes and names are values used by the system.
You generally would not edit any of the detailed fields unless you really need to and know what they are.
Though all standard time zones are provided, optionally enable only a subset for use in lists of time zone values in Oracle Fusion Applications. You can add time zones if new zones became standard and the system has not yet been patched with the latest values.
The reference implementation contains a set of data security policies that can be inspected and confirmed to be suitable or a basis for further implementation using the Authorization Policy Manager (APM).
The security implementation of an enterprise is likely a subset of the reference implementation, with the enterprise specifics of duty roles, data security policies, and HCM security profiles provided by the enterprise.
The business objects registered as secure in the reference implementation are database tables and views.
Granting or revoking object entitlement to a particular user or group of users on an object instance or set of instances extends the base Oracle Fusion Applications security reference implementation without requiring customization of the applications that access the data.
The data security policies in the reference implementation entitle the grantee (a role) to access instance sets of data based on SQL predicates in a WHERE clause.
Tip
When extending the reference implementation with additional data security policies, identify instance sets of data representing the business objects that need to be secured, rather than specific instances or all instances of the business objects.
Predefined data security policies are stored in the data security policy store, managed in the Authorization Policy Manager (APM), and described in the Oracle Fusion Applications Security Reference Manual for each offering. A data security policy for a duty role describes an entitlement granted to any job role that includes that duty role.
Warning
Review but do not modify HCM data security policies in APM except as a custom implementation. Use the HCM Manage Data Role And Security Profiles task to generate the necessary data security policies and data roles.
The reference implementation only enforces a portion of the data security policies in business intelligence that is considered most critical to risk management without negatively affecting performance. For performance reasons it is not practical to secure every level in every dimension. Your enterprise may have a different risk tolerance than assumed by the security reference implementation.
The security reference implementation includes some predefined HCM security profiles for initial usability. For example, a predefined HCM security profile allows line managers to see the people that report to them.
The IT security manager uses HCM security profiles to define the sets of HCM data that can be accessed by the roles that are provisioned to users
The security reference implementation includes no predefined data roles to ensure a fully secured initial Oracle Fusion Applications environment.
The security reference implementation includes data role templates that you can use to generate a set of data roles with entitlement to perform predefined business functions within data dimensions such as business unit. Oracle Fusion Payables invoicing and expense management are examples of predefined business functions. Accounts Payable Manager - US is a data role you might generate from a predefined data role template for payables invoicing if you set up a business unit called US.
HCM provides a mechanism for generating HCM related data roles.
By default, users are denied access to all data.
Data security makes data available to users by the following means.
Policies that define grants available through provisioned roles
Policies defined in application code
You secure data by provisioning roles that provide the necessary access. Enterprise roles provide access to data through data security policies defined for the inherited application roles.
When setting up the enterprise with structures such as business units, data roles are automatically generated that inherit job roles based on data role templates. Data roles also can be generated based on HCM security profiles. Data role templates and HCM security profiles enable defining the instance sets specified in data security policies.
When you provision a job role to a user, the job role implicitly limits data access based on the data security policies of the inherited duty roles. When you provision a data role to a user, the data role explicitly limits the data access of the inherited job role to a dimension of data.
Data security consists of privileges conditionally granted to a role and used to control access to the data. A privilege is a single, real world action on a single business object. A data security policy is a grant of a set of privileges to a principal on an object or attribute group for a given condition. A grant authorizes a role, the grantee, to actions on a set of database resources. A database resource is an object, object instance, or object instance set. An entitlement is one or more allowable actions applied to a set of database resources.
Data is secured by the following means.
|
Data security feature |
Does what? |
|---|---|
|
Data security policy |
Grants access to roles by means of entitlement |
|
Role |
Applies data security policies with conditions to users through role provisioning. |
|
Data role template |
Defines the data roles generated based on enterprise setup of data dimensions such as business unit. |
|
HCM security profile |
Defines data security conditions on instances of object types such as person records, positions, and document types without requiring users to enter SQL code |
|
Masking |
Hides private data on non-production database instances |
|
Encryption |
Scrambles data to prevent users without decryption authorization from reading secured data |
The sets of data that a user can access via roles are defined in Oracle Fusion Data Security. Oracle Fusion Data Security integrates with Oracle Platform Security Services (OPSS) to entitle users or roles (which are stored externally) with access to data. Users are granted access through the entitlement assigned to the roles or role hierarchy with which the user is provisioned. Conditions are WHERE clauses that specify access within a particular dimension, such as by business unit to which the user is authorized.
Data security policies articulate the security requirement "Who can do What on Which set of data," where 'Which set of data' is an entire object or an object instance or object instance set and 'What' is the object entitlement.
For example, accounts payable managers can view AP disbursements for their business unit.
|
Who |
can do |
what |
on which set of data |
|---|---|---|---|
|
Accounts payable managers |
view |
AP disbursements |
for their business unit |
A data security policy is a statement in a natural language, such as English, that typically defines the grant by which a role secures business objects. The grant records the following.
Table or view
Entitlement (actions expressed by privileges)
Instance set (data identified by the condition)
For example, disbursement is a business object that an accounts payable manager can manage by payment function for any employee expenses in the payment process.
Note
Some data security policies are not defined as grants but directly in applications code. The security reference manuals for Oracle Fusion Applications offerings differentiate between data security policies that define a grant and data security policies defined in Oracle Fusion applications code.
A business object participating in a data security policy is the database resource of the policy.
Data security policies that use job or duty roles refer to data security entitlement.
For example, the data security policy for the Accounts Payable Manager job role refers to the view action on AP disbursements as the data security entitlement.
Important
The duty roles inherited by the job role can be moved and job roles reassembled without having to modify the data security.
As a security guideline, data security policies based on user session context should entitle a duty role. This keeps both function and data security policies at the duty role level, thus reducing errors.
For example, a Sales Party Management Duty can update Sales Party where the provisioned user is a member of the territory associated with the sales account. Or the Sales Party Management Duty can update Sales Party where the provisioned user is in the management chain of a resource who is on the sales account team with edit access. Or the Participant Interaction Management Duty can view an Interaction where the provisioned user is a participant of the Interaction.
For example, the Disbursement Process Management Duty role includes entitlement to build documents payable into payments. The Accounts Payable Manager job role inherits the Disbursement Process Management Duty role. Data security policies for the Disbursement Process Management Duty role authorize access to data associated with business objects such as AP disbursements within a business unit. As a result, the user provisioned with the Accounts Payable Manager job role is authorized to view AP disbursements within their business unit.
A data security policy identifies the entitlement (the actions that can be made on logical business objects or dashboards), the roles that can perform those actions, and the conditions that limit access. Conditions are readable WHERE clauses. The WHERE clause is defined in the data as an instance set and this is then referenced on a grant that also records the table name and required entitlement.
Data roles are implemented as job roles for a defined set of data.
A data role defines a dimension of data within which a job is performed. The data role inherits the job role that describes the job. For example, a data role entitles a user to perform a job in a business unit.
The data role inherits abstract or job roles and is granted data security privileges. Data roles carry the function security privileges inherited from job roles and also the data security privilege granted on database objects and table rows.
For example, an accounts payables specialist in the US Business Unit may be assigned the data role Accounts Payables Specialist - US Business Unit. This data role inherits the job role Accounts Payables Specialist and grants access to transactions in the US Business Unit.
A data role may be granted entitlement over a set people.
For example, a Benefits Administrator A-E is allowed to administer benefits for all people that have a surname that begins with A-E.
Data roles are created using data role templates. You create and maintain data roles in the Authorization Policy Manager (APM). Use the Manage Data Roles and Security Profiles task to create and maintain HCM data roles in Oracle Fusion HCM.
HCM security profiles are used to secure HCM data, such as people and departments. You use HCM security profiles to generate grants for an enterprise role. The resulting data role with its role hierarchy and grants operates in the same way as any other data role.
For example, an HCM security profile identifies all employees in the Finance division.
Oracle Fusion Payroll uses HCM security profiles to secure project organizations. Applications outside of HCM can use the HCM Data Roles UI pages to give their roles access to HR people.
Oracle Fusion Applications uses masking to protect sensitive data from view by unauthorized users. Encryption APIs mask sensitive fields in applications user interfaces. Additionally, Oracle Data Masking is available for masking data in non-production instances and Oracle Transparent Data Encryption is available for protecting data in transit or in backups independent of managing encryption keys.
A data security policy applies a condition and allowable actions to a database resource for a role. When that role is provisioned to a user, the user has access to data defined by the policy. In the case of the predefined security reference implementation, this role is always a duty role. Data roles generated to inherit the job role based on data role templates limit access to database resources in a particular dimension, such as the US business unit.
The database resource defines and instance of a data object. The data object is a table, view, or flexfield.
The following figure shows the database resource definition as the means by which a data security policy secures a data object. The database resource names the data object. The data security policy grants to a role access to that database resource based on the policy's action and condition.
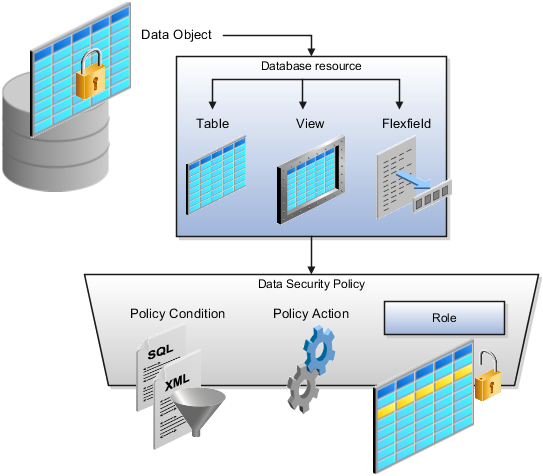
A database resource specifies access to a table, view, or flexfield that is secured by a data security policy.
Name providing a means of identifying the database resource
Data object to which the database resource points
Data security policies consist of actions and conditions for accessing all, some, or a single row of a database resource.
Condition identifying the instance set of values in the data object
Action specifying the type of access allowed on the available values
Note
If the data security policy needs to be less restrictive than any available database resource for a data object, define a new data security policy.
Actions correspond to privileges that entitle kinds of access to objects, such as view, edit, or delete. The actions allowed by a data security policy include all or a subset of the actions that exist for the database resource.
A condition is either a SQL predicate or an XML filter. A condition expresses the values in the data object by a search operator or a relationship in a tree hierarchy. A SQL predicate, unlike an XML filter, is entered in a text field in the data security user interface pages and supports more complex filtering than an XML filter, such as nesting of conditions or sub queries. An XML filter, unlike a SQL predicate, is assembled from choices in the UI pages as an AND statement.
Tip
An XML filter can be effective in downstream processes such as business intelligence metrics. A SQL predicate cannot be used in downstream metrics.
Oracle Fusion Applications supports securing data through role-based access control (RBAC) by the following methods.
|
Method of securing data |
Reason |
Example |
|---|---|---|
|
Data roles apply explicit data security policies on job and abstract roles |
Appropriate for job and abstract roles that should only access a subset of data, as defined by the data role template that generates the data role or by HCM security profiles. |
Accounts Payable Manager - US data role to provide an accounts payable manager in the US business unit with access to invoices in the US business unit. |
|
Data security policies |
Define data access for application roles and provide inheriting job and abstract roles with implicit data security |
Projects |
If a user has access to the same function through different roles that access different data sets, then the user has access to a union of those data sets.
When a runtime session is created, Oracle Platform Security Services (OPSS) propagates only the necessary user to role mapping based on Oracle Fusion Data Security grants. A grant can specify entitlement to the following.
Specific rows of data (data object) identified by primary key
Groups of data (instance set) based on a predicate that names a particular parameter
Data objects or instance sets based on runtime user session variables
Data is either identified by the primary key value of the row in the table where the data is stored. Or data is identified by a rule (SQL predicate) applied to the WHERE clause of a query against the table where the data is stored.
Oracle Fusion Data Security can be used to restrict the following.
Rows that are returned by a given query based on the intended business operation
Actions that are available for a given row
Grants control which data a user can access.
Note
Attribute level security using grants requires a data security policy to secure the attribute and the entitlement check enforces that policy.
A grant logically joins a user or role and an entitlement
with a static or parameterized object instance set. For example, REGION='WEST' is a static object instance set
and REGION=&GRANT_ALIAS.PARAMETER1 is a parameterized object instance set. In the context of a specific
object instance, grants specify the allowable actions on the set of
accessible object instances. In the database, grants are stored in
FND_GRANTS and object instance sets are stored in FND_OBJECT_INSTANCE_SETS.
Object access can be tested using the privilege check application
programming interface (API).
A business object is a logical entity that is typically implemented as a table or view, and corresponds to a physical database resource. The data security policies of the security reference implementation secure predefined database resources. Use the Manage Data Security Policies task to define and register other database resources.
Data security policies identify sets of data on the registered business object and the actions that may be performed on the business object by a role The grant can be made by data instance, instance set or at a global level..
Note
Use parameterized object instance sets whenever feasible to reduce the number of predicates the database parses and the number of administrative intervention required as static object instances sets become obsolete. In HCM, security profiles generate the instance sets.
You use data role templates to generate data roles. You generate such data roles, and create and maintain data role templates in the Authorization Policy Manager (APM).
Note
HCM data roles are generated using the Manage Data Roles and Security Profiles task, which uses HCM security profiles, not data role templates, to define the data security condition.
The following attributes define a data role template.
Template name
Template description
Template group ID
Base roles
Data dimension
Data role naming rule
Data security policies
The data role template specifies which base roles to combine with which dimension values for a set of data security policies. The base roles are the parent job or abstract roles of the data roles.
Note
Abstract, job, and data roles are enterprise roles in Oracle Fusion Applications. Oracle Fusion Middleware products such as Oracle Identity Manager (OIM) and Authorization Policy Manager (APM) refer to enterprise roles as external roles. Duty roles are implemented as application roles in APM and scoped to individual Oracle Fusion Applications.
The dimension expresses stripes of data, such as territorial or geographic information you use to partition enterprise data. For example, business units are a type of dimension, and the values picked up for that dimension by the data role template as it creates data roles are the business units defined for your enterprise. The data role template constrains the generated data roles with grants of entitlement to access specific data resources with particular actions. The data role provides provisioned users with access to a dimensional subset of the data granted by a data security policy.
An example of a dimension is a business unit. An example of a dimension value is a specific business unit defined in your enterprise, such as US. An example of a data security policy is a grant to access a business object such as an invoice with a view entitlement.
When you generate data roles, the template applies the values of the dimension and participant data security policies to the group of base roles.
The template generates the data roles using a naming convention specified by the template's naming rule. The generated data roles are stored in the Lightweight Directory Access Protocol (LDAP) store. Once a data role is generated, you provision it to users. A user provisioned with a data role is granted permission to access the data defined by the dimension and data security grant policies of the data role template.
For example, a data role template contains an Accounts Payable Specialist role and an Accounts Payable Manager role as its base roles, and region as its dimension, with the dimension values US and UK. The naming convention is [base-role-name]:[DIMENSION-CODE-NAME]. This data role template generates four data roles.
Accounts Payable Specialist - US (business unit)
Accounts Payable Specialist - UK (business unit)
Accounts Payable Manager - US (business unit)
Accounts Payable Manager - UK (business unit)
If you add a base role to an existing data role template, you can generate a new set of data roles. If the naming rule is unchanged, existing data roles are overwritten.
If you remove a base role from a data role template and regenerate data roles, a resulting invalid role list gives you the option to delete or disable the data roles that would be changed by that removal.
If you add a dimension value to your enterprise that is used by a data role template, you must regenerate roles from that data role template to create a data role for the new dimension. For example if you add a business unit to your enterprise, you must regenerate data roles from the data role templates that include business unit as a dimension.
If you add or remove a dimension value from your enterprise that is used to generate data roles, regenerating the set of data roles adds or removes the data roles for those dimension values. If your enterprise has scheduled regeneration as an Oracle Enterprise Scheduler Services process, the changes are made automatically.
For information on working with data role templates, see the Oracle Fusion Middleware Administrator's Guide for Authorization Policy Manager (Oracle Fusion Applications Edition).
In Oracle Fusion Applications, each business document or business event is uniquely identified by a document sequence number that you assign to it. However, the document sequencing feature must be turned on (enabled) on the business document or event to allow the assignment. For example, if document sequencing is enabled, you can assign a document sequence number to an invoice that gets generated in response to a purchase order. You can use document sequences as a proof to track successfully executed transactions as well as failed transactions. Additionally, a document sequence helps in generating an audit trail, which can be used to identify how a particular transaction passed through various applications.
Document sequencing can be managed automatically, manually, and gaplessly.
Note
Plan your document sequencing carefully before you use the options available in the application to apply sequence numbers. Avoid changes to the options after you saved your work on the Manage Document Sequences and Manage Document Sequence Categories pages.
Automatic document sequencing assigns a unique number to each document as it is generated, and this unique number is stored in the database. The numbering is sequential by date and time of creation. If you define a sequence to automatically number documents, you can provide an initial value to begin the sequence. In absence of a custom value, the default value 1 is used.
Manual sequencing requires you to assign a unique number to each document before it is generated. In manual sequencing, the numerical ordering and completeness of a transaction is not enforced. Users can skip or omit numbers when entering the sequence value. However, each time that a number is assigned, the application validates its uniqueness.
Gapless sequencing is similar to automatic sequencing. It automatically generates a unique number for each document, but does that only for successfully generated documents. As a result, the sequence is maintained for all the documents that are generated, and no sequence numbers are lost due to incomplete or failed document generation.
Important
Use this type of sequencing only if necessary because it may affect the performance of the system and slow down transaction processing.
A document sequence category is a set of documents that share similar characteristics and that are formed into a logical group. Document sequence categories simplify the task of assigning number sequences to specific documents. Instead of assigning a number to each document, you assign a document sequence to one or more document sequence categories. The document sequence category automatically takes care of numbering the documents.
A document sequence category identifies the database table that stores documents resulting from transactions that your users enter. When you assign a sequence to a category, the sequence numbers the documents that are stored in a particular table. You must create document sequence categories to be able to manage the task of assigning document sequences.
Restriction
Once a document sequence category is created, you cannot change the application, the category code, or the table name. Therefore, carefully consider these details and plan your document sequencing requirement before you begin working with the application.
Once you create a document sequence category, it is available for use under the Document Sequences: Assignments section on the Manage Document Sequences page. The Category field contains the name of the document sequence category. After you create a document sequence, you can assign it to a document sequence category.
Sequencing documents is an important business and legal requirement. Certain aspects of the defining process are permanent and cannot be modified later. Therefore, it is important that you first decide the appropriate document sequence to use for a set of documents. You must also decide beforehand the type of document sequencing, because you are not allowed to switch to other types once a sequence is assigned to a document sequence category. Make a note of the details such as the document sequence and document sequence category so that you can refer to them at a later point in time. Also note if there are any restrictions or configuration prerequisites before you define document sequencing.
Note
Products that implement document sequencing have specifications about its usage. Refer to the corresponding product documentation for specific details and also to determine if there are any restrictions or configuration prerequisites.
You can create document sequences that are automatic, manual, or gapless, depending on the business or legal requirement. By default, the current date is considered as the start date. If the end date is left blank, it means that the sequence definition never expires. Among the several options used in creating and editing document sequences, the following options are functionally more important and therefore need to be carefully determined:
Determinant Type: Select to limit the document sequencing activity to certain documents that belong to a specific business entity, such as Ledger, Tax Registration, and so on.
Initial Value: Enter a value for the first document in your sequence. This field applies only to sequences with automatic or gapless numbering types. Sequence numbers should not be greater than eight digits. If you leave this field blank, the first document is automatically assigned a value of 1. Once a document sequence is defined, you cannot change this initial value.
Document sequence categories are defined to make it easy to assign document sequence definitions to a group of documents instead of to individual documents. Each document sequence category is mapped to a specific table, where the documents belonging to that category are stored. The table must already be enabled for document sequencing. When specifying the table, you must consider the following points:
When the sequential numbering feature checks for completeness or generates a report, it locates the category's documents in the table.
You can select only tables belonging to the application associated with the category.
Once a category is defined, you cannot change the choice of table.
Identify the documents to be numbered before assigning them a document sequence. For each document sequence, there can be only one active assignment to a document sequence category, a method code, and a determinant value (if applicable). As part of the assignment, specify whether the document is created automatically (for example, due to a batch process, or manually through a form). If you do not specify an end date, the assignment continues to remain active throughout the process cycle. If a determinant type was specified for the document sequence, then enter a specific determinant value related to the selected determinant type.
At runtime, when users create documents, the document sequence to be assigned is determined by finding the active assignment that matches the correct combination of category, numbering method, and the date range containing the transaction date.
You can audit document sequences, if required, to provide an audit trail of the document sequences used in a specific product. However, before enabling the audit functionality for a document sequence, you must have created an audit table for the specific document sequence, using appropriate details. Enabling the audit functionality is permitted only for newly created document sequences. You cannot audit document sequences that are already in use by a specific product.
For more information about defining a document sequence audit table, see the Oracle Fusion Applications Developer's Guide.
Oracle Fusion applications generate thousands of rows of data that require unique identifiers (UIDs). These automatically generated, 18-digit numbers are not easily read or used by humans. A cogent example is an electronic airline ticket whose numbers can be 13 digits long, such as, 0162128736572. There are also confirmation or itinerary numbers that relate directly to that ticket that are only six digits long, such as QDLG9S; these can be used interchangeably with the ticket number. These shorter confirmation numbers are much easier to read and process by passengers and employees alike. A separate Public Unique ID (PUID) is also generated by the document sequencing feature and is available for encoding into a more user-friendly, alphanumeric ID.
The Oracle Fusion default setup shows the automatically generated numeric private UIDs and PUIDs for data rows. To use an alphanumeric PUID instead of the delivered numeric, navigate to the Setup and Maintenance task Manage Public Unique Identifier Profile Options to enable the encoding process. There are two profile options to configure the PUID:
CRM Public Unique ID String Encoding controls the characters used in the encoding of the PUID based on a radix, or base number.
CRM Public Unique ID Prefix defines the optional prefix value for the PUID.
Document sequencing typically begins with the number one. You may choose to start the sequences of your PUIDs at a specific value. See the related links below to determine the document sequencing.
This profile option determines the set of numbers and letters to be used in encoding the PUID generated by the document sequencing feature. The PUID is delivered with the encoding set to none. To enable the encoding of the PUID, choose a radix, or base conversion algorithm. The available values are stored in the lookup type ZCA_PUID_ENCODING. These encoding methods convert the PUID into user readable IDs using alphanumeric characters rather than just numeric digits. For example, if BASE_26 is chosen, only the upper case letters of the alphabet will be used.
There are seven delivered base values. These are not extensible.
|
RADIX |
Values |
|---|---|
|
BASE_16 |
Numbers 0-9, letters A-F |
|
BASE_26 |
Letters A-Z, Upper Case |
|
BASE_29 |
Numbers 2-9, letters BCDFGHJKLMNPQRSTVWXYZ |
|
BASE_31 |
Numbers 0-9, letters ABCDEFGHJKLMNPQRTUWXY |
|
BASE_36 |
Numbers 0-9, letters A-Z upper case |
|
BASE_62 |
Numbers 0-9, letters A-Z, letters a-z |
|
NONE (default) |
No Encoding |
A prefix may be defined as a site-level profile option. This profile option is delivered with no prefix defined. When defined, the inserted text is prepended to the PUID base encoded document sequence value. For example, if the PUID was CLE123 and the Prefix was ORA, the new PUID would be ORACLE123. Any delimiters or separation characters desired must be defined in the prefix itself. Ensure that the prefix length is short enough so that the concatenated PUID and prefix do not exceed the defined field length, usually no more than 30 characters. For example, you may want the records for the pharmaceutical divisions of your company to be denoted with PUIDs and the prefix Pharma- or Pharma1, Pharma2, and so on.
Use the tree management feature in Oracle Fusion applications to organize data into hierarchies. A hierarchy contains organized data and enables the creation of groups and rollups of information that exist within an organization. Trees are hierarchical structures that enable several data management functions such as better access control, application of business rules at various levels of hierarchies, improved query performance, and so on.
For example, XYZ Corporation has two departments: Marketing and Finance. The Finance department has two functional divisions: Receivables and Payables. Defining a tree for the XYZ Corporation establishes a hierarchy between the organization and its departments, and between the departments and their respective functional divisions. Such a hierarchical modeling of organizational data could be used for executing several data management functions within that organization.
You can create one or more versions of trees, and they can be labeled for better accessibility and information retrieval. You can create trees for multiple data sources, which allow the trees to be shared across Oracle Fusion applications.
A tree structure is a representation of the data hierarchy, and guides the creation of a tree. A tree is an instance of the hierarchy as defined in the tree structure. Tree structures enable you to enforce business rules to which the data must adhere.
The root node is the topmost node of a tree. Child nodes report to the root node. Child nodes at the same level, which report to a common parent node, are called siblings. Leaves are details branching off from a node but not extending further down the tree hierarchy.
A tree is created having only one version. However, users can create more than one tree version depending on the need, and they can make changes to those versions. Depending on varying requirements, users can create one or more tree versions and publish all of them or some of them by making the versions active at the same time. Similar to any other version control system, versions of trees are maintained to keep track of all the changes that a tree undergoes in its life cycle.
Tree labels are short names associated with trees and tree structures and point directly to the data source. Tree labels are automatically assigned to the tree nodes. You can store labels in any table and register the label data source with the tree structure.
A tree structure defines the hierarchy for creating trees and prescribes rules based on which trees are created, versioned, and accessed. You can associate multiple data sources with a tree structure. A tree is an instance of this hierarchy. Every tree structure can contain one or more trees.
You can create tree structures specific to an application but you can share tree structures across applications. If you apply version control to the tree structure, it is carried over to the trees that are based on the tree structure. Each tree version contains at least one root node. Occasionally, a tree version may have more than one root node.
An administrator controls the access to tree structures through a set of rules that are periodically audited for validity.
Defining a tree structure involves specifying several important pieces of information on the Create Tree Structure: Specify Definition page.
The Tree Node table displays data in nodes that exist in the data hierarchy. You must select the correct and most appropriate tree node table to be able to define the tree structure, based on the tree hierarchy you want to establish. This selection also affects the level of security that is set on a tree node and its child entities.
The following options are used to determine the mode of sharing a tree structure across the applications.
Open: Indicates that the tree is associated with all reference data sets.
Set ID: Indicates that the tree will be associated with a specific reference data set.
Indicates the source where the tree structure is being defined. For predefined tree structures select Oracle and for custom structures, select Customers.
You can customize the predefined tree structures as well as the ones that you created. However, customizing the predefined tree structures involves certain level of access restrictions, and will be limited to specific tree nodes and downwards in hierarchy.
One or more trees and tree versions can be based on a tree structure. A tree structure can have one or more trees and tree versions based on it. Usually, only one active version is permitted at any given point of time. However, depending on the requirement, you can allow two or more tree versions to be in the active state for the same date range. This flexibility allows you to choose the tree version that you want to implement.
You can create, edit, and delete tree structures depending upon the requirement. You can also audit and change the status a tree structure.
You can create trees on the basis of a tree structure. When you edit an active tree structure, the status of the tree structure and all associated trees and their versions change to draft. To reuse a tree structure, you can create a copy of it without copying the associated trees and tree versions. If you delete a tree structure, all the associated trees and tree versions are automatically deleted.
Note
For specific information on working with the predefined tree structures that exist in an Oracle Fusion application, refer to the specific product documentation.
If you change the status of a tree structure, the status of the trees and tree versions associated with that tree structure also changes.
The following table lists the different statuses of a tree structure.
|
Status |
Meaning |
|---|---|
|
Draft |
Yet to be published or is in a modified state. |
|
Active |
In use and based on which one or more trees or tree versions are created. |
|
Inactive |
Not in use. |
Use the tree structure audit results to verify the tree structure's correctness and data integrity. The audit results include the following details:
The name of the validator, which is a specific validation check
The result of the validation, including a detailed message
Corrective actions to take if there are any validation errors
Setting the status of a tree structure to active automatically triggers an audit of that tree structure. You can also manually trigger an audit on the manage Tree Structures page, using Actions - Audit. The Tree Structure Audit Result table shows a list of validations that ran against the selected tree structure.
The following table lists the validators used in the audit process and describes what each validator checks for. It also lists possible causes for validation errors and suggests corrective actions.
|
Validator |
Description (what is checked) |
Possible Cause for Validation Failure |
Suggested Corrective Action |
|---|---|---|---|
|
Restrict By Set ID |
On the Manage Tree Structures: Specify Data Sources page, if the Set ID check box is selected to enable the Restrict Tree Node List of Values Based on option for a tree structure, each of its data source view objects must have a reference data set attribute. This validation does not take place when the check box is not selected. |
Even when the check box is selected, one or more of its data source view objects does not contain a reference data set attribute. |
If reference data set restriction is required for this tree structure, include a reference data set attribute on all data sources. Otherwise, deselect the check box. |
|
Row Flattened Table Name |
On the Manage Tree Structures: Specify Performance
Options page, a valid row flattened table must be specified for the
tree structure. It can either be the standard row flattened table |
|
Correct the row flattened table definition. |
|
Available Label Data Sources |
On the Manage Tree Structures: Specify Data Sources page, if a labeling scheme is specified for the tree structure by selecting a list item from the Labeling Scheme list box, the label data source view object specified for each data source must be accessible, and the primary keys must be valid. This restriction does not apply when you select None from the Labeling Scheme list box. |
|
|
|
Available Data Sources |
Each data source view object specified for the tree structure must be accessible, and all its primary key attributes must be valid. |
|
|
|
Column Flattened Table Name |
On the Manage Tree Structures: Specify Performance
Options page, a valid column flattened table must be specified for
the tree structure. It can either be the standard row flattened table |
|
Correct the column flattened table definition. |
|
Restrict by Date |
On the Manage Tree Structures: Specify Data Sources page, if the Date Range check box is selected to enable the Restrict Tree Node List of Values Based on option for a tree structure, each of its data source view objects must have effective start date and effective end date attributes. This validation does not take place when the check box is not selected. |
Even when the check box is selected, one or more of its data source view objects does not contain effective start date and effective end date attributes. |
If the date restriction is required for this tree structure, include the effective start date and effective end date attributes on all data sources. Otherwise, deselect the check box. |
|
Tree Node Table Name |
On the Manage Tree Structures: Specify Definition
page, a valid tree node table must be specified for the tree structure.
It can either be the standard row flattened table |
|
Correct the tree node table definition. |
|
Allow Node Level Security |
If the |
The option is set to No for the tree structure but one or more associated data sources have that option set to Yes. |
Correct the option setting in the tree structure and their data sources. |
The data sources provide the items for establishing hierarchy in a tree structure. In the tree management infrastructure, these data sources are Oracle Application Development Framework (ADF) business components view objects, which are defined by application development.
Selecting a labeling scheme determines how the tree nodes are labeled. You may select a labeling scheme to assign at the data source level, at the parent node level, or keep it open for customer assignment. You may also choose not to have any labeling scheme. However, if you decide to use any of the labeling schemes, you may need to select the following additional options, to restrict the list of values that appear under the selected tree node.
Allow Ragged Nodes: To include nodes that have no child nodes, and are shorter than the remaining nodes in the entire hierarchy.
Allow Skip Level Nodes: To include nodes that are at the same level but have parent nodes at different levels.
You can decide the depth of the tree structure by selecting an appropriate value from the list. Keeping the depth limit open renders an infinite list of values.
Using the following options, you can restrict the list of values that appear for selection under a specific tree node.
Date Range: Specifies whether a selection of nodes should be restricted to the same date range as the tree version.
Allow Multiple Root Nodes: Allows you to add multiple root nodes when creating a tree version.
Reference Data Set: Specifies whether a selection of nodes should be restricted to the same set as the tree.
Tree data sources have optional data source parameters with defined view criteria and associated bind variables. You can specify view criteria as a data source parameter when creating a tree structure, and edit the parameters when creating a tree. Multiple data sources can be associated with a tree structure and can have well-defined relationships among them.
Note
Parameter values customized at the tree level override the default values specified at the tree-structure level.
The data source parameters are applied to any tree version belonging to that data source, when performing node operations on the tree nodes. Data source parameters also provide an additional level of filtering for different tree structures. The tree structure definition supports three data source parameter types.
Bound Value: Captures any fixed value, which is used as part of the view criteria condition.
Variable: Captures and binds a dynamic value that is being used by the data source view object. This value is used by the WHERE condition of the data flow.
View Criteria: Captures the view criteria name, which is applied to the data source view object.
You can also specify which of the data source parameters are mandatory while creating or editing the tree structure.
View objects from the ADF business components are used as data sources. To associate the view object with the tree structure, you can pick the code from ADF business component view objects and provide the fully qualified name of the view object, for example, oracle.apps.fnd.applcore.trees.model.view.FndLabelVO.
Tree structures are heavily loaded with data. As a tree management guideline, use the following settings to improve performance of data rendering and retrieval.
Row Flattening
Column Flattening
Column Flattened Entity Objects
ADF Business Component View Objects
Row flattening optimizes parent-child information for run-time performance by storing additional rows in a table for instantly finding all descendants of a parent without initiating a CONNECT BY query. Row flattening eliminates recursive queries, which allows operations to perform across an entire subtree more efficiently.
To store row flattened data for the specific tree
structure, users can either use the central FND_TREE_NODE_RF table or they can register their own row flattened table. For example,
in a table, if Corporation is the parent of Sales Division (Corporation-Sales
Division), and Sales Division is the parent of Region (Sales Division-Region),
a row-flattened table contains an additional row with Corporation
directly being the parent of Region (Corporation-Region).
Column flattening optimizes parent-child information for run-time performance by storing an additional column in a table for all parents of a child.
To store column flattened data for the specific tree
structure, users can either use the central FND_TREE_NODE_CF table or they can register their own column flattened table. For
example, in a table, if Corporation is the parent of Sales Division
(Corporation-Sales Division), and Sales Division is the parent of
Region (Sales Division-Region), a flattened table in addition to these
columns, contains three new columns: Region, Sales Division, and Corporation.
Although positioned next to each other, the column Region functions
at the lower level and Corporation at the higher level, retaining
the data hierarchy.
In the absence of a column-flattened table, if you need to generate the business component view objects for your tree structure for the flattened table, use the tree management infrastructure to correctly provide the fully qualified name of the entity object for the column flattened table.
View objects from the ADF business components can also be used as data sources, eliminating the need to create new types of data sources. This field is to store the fully qualified name for the business component view object generated by the tree management for business intelligence reporting and usage The business component view object is a combination of the tree data source and column flattened entity. Using this option prevents data redundancy and promotes greater reuse of existing data, thereby improving the performance of the tree structure.
Tree labels are tags that are stored on tree nodes. You can store labels in any table and register the label data source with the tree structure. When a labeling scheme is used for trees, the selected labels are stored in the tree label entity and each tree node contains a reference to a tree label in the labeling scheme.
The following table lists the three ways in which tree labels are assigned to the tree nodes.
|
Labeling Scheme |
Description |
|---|---|
|
Level |
Labels that are automatically assigned based on the data source to which the tree node belongs. A level label points to a specific data source. For example, in a tree that reflects the organizational hierarchy of an enterprise, all division nodes appear on one level and all department nodes on another. |
|
Group |
Labels that you can arbitrarily assign to tree nodes. |
|
Depth |
Labels that are automatically assigned based on the depth of the tree node within the tree. No manual assignment is performed. Note In an unbalanced hierarchy, a level may not be equal to depth. |
You can create and edit trees and tree versions depending upon the requirement. A tree can have one or more tree versions. Typically, when changes are made to an existing tree, a new version is created and published.
Trees are created based on the structure defined in the tree structure. You can create trees, modify existing trees, and delete trees. If you want to copy an existing tree, you can duplicate it. However, only the tree is duplicated and not its versions.
Creating a tree involves specifying the tree definition and specifying the labels that are used on its nodes. If the selected tree structure has data sources and parameters defined for it, they appear on the page allowing you to edit the parameter values at the tree node level.
Note
Parameter values customized at the tree level will override the default values specified at the tree-structure level.
Tree versions are created at the time of creating trees. A tree must contain a version.
Editing an existing tree provides you the choice to update the existing version. You can also edit the existing version that lies nested under the tree in the search results.
When you edit a tree version bearing Active status, the status changes to Draft until the modifications are saved or cancelled.
Use the tree version audit results to verify the tree version's correctness and data integrity. The audit results include the following details:
The name of the validator, which is a specific validation check
The result of the validation, including a detailed message
Corrective actions to take if there are any validation errors
An audit automatically runs whenever a tree version is set to active. You can also manually trigger an audit on the Manage Trees and Tree Versions page, using Actions - Audit. The Tree Version Audit Result table shows a list of validations that ran against the selected tree version.
The following table lists the validators used in the audit process and describes what each validator checks for. It also lists possible causes for validation errors and suggests corrective actions.
|
Validator |
Description (what is checked) |
Possible Cause for Validation Failure |
Suggested Corrective Action |
|---|---|---|---|
|
Effective Date |
The effective start and end dates of the tree version must be valid. |
The effective end date is set to a value that is not greater than the effective start date. |
Modify the effective start and end dates such that the effective start date is earlier than the effective end date. |
|
Root Node |
On the Manage Tree Structures: Specify Data Sources page, if the Allow Multiple Root Nodes check box for the Restrict Tree Node List of Values Based on option is not selected, and if the tree structure is not empty, the tree version must contain exactly one root node. This validation does not take place if the check box is selected. |
Even if the check box is deselected, the tree version has multiple root nodes. |
Modify the tree version such that there is exactly one root node. |
|
Data Source Max Depth |
For each data source in the tree structure, on the Data Source dialog box, if the data source is depth-limited, the data in the tree version must adhere to the specified depth limit. This validation does not apply to data sources for which the Maximum Depth field is set to Unlimited. |
The tree version has data at a depth greater than the specified depth limit on one or more data sources. |
Modify the tree version such that all nodes are at a depth that complies with the data source depth limit. |
|
Duplicate Node |
On the Data Source dialog box, if the Allow Duplicates check box is not selected, the tree version should not contain more than one node with the same primary key from the data source. If the check box is selected, duplicate nodes are permitted. |
Even when the check box is deselected, the tree version contains duplicate nodes. |
Remove any duplicate nodes from the tree version. |
|
Available Node |
All nodes in the tree version should be valid and available in the underlying data source. |
|
Remove any orphaned nodes from the tree version. Update tree reference nodes so that they reference existing tree versions. |
|
Node Relationship |
All nodes must adhere to the relationships mandated by the data sources registered in the tree structure. |
The tree structure has data sources arranged in a parent-child relationship, but the nodes in the tree do not adhere to the same parent-child relationship. For example, if the tree structure has a Project data source with a Task data source as its child, Task nodes should always be under Project nodes in the tree version. This validation fails if there are instances where a Project node is added as the child of a Task node. |
Modify the tree version such that the nodes adhere to the same parent-child relationships as the data sources. |
|
SetID Restricted Node |
On the Manage Tree Structures: Specify Data sources page, if the Set ID check box is selected to enable the Restrict Tree Node List of Values Based on option for each tree node, the underlying node in the data source must belong to the same reference data set as the tree itself. This restriction does not apply when the check box is not selected. |
Even when the check box is selected, the tree version has nodes whose data source values belong to a different reference data set than the tree. |
Modify the tree version such that all nodes in the tree have data sources with reference data set matching that of the tree. |
|
Label Enabled Node |
On the Manage Tree Structures: Specify Data Sources page, if a labeling scheme is specified for the tree structure by selecting a list item from the Labeling Scheme list box, all nodes should have labels. This restriction does not apply when you select None from the Labeling Scheme list box. |
The tree structure has a labeling scheme but the tree version has nodes without labels. |
Assign a label to any node that does not have a label. |
|
Date Restricted Node |
On the Manage Tree Structures: Specify Data Sources page, if the Date Range check box is selected to enable the Restrict Tree Node List of Values Based on option for a tree structure, each node in the underlying data source must have an effective date range same as the effective date range of the tree version. This restriction does not apply if the check box is not selected. |
Even when the check box is selected, there are data source nodes that have a date range beyond the tree version's effective date range. For example, if the tree version is effective from Jan-01-2012 to Dec-31-2012, all nodes in the tree version must be effective from Jan-01-2012 to Dec-31-2012 at a minimum. It is acceptable for the nodes to be effective for a date range that extends partly beyond the tree version's effective date range (for example, the node data source value is effective from Dec-01-2011 to Mar-31-2013). It is not acceptable if the nodes are effective for none or only a part of the tree version's effective date range (for example, the node data source value are effective only from Jan-01-2012 to June-30-2012). |
Ensure that all nodes in the tree version have effective date range for the effective date range for the tree version. |
|
Multiple Active Tree Version |
On the Manage Tree Structures: Specify Definition page, if the Allow Multiple Active Tree Versions check box is not selected for the tree structure, there should not be more than one active tree version under a tree at any time. This restriction does not apply if the check box is selected. |
Even when the check box is not selected, there is more than one active tree version in the tree for the same date range. |
Set no more than one tree version to Active within the same date range and set the others to inactive or draft status. |
|
Range Based Node |
On the Data Source dialog box, if the Allow Range Children check box is not selected, range-based nodes are not permitted from that data source. This restriction does not apply if the check box is selected. |
Even when the check box is not selected, there are range-based nodes from a data source. |
Ensure that any range nodes in your tree version are from a data source that allows range children. |
|
Terminal Node |
On the Data Source dialog box, if the Allow Use as Leaves check box is not selected, values from that data source cannot be added as leaves (terminal nodes) to the tree version. This restriction does not apply if the check box is selected. |
Even when the check box is not selected, values from a data source are added as leaf nodes (terminal nodes). |
Modify the tree version such that all terminal nodes are from data sources for which this check box is selected. |
|
Usage Limit |
On the Data Source dialog box, if the Use All Values option is selected to set the Usage Limit for the data source, every value in the data source must appear as a node in the tree. This restriction does not apply if None option is selected. |
Even if the Use All Values option is selected, there are values in the data source that are not in the tree version. |
For each data source value that is not yet available, add nodes to the tree version. |
Data sources form the foundation for tree management in Oracle Fusion Applications. Tree structures, trees, and tree versions establish direct and real-time connectivity with the data sources. Changes to the data sources immediately reflect on the Manage Trees and Tree Versions page and wherever the trees are being used.
Tree structures contain the metadata of the actual data that is used in Oracle Fusion Applications. Tree structures contain the core business logic that is manifested in trees and tree versions.
Trees and tree versions are built upon the tree structures. They employ the business rules defined in the tree structures and allow an application to select and enable a subset of trees to fulfill a specific purpose in that application.
Source data is mapped to tree nodes at different levels in the database. Therefore, changes you make to the tree nodes affect the source data. Access control set on trees prevents unwanted data modifications in the database. Access control can be applied to the tree nodes or anywhere in the tree hierarchy.
Tree nodes are points of data convergence that serve as the building blocks of a tree structure. Technically, the node may be stored either in a product-specific table or in an entity that has been established by tree management as the default storage mechanism. However, since all data in Oracle Fusion Applications usually have a storage home, only user-created data needs to be stored in an entity.
Nodes are attached to tree versions. Whenever you create or edit a tree version, you need to specify its tree node.
You can create, modify, or delete tree nodes on the Tree Version: Specify Nodes page. To add a tree node, ensure that the tree structure with which the tree version is associated is mapped to a valid data source. You can also duplicate a tree node if the multiple root node feature is enabled.
In most trees, all nodes at the same level represent the same kind of information. For example, in a tree that reflects the organizational hierarchy, all division nodes appear on one level and all department nodes on another. Similarly, in a tree that organizes a user's product catalog, the nodes representing individual products might appear on one level and the nodes representing product lines on the next higher level.
When levels are not used, the nodes in the tree have no real hierarchy or reporting structure but do form a logical summarization structure. Strictly enforced levels mean that the named levels describe each node's position in the tree. This is natural for most hierarchies. Loosely enforced levels mean that the nodes at the same visual level of indentation do not all represent the same kind of information, or nodes representing the same kind of information appear at multiple levels. With loosely enforced levels, users assign a level to each node individually. The level is not tied to a particular visual position.
A tree node has the following node types.
Single: Indicates that the node is a value by itself.
Range: Indicates that the node represents a range of values and possibly could have many children. For example, a tree node representing account numbers 10000 to 99999.
Referenced Tree: Indicates that the tree node is actually another version for the tree based on the same tree structure, which is not physically stored in the same tree. For example, a geographic hierarchy for the United States can be referenced in a World geographic hierarchy.
Profile options manage configuration data centrally and influence the behavior of applications. Profile options serve as permanent user preferences and application configuration parameters. You configure profile options with settings for specific contexts or groups of users. Users customize how their user interfaces look and behave by changing the values of available profile options.
Profile options store the following kinds of information.
|
Type of Information |
Profile Option Example |
|---|---|
|
User preferences |
Settings to provide access to social networking features |
|
Installation information |
Setting to identify the location of a portal |
|
Configuration choices |
Settings to change user interface skins and behaviors |
|
Processing options |
Settings to affect how much information to log either for an entire site or a specific user |
You can add and configure new profile options in addition to configuring predefined profile options that are implemented as updateable.
Application developers add new profile options and configure ones that are not to be updated by other users. Application administrators and implementation consultants configure profile options with profile option values that are implemented as updatable.
Profile option definitions consist of the following.
Profile option name
Application and module in the application taxonomy
Profile option values
Profile options categories
Profile option levels
Profile option level hierarchy
Profile options can appear on any user interface page without indication that a profile option is what is being set.
Some profile options have predefined profile option values.
The Manage Profile Option Values task flow allows an administrator to set updatable profile option values at the available levels, including the user level. You can access the Manage Profile Option Values task starting in the Setup and Maintenance Overview page and searching for profile option tasks.
You can set profile option values at different levels: site, product, and user. The following table provides examples.
|
Profile Option Level |
Value of the Profile Option Level |
Profile Option Value |
Effect |
|---|---|---|---|
|
User |
Manager1 |
UK pound sterling |
Access to site and all products shows UK pounds sterling in effect |
|
User |
Manager2 |
US dollar |
Access to site and all products shows US dollars in effect |
|
Product |
Financials for EMEA |
Euro |
Unless superseded by a user level value, Euros in effect for Financials for EMEA applications |
|
Site |
Site |
UK pound sterling |
UK pounds sterling in effect for all other users and products |
Context such as user session or accessed product determines which profile option value is associated with the profile option name. In the example, if manager1 does not set a profile option value for this profile option, access to Financials for EMEA shows currency in Euros; and access to other products shows currency in UK pounds sterling.
Categories group profile options based on their functional area. Profile option categories facilitate searching and defining data security.
For example, in Oracle Fusion Receivables, the Transactions profile option category groups profile options related to setting how Receivables transactions are to be processed, such as Require Adjustment Reason.
A profile option can be in more than one category.
Application developers specify at which hierarchy level a profile option is enabled. The predefined profile option hierarchy levels are site, product, and user.
The hierarchy levels specified in the profile option definition determine the context in which a profile option value may be set. If the profile option value at a particular level is updatable, an administrator can update the profile option value for that context.
Note
Profile options should only be enabled for context levels that are appropriate for that profile option. For example, a profile option indicating a global configuration setting should not be enabled at the user level, if users cannot choose a different value for that setting.
For security, one level in the hierarchy is designated as a user level. A profile option may be enabled at any or all hierarchy levels. When enabled at all levels, the predefined ordering of profile option hierarchy levels gives precedence to the values that are set at the user level over values set at the product and site levels, and precedence to values set at the product level to values set at the site level. If there is no value for the current user, then the product value applies. If there is no value for the user or product, then the site value applies.
The table shows the predefined profile option hierarchy and ordering.
|
Hierarchy Level |
Priority When Multiple Levels Set |
Effect on Applications |
Example |
|---|---|---|---|
|
Site |
Lowest |
Affect all applications for a given implementation |
Currency for the site is set to Euros. |
|
Product |
Supersedes Site |
Affect all applications of a product family such as Financials |
Currency for the Financials products set to UK pound sterling. |
|
User |
Highest, supersedes Product |
Affect only the experience of the current user |
Currency for the user of Financials applications set to US dollars. |
You can configure updatable values for profile options at one or more levels depending on which levels are enabled in the profile option definition. When a profile is set at more than one level, higher levels of specificity override lower levels of specificity.
In the example, if the currency setting for the site is UK pounds sterling, but the Financials division works in the Netherlands using the Euro, a manager in the US can override that product level setting at the user level to use US dollars when accessing Financials applications.
In another example, if a profile option called Printer is set only at the site and product levels. When a user logs on, the Printer profile option assumes the value set at the product level, since it is the highest level setting for the profile.
Tip
Set site-level profile option values before specifying values at any other level. The profile option values specified at the site-level work as defaults until profile option values are specified at the other levels.
For more information on the predefined profile options, see assets with the Profile Option type in the Oracle Enterprise Repository for Oracle Fusion Applications (http://fusionappsoer.oracle.com).
Plan profile options before defining and configuring them.
The following aspects assist you in better planning how to manage profile options.
Profile option tasks
Before creating a profile option
Profile options data model
Users may be able to set their own profile options, depending on settings in the profile option definition. However, not all profile options are visible to end users, and some profile options, while visible, may not be updated by end users.
The following table lists tasks and considerations relevant to planning profile options.
|
Tasks |
Role |
Considerations |
|---|---|---|
|
Planning, creating, and editing a new profile option |
Applications developer |
Since profile options are for permanent settings, do not use profiles options to cache temporary session attributes. Add capacity for user preferences and system configuration. Customize profile options with values, value behaviors, validation, category values, and security. Define the levels at which the profile option is enabled. |
|
Configure values in an existing profile option |
Applications developer, application administrator, and implementation consultant |
Manage the values for existing profile options. |
|
Create and edit profile option categories |
Applications developer, application administrator, and implementation consultant |
Manage categories for organizing existing profile options. |
Note
Since a profile option enables a behavior in an application user interface or across applications, a value change made by an end user is reflected in the UI page for managing profile option values.
Profile options are best defined for managing configuration data centrally and influencing the behavior of applications.
If the purpose of a profile option setting is specific to a piece of data (typically setup data), it is best implemented as an attribute of that data.
Do not use profile options for behavior that is not configurable.
Profile options exist independent of role.
Do not use profile options to implement function security. For example, an application should not check for a profile option value set to yes to provide access to a page. Do not use profile options to implement data security, such as a profile option value that must be set to a specific value to provide view access to an entity.
Do not use profile options to capture a dynamic system states, such as data stored in a temporary table. Use Global Variables for temporary states instead.
Evaluate if there is a genuine need before creating a profile option. Do not force users to make a decision about an aspect of their application use that is of no concern.
Evaluating need includes looking for duplicate or similar profile options, even in other products, before creating a new one. For example, you do not need multiple profile options to choose a preferred currency.
The profile option data model illustrates the relationships among profile option elements.
The figure shows the data model of profile option entities.
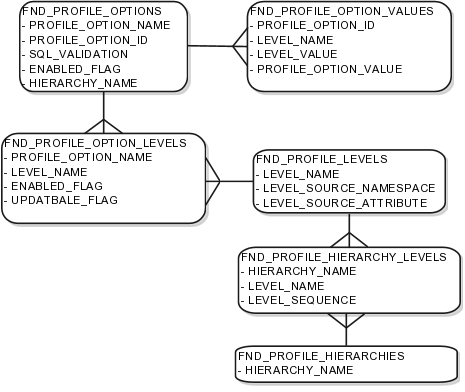
For more information about planning profile options, see the Oracle Fusion Applications Developer's Guide.
A profile option definition consists of a name for the profile option and valid values. It is defined within a module of the application taxonomy. Application developers manage profile options to create new profile options or modify existing profile option definitions, which includes specifying the levels at which a profile option is enabled and defining values. Implementation consultants and application administrators configure existing profile options by managing the profile option's updatable values, and creating categories that group profile options.
A profile option definition includes information about the owning application and module in the application taxonomy. A start or end date, or both may limit when a profile option is active. The profile option definition may include an SQL validation statement that determines which values are valid, and the hierarchy levels at which the profile option is enabled and updatable.
To be visible to users, a profile option must be user enabled. You can also allow user updates of the profile option, which means users can make changes to the validation and the profile option level information.
Profile option levels specify at which context level profile values may be enabled or updated
Profile options should only be enabled for context levels that are appropriate for that profile option. For example, a profile option indicating a global configuration setting should not be enabled at the user level, if users cannot choose a different value for that setting.
The SQL validation of the profile option definition determines what valid profile option values are available. In the absence of validation, any value is valid.
For example, SQL validation provides a means of defining a list of values for the valid values of the profile option. The SQL validation can use lookups to provide the valid values for profile options, such as the lookup codes of the YES_NO lookup type.
SELECT DESCRIPTION Language, NLS_LANGUAGE
FROM FND_LANGUAGES_VL
WHERE INSTALLED_FLAG IN ('B','I')
ORDER BY DESCRIPTION
This results in the following list of values based
on data in FND_LANUGUAGE_VL.
|
Display Value |
Hidden Value |
|---|---|
|
American English |
US |
|
French |
F |
|
Spanish |
E |
Hidden values must be varchar2(2000).
Profile options generally provide configuration values within a particular context. Though you can create a profile option to be global, think of global values as default values to avoid storing inappropriate configuration information as profile option values. Create global profile options that have corresponding contextual levels.
Use profile option categories to group profile options.
As a guideline, group profile options in a single category if the profile options affect the same feature, or if an administrator would likely want to see the profile options in the results of a single search.
Application developers are responsible for the initial groupings and then administrators can make changes based on their specific needs. Administrators can categorize profile options and then easily search on profile options by category.
Tip
Define profile option categories first and assign new profile options to existing categories rather than defining profile options first and then defining categories to categorize them.
You can add new categories or add profiles to an existing category.
You can create a profile option category by duplicating an existing category and editing it for a new grouping of profile options. You can add multiple profile options to a category. A profile option can exist in multiple categories.
Specify a profile option sequence to determine the order of profile options when queried by profile option category.
A profile option value consists of the value and the context or level where the value is set. You specify the context with a pairing of the profile option value's level and level value, such as the product level and the level value GL for Oracle Fusion General Ledger. Adding or modifying profile option values can include deciding which valid values are enabled or updatable at which level.
The SQL validation of the profile option definition determines what valid profile option values are available. In the absence of validation, any value is valid.
Site level profile option values affect the way all applications run for a given implementation. Product level profile option values affect the way applications owned by a particular product code behave. For example, a product may use profile options set at the product level to determine how regions provided by a common module such as those available from Oracle Fusion Trading Community Model or Customer Relationship Management (CRM) display in a particular work area or dashboard. User level profile option values affect the way applications run for a specific application user
Whichever profile option value is most specific to a user session, that is the value at which the profile option is set for the user session.
For example, the predefined FND_LANGUAGE profile option sets the default language. In addition to a site level value, you can define a value for various product or user levels.
|
Level Name |
Level Value |
Profile Option Value |
|---|---|---|
|
Site |
InFusion |
American English |
|
Product |
Customer Center |
French |
|
Product |
CRM Application Composer |
American English |
|
User |
Application Administrator |
American English |
|
User |
Hima |
Hindi |
Values at the site level take effect for any user unless overridden by a different value set at the more specific levels of product and user. Product level profile option values affect the way applications owned by a particular product code behave. In addition to user level profile option values in applications, selections may be available in the user preferences workspace.
The following table demonstrates the FND_LANGUAGE profile option settings that would apply to specific users, based on the example above. For example, the user Hima is using the CRM Application Composer product, in the InFusion site. The example above shows that this profile option is set to Hindi at the user level for Hima. Because user is the highest applicable level for Hima, the applicable profile option value is Hindi for Hima.
|
Site |
Product |
User |
Highest Available Level |
Active Profile Option Value |
|---|---|---|---|---|
|
InFusion |
CRM Application Composer |
Hima |
User |
Hindi |
|
Acme |
Payables |
Application Administrator |
User |
American English |
|
InFusion |
Customer Center |
Guillaume |
Product |
French |
|
InFusion |
Payables |
Implementation Consultant |
Site |
American English |
|
Acme |
Payables |
Implementation Consultant |
none |
no value |
Note
More than one site level value is relevant in an enterprise with multiple tenants using a single instance of Oracle Fusion Applications.
Any change you make to a user level profile option has an immediate effect on the way applications run for that session. When you sign in again, changes made to your user level profile options in a previous session are still in effect. When you change profile option value at the product level and no user level values are set, you see the update immediately, but other users may not see the changed value until signing out and back in. When you change a profile option value and the new value affects other users, the change takes effect only when users sign in the next time.
Changes to site level profile options take effect for any user session that is started after the setting has been changed. Changes to site or user level profile options do not affect any user sessions that are already in progress when the change is made.
Changes to site or user level profile options take effect for any C or PL/SQL processes, such as scheduled jobs, that are launched after the setting has been changed. Profile option changes do not affect C or PL/SQL processes that are already running.
Flexfields are a mechanism for configuring and extending applications to meet enterprise-specific needs by adding an attribute to a business component. Using flexfields, you can extend application objects to capture data that would not otherwise be tracked by the application, or configure intelligent key codes comprised of meaningful parts according to your business practices. Flexfields encapsulate all of the pieces of information related to a specific purpose, such as a key identifying a particular purchase, or the components of a student's contact information, or the features of a product in inventory.
A flexfield is an extensible data field consisting of subfields Each subfield is a flexfield segment. You configure segments to capture enterprise-specific information. Each segment captures a single atomic value, has a name, and maps to a pre-reserved column in the applications database.
Flexfields allow enterprise requirements to be met without changing the data model. Different data can be captured on the same database table.
Application developers create a flexfield and register it so that it is available for configuration. Administrators and implementation consultants setup or configure segments and other properties of the available flexfields. End users see flexfield segments as attributes of information displayed in the application user interface. They enter a value for the attribute. The value may be selected from a list of valid values or entered as free-form text that complies with formatting rules.
Manage flexfields using tasks you access by starting in the Setup and Maintenance Overview page. This page is available from the Administrator menu.
Tip
Use the Business Object parameter to search Application Key Flexfields, Application Descriptive Flexfields, and Application Extensible Flexfields to find all tasks related to flexfields. To manage any flexfield across all Oracle Fusion Applications products, search for the Define Flexfields task list and access the Manage Descriptive Flexfields, Manage Extensible Flexfields, and Manage Key Flexfields tasks.
For lists of flexfields, see assets with the Flexfield: Descriptive, Flexfield: Extensible, or Flexfield: Key type in Oracle Enterprise Repository for Oracle Fusion Applications (http://fusionappsoer.oracle.com).
The following three types of flexfields are available in Oracle Fusion Applications and provide a means to customize applications features without programming.
Key
Descriptive
Extensible
For example, in Oracle Fusion Financials, key flexfields represent objects such as accounting codes and asset categories. Generally, correct operations of a product depend on key flexfield setup. In Oracle Fusion Payables, a descriptive flexfield expands a customizable area of an invoices page by providing subfields for collecting invoice details. You can implement these subfields, which are descriptive flexfield segments, as context sensitive so they appear only when needed. Extensible flexfields are similar to descriptive flexfields, but provide additional advanced features. Generally setup of descriptive and extensible flexfields is optional because their segments capture additional information that is stored attributes on an entity
All flexfields consist of segments. Segments represent attributes of information. They can appear globally wherever the flexfield is implemented, or based on a structure or context.
You define the appearance and meaning of individual segments when configuring a flexfield.
A key flexfield segment commonly describes a characteristic of the entity identified by the flexfield, such as a part number structured to include information about the type, color, and size of an item. A descriptive flexfield segment represents an attribute of information that describes a characteristic of the entity identified on the application page, such as details about a device containing components, some of which are globally present on the page while others are contextually dependent on the category of the device.
A value set is a predefined, named group of values that can be used to validate the content of a flexfield segment.
You configure a flexfield segment with a value set that establishes the valid values that an end user can enter for the segment. You define the values in a value set, including such characteristics as the length and format of the values. You can specify formatting rules, or specify values from an application table or predefined list. Multiple segments within a flexfield, or multiple flexfields, can share a single value set.
Key flexfields have structure. Descriptive flexfields and extensible flexfields have context.
Each key flexfield structure is a specific configuration of segments. Adding or removing segments, or rearranging their order, produces a different structure. The database columns on which segments in different structures are based can be reused in as many structures as desired.
Descriptive flexfield segments can be context-sensitive, which means available to an application based on a context rather than globally available wherever the flexfield appears. (which means available to an application based on a context value rather than globally available wherever the flexfield appears. A descriptive flexfield context is a set of context-sensitive segments that store information related to the same context value. You define contexts as part of configuring a descriptive flexfield. End users see global segments, as well as any context-sensitive segments that apply to the selected context value.
Extensible flexfield segments are made available to an application based upon a category value. An extensible flexfield context serves as a container for related segments, used to organize the various segments that are applicable to a category value. You define contexts with context-sensitive segments and associate them to categories as part of configuring an extensible flexfield. End users see the segments displayed in subregions, one for each context associated to the selected category value.
In descriptive flexfields and extensible flexfields, the database columns on which context-sensitive segments are based can be reused in as many contexts as desired.
A flexfield must be deployed to display its current definition in a runtime application user interface. For example, if the deployment status is Edited, the flexfield segments may appear in the UI based on the flexfield definition at the time of last deployment, rather than the current definition.
You can deploy a flexfield as a sandbox for testing the configuration before deploying it to the mainline for all users. In the case of extensible flexfields, you can deploy offline as a background process.
In an application user interface, descriptive flexfield segments appear as label and field pairs or as a table of fields where the column headers correspond to the labels. The fields represent the flexfield segments and accept entered input or a selection from a list of choices that correspond to the segment's assigned value set. Extensible flexfield segments appear grouped within labeled regions, where each grouping is a context and the region labels are the context names.
Use the Highlight Flexfields command in the Administration menu of the Setup and Maintenance work area to identify the location of the flexfields on the runtime page. Flexfields in highlight mode display an information icon to access details about the flexfield, an edit icon to manage the flexfield, and a quick create icon to add descriptive flexfield segments.
All segments of a single flexfield are grouped together by default. The layout and positions of the flexfield segments depend on where the application developer places the flexfield on the page. Flexfields may also be presented in a separate section of the page, in a table, or on their own page or subwindow.
You can use Oracle Composer to edit the layout, position, or other display features of the flexfield segments.
Administrators configure flexfield segments to capture data that represents the values of attributes. Flexfield segments represent attributes of entities (business objects). Most business objects are enabled for descriptive flexfields. Some business objects are enabled for extensible flexfields.
For example, an airline manufacturer might require very specific attributes for their orders that are not provided by the out-of-the-box implementation of an order. Because a flexfield exists for the order business component, you can use it to create and configure the desired attribute.
The figure shows the layers of a flexfield: the business entity table and metadata in the database, business components that are Application Development Framework (ADF) objects or ADF business component (ADFbc) objects derived from the metadata and stored in the Metadata Services Repository (MDS), and the user interface where the input fields defined by the flexfield segments are rendered. The flexfield definition consists of all the metadata defined during configuration and stored in the database.
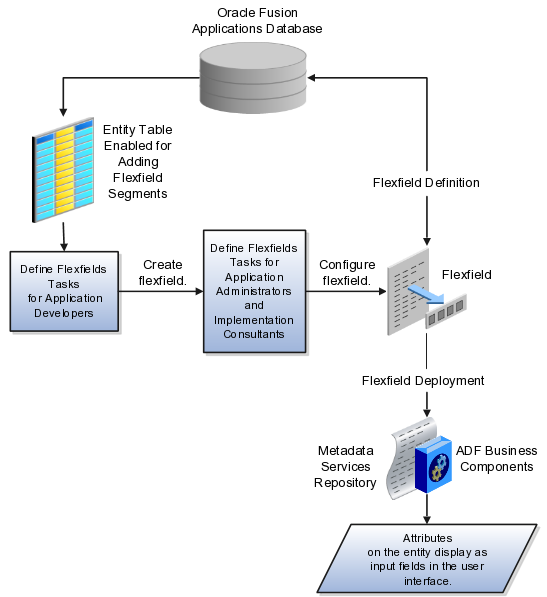
Application developers create a flexfield and register it so that it is available for configuration. Administrators and implementation consultants configure segments and other properties of the available flexfields. This information is stored as additional flexfield metadata in the database. Deploying the flexfield generates ADF business components based on the flexfield metadata in the database.
The attributes that you add by configuring flexfields are available throughout the Oracle Fusion Middleware technology stack, allowing the flexfields to be used in user interface pages, incorporated into the service-oriented architecture (SOA) infrastructure, and, in the case of descriptive flexfields, integrated with Oracle Business Intelligence.
A flexfield affects the Web Services Description Language (WSDL) schemas exposed by ADF services and used by SOA composites. The Web services that expose base entity data also expose flexfield segment data.
Attributes incorporate into SOA infrastructure (BPEL, Rules) and integrate with business intelligence (Oracle Business Intelligence, Extended Spread Sheet Database (ESSbase)).
Flexfield configurations are preserved across Oracle Fusion Applications updates.
The metadata for the flexfield is stored in the application database as soon as you save your configuration changes. Deploying the flexfield generates the ADF business components so that the runtime user interface reflects the latest definition of the flexfield in the metadata.
You can export and import flexfields with a deployment status of Deployed or Deployed to Sandbox across instances of Oracle Fusion Applications using the Setup and Maintenance Overview page. Ensure a flexfield is eligible for migration (by verifying that it has successfully deployed) prior to attempting the migration.
For a flexfield to reflect the latest flexfield definition at runtime it must be deployed. The user interface accesses a business object and the deployed flexfield definition indicates which business object attributes the flexfield captures values for. If you add display customizations for a flexfield using Oracle Composer, these are customizations on the page so that the same flexfield segments can appear differently on various different pages.
Values entered for segments are validated using value sets.
Flexfield configurations are stored in an MDS repository, and are preserved during patching and upgrading.
Managing flexfields involves, registering, planning, and configuring flexfields.
You plan and configure the registered flexfields provided in your applications by applications developers. How you configure flexfield segments determines how the flexfield segments appear to end users. Optionally, you can customize the UI page to change how the flexfield segments appear to end users on that page.
The figure shows the processes involved in making flexfields available to end users. The tasks in the Define Flexfields activity allow administrators to configure and deploy flexfields. If you deploy a flexfield to a sandbox and decide not to make further changes, you select the flexfield in the Manage Flexfields tasks of the Define Flexfields activity and deploy the flexfield in the mainline so it is available to users.
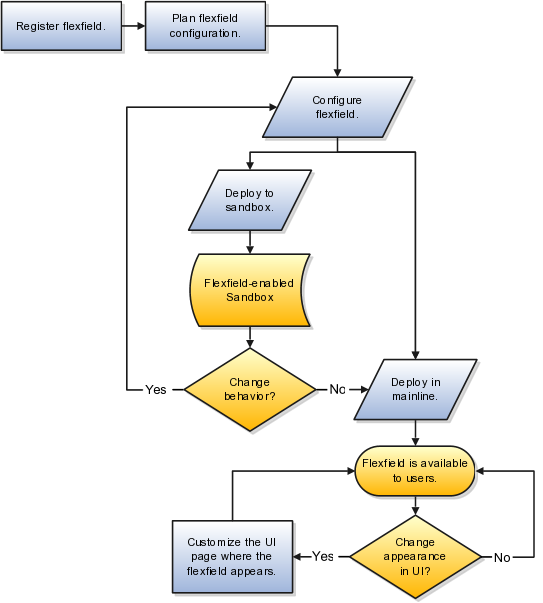
Application development registers flexfields so they are available to administrators and implementation consultants for configuration.
Application development creates the capacity of database tables to support flexfields so an enterprise can capture specific information about an entity. Many flexfields are predefined in Oracle Fusion Applications.
A flexfield must be registered before it can be configured.
For more information on registering flexfields, see Oracle Fusion Applications: Developer's Guide.
All flexfields consist of segments which represent attributes of an entity. The values an end user inputs for an attribute are stored in a column of the entity table. Application development enables columns of entity tables for use in flexfields during flexfield registration.
A flexfield must be registered before it can be configured. Before configuring new flexfield segments for your enterprise, be sure to plan their implementation carefully.
For more information on planning flexfield configuration, see Oracle Fusion Applications Extensibility Guide.
Administrators or implementors configure flexfields so they meet the needs of the enterprise. Some flexfields require configuration to make an application operate correctly.
You can configure flexfields using the following methods:
Go to the manage flexfield tasks in the Setup and Maintenance work area.
Use the Highlight Flexfields command in the Administration menu while viewing a runtime page.
Use the edit icon to manage a flexfield.
Use the quick create icon to add descriptive flexfield segments.
Configuring a flexfield includes the following.
Defining value sets against which the values entered by end users are validated
Defining the structure or context of the segments in the flexfield
Specifying the prompt, length and data type of each flexfield segment
Specifying valid values for each segment, and the meaning of each value within the application
Tip
You can create value sets while creating descriptive and extensible flexfield segments. However, define value sets before configuring key flexfield segments that use them, because you assign existing value sets while configuring key flexfield segments.
Some descriptive flexfields provide parameters that are attributes of the same or related entity objects. You use parameters to set the initial value or derivation value of an attribute from external reference data, such as a column value or a session variable, rather than from user input.
You can enable key flexfield segment instances and descriptive flexfield segments for business intelligence if the flexfield is registered in the database as an Oracle Business Intelligence-enabled flexfield. For more information on enabling segments for business intelligence, see points to consider when enabling key and descriptive flexfield segments for business intelligence.
After you configure or change a flexfield, you must deploy it to make the latest definition available to end users.
You deploy a flexfield in the mainline for general use in a test or production environment, or you can deploy a flexfield as a flexfield-enabled sandbox to confirm that it is correctly configured before deploying it to the mainline.
Deploying a flexfield results in a deployment status. Once deployed, the deployment status indicates the state of the currently configured flexfield relative to the last deployed definition
The flexfield attributes you define integrate with the user interface pages where users access the attributes' business object. Application development determines the UI pages where business objects appear and the display patterns used by default to render flexfield segments.
You can customize the appearance of the flexfield segments in the UI page using Oracle Composer once the flexfield is deployed to the mainline.
The Highlight Flexfields command in the Administration menu of the Setup and Maintenance work area identifies the location of descriptive and key flexfields on the runtime page by displaying an information icon for accessing details about each flexfield.
Even if a flexfield has not yet been deployed and does not appear on the runtime page in normal view, it appears in the Highlight Flexfield view for that page. Highlight Flexfields accesses the current flexfield metadata definition.
Use the highlighted flexfield's edit icon to manage the descriptive or key flexfield directly. Alternatively, note a highlighted flexfield's name to search for it in the tasks for managing flexfields.
Independent of the value set assigned to a segment, segments may have properties such as validation.
Range validation enables you to enforce an arithmetic inequality between two segments of a flexfield. For example, a product must be ordered before it can be shipped, so the order date must be on or before the ship date, and consequently the order date segment value must be less than or equal to the ship date segment value. You can use range validation to ensure this relationship.
The conditions for range validation are as follows.
Segments must be configured for range validation in pairs, one with the low value and one with the high value.
Both segments must be the same data type.
Both segments must be part of the same structure in a key flexfield or part of the same context in a descriptive flexfield or extensible flexfield.
The low value segment must have a lower sequence number than the high value segment.
Non-range validated segments can exist between a range validated pair, but range validated pairs cannot overlap or be nested.
You can configure as many range validated pairs as you want within the same flexfield. Your application automatically detects and applies range validation to the segment pairs that you define, in sequence order. It must encounter a low value segment first, and the next range validated segment it encounters must be a high value segment. These two segments are assumed to be a matching pair. The low value and the high value can be equal.
When entering codes such as segment code, enter a code consisting of the characters A-Z, a-z, 0-9, with a non-numeric leading character.
The code is used in the flexfield's element in the XML schema for web services. You can maximize the readability of the schema by naming codes with a leading alphabetic character followed by alphanumeric characters. The use of spaces, underscores, multi-byte characters, and leading numeric characters, which are all encoded in XML schemas, make the codes in the schema element difficult to read.
This applies to context code in descriptive and extensible flexfields, and to structure instance code in key flexfields.
Value sets are specific to your enterprise. When gathering information using flexfields, your enterprise's value sets validate the values your users enter based on how you defined the value set.
You can assign a value set to any number of flexfield segments in the same or different flexfields. Value set usage information indicates which flexfields use the value set.
As a flexfield guideline, define value sets before configuring the flexfield, because you assign value sets to each segment as you configure a flexfield.
Caution
Be sure changes to a shared value set are compatible with all flexfield segments using the value set.
When you change a value in a shared value set, the change affects the value set for all flexfields that use that value set. The advantage of a shared values set is that a single change propagates to all usages. The drawback is that the change shared across usages may not be appropriate in every case.
When you deploy a flexfield, the value sets assigned to the segments of the flexfield provide end users with the valid values for the attributes represented by the segments.
To populate a flexfield segment with a default value when a row is created, specify a default type of constant or parameter and a default value.
To synchronize a segment's value with another field's value whenever it changes, specify the derivation value to be the flexfield parameter from which to derive the attribute's value. Whenever the parameter value changes, the attribute's value is changed to match. If you derive an attribute from a parameter, consider making the attribute read-only, as values entered by users are lost whenever the parameter value changes.
When defaulting or deriving a default value from a parameter, only those attributes designated by development as parameters are available to be chosen.
Different combinations of making the segments read only or editable in combination with the default or derivation value or both, have different effects.
Initial runtime behavior corresponds to the row for the attribute value being created in the entity table. If the default value is read only, it cannot subsequently be changed through the user interface. If the default value is not read only, users can modify it. However, if the segment value is a derived value, a user-modified segment value is overwritten when the derivation value changes.
|
Default Type |
Default value specified? |
Derivation value specified? |
Initial runtime behavior |
Runtime behavior after parameter changes |
|---|---|---|---|---|
|
None |
No |
Yes |
No initial segment value |
Changed parameter derivation value updates segment value |
|
Constant |
Yes |
No |
Default segment value |
N/A |
|
Constant |
Yes |
Yes |
Default segment value |
Changed parameter derivation value updates segment value |
|
Parameter |
Yes |
No |
Default segment value is the parameter's default value |
N/A |
|
Parameter |
Yes |
Yes, and same as default value |
Default segment value is parameter's default and derivation value |
Changed parameter derivation value updates segment value |
|
Parameter |
Yes |
Yes, and different from default value |
Default segment value is parameter's default value |
Changed parameter default value does not update segment value. Only the changed derivation value updates the segment value. |
To use a flexfield at runtime, the flexfield must have been deployed at least once. Deployment generates or refreshes the Application Development Framework (ADF) business component objects that render the flexfield in a user interface. Flexfields are deployed for the first time during the application provisioning process.
After you configure or change a flexfield, you must deploy it to make the latest definition available to end users. You can deploy a flexfield to a sandbox for testing or to the mainline for use. In the case of extensible flexfields, you can deploy offline as a background process.
Every flexfield has a deployment status.
A flexfield can have the following deployment statuses.
|
Deployment Status |
Meaning |
|---|---|
|
Edited |
The flexfield metadata definition has not been deployed yet. Updates of the metadata definition are not applied in the runtime environment yet. |
|
Patched |
The flexfield metadata definition has been modified through a patch or through a data migration action, but the flexfield has not yet been deployed so the updated definition is not reflected in the runtime environment. |
|
Deployed to Sandbox |
The current metadata for the flexfield is deployed in ADF artifacts and available as a flexfield-enabled sandbox. The status of the sandbox is managed by the Manage Sandboxes task available to the Administrator menu of the Setup and Maintenance work area. |
|
Deployed |
The current metadata for the flexfield is deployed in ADF artifacts and available to end users. There have not been any changes to the flexfield since it was last deployed in the mainline. |
|
Error |
The deployment attempt in the mainline failed. |
Note
Whenever a value set definition changes, the deployment status of a flexfield that uses that value set changes to edited. If the change results from a patch, the deployment status of the flexfield changes to patched.
The Oracle Fusion Applications installation loads flexfield metadata into the database. This initial load sets the flexfield status to Edited to indicate that the flexfield has not been deployed yet. The application provisioning process during installation deploys the predefined flexfields of the provisioned applications, which sets their status to Deployed if no errors are encountered.
When accessing a provisioned application, deployed flexfields are ready to use. In some cases, flexfield availability at runtime requires setup, such as defining key flexfields.
Use the Validate Metadata command to view possible metadata errors before attempting to deploy the flexfield. Metadata validation is the initial phase of all flexfield deployment commands. By successfully validating metadata before running the deployment commands, you can avoid failures in the metadata validation phase of a deployment attempt. Errors in the metadata validation phase of deployment cause the deployment attempt to abort. Metadata validation results do not affect the deployment status of a flexfield.
Flexfield deployment status indicates how the flexfield metadata definition in the Oracle Fusion Applications database relates to the Application Development Framework (ADF) business components generated into a Metadata Services (MDS) repository.
If you have made a change to a flexfield and expect a changed deployment status, be sure you have saved your changes. No settings affect flexfield deployment status.
If the flexfield definition has been edited through the Define Flexfields activity task flows, the status is Edited. The latest flexfield metadata definition in the Oracle Fusion application diverges from the latest deployed flexfield definition. Any change, including if a value set used in a flexfield changes, changes the deployment status to Edited. If a flexfield has never been deployed, its status is Edited.
Note
When an application is provisioned, the provisioning framework attempts to deploy all flexfields in that application.
If you deploy the flexfield to a sandbox successfully, the status is Deployed to Sandbox. The latest flexfield metadata definition in the Oracle Fusion application matches the metadata definition that generated ADF business components in a sandbox MDS repository. Whether the sandbox is active or not does not affect the deployment status. If the flexfield was deployed to a sandbox and has not been edited or re-deployed to the mainline since then, the status remains Deployed to Sandbox independent of whether the sandbox is active, or who is viewing the status.
If you deploy the flexfield successfully, meaning to the mainline, the status is Deployed. The latest flexfield metadata definition in the Oracle Fusion application matches the metadata definition that generated ADF business components in a mainline MDS repository. Change notifications are sent when a flexfield is deployed successfully to the mainline.
If either type of deployment fails so the current flexfield definition is not deployed, the status is Error. The deployment error message gives details about the error. The latest flexfield metadata definition in the Oracle Fusion application likely diverges from the latest successfully deployed flexfield definition.
If the flexfield definition has been modified by a patch, the status is Patched. The latest flexfield metadata definition in the Oracle Fusion application diverges from the latest deployed flexfield definition. If the flexfield definition was Deployed before the patch and then a patch was applied, the status changes to Patched. If the flexfield definition was Edited before the patch and then a patch was applied, the status will remain at Edited to reflect that there are still changes (outside of the patch) that are not yet in effect.
When a deployment attempt fails and you can access the Deployment Error Message for details.
The flexfield definition in a sandbox corresponds to the flexfield metadata definition in the Oracle Fusion Applications database at the time the flexfield was deployed to the sandbox. When the flexfield is ready for end users, the flexfield must be deployed to the mainline.
A flexfield-enabled sandbox uses the following components.
Flexfield metadata in the Oracle Fusion Applications database
Flexfield business components in a sandbox Metadata Services (MDS) repository
User interface customizations for the flexfield in the mainline MDS repository
The figure shows the two types of deployment available in the Manage Flexfield tasks of the Define Flexfields activity. Deploying a flexfield to a sandbox creates a sandbox MDS repository for the sole purpose of testing flexfield behavior. The sandbox is only accessible to the administrator who activates and accesses it, not to users generally. Deploying a flexfield to the mainline applies the flexfield definition to the mainline MDS repository where it is available to end users. After deploying the flexfield to the mainline, customize the page where the flexfield segments appear. Customization of the page in the sandbox MDS repository cannot be published to the mainline MDS repository.

Deploying the flexfield to a sandbox generates the Application Development Framework (ADF) business components of a flexfield in a sandbox MDS repository for testing in isolation.
Warning
Do not make changes to flexfield segment display features in a flexfield-enabled sandbox as these changes will be lost when deploying the flexfield to the mainline.
The Oracle Fusion Applications database stores the single source of truth about a flexfield. From this the ADF business component objects that implement the flexfield in the runtime user interface are generated in the mainline MDS repository when the flexfield is deployed.
Deploying a flexfield to a sandbox creates a flexfield-enabled sandbox . Each flexfield-enabled sandbox contains only one flexfield.
You can test the runtime behavior of a flexfield in the flexfield-enabled sandbox. If changes are needed, return to the Define Flexfield tasks to change the flexfield definition.
When you deploy a flexfield to sandbox, the process reads the metadata about the segments from the database, generates flexfield Application Development Framework (ADF) business component artifacts based on that definition, and stores in the sandbox only the generated artifacts derived from the definition.
The sandbox data allows you to test the flexfield in isolation without first deploying it in the mainline where it could be accessed by users.
Warning
Do not make changes to flexfield segment display features in a flexfield-enabled sandbox as these changes will be lost when deploying the flexfield to the mainline.
When you deploy a flexfield as a sandbox, that flexfield-enabled sandbox automatically gets activated in your user session. When you sign back in to see the changes, the sandbox is active in your session.
You can only deploy a flexfield to a sandbox using the Define Flexfields task flow pages.
You also can use the Manage Sandboxes feature in the Administration menu of the Setup and Maintenance work area to activate, access, or delete a flexfield-enabled sandbox.
Note
Whether you use the Define Flexfields or Manage Sandboxes task flows to access a flexfield-enabled sandbox, you must sign out and sign back in before you can see the changes you deployed in the runtime.
You cannot publish the flexfield from the sandbox to the mainline. You must use the Define Flexfields task flow pages to deploy the flexfield for access by users of the mainline because the flexfield configuration in the mainline is the single source of truth.
You can use the Manage Key Flexfields, Manage Descriptive Flexfields, and Manage Extensible Flexfields tasks to deploy flexfields. You can also use WebLogic Server Tool (WLST) commands for priming the Metadata Services (MDS) repository with predefined flexfield artifacts and for deploying flexfields.
The table describes the available commands.
|
WebLogic Server Tool Command |
Description |
|---|---|
|
Deploys all flexfields for the specified enterprise application. Only flexfields whose status is other than deployed are affected by this command unless the option is enabled to force all flexfields to be deployed regardless of deployment status. Initial application provisioning runs this command to prime the MDS repository with flexfield artifacts. |
|
Deploy a single flexfield regardless of deployment status |
|
Deploys flexfield changes that have been delivered using a flexfield Seed Data Framework (SDF)patch. Deploys flexfields that have a Patched deployment status. |
|
Displays MDS label of flexfield changes for viewing and deleting patching labels. |
|
Displays list including flexfields that are not deployed or failed deployment. |
Executing these commands outputs a report at the command line. The report provides the following information for every flexfield that is processed.
Application identity (APPID)
Flexfield code
Deployment result, such as success or error
In case of errors, the report lists the usages for
which the errors were encountered. If a runtime exception occurs,
the output displays the traceback information. For each WLST flexfield
command, adding the reportFormat='xml' argument returns the report as an XML string.
Consider the following aspects of command line deployment.
Preparing to use the WLST flexfield commands
Using the deployFlexForApp command
Using the deployFlex command
Using the deployPatchedFlex command
Using the deleteFlexPatchingLabels command
Using the validateFlexDeploymentStatus command
Exiting the WLST and checking the results
You can only execute the WLST flexfield commands on a WebLogic Administration Server for a domain that has a running instance of the Oracle Fusion Middleware Extensions for Applications (Applications Core) Setup application.
For more information on deploying the Applications Core Setup application, see the Oracle Fusion Applications Developer's Guide.
Ensure that the AppMasterDB data source is registered as a JDBC data source with the WebLogic Administration Server and points to the same database as the ApplicationDB data source.
Start the WebLogic Server Tool (WLST) tool, if it is not currently running.
UNIX:
sh $JDEV_HOME/oracle_common/common/bin/wlst.sh
Windows:
wlst.cmd
Connect to the server, replacing the user name and password arguments with your WebLogic Server user name and password.
connect('wls_username', 'wls_password', 'wls_uri')
The values must be wrapped in single-quotes. The wls_uri value is typically T3://localhost:7101.
For more information on the WLST scripting tool, see the Oracle Fusion Middleware Oracle WebLogic Scripting Tool.
The deployFlexForApp command translates the product application's predefined flexfield
metadata into artifacts in the MDS repository.
Important
This command is run automatically when you provision
applications. However, after custom applications development, you
must run the deployFlexForApp command
after you configure your application to read the flexfield artifacts
from the MDS repository and before you log into the application for
the first time, even if there is no predefined flexfield metadata.
This command does not deploy flexfields that have
a status of Deployed unless the force parameter is set to 'true' (the default setting is 'false').
For more information on priming the MDS partition with configured flexfield artifacts, see the Oracle Fusion Applications Developer's Guide.
From the WLST tool, execute the following commands
to deploy the artifacts to the MDS partition, replacing product_application_shortname with the application's
short name wrapped in single-quotes.
deployFlexForApp('product_application_shortname'[, 'enterprise_id'] [,'force'])
In a multi-tenant environment, replace enterprise_id with the Enterprise ID to which
the flexfield is mapped. Otherwise, replace with 'None' or do not provide a second argument.
To deploy all flexfields regardless of their deployment
status, set force to 'true' (the default
setting is 'false'). If you want to
deploy all flexfields in a single-tenant environment, you either can
set enterprise_id to 'None', or you can use the following signature:
deployFlexForApp(applicationShortName='product_application_shortname',force='true')
Tip
The application's short name is the same as the application's module name.
For more information about working with application taxonomy, see the Oracle Fusion Applications Developer's Guide.
From the WLST tool, execute the following
command to deploy a flexfield, replacing flex_code with the code that identifies the flexfield, and replacing flex_type with the flexfield's type, which is
either DFF, KFF, or EFF.
deployFlex('flex_code', 'flex_type')
The values must be wrapped in single-quotes.
Use the deployPatchedFlex command for situations where the patching framework does not invoke
the command, such as when an application has been patched offline.
If the installation is multi-tenant enabled, the command deploys all patched flexfields for all enterprises. This command is not intended to be invoked manually.
Check with your provisioning or patching team, or the task flows for managing flexfields, to verify that the flexfield has a Patched deployment status.
From the WLST tool, execute the following command to deploy the artifacts to the MDS partition of all flexfields that have a READY status.
deployPatchedFlex()
Execute the following command to deploy all flexfields that have either a READY status or an ERROR status.
deployPatchedFlex(mode='RETRY')
Whenever you deploy flexfield changes to MDS
using the deployPatchedFlex() WLST command,
an MDS label is created in the format FlexPatchingWatermarkdate+time. Use the deleteFlexPatchingLabels command
to inquire about and delete these labels.
From the WLST tool, execute the deleteFlexPatchingLabels () command with no arguments to
delete the flexfield patching labels.
To output a list of flexfield patching labels, execute
the command with the infoOnly argument,
as follows:
deleteFlexPatchingLabels(infoOnly='true')
The validateFlexDeploymentStatus
() WLST command checks the deployment status of all flexfields
in an Oracle Fusion Applications deployment.
validateFlexDeploymentStatus()
Only the flexfields that belong to the current instance of provisioned Java EE applications are checked.
To exit the tool, execute the following command.
disconnect()
Optionally, sign into the application, access user interface pages that contain flexfields, and confirm the presence of flexfields for which configuration exists, such as value sets, segments, context, or structures.
A value set is a set of valid values that you assign to a flexfield segment.
An end user enters a value into a flexfield segment while using the application. The flexfield validates the segment against the set of valid values that you configured as a value set and assigned to the segment.
For example, you can define a required format, such as a five digit number, or a list of valid values, such as green, red, and blue.
Flexfield segments are usually validated, and typically each segment in a given flexfield uses a different value set. You can assign a single value set to more than one segment, and you can share value sets among different flexfields.
Caution
Be sure changes to a shared value set are compatible with all flexfields segments using the value set.
Defining value sets involves making decisions about the following.
Validation
Security
Precision and scale
Usage and deployment
The following types of validation are available for value sets.
Format only, where end users enter data rather than selecting values from a list
Independent, a list of values consisting of valid values you specify
Dependent, a list of values where a valid value derives from the independent value of another segment
Subset, where the list of values is a subset of the values in an existing independent value set
Table, where the values derive from a column in an application table and the list of values is limited by a WHERE clause
A segment that uses a format only value set does not present a list of valid values to users.
You can build a tree structure from the values in an independent value set whose data type is character.
Note
Adding table validated value sets to the list of available value sets available for configuration is considered a custom task.
For more information, see the Oracle Fusion Applications Extensibility Guide.
Value set security only works in conjunction with usage within flexfield segments. If a value set is used standalone, meaning outside a flexfield, value set security is not applied, but Oracle Fusion data security is enforced.
You can specify that data security be applied to the values in flexfield segments that use a value set. Based on the roles provisioned to users, data security policies determine which values of the flexfield segment end users can view or modify.
Value set security applies at the value set level. If a value set is secured, every usage of it in any flexfield is secured. It is not possible to disable security for individual usages of the same value set.
Value set security applies to independent, dependent, or table-validated value sets.
Value set security applies mainly when data is being created or updated, and to key flexfield combinations tables for query purposes. Value set security does not determine which descriptive flexfield data is shown upon querying.
Security conditions defined on value sets always use table aliases. When filters are used, table aliases are always used by default. When predicates are defined for data security conditions, make sure that the predicates also use table aliases.
For key flexfields, the attributes in the view object that correspond to the code combination ID (CCID), structure instance number (SIN), and data set number (DSN) cannot be transient. They must exist in the database table. For key flexfields, the SIN segment is the discriminator attribute, and the CCID segment is the common attribute.
For a value set with the data type Number, you can specify the precision (maximum number of digits user can enter) or scale (maximum number of digits following the decimal point).
The usage of a value set is the flexfields where that value set is used. The deployment status of flexfields in which the value set is used indicates the deployment status of the value set instance.
The figure shows a value set used by a segment in a key flexfield and the context segment of a descriptive flexfield.
For most value sets, when you enter values into a flexfield segment, you can enter only values that already exist in the value set assigned to that segment.
Global and context-sensitive segment require a value set. You can assign a value set to a descriptive flexfield context segment. If you specify only context values, not value sets for contexts, the set of valid values is equal to the set of context values.
Validation and usage of value sets determine where and how end users access valid values for attributes represented by flexfield segments.
Tip
You can create value sets while creating descriptive and extensible flexfield segments. However, define value sets before configuring key flexfield segments that use them, because you assign existing value sets while configuring key flexfield segments.
When assigning a value set to a context segment, you can only use table-validated or independent value sets. The data type must be character and the maximum length of the values being stored must not be larger than column length of the context.
The format only validation type enables end users to enter any value, as long as it meets your specified formatting rules. That is, the value must not exceed the maximum length you define for your value set, and it must meet any format requirements for that value set.
For example, if the value set allows only numeric characters, your user could enter the value 456 (for a value set with maximum length of three or more), but could not enter the value ABC. A format only value set does not otherwise restrict the range of different values that users can enter. For numeric values, you can also specify if a numeric value should be zero filled or how may digits should follow the radix separator
You cannot specify a dependent value set for a given segment without having first defined an independent value set that you apply to another segment in the same flexfield. You use a dependent value set to limit the list of values for a given segment based on the value that the end user has chosen for a related independent segment. The available values in a dependent list and the meaning of a given value depend on which value was selected for the independently validated segment.
For example, you could define an independent value set of U.S. states with values such as CA, NY, and so on. Then you define a dependent value set of U.S. cities, with values such as San Francisco and Los Angeles that are valid for the independent value CA, and New York City and Albany that are valid for the independent value NY. In the UI, only the valid cities can be selected for a given state.
Because you define a subset value set from an existing independent value set, you must define the independent value set first. End users do not need to choose a value for another segment first to have access to the subset value set.
Typically, you use a table-validated set when the values you want to use are already maintained in an application table (for example, a table of vendor names). Table validation allows you to enable a segment to depend upon multiple prior segments in the same context or structure.
Table-validated value sets have unique values across the table, irrespective of bind variables. The WHERE clause fragment of the value set is considered if it does not have bind variables. If it has bind variables, the assumption is that the values are unique in the value set.
In the case of format, independent, or dependent value sets, you can specify a range to further limit which values are valid. You can specify a range of values that are valid within a value set. You can also specify a range validated pair of segments where one segment represents the low end of the range and another segment represents the high end of the range
For example, you might specify a range for a format-only value set with format type Number where the user can enter only values between 0 and 100. If you use a table value set, you cannot reference flexfield segments in the WHERE clause of the value set . For example, the WHERE clause cannot reference a segment or a value set.
In the case of independent and dependent values, you can specify that data security be applied to the values in segments that use a value set. Based on the roles provisioned to users, data security policies determine which values of the flexfield segment end users can view or modify.
When you enable security on a table-validated value sets, the security rule that is defined is absolute and not contingent upon the bind variables (if any) that may be used by the WHERE clause of the value set. For example, suppose a table-validated value set has a bind variable to further filter the value list to x, y and z from a list of x, y, z, xx, yy, zz. The data security rule or filter written against the value set should not assume anything about the bind variables; it must assume the whole list of values is available and write the rule, for example, to allow x, or to allow y and z. By default in data security all values are denied, and show only rows to which access has been provided.
There is no need to define or maintain values for a table-validated or subset value set, as the values are managed as part of the referenced table or independent value set, respectively.
If your application has more than one language installed, or there is any possibility that you might install one or more additional languages for your application in the future, select Translatable. This does not require you to provide translated values now, but you cannot change this option if you decide to provide them later.
For more information about defining value sets, see the Oracle Fusion Applications Extensibility Guide.
Descriptive flexfields provide a way to add custom attributes to entities, and define validation and display properties for them. These attributes are generally standalone. They don't necessarily have anything to do with each other and are not treated together as a combination.
All Oracle Fusion Applications business entities that you can access are enabled for descriptive flexfields. Descriptive flexfields are optional. You can choose to configure and expose segments for the descriptive flexfield defined and registered in your database, or not. For lists of descriptive flexfields, see assets with the Flexfield: Descriptive type in Oracle Enterprise Repository for Oracle Fusion Applications (http://fusionappsoer.oracle.com).
A descriptive flexfield provides a set amount of segments for an entity. The segments of a descriptive flexfield are made available to end users as individual fields in the application user interface.
A descriptive flexfield can have only one context segment to provide context sensitivity.
The same underlying column can be used by different segments in different contexts. For example, you can define a Dimensions context that uses the ATTRIBUTE1 column for height, the ATTRIBUTE2 column for width, and the ATTRIBUTE3 column for depth. You can also define a Measurements context that uses the same columns for other attributes: the ATTRIBUTE1 column for weight, the ATTRIBUTE2 column for volume, and the ATTRIBUTE3 column for density.
Descriptive flexfield segments are of the following types.
|
Segment Type |
Runtime Behavior |
|---|---|
|
Global segment |
Always available |
|
Context segment |
Determines which context-sensitive segments are displayed |
|
Context-sensitive segment |
Displayed depending on the value of the context segment |
In the figure, a descriptive flexfield has one context segment called Category for which there are three values: Resistor, Battery, and Capacitor. In addition, the descriptive flexfield consists of two global segments that appear in each of the contexts, and three context-sensitive segments that only appear in the context in which they are configured.
Application development determines the number of segments available for configuring. During implementation you determine which attributes to add using the available segments, and the context values and the combination of attributes in each context. A segment can be used for different attributes, such as Height in Context1 and Color in Context2. Each segment of a descriptive flexfield that you make available to end users is exposed in the user interface as an individual field.
For each global and context-sensitive segment, you configure the values allowed for the segment and how the values that end users enter are validated, including interdependent validation among the segments.
Configuring descriptive flexfields involves managing the available flexfields registered with your Oracle Fusion Applications database and configuring their flexfield-level properties, defining and managing descriptive flexfield contexts, and configuring global and context-sensitive segments.
Every descriptive flexfield is registered to include a context segment, which you may choose to use or not.
You can assign sequence order numbers to global segments and to context-sensitive segments in each context. Segment display is always in a fixed order. You cannot enter a number for one segment that is already in use for a different segment.
Value sets are optional for context segments. The value set that you specify for a context segment consists of a set of context codes, each of which corresponds to a context that is appropriate for the descriptive flexfield. If you do not specify a value set for a context segment, the valid values for that context segment are derived from the context codes. The definition of each context segment specifies the set of context-sensitive segments that can be presented when that context code is selected by the end user.
For reasons of data integrity, you cannot delete an existing context. Instead, you can disable the associated context value in its own value set by setting its end date to a date in the past.
You can configure the individual global segments and context-sensitive segments in a descriptive flexfield. These segment types are differentiated by their usage, but they are configured on application pages that use most of the same properties.
Descriptive flexfield usages allow for the same definition to be applied to multiple entities. Descriptive flexfield tables define the placeholder entity where the flexfield segment values are stored once you have configured the descriptive flexfield.
Parameters are public arguments to a descriptive flexfield. Parameters provide outside values in descriptive flexfield validation. Parameters can be referenced by the logic that derives the default segment value and in table-validated VALUE set WHERE clauses.
A segment delimiter or separator visually separates segment values when the flexfield is displayed as a string of concatenated segments.
The ADF business components or artifacts of a flexfield, which are generated into an metadata services (MDS) repository when the flexfield is deployed, are cached within a user session. You must sign out and back in again to view flexfield definition changes reflected in the runtime application user interface page.
A flexfield's status relative to its deployment determines whether the flexfield segments as currently defined in the metadata are available to end users. The flexfield segments seen by end users in the runtime correspond to the flexfield definition that was last deployed successfully.
Value set security is a feature that enables you to secure access to value set values based on the end user's role in the system.
As an example, suppose you have a value set of US state names. When this value set is used to validate a flexfield segment, and users can select a value for the segment, you can use value set security to restrict them to selecting only a certain state or subset of states based on their assigned roles in the system.
For example, Western-region employees may choose only California, Nevada, Oregon, and so on as valid values. They cannot select non-Western-region states. Eastern-region employees may choose only New York, New Jersey, Virginia, and so on as valid values, but cannot select non-Eastern-region states. Value set security is implemented using Oracle Fusion Applications data security.
When you define or edit a flexfield segment, you specify a default value from the values provided by the value set assigned to that segment.
You can set the default value to be a parameter, which means the entity object attribute to which the parameter you choose is mapped will provide the initial default value for the segment.
You can set to be a constant, if appropriate to the data type of the value set assigned to the segment.
In addition to an initial default value, you can set a derivation value for updating the attribute's value every time the parameter value changes. The parameter you choose identifies the entity object source attribute. Any changes in the value of the source attribute during runtime are reflected in the value of the segment.
If the display type of the segment is a check box, you can set whether the default value of the segment is checked or unchecked.
Attachments are pieces of supplementary information that users can associate with specific business objects such as expense reports or purchase orders. Attachments can be URLs, desktop files, text, or in cases where available, repository folders. For any given business object, a user may be able to only view attachments, or also create, delete, or edit attachments, depending on security. For more information on an introduction to attachments, see the Oracle Fusion Applications Developer's Guide.
Attachments are stored in a content management repository provided by Oracle WebCenter Content Server. Users managing attachments have no real interaction with the repository unless the repository mode is enabled for attachments on specific business objects. In that case, users can share attachments among objects, update attachments by checking them out of and back into the repository, and perform other tasks. Access to attachment files is controlled by a digital signing mechanism. Depending on security, users might have direct access to the repository.
Data security that applies to a specific business object also applies to attachments for that object, as determined by the attachment entity defined for the object. For example, if a user has no access to a specific expense report, then the same user cannot access attachments for the expense report. You can also use attachment categories to control access and actions on attachments, based on roles associated with the category. For more information on securing attachments, see the Oracle Fusion Applications Developer's Guide.
An attachment entity is usually a database entity, for example a table or view, that represents a business object attachments can be associated with. Each attachment UI must be defined with a corresponding attachment entity, which not only identifies the business object to attach to, but also controls what users can do. Attachment entities are used only in the context of attachments and exist separately from the database entities that they are based on.
Edit and create attachment entities on the Manage Attachment Entities page, which you can access by starting in the Setup and Maintenance Overview page and searching for the Manage Attachment Entities task. Though you would generally use predefined attachment entities with attachment UIs, you might need to create new entities, for example when developing custom UIs.
An attachment entity name should match the name of the table or view that represents the business object to attach to. The name is also used in the repository folder that is automatically created to store attachments for the entity. The attachment entity display name should be something that users know to represent the business object.
The data security policies associated with the database resource defined for the attachment entity would apply to attachments for that entity. For example, based on the database resource for the expense reports attachment entity, the same policies apply to attachments for expense reports. The database resource value must match the value in the OBJ_NAME column in the FND_OBJECTS table for the business object that the entity represents.
Security based on the database resource associated with the attachment entity is always in effect. What you can enable or disable is security based on attachment categories. If any of the attachment categories associated with the attachment entity has data security defined, then that security applies to this entity only if enabled.
The association between attachment entities and categories determines which categories can be used for an entity. For example, categories associated with the expense report attachment entity are available to be implemented in attachment UIs for expense reports. You can define these associations when managing either entities or categories. Any association changes in either the Manage Attachment Entities or Manage Attachment Categories page are reflected on the other page. You can access either page by starting in the Setup and Maintenance Overview page and searching for attachment tasks.
You determine which attachment categories are relevant to a particular entity on the Manage Attachment Entities page, and each entity must have at least one category. Depending on configuration, any or all of the available categories for that entity are used. For example, you assign three categories to the expense reports attachment entity. For a particular expense report page with attachments functionality, you can customize the attachments component to specify which of the three categories are used. Based on your selection, the data security defined for each category, if any, is applied to attachments on that page if the attachment entity has category-based security enabled.
If you create an attachment category and need to assign it to multiple attachment entities, use the Manage Attachment Categories page. The association means the same as the association on the Manage Attachment Entities page.
Attachments UIs for users to add and manage attachments are fully functional as is, and users usually would not encounter issues. If you customize attachments in any way, for example by creating additional attachment categories and implementing data security on them, then some issues might arise.
Users encounter issues when trying to view attachments or perform actions such as adding attachments.
Users can no longer see specific attachments that they were previously able to see.
Likewise, they can no longer update or delete attachments.
Users get an error stating that they do not have permission to add attachments.
Use the Manage Attachment Entities page to ensure that attachment categories are associated to the relevant attachment entity. For example, if users can no longer see attachments for an expense report, then search for the expense report attachment entity and assign all necessary categories to it. You might need to check with your system administrator or help desk to determine the exact entity used on the page with the expenses attachments or what categories to assign.
If data security is implemented on the categories for the attachment entity, then verify that the Enable Security check box is selected in the Manage Attachment Entities page for that entity. Make sure that users have a role with the privileges shown in the following table, to view, add, update, or delete attachments with a specific attachment category.
|
Action |
Privilege |
|---|---|
|
View |
Read Application Attachment (FND_READ_APPLICATION_ATTACHMENT_DATA) |
|
Add or Update |
Update Application Attachment (FND_UPDATE_APPLICATION_ATTACHMENT_DATA) |
|
Delete |
Delete Application Attachment (FND_DELETE_APPLICATION_ATTACHMENT_DATA) |
For example, if users have the Read Application Attachment privilege for all categories associated with the expense report attachment entity, except the Receipts attachment category, then they can view all expense report attachments except those created with the Receipts category. Likewise, if users do not have the Update Application Attachment privilege for any attachment categories tied to the expense report attachment entity, then they cannot create any attachments at all for expense reports.
For more information on attachment category data security, see the Oracle Fusion Applications Developer's Guide.
Finally, certain attachments UI for users have predefined restrictions on categories in place. Your developers can also introduce additional filters to determine which document categories are available for a specific page. Check with your developers or help desk.
Users can see existing attachments, but the attachments no longer have an attachment category value.
When the attachment was added, at least one category existed for the corresponding attachment entity, as otherwise the attachment could not have been added. Since then, the entity was edited so that it no longer has any assigned categories, so the user cannot see the category associated with that attachment.
Use the Manage Attachment Entities page to reassign attachment categories to the relevant attachment entity. For example, if users can no longer see the Receipts attachment category for an attachment to an expense report, then search for the expense report attachment entity and assign to it the Receipts category. You might need to check with your system administrator or help desk to determine the exact entity used on the page with the expenses attachments or what additional categories to assign.
Finally, certain attachments UI for users have predefined restrictions on categories in place. Your developers can also introduce additional filters to determine which document categories are available for a specific page. Check with your developers or help desk.
An attachment category is used to classify and secure attachments. Each attachment user interface must be defined with at least one category for users to be able to add attachments. If there are multiple categories, users can view them and select one when adding attachments. For example, attachments for an expense report can be categorized as receipts, scanned invoice images, and so on.
You can also associate roles with categories to determine user access and actions for attachments, based on the categories assigned to the attachment entity. For example, security for expense report attachments can be based in part on the categories assigned to the expense report attachment entity. You can define multiple categories per module, and add and manage custom categories for your own purposes. For more information on attachment category data security, see the Oracle Fusion Applications Developer's Guide.
Use the Manage Attachment Categories page, which you can access by starting in the Setup and Maintenance Overview page and searching for the Manage Attachment Categories task.
Activity Stream is a region on the Oracle Fusion Applications Welcome dashboard and other pages in various applications. Users track the activities and transactions of other users in this region. You can set options that affect the all Activity Stream regions for all users across your site. Individual users can still override your settings through Activity Stream preferences.
Activity stream settings are described in the Oracle Fusion Middleware User's Guide for Oracle WebCenter Portal: Spaces. When you read content from that guide, note that:
Your setup applies to all users, not just yourself or any individual user.
You can disregard discussions about how to access the settings, because you access the Set Activity Stream Options page by starting in the Setup and Maintenance Overview page and searching for the Set Activity Stream Options task.
You can customize the Navigator menu, which is the main menu of Oracle Fusion Applications and is always available in the global area. You can also customize the home page of Oracle Fusion Applications by adding tabs to display additional dashboards. Use the Manage Menu Customizations page, which you can access by starting in the Setup and Maintenance Overview page and searching for the Manage Menu Customization task.
An overview of customizing the Navigator menu and home page is provided in the Oracle Fusion Applications Extensibility Guide.
Common messages, which have message names that begin with FND_CMN and message numbers between 0 and 999, are used throughout Oracle Fusion Applications. Each common message can appear in multiple places in any product family. For example, the FND_CMN_NEW_SRCH message can be used for any search to indicate that no results were found. Common messages that are of type error or warning are part of the message dictionary.
Because a common message can be used in any application, consider the ramifications if you edit any aspect of the message, including incident and logging settings. Changes would be reflected in all instances where the message is used. For example, if you change the message text, make sure that the text would make sense to all users across Oracle Fusion Applications who might see it.
You can create custom common messages for use in multiple places within a single product. Do not begin the message name with FND_CMN, but use another suitable convention. The message number should be within the range that is designated for the product.
Each message in the message dictionary has many attributes and components, including message properties, text, and tokens, that you define when creating or editing the message.
Details about these messages are described in the Oracle Fusion Applications Developer's Guide.
Some Oracle Fusion Middleware Extensions for Applications profile options are related to general preferences in the global area.
The related general preferences are Default Application Language, Territory, Date Format, Time Format, Currency, and Time Zone. When the user changes any of these preferences, the stored values in LDAP are updated accordingly.
The corresponding profile options are Default Language, Default Territory, Default Date Format, Default Time Format, Default Currency, and Default User Time Zone. No matter what you set for these profile options at any level, the preferences settings, or LDAP values, take precedence. The profile option value is used only if the LDAP value is not available. Updating the profile option value does not automatically update the value in LDAP or preferences.