11g Release 7 (11.1.7)
Part Number E20388-06
Home
Contents
Book
List
Contact
Us
|
Oracle® Fusion Applications CRM Extensibility Guide 11g Release 7 (11.1.7) Part Number E20388-06 |
Home |
Contents |
Book List |
Contact Us |
|
Previous |
Next |
This chapter contains the following:
Creating Object Workflows : Overview
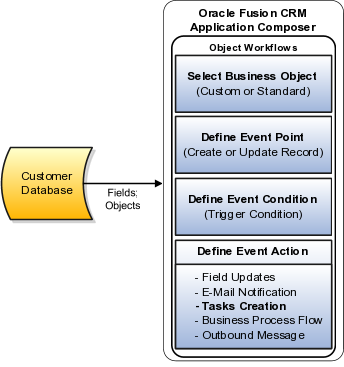
Object Workflows and Application Composer : How They Work Together
Object Workflows and Field Updates : How They Work Together
Object Workflows and E-Mail Notification : How They Work Together
Object Workflows and Task Creation : How They Work Together
Object Workflows and Outbound Message : How They Work Together
Creating Object-Specific Web Services : Explained
Configuring Object Workflows : Example
Object Workflows and Business Processes : How They Work Together
Object Workflows and Business Processes : Critical Choices
Sales Lead Approval Flow : Worked Example
FAQs for Creating Object Workflows
In this chapter, you will learn about:
The concepts and terminology used in object workflows.
How to set trigger conditions for object workflows using groovy scripts.
Configuring event actions such as tasks, e-mail notifications, field updates, business process flows, and outbound messages using object workflows.
Creating an approval flow using business process composer and then triggering the approval flow through object workflows.
You configure object workflows using the main page of the Application Composer.
This figure illustrates how you configure and trigger object workflow.

This figure illustrates the create object workflow page.

Some of the aspects or common terminology used for object workflows is as follows:
Business Object: A business object or an object can be a standard object delivered with the product or a custom object that you define based on your business need.
Event Point: An event point is associated with an object and is an instance when an event occurs. Event points are of the following types:
When a record is created.
When a record is updated.
Event Condition: An event condition is a trigger for object workflows. It is a combination of event point and an expression that supports logical, math operations, or field-value lookups. Defining an expression prevents the triggering of the object workflow each time an update or create event point occurs. See: Expression Editor in this topic.
Event Action: An event action determines what action is expected from an object workflow when the conditions set for an object are met.
Event actions are of the following types:
Field Updates.
E-Mail Notification.
Task Creation.
Outbound Message.
Business Process Flow.
You can use the Application Composer to customize standard business objects delivered as is or create custom business objects based on business needs. You can use both standard objects and custom objects to define object workflows. How you create and configure these objects determines and enforces that only the data relevant to the object in context is available for selection when defining a workflow. For example, when you define a trigger condition, an expression editor lists only those fields that are relevant to the object that you have selected.
An expression editor supports building logical and math operations, including field lookups that you can optionally use to define trigger condition. Fields in the expression editor are populated based on the object for which you are defining a workflow. The expression editor displays a warning if your expression contains an invalid attribute name. However, you must confirm whether the attribute name is actually invalid. If an attribute exists which was created at run time, then you can safely ignore the warning.
This figure illustrates the expression editor using which you can define groovy conditions for object workflows.
Use the expression editor to write Groovy-based application logic that determines when an object workflow is triggered.
Note
Object workflows are not triggered when records are created via file-based import. File-based import bypasses any Groovy validation and trigger logic on an object.
Some examples of the raise conditions you can use include the following:
Example 1:
Status=='IN_PROGRESS' && BudgetAvailableDate==Today() + 30
Example 2:
if (isAttributeChanged('PrimaryContactPartyName') &&
PrimaryContactPartyName =='Business World')  return true;  else  return false;
Example 3:
WinProb>10 || WinProb<50
In addition, keep these points in mind when using the expression editor to build raise conditions:
Ensure that you return a valid boolean as part of your raise condition. Returning a non-boolean value could lead to run-time errors.
Use return true or return false to explicitly return
the boolean value and code indentation when the evaluation logic is
complex, to minimize risk of run-time errors.
For lookup values, use the lookup code instead of the display value.
Use <, >, == for comparison.
For the event point When a record is updated, avoid redundant
calls of the actions by always specifying which field change should
trigger the object workflow, using the function isAttributeChanged.
Be aware of Groovy-type coercion, if you are not returning an explicit boolean value.
Use the logging capability to debug your condition and review the generated log by selecting Runtime Messages in the Common Setup pane.
For more information on groovy scripting, see Oracle Fusion CRM Application Composer Scripting Guide (ID 1354807.1) on My Oracle Support at https://support.oracle.com.
While defining an event action, you can optionally set an execution schedule that governs when an event action should happen. Else, the event actions are run immediately. When multiple event actions are configured, the Field Updates happen first before any other event action is triggered. For event actions other than Field Updates, there is no particular sequence and the event actions are triggered based on whether or how you configure the execution schedule. You can set a time rule for an event action based on whether that event action must occur after or before the triggering of a workflow or the occurrence of a date, and also specify the time duration in Hours, Days, or Weeks. If you schedule an event action for a time in the past, the event action is executed immediately after it is triggered.
This figure illustrates the execution schedule region.


This figure illustrates what you can do using Application Composer within the extensibility framework.
You can use the Application Composer to customize standard business objects delivered as is or create custom business objects based on business needs. You can use both standard objects and custom objects to define object workflows. How you create and configure these objects determines and enforces that only the data relevant to the object in context is available for selection when defining a workflow. For example, when you define a trigger condition, an expression editor lists only those fields that are relevant to the object that you have selected.
For more information on customizing Oracle Fusion CRM Applications using Application Composer, see Oracle Fusion Applications CRM Extensibility Guide on Oracle Technology Network at http://www.oracle.com/technetwork/indexes/documentation.
In a sales division, the management plans to set an automated business process where an opportunity must have an initial close date set automatically to 90 days from its date of creation. Being an administrator, you must create an object workflow based on management directions.
This figure illustrates the triggering of the event action for the business scenario.
To create field updates event action:
From the Application Composer main page, select Object Workflows.
Click Create.
Select the Opportunity object and provide a meaningful Name and Description.
Define the trigger condition using When a record is created event point. Use
the expression editor to set the event condition as Close Date is Null.
Under Actions, select Field Updates event action.
This opens the Create Action: Field Updates page where you configure the event action.
Provide the Name and Description for the field updates action and optionally set the Execution Schedule.
Under Field Update Details, select Close Date and set its value to Creation Date plus 90 days.
Save the event action.
When a user creates an opportunity, the workflow is triggered which sets the close date to 90 days from the date of creation.
In a sales division, the management plans to set a business process that when an opportunity is updated whose close date is current or past and the status is open, an e-mail notification is automatically sent to specified recipients and the close date is extended by 15 days. Being an administrator, you must create an object workflow based on management directions.
This figure illustrates how you configure multiple event-actions for the business scenario.

In this example, you must create a workflow with two event actions, namely, Field Updates and E-Mail Notifications.
From the Application Composer main page, select Object Workflows.
Click Create.
Select the Opportunity object and provide a meaningful Name and Description.
Specify the event point as When a record is updated. Use the expression
editor to set an event condition as Close Dateis less than or equal to Current Date and Status is Open.
You are now creating Field Updates event action.
On the Create Object Workflow page, select Field Updates event action.
This opens the Create Action: Field Updates page.
Provide the Name and Description for the field updates action and optionally set the Execution Schedule for triggering the action.
Under the Field Update Details, select Close Date and set its value to Current Date plus 15 days.
Save the event action.
You are now creating the E-Mail Notification event action.
On the Create Object Workflow page, select E-Mail Notification event action.
This opens the Create Action: E-Mail Notification page.
Provide the Name and Description for the e-mail notification action and optionally set the Execution Schedule for triggering such notifications.
Search and select an existing E-Mail Template or create one with a related e-mail subject and body.
When you create a template, you specify action-related text and field tokens that are populated at run time. See: E-Mail Templates: Explained topic.
Locate and specify Specific users under Recipient Types. See: recipient types in E-Mail Templates: Explained topic.
Click Save.
When a user updates an opportunity record which satisfies the trigger condition, an e-mail is sent to the specified recipients and the Close Date is extended by 15 days.
This figure illustrates how the field updates are configured and triggered.

To create field updates event action:
From the Application Composer main page, select Object Workflows.
Click Create.
Select an Object and provide a meaningful Name and Description.
Define the trigger condition using When a record is created or When a record is updated event point.
Note
If you have created a field in a sandbox and want to set a condition on that field or apply a new value, you must first publish the sandbox to make that field available to the mainline application.
Select Field Updates as the event action.
This opens the Create Action: Field Updates page.
Provide the Name and Description for the field updates action and optionally set the Execution Schedule.
Specify the fields you want to update when the workflow is triggered. See: Specifying Field Update Details in this topic.
Save the event action.
Note
If you have a record open and a workflow is triggered on a field in that record, you must exit from the record and reopen it to see the updates.
In the Field Update Details region, select the fields and specify the values to which these fields must be set when the workflow is triggered. When you select a field to update, the options on the page dynamically change depending on the field type. For example, if you select a field of type Date, a date picker appears.
If you are updating a currency field, you must specify the value to which this field will be set when the field updates action is invoked.
In case of static choice list, the list of field values can either be in an alphabetical order or in the display sequence such as High, Medium, or Low. For updating static fields that have a display sequence, specify whether you want to populate the field with the next value in list or with the previous value in list.
For example, for a display sequence of High, Medium, and Low, you can change from High to Medium (populate with next value) or from Low to Medium (populate with previous value) during field updates; however, if the current value is Low and you configure using populate with next value in list, the field is not updated because Low is already the last value in the sequence.
Use Update More Fields option to select additional fields to update.
You can configure field updates using either a parent or a child object. When you select a child object for defining an object workflow, you can update fields only in the records of that child object; however, you cannot update fields in the records of that child object's parent.
For example, if you are defining a workflow for Opportunity Team, which is a child object of Opportunity, you can configure field updates when a new team member (child record) is added to the Opportunity Team, but you cannot configure field updates for records in the parent Opportunity object.
Additionally, when inserting field tokens while configuring field updates, only those tokens belonging to the selected child object in context is available for selection.
The field-updates event action acts on the same object that raises the event. For example, when you create an Opportunity object and do not specify the Close Date, you can define a field update action that sets the Close Date automatically to 90 days after the creation date.
While defining an event action, you can optionally set an execution schedule that governs when an event action should happen. Else, the event actions are run immediately. When multiple event actions are configured, the Field Updates happen first before any other event action is triggered. For event actions other than Field Updates, there is no particular sequence and the event actions are triggered based on whether or how you configure the execution schedule. You can set a time rule for an event action based on whether that event action must occur after or before the triggering of a workflow or the occurrence of a date, and also specify the time duration in Hours, Days, or Weeks. If you schedule an event action for a time in the past, the event action is executed immediately after it is triggered.
For example, you can define a workflow that when the win probability of an opportunity is set to 30 percent or more, the workflow automatically sends out e-mail alerts to the resources who are assigned that opportunity along with the required information.
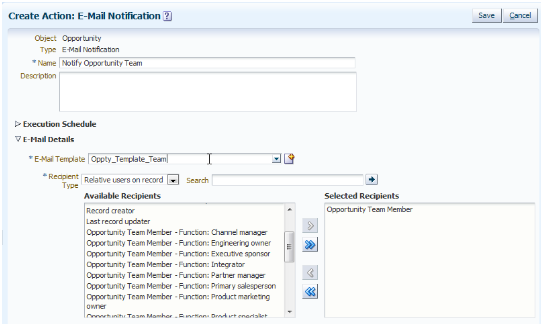
This figure illustrates how e-mail notifications are configured and triggered.

You can configure e-mail notifications using either a parent or a child object.
To define an e-mail notification:
From the Application Composer main page, select Object Workflows.
Click Create.
Select an Object and provide a meaningful Name and Description.
Define the trigger condition using When a record is created or When a record is updated event point.
Select E-Mail Notification as the event action.
This opens the Create Action: E-Mail Notification page.
Provide the Name and Description for the e-mail notification action and optionally set the Execution Schedule for triggering such notifications.
Search and select an existing e-mail template or create one with a related e-mail subject and body.
When you create a template, you specify action-related text and field tokens that are populated at run time. See: E-Mail Templates: Explained topic.
Specify the Recipient Types. See: Recipient Types in this topic.
Click Save.
While defining an event action, you can optionally set an execution schedule that governs when an event action should happen. Else, the event actions are run immediately. When multiple event actions are configured, the Field Updates happen first before any other event action is triggered. For event actions other than Field Updates, there is no particular sequence and the event actions are triggered based on whether or how you configure the execution schedule. You can set a time rule for an event action based on whether that event action must occur after or before the triggering of a workflow or the occurrence of a date, and also specify the time duration in Hours, Days, or Weeks. If you schedule an event action for a time in the past, the event action is executed immediately after it is triggered.
The recipients available for sending e-mail notifications are contextual. If you are defining a workflow using a parent object, then the recipients belong to the parent and its related child objects. If you are defining a workflow using a child object, then the recipients belong only to that child object.
Additionally, when inserting field tokens while configuring e-mail notifications, only those tokens belonging to the selected primary or child object are available for selection.
Select the recipients from the following options available under Recipient Type:
E-mail fields on record: If the selected object contains fields that store e-mails, you can select those fields to send e-mail notifications. For example, Primary Contact E-Mail under Opportunity object.
Relative users on record: Contains relative users who could be either a creator of an opportunity record, a person who last updated a record, a manager or his directs, or a team of resources working on an object, and so on.
Roles: Contains users assigned to a particular resource role. Enterprise groups or users granted with that role could be the recipients of the e-mail notification.
When selecting a Role, you can optionally apply an additional filter to specify the organization to which that role belongs. For example, if you want to send an e-mail notification to a Sales Director role within a particular organization, specify that organization using the Filter By field in the dialog where you select the role.
Specific users: Contains details of individual users and their e-mails.
Specific e-mail addresses: Enter individual e-mails separated by a comma.
You can configure object workflows to trigger auto-creation and assignment of tasks. You can define tasks action for only those objects that support the creation of tasks. For other objects, the tasks option is disabled.
When you configure an object workflow using a child object, the selectable fields for Tasks Creation event action contain fields specific only to that child object.
When a child-object-based task is triggered, the task is assigned to the parent object of that child. You cannot configure a task for a child object of another child object.
This figure illustrates how tasks are configured.
To define a tasks creation action:
From the Application Composer main page, select Object Workflows.
Click Create.
Select an Object and provide a meaningful Name and Description.
Define the trigger condition using When a record is created or When a record is updated event point.
Select Tasks Creation event action.
This opens the Create Action: Tasks Creation page.
Provide the Name and Description for the event action and optionally set the Execution Schedule.
Use the Task Details region to configure a task based on your requirements. Here are the things you can do using tasks details region:
Select a Subject and Description, as appropriate, for your task notification.
Select the Start Date and Due Date for a task. When you select a date, you can also provide logical conditions for these dates, for example, a Due Date must be 30 days after the Start Date.
Select the Owner and Assignees for a task. The values in these lists change depending on the object for which the task is being defined.
For example, for an opportunity object, the Assignees list would include the owner, resource team, resource team with different access levels, member functions, and so on. When an opportunity reaches a Close Date and the status is still Open, you can use the task creation action to assign a follow up task to the owner of the opportunity.
Select the Category to which a task belongs, such as meeting, administration, and so on.
Assign a Priority to the task. The default priority is 3.
Save the event action.
Note
If an object for which you are defining this event action contains a customer, that customer is automatically included in the created task.
While defining an event action, you can optionally set an execution schedule that governs when an event action should happen. Else, the event actions are run immediately. When multiple event actions are configured, the Field Updates happen first before any other event action is triggered. For event actions other than Field Updates, there is no particular sequence and the event actions are triggered based on whether or how you configure the execution schedule. You can set a time rule for an event action based on whether that event action must occur after or before the triggering of a workflow or the occurrence of a date, and also specify the time duration in Hours, Days, or Weeks. If you schedule an event action for a time in the past, the event action is executed immediately after it is triggered.
For example, you can define an object workflow that automatically sends, based on a trigger, an outbound message containing an object like opportunity, lead, or account details from one system to another.
This figure illustrates how outbound messages are configured as part of object workflows.

You can configure outbound-messages event for a parent or a child object. When you define a workflow using a parent object, the outbound message is sent using service data objects (SDO) of that parent object as well as its child objects. When you define a workflow using a child object, the outbound message is sent using the SDO of only the child object.
To define an outbound message action:
From the Application Composer main page, select Object Workflows.
Click Create.
Select an Object and provide a meaningful Name and Description for the workflow you are creating.
Define the trigger condition using When a record is created or When a record is updated event point.
Select the Outbound Message event action.
This opens the Create Action: Outbound Message page.
Specify the Name and Description for the outbound message action and set the Execution Schedule for triggering the action. See: Execution Schedule in this topic.
Provide the endpoint URL of the external Web service, for example,
an endpoint URL can be http://GlobalFusion:7011/OMTestOpportunity/OutboundMessageServiceSoapHttpPort. At run time, a service data object containing details of the object
on which the object workflow is defined is sent to the specified endpoint
URL.
Save the event action.
While defining an event action, you can optionally set an execution schedule that governs when an event action should happen. Else, the event actions are run immediately. When multiple event actions are configured, the Field Updates happen first before any other event action is triggered. For event actions other than Field Updates, there is no particular sequence and the event actions are triggered based on whether or how you configure the execution schedule. You can set a time rule for an event action based on whether that event action must occur after or before the triggering of a workflow or the occurrence of a date, and also specify the time duration in Hours, Days, or Weeks. If you schedule an event action for a time in the past, the event action is executed immediately after it is triggered.
If a field update event action is also scheduled along with outbound messages event action, the field updates event action is triggered first, so that the outbound messages contain the updated data.
The outbound messages can use either an authentication-only
client-side security policy or a transport-level security policy that
protects the message during transfer. The default authentication-only
policy used by object workflow outbound message is oracle/wss10_saml_token_client_policy. This policy includes
Security Assertion Markup Language (SAML) tokens in outbound Simple
Object Access Protocol (SOAP) request messages. This policy should
only be used when the target web service is located within a secure
network segment.
The corresponding service can use any compatible service
policy, such as oracle/wss10_saml_token_service_policy or oracle/wss_saml_or_username_token_service.
When the service is outside your firewall, you must
protect the message by selecting the Protect
Message option on the Create Action: Outbound Message
page. When protected, the outbound message uses oracle/wss_username_token_over_ssl_client_policy with one-way
secure socket layer (SSL) enabled by default. The corresponding service
must use a compatible service policy, such as oracle/wss_username_token_over_ssl_service_policy.
For more information on basic administration involving deployment, configuration, and management of Web services, refer part II of the Oracle Fusion Middleware Security and Administrator's Guide for Web Services.
You must perform the following setup activities when you are using the Protect Message option:
Oracle Fusion Application requires credentials to access the remote system to which the outbound message is being sent. Log a service request (SR) to provide these credentials to Oracle Fusion Applications to access the remote system.
If the remote system is using a self-signed SSL certificate, log an SR for the Oracle administrator to import the SSL certificate into the Oracle Fusion Applications.
This topic provides the following:
How to configure a Web service
An example of the OutboundMessageService.wsdl
An example of the OutboundMessageService.xsd
The security policies available
To configure a Web service, you must replace the parameters in the OutboundMessageService.xsd file using the Oracle Fusion Web service instructions.
Navigate to Oracle Enterprise Repository (OER):
For a standard object, search for ADF Service in OER by object name.
For custom objects, search for the generic Web service for all custom objects in the corresponding application, for example, Sales Custom Business Object.
Extract the .xsd files from the live environment URL using the information provided under the service.
Replace the parameters in OutboundMessageService.xsd with the names for the object of your interest.
The parameters are marked in the .xsd file as parameters, $OBJECT_TARGET_NAMESPACE$ and $OBJECT_NAME$.
For more information about Oracle Enterprise Repository, see Oracle Fusion Middleware Configuration Guide for Oracle Enterprise Repository.
Examples of OutboundMessageService.wsdl and OutboundMessageService.xsd are provided here for reference.
This section includes an example of the OutboundMessageService.wsdl, for your reference.
//Sample OutboundMessageService.wsdl
<wsdl:definitions
     name="OutboundMessageService"
     targetNamespace="http://xmlns.oracle.com/apps/crmCommon/content/outboundMessage/"
     xmlns:errors="http://xmlns.oracle.com/adf/svc/errors/"
     xmlns:wsdl="http://schemas.xmlsoap.org/wsdl/"
     xmlns:tns="http://xmlns.oracle.com/apps/crmCommon/content/outboundMessage/"
     xmlns:soap="http://schemas.xmlsoap.org/wsdl/soap/"
     xmlns:types="http://xmlns.oracle.com/apps/crmCommon/content/outboundMessage/types/"
    >
    <wsdl:import namespace="http://xmlns.oracle.com/adf/svc/errors/" location="ServiceException.wsdl"/>
    <wsdl:types>
        <schema xmlns="http://www.w3.org/2001/XMLSchema">
            <import namespace="http://xmlns.oracle.com/apps/crmCommon/content/outboundMessage/types/"
                 schemaLocation="OutboundMessageService.xsd"/>
        </schema>
    </wsdl:types>
    <wsdl:message name="OutboundMessageService_processOutboundMessage">
        <wsdl:part name="parameters" element="types:processOutboundMessage"/>
    </wsdl:message>
    <wsdl:message name="OutboundMessageService_processOutboundMessageResponse">
        <wsdl:part name="parameters" element="types:processOutboundMessageResponse"/>
    </wsdl:message>
    <wsdl:portType name="OutboundMessageService">
        <wsdl:documentation/>
        <wsdl:operation name="processOutboundMessage">
            <wsdl:input message="tns:OutboundMessageService_processOutboundMessage"/>
            <wsdl:output message="tns:OutboundMessageService_processOutboundMessageResponse"/>
            <wsdl:fault name="ServiceException" message="errors:ServiceException"/>
        </wsdl:operation>
    </wsdl:portType>
    <wsdl:binding name="OutboundMessageServiceSoapHttp" type="tns:OutboundMessageService">
        <soap:binding style="document" transport="http://schemas.xmlsoap.org/soap/http"/>
        <wsdl:operation name="processOutboundMessage">
            <soap:operation soapAction="http://xmlns.oracle.com/apps/crmCommon/content/outboundMessage/processOutboundMessage"/>
            <wsdl:input>
                <soap:body use="literal"/>
            </wsdl:input>
            <wsdl:output>
                <soap:body use="literal"/>
            </wsdl:output>
            <wsdl:fault name="ServiceException">
                <soap:fault name="ServiceException" use="literal" encodingStyle=""/>
            </wsdl:fault>
        </wsdl:operation>
    </wsdl:binding>
    <wsdl:service name="OutboundMessageService">
        <wsdl:port name="OutboundMessageServiceSoapHttpPort" binding="tns:OutboundMessageServiceSoapHttp">
            <soap:address location="http://adc2111013:7101/OMInterface/OutboundMessageService"/>
        </wsdl:port>
    </wsdl:service>
</wsdl:definitions>
This section provides an example of the OutboundMessageService.xsd, for your reference. The parameters are marked in the .xsd file as parameters, $OBJECT_TARGET_NAMESPACE$ and $OBJECT_NAME$.
//Sample: OutboundMessageService.xsd

<schema elementFormDefault="qualified" targetNamespace="http://xmlns.oracle.com/apps/crmCommon/content/outboundMessage/types/"
     xmlns:ns0="http://xmlns.oracle.com/adf/svc/errors/" xmlns:ns1="$OBJECT_TARGET_NAMESPACE$"
     xmlns:ns2="http://xmlns.oracle.com/adf/svc/types/" xmlns:tns="http://xmlns.oracle.com/apps/crmCommon/content/outboundMessage/types/"
     xmlns="http://www.w3.org/2001/XMLSchema">
    <import namespace="http://xmlns.oracle.com/adf/svc/types/" schemaLocation="BC4JService.xsd"/>
    <import namespace="$OBJECT_TARGET_NAMESPACE$" schemaLocation="$OBJECT_NAME$.xsd"/>
    <import namespace="http://xmlns.oracle.com/adf/svc/errors/" schemaLocation="ServiceException.xsd"/>
    <element name="processOutboundMessage">
        <complexType>
            <sequence>
                <element name="object" type="ns1:$OBJECT_NAME$"/>
            </sequence>
        </complexType>
    </element>
    <element name="processOutboundMessageResponse">
        <complexType>
            <sequence/>
        </complexType>
    </element>
</schema>
The outbound messages can use either an authentication-only
client-side security policy or a transport-level security policy that
protects the message during transfer. The default authentication-only
policy used by object workflow outbound message is oracle/wss10_saml_token_client_policy. This policy includes
Security Assertion Markup Language (SAML) tokens in outbound Simple
Object Access Protocol (SOAP) request messages. This policy should
only be used when the target web service is located within a secure
network segment.
The corresponding service can use any compatible service
policy, such as oracle/wss10_saml_token_service_policy or oracle/wss_saml_or_username_token_service.
When the service is outside your firewall, you must
protect the message by selecting the Protect
Message option on the Create Action: Outbound Message
page. When protected, the outbound message uses oracle/wss_username_token_over_ssl_client_policy with one-way
secure socket layer (SSL) enabled by default. The corresponding service
must use a compatible service policy, such as oracle/wss_username_token_over_ssl_service_policy.
For more information on basic administration involving deployment, configuration, and management of Web services, refer part II of the Oracle Fusion Middleware Security and Administrator's Guide for Web Services.
Note
If you are working in a sandbox, exit from the sandbox and create the e-mail template in the mainline application.
A template is created for a particular type of object and can be used only with that object when defining e-mail notifications. You can compose e-mail templates using Oracle Fusion CRM Application Composer. You can also create using any e-mail editor and then upload the template using application composer. You can use e-mail templates, for example, for including your company letterhead in outbound e-mail communications.
You can Search an e-mail template using either or all of the search parameters such as full or partial Name of the template, the Object to which the template is associated, and whether the template is Active.
Options available for managing e-mail templates include:
Viewing the existing e-mail templates and customizing views.
Filtering or querying existing templates including partial search using wildcard.
Editing an existing template or creating a duplicate.
Note
You cannot change the object for which a template is defined.
Creating and configuring a new template.
Detaching the listed templates for a full-page view.
Viewing which templates are Active.
Note
Only an Active template can be used for object workflow definition. Saving does not automatically make the template Active.
You can define a template using the formatting features as available in any HTML based e-mail client. Templates are automatically converted to plain text for users who cannot view HTML e-mails. Advanced HTML users can edit the templates using the Source Code Editing Mode where the tags are set to visible. These advanced users can copy and edit the source code in any HTML editor, and then paste the edited code back to Oracle Fusion. While defining an e-mail template, the fields you select and embed in a template are specific to the selected object. The fields are populated with values at run time.
Options available for configuring e-mail templates include:
Specifying Name and Description for the template.
Attaching artifacts relevant to the e-mail template. Attachments are included in every e-mail that uses the template having an attachment. You can also send attachments as links to avoid crowding the Inbox of the recipients. An attachment can be a file on a local computer or a shared file in a repository.
Note
File attachments cannot exceed 10 MB.
Specifying whether an e-mail template is Active.
Note
You can use only the Active templates when creating object workflows for e-mail notifications.
Inserting the Fields or Functions, as applicable. You can use Functions to insert Date, Current date and time, or a Hyperlink to record, which triggers an e-mail notification. You can also Browse and then insert the content of a local file in the body of the e-mail template.
Performing basic formatting such as font format, character format, paragraph alignment, bullets and numbering, and so on as in any HTML based e-mail client.
Field Updates: Set the opportunity Close Date to 7 days from the new budget availability date. Additionally, lower the Level of Risk for the opportunity and set the Strategic Value to Medium.
Task Creation: Create a task for the opportunity owner to follow up with the customer.
E-mail notification: First, create an e-mail template for sending e-mail notifications. Then, notify the entire opportunity team about the change in the budget availability date using e-mail.
You are on the Overview page of the Application Composer. This page shows the various tasks available to customize and extend your CRM application. In the left pane, the default Application shown is Common, which hosts common objects such as Contact, Resource, Organization, Note, Interaction, and so on. In this activity, you are configuring a workflow for the Opportunity object; therefore, you will select Sales from the Application list.
You are on the Object Workflows page. You can use this page to search for an existing workflow or create a workflow. In this activity, you will create a workflow.
if(isAttributeChanged('BudgetAvailableDate') &&
'BudgetAvailableDate' != null && contains(Name, ' 50 Solar
Green Servers')) { return true; } else { return false; }
In this section, you will lower the Level of Risk for an opportunity when the workflow is triggered. The values in the Level of Risk field are in a descending order of High, Low, and None; therefore, when you select the Populate with next value in list option for Level of Risk, the risk level will be lowered by one step. For example, if the initial value is High, it will change to Low when the workflow is invoked, because Low is the next value in the list.
Note: If there are multiple Strategic Value fields in the list, click the first one
Note: Expand the Task Details region if not already expanded.
Note: If there are multiple entries for Customer, select the first one.
Opportunity Name ([$Name$]) - Primary
Contact ([$PrimaryContactPartyName$]) - Primary Contact E-Mail ([$PrimaryContactEmailAddress$])
Customer ([$PartyUniqueName$]) - Opportunity Name ([$Name$]),
- Date Budget Available ([$BudgetAvailableDate$]) - Close Date ([$EffectiveDate$])
Note: Rich text formatting is available only if your e-mail account supports HTML format e-mail.
In this section, you will trigger (launch) the object workflow that you created in the previous activity by entering the budget availability date for an opportunity.
Field Updates: Verify that the opportunity Close Date is set to 7 days from the new Budget Available Date. Verify that the Level of Risk is lowered for the opportunity and the Strategic Value is set to Medium
Task Creation: Verify that a task is created for the opportunity owner to follow up with the customer
E-mail notification: Verify that an e-mail notification is sent to the entire opportunity team about the change in the opportunity's Budget Available Date.
Ensure that the All Sales Accounts tab is selected.
You have just changed the budget availability date and saved the record, committing the changes to the database. The object workflow will be evaluated and triggered at this time, and all the event actions will be executed. The Field Updates event action always happens first followed by other event actions in no particular order. It might take a few seconds for the updates to occur.
You are on the Edit Opportunity page. The workflow is now triggered and the configured event actions have been invoked. You will now verify the invocation of Field Updates event action.
In the Activity Center region, the Due Date filter under the Tasks tab may prevent your task from appearing in the invoked tasks list even after it is invoked. For example, a task having a due date after 10 days will not appear if the Due Date filter is set to Next 7 Days. In this activity, you will use the All Tasks filter option to search for your invoked task
You are on the Edit Task popup. Note these details in the popup:
The Owner of the opportunity is the owner of this task.
The task Assignees are persons in the opportunity sales team.
In the Description field, the field tokens that you had inserted when creating the Task Creation event action have been replaced with values at run time.
You create and deploy an approval flow (also called a project) using Oracle Business Process Composer using the seeded template. You then configure an object workflow with a business process flow event action and configure this event action to call the deployed approval flow. When you trigger the object workflow, the approval process is also triggered.
The approval flow and the object workflow are associated by way of input parameters, which supply the required inputs from object workflows to the approval flow. When the object workflow is triggered, the approval flow is also triggered which starts the approval process that you configured using business process composer.
There are three applications involved in the approval flow process:
Oracle Fusion CRM Application Composer
Oracle Fusion CRM Application Composer is a browser-based configuration tool that enables business analysts and administrators, not just application developers, to customize and extend an Oracle Fusion CRM application.
For more information on how you customize and extend your applications using CRM application composer, see Extending CRM Applications: How It Works topic.
Oracle Business Process Composer
You can use Oracle Business Process Composer to orchestrate predefined components such as human-workflow tasks, services, and BPEL flows.
For more information on Oracle Business Process Composer, refer Oracle Fusion Middleware Business Process Composer User's Guide for Oracle Business Process Management on Oracle Technology Network, at http://www.oracle.com/technetwork/indexes/documentation/index.html.
Oracle Business Process Management (BPM) Worklist application
Oracle BPM Worklist application displays tasks or approvals that are assigned to a user or a group. The worklist tasks appear on the Home page of the Oracle Fusion Applications, where the assignee approves or rejects an approval request.
Note
You do not perform any configuration in the worklist application as part of configuring object workflows and business processes.
For information on the worklist application, see "Using Approval Management" in Oracle Fusion Middleware Modeling and Implementation Guide for Oracle Business Process Management on Oracle Technology Network, at http://www.oracle.com/technetwork/indexes/documentation/index.html.
This figure illustrates how object workflows and business processes work together.

You can use these automated flows to send approval requests, for example, for the following business scenarios. You can use both standard and custom objects to trigger workflows.
When changing the win probability of an opportunity above a threshold level.
When a new order is created.
When a high-priority help request is raised.
When a custom object has been updated.
These steps provide an overview of how approval flows are triggered using custom fields in a typical scenario. These steps have been described later in this topic using examples.
Create and add custom fields to the desired pages of an object. This object can be a standard or a custom object. You use these custom fields to trigger approval flows and track the status of approvals.
Create an approval flow in Oracle Business Process Composer using the seeded template, and save it as a project. You select this project when configuring the business process flow event action in object workflow.
Create an object workflow using the object to which you added the custom fields:
Set a trigger condition on one of those custom fields.
Select the Business Process Flow event action.
Select the project you created in business process composer and map the input fields that you want to supply to that project (or approval flow) in business process composer.
Trigger the object workflow.
This triggers the business process flow event action, which in turn triggers the approval flow.
This section provides an illustration to help you understand how you can submit and track approvals. The fields in this illustration have been used in examples later in this topic when configuring the object workflow.
Create a custom object and its work area.
For more information on creating custom objects and how you customize and extend your applications, refer Oracle Fusion Applications CRM Extensibility Guide on Oracle Technology Network, at http://www.oracle.com/technetwork/indexes/documentation/index.html.
Create the following (custom) fields and add these to the desired pages of the custom object you just created.
Note
If you are creating these fields in a sandbox, you must publish the sandbox to make these fields available for use in the mainline application.
Approvalstatus_c field: This is drop down, fixed-choice list field that holds the status of the approval. Use the lookup type ZCX_HOLD_STATUS to configure these status values as per your business requirement. The default values provided in this lookup type are: APPROVALPENDING, APPROVED, and REJECTED. To capture the approval status, you can use only fields of type text or fixed choice list.
When you are using the lookup type ZCX_HOLD_STATUS, ensure that it contains the default values or the values that you have specified in this lookup type for tracking the approval status.
Submitforapproval_c field: This is a check box field that you will use to submit approvals. You will use this field to set the trigger condition for object workflows.
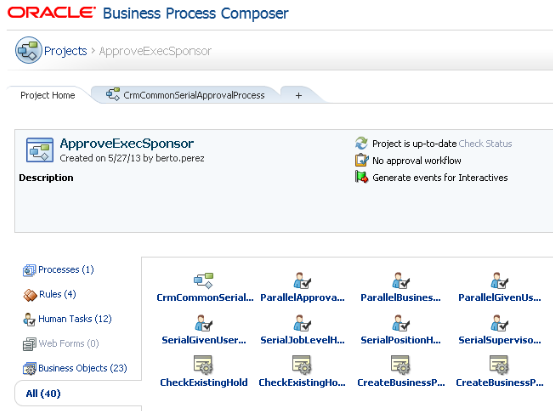
This section covers how you create and deploy an approval flow (also called project) in Oracle Business Process Composer.
Note
You must have at least one business process flow deployed for use before defining an object workflow to trigger an approval process.
To access Oracle Business Process Composer:
Navigate to the Application Composer using the main menu of the Oracle Fusion Applications.
From the Overview page of the Application Composer:
Select the Business Processes option.
On the Business Processes page, click Create under the Actions menu.
Enter a meaningful name in the popup.
Click OK.
If popup blocker is enabled on your browser, the business process composer may not open after you click OK, and your browser may get locked. As a workaround, use the browser back button to go back to the Business Processes option in the application composer, and click Edit for the business process that you were creating.
This opens the Oracle Business Process Composer in a separate Window.

This process is based on seeded template ExtnBusinessProcess, which uses the basic CrmCommonSerialApprovalProcess flow.
In the main menu, click Deploy Project.
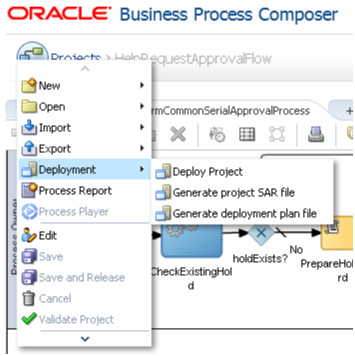
In the Deploy Project popup enter the following information:
|
Field |
Value |
|---|---|
|
Revision ID |
Provide an identifiable ID. |
|
Deployer Username |
Your sign in name for Oracle Fusion. |
|
Password |
Your password for Oracle Fusion. |
|
Mark composite revision as default |
Select this option. |
For more information about the options in this popup and deploying business processes, refer "Deploying a BPM Project" in Oracle Fusion Middleware Business Process Composer User's Guide for Oracle Business Process Management on Oracle Technology Network, at http://www.oracle.com/technetwork/indexes/documentation/index.html.
Click Deploy.
A confirmation message appears when your project has been deployed successfully.
Close the Oracle Business Process Composer.
Verify whether the project has been deployed successfully.
On the overview page of the application composer, click the Business Processes option
On the Business Processes page, verify that a green check-mark appears under the Deployed column for the project you created.
You can also open Oracle Business Process Composer from object workflows.
Select the Object Workflows option in the application composer.
Create an object workflow with a Business Process Flow event action.
From the Create Action: Business Process Flow page, click the search icon for Projects.
Search a project using a name or directly select the business process flow from the list.
Click Edit.
This opens the business process composer.
After you have successfully deployed your project, you can now configure the object workflow which triggers this deployed approval process flow.
This section covers how you set conditions and parameters in object workflow to trigger the approval flow. This section refers to the field names defined in "Creating a Custom Object and Adding Fields to Submit and Track Approvals" illustration in this topic.
For more information about object workflows, see related topic Object Workflows: Explained.
From the overview page of the application composer, select Object Workflows.
On the Create Object Workflows Page, select the object to which you added the custom fields.
Enter a name for your object workflow.
Define a trigger condition using When a record is updated event point.
You set the trigger condition on the field that you created and have
added to the required pages for submitting an approval. In the illustration,
you added a Submitforapproval_c field of type check box, for which the trigger condition will be
as follows: isAttributeChanged('Submitforapproval_c')
&& Submitforapproval=='Y'
Select the Business Process Flow event action.
On the Create Action: Business Process Flow page, provide a meaningful name and description for the business process workflow.
Specify an execution schedule that governs when the event action should be triggered.
Search and select the Project that you deployed.
This figure shows how you search and select a deployed business process. You can also create or edit a business process using this popup.

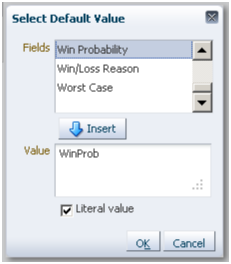
Specify the Input parameters that you want to pass to the deployed approval flow.
To pass actual or static values, you must define the parameters as Literal. To do this, either select Literal to insert values when using the Select Default Value dialog , or type-in the parameters while enclosing them in single quotes, for example, 'user1'.
You can also obtain approvals serially from multiple
approvers. For example, to obtain approvals first from user1 and then
from user2 for static values, enter 'user1,user2'. Notice that you use single quotes for the entire string without
any space in between the values. Similarly, for runtime fields, enter user1,user2
To pass runtime values, do not define the parameters
as Literal. In this case, you
do not select Literal in the Select Default Value dialog, or you type-in
the parameters without quotes. For example, to pass a runtime field
for approver, enter user1.
This figure illustrates how you select the fields to map from object workflows.
You can map only approvers and heldEntityStatusField values.
In the illustration, you created a custom Approvalstatus_c field for capturing approval
status; therefore, you must map the 'Approvalstatus_c' field with the reserved parameter heldEntityStatusField. Additionally, if the approvers are user1 and user2, specify these users as 'user1,user2'. Notice the use of quotes when supplying multiple
values.
This figure illustrates the mapped fields under the inputs region.

You can also view these input parameters under Properties of the Start node in Oracle Business Process Composer. See related topic Object Workflows and Business Processes: Critical Choices.
Save the object workflow.
You have now created and deployed an approval flow, and configured the object workflow that triggers the approval flow.
Trigger the workflow.
Navigate to the page where you added the Submitforapproval_c check box field.
Select the check box
Save the page.
This satisfies the condition you set for object workflow. The business process flow event action is run, and it triggers the approval flow in the deployed project.
You create and deploy an approval flow (also called a project) using Oracle Business Process Composer using the seeded template. You then configure an object workflow with a business process flow event action and configure this event action to call the deployed approval flow. When you trigger the object workflow, the approval process is also triggered.
The approval flow and the object workflow are associated by way of input parameters, which supply the required inputs from object workflows to the approval flow. When the object workflow is triggered, the approval flow is also triggered which starts the approval process that you configured using business process composer.
There are three applications involved in the approval flow process:
Oracle Fusion CRM Application Composer
Oracle Fusion CRM Application Composer is a browser-based configuration tool that enables business analysts and administrators, not just application developers, to customize and extend an Oracle Fusion CRM application.
For more information on how you customize and extend your applications using CRM application composer, see Extending CRM Applications: How It Works topic.
Oracle Business Process Composer
You can use Oracle Business Process Composer to orchestrate predefined components such as human-workflow tasks, services, and BPEL flows.
For more information on Oracle Business Process Composer, refer Oracle Fusion Middleware Business Process Composer User's Guide for Oracle Business Process Management on Oracle Technology Network, at http://www.oracle.com/technetwork/indexes/documentation/index.html.
Oracle Business Process Management (BPM) Worklist application
Oracle BPM Worklist application displays tasks or approvals that are assigned to a user or a group. The worklist tasks appear on the Home page of the Oracle Fusion Applications, where the assignee approves or rejects an approval request.
Note
You do not perform any configuration in the worklist application as part of configuring object workflows and business processes.
For information on the worklist application, see "Using Approval Management" in Oracle Fusion Middleware Modeling and Implementation Guide for Oracle Business Process Management on Oracle Technology Network, at http://www.oracle.com/technetwork/indexes/documentation/index.html.
Following are some of the key considerations involved when working with approval flows and object workflows together:
Deploy at least one project.
Ensure that a project has been deployed using the seeded template in Oracle Business Process Composer. You deploy a project to make it available for use for configuring object workflows. For information on deployment, see related topic Object Workflows and Business Processes: How They Work Together
Editing Projects.
You can edit a project only if the type of project is DEV or DEPLOYED_DEV. You cannot edit a project that does not exist in the Development partition of the Oracle Metadata Services (MDS) Repository, or if the type of project is DEPLOYED.
For more information about Oracle MDS, refer "Understanding a Metadata Repository" in Oracle Fusion Middleware Administrator's Guide on Oracle Technology Network, at http://www.oracle.com/technetwork/indexes/documentation/index.html.
Specifying trigger conditions.
Ensure
that the trigger condition for the object workflow contains the field
that you will be updating to trigger the workflow. For example, if
you have defined a custom field Submit_c of type check box, the trigger condition would look like: isAttributeChanged('Submit_c') && Submit_c=='Y'.
A trigger condition is a combination of event point and an expression that supports logical, math operations, or field-value lookups. Defining an expression prevents the triggering of the object workflow each time an update or create event point occurs. For more information on how to set trigger conditions, see Object Workflows: Explained topic.
Specifying input parameters.
Carefully specify the parameters that you want to map from object workflows to the approval flow in business process composer. The input parameters supply the fields or values to the business process flow when the object workflow is triggered.
You can map only the following parameters for approval flows:
|
Parameter |
Description |
|---|---|
|
approvers |
Specifies the owner or the one who should receive the approval request. |
|
heldEntityStatusField |
Specifies the field that displays the status of the approval request. |
To pass actual or static values, you must define the parameters as Literal. To do this, either select Literal to insert values when using the Select Default Value dialog , or type-in the parameters while enclosing them in single quotes, for example, 'user1'.
This figure illustrates how you select and mark the input parameters as literal.
To pass runtime values, do not define the parameters
as Literal. In this case, you
do not select Literal in the Select Default Value dialog, or you type-in
the parameters without quotes. For example, to pass a runtime field
for approver, enter user1.
You can also obtain approvals serially from multiple
approvers. For example, to obtain approvals first from user1 and then
from user2 for static values, enter 'user1,user2'. Notice that you use single quotes for the entire string without
any space in between the values. Similarly, for runtime fields, enter user1,user2
To see where these input parameters reside in Oracle Business Process Composer, right click on the Start node and select Properties.
This figure illustrates the input parameters in business process composer.

Notice the heldEntityStatus and approvers parameters. These are the parameters you are mapping to from the object workflows.
Using the seeded template.
The seeded template ExtnBusinessProcess has the basic CrmCommonSerialApprovalProcess process flow. This template contains an approval process covering a typical CRM use case.
Any project you create with the seeded template will have CrmCommonSerialApprovalProcess process.
The seeded template contains services, business rules, and tasks which you can use for configuring approval flows. Select the Project Home tab to see the services, tasks, and rules available.
You can change or add a node or business rules for human task implementation process. For example, you can change SerialGivenUserNameApproval with SerialApprovalGroupApproval; however, when creating or modifying a project, do not attempt the following unless you are sure:
Deleting or modifying the services, rules, tasks, or system fields in an existing business process. It may fail validations.
Removing or changing reserved parameters such as owner, heldEntity, heldEntityId, heldEntityStatusField, and objectProperties.
Removing nodes such as CreateHold, UpdateHold, UpdateEntity, and so on.
For information on working with business rules, services, and tasks and how to model process flows, refer Oracle Fusion Middleware Modeling and Implementation Guide for Oracle Business Process Management at Oracle Technology Network, at http://www.oracle.com/technetwork/indexes/documentation/index.html.
In this example, you are a sales administrator and your management has asked you to create a workflow to automate the approval process as follows:
The approval process should be triggered when a sales representative creates a sales lead with a deal amount greater than $100000.
When the approval process is triggered, the sales manager of that representative should automatically receive a request for approving the deal.
As a sales administrator, you will also test this approval process.
In this step, you will create a field to track the status of the approval and add this field to the desired pages.
Sign in to Oracle Fusion Applications as an administrator.
Create a sandbox and activate it.
Sandboxes in Oracle Fusion Applications provide robust out-of-the-box functionality to help isolate and control customization efforts without impacting other users' configuration or production environment, or both. For more information on sandboxes, see Sandboxes: Explained topic.
Navigate to Application Composer.
The Sales Lead object belongs to marketing application; therefore, select Marketing from the Application drop down.
In the left pane, open the Standard Objects tree.
Select the Sales Lead object.
Select the Fields node.
In the Custom tab, click Create under the Action menu.
A Select Field Type popup appears.
Select Text in the popup.
Click OK.
This opens a Create Text Field page.
In the Appearance region, enter the Display Label as Large Deal Approval.
Click Save and Close.
In the left pane, select the Pages node of the Sales Lead object.
Under Enterprise Pages tab, click Create Lead.
In the Create Lead page, move the Large Deal Approval field from the Available Fields box to the Selected Fields box.
Click Save and Close.
You have now added the custom approval field to the create lead page.
Under Enterprise Pages tab, click Show Details.
In the Show Details page, move the Large Deal Approval field from the Available Fields box to the Selected Fields box.
Click Save and Close.
You have now added the custom approval field to the show details page.
At this point, you are working within your sandbox. You have created a custom field and have added that field to two pages.
Note
Configurations done within a sandbox for object workflows and business processes are not available to the mainline application unless published.
Publish your sandbox to make these changes available for use in the mainline application.
In this step, you will publish your sandbox and verify that the Large Deal Approval field has been added to the Create Lead and Show Details pages.
When publishing a sandbox, the included application customizations overwrite the mainline application's existing configuration. For more information on creating and managing sandboxes, and the considerations involved when working with sandboxes, see Sandboxes: Explained topic and its related topics.
To publish the sandbox and verify the addition of the fields:
Under the Administration menu, select Manage Sandboxes....
Select your sandbox and click Publish.
Click the Navigator menu at the top.
Click Lead Qualification under Sales.
Click Create Lead.
Verify that Large Deal Approval field has been added to the Create Lead page.
Click Cancel. You will be creating a deal later in this example.
To create and deploy a process using Oracle Business Process Composer:
Navigate to the Application Composer using the main menu of Oracle Fusion Applications.
From the Overview page of the Application Composer:
Select the Business Processes option.
On the Business Processes page, click Create under the Actions menu.
Enter the Name as Sales Lead Approval in the popup.
Click OK.
If a popup blocker is enabled on your browser, the business process composer may not open after you click OK, and your browser may get locked. As a workaround, use the browser back button to go back to the Business Processes option in the application composer, and click Edit for the business process that you were creating.
This opens the Oracle Business Process Composer in a separate Window.
This process is based on seeded template ExtnBusinessProcess, which uses the basic CrmCommonSerialApprovalProcess flow.
Click Deploy Project using the main menu.
In the Deploy Project popup enter the following information:
|
Field |
Value |
|---|---|
|
Revision ID |
Provide an identifiable ID. |
|
Deployer Username |
Your sign in name for Oracle Fusion Applications. |
|
Password |
Your password for Oracle Fusion Applications. |
|
Mark composite revision as default |
Select this option. |
For more information about the options in this popup and deploying business processes, refer "Deploying a BPM Project" in Oracle Fusion Middleware Business Process Composer User's Guide for Oracle Business Process Management on Oracle Technology Network, at http://www.oracle.com/technetwork/indexes/documentation/index.html.
Click Deploy.
A confirmation message appears when your project has been deployed successfully.
Close the Oracle Business Process Composer.
Verify whether the project has been deployed successfully.
On the overview page of the application composer, select the Business Processes option.
On the Business Processes page, verify that a green check-mark appears under the Deployed column for the project you created.
You have now deployed a project with the name Sales Lead Approval. You will now configure an object workflow to call this process.
To configure an object workflow:
From the Overview page of the application composer, select Object Workflows.
Select Create from the Actions menu.
On the Create Object Workflows Page, select the Sales Lead object.
In the Name field, enter Deal amount more than USD 10000..
Select When a record is created event point.
Click on the Groovy Builder icon.
In the groovy builder, enter the following event condition:
if(DealAmount>10000 &&
CurrencyCode=='USD') return true;
Click OK.
In the Actions region, select Business Process Flow and configure the event action as follows:
On the Create Action: Business Process Flow page, enter Sales Lead Approval in the Name field.
In the Project Name field, search and select Sales Lead Approval project that you deployed.
This figure shows how you search and select a deployed business process. You can also create or edit a business process using this popup.
Click OK.
In the Inputs region, specify the input parameters that you want to pass to the deployed approval flow using the Select Default Value button. You can also type-in these parameters. .
You must mark these values as Literal so as to pass the actual name.
|
Name |
Default Value |
|---|---|
|
approvers |
'SALES_MANAGER' |
|
heldEntityStatusField |
'LargeDealApproval_c' |
Note
You can map only approvers and heldEntityStatusField values.
After inserting the input parameters, click Save to save the business process event action.
Click Save to save the object workflow.
You have now configured the object workflow to trigger the approval flow.
Sign in to Oracle Fusion Applications using SALES_REPRESENTATIVE role.
Click the Navigator menu at the top.
Click Lead Qualification under Sales.
Click Create Lead.
Enter the Name as New Deal.
Create a lead with a Deal Size of 120000 USD.
Click Save.
This action triggers the object workflow, because the deal size you have just entered is greater than 10000 USD.
To verify whether the workflow has been triggered, you may check the status in the approval field.
Edit New Deal lead.
Note the status in the Large Deal Approval field, which has been set to APPROVALPENDING by default.
You are currently signed in with a sales representative role. You must first sign out and then sign in as a sales manager to approve the request.
Sign out of Oracle Fusion Applications.
Sign in to Oracle Fusion Applications using SALES_MANAGER role.
A new task or request appears on the Home page under the Worklist region.
Approve the request.
At this point, you are signed in as a sales manager. You must first sign out and then sign in as a sales representative to verify whether the status in the Large Deal Approval field has changed.
Sign out of Oracle Fusion Applications.
Sign in to Oracle Fusion Applications with a SALES_REPRESENTATIVE role.
Navigate to Lead Qualification.
Edit New Deal.
Verify that the status in the Large Deal Approval has been set to APPROVED.
You have now verified that the approval process was successfully triggered via object workflows.