| Oracle® Fusion Applications Cloning and Content Movement Administrator's Guide 11g Release 7 Refresh 5 (11.1.7) Part Number E38322-23 |
|
|
PDF · Mobi · ePub |
| Oracle® Fusion Applications Cloning and Content Movement Administrator's Guide 11g Release 7 Refresh 5 (11.1.7) Part Number E38322-23 |
|
|
PDF · Mobi · ePub |
This chapter contains the start-to-finish steps for cloning a source Oracle Fusion Applications instance onto a fresh destination environment.
Cloning Oracle Fusion Applications requires the following steps:
Discovery: An in-depth notation of all aspects of the source and destination topology and configuration details, with entries typed into the Discovery Workbook for Cloning and Content Movement provided. See Section 2.2.
Creating a Master Image of the Source: This is a manual process. If you have virtualized your installation using Oracle Virtual Machine, then you can create a master image of the entire VM. (This guide does not describe that procedure.) For standard Fusion Applications installations, this is done using .tar. See Section 2.3.
Preparing the Target Environment: Though this step can be done out of sequence (i.e. before creating the master image), it clearly must be done before copying the images onto the destination. See Section 2.4.
Making Master Images Accessible to Target: See Section 2.5.
Duplicating the Database(s) from Source to Target: This is a self-contained process that must occur before running the faclone.sh scripts. See Section 2.6.
Running the faclone.sh Script: This will "wire together" and configure the entire destination instance of Oracle Fusion Applications. See Section 2.7.
Performing Validation Steps: See Section 2.8.
Performing Post-Clone Cleanup: See Section 2.9.
Appendix A, "Post-Clone Data Masking (Optional)" can be performed.
Appendix B, "Best Practices: Install with Cloning in Mind" gives tips for installing a new source environment in such a way that cloning will be streamlined.
Appendix C, "Abstract Hostnames in Detail" gives more theoretical understanding of the naming conventions, if needed.
Appendix E, "Install the BI Administration Tool" gives the installation steps, in case the BI Administration tool has not yet been installed.
The discovery phase may be the most important part of the cloning process. Here you determine all the details of your source environment (existing or planned), as well as your destination environment, and record them.
The Oracle Fusion Applications Discovery Workbook for Cloning and Content Movement is a required companion document to this User Guide. It is used to help you research and annotate every aspect of your source and destination Fusion Applications environments. Fill in all the tabs in the Workbook that are preceded by C_; these are cloning-related. You will then copy/paste the entries to complete the cloning response file (faclone.rsp) appropriately.
provisioning.rsp and provisioning.planThe best resource for many of the Workbook entries is the provisioning.rsp file. For some data, it is also necessary to refer to provisioning.plan.
Both files may be located in the same directory:
(APPLICATIONS_BASE/provisioning/plan/).
If the .rsp file is not in the /plan directory, search for provisioning.setup.choice.core.provisionplan.install within provisioning.plan, to see where the .rsp file is located.
The Workbook gives some shorthand tips on where to find things or how to enter them, but this section of the User Guide provides much more guidance.
To begin, open the Discovery Workbook and proceed through the tabs of data you are asked to collect. (Cloning-related tabs are preceded by C_.) They are organized as follows:
The last tab is special; it automatically collates the data from the rest of the tables and organizes them for ease of use in the faclone.rsp file. It is:
The System Administrator responsible for Oracle Fusion Applications should know the values of the properties in this section, without having to delve too deeply into the environment itself.
The General Information table provides the baseline data for the Fusion Applications instance to be cloned.
Company Name: Self-explanatory and the same for both source and destination. This entry is not officially used within the response files.
Fusion Applications Version: Will be the same for source and destination.
Operating System: Note the OSs used for the databases, the Middleware components, front-end servers (web servers, load balancers, Oracle HTTP Server (OHS)), and any ODI clients.
Environment Name: This is the naming convention you use to identify your installation. It's for human use only; not a name that is registered in the system. Examples could be "QA1" or "Production".
Environment Type: Like Environment Name, this is for your own understanding only. Annotate, for example, whether the installation is physical or virtual (i.e. using VMWare or another method).
HA/Scaled-Out: By default, only one instance of each Middleware component is provisioned during a standard installation. Indicate whether the source environment has been scaled out beyond this for high-availability or not. Enter the value "true" or "false"; it will later be used in the faclone.rsp file for the property FA_TOPOLOGY_SCALEOUT.
Includes Customer Data: Set to TRUE if the source contains transaction data and FALSE if not. The flag alerts the cloning tool to execute some required additional data cleanup when transactional data is present.
Includes Customizations: If your enterprise has extended or altered the core Fusion Applications installation, those changes will have to be manually replicated after the cloning process is complete.
HTTP Domain: Sample entry: mycompany.com. Enter the domain portion of the external URL for the source instance, and the one that will be used on the destination.
Enter the value for the destination domain in the faclone.rsp file, for the property FA_WEBTIER_DOMAIN_TARGET.
LBR/Reverse Proxy Used for Internal HTTP Endpoints: TRUE or FALSE value describing whether a load balancer/reverse proxy is used for internal HTTP endpoints. Check provisioning.rsp for the LBR_ENABLED entries to confirm, if necessary. (NOTE: If your organization changed the use of LBR/Reverse Proxy sometime after provisioning, then the .rsp file entry would not be accurate and you would need to consult the network administrator for details.)
LBR/Reverse Proxy Used for External HTTP Endpoints: TRUE or FALSE value describing whether a load balancer/reverse proxy is used for external HTTP endpoints. Check provisioning.rsp for the LBR_ENABLED entries to confirm, if necessary. (NOTE: If your organization changed the use of LBR/Reverse Proxy sometime after provisioning, then the .rsp file entry would not be accurate and you would need to consult the network administrator for details.)
The OS Commands table is automatically populated based on the entry you provided for Operating System on the General Info tab. The parameters are required for the cloning tool, but do not need to be manually modified unless your system values differ from the defaults.
AWK: The path to the awk tool in your system
EGREP: The path to the egrep command in your system
ID: The path to discover the user ID command in your system
IFCONFIG: The path to the ifconfig utility in your system
MKNOD: The path to the mknod command in your system,
OPENSSL: The path to the OpenSSL toolkit in your system
SED: The path to the stream editor utility in your system
The Topology information is obtained through a multi-step discovery process, and depends on which domain configuration was used during the source provisioning. The midtier component information, the database information, and the Oracle Identity Management information are each discovered separately. This section includes the following:
Section 2.2.5.1, "Topology: Find Source MidTier Abstract Host Name(s)"
Section 2.2.5.3, "Topology: Find Source (Real) Host Names, IP Addresses, and Users"
Section 2.2.5.2, "Topology: Find Database Abstract Host Name"
Section 2.2.5.4, "Topology: Find Oracle Identity Management Information"
Section 2.2.5.6, "Component Assignment: Associate Nodes with Components"
Section 2.2.5.8, "Blacklisted Hosts"
Note:
Abstract hostnames are an important part of the cloning process and can be confusing. This section provides guidance on finding and entering abstract hostnames; for more context and examples, see Appendix C, "Abstract Hostnames in Detail".During the initial install/provisioning of Oracle Fusion Applications, the Fusion Applications midtier host names were defined in the Domain Topology Configuration screen. (See "The Domain Topology Configuration" in the Oracle Fusion Applications Installation Guide, for a refresher, if desired. See also "Appendix D," in the same guide for details about the screen, copied below.)
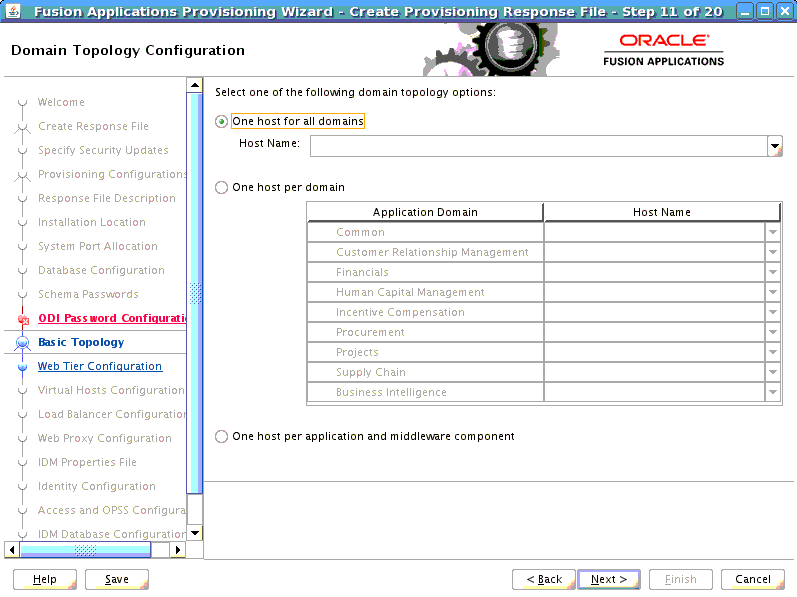
Note the three installation options, which correspond in the provisioning.rsp file to three levels: Basic, Medium, and Advanced.
Basic = One host for all domains. To find out if your source environment used this configuration, search provisioning.rsp for #Domain Topology and check whether TOPOLOGY_BASIC_SELECTED= TRUE.
If it does, then the TOPOLOGY_BASIC_HOST (such as fusionapps1.mycompany.com) listed immediately thereafter is the Abstract Host Name for your entire midtier environment.
Medium = One host per domain. To find out if your source environment used this configuration, search provisioning.rsp for #Domain Topology and check whether TOPOLOGY_MEDIUM_SELECTED= TRUE
If it does, then the TOPOLOGY_MEDIUM_COMMONDOMAIN_HOST= listed immediately thereafter gives a path name that refers to the provisioning.plan file. For example:${provisioning.setup.common.core.default.host.name}. Follow these steps to search provisioning.plan and fill in the Abstract Host Name for each environment domain:
Open provisioning.plan.
Search for ${provisioning.setup.common.core.default.host.name}.
Take note of the domain names listed thereafter. In a Medium configuration, for example, all the CRM components will have the same domain assignment (such as crmdomain1), all the HCM components to another, and so on. Enter these domains as source Abstract Host Names in the Topology table
Advanced = One host per application and middleware component. To find out if your source environment used this configuration, search provisioning.rsp for #Domain Topology and check whether TOPOLOGY_ADVANCED_SELECTED= TRUE.
If it does, then all the components and products will be listed thereafter with either an Abstract host name, or a reference to provisioning.plan where you can search out the Abstract name.
See a partial sample of an Advanced provisioning.rsp file below. Note, for example, that the value for TOPOLOGY_ADVANCED_COMMON_ADMIN_HOST is the Abstract name commonhost01.mycompany.com. The value of TOPOLOGY_ADVANCED_CRM_ANALYTICS must be found by searching provisioning.plan for ${provisioining.setup.crm-hosts.domain.hostname}.
Sample (Partial) Advanced Provisioning.rsp File Entries:
TOPOLOGY_ADVANCED_SELECTED=true
TOPOLOGY_ADVANCED_COMMON_ADMIN_HOST=commonhost01.mycompany.com
TOPOLOGY_ADVANCED_COMMON_FUNCTIONALSETUP_HOST=${provisioning.setup.fs-hosts.domain.hostname}
TOPOLOGY_ADVANCED_COMMON_HELPPORTAL_HOST=${provisioning.setup.fs-hosts.domain.hostname}
TOPOLOGY_ADVANCED_COMMON_HOMEPAGE_HOST=${provisioning.setup.fs-hosts.domain.hostname}
TOPOLOGY_ADVANCED_COMMON_ESS_HOST=${provisioning.setup.fs-hosts.domain.hostname}
TOPOLOGY_ADVANCED_COMMON_OWLCS_HOST=${provisioning.setup.fs-hosts.domain.hostname}
TOPOLOGY_ADVANCED_COMMON_OWLCSSIP_HOST=${provisioning.setup.fs-hosts.domain.hostname}
TOPOLOGY_ADVANCED_COMMON_IPM_HOST=${provisioning.setup.fs-hosts.domain.hostname}
TOPOLOGY_ADVANCED_COMMON_SES_HOST=${provisioning.setup.fs-hosts.domain.hostname}
TOPOLOGY_ADVANCED_COMMON_SOA_HOST=${provisioning.setup.fs-hosts.domain.hostname}
TOPOLOGY_ADVANCED_COMMON_UCM_HOST=${provisioning.setup.fs-hosts.domain.hostname}
TOPOLOGY_ADVANCED_COMMON_WCSERVICES_HOST=${provisioning.setup.fs-hosts.domain.hostname}
TOPOLOGY_ADVANCED_COMMON_WCSPACES_HOST=${provisioning.setup.fs-hosts.domain.hostname}
TOPOLOGY_ADVANCED_CRM_ADMIN_HOST=crmhost01.mycompany.com
TOPOLOGY_ADVANCED_CRM_ANALYTICS_HOST=${provisioning.setup.crm-hosts.domain.hostname}
TOPOLOGY_ADVANCED_CRM_CONTRACT_HOST=${provisioning.setup.crm-hosts.domain.hostname}
...
Search your own provisioning.plan file and note each Abstract host name, as needed, in the Topology table.
In the destination (target) environment, the names assigned to the source Domain Topology Configuration become the destination Abstract host names and will be added to the /etc/hosts files on all clone nodes.
When all the Abstract host name information is entered for the midtier, then find it for the database(s) and Oracle Identity Management components. See Section 2.2.5.2 and Section 2.2.5.4.
In provisioning.rsp, search for #Database Configuration and Database Host:= to find the abstract host name. If RAC is used, then enter additional lines in the workbook to add the correct number of RAC instances and their names.
Ping each Abstract Host Name that was identified in sections Section 2.2.5.1 and Section 2.2.5.2. This will reveal the "real" host names and IP addresses. Enter this information in the Workbook.
To find the assigned users, go to the Fusion Applications directory, and use list
(ls -l) to find the users assigned to each of the directories. Enter all values into the Workbook.
Access the Oracle Identity Management information through Fusion Middleware Control user interface (FMW). See sample, below. Enter the values in the Workbook.
When all the host information is entered in the Topology table, then number each entry consecutively in the Node # column on the left. These node associations will be used to define which Oracle Fusion Applications components are installed/associated with which source hosts. See Section 2.2.5.6.
The Component Assignment table lists all Oracle Fusion Applications products/components that could possibly be installed in an environment. For each component that is relevant for your installation, deduce the abstract host name on which that component resides. (Ideally, best-practice naming conventions were used, so that components and host names have a logical relationship, but do not include environment-specific tags such as "test," "production," "staging," or similar.)
In a core installation, only one node (abstract host) is installed per component. If your source installation was subsequently scaled out over multiple hosts, then enter the additional node numbers in a comma-separated list in the HA-Scale-out Node column. See an example in the sample tables, below.
Sample Topology Table (Partial)
| Node # | Abstract Host Name |
|---|---|
| 1 | fusionapps1.mycompany.com |
| 2 | faweb1.mycompany.com |
| 3 | fusionidm.mycompany.com |
| 4 | sso.mycompany.com |
| 5 | fadb1.mycompany.com |
| 6 | fadb2.mycompany.com |
| 7 | idmdb.mycompany.com |
| 8 | fusionapps2.mycompany.com |
| 9 | faweb2.mycompany.com |
Sample Component Assignment Table (Partial)
| Node # | Component | HA-Scale-out |
|---|---|---|
| 5 | FADB | 6 |
| 7 | IDMDB | |
| 7 | OIDDB | |
| 3 | OIDINST | |
| 3 | IDMOHS_INST | |
| 4 | IDMDOMAIN_ADMIN | |
| 3 | IDMDOMAIN_SOA (...) | |
| 2 | FA_WEBTIER | 9 |
| 1 | COMMON_ADMIN | 8 |
Enter the information for the planned destination environment:
Target Host Name: The (real) host names of the machines to be used in the destination environment. Note that you will map abstract host names onto these machines in Section 2.4.1.
Target User: Enter planned target user names. They may or may not match the source.
Target IP Address: Enter the IP addresses that are planned in the destination environment for each component.
Determine whether there are any connections to servers other than the servers running Fusion Applications components. Examples could include:
A mis-configuration using an alternate host name, to connect to a Fusion Applications host
External integrations, such as Active Directory or other Business Intelligence resources
Database Links
Customization
E-mail servers monitored for incoming messages
The clone utility automatically disables all outgoing e-mail configuration (which is defined during provisioning). However, incoming mail configuration (for example, incoming mail server configured manually in User Messaging Service for SOA) is a manual post-install step and is not handled by FAClone currently. To avoid having the target environment access and potentially process/delete e-mail messages meant for the source environment, please add these e-mail servers to the blacklist. (Or, option 2, add code to disable user messaging completely.)
Because these endpoints could potentially lead to a production system, enter them into the Blacklist so that the faclone.sh tool will stop any unintended connections. (You will then, in post-clone, have to update these connections manually to point to alternate resources.)
The script ODI_blacklist_hosts.sql, found in the /discover/scripts directory, will generate a list of non-Fusion Application database sources or targets that have been created in the source ODI environment. These need to be added to the blacklist to prevent accidental connections from the cloned environment.
Connect to the Fusion Database as the SYS user and run the script.
This will generate a list of host names that should be added to the Topology Worksheet in the Discover Workbook, under the Blacklist section.
If no additional database sources have been set up previously, the script will not generate an output.
The storage tables are divided into Shared storage, DMZ, and Node storage. Note that not all entries may be relevant for your particular installation. The default values shown in the Workbook are the most common and are entered for convenience, but can be edited if your environment differs.
IMAGEFILE_EXTRACT: Extraction of image files required. This is set to true or false.
IMAGEFILE_POOL_DIR: Directory location of all of the image files created in preparation for cloning.
IMAGEFILE_LOCAL_1: Local directory for runtime (domain) configuration (optional, local storage not supported at this time).
IMAGEFILE_LOCAL_2: Local directory for runtime (domain) configuration (optional, local storage not supported at this time).
IMAGEFILE_SHARED_FA: Location of Fusion Applications image file.
IMAGEFILE_DMZ_FA: If a DMZ is present, this will be the location of the FA Image files and the field IMAGEFILE_SHARED_FA should be blank.
IMAGEFILE_SHARED_IDM: Location of IDM image file >
IMAGEFILE_DMZ_IDM: If a DMZ is present, this will be the location of the IDM Image files and the field IMAGEFILE_SHARED_IDM should be blank.
This section describes how to fill the columns, not the rows.
Abstract Mount Point (FA Shared): To find this, search provisioning.rsp for #Installation Locations and find INSTALL_APPHOME_DIR. The abstract mount point is usually the directory that contains INSTALL_APPHOME_DIR and is defined in /etc/fstab.
Abstract Mount Point (IDM Shared): Check the FMW Control.
Source User (FA Shared and IDM Shared): Enter the OS user that owns the mount point.
Source Group (FA Shared and IDM Shared): Enter the OS group that owns the mount point.
Source Real Mount Point: This field is for informational purposes only and is not used during Cloning. Use it to provide an alternative mount point (to be used for administrative purposes; will be different between source and target) or to provide the remote NFS directory that corresponds to the abstract mount point at the source.
Target Real Mount Point: This field is for informational purposes only and is not used during Cloning. Use it to provide an alternative mount point (to be used for administrative purposes. it will be different between source and target) or to provide the remote NFS directory that corresponds to the abstract mount point at the target.
To discover whether DMZ is used, search the provisioning.rsp file for WEBTIER_DMZINSTALL_ENABLE=. If TRUE, then the DMZ mount point information can be found by going to the DMZ host listed, and checking the oraInventory there.
Copy the Node #s from the Topology table and enter the relevant storage information in each column.
Local Storage Directory: Leave row blank. Source must have been provisioned without using local storage.
Uses FA Shared Storage?: Enter TRUE or FALSE for each node.
Uses IDM Shared Storage?: Enter TRUE or FALSE for each node.
Uses FA DMZ Shared Storage?: Enter TRUE or FALSE for each node.
Uses IDM DMZ Shared Storage?: Enter TRUE or FALSE for each node.
Below are tips on how to find the Full Paths for each relevant directory:
IDM-related entries: Log in to the FMW Control for IDM and go through the Topology for each component. The Oracle Homes and Instance Homes for each IDM component are listed and can be entered into the Workbook.
Fields should be left blank if not used.
IDM_INSTALL_APPHOME_DIR: This is only used if IDM was installed as part of provisioning (Rel 7 or later). This is your products directory similar to /u01/oracle/products
IDM_INSTALL_APPCONFIG_DIR: This is only used if IDM was installed as part of provisioning (Rel 7 or later). This is your config directory similar to /u01/oracle/config
IDM_INSTALL_LOCALCONFIG_DIR: This is only used if IDM was installed as part of provisioning (Rel 7 or later). This is your local config directory similar to /u01/oracle/config
FA Base, Home, and OHS/Webtier: Search provisioning.rsp for INSTALL_APPHOME_DIR (Base, and OHS/webtier), and INSTALL_APPCONFIG_DIR (Instance Home), which then includes the Domains as subdirectories. If the INSTALL_LOCALCONFIG_DIR entry contains values, indicating that local storage is used, then the OHS/webtier would be located there instead. In this release, local storage is not supported for cloning.
FA BI Instance (when used): If Business Intelligence (BI) is used, the directory path is either the LOCALCONFIG_DIR or INSTALL_APPCONFIG_DIR, followed by /BIInstance.
This tab includes information about the Admin and Managed servers in both the Fusion Applications (FA) and Identity Management (IDM) components.
This section describes the columns rather than the rows.
Provide the Admin Server path and port for each Fusion Applications domain.
AdminServerPath: This is the path to the domain directory, in the format
<FA Instance home/domains/<abstract host name of the topology component>/Domain name>.
For example, if the instance home is u01/app/fa/instance, and the abstract hostname for COMMON Admin is fusionapps.mycompany.com, then the Admin Server path for Common Domain would be:
u01/app/fa/instance/domains/fusionapps.mycompany.com/CommonDomain
AdminServerPort: This can be found in provisioning.rsp under TOPOLOGY ADVANCED <topology component> PORT. For example:
TOPOLOGY_ADVANCED_COMMON_ADMIN_PORT=17001
TOPOLOGY_ADVANCED_CRM_ADMIN_PORT=19001
TOPOLOGY_ADVANCED_FIN_ADMIN_PORT=17401
TOPOLOGY_ADVANCED_HCM_ADMIN_PORT=19401
Provide the Admin Server path and port for the Identity Management domains as well.
AdminServer Path: The path to the domain home can be found from Fusion Middleware Control.
AdminServer Port: This can be found in provisioning.rsp under IDENTITY OIM ADMINPORT.
Provide the server name prefix for each type of managed server. The server name is found in the WebLogic (WLS) Console under Servers. For example: If the WLS Console shows the server name for OAM is wls_oam1, then enter wls_oam in the Workbook as the prefix for OAM.
This tab is set up assuming that different virtual hosts are used for Fusion Applications core components, and for Identity Management components.
The Internal Names for both source and destination are the same. To find most endpoint information, use provisioning.rsp as a first resource.
Search provisioning.rsp for #Load Balancer Configuration, and if set to TRUE, use the subsequent entries to fill in the workbook.
If #Load Balancer Configuration is FALSE, then search for #Virtual Host Configuration. Three sections, IP, Port, and Name are listed. Search #Webtier Configuration and discover which WEBTIER_MODE is used in your installation (IP, Port, or Name). Then refer to the individual listings for the entries.
For example, if my WEBTIER_MODE=IP, then FA Internal Name would correspond to VIRTUALHOST_IP_FIN_INTHOST in the #Virtual Host Configuration - IP section. This method can be used to discover all the Source HTTP endpoint entries. Destination/Target entries are based on your plans for that environment, and may match the source.
FA Internal Name
FA Internal Port
Source FA External Name
Source FA External Port
Source FA Ext. Protocol
FA OHS Internal Port (w/LBR)
FA OHS External Port (w/LBR)
Target FA External Name
Target FA External Port
Target FA External Protocol
In Topology Mgr?: Note this is for internal use and should not be changed.
Topology Mgr Domain Name: Note this is for internal use and should not be changed.
Search provisioning.rsp for IDENTITY_OIM_INTERNAL_ENDPOINT_URL. The resulting value (for example: http://idminternal.mycompany.com:7777) is used for the Internal Name, Internal Port, and Protocol. Search for IDENTITY_OIM_EXTERNAL_ENDPOINT_URL for the corresponding external entries. Note that the internal and external endpoint ports should be different.
For Identity Management, the default Topology Mgr Domain Name is IDMDomain, but it is not required to be named in this way. If your organization used a different name, edit this value in the Workbook as needed.
Most of the LDAP Abstract Name and Port information can be found in provisioning.rsp. If OVD is used, then you must check the OVD Adapter in ODSM to find information about Oracle Internet Directory.
Policy Store (OID): Search provisioning.rsp for #Access and Policy Management Within that section, locate OAM_OPSS_HOST and OAM_OPSS_PORT to identify the Abstract Host and Abstract Port.
You can search provisioning.rsp for #Identity Management Configuration to find the IDENTITY_HOST (Abstract name) and IDENTITY_PORT (Abstract Port) for one of the Identity Stores.
To determine which one you are dealing with, check IDENTITY_SERVERTYPE. The value will be OID or OVD.
OID Identity Store: If OID was the IDENTITY_SERVERTYPE, enter its value here. In this case, OVD is not relevant and can be skipped.
OVD Identity Store (if used): If OVD was used, enter the OVD information. If OVD is active, then it is used to reach OID and you check the OVD Adapter in Oracle Directory Services Manager (ODSM) to locate the information about the OID Identity Store.
The Enterprise Deployment Guides use virtual IPs in their sample environments. List any virtual IPs and virtual hostnames that may have been created in your source system for Identity Management and Fusion Applications. Add the source IP addresses to the Source Virtual IP column. The target IP address should go in the Target Virtual IP column.
Note that the clone process requires that VIPs match the same IP address as the one specified in the Topology tab, Topology table, Target IP Address column. If that is not the case, you must change the IPs in the /etc/hosts file for the target system (temporarily) for the duration of the cloning process. You can revert to the desired VIPs once cloning is complete. See details in Section 2.4.3.3, "Set Up /etc/hosts File for Internal Endpoints".
/etc/hosts File EntriesList any additional /etc/hosts file entries in the source system that should be added to the /etc/hosts in the target system. This includes any other hostnames used in the source environment that are not in the abstract hostnames Topology tab or in the FA/IDM HTTP Endpoints or Virtual IPs sections.
The database administrator can usually provide the information on this Workbook tab, or most information can be found in the provisioning.rsp file. Note that the system requirements for database duplication are described in Section 1.3.1.3, "Database Requirements". Also, in addition to the Discovery tables, there are additional tips for understanding and encompassing the source database structure, listed in Section 2.6.1, "Full Discovery of Source Database Environment".
Search provisioning.rsp for #Database Configuration and use the subsequent entries to fill out the FA DB table entries in the Workbook. For example, see these sample .rsp entries:
DATABASE_ENTERPRISE_SELECTED=true
DATABASE_ENTERPRISE_SYSDBA_USERNAME=sys
DATABASE_ENTERPRISE_SYSDBA_PASSWORD=<encrypted key>
DATABASE_HOST=fusiondb.mycompany.com
DATABASE_PORT=1521
DATABASE_SERVICENAME=fusiondb
DATABASE_RAC_SELECTED=false
DATABASE_RAC_SYSDBA_USERNAME=
DATABASE_RAC_SYSDBA_PASSWORD=
DATABASE_RAC_SERVICENAME=fusion
DATABASE_RAC_INSTANCE1_HOST=
DATABASE_RAC_INSTANCE1_NAME=
DATABASE_RAC_INSTANCE1_PORT=
DATABASE_RAC_INSTANCE1_ROW=Instance1
The database administrator needs to provide the Directory entries that were used when installing and configuring the database.
When installing the Fusion Applications database on the source, it was required to create a file directory for the following database directories:
Directory APPLCP_FILE_DIR
Directory APPLLOG_DIR
Directory KEYFLEXCOMBFILTER
Directory FUSIONAPPS_PROV_RECOVERY_DIR
Directory OTBI_DBINSTALL_DUMP_DIR
To rediscover those file directory paths on the source environment, use sqlplus to run the following SQL command against the Fusion Applications database as sysdba:
select DIRECTORY_PATH from dba_directories where directory_name=<DIRECTORY_NAME>
where <DIRECTORY_NAME> is the database directory (such as APPLCP_FILE_DIR). Repeat for each directory. Enter the resulting paths in the source column. For the destination, you can choose to use matching paths or create a different path. You will manually create the directories on the destination in Section 2.6.3.
Search provisioning.rsp for #IDM Database Configuration and use the subsequent entries to fill out the Identity Management DB entries in the Workbook. The Identity Management database administrator must provide the IDM DB Prefix used in the schemas.
Typically, Oracle Internet Directory (OID) DB information matches the Identity Management (IDM) DB entries. The Fusion Middleware Control (FMW) interface also includes information about the IDM Database(s). Otherwise, consult the Identity Management database administrator.
If your destination databases have any database links, the cloning tool will report a validation error and will not continue unless the database link uses a connect string that is whitelisted: \u0009\u0009
Enter all whitelisted connect strings in DB_WHITELISTED_DBLINK_CONNECTSTRING_LIST separated by ','.
For example: DB_WHITELISTED_DBLINK_CONNECTSTRING_LIST=devdb,testdb
Some of the Container information is located in provisioning.rsp and can be located there (as noted below). All the information can also be located in the Oracle Directory Services Manager (ODSM) and tips for locating the sections are listed as well.
IDM_IDSTORE_TYPE: This specifies the identity store that is used in the source environment for IDM. If you provisioned your environment using the Enterprise Development Guide, this will be OVD.
FA_IDSTORE_TYPE:This specifies the identity store that is used in the source environment for IDM. This can be either OID or OVD. This can be found in the provisioning.rsp in the IDENTITY_SERVERTYPE field.
Base DN: This is the DN that appears after the cn=Users.
User Base DN: Search provisioning.rsp for IDENTITY_USERBASEDN= (for example: cn=Users,dc=mycompany,dc=com)
Group Base DN: Search provisioning.rsp for IDENTITY_GROUPBASEDN= (for example: cn=Groups,dc=mycompany,dc=com)
The remaining values must be located in the Oracle Directory Services Manager (ODSM).
APPID User Container DN: Look under the User tree node in ODSM.
APPID Group Base DN: Look under the Group tree node in ODSM
FusionUsers Container DN: Look under the User tree node in ODSM. If your system has not had any users created, this entry will not be present in ODSM. In that case, leave it blank in the Discovery Worksheet.
FusionGroups Container DN: Look under the User tree node in ODSM.
FA Domains JPSRoot: The best place to find this is in the response file OAM_OPSS_JPSROOTNODE.
IDMDomain JPSRoot: Best place to find this is in the IDMDomain Enterprise Manager. Go to Farm_IDMDomain, then WebLogic Domains, then IDMDomain. Right-click and go to Security, then Security Provider Configuration. The JSP Root is the cn=XXXXXX portion of the Location URL under Security Stores.
IDM Administrators Group DN: Go to ODSM and get the entire DN for the IDM Administrators Group.
Go to the ODSM for all entries. Enter the user name, i.e. the value after cn=, as it appears in the ODSM.
OAAM admin user (LDAP): Look for cn=oaamadmin in the Users tree node of ODSM.
OAM admin user (LDAP): This is the user name used to log into the OAM Console, normally oamadmin. To check, look for cn=oamadmin in the Users tree node of ODSM. This user should be part of the OAMAdministrators group.
OblixAnonymous user (LDAP): Look for cn=OblixAnonymous in ODSM in the Base DN tree.
OIM LDAP user: Look for cn=oimldap in ODSM in the systemids tree. This user should be the user in OIMAdministrators Group.
OIM admin user (LDAP): This is the user name used to log into the OIM Console, normally xelsysadm. To check, look for cn=xelsysadmin the Users tree node of ODSM.
IDM super user (LDAP): Look for cn=weblogic_idm in the Users tree node of ODSM.
OAM LDAP user: Look for cn=oamldap in the Users tree node of ODSM.
IDM Policy Store ReadWrite (LDAP): IDMPolicyRWUser if your environment was installed using the IDM Provisioning tool.
IDM Policy Store ReadOnly (LDAP): IDMPolicyROUser if your environment was installed using the IDM Provisioning tool.
OVD ROOT user: The OVD Root User will not appear in ODSM. It was defined during OVD installation and is used to log into OVD as administrator.
OVD EMADMIN user:Check FMW Control under the Agent-Monitored Targets menu, and check the OVD Agent for the details.
IDMDomain WLS admin: Typically is weblogic.
IDMDomain WLS nodemanager admin: Check the config.xml file in the IDM domain and search for <node-manager-username>. You can also look in the WLS Console under the Security tab. Select Advanced at the bottom of the page to see the listing.
OIM LDAP IT Resource user: Usually oimldap. To check, got to the Oracle Identity Manager (OIM) Console, select Advanced, then Manage IT Resource. On the popup window click the Search button. Click on Directory Server. This is the OIM LDAP IT Resource User.
OAM LDAP Data Source user (LDAP): Usually oamldap. To check, go to the Oracle Access Manager (OAM) interface, choose the System Configuration tab, then Data Sources, and select OIMIDSTORE and check the Bind DN value.
OVD--> OID Adapter User: Go to ODSM, connect to OVD.
IDMDomain WLS Authenticator (LDAP): Can be obtained by going to the WLS console in any of the domains, then going to Security, then my realm, then Providers, then OVD Authenticator, then Provider Specific. and obtaining user name portion of the Principal property.
IDMDomain EM Monitoring User: Go to the Enterprise Manager for IDM Domain and click on Farm on the top-left corner. Select Agent-Monitored Targets. A list of agent-monitored targets (OID, OVD) will appear. Click the Configure button next to any of them. The property is the WebLogic Monitoring User Name.
IDMDomain Credential Bootstrap User: Usually orcladmin OID user (if your environment was installed manually following the EDG) or the IDMPolicyRWUser if your environment was installed using the IDM provisioning tool.
All the FA User information can be found in the provisioning.rsp file, or optionally in ODSM.
FA Super User (LDAP): Search provisioning.rsp for IDENTITY_SUPERUSER.
FA IDStore Read-Only (LDAP) : Search provisioning.rsp for IDENTITY_RO_USER.
FA IDStore ReadWrite (LDAP): Search provisioning.rsp for IDENTITY_USERDN.
FA Policy Store ReadWrite (LDAP): Search provisioning.rsp for OAM_OPSS_USER.
FA Policy Store ReadOnly (LDAP): This is usually PolicyROUser, which can be verified by going to ODSM and looking in the Users tree node.
FA Domains nodemanger admin: The nodemanager admin user.
FA Domains WLS Authenticator (LDAP): The FA Domains WLS Authenticator user can be obtained by either 1) checking the provisioning.rsp file for IDENTITY_RO_USERDN, or 2) going to the WLS console in any of the domains, then going to Security, then my realm, then Providers, then OVD Authenticator, then Provider Specific. and obtaining user name portion of the Principal property.
FA IDStore Admin: This is normally orcladmin.
FADomains Credential Bootstrap User: This will usually be the PolicyRWUser.
Log in to the Oracle Access Manager and select System Configuration tab, then expand the Access Manager Settings tab, then choose OAM Agents to find the values for both web gates. Fusion Applications and Identity Management web gates use the same mode.
Webgate Mode: Open either webgate entry and check whether the Security mode is set to Open, Simple, or Cert. Enter the value in the Workbook.
FA WebGate Name: When you select OAM Agents, the table on the resulting page lists both the FA Webgate and IDM Webgate names in the Name column.
IDM WebGate Name: When you select OAM Agents, the table on the resulting page lists both the FA Webgate and IDM Webgate names in the Name column.
The CSF (User) names for the IDM and FA domains are both found in the FMW Control.
For IDM Domain: Log in to FMW, and under WebLogic Domain, select IDMDomain. Right-click Security>Credentials to see the Credentials page. Open each listed folder, locate the key you are looking for, then click Edit to open the window that displays the User Name. If it's not there, then leave the row empty.
For FA Domain: Under WebLogic Domain, select, for example, Common Domain. Select Security and look for maps (such as Oracle Patching) and key. Click Edit to open the window that displays the User Name.
In this version of the cloning tool, the Email entries are not used and can be ignored.
This section is for SMTP information.
Email SMTP Host: The SMTP host used for sending email notifications. This may be external to the Fusion Applications instance, such as a corporate address for order notifications, incident reporting, and so on. Enter the correct information for both the source and the destination environments.
You will enter the value for the destination SMTP host in the faclone.rsp file, for the property FA_SMTP_HOST_TARGET.
Email SMTP Port: The SMTP port associated with the SMTP host, for both source and destination environments.
Enter the value for the destination SMTP port in the faclone.rsp file for the property FA_SMTP_PORT_TARGET.
Email SMTP User: The SMTP user associated with the SMTP server, for both source and destination environments.
Enter the value for the destination SMTP port in the faclone.rsp file, for the property FA_SMTP_PORT_TARGET
Use the Oracle BI Administration Tool to open the current RPD, find the following values, and enter them in the worksheet. For help with installing the tool, see Appendix E, "Install the BI Administration Tool".
For CRM BI Broker APPID User and URL:
On the BI Admin Tool, open the latest RPD from your Fusion Applications environment and locate the Physical column on the screen.
Expand the item named oracle.apps.crm.model.analytics.applicationModule.CrmAnalyticsAM_CrmAnalyticsAMLocal
Double-click the "Connection Pool" subitem to display its properties.
On the Connection Pool popup window General tab, locate the field called User name. This normally contains the value FUSION_APPS_BI_APPID.
This is the "CRM BI Broker APPID" value to be used in the Discovery Workbook
Click on the Miscellaneous tab and locate the field named URL. This is the value of the "CRM BI Broker URL" to be used in the Discovery Workbook
For HCM BI Broker APPID User and URL:
Repeat the steps used above for CRM, but use the item called
oracle.apps.hcm.model.analytics.applicationModule.HcmTopModelAnalyticsGlobalAM_HcmTopModelGlobalAMLocal in the Physical column.
For FSCM BI Broker APPID User and URL:
Repeat the steps used above, but use the item called oracle.apps.fscm.model.analytics.applicationModule.FscmTopModelAM_FscmTopModelAMLocalin the Physical column.
Note:
The RPD password must be changed, which can be done in the BI Administration Tool.The tables in the Ports tab of the Workbook are divided into Identity Management components and Fusion Applications components. Note that not every component may be relevant for your particular installation.
Look for port information in various places, depending on the component type.
IDM OHS: Check the httpd.conf file in the IDM web server config directory.
IDM OHS SSL: Check the ssl.conf file in the IDM web server config directory.
IDM OHS OPMN Local/Remote: Check the opmn.xml file in the IDM web server config/OPMN directory.
OID Components: Check the OID config directory to find the following properties file: /config/OPMN/opmn.ports.prop.
OVD Components: Check the OVD config directory to find the following properties file: /config/OPMN/opmn.ports.prop.
ODS Components: Check the ODS config directory to find the following properties file: /config/OPMN/opmn.ports.prop.
IDM Managed Servers and Admin Server: Check the WebLogic Server Console (WLS) to find the port information in the user interface.
Node Manager Properties: If using Node Manager, check the nodemanager.properties file in the wlserver_10.3/common/nodemanager directory.
Proxy and Coherence: Check the oam-config.xml file located in the <IDMDomain>/config/fmwconfig directory.
Note that SOA Coherence is almost always set to the default value of 9778. To double-check, go to <IDMDomain>/bin, find set.DomainEnv.sh, and search for the listing.
Find the port information for almost all the Oracle Fusion Applications components by logging in to the WLS Console and checking the user interface. Two exceptions are listed below:
Node Manager Properties: For Fusion Applications components, node manager properties can be found in the directory
wlserver_10.3/common/nodemanager/<abstracthost> . For example:
wlserver_10.3/common/nodemanager/admin-apps.oracleoutsourcing.com
Every host has its own node manager process with its own directory, but typically all hosts use the same port number, so checking one node manager directory may be sufficient.
Informatica (IR or IIR): This component is used only when Customer Relationship Management (CRM) products are installed. If applicable, look for this port number by searching provisioning.rsp for Informatica or IR or IIR, or search the Informatica host for InformaticaIR/env/envc.
This tab is informational only; do not enter values in the fields! These are the passwords that will be required during cloning.
This tab organizes all your entries and presents them so they are easy to use. The Generated RSP Entries tab collates the data entered in all the other tabs and tables, and generates the entries and values that are needed by the finalfaclone.rsp file. When discovery is finished, transfer the generated RSP entries to the .rsp file as follows:
Locate the sample template that will become your .rsp file for cloning.
Look for $CLONE_HOME/bin/faclone.rsp.template.R7. Save it as a new file, with the name faclone.rsp. This template, now renamed, includes both sample parameters and non-editable internal information used by the cloning tool.
Replace the sample parameters and values on the new faclone.rsp template with the Generated Cloning RSP Entries by copying each segment and pasting into your faclone.rsp.
Save the file; it will be used when the cloning scripts are run.
For standard installations, master images from the source environment should be obtained using TAR and are done on a component-by-component basis. Be sure that all necessary patches have been applied to the source environment, as detailed in Section 1.3.1.3.
Note:
The databases (the Oracle Fusion Applications database and the Oracle Identity Management database(s)) are handled in a separate process (see Section 2.6). The master image does not include the source databases.Before obtaining the images, it is recommended to validate the name resolution settings in the source environment. See Section 2.3.1. The image creation instructions are in Section 2.3.2.
Note:
If you have virtualized your provisioned Fusion Applications instance, then this section of the guide will not apply. You can request a copy of the Oracle VM User's Guide for information on importing existing VMs, instead.The faclone.sh scripts rely on local name resolution (using the /etc/hosts file) for internal HTTP endpoints and abstract host names, to keep the internal wiring intact on the destination environment. If you are installing the source system following the Best Practices Appendix B, then this step will be streamlined and unnecessary. But if you already have a source installation that did not make use of abstract host names, then some preparation is required on both the source and the destination environments.
See Section 1.1.1.1, "Understanding Internal Wiring and Abstract Endpoints" to review the concepts, if necessary.
If, in your existing source environment, you have placed internal names in DNS, they need to be removed. You then must add them to /etc/hosts on each node of the source, where they take over the name resolution activity that was formally handled on DNS. You should also replace any abstract host name entries in the source DNS.
These steps are described in the following sections:
Part I, "Verify Whether DNS Entries for HTTP Internal Endpoints Exist on Source"
Part I, "Move Internal HTTP Endpoint Entries to /etc/hosts If Necessary"
To validate:
Verify that no DNS entries exist for FA or IDM Internal Names
Check Discovery Workbook: Virtual Hosts tab, FA Internal Name column and IDM Internal Name column for the references.
Verify that these entries are all present in the /etc/hosts file on each node at the source environment.
Ping these entries to verify that they resolve to the correct nodes. They should all point either to the FA OHS node, the IDM OHS node or the Load Balancer/Reverse proxy.
If everything validates, then no further action is required on the source system.
If there are entries in the DNS for internal endpoints, then continue with Section 2.3.1.2.
/etc/hosts If NecessaryIf your source environment has the internal HTTP endpoints set up in DNS, we recommend:
Removing the DNS entries for the internal http endpoints.
These corollate with the entries in the Discovery Workbook: Virtual Hosts tab, FA Internal Name column and IDM Internal Name column.
Add the entries to the /etc/hosts file on each node at the source environment.
Ping these entries to verify that they resolve to the correct nodes (they should all point either to the FA OHS node, the IDM OHS node or the Load Balancer/Reverse proxy.
If your source environment was installed without using the Best Practices Appendix B, then the source host names will be used as the abstract host names and used as-is in the internal wiring of Fusion Applications. (In Section 2.4.3.3 you will add these now-abstract host name entries to the/etc/hosts files at the destination environment, so they will resolve correctly.)
It is desirable to further abstract these names by removing their entries from the source DNS. To do so:
Add these host names to the /etc/hosts file for all servers at the source environment.
Check Discovery Workbook: Topology tab, Abstract Host Name column for the references.
Remove these CNAMES from DNS.
Create new DNS CNAMES for the source servers.
If your Fusion Applications source environment was set up using Virtual IPs (VIPs), as per the instructions in the various Oracle Fusion Applications Enterprise Deployment Guides, the corresponding host names must also be added to the /etc/hosts file for cloning. To do so:
Ensure the host names for these virtual IPs are in the /etc/hosts file for all servers at the source environment.
Check Discovery Workbook, Virtual Hosts tab, Virtual IPs (VIPs)
Remove these CNAMES from DNS.
Table 2-1 describes the clone image files to be obtained from the source environment. We recommend using options czvpf, which compact the images and maintain permissions.
Note:
All mount point and directory structures for the image files must be the same between source and target.The image creation instructions use the property names in the faclone.rsp file related to image files. Ensure that those properties are defined correctly in your .rsp file, as they will be used by the faclone.sh scripts to extract the files to the appropriate locations.
The Image files all require a checksum to be generated. Here are example commands for capturing the Identity Management (IDM) Shared directory:
cd $IMAGEFILE_POOL_DIR
cd ..
tar czvpf <image_file_name_with_extension> $STORAGE_SHARED_IDM

cksum <image_file_name_with_extension>
Table 2-1 Image File Details
| Directory | Availability | Includes | May Also Include | TAR File Name | Root Directory |
|---|---|---|---|---|---|
|
IDM Shared directory |
Always |
IDM Oracle Home IAM Oracle Home SOA Oracle Home IDMDomain AdminServer IDM oraInventory |
IDMDomain managed servers AS instances for OID and OVD Webtier Oracle Home and instances for OHS |
|
|
|
FA Shared directory |
Always |
FA Base directory FA |
FA Webtier Oracle Home and instances under FA Scaled-out instances and domain managed servers |
|
|
|
IDM DMZ directory |
Optional |
IDM Webtier Oracle Home |
Instances for IDM OHS |
|
|
|
FA DMZ directory |
Optional |
FA Webtier Oracle Home |
Instances for FA OHS |
|
|
|
Local Storage |
Optional |
Instances for OVD, OID, OHS IDM domains, managed servers FA domains, managed servers BI Instance |
|
|
Note:
In certain circumstances, you may want to copy the files manually, instead of creating TAR files and lettingfaclone.sh extract them. This can be accomplished by setting the faclone.rsp property EXTRACT_IMAGEFILE = false, which will skip the extraction of TAR files to the destination environment.After ensuring that your destination environment meets the core system requirements laid out in Section 1.3.2, "Destination Requirements", there are some additional steps to set up the destination network. They include:
Section 2.4.1, "Configure DNS Entries for External Endpoints"
Section 2.4.2, "Configure Load Balancer/Reverse Proxy Settings"
All external endpoints for the destination environment must be set up in DNS so they can be accessed by the end users.
Configure the following CNAMES on your DNS server.
| DNS CNAME for | External HTTP Endpoint | Points At |
|---|---|---|
| Common |
Discovery Workbook: Virtual Hosts tab Target FA External Name column |
Discovery Workbook: Topology tab External LBR/RP or nodes containing |
| BI | ||
| Financial | ||
| CRM | ||
| HCM | ||
| Procurement | ||
| Procurement (Supplier Portal) |
||
| Projects | ||
| SCM | ||
| IDM | Target IDM External Name column | External LBR/RP or nodes containingIDMOHS_INST |
Note:
Remember that internal HTTP endpoints should not be set up on DNS, but configured in/etc/hosts (see Section 2.4.3.3).If using a load balancer (LBR) or reverse proxy (RP) as the front-end of Fusion Applications, then configure the following external and internal mappings.
These should be configured at the LBR/RP that provides external access to Fusion Applications (for end-users and external integrations.
| External LBR Mapping for | Port (LBR/RP) | Maps to (Node) | Maps to (Port) |
|---|---|---|---|
| Common |
Discovery Workbook: Virtual Hosts tab Target FA External Port column |
Discovery Workbook: Topology tab Nodes containing |
Discovery Workbook: Virtual Hosts tab FA OHS External Port column |
| BI | |||
| Financial | |||
| CRM | |||
| HCM | |||
| Procurement | |||
| Procurement (Supplier Portal) |
|||
| Projects | |||
| SCM | |||
| IDM | Target IDM External Port column | Nodes containingIDMOHS_INST |
IDM OHS External Port column |
Note: Fusion Applications configures SSL to terminate at the LBR/RP, so you may also have to configure certificates as appropriate, on your LBR/RP.
The default configuration when using the Load Balancer option during Fusion Applications provisioning is for the source environment to also have internal endpoints at the load balancer. In this case, you must also create appropriate mappings. Note that internal and external LBR/RPs may be different.
| Internal LBR Mapping for | Port (LBR/RP) | Maps to (Node) | Maps to (Port) |
|---|---|---|---|
| Common |
Discovery Workbook: Virtual Hosts tab Target FA Internal Port column |
Discovery Workbook: Topology tab Nodes containing |
Discovery Workbook: Virtual Hosts tab FA OHS Internal Port column |
| BI | |||
| Financial | |||
| CRM | |||
| HCM | |||
| Procurement | |||
| Procurement (Supplier Portal) |
|||
| Projects | |||
| SCM | |||
| IDM | Target IDM Internal Port column | Nodes containingIDMOHS_INST |
IDM OHS Internal Port column |
In a highly-available or scaled-out topology, the load balancer is used to route requests to the various instances of Oracle Internet Directory and Oracle Virtual Directory.
| LDAP LBR Mapping for | Port (LBR) | Maps to (Node) | Maps to (Port) | |
|---|---|---|---|---|
| Main Discovery Workbook Location | Identity Management Tab, LDAP Abstract Names table | Topology Tab | Ports Tab | |
| OID | Abstract Port column | Nodes containing OID_INST |
OID | |
| OVD | Abstract Port column | Nodes containing OVD_INST |
OVD |
Complete the destination setup in the following sections.
Ensure that:
Target nodes have the same operating system and version number as the source nodes
There is a 1:1 mapping between source and destination nodes; i.e the same number of nodes on each, and the same memory and disk space requirements will apply.
An OS user (the "oracle" user) is configured on all nodes with the same ID and the same Groups. This user will own the destination Fusion Applications instance.
Ensure all the prerequisites for operating system, network, and storage, are satisfied for the destination environment. Check the following documentation for additional guidance:
/etc/hosts File for Internal EndpointsSee Appendix C, "Abstract Hostnames in Detail" for more background information on this topic.
In the /etc/hosts file for each destination node, add the following entries:
| Category | Hostname (Discovery Workbook) |
Map to IP (Discovery Workbook) |
|---|---|---|
| Abstract host names | Topology tab,Topology table, Abstract Host Name column | Topology tab, Topology table, Target IP Address |
| Abstract LDAP names | Virtual Hosts tab, LDAP Abstract Namestable, Abstract Name column | Virtual Hosts tab, LDAP Abstract Names table, IP Endpoint - Target Environment column |
| FA Internal HTTP Endpoints | Virtual Hosts tab, FA HTTP Endpoints table, FA Internal Name column | Topology tab, Node containing IDMOHS_INST or Internal LBR/RP |
| IDM Internal HTTP Endpoints | Virtual Hosts tab, IDM HTTP Endpoints table, IDM Internal Name column | Topology tab, Node containing FA_WEBTIER or Internal LBR/RP |
| Blacklisted host names | Topology tab, Blacklisted hosts table, Host name column | Topology tab, Blacklisted hosts table, Target IP Address (or 127.0.0.1) |
| Virtual IPs (VIPs) | Virtual Hosts tab, Virtual IPs (VIPs) table, Virtual hostname column | During Cloning: use the local IP of the host the VIP is pointing to, as in the Topology tab, Topology table, Target IP Addresscolumn.
After Cloning: if a different IP address is to be used, use the VIP as in the Virtual Hosts tab, Virtual IPs (VIPs) table, Target IP column |
| Additional entries | Virtual Hosts tab, Additional /etc/hosts Entries table, Abstract Name column | Virtual Hosts tab, Additional /etc/hosts Entries table, Target IP column |
The storage setup on the destination environment must mirror the setup at the source, i.e:
Same size requirements
Same mount point
Shared storage must be mounted to equivalent nodes
Verify all storage is mounted according to the Storage tab in the Discovery Workbook, including:
Identity Management Shared storage
Identity Management DMZ storage (if applicable)
Fusion Applications Shared Storage
Fusion Applications DMZ storage (if applicable)
Local Identity Management or Fusion Applications storage for each node in the topology (if applicable)
Ensure all DNS, LBR and /etc/hosts setup has been done correctly by performing the following tests from each one of the nodes in the destination environment:
Use the ping command to test if the endpoints are set correctly in your environment:
| Ping from | Hostname to Ping | Should resolve to |
|---|---|---|
| All nodes | All host names from Section 2.4.3.3 | As defined in that section |
| FA DMZ node (if applicable) | Abstract host names for node containing all Fusion Applications WLS domains | As defined |
| IDM DMZ node (if applicable) | Abstract host names for node contain IDMDomain | As defined |
| All nodes | All endpoints defined in Section 2.4.2.1 | As defined in that section (OHS or LBR, depending on topology) |
To test the load balancer/reverse proxy (LBR/RP) mappings, you must start a listener process on the node to which the load balancer/reverse proxy is forwarding requests. This can be done using the command "nc -l <target port number>" for each port you want to test.
| LBR Mapping Type | Telnet from | Hostname and Port to Telnet to (from Discovery Workbook) | Should Resolve to (Discovery Workbook: Topology Tab) |
|---|---|---|---|
| Fusion Applications External LBR/RP | All nodes except DMZ | Virtual Hosts tab, FA Virtual Hosts table, Target FA external Name/Port columns | Nodes containing FA_WEBTIER |
| Identity Management External LBR/RP | All nodes except DMZ | Virtual Hosts tab, IDM Virtual Hosts table, Target IDM external Name/Port columns | Nodes containing IDMOHS_INST |
| Fusion Applications Internal LBR | All nodes except DMZ | Virtual Hosts tab, FA Virtual Hosts table, Target FA internal Name/Port columns | Nodes containing FA_WEBTIER |
| Identity Management Internal LBR | All nodes except DMZ | Virtual Hosts tab, IDM Virtual Hosts table, Target IDM internal Name/Port columns | Nodes containing IDMOHS_INST |
| LDAP LBR | All nodes except DMZ | Identity Management tab, LDAP Abstract Names table | Nodes containing OID_INST, OVD_INST |
All the master files created in Section 2.3.2 should be copied to a shared location, visible to all nodes in the destination environment. In the faclone.rsp file, this location is defined as IMAGEFILE_POOL_DIR.
For DMZ nodes, where the shared location will not be accessible, copy the respective DMZ image file (IMAGEFILE_SHARED_FA and/or IMAGEFILE_DMZ_IDM) to the same location on the DMZ node. If the DMZ nodes also use local storage, copy the local storage image files (IMAGEFILE_LOCAL_*) as well.
We recommend using checksum to validate the file copy to the destination environment.
Ensure that database system requirements have been met (see Section 1.3.1.3).
Note that you should have completed the Discovery phase for Database information as well (see Section 2.2.9).
Database duplication includes the following steps:
Section 2.6.1, "Full Discovery of Source Database Environment"
Section 2.6.2, "Duplicate the Source Database Using Your Preferred Tools"
Section 2.6.4, "Prepare Database Files that the Clone Tool Will Use for Validation"
Section 2.2.9 gives tips for filling out the Discovery Workbook tables related to the Oracle Fusion Applications transaction database and the Oracle Identity Management database(s). In addition, collaborate with the database administrator to attain full familiarity with the following additional database details.
All this information will be used to prepare a destination environment that exactly matches the source, and then post-duplication, to verify that the two environments are identical in content and semantics.
In the Discovery Workbook, you will have identified:
Whether the source is RAC, and what version, patch sets, and patches were applied
The databases and instance names to be duplicated
Use v$database and gv$instance to discover. Note that if RAC is used, you can search from any one of the hosts in the database cluster.
Hosts on which the databases are installed
Host operating system, version, and patch levels
Oracle database Homes involved, their patch levels, and the space taken by each Home
Also identify the follow database-specific details:
Identify whether ASM storage is used. If it is, then find the version, patch sets, and patches applied.
Check if the SIDs are present in the /etc/oratab or /var/opt/oracle/oratab, as appropriate.
Identify the Oracle Parameter files. Determine if initialization files (init<SID>ora) are in use, and if an spfile is in use.
Identify the Database character set.
Identify the Archive log mode.
Identify the number of redo log groups and files.
Identify the Flashback mode.
Determine the number of data files and the number of temporary files. Not the space that they consume.
Identify flash recovery area, and the storage allocated to it.
Determine the time a last full (level 0) backup was taken.
Use your preferred technology, to simplify the duplication process.
Determine whether any tablespaces should be skipped.
Determine the directory objects in the source database, and the location to which they point.
List the database links in the source database, the corresponding TNS name from tnsnames.ora, if appropriate, and the hosts or IP address to which they point.
Determine any local hosts entries (/etc/hosts, for example) that have been created.
Determine the jobs and schedules that may have been created.
Identify the number of job-queue processes in the job_queue_processes initialization parameter.
Database duplication is done in whatever method your enterprise uses: RMAN backup (along with installing the Oracle RDBMS Server binaries), file system copy, storage replication, VM snapshot, etc. Adhere to the requirements when duplicating the source database and mounting it to the destination environment:
For RAC installations, ensure that the Grid Infrastructure is installed on the destination.
Before duplicating, shut down the source Fusion Applications web tier and application tier, as well as the Identity Management web tier and application tier, and ensure that all in-flight transactions have been completed.
Shut down the source database cleanly (no abort). The clone/copy must be taken cold.
Remember that the topology and operating systems must be identical between source and destination.
When the database has been duplicated onto the destination environment, bring it up and verify that the contents match the source.
Take care, before starting the destination database:
Ensure the host is fenced off, so the database links do not point to the source system.
Ensure that the initialization parameter (job_queue_processes) is set to 0, so that the database scheduler and job queue system are disabled.
When you have verified that the destination database has been duplicated and mounted correctly, then configure it for full use. This means:
Turn off archive log mode, if needed.
Turn off flashback mode, if needed.
Register the destination database with the local listener.
Manually create the file directory paths for the database directories, as defined in the Discovery Workbook (see Section 2.2.9, "Databases").
The relevant directories are:
Directory APPLCP_FILE_DIR
Directory APPLLOG_DIR
Directory KEYFLEXCOMBFILTER
Directory FUSIONAPPS_PROV_RECOVERY_DIR
Directory OTBI_DBINSTALL_DUMP_DIR
Then, as sysdba, update the dba directories on the database using sqlplus to run the following SQL command against the Fusion Applications destination database:
create or replace directory <DIRECTORY_NAME> as '<DIRECTORY_PATH>'
where <DIRECTORY_NAME> is the name of the directory as specified in the Setting column (such as APPLOG_DIR) and <DIRECTORY_PATH> is the value specified in the Target column of the Discovery Workbook.
Temporarily switch off any database password policies for all IDM and FA databases on the target environment. Those policies can be turned back on after cloning is complete.
Change the passwords for all schemas listed in Column A of the Discovery Workbook C_Passwords tab.
If it is a RAC database, then convert the single instance into a RAC multi-instance database.
For more information on duplicating databases in a RAC environment, and on converting a single-instance database to a RAC database, see Oracle® Real Application Clusters Installation Guide for Linux and UNIX,11g Release 2 (11.2).
In addition to the administrator verifying and validating that the databases are duplicated properly, the cloning tool also performs validation steps to ensure that the source and destination database environments are equivalent. This automated validation requires files with information about the two environments, which the cloning tool will compare.
Obtaining the files and getting them into the correct location is a two-step process that the administrator performs on both the source and the target databases:
Run a discovery script on the each database (source and target). This generates two files per database. (Note that if you have a RAC database, the script is run on the first instance only.)
Place the generated files in the discover output directory (typically located in ${CLONE_HOME}/discover.
If the database administrator is not responsible for the cloning process, then provide the script to the database administrator with the script instructions that follow.
The discoverEnv.sh script is located in the ${CLONE_HOME}/discover/scripts directory.
discoverEnv.sh Script on Each DatabaseThe following activities are done by the database administrator for the Fusion Applications and Identity Management databases on the source and the destination environments:
Create temporary directories to hold the discover scripts and the output files. For example:
mkdir -p /some-path/clone/discover/scripts
mkdir -p /some-path/clone/discover/output
Place the discoverEnv.sh script in the scripts directory.
Ensure that the script has execute permissions turned o:
cd /some-path/clone/discover/scripts
chmod u+x ./discoverEnv.sh
Note:
Perform these steps on each of the servers where the fusion applications and Identity Management are available. For RAC this should be done only on the host where the first instance runs.Run the discoveryEnv.sh script for each database.
For help using the discoverEnv.sh command, the syntax is:
discoverEnv.sh {-h | --help}
The syntax to run the discoveryEnv.sh script is :
discoverEnv.sh [ {-t | --tmp} tmpdir ] [ {-d | --debugLevel} level ]

{-e | --env | --environment} {source|target} {-i | --sid} sid {-n |

--serviceName} service-name {-o | --oh | --oracleHome} oracle-home {

-u |--userName} username {-l | --directoryLocation} output-directory
For example:
cd /some-path/clone/discover/scripts
./discoverEnv.sh --env target --sid fatarg1 --serviceName
fatarg1.mycompany.com --oh oracle-home-of-database -u system
--directoryLocation /some-path/clone/discover/output
Where (conventions):
Command line options are of the form --switch switch-value
Optional switches are surrounded by brackets [ ]
Mandatory switches are surrounded by curly braces { } if there are multiple ways of specifying that switch. If there are is only one way of specifying it then it is not surrounded by {}. For example : { --env | --environment } {source|target} and --userName sysdba-username
Where there are multiple choices, they are separated by the pipe symbol "|"
Parameters:
| Valid Switches | Value |
|---|---|
--tmp tmpdir |
Directory where script writes temporary files before writing the final output files |
--env or --environment |
Specify source or target, depending on which environment the script is run. |
--sid sid |
The SID of the database, as would be identified in the clone scripts. Note: If the instance name (noted in the Discovery Workbook) differs from the SID, then use the instance name. |
--serviceName service-name |
The service name of the database instance. |
--oracleHome $ORACLE_HOME |
Specify the ORACLE_HOME path for the database instance for which the discoverEnv.sh script is being run. |
--userName sysdba-username |
Specify the database account with sysdba privileges. Valid values include "/", sys, and so on. |
--directoryLocation ${CLONE_HOME}/discover/output |
The output file directory created for this instance. |
The script generates two files for each run (for each database instance) and places them in the directory defined by the --directoryLocation command line switch. Provide these files to the application administrator who performs the cloning.
Note to Application Administrator:
Before running the cloning scripts, ensure that the files are placed in the$CLONE_HOME/discover/output directory.
There should be two files generated for each database involved. Thus there should be at least 8 files total: two for Identity Management, two for Fusion Applications, for both source and target. When there are separate databases for Identity Management and OID, there would be a total of 12 files (6 from source and 6 from target).
RAC instances do not affect the file number; the script is run only on the first instance.
As an administrator, to finish verifying that the destination database is up, running, and identical to the source:
Check that all instances (single or RAC) have been registered with the listeners and are accessible remotely.
Ensure all database instances are running.
Ensure that jobs relevant only to the source environment have been dropped (preferable) or disabled.
Ensure locations defined in the directory object are present, and have the appropriate permissions. In the case of RAC, ensure that it is in a shared file system or location, as matches the source.
Ensure the number of tablespaces and data files matches the source.
(Note: if you skipped source-specific tablespaces, don't forget to adjust your count to accommodate.
Finally, shut the database(s) down, ensuring all instances are down, and take a complete cold backup. This represents your master copy of the destination environment, and can be used for recovery, in case of need.
If the preceding sections in this Guide are complete, you can continue with running the cloning script (Section 2.7).
faclone.sh to Extract and Rewire Components on TargetRunning the cloning scripts on the destination environment for each Fusion Applications component is known as the "clone phase" of the process. Before the clone phase, ensure that:
You have completed the Discovery Workbook
You have completed the faclone.rsp file
You have completed all preceding steps in this guide (met all system requirements, created master image files, prepared the destination environment, made master images available, and duplicated the databases.
You have extracted the FAClone Kit to a location shared among all nodes in the topology with read-write permission (except the database and DMZ nodes). We will refer to this location as $CLONE_HOME
The clone phase is fully automated and accomplishes the following:
Extracting master TAR files
Re-wiring the mid tier to the new destination databases
Changing the passwords for all components (see details below)
Performing cleanup tasks, such as removing running job instances, clearing log files, etc.
Re-wiring the midtier and web tier for the new external endpoints
Starting up components
Performing initial validation of individual components
During the clone phase, no access to the source environment is needed. This phase implements fail-safe measures to ensure that no access from the clone to the source environment takes place during or after the clone process.
Understand Password Handling for Cloning
Part of cloning is entering passwords for the target environment, which cannot be the same as the source environment. You can define these passwords in one of two ways:
As an independent activity before running the faclone.sh script, or
As the first prompted action when running the script.
To enter the passwords independently, use the following syntax:
/path-to-bin/faclone.sh -p /path-to-rsp-file/response_file.rsp generate passwordfile
You will be prompted to enter passwords which are labeled according to Column D of the C_Passwords tab in the workbook.
Otherwise, when you start faclone.sh the first time, the script will prompt you for passwords then. Check Column D of the C_Passwords tab in the workbook for any needed clarification.
When the passwords have been entered, an encrypted password file is generated and stored on the same node as the response file.
FAClone.shIf issues occur while running the script, you can identify the problem, resolve it, and re-run the script.
In the event of a failure of the cloning process, you will be prompted to run what is known as "fail clean up". Once prompted, you will have three choices:
Leave the clone in this state for a period of time while you gather the information required to debug the issue (i.e., do not press any key). Once you proceed, debug information will be lost. After obtaining the debug information, you can proceed with fail cleanup and prepare to restart the cloning process
Proceed by hitting any key and the fail cleanup process will be run.
Hit Ctrl-C to exit the clone. This leaves the system in a state where the fail cleanup will be detected when the clone is restarted and it will automatically be run with no prompt to the user. This is an alternate way to take the required time to gather the debug information prior to restarting the clone.
To identify the cause of the error, find the latest log available in the CLONE_LOG directory and look for error messages. Additional logs to check include WLS server logs, OPMN logs, node manager logs, and so on.
Once found, an error can be addressed as follows:
If the fix requires a response file or password file change, you may have to clean up the target environment and the CLONE_HOME before running faclone.sh again. See Section 2.7.1.1, "Making Changes to Response or Password Files After Having Run the Script".
If the fix requires a manual change to a configuration on the target environment (mid-tier or web tier), we recommend cleaning up the target environment and restarting the process. See Section 2.7.1.2, "Cleaning Up the Target Environment and CLONE_HOME to Restart the Script"
If the fix requires an OS-level parameter change only or a simple database parameter change (with NO changes to the response file, password file or configuration changes in the mid-tier or web-tier), you can simply re-run faclone.sh with no additional changes.
If the issue requires a change to the response file or password files after you have already run faclone.sh, you must restart the clone process from the beginning, including cleaning up the target environment and the CLONE_HOME. This is necessary because some of the new values in the response/password file may have already been written to the clone image, so simply changing them in the response file is not enough to revert those changes already made.
After making changes to the response file or password file, follow the procedure outlined in Section 2.7.1.2.
To make file changes:
Response File:
Simply change the value in the file directly. For consistency, don't forget to update the Discovery Workbook accordingly.
Password File:
This file is encrypted, so changing the value manually is not an option. To regenerate the file:
Find the password file in the same directory you previously specified for the response file when you ran faclone.sh (-p or –-responsefile option). The password file name is defined by the response file property CLONE_PASSWORDFILE_NAME.
Rename or delete the file.
Next time faclone.sh is run, the tool will prompt again for the password values.
In some situations, including changes to the response or password files, you must restart the clone process from the beginning, and need to make manual changes to the target environment. To do so:
Ensure that faclone.sh is not running. If it is, wait for it to finish or kill the process manually.
Ensure there are no running processes on the target environment, including any mid-tier process (OPMN, OID, OVD, BI, OHS, WLS, node manager) as well as databases.
Clean up the target environment by deleting all Fusion Applications (FA), Identity Management (IDM) and database (DB) directories.
Restore the database clones to the target environment, leaving the target environment in the same state as the end of Section 2.6.
Clean up the CLONE_HOME by deleting the contents of the following directories (don't delete the directories themselves; just leave them empty):
backup (CLONE_BACKUP)
log (CLONE_LOG)
phaseguards (CLONE_PHASEGUARDS)
temp (CLONE_TMP)
Re-run faclone.sh.
The automated clone scripts are run on the following nodes in the destination environment:
Oracle Internet Directory (OID)
Oracle Virtual Directory (OVD)
Identity Management Domain Admin Server
Fusion Applications Common Domain AdminServer
Fusion Applications Business Intelligence (BI)
Fusion Applications Web Tier
If one or more of these components run on the same node, faclone.sh will only run once on each mode. For example:
If OID and OVD are located on the same node, since both are processed in the IDMMT mode, faclone.sh will detect this automatically and process both without the need to run it twice.
If the FA CommonDomain AdminServer and BI are on the same node, since both are processed in the FAMT mode, faclone.sh will detect this automatically and process both without the need to run it twice.
If the FA CommonDomain AdminServer and the FA Web Tier are located on the same node, they will still require two separate runs of faclone.sh (one in FAMT mode and one in FAWT mode) since they are processed in different modes of the clone phase.
Note that in version 1, faclone.sh only supports running on the primary nodes of scaled-out environments. Thus, while it can still run against scaled-out environments, only the primary nodes will be cloned completely.
To execute the clone phase, run the faclone.sh tool located in $CLONE_HOME/bin, as follows
faclone.sh clone <mode> --responseFile <response file full path>
Table 2-2 describes where, how, and in what order to run the faclone.sh scripts.
Running faclone.sh may take several minutes, depending on the mode chosen. While it is running, you can follow its progress on the screen. You can also view the log files generated in the $CLONE_HOME/log directory. Upon completion of each mode on a node, you will see a message indicating that mode has completed successfully.
Table 2-2 Clone Phase
| Order | Mode | Runs On | Details |
|---|---|---|---|
|
1 |
idmmt |
All Primary IDM midtier nodes in the following order: 1. OID (primary node) 2. OVD (primary node) 3. IDMDomain AdminServer (primary node) If one or more of the above are located on the same node, you should still follow the same order e.g. if OID and OVD are on the same node and the IDMDomain AdminServer is on a separate one, run If you attempt to run the This mode requires node manager to be running on all WLS nodes before starting it. |
Extracts the IDM MidTier clone images, and performs re-wiring, password change, cleanup, server startup, and validation |
|
2 |
idmwt |
The primary IDM Web tier node. If this node is located on the DMZ and the node is not able to access the shared storage where The clone phase for the Web Tier checks whether the IDMDomain can be accessed via HTTP from the Web Tier node, so be sure you have completed the clone phase in |
Extracts the IDM Web Tier clone images, and performs re-wiring, password change, cleanup, server startup and validation |
|
3 |
famt |
NOTE: This mode requires node manager to be running on all WLS nodes before starting it. All primary Fusion Applications midtier nodes in the following order: 1. CommonDomain AdminServer (aka Primordial node) 2. BI (primary node) If both are located on the same node, you only have to run the If you attempt to run the The |
Extracts the Fusion Applications Mid Tier clone images and performs re-wiring, password change, cleanup, server startup and validation |
|
4 |
fawt |
The primary FA Web tier node. If this node is located on the DMZ and the node is not able to access the shared storage where $CLONE_HOME is, copy the FAClone Kit to the DMZ node and run it from there. The Clone phase for the Web Tier checks whether the FA Domains can be accessed via HTTP from the Web Tier node, so make sure you have completed the Clone phase in FAMT mode before starting it in IDMWT mode. |
extracts the FA Web Tier clone images and performs rewiring, password change, cleanup, server startup and validation |
The clone tool performs automatic validation on each component during the clone phase. Those automated processes are detailed in Table 2-3, and can also be triggered manually with corresponding validation modes, as desired.
The Fusion Applications Administrator should also perform a final environment validation of the entire stack. Table 2-4 gives a high-level list of such tasks.
Table 2-3 Validation Steps
| Automated Task | Detail | Manual Validation Mode |
|---|---|---|
|
Validate IDM DB |
- Test connection to IDM DB with all schema users -Basic data validation |
May be 1 or 2 databases |
|
Validate IDM Mid Tier |
- Test direct connectivity to OAM Console, OIM console, EM, WLS console - Test all servers are up |
validates the IDM Mid Tier environment using the destination configuration from the response file |
|
Validate IDM Web Tier |
- Test connectivity to IDM consoles via LBR / OHS - Validate SSO for IDM - Leverage existing IDM validation code |
Validates the IDM Web Tier environment using the destination configuration from the response file |
|
Validate FA DB |
- Test connection to FA DB with all schema users - Basic data validation |
|
|
Validate FA Mid Tier |
- Test direct connectivity to EM, WLS consoles - Test all servers are up |
Validates the FA Mid Tier environment using the destination configuration from the response file |
|
Validate FA Web Tier |
- Test connectivity to FA via LBR / OHS - Validate SSO for FA |
Validates the FA Web Tier environment using the destination configuration from the response file |
Table 2-4 provides a high-level list of functional validation steps that should be performed by an experienced Oracle Fusion Applications administrator.
Table 2-4 Technical Stack Validation
| Component | Task | Expected Outcome |
|---|---|---|
|
OID |
Use an LDAP client (such as JXplorer, Apache Directory Studio) to connect to OID at the destination host and port specified in the Discovery Workbook. If using a Load Balancer for LDAP, use the Load Balancer host and port to connect. |
You should be able to connect successfully and see the objects in the LDAP tree, including users and groups. |
|
OVD |
Use an LDAP client (such as JXplorer, Apache Directory Studio) to connect to OVD at the destination host and port specified in the Discovery Workbook. If using a Load Balancer for LDAP, use the Load Balancer host and port to connect. |
You should be able to connect successfully and see the objects in the LDAP tree, including users and groups. |
|
WLS Console |
Connect to the WLS Console of the IDMDomain using a browser (point directly at the WLS AdminServer port). |
You should be able to connect successfully and check the status of the servers in the domain. |
|
EM Console |
Connect to the EM Console of the IDMDomain using a browser (point directly at the WLS AdminServer port). |
You should be able to connect successfully and check the status of the Fusion Middleware components. |
|
OIM Console |
Connect to the OIM Console using a browser (point directly at the OIM server port). |
You should be able to connect successfully and see users and groups. |
|
OAM Console |
Connect to the OAM Console using a browser (point directly at the AdminServer server port). |
You should be able to connect successfully. |
|
Identity Management OHS |
Connect to the external endpoint host and port for the IDM OHS (point at the OHS host/port) |
You should be able to connect successfully and see the default HTTP Server page. |
|
Identity Management OHS (via LBR) |
Connect to the external endpoint host and port for the load balancer for IDM (point at the LBR if your environment has one). |
You should be able to connect successfully and see the default HTTP Server page. |
|
SSO |
Connect to any/all of the IDM Consoles (WLS, EM, OIM, OAM) using a browser (point at the OHS host/port or LBR if your environment has one). |
You should be redirected to the OAM SSO login screen. After logging in you should see the console main page. |
|
WLS Console |
Connect to the WLS Console of each Fusion Applications Domain using a browser (point directly at the WLS AdminServer port). |
You should be able to connect successfully and check the status of the servers in the domain. |
|
EM Console |
Connect to the EM Console of each Fusion Applications Domain using a browser (point directly at the WLS AdminServer port). |
You should be able to connect successfully and check the status of the Fusion Middleware components (including BI, WebCenter, ESS, SOA) as well all the Fusion Applications managed servers for each domain. |
|
SSO/Home Page |
Open the Fusion Applications Homepage using a browser (point at the CommonDomain OHS host/port or LBR if your environment has one); |
You should be redirected to the OAM SSO login screen. After logging in you should see the Fusion Applications Homepage and no error messages. If you see error message, attempt to refresh the page as they may simply be timeouts since this is the first time the page is being accessed. |
|
Functional Setup |
Navigate to Setup and Maintenance page using the Navigator Menu. |
You should see the Setup and Maintenance page with no error messages. |
|
Scheduled Jobs |
Navigate to the Scheduled Jobs page using the Navigator Menu. * |
You should see the Scheduled Jobs page with no error messages. There should be no running or pending jobs as all jobs should have been cleaned up during the clone phase. |
|
Reports and Analytics |
Navigate to the Reports and Analytics page using the Navigator Menu. * |
You should see the Reports and Analytics page with no error messages. Click on the folders to display the available reports. |
* If the Scheduled Jobs or Reports and Analytics links do not appear in the Navigator Menu, you will have to enable them in Functional Setup:
Navigate to Setup and Maintenance using the Navigator Menu.
Use the Search box to search for the Work Menu. The results will display on the right and should include Manage Menu Customizations.
Click on Go to Task (next to Manage Menu Customizations).
Find the Scheduled Jobs or Reports and Analytics menu items on the tree and make sure they are configured as visible/rendered.
For more information see theFusion Applications Extensibility Guide.
When cloning and validation is complete, you may need to do the following:
Change the RPD password: See Section 2.9.1.
Change OID and OVD passwords for Oracle Identity Management: Because the passwords for these components are stored in the cwallet.sso files, they are not updated by the faclone scripts and must be handled manually. See Section 2.9.2.
Rewire IIR using the Functional Setup Manager: See Section 2.9.3.
Re-spin essbase cubes for Financial and Customer Relations Management (CRM) products, if applicable (see Section 2.9.4). If these products are used, this step is mandatory.
Enable the OIM Job Scheduler: See Section 2.9.5.
Enable/disable Oracle Identity Federation (if used): See Section 2.9.6.
If you use OIF to control front-end access to Fusion Applications, then you should have added the OIF endpoints to the blacklisted hosts. You will now revert the OIF configuration to use it as the front end and be able to log into Fusion Applications.
Perform data masking. See Appendix A. This step is optional.
Rewire or reintegrate any extensions or customizations that might have been done on your particular source environment, which are not replicated by the clone tool. (As needed.)
If your environment contains components in addition to those described in Section 1.1.1.2.1, "Component Review", then you must manually re-wire those components in the post-clone phase.
For example, if your environment uses federation (OIF) for Single-sign-on between Fusion Applications and other applications protected by Oracle Identity Management software, then you must manually re-wire the OIF components, based on what portion(s) of the applications outside Fusion Applications will be cloned. Likewise, if you have enabled HR2HR integration, then those integration components must be rewired as well. Your environment may contain additional examples.
Follow these steps to change the repository password using the BI Administration Tool, then publish the modified repository in Fusion Middleware Control.
(To install the BI Administration tool, see Appendix E.)
Change the password:
Open the repository in the Administration Tool in offline mode.
Select File, then select Change Password.
Enter the current (old) password.
Enter the new password and confirm it. The repository password must be longer than five characters and cannot be empty.
Click OK, then save and close the repository.
Publish the repository:
Open a Web browser and log in to Fusion Middleware Control from the computer where the updated repository is located.
In the navigation tree, expand Business Intelligence and then click coreapplication to display the Business Intelligence Overview page.
Display the Repository tab of the Deployment page.
Click Lock and Edit Configuration.
Click Browse next to Repository File. Then, select the updated repository file and click Open.
Enter the new (updated) repository password in the Repository Password and the Confirm Password fields.
Click Apply, then click Activate Changes.
Return to the Business Intelligence Overview page and click Restart.
To update the OID and OVD passwords in the Fusion Middleware Control (or Enterprise Manager) these steps must be performed manually:
Go to the primary OID node and check for the presence of the file
<OID_INST_DIR>/config/OPMN/opmn/admin.password.txt
If this file is present, you should delete it completely.
Run the following command:
<OID_INST_DIR>/bin/opmnctl updatecomponentregistration -componentType OID -componentName <OID_COMPONENT_NAME> -Sport <OID_SSL_PORT> -Port <OID_PORT>
<OID_INST_DIR> is the directory of the OID instance.
<OID_COMPONENT_NAME> is the component name for OID.
This will display the abstract hostname of the IDM Domain host and the username of the domain administrator. You are prompted for the domain admin password. Upon success, the message Command succeeded is displayed.
Go to the primary OVD node and check for the presence of the file:
<OVD_INST_DIR>/config/OPMN/opmn/admin.password.txt
If this file is present, you should delete it completely.
Run the following command:
< OVD_INST_DIR>/bin/opmnctl updatecomponentregistration -componentType OVD -componentName < OVD_COMPONENT_NAME> -Sport <OID_SSL_PORT> -Port <OID_PORT>
As above, you are prompted to enter the domain admin password for OVD, and should receive the Command Succeeded message.
If you have installed the Customer Relations Management (CRM) product in your environment, then IIR must be manually rewired using the Functional Setup Manager. To do so:
From the Navigator menu, select Setup and Maintenance. Select the All Tasks tab.
In the resulting Search panel, enter "Manage Server Configuration" in the Name field. When Manage Server Configuration is displayed at the bottom of the page, click its "Go to task" icon in the fourth column.
The Manage Data Quality Server Configurations page is displayed, with another Search panel at the top.
Leave all search fields blank and click "Search."
Four results are displayed at the bottom of the page: "Batch Cleanse Server," "Realtime Cleanse Server", "Advanced Batch Match Server", and "Realtime and Batch Server."
For each of these results, you will need to edit the server address to match your target environment. If the port is different the default, or if no port number is displayed, then port information will be needed as well. To do this:
Select one of the results (i.e. Batch Cleanse Server) and click "Edit."
On the resulting page, enter the following values:
Server Address: IP of destination Admin host where IIR will be running
Server Port: enter the appropriate value if needed, or accept the default.
Save edits and repeat the process for the other three pages.
The Customer Relations Management and Financial product families of Fusion Applications use multi-dimensional Essbase cubes as part of the reporting and analytics functionality.
After completion of cloning, these Essbase cubes must be recreated against the cloned Fusion Applications database, to confirm that the re-wiring was successfully completed, and to ensure that the cubes exactly correlate to the transactional data in the cloned database. This process is called 're-spinning'.
If your cloned environment uses the CRM product family, follow these steps.
Log into the Fusion Applications Home Page.
From the Navigator drop-menu, select Territories and Quotas.
From the Task list on the left, select Enable Dimensions and Metrics.
Create a New Stage environment, or Edit an existing Stage environment (depending on whether a Stage environment has already been previously created).
To create new: Click on the Create Stage Environment button then move to step 5.
To edit existing: Click on the View Stage Environment button.
Click the Edit button.
Start the Stage synchronization process (background ESS Job) which populates the dimensional data used to define territory coverages, as well as the Essbase cube used to support Territory metrics and analytics.
Click OK at the informational pop-up. Note: The UI will initially show the status for the Staging process as Scheduled for later, but will change to Processing when the job is actually running. You can click on the Stage process status link to view the ESS Job details as well as download the log.
When the job completes, the dimension data and Essbase cube should be loaded and available for use in Territory alignment.
The Last Promotion value will be updated to the latest date-time when the process completed the promotion. The Stage Process Status should return back to Not started in preparation from the next cycle. The button at the top should also change back from View Stage Environment to Create Stage Environment to prepare for the next cycle.
If your cloned environment uses the FSCM product family, follow these steps.
(Note that to re-spin the FSCM cubes, the user performing the process must have the "General Accountant" role assigned, and the menu option for Tools / Scheduled Processes (within the main Navigator section) must be un-hidden.)
Generate a list of the cubes that need to be rebuilt by logging into the Fusion Applications database through a SQL+ session and running the following command:
SELECT fksiv.name chart_of_accounts_name, glc.user_period_set_name calendar_name
FROM gl_balances_Cubes cubes,
gl_calendars glc,
fnd_kf_str_instances_vl fksiv
WHERE cubes.calendar_id = glc.calendar_id
AND cubes.chart_of_accounts_id = fksiv.structure_instance_number AND fksiv.application_id = 101;
Run the following SQL code to delete the existing cube details:
delete from gl_balances_cubes;
delete from gl_essbase_duplicate_parents;
COMMIT;
Log in to the Fusion Applications Home Page.
From the Navigator drop-menu, select Scheduled Processes' from the Tools section.
Select Schedule New Process.
In the search window, click the drop-down arrow and scroll to the bottom of the list. Select Search.
Enter Create Cube, and then Search. Select the Create Cube action in the results set, then click OK, and then OK again
Using the output from Step 1, enter the details of the Chart of Accounts: Name, Calendar and Starting Period, and then click Close.
You can select the option to be notified of the process completion if you prefer. Repeat this process for each cube that was listed in the output from Step 1.
The clone tool disables the OIM job scheduler to ensure that no jobs run during the cloning process. When cloning is complete, you must manually enable the job scheduler.
Disable jobs that send email notifications, as follows:
Log in to the OIM console (http://<host>:</port>/oim).
Go to Advanced and click on "Search Scheduled Jobs."
Look in the right pane for the following jobs:
Disable/Delete User After End Date
Password Expiration Task
Password Warning Task
Click each job, and its resulting page, select the "Disable" button.
Enable the OIM Job Scheduler, as follows:
Log in to the WebLogic Console of the IDM Domain. (http://<host>:</port>/console.
On the left pane, select the Environment|Servers link and click the name of the OIM managed server (usually oim_server1 or wls_oim1).
Select the Configuration|Server Start tab in the right pane. (Page will be read-only). The property called 'Arguments' includes the following: -Dscheduler.disabled=true , which disables the OIM job scheduler. Removing this option enables the scheduler, as follows.
Click the Lock and Edit button on the left pane.
On the "Arguments" box, de-select the property -Dscheduler.disabled=true, and click Save.
Click the Activate Change button on the left pane.
Return to the main Servers page and restart the OIM managed server for the changes to take effect.
This section describes how to switch the authentication of the OAM security domain from Federation SSO to local authentication.
Perform the following operations to switch betweem local authentication and Federation SSO for browser-based schemes:
To disable Oracle Identity Federation
In a browser, go to the OAM Console, at: http://ADMINVHN.mycompany.com:7001/oamconsole
Log in as the Oracle Access Manager user identified in the provisioning response file. (When provisioning IDM, a variety of users were automatically created, and three of the user names could be edited to more user-friendly titles within the response file. If you followed this editing process, then the following user names were potentially affected:
#IDStore UserNames Configuration)
IDSTORE_OAMADMINUSER=oamadmin
IDSTORE_OAMSOFTWAREUSER=oamLDAP
IDSTORE_OIMADMINUSER=oimLDAP
Navigate to Policy Configuration -> Shared Components -> Authentication Schemes -> FAAuthScheme.
Set the Challenge Method to FORM.
Set the Authentication Module to SaaSModule.
Set the Challenge URL to /pages/oamLogin.jsp.
Set the Context Type to customWar.
Set the Context Value to /fusion_apps.
Set the Challenge Parameters field with the following entries:
federationEnabled=false

ssoChooserEnabled=false

fedSSOEnabled=false

initial_command=NONE

TAPPartnerId=OIFDAPPartner

TAPChallengeURL=https://SSO.mycompany.com:443/fed/user/spoam11g
The user should be able to log into Fusion Applications.
Subsequently, the user can re-enable OIF if desired.
To enable OIF:
In a browser, go to the OAM Console, at: http://ADMINVHN.mycompany.com:7001/oamconsole
Log in as the Oracle Access Manager user identified in the provisioning response file. (When provisioning IDM, a variety of users were automatically created, and three of the user names could be edited to more user-friendly titles within the response file. If you followed this editing process, then the following user names were potentially affected:
#IDStore UserNames Configuration)
IDSTORE_OAMADMINUSER=oamadmin
IDSTORE_OAMSOFTWAREUSER=oamLDAP
IDSTORE_OIMADMINUSER=oimLDAP
Navigate to Policy Configuration -> Shared Components -> Authentication Schemes -> FAAuthScheme.
Set the Challenge Method to FORM.
Set the Authentication Module to SaaSModule.
Set the Challenge URL to /pages/oamLogin.jsp.
Set the Context Type to customWar.
Set the Context Value to /fusion_apps.
Set the Challenge Parameters field with the following entries:
federationEnabled=true

ssoChooserEnabled=false

fedSSOEnabled=true

initial_command=NONE

TAPPartnerId=OIFDAPPartner

TAPChallengeURL=https://SSO.mycompany.com:443/fed/user/spoam11g
|
Copyright © 2015, Oracle and/or its affiliates. All rights reserved. Legal Notices |
|