| Oracle® Fusion Middleware Business Process Composer User's Guide for Oracle Business Process Management 11g Release 1 (11.1.1.7) Part Number E15177-09 |
|
|
PDF · Mobi · ePub |
| Oracle® Fusion Middleware Business Process Composer User's Guide for Oracle Business Process Management 11g Release 1 (11.1.1.7) Part Number E15177-09 |
|
|
PDF · Mobi · ePub |
This chapter provides a general outline of the steps required to create a BPM project, create, design, and test BPMN processes, and deploy a BPM project to run time. It provides links to other chapters containing additional information and procedures for performing the required tasks.
This chapter contains the following sections:
Section 3.3, "Implementing a BPMN Process - Defining User Interaction"
Section 3.4, "Implementing a BPMN Process - Creating a Business Rule"
Section 3.5, "Implementing a BPMN Process - Defining a Service"
Before you can begin modeling a business process, you must first set up a BPM project. The following sections describe how to login to Oracle Business Process Composer to create and save a BPM project.
BPM projects contain all of necessary components required by a business application. This includes the BPMN processes that form the core of an Oracle BPM application and the technical components used to connect the application to other processes, databases, etc. See Section 4.1, "Introduction to Oracle BPM Projects" for more information.
The following sections describe how to login to Business Process Composer, create a new BPM project and create the BPMN process that will define the behavior of the travel request application.
Before creating a BPM project, you must login to Business Process Composer using the following information provided by your system administrator.
URL: The location of your Business Process Composer installation.
Username: The username you use to access Business Process Composer.
Password: The security credential you use to access Business Process Composer.
To Login in to Oracle Business Process Composer
Go to the Business Process Composer URL.
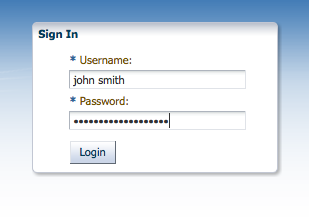
Figure 3-1 shows the sign-on screen that appears after the Oracle BPM application loads.
Figure 3-1 Oracle Business Process Composer Sign-on Screen
Note:
Oracle Application Server Single Sign-On is enabled by default in Oracle BPM Suite. OracleAS Single Sign-On enables you to use one sign on session to access multiple web-based applications. If OracleAS Single Sign-On is enabled and you have previously signed on to another application, the Business Process Composer sign on screen may not appear.
Enter your username and password, then click Login.
After logging in, Business Process Composer displays the Application Welcome page. as shown in Figure 3-2.
See Section 2.4, "Introduction to the Business Process Composer User Interface" for a description of the Application Welcome page and the Business Process Composer user interface.
After logging into Business Process Composer, the first step in creating a BPM application is to create a new BPM project. You can create a new project directly from the Application Welcome page.
To create and open a BPM project:
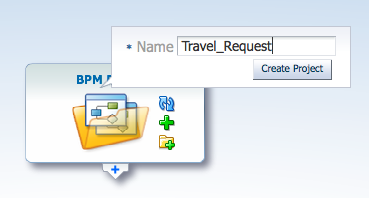
Click the New Project (+) icon.
Enter "Travel_Request" then click Create Project as shown in Figure 3-3.
Figure 3-3 Creating a New Project from the Application Welcome Page
The new project appears in the hierarchical project tree as shown in Figure 3-4.
Figure 3-4 The Travel Request Project in the Application Welcome Page
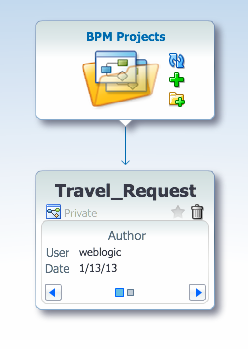
The project tree lists all the project you created or have access to view. See Chapter 4, "Working with BPM Projects" for more information about working with BPM projects.
To open the Travel Request project, click its name in the project tree.
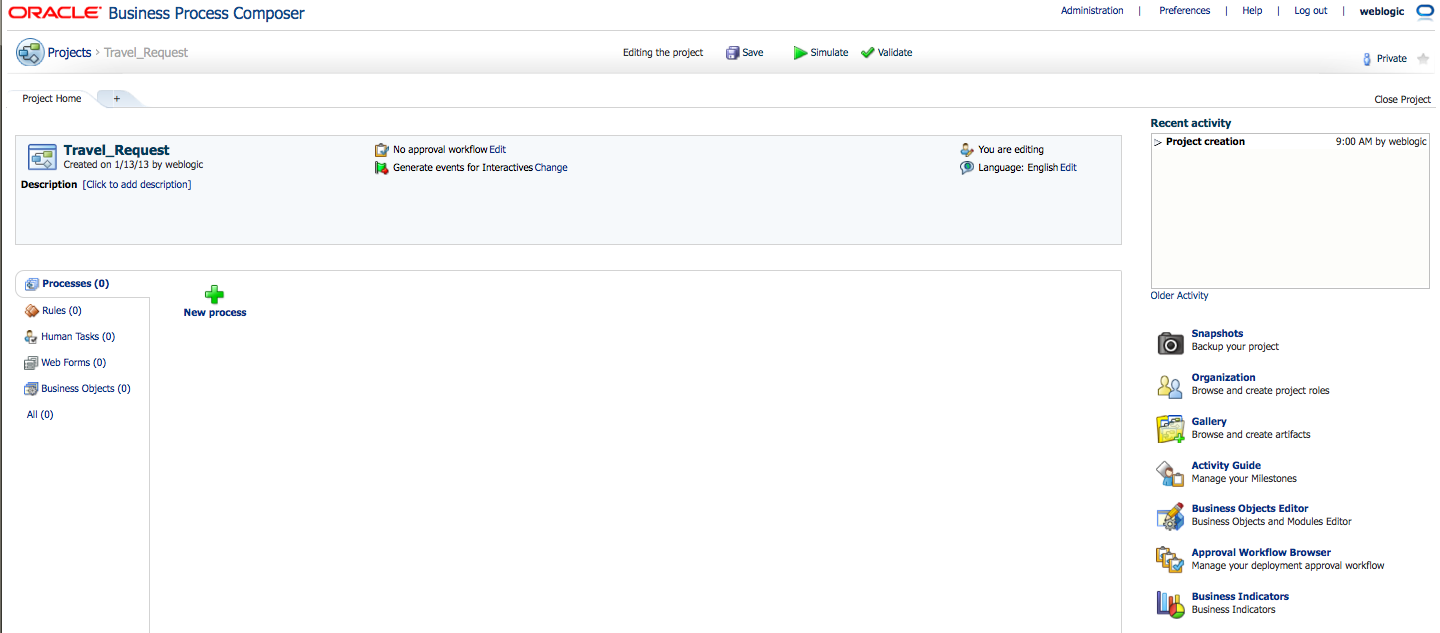
When you open a BPM project the Project Welcome page appears. The Project Welcome page enables you to create, view, and edit the processes and components required for a fully-functioning BPM application.
Figure 3-5 shows how the Project Welcome page appears for a new BPM project.
Figure 3-5 The Project Welcome Page after Creating a New BPM Project
See Chapter 4, "Working with BPM Projects" for general information about BPM projects.
After opening a BPM project, you can create the resources, including BPMN processes, required by the travel request application. In the Travel Request application you must create a BPMN process called TravelRequestProcess.
One definition of a business process is a sequence of tasks that result in a well-defined outcome. A BPMN process defines the tasks performed by your application using flow objects. See Section 5.1, "Introduction to Business Processes" for general information about business processes in Oracle BPM.
To create a new BPMN process:
In the Project Welcome page, select the Processes tab.
Click New Process, then enter TravelRequestProcess as shown in Figure 3-6.
Figure 3-6 Creating the Travel Request Process
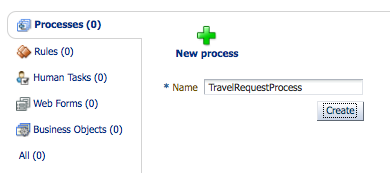
Click Create.
After creating the process, it appears the Processes tab. Additional BPMN processes that you create also appear under this tab.
When editing a BPM project, you can save your changes at any time. Business Process Composer saves BPM projects in the BPM repository. The BPM repository is a shared repository that enables you to collaborate with other Business Process Composer and Oracle BPM Studio users.
See Section 4.1.2, "Introduction to the Oracle BPM Repository" for more information.
To save a BPM project to the BPM repository:
In the Project toolbar, click Save as shown in Figure 3-7.
Saving a project is the final step in setting up a basic BPM project. After saving your project you can begin modeling your business process by adding flow objects and sequence flows. Section 3.2, "Modeling a BPMN Process" describes how to use these elements to define the specific behavior of the travel request application.
BPMN is a standard format for defining process flows.
Sequence flows define the order in which these tasks are performed. See Chapter 5, "Working with Processes and the Process Editor" for general information about creating business processes using Business Process Composer. See Appendix A, "BPMN Flow Object Reference" for information about the BPMN flow objects supported by Oracle Business Process Management.
In the travel request approval application, these tasks include each of the steps involved in creating and approving the travel request. This includes both the end user's interaction with the application and any required automated tasks like updating a database.
You can open a business process directly from the Project Welcome page.
To open a business process:
From the Project Welcome page select the Processes tab.
Click TravelRequestProcess.
The process opens in the process editor as shown in Figure 3-8.
Figure 3-8 The Process Editor after Creating a New Process
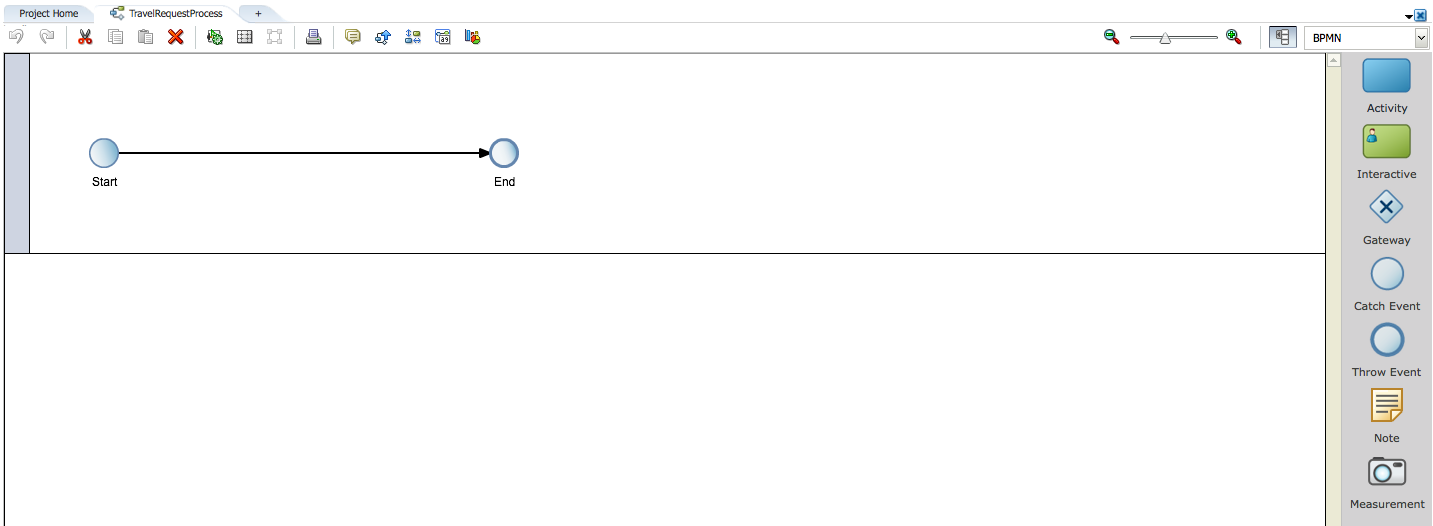
The process editor enables you to add flow objects and sequence flows to a process. See Section 5.2.2, "Introduction to the Process Editor Canvas" for information about the process editor. See Appendix A, "BPMN Flow Object Reference" for information about the BPMN flow objects supported by Oracle BPM.
When you create a new BPMN process, by default it is created with a none start and end event. See Appendix A, "Introduction to the None Start Event" for more information.
After creating and opening a business process, you can begin adding the BPMN flow objects that define the process flow. The first activity required by the Travel Request application is to enable users to submit a travel request.
The user task is the BPMN flow object used to define user interaction. You can add a user task to your process by dragging and dropping it from the BPMN component palette.
See Appendix A, "Introduction to the User Task" for more information about the user task. See Section 5.2.3, "Introduction to the BPMN Component Palette" for information about the component palette.
To add a user task to your process:
In the BPMN component palette, select BPMN from the drop down list as shown in Figure 3-9.
Figure 3-9 Selecting the BPMN Component Palette
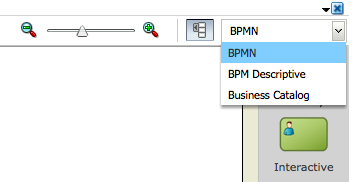
Double-click Interactive in the component palette.
For the initial task of the travel request process, you must add an initiator task. Initiator user tasks are used to begin a business process. Initiator tasks create a process instance and are the first user task within a process flow
Click the Initiator icon, then drag it onto the process editor canvas to a point on the sequence flow between the start and end events of the process.
When the sequence flow begins flashing, click again to add the task to your process. After adding the user task you process appears as shown in Figure 3-10.
Figure 3-10 The Travel Request Process After Adding a User Task

When adding a flow object to a sequence flow in this manner, Business Process Composer automatically connects the sequence flows as incoming and outgoing sequence flows.
Move the mouse over the newly added task, then click the Edit icon.
In the Name field, change the name to Submit Request.
Click outside of the properties popup to record your changes.
Save your project.
Adding the Submit Request user task defines the first stage of the travel request process. Section 3.3, "Implementing a BPMN Process - Defining User Interaction" describes how to define the user interface implemented by this user task.
As you continue adding BPMN flow objects to your process, you should continually save your changes. You save changes to your process by saving the BPM project. See Section 3.1.4, "Save Your BPM Project" for more information.
Roles define the users or groups of users that are responsible for performing the tasks defined by your process. They also define who has access to these tasks. Within a BPMN process the roles correspond to the swimlanes that extend horizontally across the process editor canvas.
The travel request process requires a role for an employee who is responsible, and also has permission, to create a travel request. To add this role, you must create a role called Employee that contains the Submit Request user task.
To create the Employee role in your process:
Move the cursor over the Unassigned Role text at the top left of the process editor canvas, then click the Edit icon.
Select Create, then enter "Employee" as shown in Figure 3-11.
Figure 3-11 Creating a New Role in the Travel Request Process
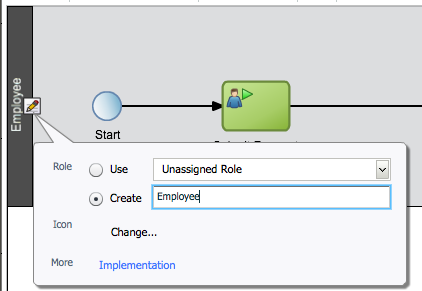
Click outside the properties popup to record your changes.
Save your project.
The Employee role is created and appears as the title of the swimlane. After creating a role, you can use it again in other swimlanes within the same process. Roles can also be shared by other processes within the same BPM project.
When deploying a project, a process administrator maps the roles defined in your BPM project to the real-world users within your organization using Process Workspace.
In the travel request application, if an employee submits a travel request that is under a certain amount, it does not require manual approval. To model this within a BPMN process, you can use a business rules task to calculate if the given request is above or below a certain amount.
A business rule task is a BPMN flow object that enables you to implement a business rule within a process. In the travel request application, a business rule performs a check on the value of a data object which stores information about the travel request.
In this context, creating the business rules and data objects is performed as part of the implementation of a business process.Section 3.4.2, "Create a New Business Rule and Define Input and Output Data Objects" describes how define a business rule for the travel request application.
To add a business rule task to your process:
In the BPMN component palette, select BPMN from the drop down list.
Double-click Activity.
Click the Business Rule icon and drag it to a point on the sequence flow between the Submit Request user task and the end event.
When the sequence flow begins flashing, click again to add the task to your process.
Move the mouse over the newly added task, then click the Edit icon.
In the Name field, change the name to Approval Rules.
Click outside the properties popup to record your changes.
Save your project.
After adding and editing the business rule task, you process should appear as shown in Figure 3-12.
Figure 3-12 The Travel Request Process after Adding a Business Rule Task

In addition to the Employee role, the travel request process requires a role for managers who are responsible for approving the travel request. After creating a new role, you must also create a new swimlane within the BPMN process. Business Process Composer enables you to create a new swimlane quickly by dragging an activity to a blank area of the process editor canvas.
To add a new swimlane and create the manager role:
Double-click the business rule task, then drag it to an area below the Employee swimlane.
Release the mouse.
Business Process Composer creates a new swimlane. By default, new swimlanes are not assigned a role.
Move the cursor over the Unassigned Role text at the left of the process editor canvas, then click the Edit icon.
Select Create, then enter "Manager."
Click outside the properties popup to record your changes.
The Employee role is created and appears as the title of the swimlane. After creating a role, you can use it again in other swimlanes within the same process. Roles can also be shared by other processes within the same BPM project.
Double-click the end event and drag it to the Manager swimlane.
Save your project.
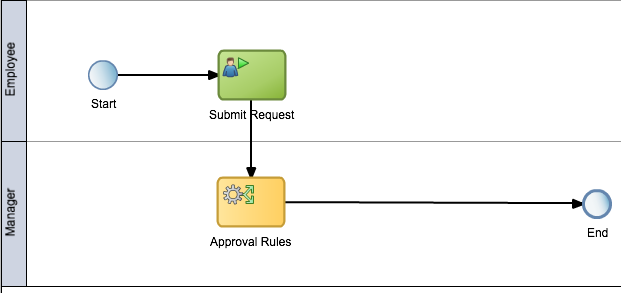
After creating a adding a new swimlane and creating the Manager role, your process should appear as shown in Figure 3-13.
Figure 3-13 The Travel Request Process after Adding the Manager Role
In the travel request process, a business rules task performs a check on the amount of a travel request. However, the actual path a token takes through a business process is determined by a gateway. Gateways are BPMN flow objects that determine the path through a business process based on certain conditions, usually the value of data objects. See Section A.7, "Controlling Process Flow Using Gateways" for more information about the gateways supported by BPMN.
Within the travel request process there are two possible paths depending on the amount of the travel request. Choosing between two possible paths, where only one option is possible, is performed by an exclusive gateway.
To add a exclusive gateway to your process:
In the BPMN component palette, select BPMN from the drop down list.
In the component palette, double-click Gateway.
Double-click the Exclusive Gateway icon, then move the mouse to a point on the sequence flow between the business rules task and the end event.
When the sequence flow begins flashing, click again to add the exclusive gateway to your process.
Double-click the text of the exclusive gateway, then enter "Manual Approval Required?"
Hit Enter to record your changes.
Save your project.
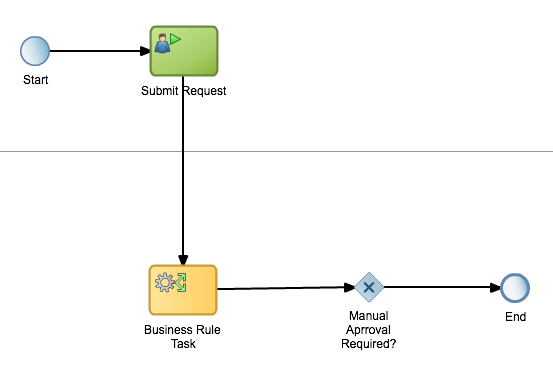
After adding an exclusive gateway, your process should appear as shown in Figure 3-14.
Figure 3-14 The Travel Request Process After Adding and Exclusive Gateway
Later in the design phase of the travel request application you add an additional sequence flow. Section 3.2.11, "Add a Sequence Flow to Handle Rejected Travel Requests" describes how to add the conditional sequence flow that is followed if the travel request does not require manual approval.
When defining the data objects used by the BPMN process must also define the expressions that are used to evaluate which outgoing sequence flow the process will follow. See Section 3.6, "Defining the Data Used by Your Process" for more information.
In the travel request process, if manual approval is required, you must add an additional user task that enables a user to approve or reject the travel request.
To add the approval user task:
In the BPMN component palette, select BPMN from the drop down list.
Double-click Interactive in the component palette.
Double-click the User Task icon, then drag it onto the process editor canvas to a point on the sequence flow between the exclusive gateway and the end event.
When the sequence flow begins flashing, click again to add the task to your process.
Move the mouse over the newly added task, then click the Edit icon.
In the Name field, change the name to Approve Request.
Click outside of the properties popup to record your changes.
Save your project.
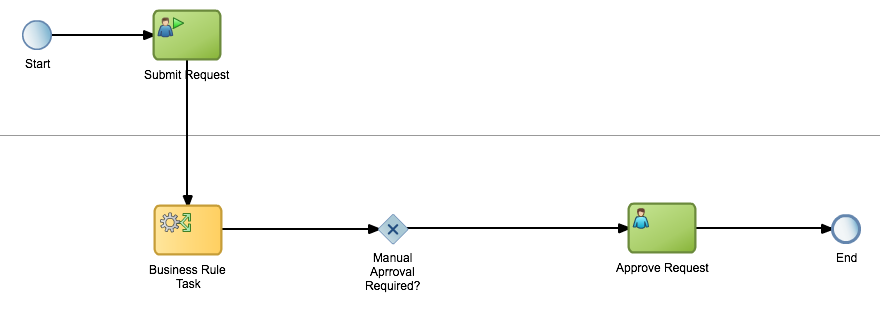
After adding an addition user task to handle approval of the travel request, you process you appear as shown in Figure 3-15.
Figure 3-15 The Travel Request Process after Adding the Approval User Task
Within the travel request application, if a travel request is rejected, process flow should return back to the initial step to enable users to enter another travel request. To model this in BPMN, you can add an additional exclusive gateway to handle the approval outcome.
To add an additional exclusive gateway:
In the BPMN component palette, select BPMN from the drop down list.
In the component palette, double-click Gateway.
Double-click the Exclusive Gateway icon, then move the mouse to a point on the sequence flow between the Approve Request user task and the end event.
When the sequence flow begins flashing, click again to add the exclusive gateway to your process.
Move the mouse over the newly added task, then click the Edit icon.
In the Name field, change the name to "Approval Outcome."
Click outside of the properties popup to record your changes.
Save your project.
After adding the exclusive gateway to handle the approval outcome, your process should appear as shown in Figure 3-16.
Figure 3-16 The Travel Request Process after Adding an Additional Exclusive Gateway

The final requirement for the travel request application is to save the travel request in a database. To model connectivity with other systems like databases, BPMN uses the service task. During the design phase you can add a service task to your process model and later define the technical implementation details of the service.
To add a service task:
In the BPMN component palette, select BPMN from the drop down list.
Double-click Activity.
Double-click the Service Task icon and drag it to a point on the sequence flow between the Approval Outcome exclusive gateway and the end event.
When the sequence flow begins flashing, click again to add the task to your process.
Move the mouse over the newly added service task, then click the Edit icon.
In the Name field, change the name to Save Request.
Click outside the properties popup to record your changes.
Save your project.
After adding the service task, your process should appear as shown in Figure 3-17.
Figure 3-17 The Travel Request Process after Adding a Service Task

The service task is the final BPMN flow object required by travel request application. The process flow shown Figure 3-17 defines the basic flow of the travel request application. The following sections describe how to add and configure sequence flows to handle alternate paths through your process.
The first alternative path through your process to consider is the case where a travel request is rejected. In Section 3.2.9, "Add an Additional Exclusive Gateway" you added the exclusive gateway to determine if the travel request is rejected or approved. Now, you must add a sequence flow to handle rejected travel requests. This sequence flow returns the process instance to the Submit Request user task.
To add a new sequence flow:
Move the cursor over the Approval Outcome exclusive gateway.
The Edit and Add Sequence Flow icons appear as shown in Figure 3-18.
Click the Add Sequence Flow icon and drag the mouse to the Submit Request user task.
When the Submit Request user task begins flashing, click the mouse to add the sequence flow.
Click and drag the sequence flow to reposition it within the process editor canvas.
Move the mouse over the sequence flow and click the Edit icon.
Enter Rejected in the Name field and Conditional from the drop down list.
After adding the sequence flow to handle rejected travel requests, your process should appear as shown in Figure 3-19.
Figure 3-19 The Travel Request Process after Adding the Rejected Sequence Flow

The second alternative path required by the travel request application handles cases where manual approvals are not required. In this case, the request is saved in the database. To handle this cased, you must perform the following:
Edit the default outgoing sequence flow of the Manual Approval Required? exclusive gateway.
Add an additional sequence flow from the exclusive gateway to the Save Request service task.
To handle default approval:
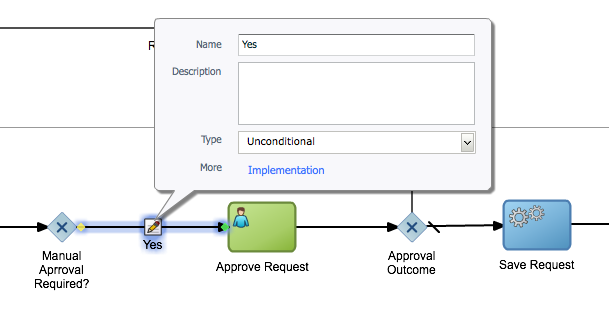
Move the mouse over the sequence flow between the Manual Approval Required gateway and the Approve Request user task, then click the edit icon.
Change the name to "Yes" and select Unconditional from the drop down list as shown in Figure 3-20.
Figure 3-20 Editing the Sequence Flow of the Approval Outcome Gateway
Click outside of the properties popup to record your changes.
Move the mouse over the Manual Approval Required? exclusive gateway and click the Add Sequence Flow icon.
Move the mouse over the Save Request service task.
When the service task begins flashing, click to add the sequence flow.
Click and drag the sequence flow to change its position.
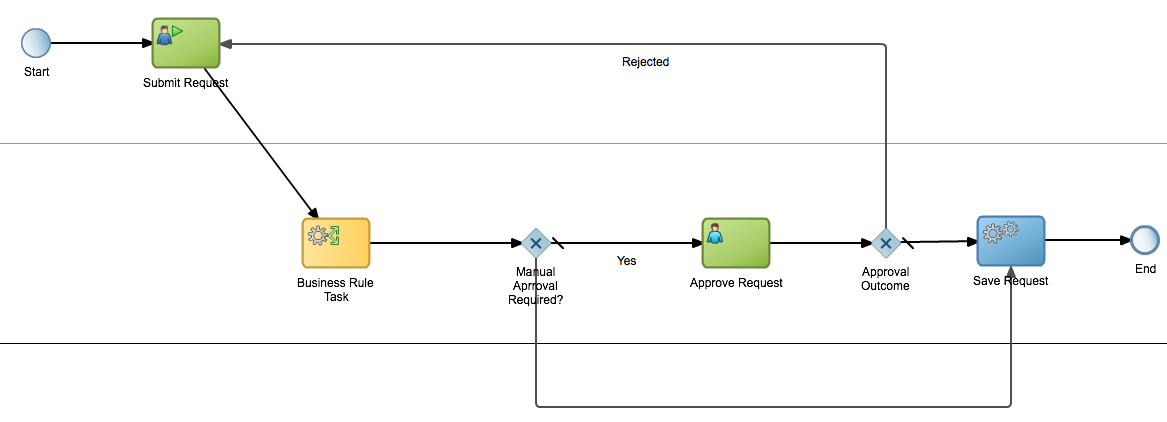
After editing and adding the sequence flows for handling approval of the travel request, you process should appear as shown in Figure 3-21.
Figure 3-21 The Finished Travel Request Process
You can create a back of your project by creating a project snapshot. Project snapshots are stored in the BPM repository and enable you to revert back to older versions and revisions.
To create a project snapshot:
Go to the Project Welcome page, then click Snapshots.
The Snapshots browser appears.
Click the Add (+) icon, then enter "TravelRequestVersion1" in the Name field.
Click Create.
The snapshot appears in the list, which also displays the date and user who created the snapshot.
Click OK to close the snapshot browser.
From the Snapshot browser you can open previous versions of your project.
After designing the general flow of your business process, you can begin adding specific implementation details for the flow objects. This section walks you through the process for defining how users interact with your process. It describes how to create a human task and how to create and configure web forms.
A human task is a type of service in Oracle BPM that enables you to define how users interact with your BPM applications. In additional to the technical and runtime functionality, human tasks also enable you to define the user interface components of your application. See Chapter 11, "Working with Human Tasks" for more information about using human tasks in Oracle BPM.
To create and open human task:
Open the TravelRequest process created in Section 3.2, "Modeling a BPMN Process"
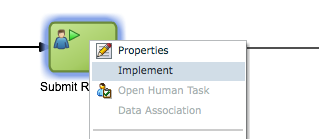
Right-click the Submit Request user task, then select Implement as shown in Figure 3-22.
Figure 3-22 Selecting the Implement OPtion from a User Task
The Implementation editor appears as shown in Figure 3-23.
Click the Add (+) icon next to the Human Task text box.
Enter "SubmitRequest" in the Name field, then click Create.
Click Apply Changes.
Close the Implementation editor by clicking the Collapse Pane arrow on the right-hand side of the window.
Right click the Submit Request user task, then select Open Human Task.
The human task opens in the human task editor. See Section 11.2, "Introduction to the Human Task Editor" for more information. After creating a human task it also appears under the Human Task tab in the Project Welcome page. You can also create and open human tasks directly from the Project Welcome page.
Web forms define the user interface components of your process-based application. Web forms are associated to a human task. See Section 9.1, "Introduction to Forms in Oracle BPM" for more information about working with web forms in Oracle BPM.
Using the web form editor, you can create the layout of a form by dragging and dropping web form components onto the form canvas.
To create a web form:
From the human task editor, select the Basic tab.
Under Presentation, select Web Form, then click the Add (+) icon.
Enter "TravelApprovalForm" in the Name field and click Create.
Click the Edit (pencil) icon.
The web form opens in the web form editor.
The first step in creating a web form is to begin adding web form controls to the web form canvas. You can add form controls by clicking and dragging them from the form controls palette to the canvas.
To add a control to a web form:
From the web form controls palette, click and drag a Text web form control onto the rectangular area of form canvas. When the green position icon displays, click again to add the web form control.
See Section 9.7.1, "How to Add Controls to a Web Form" for more information about adding web form controls. After adding the control, your web form should appear as shown in Figure 3-24.
Figure 3-24 The Travel Approval Form after Adding a Text Web Form Control

In the web form canvas, select the text control you just added.
In the Properties editor, enter "Name" in the Label property.
From the web form controls palette, click and drag a Date web form control onto the form canvas to a position towards the bottom of the "Name" text control. When a green down arrow appears, click again to add the web form control.
In the web form canvas, select the date control you just added. When a control is selected, it is highlighted in blue.
In the Properties editor, enter "Date" in the Label property.
From the web form controls palette, click and drag a Money web form control onto the form canvas to a position toward the bottom of the "Date" date control. When a green down arrow appears, click again to add the web form control.
In the web form canvas, select the money control you just added.
In the Properties editor, enter "Total Amount" in the Label property.
Deselect the Enabled property.
Save your project.
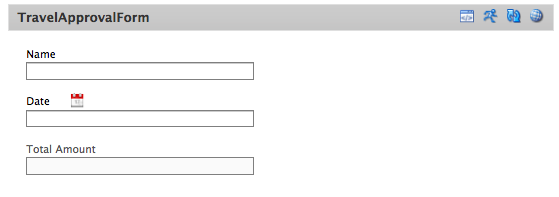
After adding the Name, Date, and Total Amount controls, your web form should appear as shown in Figure 3-25.
Figure 3-25 The Travel Approval Web Form after Adding Basic Web Form Controls
Some web form controls are designed to organize or group other web form controls. To make the travel approval web form easier to use, you can add a tabs control which creates a tabbed pane within a web form.
To add a tab control to a web form:
From the web form controls palette, click and drag a Tabs web form control onto the form canvas to a point below the "Total Amount" web form control. When the cursor displays a green down arrow, click again to add the tab control.
When you add a tab control to a form, it automatically creates three tabs. However, for this web form, you only need two tabs.
Select Tab 2, then click the Delete (-) icon.
Select Tab 0.
In the Properties editor, enter "Trip Details" in the Name field
Select Tab 1.
In the Properties editor, enter Expense Details in the Name field.
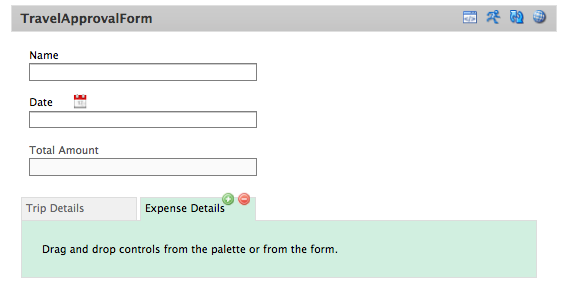
After adding a tabs web form control, your web form should appear as shown in Figure 3-26.
Figure 3-26 The Travel Approval Web Form after Adding a Tabs Web Form Control
To complete the layout of the travel approval web form, you can add additional controls to each tab.
To add controls to a tab control:
Select the "Trip Details" tab.
From the web form controls palette, click and drag each of the controls shown in Table 3-1onto the "Trip Details" tab in the web form canvas. In addition to adding each control, you should also customize the control by editing its properties using the Settings and Styles tabs of the Properties editor.
Table 3-1 Web Form Control Settings for the Trip Details Tab
| Control Name | Control Type | Settings | Styles |
|---|---|---|---|
|
Country |
Dropdown |
Label = "Country" |
none |
|
City |
Dropdown |
Label = "City" |
none |
|
Purpose of Visit |
Radio |
Option 1=Internal Meeting |
Item width=25% |
|
Customer Name |
Text |
Label= "Customer Name" |
None |
|
Justification |
Text Area |
Label = "Justification" |
Width = 80% |
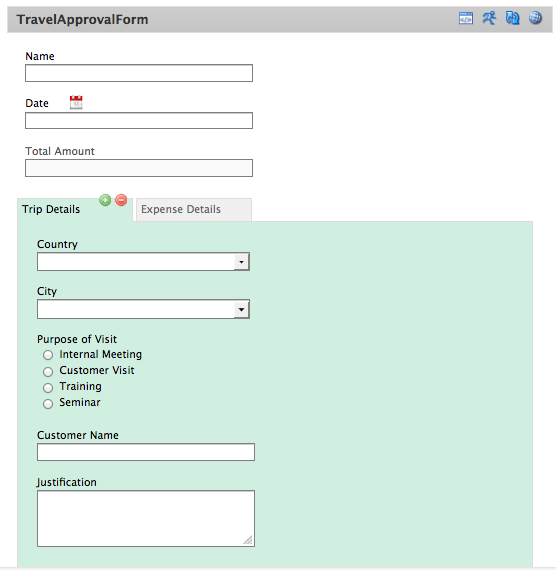
After adding each of the web form controls to the Trip Details tab, your form should appear as shown in [Fig x.x].
Figure 3-27 The Travel Approval Web Form Showing the Trip Details Tab
Select the Expense Details tab.
From the web form controls palette, click and drag each of the controls shown in Table 3-2 onto the "Expense Details" tab in the web form canvas. In addition to adding each control, you should also customize the control by editing its properties using the Settings and Styles tabs of the Properties editor.
Table 3-2 Web Form Control Settings for the Expense Details Tab
| Control Name | Control Type | Settings | Styles |
|---|---|---|---|
|
Expense Line |
Section |
Label = "Expense Line" |
none |
|
Expense Type |
Dropdown |
Label = "Expense Type" |
none |
|
Amount |
Money |
Label = "Money" |
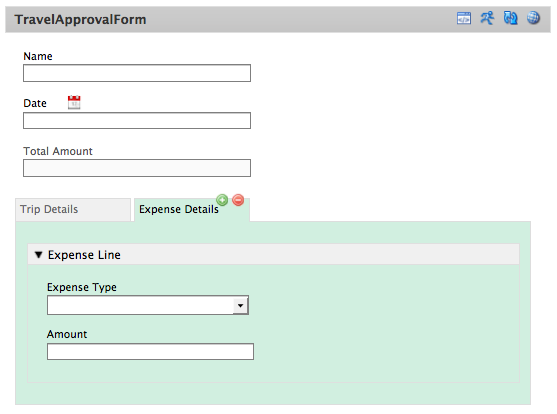
After adding each of the web form controls to the Expense Details tab, your finished form should appear as shown in Figure 3-28.
Figure 3-28 The Travel Approval Web Form Showing the Expense Details Tab
After creating the layout of your web form and adding the required web form controls, you can test its behavior directly from the web forms editor.
To test a web form:
In the web form editor toolbar, click the Test Web Form button as shown in Figure 3-29.
The web form is displayed in a popup window. You can the data input controls by enter values in each field. Fields that have invalid data display errors.
Click the Close button when you are done testing the form.
Form rules enable you to add dynamic behavior to a web form. The TravelRequest web form uses a form rule to calculate the total expense of the travel request.
To add a form rule for calculating total expense:
In the web forms editor toolbar, click the Form Rules button.
Click the Add (+) button.
Click the Edit Rule button.
In the Name field, enter "Total Expense."
Enter the following text in the Rule text area:
var total = 0;

for (var i = 0; i < Amount.value.length; i++) {
    total = total + Amount[i].value;
}
TotalAmount.value = total;
Click the Test Web Form button as shown in Figure 3-29.
In the TravelRequest application, you can create form rules to dynamically enable the customer field if the purpose the visit is set to "Customer Visit.
To add a form rule to add dynamic behavior to a form:
In the web form rules editor, click the Create New Form Rule (+) button.
Click the Edit button for the form rule.
In the Name field, enter "Enable Customer."
Enter the following text in the Rule text area:
if (PurposeOfVisit.value == 'Customer Visit') {
   CustomerName.visible = true;
}
else {

   CustomerName.visible = false;
}
Click the Test Web Form button as shown in Figure 3-29.
The second form rule required by the Travel Request application is a form rule that dynamically populates a list of options.
To add a form rule to dynamically populate a list of options:
In the web form rules editor, click the Create New Form Rule (+) button.
Click the Edit button for the form rule.
In the Name field, enter "Country Dropdown."
Enter the following text in the Rule text area:
if (form.load) {
   url = 'http://localhost:7001/LOVHelper/jersey/listvalues/countries';
   eval ('x=' + http.get(url));
   Country.options = x;
}1
Click the Test Web Form button as shown in Figure 3-29.
In Section 3.3, "Implementing a BPMN Process - Defining User Interaction" you defined the user interface of the travel request application by implementing the human task and web form associated with the users tasks. This section walks you through the process of creating the business rules required by the travel request application and how to assign a business rule to a business rule task flow object.
Before creating a business rule, you must create the data objects that define the input and output arguments of the business rule. Data objects enable you to define the data structures used by your application. See Section 12.2, "Introduction to Data Objects" for more information.
To create a business object:
From the Project Welcome page, select Business Object tab, then click New Business Object.
Enter RuleInput in the Name field, then click the Add (+) icon next to Parent Module.
Enter BusinessData, then click OK.
Select BusinessData from the drop down list, then click Create.
Click New Business Object.
Enter RuleOutput in the Name field, then select BusinessData from the Parent Module drop down list.
Click Create.
After creating the data objects, you must configure the data objects by adding attributes which define the data types used within the data objects.
To configure a business objects:
From the Project Welcome page, select the Business Object tab, then click RuleInput.
In the data objects tree, select RuleInput.
Click the Add menu, then select Add New Attribute.
Enter "amount" in the Name field, then select Real from the drop down list.
Click OK.
The amount attribute appears in the data objects tree under RuleInput.
In the data objects tree, select RuleOutput.
Click the Add menu, then select Add New Attribute.
Enter manualApproval in the Name field and select Bool from the drop down list.
Click OK.
The manualApproval attribute appears in the data objects tree under RuleOutput.
Save your project.
The data objects defined in this section are relatively simple. In a real-world application, a data object may contain multiple modules each with multiple data types.
After defining the business objects for the input and output data, you can create a new business rule.
To create a business rule and define input and output data objects:
From the Project Welcome page, select the Rule tab, then click New Business Rule.
Enter ApprovalRule in the Name field.
Add an input data object.
Click the Add (+) icon.
Select Input from the drop down list to the right of the Name field.
Enter "ruleInput" in the Name field.
From the Type drop down list, select <component>.
The Business Object drop down list appears.
From the Business Object drop down list, select /BusinessData/RuleInput.
Click Add.
The input data object appears in the table.
Add an output data object.
Click the Add (+) icon.
Select Output from the drop down list to the right of the Name field.
Enter "ruleOutput" in the Name field.
From the Type drop down list, select <component>.
The Business Object drop down list appears.
From the Business Object drop down list, select /BusinessData/RuleOutput.
Click Add.
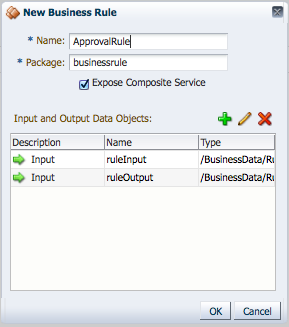
The output data object appears in the table as shown in Figure 3-30.
Figure 3-30 The Create Business Rule Dialog Showing Input and Output Data Objects
Click OK to create the business rule.
The business rule appears in the Business Rules tab of the Project Welcome page.
Save your project.
After creating a new business rule, the first step in configuring it is to create and configure a bucketset. A bucketset defines a list of values or value ranges for different properties of the business rule. In the TravelRequest application, bucket sets define the range of values that determine whether a travel request must be manually approved or not.
To create and configure a bucketset:
From the Project Welcome page, select the Rules tab, then click ApprovalRule.
The rules editor appears. See Chapter 13, "Using Oracle Business Rules" for general information about working with business rules and the rules editor.
Select the Bucketsets tab.
Click the Add menu, then select List of Ranges. A new bucketset is created and appears in the table.
Select the bucketset from the table and click the Edit Bucketset icon.
Enter the following values for the bucketset:
Name: AmountRange
Data Type: float
Create buckets:
Click the Add Bucket (+) icon.
Enter 5000 in the Endpoint column.
Enter "Low" in the Alias column.
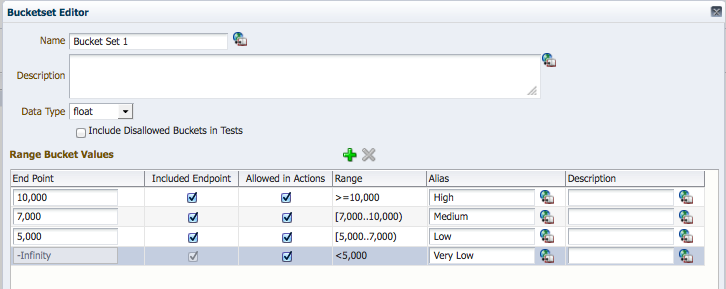
Add additional buckets with Endpoint values of 7000 and 10000. You can also update the alias column to reflect what the values represent. The bucketset table should appear as shown in Figure 3-31.
Figure 3-31 Buckets Defined for the Approval Rule
Click OK to finish configuring the bucketset.
See "Working with Facts and Bucketsets" in Oracle Fusion Middleware User's Guide for Oracle Business Rules for more information.
After defining a bucketset, the next step in configuring a business rule is defining a decision table. A decision table provides a series of IF-THEN statements that determine the performance of a business rule. These statements are arranged in a table format similar to a spreadsheet.
See "Working with Decision Tables" in Oracle Fusion Middleware User's Guide for Oracle Business Rules for more information.
To create and configure a decision table:
From the Project Welcome page, select the Rules tab, then click ApprovalRule.
Click Ruleset1.
From the Add menu, select Add Decision Table.
Enter "Approval Decision Table" in the Name field.
Create and configure conditions:
Select Conditions in the decision table.
From the Add menu, select Add Condition.
In the Condition browser, expand RuleInputType, then select Amount.
Click OK.
RuleInputType.amount appears in the table.
Select RuleInputType.amount in the table, then select Amount_Ranges from the list of bucketsets.
Click in the cell in column R1 that corresponds to RuleInputType.amount, then select the check boxes next to Low and Very Low.
Create and configure actions:
Select Actions in the decision table.
From the Add menu, select Add Action, then assert new.
Under Facts, select RuleOutputType.
Under Properties, check Parameterized and Constant.
Click OK.
In the cell in column R1 (which stands for Rule 1) that corresponds to assert new RuleOutputType, select the checkbox.
In the cell below, enter "false" in the text field.
After creating and configuring actions, the decision table should appear as shown in Figure 3-32.
Figure 3-32 The Decision Table After Creating and Configuring Actions
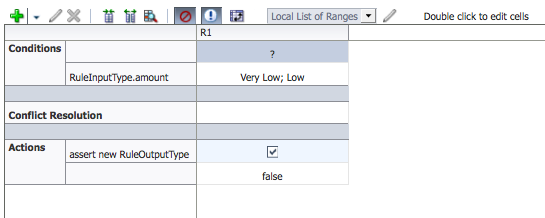
After creating and configuring your business rule, you must assign it to a business rule task.
To assign a business rule to the business rule task:
From the Project Welcome page, select the Processes tab, then click the TravelRequest process.
Right-click on the Approval Rules business task, the select Implementation.
Next to the Rule field, click the Browse icon, then click ApprovalRule.
Click Apply Changes.
During the design phase, you added a service task to model the step required to save the travel request to a database. The next step in implementing a BPMN process is to define the service used to connect to the database. Using Business Process Composer you can create new services.
To define a service and assign it to a service task:
From the Project Welcome Page open the TravelRequest process.
From the drop down list above the component palette, select Business Catalog.
Click the Add Service (+) icon.
Enter "SaveRequest" in the Name field.
From the Type drop down list select Reference.
Under WSDL Service, select URL, then enter a value in the text field. A typical value is:
http://localhost:7001/soa-infra/services/default/SaveRequest/saverequestsync_client_ep?WSDL
The specific value you should use depends on your environment and should be provided by your system administrator. After you enter a URL, Business Process Composer connects to the URL to determine information about the WSDL. If this connection is successful, Business Process Composer populates the Port Type and Callback Type drop down lists.
From the Port Type and Callback Type drop down lists, select a value.
Click OK.
Click Save.
Open the TravelRequest process.
Right-click on the SaveRequest service task, then select Implement.
From the Type drop down list, select Service Call.
Click the SaveRequest service.
Select Process from the Operation drop down list.
Click Apply Changes.
Save your project.
When modeling and implementing a business process, you must define that data that is used by your application. To define the data required by the Travel Request application, you must define the data types required to store information about the travel request. These data types are defined by data objects. When a users enters information in the user interface defined by the web forms created during the implementation phase, this information is stored in the data objects.
You can also define the expressions used in your BPMN process. Expressions are used to evaluate and change the value of data stored in a data object.
Use the data object editor to create and edit data objects in Business Process Composer.
To create the data objects required by the travel request process:
Open the TravelRequest process.
From the process editor toolbar, click the Data Objects button as highlighted in Figure 3-33.
Figure 3-33 The Process Editor Toolbar Highlighting the Data Object Button
The data objects editor appears.
From the Add menu, select Process Data Object as shown in Figure 3-34.
Figure 3-34 Creating a New Data Object in the Data Object Editor
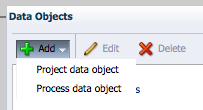
In the Name field, enter "requestDataObj."
From the Type drop down list, select <component>. After selecting this option, the Business Object drop down list appears.
Select Types.TravelApprovalForm from the drop down list, then click OK.
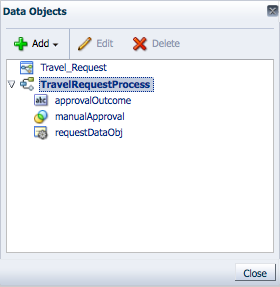
The new data object is created and appears under then TravelRequest node. If you had created a project data object, it would have appeared under Travel_Request. See Section 12.2.2, "Introduction to Process and Project Data Objects" for information about project and process data objects.
Using the procedures above, create two additional process data objects using the parameters shown in the following table.
| Name | Type |
|---|---|
|
approvalOutcome |
String |
|
manualApproval |
Boolean |
When you have finished creating these data objects, the data object editor should appear as shown in Figure 3-35.
Figure 3-35 The Data Objects Editor Showing Process Data Objects
Click Close.
Expressions enable you to evaluate the data stored in a data objects and change its value if required. The Travel Request process uses an expression to
To define an expression for the manual approval sequence flow
Move the mouse over the No sequence flow, then click the Edit button.
Click Implementation.
Click Edit next to the Condition text field.
The expression editor displays.
In the expression editor enter manualApproval==false.
Click Validate to ensure the expression is valid, then click OK.
Click Apply Changes in the Implementation editor.
To define an expression for the rejected sequence flow:
Move the mouse over the Rejected sequence flow, then click the Edit button.
Click Implementation.
Click Edit next to the Condition text field.
In the expression editor, enter approvalOutcome=="REJECT".
Click Validate to ensure the expression is valid, then click OK.
Click Apply Changes in the Implementation editor.
The final step in defining how data is used in your business process is the define the data associations. Data associations define how information is passed between one BPMN flow object to another.
To define the data associations for a human task:
Right-click on the Submit Request human task, then select Data Associations
The Data Associations edit displays.
In the Data Objects pane on the right-hand side, expand Data Objects.
Click and drag requestDO to the Outputs text field for the Submit Request human task.
Also, click and drag requestDO to the Input text field for the Submit Request human task.
Click Apply.