12 Managing the Audit Vault Server and Database Firewalls
This section describes managing day-to-day Audit Vault Server and Database Firewall operations once the initial configuration is completed.
-
Managing Audit Vault Server Settings, Status, and Maintenance Operations
-
Changing the Audit Vault Server's Network or Services Configuration
-
Managing Server Connectors for Email, Syslog, and Arcsight SIEM
Managing Audit Vault Server Settings, Status, and Maintenance Operations
Checking Server Status and System Operation
To check the Audit Vault Server status:
-
Log in to the Audit Vault Server as an Administrator.
-
Click the Settings tab.
-
In the System menu, click Status.
Server statistics, processes, and network services and connections are displayed.
-
Optionally, click the Test Diagnostics button to perform a series of diagnostic checks.
These diagnostics include testing:
-
Existence and access permissions of configuration files
-
File system sanity
-
Network configuration
-
Status of various process that are required to run on the system, for example, database server process(es), event collection process, Java framework process, HTTP server process, etc.
After the system completes the diagnostic tests, it displays a report listing the results of each test.
-
Accessing the Audit Vault Server Certificate and Public Key
Accessing the Server Certificate
If you have deployed Database Firewalls, you must provide the Audit Vault Server certificate and IP address to each Database Firewall.
To access the server certificate:
-
Log in to the Audit Vault Server console as an Administrator.
-
Click the Settings tab.
-
In the Security menu, click Certificate.
The server's certificate is displayed. You can copy the certificate and provide it to each Database Firewall. See "Specifying the Audit Vault Server Certificate and IP Address".
Accessing the Server Public Key
You must provide the server's public key to another system in order to upload archive files from the Audit Vault Server to that system. This public key must be added to the authorized_keys file for that system. For a typical linux installation, this file is in the user's home directory under .ssh, and its permissions must be set to 0700.
To access the server public key:
-
Log in to the Audit Vault Server console as an Administrator.
-
Click the Settings tab.
-
In the Archiving menu, click Manage Archive Locations, and then click Create.
The Public Key field contains the public key. You can copy the key and paste it into the appropriate file on another system.
Rebooting or Powering Off the Audit Vault Server
To reboot or power off the Audit Vault Server:
-
Log in to the Audit Vault Server as super Administrator.
-
Click the Settings tab, and in the System menu, click Manage.
-
Click Reboot or Power Off.
Changing the Keyboard Layout
To change the keyboard layout used in the Audit Vault Server:
-
Log in to the Audit Vault Server console as a super Administrator.
-
Click the Settings tab, and in the System menu, click Manage.
-
From the Keyboard drop-down list, select the keyboard you want.
-
Click Save.
Downloading Diagnostics for the Audit Vault Server (AVDF 12.1.2)
This procedure lets you download diagnostics for the Audit Vault Server. If you want to see diagnostics for a database firewall, see "Viewing the Status and Diagnostics Report for a Database Firewall".
You can adjust the amount of diagnostics information gathered by setting the LOGLEVEL for different server components using the ALTER SYSTEM command. See "ALTER SYSTEM SET" for details.
To download a log file for Audit Vault Server diagnostics:
-
Log in to the Audit Vault Server console as a super Administrator.
-
Click the Settings tab, and in the System menu, click Status.
-
Click the Download Diagnostics button, select a file location, and then click Save.
A diagnostics log file (
.zip) is downloaded to the location you selected.
See also: "Viewing the Status and Diagnostics Report for a Database Firewall".
Archiving and Restoring Audit Data
Starting an Archive Job
When an Oracle AVDF auditor selects a retention (archiving) policy for a secured target, audit data for that secured targets will be available for archive jobs according to the Months Online specified in the retention policy. After the months online period has expired, the data is available for archiving, and is no longer visible in reports.
To start an archive job, you must have configured at least one archive location. See "Defining Archiving Locations".
For more information, see "About Archiving and Restoring Data in Oracle AVDF".
To start an archive job:
-
Click the Settings tab, and from the Archiving menu, click Archive.
-
Complete the following fields:
-
Job Name: Enter a name for the archive job.
-
Archive Location: Select the archive location.
If you have not created archiving locations, see "Defining Archiving Locations".
-
-
Select the files you want to archive.
The files listed are those for which the Months Online period has expired according to the secured target's retention policy.
-
Click the Archive button.
You can view the progress of an archive job from the Jobs page (from the System menu in the Settings tab). See "Monitoring Jobs".
Restoring Oracle AVDF Audit Data
You can restore data files for a specific secured target and time range. The Months Archived value in a secured targets retention (archiving) policy determines how long the secured target's data is available to restore to the Audit Vault Server. When the Months Archived period expires, the data is no longer available to restore, however, it continues to reside in the archive location.
For more information, see "Creating Archiving (Retention) Policies", and "About Archiving and Restoring Data in Oracle AVDF".
To restore data files from an archive:
-
Log in to the Audit Vault Server as an administrator.
-
Click the Settings tab, and from the Archiving menu, click Restore.
-
In the Job Name field, enter a name for this restore job.
-
Select the Secured Target whose data you want to restore, and a Start Date and End Date for the data to be restored.
The start and end dates are associated with the event time (the time the event occurred).
-
Click the Restore button.
You can check the status of the restore job in the Jobs page (from the System menu in the Settings tab). When the restored data files are available, they are listed in the Restored Datafiles section of the Restore From Archive page, and the data will be visible in reports.
-
To purge restored files when no longer needed, from the Restored Datafiles section of the page, select the files you want to unload from the system, and then click the Release button.
Once the release is successful, the data is not visible in reports.
Monitoring Jobs
You can see the status of various jobs that run on the Audit Vault Server, such as report generation, and user entitlement or audit policy retrieval from secured targets.
To see the status of jobs on the Audit Vault Server:
-
Log in to the Audit Vault Server as an Administrator.
-
Click the Settings tab.
-
In the System menu, click Jobs.
A list of jobs is displayed, showing the job type, ID, timestamp, status, and associated user name.
-
To see details for an individual job, click the icon to the left of that job.
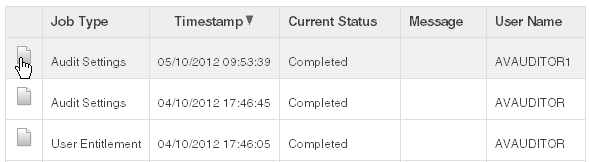
Description of the illustration ''jobs_detail_icon.gif''
Changing the Audit Vault Server's Network or Services Configuration
To set or change the network or services configuration, follow the relevant procedure below:
Managing Server Connectors for Email, Syslog, and Arcsight SIEM
To set or change connector information, follow the relevant procedure below:
Managing Plug-ins
You can deploy additional plug-ins to support more types of secured targets, or un-deploy plug-ins that are no longer needed. See "Deploying Plug-ins and Registering Plug-in Hosts" for details.
Monitoring the Server Tablespace Space Usage
The Audit Vault Server database contains the SYSAUX tablespace, which by default has one data file. The SYSAUX tablespace is a locally managed tablespace with automatic segment space management.
You should monitor the space usage for the SYSAUX tablespace and create additional data files for storage as needed.
See Oracle Database Administrator's Guide for more information about the ALTER TABLESPACE SQL statement, which you can use to add more storage data files. For information about optimizing a tablespace, see Oracle Database Performance Tuning Guide.
Monitoring the Server Archive Log Disk Space Usage
By default, ARCHIVELOG mode is enabled in the Audit Vault Server database. The ARCHIVELOG mode copies filled online redo logs to disk. This enables you to back up the database while it is open and being accessed by users, and to recover the database to any desired point in time. You should monitor the disk space usage for the redo logs.
See Oracle Database Administrator's Guide for more information about changing the LOG_ARCHIVE_DEST_n location to relocate these archive log files to larger disks. For information about backing up the archive logs, see Oracle Database Backup and Recovery Advanced User's Guide.
Monitoring the Server Flash Recovery Area
By default, the Audit Vault Server database has the following initialization parameter settings:
-
The
DB_RECOVERY_FILE_DEST_SIZEinitialization parameter is set to 2 GB. -
The
DB_RECOVERY_FILE_DESTinitialization parameter is set to the default flash recovery area, typically theORACLE_HOME/flash_recovery_areadirectory.
Ensure that the size of the flash recovery area is large enough to hold a copy of all data files, all incremental backups, online redo logs, archived redo logs not yet backed up on tape, control files, and control file auto backups. This space can fill up quickly, depending on the number of audit trails configured, the scope of the audit record collection being administered, and the backup and archive plans that you have in place.
You can use Oracle Enterprise Manager Database Control to monitor the available space in the flash recovery area. Monitor the percent space that is usable in the Usable Flash Recovery Area field under the High Availability section on the Home page. Check the alert log in the Database Console for messages. When the used space in the flash recovery area reaches 85 percent, a warning message is sent to the alert log. When the used space in the flash recovery area reaches 97 percent, a critical warning message is sent to the alert log.
You can manage space in the flash recovery area by adjusting the retention policy for data files to keep fewer copies or reduce the number of days these files stay in the recovery window. Alternatively, increase the value of the DB_RECOVERY_FILE_DEST_SIZE initialization parameter to accommodate these files and to set the DB_RECOVERY_FILE_DEST initialization parameter to a value where more disk space is available. See Oracle Database Administrator's Guide and Oracle Database Backup and Recovery Basics for more information.
Downloading and Using the AVCLI Command Line Interface
About the AVCLI Command Line Interface
As an alternative to using the Audit Vault Server console (Web) UI, you can use the AVCLI command line interface to manage Oracle AVDF, including registering and configuring secured targets and their connections to the Audit Vault Server.
You can run AVCLI from the Audit Vault Server, or download the AVCLI utility from the Audit Vault Server and install and run the utility on another computer.
The syntax used for AVCLI is similar to SQL*Plus. For example, from within AVCLI, you can use the CONNECT command to log in as another user. In addition, the AVCLI commands are not case sensitive. In this manual, the commands are entered in upper case.
See "AVCLI Commands Reference" for details of the available AVCLI commands.
Downloading the AVCLI Command Line Utility and Setting JAVA_HOME
The AVCLI utility is already installed on the Audit Vault Server. If you want to run AVCLI on a different computer, then you must download it from the Audit Vault Server console and install it on the other computer.
To download the AVCLI command line utility:
-
Log in to the Audit Vault Server console as an Administrator.
-
Click the Settings tab, and in the System menu, click Manage.
-
Click the Download Command Line Utility button, and save the
avcli.jarfile. -
Copy the
avcli.jarfile to the computer from which you want to run AVCLI, and then run this command:java -jar avcli.jar
The AVCLI utility is installed in the current directory with the necessary permissions. To install in a different directory, use the command:
java -jar avcli.jar -d directory_name -
Set the
JAVA_HOMEenvironment variable to point to the JDK 1.6 or 1.7 installation directory.
Starting AVCLI
You can invoke AVCLI interactively (that is, you must provide a password) with or without a user name.
Note:
You must set theJAVA_HOME environment variable to point to the JDK 1.6 or 1.7 installation directory.Starting AVCLI Interactively
Follow one of the methods below to invoke AVCLI interactively. Except for a few commands where it is optional, all AVCLI commands must end in a semi-colon (;). For simplicity, in this guide we use a semi-colon for all AVCLI commands.
Using Interactive Mode with a User Name
The command syntax for invoking AVCLI with a user name is:
avcli -u username
Enter password: password
For example:
avcli -u psmith
AVCLI : Release 12.1.0.0.0 - Production on timestamp
Copyright (c) 1996, 2012 Oracle.  All Rights Reserved.
Enter password for 'psmith': password

Connected to:
Oracle Audit Vault Server 12.1.0.0.0

AVCLI>
Using Interactive Mode Without a User Name
If you invoke AVCLI without a user name, you must connect to the Audit Vault Server as a valid user who has been granted the AV_ADMIN role. The command syntax for invoking AVCLI with a user name is:
avcli
AVCLI> CONNECT username;
For example:
avcli

AVCLI : Release 12.1.2.0.0 - Production on timestamp
Copyright (c) 1996, 2014 Oracle.  All Rights Reserved.

AVCLI> CONNECT psmith
Enter password: password;
Connected.
Running AVCLI Scripts
An AVCLI script contains a series of AVCLI commands. You can run an AVCLI script from the shell. Valid AVCLI script names have a .av extension.
Here is an example AVCLI script:
#Here is an AVCLI command
start collection for secured target sample_target1 using host sample_host1 from        table SYS.AUD$;
#More AVCLI commands
#Quit command
quit;
To run an AVCLI script from the shell, use the following syntax:
avcli -u username -f scriptname.av
For example:
avcli -u psmith -f myscript.av
AVCLI : Release 12.1.0.0.0 - Production on timestamp
Copyright (c) 1996, 2012 Oracle.  All Rights Reserved.
Enter password for 'psmith': password

Connected to:
Oracle Audit Vault Server 12.1.0.0.0

AVCLI> the script myscript.av executes
Specifying Log Levels for AVCLI
When you invoke AVCLI, you can specify the following log levels. Oracle AVDF writes the logs to the Audit Vault Server $ORACLE_HOME/av/log directory.
-
info: Logs informational and error messages -
warning: Logs both warning and error messages -
error: Logs only error messages (default) -
debug: Logs debug, error, warning, and informational messages
To specify a log level, enter the L option. For example, to invoke AVCLI as user psmith with the log level set to warning:
avcli -l warning -u psmith
AVCLI : Release 12.1.0.0.0 - Production on timestamp
Copyright (c) 1996, 2012 Oracle.  All Rights Reserved.
Enter password for 'psmith': password

Connected to:
Oracle Audit Vault Server 12.1.0.0.0

AVCLI>
To invoke AVCLI using a script and with the debug warning level:
avcli -l debug -f myscript.av

AVCLI : Release 12.1.0.0.0 - Production on timestamp
Copyright (c) 1996, 2012 Oracle.  All Rights Reserved.

AVCLI> Connected.

AVCLI> the script myscript.av executes
Note: You must be connected as a valid user who has been granted the AV_ADMIN role. You can do so using the CONNECT username/password directive.
Downloading the Oracle AVDF SDK
An SDK is available for developing custom Oracle AVDF plug-ins. For more information, see "About Plug-ins". For developer information, see Oracle Audit Vault and Database Firewall Installation Guide.
To download the SDK:
-
Log in to the Audit Vault Server console as an administrator.
-
Click the Settings tab, and then click Plug-ins (under the System subsection).
-
Click Download SDK.
Backing up and Restoring the Audit Vault Server
A knowledge base article is available for backing up and restoring the Audit Vault Server. Search for document number 1556200.1 at the following website:
Managing Database Firewalls
-
Changing the Database Firewall's Network or Services Configuration
-
Viewing and Capturing Network Traffic in a Database Firewall
Changing the Database Firewall's Network or Services Configuration
See one of the topics below if you need to change a Database Firewall's network, traffic sources, or services configuration:
Viewing and Capturing Network Traffic in a Database Firewall
You may wish to view network traffic for debugging purposes. You can view live network traffic going through a firewall, or capture the traffic to a file (.pcap file type) that you can download and analyze.
To view live network traffic in a Database Firewall:
-
Log in to the Database Firewall administration console.
-
Under Network Traffic, click Live Capture.
-
In the Level of Detail field, select Summary or Packet Content.
-
In the Duration field, select the number of seconds to capture live traffic.
-
In the Network field, select the network traffic source for which to capture traffic.
-
Click the Show Traffic button.
The live traffic is displayed for the selected duration.
To capture network traffic to a file:
-
Log in to the Database Firewall administration console.
-
Under Network Traffic, click File Capture.
-
In the Duration field, select the number of seconds to capture traffic.
-
In the Network field, select the network traffic source for which to capture traffic.
-
Click the Capture button.
The traffic file (
.pcapformat) is displayed in the Network Traffic Files list. -
Click Download for the file you want to download.
Rebooting or Powering Off Database Firewall
To reboot or power off a Database Firewall:
-
Log in to the Audit Vault Server as an administrator.
-
Click the Firewalls tab, and then select the firewall(s) you want to reboot or power off.
-
Click the Reboot or Power Off button.
Removing a Database Firewall from the Audit Vault Server
To remove a Database Firewall from the Audit Vault Server:
-
Log in to the Audit Vault Server as an administrator.
-
Click the Firewalls tab, and then select the firewall(s) you want to remove.
-
Click the Delete button.
Fetching an Updated Certificate from a Database Firewall
Starting with AVDF 12.1.2, you can update the Database Firewall certificate stored in the Audit Vault Server using the Audit Vault Server console UI. You must update this certificate when you upgrade the Database Firewall to maintain communication between the firewall and the Audit Vault Server.
If you have an earlier AVDF release, you must manually copy the Audit Vault Server certificate to the upgraded Database Firewall. See "Specifying the Audit Vault Server Certificate and IP Address".
To update the Database Firewall certificate stored in the Audit Vault Server:
-
After upgrading the Database Firewall, log in to the Audit Vault Server console as an administrator.
-
Click the Firewalls tab.
A list of firewalls appears.
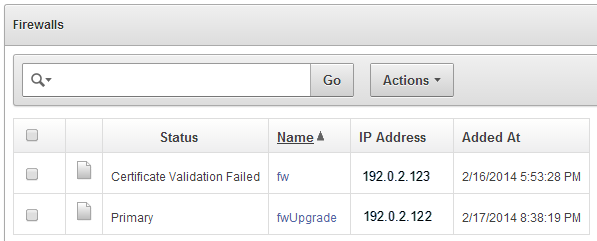
Description of the illustration ''certificate_validation.png''
-
Click the name of a firewall with the status Certificate Validation Failed.
Viewing Diagnostics for a Database Firewall
See this procedure for viewing Database Firewall diagnostics: "Viewing the Status and Diagnostics Report for a Database Firewall".