3 Installing Oracle Audit Vault and Database Firewall Software
This chapter explains how to install Oracle Audit Vault and Database Firewall (Oracle AVDF). You can deploy the Audit Vault Agent once you have installed the Audit Vault Server. Audit Vault Agent deployment and activation are covered in Oracle Audit Vault and Database Firewall Administrator's Guide.
Important:
The Security Guidelines chapter of Oracle Audit Vault and Database Firewall Administrator's Guide contains important information about installing Oracle AVDF securely and protecting your dataAbout the Software Installation Procedure
The Oracle AVDF software is installed using two disks, each created from .iso or .zip file downloads:
-
The Audit Vault installer disk (created from two files)
-
The Database Firewall installer disk (created from one file)
During the installation, you create an installation passphrase that protects the newly installed component until it is fully configured. See "Installation Passphrase Requirements".
Note:
The installation process reimages the server on which you install the Audit Vault Server or Database Firewall, automatically installing the operating system.Downloading and Verifying the Software
You can download the software from Oracle Software Delivery Cloud as Media Packs. A Media Pack is an electronic version of the software, which you can then transfer to disk.
To download the software:
-
Use any browser to access the Oracle Software Delivery Cloud portal:
-
Complete the Export Validation process by completing the online form, and accepting the terms and conditions, and then click Continue.
-
In the Media Pack Search page, in the Select a Product Pack field, select Oracle Database, select a Platform, and click Go.
-
Select the required Oracle Audit Vault and Database Firewall media pack, and click Continue.
-
In the media pack downloads page, click Readme to review the Readme file for further instructions and product information.
-
After you review the Readme, click Download for the desired software to download the individual
.zipor.isofiles.Here is an example of the downloads section on this page. The number of files, part numbers, and file sizes may be different depending on the product version you selected:
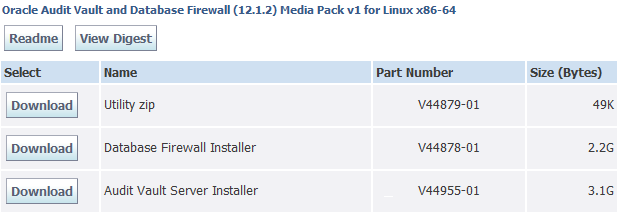
Description of the illustration ''edelivery.png''
-
After you download the files, click View Digest, and then generate MD5 checksums for each
.isoor.zipfile downloaded to verify that they match the values listed in the View Digest page.
Installation Passphrase Requirements
One step in the installation of an Audit Vault Server or Database Firewall is to create an installation passphrase. The installation passphrase protects the newly installed component from outside attack until you have done the post-install configuration tasks (described in Chapter 4, "Post-Install Configuration Tasks"). To do the tasks, you must enter the installation passphrase that you created during the installation.
After doing the tasks, you no longer need the installation passphrase, and it no longer works.
The installation passphrase must have between 8 to 255 characters in these categories:
-
Uppercase letters (A-Z) - must have at least one
-
Lowercase letters (a-z) - must have at least one
-
Digits (0-9) - must have at least one
-
At least one of the following:
-
Comma (,)
-
Period (.)
-
Colon (:)
-
Plus sign (+)
-
Underscore (_)
-
-
Space
If you have created an installation passphrase for a component but not yet completed the post-install configuration tasks, then you can change the passphrase. To do so, select Change Installation Passphrase in the Audit Vault Server menu or Database Firewall menu, shown in installation step 12.
Installing an Audit Vault Server or Database Firewall
Step 1: Download the Installer Files and Create Disks
This step depends on which version of Oracle AVDF you are installing:
Oracle AVDF 12.1.2.2.0
Follow these instructions if you are downloading Oracle 12.1.2.2.0.
To download either the Audit Vault Server or the Database Firewall software:
-
Download and verify either the Audit Vault Server Installer file or the Database Firewall Installer file from the Oracle Software Delivery Cloud.
-
Create an installer disk from the downloaded installer file.
Oracle AVDF 12.1.2.1.0
Follow these instructions if you are downloading Oracle 12.1.2.1.0. Note in this version there are two installer files for the Audit Vault Server.
To download the Audit Vault Server software:
-
Download these two files from the Oracle Software Delivery Cloud:
- Audit Vault Server Installer (Part 1 of 2)
- Audit Vault Server Installer (Part 2 of 2)
-
Unzip the two Audit Vault Server files you downloaded. You will end up with two files:
avs-installer-disc-12.1.2.1.0.iso00
avs-installer-disc-12.1.2.1.0.iso01
-
Combine the two files to create a single
.isofile using the appropriate command below (each command is on one line).Windows:
copy /b avs-installer-disc-12.1.2.1.0.iso00+avs-installer-disc-12.1.2.1.0.iso01 avs-installer-disc-12.1.2.1.0.iso
Linux:
cat avs-installer-disc-12.1.2.1.0.iso00 avs-installer-disc-12.1.2.1.0.iso01 > avs-installer-disc-12.1.2.1.0.iso
-
Generate an MD5 checksum for the combined
.isofile to make sure it matches this value:29d6595de5467f70be9b3de502d80fed -
Create an installer disk from the single
.isofile.
To download the Database Firewall software:
-
Download and verify the Database Firewall Installer file from the Oracle Software Delivery Cloud.
-
Create an installer disk from the downloaded Database Firewall Installer file.
Step 2: Install the Software
To install an Audit Vault Server or Database Firewall:
-
Insert either the installer disk for the Audit Vault Server or the installer disk for the Database Firewall in the disk drive, and then reboot the system.
The system is booted from the disk, and the initial splash screen appears, similar to the following:
Description of the illustration ''install_upgrade_start.gif''
Your splash screen will indicate the release number you are installing.
-
Type
install, and then press the Enter key.The installation proceeds. After some time, the screen displays this message:
Please enter installation passphrase
-
Type the installation passphrase, press Enter, and then confirm the passphrase.
See "Installation Passphrase Requirements".
The screen displays this message:
Installation passphrase was successfully configured
-
Press Enter.
The Select Management Interface screen appears, listing the available interfaces.
Description of the illustration ''select_mgmt_interface.gif''
-
If more than one interface is available, select the interface that you want to be the management interface.
The management interface is the network interface used by the Audit Vault Server.
-
Press the key Enter.
A screen appears with this option selected:
Use Use this device as the management port
-
Press Enter.
This screen appears:
Description of the illustration ''enter_ip_setting.gif''
-
In the field IP Address, enter the IP address of the management interface and then press Tab.
The cursor moves to the field Network Mask.
-
In the field Network Mask, enter the network mask for the management interface and then press Tab.
The cursor moves to the field Gateway.
-
In the field Gateway, enter the gateway IP address for the management interface and then press Tab.
The cursor moves to Reboot to complete installation.
-
Press Enter.
The computer reboots. This may take a long time. When rebooting has finished, the system displays your network settings.
-
Press Enter.
Either the Audit Vault Server menu appears ...
Description of the illustration ''avs_menu.gif''
Or the Database Firewall menu appears:
Description of the illustration ''dbfw_menu.gif''
-
Do the appropriate post-install configuration tasks, described in Chapter 4, "Post-Install Configuration Tasks."
For these tasks, you need the passphrase that you created in step 3 and the IP address that you provided in step 8.