A Configuring SSO Providers for Oracle Identity Manager
This appendix contains the configuration steps for enabling Oracle Identity Manager for Single Sign On (SSO). To do so, Oracle Identity Manager is enabled to use third-party SSO providers, such as OpenSSO, IBM Tivoli Access Manager, and CA SiteMinder.
This appendix contains the following sections:
A.1 Enabling Oracle Identity Manager to Work With OpenSSO
This section contains the following topics:
A.1.1 Prerequisites
The prerequisites for integrating Oracle Identity Manager with OpenSSO are:
-
Oracle Identity Manager 11g Release 2 (11.1.2.1.0) is installed and running.
-
OpenSSO 8.0 is installed and configured
-
OpenSSO Enterprise Policy Agent 3.0 for Oracle WebLogic Server/Portal 10 (weblogic_v10_agent_3) is installed.
-
It is expected that identity information in Oracle Identity Manager is synchronized with LDAP server configured as user data store in OpenSSO. For example, the LDAP synchronization feature of Oracle Identity Manager can be used for this purpose.
A.1.2 Integrating Oracle Identity Manager with OpenSSO
To integrate Oracle Identity Manager 11g Release 2 (11.1.2.1.0) with OpenSSO 8.0 on Oracle WebLogic Server:
-
Start OpenSSO.
-
Start Oracle Identity Manager.
-
Install OpenSSO policy agent on Admin Server of Oracle Identity Manager domain. To do so:
-
Create a J2EE agent profile on OpenSSO. Refer to the policy agent section in OpenSSO documentation for creating the profile.
-
Install agent on WebLogic Admin Server. Install the agent by using the agentadmin utility. Refer to the policy agent section in OpenSSO documentation.
-
-
Install OpenSSO policy agent on Oracle Identity Manager Managed Server of Oracle Identity Manager domain. To do so, install agent on Oracle Identity Manager Managed Server. Refer to the policy agent section of OpenSSO documentation for installing the agent on a managed server. Use the same agent profile that you created in step 3.a.
Note:
For a clustered deployment of Oracle Identity Manager, install the policy agent on each Oracle Identity Manager Managed Server. -
To configure OpenSSO policy agent after installation:
Note:
For a clustered deployment of Oracle Identity Manager, OpenSSO policy agent must be configured on each Oracle Identity Manager Managed Server.-
Configure WebLogic Server instances with set Agent classpath and JAVA options.
-
Deploy agent application on Admin and Managed Servers.
-
Deploy and configure agent authentication provider.
-
Add WebLogic admin to bypasslist.
-
Install agent filter to oim web-apps. In this step, add OpenSSO Agent filter to all the Oracle Identity Manager web-apps that support OIM user login. To do so:
Note:
The corresponding deployment-descriptors are located at:-
IDM_ORACLE_HOME/server/apps/oim.ear/iam-consoles-faces.war/WEB-INF/web.xml
-
IDM_ORACLE_HOME/server/apps/oracle.iam.console.identity.self-service.ear/oracle.iam.console.identity.self-service.war/WEB-INF/web.xml
-
IDM_ORACLE_HOME/server/apps/oracle.iam.console.identity.sysadmin.ear/oracle.iam.console.identity.sysadmin.war/WEB-INF/web.xml
i) Go to the IDM_ORACLE_HOME/server/apps/ directory.
ii) Create a backup of the oim.ear/iam-consoles-faces.war/WEB-INF/web.xml file, and then edit it to add the filter element as mentioned in OpenSSO documentation. Save the changes.
iii) Create a backup of the oracle.iam.console.identity.self-service.ear file, and then extract it in a temporary location. Then extract the oracle.iam.console.identity.self-service.war file. Edit WEB-INF/web.xml to add the filter element as mentioned in OpenSSO documentation. Repackage oracle.iam.console.identity.self-service.war with the modified web.xml, and then repackage oracle.iam.console.identity.self-service.ear with modified oracle.iam.console.identity.self-service.war.
iv) Create a backup of oracle.iam.console.identity.sysadmin.ear, and then extract it in a temporary location. Then extract the oracle.iam.console.identity.sysadmin.war file. Edit WEB-INF/web.xml to add the filter element as mentioned in OpenSSO documentation. Repackage oracle.iam.console.identity.sysadmin.war with the modified web.xml, and then repackage oracle.iam.console.identity.sysadmin.ear with modified oracle.iam.console.identity.sysadmin.war.
Note:
Ensure that after performing steps iii and iv, the only difference between the modified EAR files and the original EAR files is in the web.xml files.v) Shutdown Oracle Identity Manager instance.
vi) Go to OIM_DOMAIN_HOME/servers/OIM_SERVER_INSTANCE/tmp/_WL_user/ directory. Go to OIM_DOMAIN_HOME\servers\OIM_SERVER_INSTANCE\tmp\_WL_user\ directory if the setup is on Microsoft Windows.
vii) Delete the directories specific to oracle.iam.console.identity.self-service.ear and oracle.iam.console.identity.sysadmin.ear UI applications. In a typical Oracle Identity Manager setup, the directories to be deleted are oracle.iam.console.identity.self-service.ear_V2.0 and oracle.iam.console.identity.sysadmin.ear_V2.0.
viii) Restart Oracle Identity Manager Managed Server instance, and then check that the directories are re-created in the directory path mentioned in step vi.
-
-
-
Update the agent profile for Oracle Identity Manager Managed Server with Oracle Identity Manager URL information. To do so:
-
Login to OpenSSO application, and select the Oracle Identity Manager Managed Server agent profile.
-
Click the general tab. Change the Agent filter mode. Remove all existing values. Add new value with empty key and corresponding map value as J2EE_POLICY.
-
Click the applications tab. Update the various sections as follows:
-
Login Form URI. Add the following:
/oim/faces/pages/Login.jspx
/identity/faces/signin
/sysadmin/faces/signin
-
Login Error URI. Add the following:
/identity/faces/signin
/sysadmin/faces/signin
/oim/faces/pages/LoginError.jspx
-
Not Enforced URI Processing. Add the following:
/identity/faces/register
/identity/faces/forgotpassword
/identity/faces/trackregistration
/identity/faces/forgotuserlogin
/identity/faces/accountlocked
/identity/adfAuthentication
/identity/afr/blank.html
/sysadmin/adfAuthentication
/sysadmin/afr/blank.html
/sysadmin/faces/noaccess
/oim/afr/blank.html
/workflowservice/*
/callbackResponseService/*
/spml-xsd/*
-
-
-
Configure SSO in Oracle Identity Manager. To do so:
-
Set up WebLogic authenticators. To do so:
i) Add and configure WebLogic authentication provider for LDAP server corresponding to the user data store used by OpenSSO. For example, if OpenSSO uses Sun DSEE, then configure iPlanet authentication provider. Set the control flag as SUFFICIENT.
Note:
Ensure that all the Oracle Identity Manager users are synchronized with the LDAP server to which the authenticator points to.ii) Add and configure Oracle Identity Manager signature authentication provider (OIMSignatureAuthenticator). Set the control flag as SUFFICIENT.
iii) Arrange the authenticator chain in the following order:
-
DefaultAuthenticator - SUFFICIENT
-
OIMSignatureAuthenticator - SUFFICIENT
-
AgentAuthenticator - OPTIONAL
-
LDAPAuthenticator - SUFFICIENT
-
DefaultIdentityAsserter
-
-
Change the Oracle Identity Manager logout to execute OpenSSO logout URL by running the following command:
cd <IDM_ORACLE_HOME>/common/bin ./wlst.sh connect() addOAMSSOProvider(loginuri="/${app.context}/adfAuthentication", logouturi="http(s)://openssohost:openssoport/opensso/UI/Logout", autologinuri="/obrar.cgi") exit() -
Set Oracle Identity Manager ssoenabled flag to true. To do so:
i) Login to Enterprise Manager. Open System Mbean Broswer.
ii) Open the oracle.iam:Location=oim_server1,name=SSOConfig,type=XMLConfig.SSOConfig,XMLConfig=Config,Application=oim,ApplicationVersion=11.1.1.3.0 mbean.
iii) Set the value of ssoEnabled to true.
-
-
Restart Oracle Identity Manager domain.
-
Test the configuration by navigating to the following URL:
http://OIM_HOST:OIM_PORT/identity/
The page is redirected to the OpenSSO login page. Login as valid Oracle Identity Manager user.
A.1.3 Running Validation Tests to Verify the Configuration
Run the following validation steps to verify if the integration between Oracle Identity Manager and OpenSSO is successful:
User Login to Oracle Identity Manager Through SSO
Prerequisite: Create a user, for example ENDUSER001 in Oracle Identity Manager and LDAP.
Step: Try logging in to Oracle Identity Manager through SSO as the user you created, for example ENDUSER001, and check if the login is successful.
Expected output: Login is successful.
Client-Based Login to Oracle Identity Manager
Prerequisite: Make sure that Oracle Identity Manager Design Console is installed and configured.
Step: Try logging in to the Design Console as system administrator with SSO password.
Expected output: Login to the Design Console is successful, assuming that LDAPAuthenticator is configured properly for SSO login.
Signature-Based Authentication
To test signature-based authentication:
-
Try accessing the scheduler service URL. It should be running on Oracle Identity Manager Managed Server port, as shown:
http://OIM_HOST:OIM_PORT/SchedulerService-web
-
Login as system administrator with SSO password.
-
If the login is successful and you can see the following details on the screen, then signature login is successful:
Scheduler Current Status: STARTED
Last Error: NONE
-
Click Start on the page if the following is displayed:
Scheduler Current Status: STOPPED
If no errors are displayed on the page, then signature login is successful.
A.2 Enabling Oracle Identity Manager to Work With IBM Tivoli Access Manager
This section contains the following topics:
A.2.1 Prerequisites
The prerequisites for integrating Oracle Identity Manager with OpenSSO are:
-
Oracle Identity Manager 11g Release 2 (11.1.2.1.0) is installed.
-
IBM Tivoli Access Manager (TAM) for e-business 6.1 is installed.
-
IBM Tivoli Access Manager Adapter for Oracle WebLogic Server for TAM 6.1 and Oracle WebLogic Server 10g or 11g are installed.
-
The identity information in Oracle Identity Manager is synchronized with identity information in the LDAP registry used by TAM. For example, the LDAP synchronization feature of Oracle Identity Manager can be used for this purpose.
-
Form based login is enabled in TAM.
A.2.2 Integrating Oracle Identity Manager with IBM Tivoli Access Manager
To integrate Oracle Identity Manager 11g Release 2 (11.1.2.1.0) with IBM Tivoli Access Manager for e-business 6.1:
-
Start IBM Tivoli Access Manager.
-
Start Oracle Identity Manager.
-
Setup connection between webseal and WebLogic. To do so:
-
Create junctions to connect webseal to Oracle Identity Manager WebLogic Server.
-
Configure webseal logout and login page.
-
Deploy weblogic security providers.
Refer to TAM-weblogic integration documentation provided as part of IBM Tivoli Access Manager Adapter for Oracle WebLogic Server. The additional details are as follows:
-
Keep both non-SSL and SSL ports on Oracle Identity Manager into consideration while creating junctions.
-
While creating webseal junction(s) for protected resources, make sure to use the "-c iv-user" (insert iv-user HTTP header) option.
-
List of resources that needs to be protected/unprotected:
Protect the following resources:
/oim
/xlWebApp
/Nexaweb
/identity
/sysadmin
Unprotect following uris:
/identity/faces/register
/identity/faces/forgotpassword
/identity/faces/trackregistration
/identity/faces/forgotuserlogin
/identity/faces/accountlocked
/identity/adfAuthentication
/identity/afr/blank.html
/sysadmin/adfAuthentication
/sysadmin/afr/blank.html
/sysadmin/faces/noaccess
/oim/afr/blank.html
Unprotect following resources:
/workflowservice
/callbackResponseService
/spml-xsd
-
Only configure Tivolli Access Manager Identity assertion provider (AMIdentityAsserterLite). Select the iv-user option while configuring it.
-
Do not configure Tivolli Access Manager Identity authentication provider.
-
Configure WebLogic authentication provider for LDAP server corresponding to the LDAP registry used by TAM. For example, if TAM uses Sun DSEE, then configure iPlanet authentication provider. Set its control flag as SUFFICIENT. Ensure that all usersin Oracle Identity Manager are synchronized to this LDAP server. If any Oracle Identity Manager user is not present in the LDAP server, then that user will not be able to login to Oracle Identity Manager.
-
Configure Oracle Identity Manager signature authentication provider (OIMSignatureAuthenticationProvider). Provide the Oracle Identity Manager database details while configuring it. You can use the same details as specified in OIMAuthenticationProvider. Set its control flag as SUFFICIENT.
-
Arrange the authenticator chain in the following order:
TAMIdentityAsserter
OIMSignatureAuthenticator - SUFFICIENT
LDAPAuthenticator - SUFFICIENT
DefaultAuthenticator - SUFFICIENT
DefaultIdentityAsserter
-
-
-
Change the Oracle Identity Manager logout to execute TAM logout URL by using the following commands:
cd <IDM_ORACLE_HOME>/common/bin ./wlst.sh connect() addOAMSSOProvider(loginuri="/${app.context}/adfAuthentication", logouturi="http(s)://<webseal-host:port>/pkmslogout", autologinuri="/obrar.cgi") exit() -
Set OIM ssoenabled flag to true. To do so:
-
Login to Enterprise Manager. Open System Mbean Broswer.
-
Open the oracle.iam:Location=oim_server1,name=SSOConfig,type=XMLConfig.SSOConfig,XMLConfig=Config,Application=oim,ApplicationVersion=11.1.1.3.0 mbean.
-
At the value of ssoEnabled to true.
-
-
Restart Oracle Identity Manager.
-
Test the configuration by navigating to the following URL:
http(s)://WEBSEAL_HOST:WEBSEAL_PORT/identity/faces/home
TAM login page is displayed. Login as valid Oracle Identity Manager user, and the login should be successful.
A.2.3 Running Validation Tests to Validate the Configuration
Run the following validation steps to verify if the integration Oracle Identity Manager and TAM is successful:
User Login to Oracle Identity Manager Through SSO
Prerequisite: Create a user, for example ENDUSER001, in Oracle Identity Manager andLDAP.
Step: Try logging in to Oracle Identity Manager through SSO as the user that you created, for example ENDUSER001, and check if the login is successful.
Expected output: Login should be successful.
Client-Based Single Login to Oracle Identity Manager
Prerequisite: Make sure that Oracle Identity Manager Design Console is installed and configured.
Step: Try logging in to the Design Console as system administrator with SSO password.
Expected output: Login to the Design console must be successful, assuming that LDAPAuthenticator is configured properly for SSO login.
Signature-Based Authentication
To test signature-based authentication:
-
Try accessing the scheduler service URL. It should be running on Oracle Identity Manager Managed Server port, as shown:
http://OIM_HOST:OIM_PORT/SchedulerService-web
-
Login as system administrator by providing SSO password.
-
If the login is successful and you can see the following details on the screen, then signature login is successful:
Scheduler Current Status: STARTED
Last Error: NONE
-
Click Start on the page if the following is displayed:
Scheduler Current Status: STOPPED
If there are no errors on the page, then the signature login is successful.
A.3 Enabling Oracle Identity Manager to Work With CA SiteMinder
This section contains the following topics:
A.3.1 Prerequisites
The prerequisites for integrating Oracle Identity Manager with CA SiteMinder are:
-
Oracle Identity Manager is installed.
-
Identity information in Oracle Identity Manager is synchronized with identity information in the LDAP registry used by Siteminder. The LDAP synchronization feature in Oracle Identity Manager can be used for this purpose.
A.3.2 Integrating Oracle Identity Manager with CA SiteMinder
To integrate Oracle Identity Manager with CA SiteMinder:
-
Install Siteminder WebLogic Agent by referring to Siteminder installation documentation. Follow install GUI instructions.
-
Edit the setDomainEnv.sh file to set the variables, as shown:
ASA_HOME='PATH_TO_SITEMINDER_AGENT_HOME'
export ASA_HOME

SMASA_CLASSPATH="$ASA_HOME/conf:$ASA_HOME/lib/smagentapi.jar:$ASA_HOME/lib/smjavasdk2.jar:$ASA_HOME/lib/sm_jsafe.jar:$ASA_HOME/lib/smclientclasses.jar:$ASA_HOME/lib/sm_jsafeJCE.jar"
export SMASA_CLASSPATH

SM_JAVA_OPTIONS=" -Dsmasa.home=$ASA_HOME"
export SM_JAVA_OPTIONS

CLASSPATH=${SMASA_CLASSPATH}:${CLASSPATH}
export CLASSPATH
-
Edit the startWebLogic.sh file to add SM_JAVA_OPTIONS to the JAVA command, as shown:
$JAVA_HOME/bin/java ${JAVA_VM} ${MEM_ARGS} -Dweblogic.Name=${SERVER_NAME} -Djava.security.policy=${WL_HOME}/server/lib/weblogic.policy ${JAVA_OPTIONS}
${SM_JAVA_OPTIONS} ${PROXY_SETTINGS} ${SERVER_CLASS}
-
Edit the ASA_HOME/conf/WebAgent.conf file to change the value of the EnableWebAgent parameter to YES.
-
Restart all Managed and Admin servers.
-
Add/Configure SiteminderIdentityAsserter and SiteminderAuthenticationProvider in the Weblogic authentication chain. In Identity Asserter common configuration, select SMSESSION.
-
In the Provider Specific subtab, set the "SMIdentity Asserter Config File:" field to ASA_HOME/conf/WebAgent.conf.
-
In SiteminderAuthenticationProvider 'ProviderSpecific', update "SMAuth Provider Config File:" to ASA_HOME/conf/WebAgent.conf.
-
Remove existing OIMAuthenticationProvider from the authentication chain.
-
Add OIMSignatureAuthenticator to the authentication chain. Set the control flag to SUFFICIENT.
-
Rearrange the authentication chain, as listed in Table A-1:
Table A-1 Authentication Chain
Authentication Provider Control Flag SiteminderIdentityAsserter
DefaultAuthenticator
SUFFICIENT
OIMSignatureAuthenticator
SUFFICIENT
SiteminderAuthenticationProvider
SUFFICIENT
DefaultIdentityAsserter
SUFFICIENT
Note:
In the order shown in Table A-1, OIMAuthenticationProvider has been removed. Therefore, all authentication either via browser (http/https) or non-http, such as Design Console login or t3/t3s route, must be handled by Siteminder SSO. Only signature authentication will be handled by Oracle Identity Manager. -
Restart Admin server and all the Managed Servers in the domain.
-
Configure SSO logout for oim by using the following command:
cd <IDM_ORACLE_HOME>/common/bin

./wlst.sh

connect()

addOAMSSOProvider(loginuri="/${app.context}/adfAuthentication", logouturi="SITEMINDER_LOGOUT_URL", autologinuri="/obrar.cgi")

exit()
Note:
The connect() call will ask for Admin server URL and WebLogic Admin username and password. -
Set the ssoenabled flag for Oracle Identity Manager to true. To do so:
-
Login to Enterprise Manager, and open System MBean Browser.
-
Open the oracle.iam:Location=oim_server1,name=SSOConfig,type=XMLConfig.SSOConfig,XMLConfig=Config,Application=oim,ApplicationVersion=11.1.1.3.0 mbean.
-
Set the value of ssoEnabled to true.
-
-
Restart Admin Server and all Managed Servers in the domain.
-
Protect/unprotect the following Oracle Identity Manager resources:
-
Protect following resources:
/identity
/sysadmin
/oim
/xlWebApp
/Nexaweb
-
Unprotect the following URIs:
/identity/faces/register
/identity/faces/forgotpassword
/identity/faces/trackregistration
/identity/faces/forgotuserlogin
/identity/faces/accountlocked
/identity/adfAuthentication
/identity/afr/blank.html
/sysadmin/adfAuthentication
/sysadmin/afr/blank.html
/sysadmin/faces/noaccess
/oim/afr/blank.html
-
Unprotect the following resources:
/workflowservice
/callbackResponseService
/spml-xsd
-
-
To support client-based login to Oracle Identity Manager, the smclientclasses.jar must be added to the client classpath. To set the client classpath:
-
Go to the OIM_ORACLE_HOME/server/bin/ directory using the cd command.
-
Open the setEnv.sh file in VI Editor.
-
Add smclientclasses.jar to the CLASSPATH variable at the end. This setting ensures successful client login to Oracle Identity Manager while executing most of the client utilities present in OIM_ORACLE_HOME/server/bin.
However, client classpath must be separately set for the Design Console login to work. To do so:
-
Go to the OIM_ORACLE_HOME/designconsole directory.
-
Open the classpath.sh file in VI Editor.
-
Add smclientclasses.jar to the CLASSPATH variable at the end.
-
A.3.3 Running Validation Tests to Validate the Configuration
Run the following validation steps to verify if the integration Oracle Identity Manager and CA SiteMinder is successful:
User Login to Oracle Identity Manager Through SSO
Prerequisite: Create a user, for example ENDUSER001, in Oracle Identity Manager and LDAP.
Step: Try logging in to Oracle Identity Manager through SSO as the user that you created, for example ENDUSER001, and check if the login is successful.
Expected output: Login should be successful.
Client-Based Login to Oracle Identity Manager
Prerequisite: Make sure that Oracle Identity Manager Design Console is installed and configured.
Step: Try logging in to the Design Console as the system administrator with SSO password.
Expected output: Login to the Design console should be successful, assuming that SiteminderAuthenticationProvider is configured properly for SSO login.
Signature-Based Authentication
To test signature-based authentication:
-
Try accessing the scheduler service URL. It should be running on Oracle Identity Manager Managed Server port, as shown:
http://OIM_HOST:OIM_PORT/SchedulerService-web
-
Login as system administrator by providing SSO password.
-
If the login is successful and you can see the following details on the screen, then signature login is successful:
Scheduler Current Status: STARTED
Last Error: NONE
-
Click Start on the page if the following is displayed:
Scheduler Current Status: STOPPED
If there are no errors on the page, then the signature login is successful.
A.4 Configuring SSO for XIMDD
To configure SSO for XIMDD:
-
Edit the web.xml file in XIMDD. To do so:
-
Locate the XIMDD.ear file on the server. The location is OIM_ORACLE_HOME/server/webapp/optional/XIMDD.ear.
-
Unjar the XIMDD.ear file at a temporary location. This contains XIMDD.war.
-
Untar XIMDD.war, and edit the WEB-INF/web.xml file.
-
The login-config section in at the end of the web.xml file. Here, for <auth-method>, add CLIENT-CERT in addition to the already present value FORM, as shown:
<auth-method>CLIENT-CERT, FORM</auth-method>
-
Recreate the JAR with the updated web.xml, and pack it in the XIMDD.ear.
-
-
Deploy the XIMDD.ear. To do so:
-
Select the XIMDD.ear from the Deployments screen, and click Start to start the application.
-
Log in to Oracle WebLogic Administration Console.
-
In the left navigation pane, click Deployments. It lists all the applications deployed on the server.
-
Click Install.
-
Navigate to the location for deploying the EAR file. Typically, the EAR file is located in the following directory:
OIM_ORACLE_HOME/server/webapp/optional/
-
Select XIMDD.ear from the Current Location panel.
-
Click Next on the Choose targeting style page.
-
Select OimServer (Oracle Identity Manager Server) from the Available targets for XIMDD panel, and click Next.
-
Click Finish. The following message appears:
All changes have been activated. No restarts are necessary. The deployment has been successfully installed.
-
Select the XIMDD.ear from the list of applications on the Deployment page. Click Start to start the application.
-
-
Update the /u01/ohsauth/ohsauth11g_inst/config/OHS/ohs1/moduleconf/idm.conf file to add a new section for /XIMDD. There are multiple virtual hosts. Add the section for the Admin virtual host, as shown:
<Location /XIMDD> SetHandler weblogic-handler WLCookieName oimjsessionid WebLogicHost myhost.mycompany.com WebLogicPort 14000 WLLogFile "${ORACLE_INSTANCE}/diagnostics/logs/mod_wl/oim_component.log" </Location> -
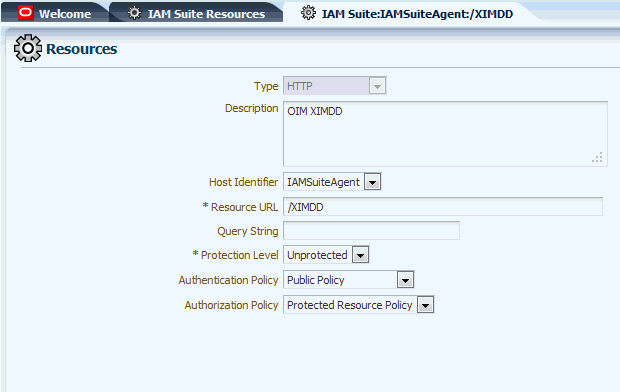
Change the /XIMDD to protected resource from /oamconsole. To do so:
-
Login to the /oamconsole as oamAdminUser.
-
Navigate to Policy Configuration, Application Domains, IAMSuiteAgent, Resources. Edit the entry for /XIMDD, so that the screen is similar to Figure A-1:
-
From the Protection Level list, select Protected, and click Apply.
-
-
Login to /XIMDD. To do so, login to Oracle Identity System Administration as the system administrator. Then, navigate to http://HOST:PORT/XIMDD. The Diagnostic Dashboard is displayed after auto login.
-
Run the tests on the Diagnostic Dashboard. For information about the various tests in the Diagnostic Dashboard, see "Working with the Diagnostic Dashboard".