10 Managing System Configurations
Security Module definitions and administrator configurations are defined within the top-level System Configuration tab in the Authorization Policy Manager Administration Console. This chapter contains the following topics.
10.1 Delegating With Administrators
Administrator Roles can be created to delegate management operations for policy objects. For example, Application and Policy Domain delegating administrators can be defined by creating an Administrator Role at the appropriate level and assigning the role Administration Privileges as well as a user, group, or another role. See Chapter 11, "Delegating With Administrator Roles" for more information. It includes a section on creating System Administrator Roles which can manage other types of Administrator Roles in any Application or Policy Domain.
10.2 Configuring Security Module Definitions
A Security Module is an Oracle Entitlements Server client that plays a key role in authorization. After an authorization request is generated, the Security Module evaluates policy data to determine if access to the resource will be granted or denied. An Application (the Oracle Entitlements Server object that represents the protected resource) must be bound to the Security Module that protects it. Binding Security Modules enables policy data to be transmitted to it for evaluation. The Policy Distribution Component (discussed in Chapter 6, "Managing Policy Distribution") is the mechanism used to transmit policy data to the Security Modules.
Note:
For more information about the authorization process, see Section 1.4, "How Oracle Entitlements Server Processes Authorization Policies."
The following sections document how to bind (and unbind) Security Module definitions to (and from) Application objects.
-
Section 10.2.2, "Binding an Application to a Security Module"
-
Section 10.2.3, "Unbinding an Application From a Security Module"
Note:
Before binding Security Module definitions, you must install and configure the Security Module. See Chapter 8, "Managing Security Module Configurations" for details.
10.2.1 Creating a Security Module Definition
To create a security module, proceed as follows.
-
Select the System Configuration tab from the Home area.
-
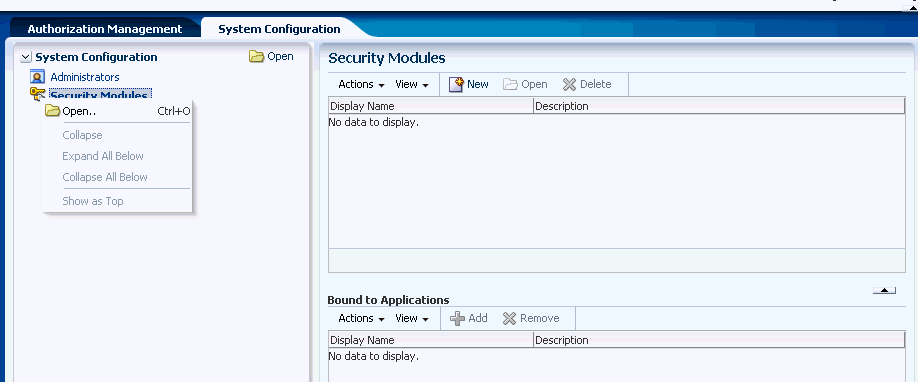
Double-click Security Modules in the Navigation Panel.
Alternately, right-click Security Modules and select Open. The Security Modules page is displayed as in Figure 10-1.
Figure 10-1 Security Modules in Home Area

Description of "Figure 10-1 Security Modules in Home Area"
-
Click New to create a new Security Module definition.
Alternately, select New from the Actions menu. The Security Module dialog is displayed.
-
Provide the following values for the new Security Module.
-
Name: The entry must be a unique.
-
Display Name
-
Description
-
-
Click Save.
10.2.2 Binding an Application to a Security Module
To bind an Application to a Security Module, proceed as follows.
-
Select the System Configuration tab from the Home area.
-
Double-click Security Modules in the Navigation Panel.
Alternately, right-click Security Modules and select Open. The Security Modules page is displayed.
-
Select the name of the Security Module definition from the table.
-
Click Add in the Bound to Applications table to display the Add Applications dialog.
Alternately, select Add from the Bound to Applications Actions menu to display the Add Applications dialog.
-
Enter a search string in the text box and click the arrow to search.
Alternately, click the arrow with no search string to return all available Applications.
-
Select one or more applications from the list returned.
-
Click Add.
The selected applications are bound to the selected Security Module and displayed in the Bound to Applications table.
10.2.3 Unbinding an Application From a Security Module
To unbind an application from a Security Module, proceed as follows.
-
Select the System Configuration tab from the Home area.
-
Double-click Security Modules in the Navigation Panel.
Alternately, right-click Security Modules and select Open. The Security Modules page is displayed.
-
Select the name of the applicable Security Module definition in the table.
-
Select the name of the applicable Application in the Bound to Applications table.
-
Click Remove or select Remove from the Actions menu.
A confirmation dialog is displayed.
-
Click Unbind.
10.2.4 Deleting a Security Module Definition
To remove a Security Module definition, proceed as follows.
-
Select the System Configuration tab from the Home area.
-
Double-click Security Modules in the Navigation Panel.
Alternately, right-click Security Modules and select Open. The Security Modules page is displayed.
-
Select the name of the applicable Security Module definition in the table.
-
Click Delete or select Delete from the Actions menu.
A confirmation dialog is displayed.
-
Click Remove.
10.3 Configuring Identity Directory Service Profiles
When defining policies using Oracle Entitlements Server, users and groups need to be specified as the subject. This is done by searching an identity data store. The Identity Directory Service is a flexible and configurable service used by Oracle Entitlements Server as the means for accessing multiple identity data stores. The purpose of the Identity Directory Service is to allow the management of policies that contain users or groups from identity stores not deployed with Oracle Entitlements Server itself.
An Application (the Oracle Entitlements Server object that represents the protected resource) must be bound to an Identity Directory Service profile to enable Oracle Entitlements Server to communicate with the identity store which the profile represents. By default, an Application is associated with the LDAP directory used for authentication when logging into the Administration Console. An administrator can change this association so that any identity data store configured with the Identity Directory Service can be used.
Note:
Once an Identity Directory Service profile is bound to an Application, an Advanced or Simple Search can be initiated either globally (default option) or within the scope of the Application. The latter option searches in the identity data store configured for that Application. See Chapter 5, "Querying Security Objects" for more information.
The following sections document how to bind (and unbind) Identity Directory Service profiles to (and from) Application objects.
-
Section 10.3.1, "Creating an Identity Directory Service Profile"
-
Section 10.3.2, "Binding an Application to an Identity Directory Service Profile"
-
Section 10.3.3, "Unbinding an Application From an Identity Directory Service Profile"
-
Section 10.3.4, "Deleting an Identity Directory Service Profile"
Note:
For information on the WebLogic Scripting Tool (WLST) commands for the Identity Directory Service, see Oracle Fusion Middleware WebLogic Scripting Tool Command Reference.
10.3.1 Creating an Identity Directory Service Profile
To create an Identity Directory Service profile, proceed as follows.
-
Select the System Configuration tab from the Home area.
-
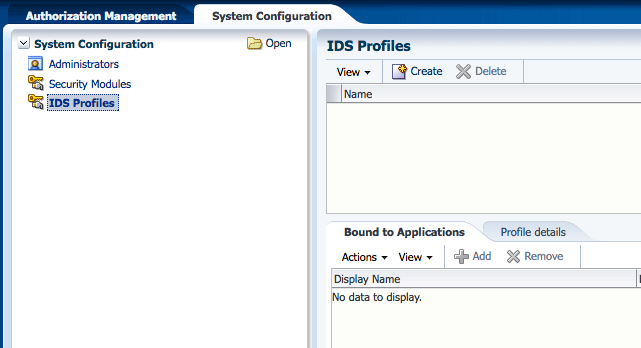
Double-click IDS Profiles in the Navigation Panel.
Alternately, select IDS Profiles and click Open. The IDS Profiles page is displayed as in Figure 10-2.
-
Click Create to create a new Identity Directory Service profile.
The Create Identity Store Profile page is displayed as in Figure 10-3.
Figure 10-3 Create Identity Store Profile Page

Description of "Figure 10-3 Create Identity Store Profile Page"
-
Provide the following values for the new Identity Directory Service profile.
-
Name: the entry must be a unique.
-
Description
-
-
Select Create New or Use Existing and provide the applicable values to define the repository.
-
Name: the entry must be a unique.
-
Directory Type - select from the drop-down menu
-
Host Information - add Host name, Port number and Load Weightage percentage
-
Availability - select Failover or Load balanced
-
SSL - select to enable
-
Bind DN
-
Bind Password
-
Base DN
Click Test Connection to confirm the values are correct.
-
-
Provide the applicable values to define how users can be found.
-
Object Classes
-
Name Attribute
-
Base DN
-
-
Provide the applicable values to define how groups can be found.
-
Object Classes
-
Name Attribute
-
Base DN
-
-
Click Create.
The profile is displayed in the IDS Profiles table.
10.3.2 Binding an Application to an Identity Directory Service Profile
To bind an Application to an Identity Directory Service profile, proceed as follows.
-
Select the System Configuration tab from the Home area.
-
Double-click IDS Profiles in the Navigation Panel.
Alternately, select IDS Profiles and click Open.
-
Select the name of the Identity Directory Service profile from the upper table.
-
Click Add in the Bound to Applications table to display the Add Applications dialog.
Alternately, select Add from the Bound to Applications Actions menu to display the Add Applications dialog.
-
Enter a search string in the text box and click the arrow to search.
Alternately, click the arrow with no search string to return all available Applications.
-
Select one or more applications from the list returned.
-
Click Add.
The selected applications are bound to the selected Identity Directory Service profile(s) and displayed in the Bound to Applications table.
Note:
If an Application is already bound to a Identity Directory Service profile and you want to bind it to a different Identity Directory Service profile, the Application will automatically be unbound from the first profile.
10.3.3 Unbinding an Application From an Identity Directory Service Profile
To unbind an application from an Identity Directory Service profile, proceed as follows.
-
Select the System Configuration tab from the Home area.
-
Double-click IDS Profiles in the Navigation Panel.
Alternately, select IDS Profiles and click Open.
-
Select the name of the applicable Identity Directory Service profile in the table.
-
Select the name of the applicable Application in the Bound to Applications table.
-
Click Remove or select Remove from the Actions menu.
A confirmation dialog is displayed.
-
Click Unbind.
10.3.4 Deleting an Identity Directory Service Profile
To remove an Identity Directory Service profile, proceed as follows.
-
Select the System Configuration tab from the Home area.
-
Double-click IDS Profiles in the Navigation Panel.
Alternately, select IDS Profiles and click Open.
-
Select the name of the applicable Identity Directory Service profile in the table.
-
Click Delete.
A confirmation dialog is displayed.
-
Click OK.
