Add data set values to a pull-down menu or radio button
You can add or import data set values for data definitions that require data sets. These values are used to populate the available choices on pull-down menu fields, radio buttons, or checkboxes on a form or attribute form.
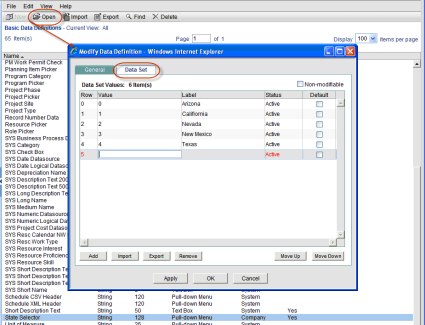
To add data set values to a Data Definition (all except Multi-select Input)
|
1
|
Go to the Company Workspace tab and switch to Admin mode. |
|
2
|
Click Data Structure Setup>Data Definitions>Basic or Cost Codes in the left Navigator. |
|
3
|
Select a data definition and click Open. The Modify Data Definition window opens. |
|
4
|
Click the Data Set tab. |
|
5
|
Click Add. An editable row appears on the window. You can press the Tab key to move from one field to the next, or click inside a field. |
|
6
|
Enter a Value. This Value is the data that is stored in the database. This value will appear on the form if you do not enter a Label. |
|
7
|
Enter an optional Label. This is what is presented to the user as a pull-down menu or radio button option. This can be different from the Value. |
|
8
|
In the Status field, enter Active or Inactive. The default is Active. If you want the value to remain on the data set but not show up for users at runtime, you can Inactivate it, rather than remove it. |
|
9
|
You can select the Default checkbox for one of the values on the data set list. This will display in the field at runtime. Selecting a default value is optional. |
|
10
|
To add another row, click Add. |
|
•
|
To insert a data set value in the middle of the list, select a value and click Add. The new row will be added above your selection. |
|
•
|
To add a new value to the bottom of the list, be sure a row is not selected, and click Add. (Or, press the Tab key and tab through the fields of the last row, until the Add button is highlighted.) |
|
11
|
If you want the data set list to be non-editable, then select the Non-Modifiable checkbox. |
Select this if you do want other users to be able to alter the list. Use caution before selecting Non-Modifiable. Once you select this you will be able to rearrange the order and select a different default value but you will not be able to modify or remove values from the data set.
If this option is selected by a user with create permissions, other users cannot modify the data set value list. If it is selected by a user with modify permissions, the option cannot be deselected again, except by a user with create permissions.
|
12
|
Click Apply to save your entries, or OK to save and exit. |
Oracle Corporation
Primavera Unifier 9.10 • Copyright © 1998, 2012, Oracle and/or its affiliates. All rights reserved.
Copyright Information
Open topic with navigation