Forms usually consist of three sections:
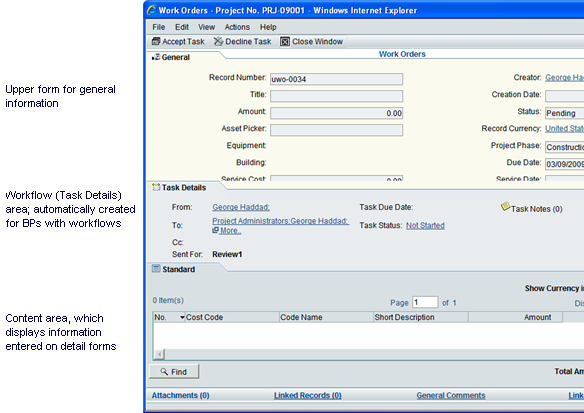
The upper form contains the basic information the form is managing, such as the name of a record and its description, who created the record and when, and so on. It also contains general data entry, informational, or reference fields.
The workflow (Task Details) section shows details of the step the form is currently on, including the last person who took action on the form, the status of the step, the due date for the task, and any notes that have been included at this step. Depending on how the workflow has been set up, the next assignee(s) for the task may be pre-determined (as in the example above), or the user may need to specify the next assignee or send a copy of the form to another user.
The content (lower form) area shows information that has already been attached to this form, such as a line item (as in the example above), a document, or response comments for an RFI. The information displayed in this part of the form was entered via a detail form that users fill in when they accept a task.
|
Tip for Action and View Forms for a Workflow |
|
|
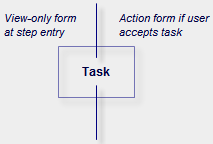
To accommodate both view-only and action forms for a workflow step, you will need to create both forms and then specify which form should be used at the step’s entry and which form should be used when the user accepts the task (see Adding Steps to a Workflow). A quick way to create the action and view-only forms is to copy one form from another and change the fields to “editable,” “required,” or “read-only” as necessary. You can also add or remove fields as appropriate for the form. |
|
Business processes must contain an upper form; forms for managers and shells do not. This part of the form holds the basic information the business process is managing, such as the name of a record, its status, a description of the business process or step, who created the record and when, and so on. It also contains general informational or reference fields.

For BPs with workflows, you can design multiple upper forms—a different one for each step in the workflow, if necessary. Different upper forms are often necessary to accommodate cases where fields on the form must change from enabled to disabled, or where some fields should appear or not appear, depending on whether or not they are relevant to the step.
Note: If your business process includes multiple workflow schemas, the number of different upper forms can increase in proportion to the number of steps in every schema. The one constant, however, is that the upper form at the end step of all schemas must be the same.
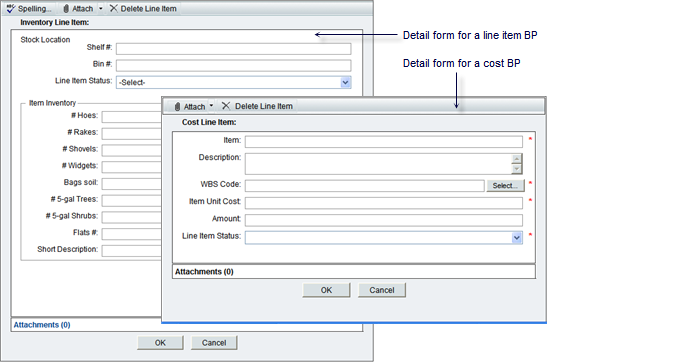
Detail forms are for cost, line item, RFB, schedule, resource, and document management BPs, as well as asset classes, plans, shells, and configurable managers. Users use them to enter information for these elements, such as line item details for a BP, new plan information for the Planning Manager, or new activity information for schedules. For shells, detail forms are for creating new sub-shells in a hierarchy. For configurable managers, they are for entering new items onto the manager’s tracking sheet.
A detail form opens as a separate window in Primavera Unifier, where users enter or modify information. The fields on the detail form, and the information the users enter, are then displayed:
| • | At the bottom of the form |
| • | On a line item list, attached document, or response area |
| • | Other parts of the Primavera Unifier interface, such as a planning item log or a schedule |
Primavera Unifier automatically creates a detail form whenever you create these types of business processes, generic managers or other components, except for document BPs: Detail forms are optional for document BPs.
Forms are composed of blocks and fields. Each block can contain one or more fields which you can fill with data elements.

A data element can be a text box, where the user types in information; a pull-down menu of choices (also known as a picker), such as dates or names; radio buttons, where the user must select one of the options presented; or a check box, where the user has the option of choosing something or not. See the Primavera Unifier and Primavera uDesigner Reference Guide for a list of these elements, along with a description of what they do and where to use them.
You can also add new elements as your company requires them. (For instructions on creating new data elements, see Creating a Data Element.)
Oracle Primavera ships Primavera Primavera uDesigner and Unifier with a substantial number of pickers. These pickers are important elements for forms; a basic understanding of them will help you know where to include them on your forms. See the Primavera Unifier and Primavera uDesigner Reference Guide for a list of these pickers, along with a description of what they do and where to use them.
Overall Steps in Designing a Form
Restoring a Version of a Design
Oracle Corporation
Primavera Unifier 9.10 • Copyright © 1998, 2012, Oracle and/or its affiliates. All rights reserved.