
In this procedure, you will be:
| • | Connecting the steps |
| • | Specifying each link’s action (such as send, reject, or approve) |
| • | Specifying the status of the BP (form) after the step action is taken; for example, “Pending” for a transmittal in the approval process, or “Approved” for a transmittal enroute to the end step in the workflow |
Note: These statuses are drawn from the statuses that you specified for the BP form being used at this step.
When you link steps, you can also “stamp” the form with information about the action that was taken at that point in the workflow. For example, a project manager might want to see who has reviewed the record on a step, or who has made final approval of the record, as well as the date and time of the action. This information can also be included on the business process log so that users can see this information quickly, without having to open a record.
You can link steps using two types of connectors:
The Create step can have only one outgoing line; the End step can have multiple incoming lines, but only one incoming line from any single step.
To connect the steps
| 1 | Click the Line or Elbow tool. |
| 2 | Mouse over the step until you see a border of red x's. These points (x's) indicate where you can attach a connector line. |

| 3 | Click the step and hold, then drag the arrow to the next step. When you see a red border of x's, release the mouse. |


| 4 | Continue to add lines until you have connected all the steps in the workflow. |
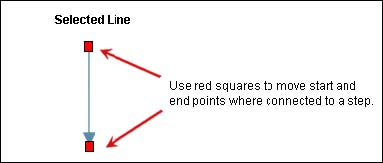
To modify a line:
| 1 | Click the Select tool, then click the line you want to modify. |
| 2 | Click and hold the red squares to move the start and end points of the line. |
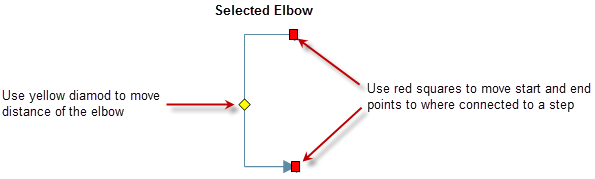
To modify an elbow:
| 1 | Click the Select tool, then click the elbow you want to modify. |
| 2 | Click and hold the yellow diamond to expand the distance of the elbow, or click on the red squared to move the start and end points connected to the step. |
To delete a line or elbow:
| 1 | Click the Select tool, then click the line or elbow you want to delete. |
| 2 | Click the Delete button. |
Each link between steps denotes the progression of the business process through the workflow.

The action the link takes ( Approve, Return for Edit, etc.) appears in Primavera Unifier as a choice the user makes on the business process form. This choice moves the task to the next step.
Note: A link can also automatically create other records. If the action of the workflow should include creating another record, see the instructions under Auto-Creating a BP Record from a Workflow to accommodate this.

|
How Terminal Statuses Affect Workflows
|
To specify the link’s action
| 1 | In the Workflow Designer window, double-click a line or elbow connecting two non-conditional steps. The Action Properties window opens. |
| 2 | Use the information in the following table to complete the fields on this window. |
|
In this field: |
Do this: |
|
Action Name |
Enter a name that describes the action the link is taking.Use a verb that designates the action being taken, such as “Send for Review,” or “Return for Clarification.” You can enter a total of 40 characters for the Action Name. |
|
Description |
(Optional) Enter details about this action and what it is designed to do. This can be helpful to others in understanding how this action works, particularly if it has a special behavior, such as automatically creating another record. You can enter up to 4000 characters. |
|
Record Status |
Choose the status of the record at this point in its progress through the workflow; for example, “Pending” for a transmittal in the approval process, or “Approved” for a transmittal enroute to the end step in the workflow. This is the status that will appear on the form the users see in Primavera Unifier whenever they open a task. The list of possible record statuses resides in Primavera uDesigner’s Administration mode under the Data Structure node of the Navigator. If the status you want is not on the list, return to Administration mode and create it. |
|
Select data elements to capture action taken |
(Optional) Include these data elements if you want to gather information on the action that was taken on this link. By using these options, you can “stamp” the form with this information This information can also be included on the business process log so that users can see this information quickly, without having to open a record. Taken By Specify the user picker or a data picker (one based on the user attribute form) on the upper form of the business process that will contain the name of the user (or the last user) who accepted the task. Action Name Specify the name of the field that describes this link’s action. Taken On Specify the date picker on the form that will contain the date and time the action was taken. |
|
Auto-create other record |
Use this check box to instruct this action to automatically create another record. For more information about this setting and how to use it, see Auto-Creating a BP Record from a Workflow. |
| 3 | Click OK. |
Oracle Corporation
Primavera Unifier 9.10 • Copyright © 1998, 2012, Oracle and/or its affiliates. All rights reserved.
